
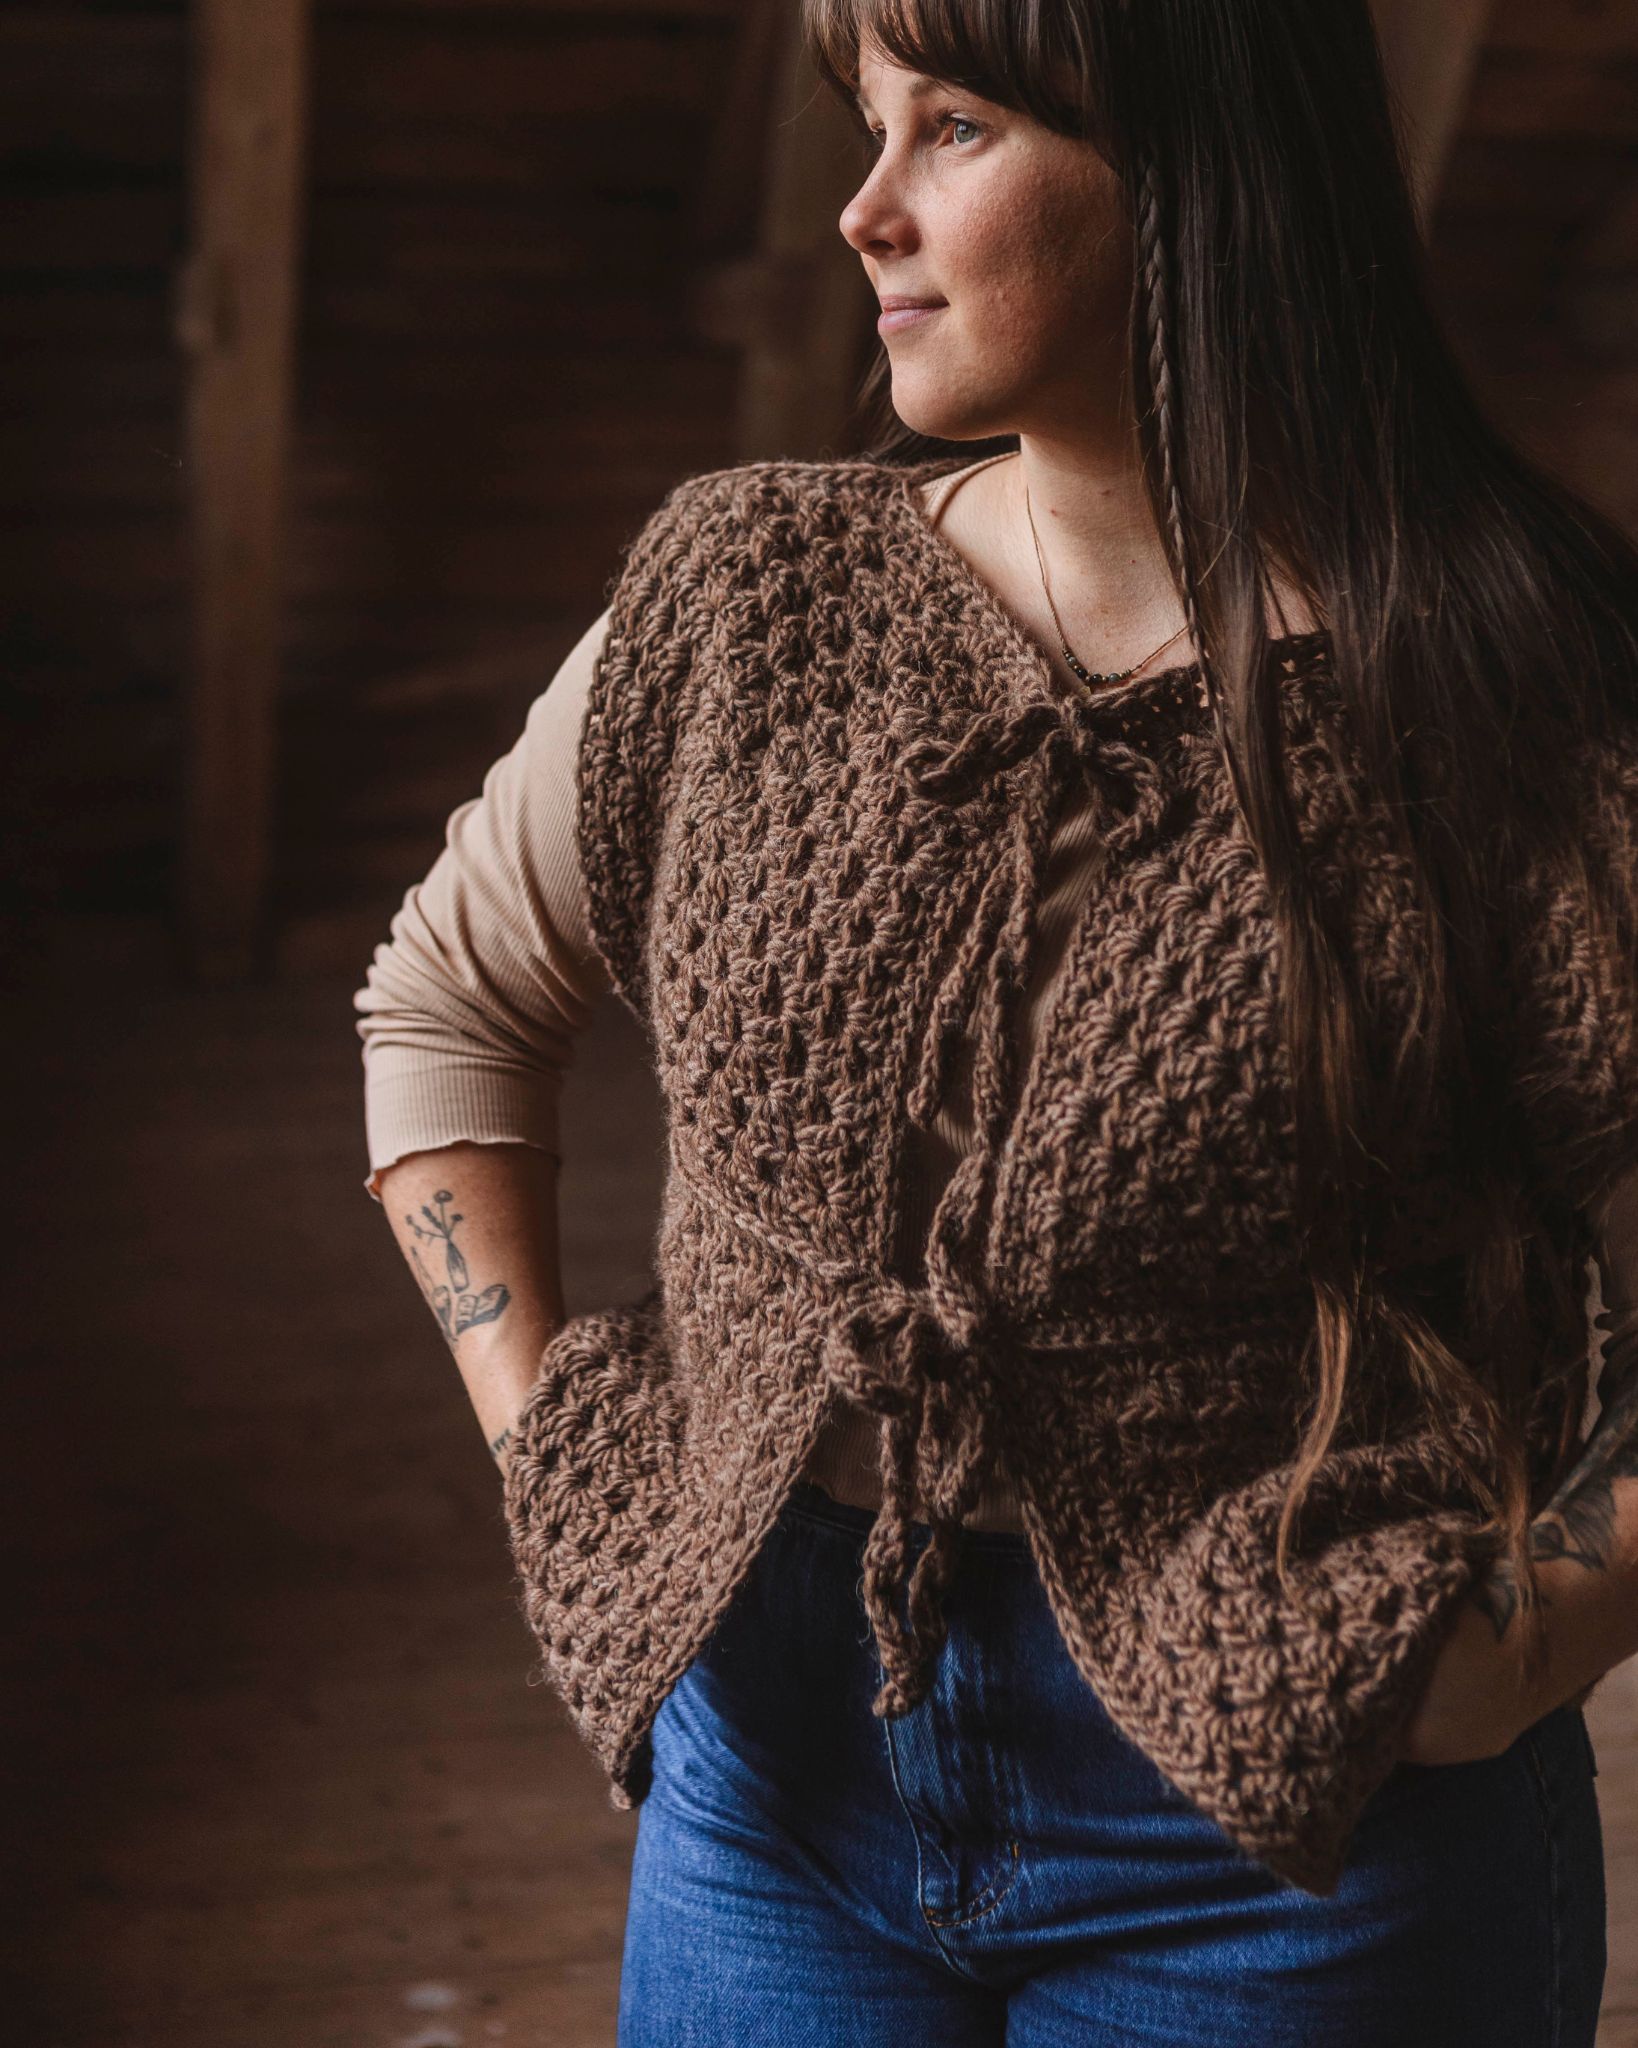
Crochet vest “Eliza”
Crochet this easy and beautiful vest in granny squares!
With MYO Chunky wool and crochet hook 8, 10 (or 12 mm) you can crochet this super trendy and stylish vest in granny squares. The instruction is simple and we have technique videos along the way to help you if you are not sure how to do any of the parts. So this tutorial does not have a long video but don't worry - our technique videos will help you get your vest together!
Yarn Consumption: For size S, about 600-700 g is needed, about 6-7 skeins. For the beige lot you need 4 skeins and the remaining skeins are the colors you want in the middle of your granny squares. If you make size M, take 5 skeins, L/XL 6 skeins in warm grey. The yarn consumption depends on how hard you crochet.
Note that we in this instruction uses videos from out technique library. If you are looking for a full instruction video for a crocheted vest, we suggest the vest Hedvig.
.jpg)


Here's how to do it
What you need to make the vest is MYO Chunky Wool and a crochet hook 8, 10 or 12. For reference, the vest in the picture is size S and to get it, choose crochet hook size 8. If you want to make a size M use crochet hook 10, L/XL crochet hook 12. Easiest to get the size you wish to measure yourself and the squares, as well as adjust the size of the squares using single crochet. You will crochet 8 granny squares in total which you will then assemble together. You finish by crocheting an edge and ribbon so you can close the vest. As well as the decoration with hanging yarn if you want it. Good luck to you! /Salli

This is what you need:
Here you can directly purchase the material for the product. Please note that the instruction is digital and appears here on the page (no written instruction).


.jpg)
Unleash your creativity
For only 85kr per month you get access to all our 300+ beginner-friendly instructions for crochet, knitting and macrame.
A perfect way to get started with your new hobby!

Information
The vest is made from 8 granny squares. Crochet the squares in any color combinations you like.
Start by making a test granny square to ensure your finished vest will be the size you want. Once you've completed your swatch, measure the sides and compare them to the measurements below for your chosen size. Everyone crochets with a different tension, so follow the size guidelines below to help ensure your vest turns out the right size.
- If your square is larger than the measurements below: Try using a smaller crochet hook or crocheting one fewer round for each square.
- If your square is smaller: Try blocking it to the correct size. Alternatively, use a larger crochet hook or add one extra round, then measure again. Please note that adding an extra round will require more yarn.
Size
S/M: Use an 8–10 mm crochet hook. Each side of the granny square should measure approximately 25–27 cm (10–10¾ in).
L/XL: Use a 12 mm crochet hook. Each side of the granny square should measure approximately 30–31 cm (11¾–12¼ in).
If you'd like your vest to be longer, simply continue crocheting granny stripes along the bottom edge.
Crochet granny squares
Start by crocheting 8 granny squares with the color combinations you want. If you are not sure how to make a granny square, see video below. Add 2 rounds to the square in the video and you will get the same size that is crocheted in this vest. There will be a total of 5 rounds. The Granny Squares should be around 25-26 cm on each side (S/M).
Round 1: Crochet a magic ring and in the ring you start with 3 chain stitches, then you crochet 2 double crochets. This will be the first double crochets pair. Then crochet two chain stitches. Repeat this (3 double crochets+2 chain stitches) a total of 4 times. Finish with a slip stitch in the third chain stitch from the start.
Round 2: Change color. Start in one hole and in each hole you crochet three double crochets, two chain stitches, three double crochets, this forms the corners. Do not crochet a chain stitch between the corners. Finish with a slip stitch in the third chain stitch from the start.
Round 3: Change color. Start in a hole where you crocheted two chain stitches. In this hole (the corner) you must crochet three double crochets, two chain stitches, three double crochets. The next hole will be a hole between the corners, here you crochet three double crochets. Then crochet the next corner in the same way as the first and continue in the same way. The corners are therefore crocheted with three double crochets, two chain stitches and three double crochets in the same hole. Between the corners you crochet three double crochets. Finish with a slip stitch in the third chain stitch from the start.
Round 4-5: Crochet in the same way as round 3, all corners are crocheted with three double crochets, two chain stitches and three treble crochets in the same hole and between the corners you crochet three double crochets. Finish in the same way as above. In the cardigan in the picture, we have used the same color on the last round of all squares.
If the square is not 25-26 cm on each side (S/M), then crochet one more round as round 5 or crochet a round with only single crochets.
When finish with a square, tie the yarn tails together on the inside and hide them under som close by stitches.
Assembly
Step 1. When you are done with your squares, lay them as below picture and crochet all the squares together. Crochet the squares on the wrong side of the squares (keep the nice sides out you crochet together).
Sew them together according to the pink markings in the picture below.
Note! Do NOT put together the squares that have blue marking in the below picture (it is the opening on your vest).
Crochet single crochets in the stitches closest to each other. So in the back loop only of the first square and the front loop only of the back square. When you do this, you get a large piece with all the squares stuck together. Watch the video below to see the technique you can use to crochet the squares together. There are several techniques and you can use the technique you think is the best, this is just one example.

Step 2. After you have crocheted all the squares, follow the steps below on how to assemble the whole piece with all the squares into a vest.
a) Crochet the pink parts together. This is below the armhole and becomes the side of your vest.
b) Crochet the beige parts together. This is below the armhole and becomes the other side of your vest.
Now you have assembled the entire vest!

Crochet around the vest
In this step we want to crochet an edge around opening front, neck, and bottom. Crochet one round of single crochet. If you choose to do L/XL, you may need to do more rounds with this technique to get the length you want.
Follow the pink markings in the photo below to understand where on the vest I have crocheted an edge.
You can start making your half double crochet anywhere on your vest (pink highlight below). Start by crocheting a chain of 3, this one counts as the first post. Then continue with half-posts. Continue crocheting turns with half-posts until you reach the desired length/width. In each corner we make 3pcs half double crochet and then continue crocheting half double crochet. In the corner, 2 slip stitches followed by 3 halv double crochet, this to get as nice a corner as possible.

Crochet ribbon
Crochet ribbons so that you can tie your vest.
Row 1: Crochet a chain of chain stitches, as long as you wish for your ribbon. See below video if you are not sure how to crochet a chain.
Row 2: Turn and crochet single crochet in all chains, starting in the second chain. Crochet all the way until the end of your chain. See below video if you are unsure how to crochet single crochet.
In total, crochet 2 rows per ribbon. You crochet a total of 4 ribbons if you want to be able to tie both at the top of the neck and at the waist.
Then fasten them at the top of the neck and at the waist on each side of the vest. See the picture in step 4 how it looks when it is finished.
Fasten off all the yarn tails that are left on your vest.
Hope you are happy with your vest <3
.jpeg)
Crochet terms (US terms)
We’re going to crochet a nice vest! If you need help along the way, check out the easier version of this pattern where you can find technique videos of the techniques we use in this patter, as well as of the granny square.
Abbreviations:
ch = chain
sl st = slip stitch
dc = double crochet
mc = magic circle
sp = space
st(s) = stitch(es)
blo = back loop only
flo = front loop only
Information
The vest is made from 8 granny squares. Crochet the squares in any color combinations you like.
Start by making a test granny square to ensure your finished vest will be the size you want. Once you've completed your swatch, measure the sides and compare them to the measurements below for your chosen size. Everyone crochets with a different tension, so follow the size guidelines below to help ensure your vest turns out the right size.
- If your square is larger than the measurements below: Try using a smaller crochet hook or crocheting one fewer round for each square.
- If your square is smaller: Try blocking it to the correct size. Alternatively, use a larger crochet hook or add one extra round, then measure again. Please note that adding an extra round will require more yarn.
Size
S/M: Use an 8–10 mm crochet hook. Each side of the granny square should measure approximately 25–27 cm (10–10¾ in).
L/XL: Use a 12 mm crochet hook. Each side of the granny square should measure approximately 30–31 cm (11¾–12¼ in).
If you'd like your vest to be longer, simply continue crocheting granny stripes along the bottom edge.
Start with 8 Granny Squares.
Start with the color you want in the center of your squares. Make a MR (magic ring) or ch 4 and join with a sl st to form a ring.
Round 1: Ch 3 (counts as 1 dc), 2 dc, ch 2. *3 dc, ch 2* x3. Join with a sl st in the 3rd ch of beginning ch-3. (12 dc)
Change color or continue with the same color.
Round 2: Join yarn with a sl st in any corner sp. Ch 3 (counts as 1 dc), 2 dc, ch 2, 3 dc in same sp. *In next corner: 3 dc, ch 2, 3 dc* x3. Join with a sl st in the 3rd ch of beginning ch-3. Fasten off. (24 dc)
Change color or continue with same color.
Round 3: Join yarn with a sl st in any side sp (not corner). Ch 3, 2 dc. *In next corner: 3 dc, ch 2, 3 dc; in next side sp: 3 dc* x3. Finish with 3 dc, ch 2, 3 dc in last corner, then sl st to top of beginning ch-3. Fasten off. (36 dc)
Change color or continue.
Round 4: Work same as round 3 — 3 dc in each side sp. 3 dc, ch 2, 3 dc in each corner. Fasten off. (48 dc)
Change color or continue.
Round 5: Repeat round 4. (60 dc)
If the square is smaller than approx. 10–10.25 inches per side (S/M), work 1 more round like round 5, or one round of sc around. Weave in all ends.
Assembly
Step 1: When all squares are finished, lay them out as shown in the layout diagram and join them using sl st on the WS (wrong side) through the blo. Sew together as shown by pink lines in the diagram.
NOTE: Do NOT join the squares marked in blue in the layout diagram (this will be the opening of your vest).
Join with sc through the loops that are closest to each other — that is, in blo of the front square and the flo of the back square.
Once all squares are joined, you'll have one large connected piece.
Then follow these steps to assemble the vest:
a) Join the pink sections together — this is below the armhole and forms one side of your vest.
b) Join the beige sections together — this is also below the armhole and forms the other side of your vest.
Your vest is now fully assembled!
Crochet edging
Now we’re going to crochet an edging around the front opening, neckline, and bottom of the vest.
Crochet two rounds of hdc.
If you are making size L/XL, you may need to add more rounds using this technique to achieve the desired length.
Follow the pink markings in the image below to understand where the edging has been added on the vest.
You can start your hdc anywhere on your vest. Begin by ch 3 — this counts as your first st. Then continue with hdc.
In each corner, crochet: 3 hdc, 2 sl st, 3 hdc — this creates a neat, rounded corner.
Continue crocheting rounds of hdc until you reach your desired length or width.
Crochet ties
To be able to tie your vest, crochet straps.
Row 1: Chain as many ch as needed for the desired length of your tie.
Row 2: Start in the 2nd ch from the hook; crochet sc in each st. You’ll crochet 2 rows per tie.
Crochet a total of 4 ties if you want to be able to tie the vest at both the neck and the waist.
Attach the ties at the top of the neckline and at the waistline on both sides of the vest.
Fasten off your yarn.
Hope you’re happy with your vest! ❤️
// Salli
The rights to this pattern belong to MYO Make Your Own. The pattern or its pictures may not be copied, shared or resold either in parts or in its entirety, but you may sell items you have crocheted from this pattern. If you have questions about the pattern, contact MYO at hello@makeyourown.se.
Information
The vest is made from 8 granny squares. Crochet the squares in any color combinations you like.
Start by making a test granny square to ensure your finished vest will be the size you want. Once you've completed your swatch, measure the sides and compare them to the measurements below for your chosen size. Everyone crochets with a different tension, so follow the size guidelines below to help ensure your vest turns out the right size.
- If your square is larger than the measurements below: Try using a smaller crochet hook or crocheting one fewer round for each square.
- If your square is smaller: Try blocking it to the correct size. Alternatively, use a larger crochet hook or add one extra round, then measure again. Please note that adding an extra round will require more yarn.
Size
S/M: Use an 8–10 mm crochet hook. Each side of the granny square should measure approximately 25–27 cm (10–10¾ in).
L/XL: Use a 12 mm crochet hook. Each side of the granny square should measure approximately 30–31 cm (11¾–12¼ in).
If you'd like your vest to be longer, simply continue crocheting granny stripes along the bottom edge.
Crochet granny squares
Start by crocheting 8 granny squares with the color combinations you want. If you are not sure how to make a granny square, see video below. Add 2 rounds to the square in the video and you will get the same size that is crocheted in this vest. There will be a total of 5 rounds. The Granny Squares should be around 25-26 cm on each side (S/M).
Round 1: Crochet a magic ring and in the ring you start with 3 chain stitches, then you crochet 2 double crochets. This will be the first double crochets pair. Then crochet two chain stitches. Repeat this (3 double crochets+2 chain stitches) a total of 4 times. Finish with a slip stitch in the third chain stitch from the start.
Round 2: Change color. Start in one hole and in each hole you crochet three double crochets, two chain stitches, three double crochets, this forms the corners. Do not crochet a chain stitch between the corners. Finish with a slip stitch in the third chain stitch from the start.
Round 3: Change color. Start in a hole where you crocheted two chain stitches. In this hole (the corner) you must crochet three double crochets, two chain stitches, three double crochets. The next hole will be a hole between the corners, here you crochet three double crochets. Then crochet the next corner in the same way as the first and continue in the same way. The corners are therefore crocheted with three double crochets, two chain stitches and three double crochets in the same hole. Between the corners you crochet three double crochets. Finish with a slip stitch in the third chain stitch from the start.
Round 4-5: Crochet in the same way as round 3, all corners are crocheted with three double crochets, two chain stitches and three treble crochets in the same hole and between the corners you crochet three double crochets. Finish in the same way as above. In the cardigan in the picture, we have used the same color on the last round of all squares.
If the square is not 25-26 cm on each side (S/M), then crochet one more round as round 5 or crochet a round with only single crochets.
When finish with a square, tie the yarn tails together on the inside and hide them under som close by stitches.
Assembly
Step 1. When you are done with your squares, lay them as below picture and crochet all the squares together. Crochet the squares on the wrong side of the squares (keep the nice sides out you crochet together).
Sew them together according to the pink markings in the picture below.
Note! Do NOT put together the squares that have blue marking in the below picture (it is the opening on your vest).
Crochet single crochets in the stitches closest to each other. So in the back loop only of the first square and the front loop only of the back square. When you do this, you get a large piece with all the squares stuck together. Watch the video below to see the technique you can use to crochet the squares together. There are several techniques and you can use the technique you think is the best, this is just one example.
Step 2. After you have crocheted all the squares, follow the steps below on how to assemble the whole piece with all the squares into a vest.
a) Crochet the pink parts together. This is below the armhole and becomes the side of your vest.
b) Crochet the beige parts together. This is below the armhole and becomes the other side of your vest.
Now you have assembled the entire vest!
Crochet around the vest
In this step we want to crochet an edge around opening front, neck, and bottom. Crochet one round of single crochet. If you choose to do L/XL, you may need to do more rounds with this technique to get the length you want.
Follow the pink markings in the photo below to understand where on the vest I have crocheted an edge.
You can start making your half double crochet anywhere on your vest (pink highlight below). Start by crocheting a chain of 3, this one counts as the first post. Then continue with half-posts. Continue crocheting turns with half-posts until you reach the desired length/width. In each corner we make 3pcs half double crochet and then continue crocheting half double crochet. In the corner, 2 slip stitches followed by 3 halv double crochet, this to get as nice a corner as possible.
Crochet ribbon
Crochet ribbons so that you can tie your vest.
Row 1: Crochet a chain of chain stitches, as long as you wish for your ribbon. See below video if you are not sure how to crochet a chain.
Row 2: Turn and crochet single crochet in all chains, starting in the second chain. Crochet all the way until the end of your chain. See below video if you are unsure how to crochet single crochet.
In total, crochet 2 rows per ribbon. You crochet a total of 4 ribbons if you want to be able to tie both at the top of the neck and at the waist.
Then fasten them at the top of the neck and at the waist on each side of the vest. See the picture in step 4 how it looks when it is finished.
Fasten off all the yarn tails that are left on your vest.
Hope you are happy with your vest <3
Crochet terms (US terms)
We’re going to crochet a nice vest! If you need help along the way, check out the easier version of this pattern where you can find technique videos of the techniques we use in this patter, as well as of the granny square.
Abbreviations:
ch = chain
sl st = slip stitch
dc = double crochet
mc = magic circle
sp = space
st(s) = stitch(es)
blo = back loop only
flo = front loop only
Information
The vest is made from 8 granny squares. Crochet the squares in any color combinations you like.
Start by making a test granny square to ensure your finished vest will be the size you want. Once you've completed your swatch, measure the sides and compare them to the measurements below for your chosen size. Everyone crochets with a different tension, so follow the size guidelines below to help ensure your vest turns out the right size.
- If your square is larger than the measurements below: Try using a smaller crochet hook or crocheting one fewer round for each square.
- If your square is smaller: Try blocking it to the correct size. Alternatively, use a larger crochet hook or add one extra round, then measure again. Please note that adding an extra round will require more yarn.
Size
S/M: Use an 8–10 mm crochet hook. Each side of the granny square should measure approximately 25–27 cm (10–10¾ in).
L/XL: Use a 12 mm crochet hook. Each side of the granny square should measure approximately 30–31 cm (11¾–12¼ in).
If you'd like your vest to be longer, simply continue crocheting granny stripes along the bottom edge.
Start with 8 Granny Squares.
Start with the color you want in the center of your squares. Make a MR (magic ring) or ch 4 and join with a sl st to form a ring.
Round 1: Ch 3 (counts as 1 dc), 2 dc, ch 2. *3 dc, ch 2* x3. Join with a sl st in the 3rd ch of beginning ch-3. (12 dc)
Change color or continue with the same color.
Round 2: Join yarn with a sl st in any corner sp. Ch 3 (counts as 1 dc), 2 dc, ch 2, 3 dc in same sp. *In next corner: 3 dc, ch 2, 3 dc* x3. Join with a sl st in the 3rd ch of beginning ch-3. Fasten off. (24 dc)
Change color or continue with same color.
Round 3: Join yarn with a sl st in any side sp (not corner). Ch 3, 2 dc. *In next corner: 3 dc, ch 2, 3 dc; in next side sp: 3 dc* x3. Finish with 3 dc, ch 2, 3 dc in last corner, then sl st to top of beginning ch-3. Fasten off. (36 dc)
Change color or continue.
Round 4: Work same as round 3 — 3 dc in each side sp. 3 dc, ch 2, 3 dc in each corner. Fasten off. (48 dc)
Change color or continue.
Round 5: Repeat round 4. (60 dc)
If the square is smaller than approx. 10–10.25 inches per side (S/M), work 1 more round like round 5, or one round of sc around. Weave in all ends.
Assembly
Step 1: When all squares are finished, lay them out as shown in the layout diagram and join them using sl st on the WS (wrong side) through the blo. Sew together as shown by pink lines in the diagram.
NOTE: Do NOT join the squares marked in blue in the layout diagram (this will be the opening of your vest).
Join with sc through the loops that are closest to each other — that is, in blo of the front square and the flo of the back square.
Once all squares are joined, you'll have one large connected piece.
Then follow these steps to assemble the vest:
a) Join the pink sections together — this is below the armhole and forms one side of your vest.
b) Join the beige sections together — this is also below the armhole and forms the other side of your vest.
Your vest is now fully assembled!
Crochet edging
Now we’re going to crochet an edging around the front opening, neckline, and bottom of the vest.
Crochet two rounds of hdc.
If you are making size L/XL, you may need to add more rounds using this technique to achieve the desired length.
Follow the pink markings in the image below to understand where the edging has been added on the vest.
You can start your hdc anywhere on your vest. Begin by ch 3 — this counts as your first st. Then continue with hdc.
In each corner, crochet: 3 hdc, 2 sl st, 3 hdc — this creates a neat, rounded corner.
Continue crocheting rounds of hdc until you reach your desired length or width.
Crochet ties
To be able to tie your vest, crochet straps.
Row 1: Chain as many ch as needed for the desired length of your tie.
Row 2: Start in the 2nd ch from the hook; crochet sc in each st. You’ll crochet 2 rows per tie.
Crochet a total of 4 ties if you want to be able to tie the vest at both the neck and the waist.
Attach the ties at the top of the neckline and at the waistline on both sides of the vest.
Fasten off your yarn.
Hope you’re happy with your vest! ❤️
// Salli
The rights to this pattern belong to MYO Make Your Own. The pattern or its pictures may not be copied, shared or resold either in parts or in its entirety, but you may sell items you have crocheted from this pattern. If you have questions about the pattern, contact MYO at hello@makeyourown.se.
%20(5).jpg)
Share your creations with us
Thank you!
Your comment was sent!