
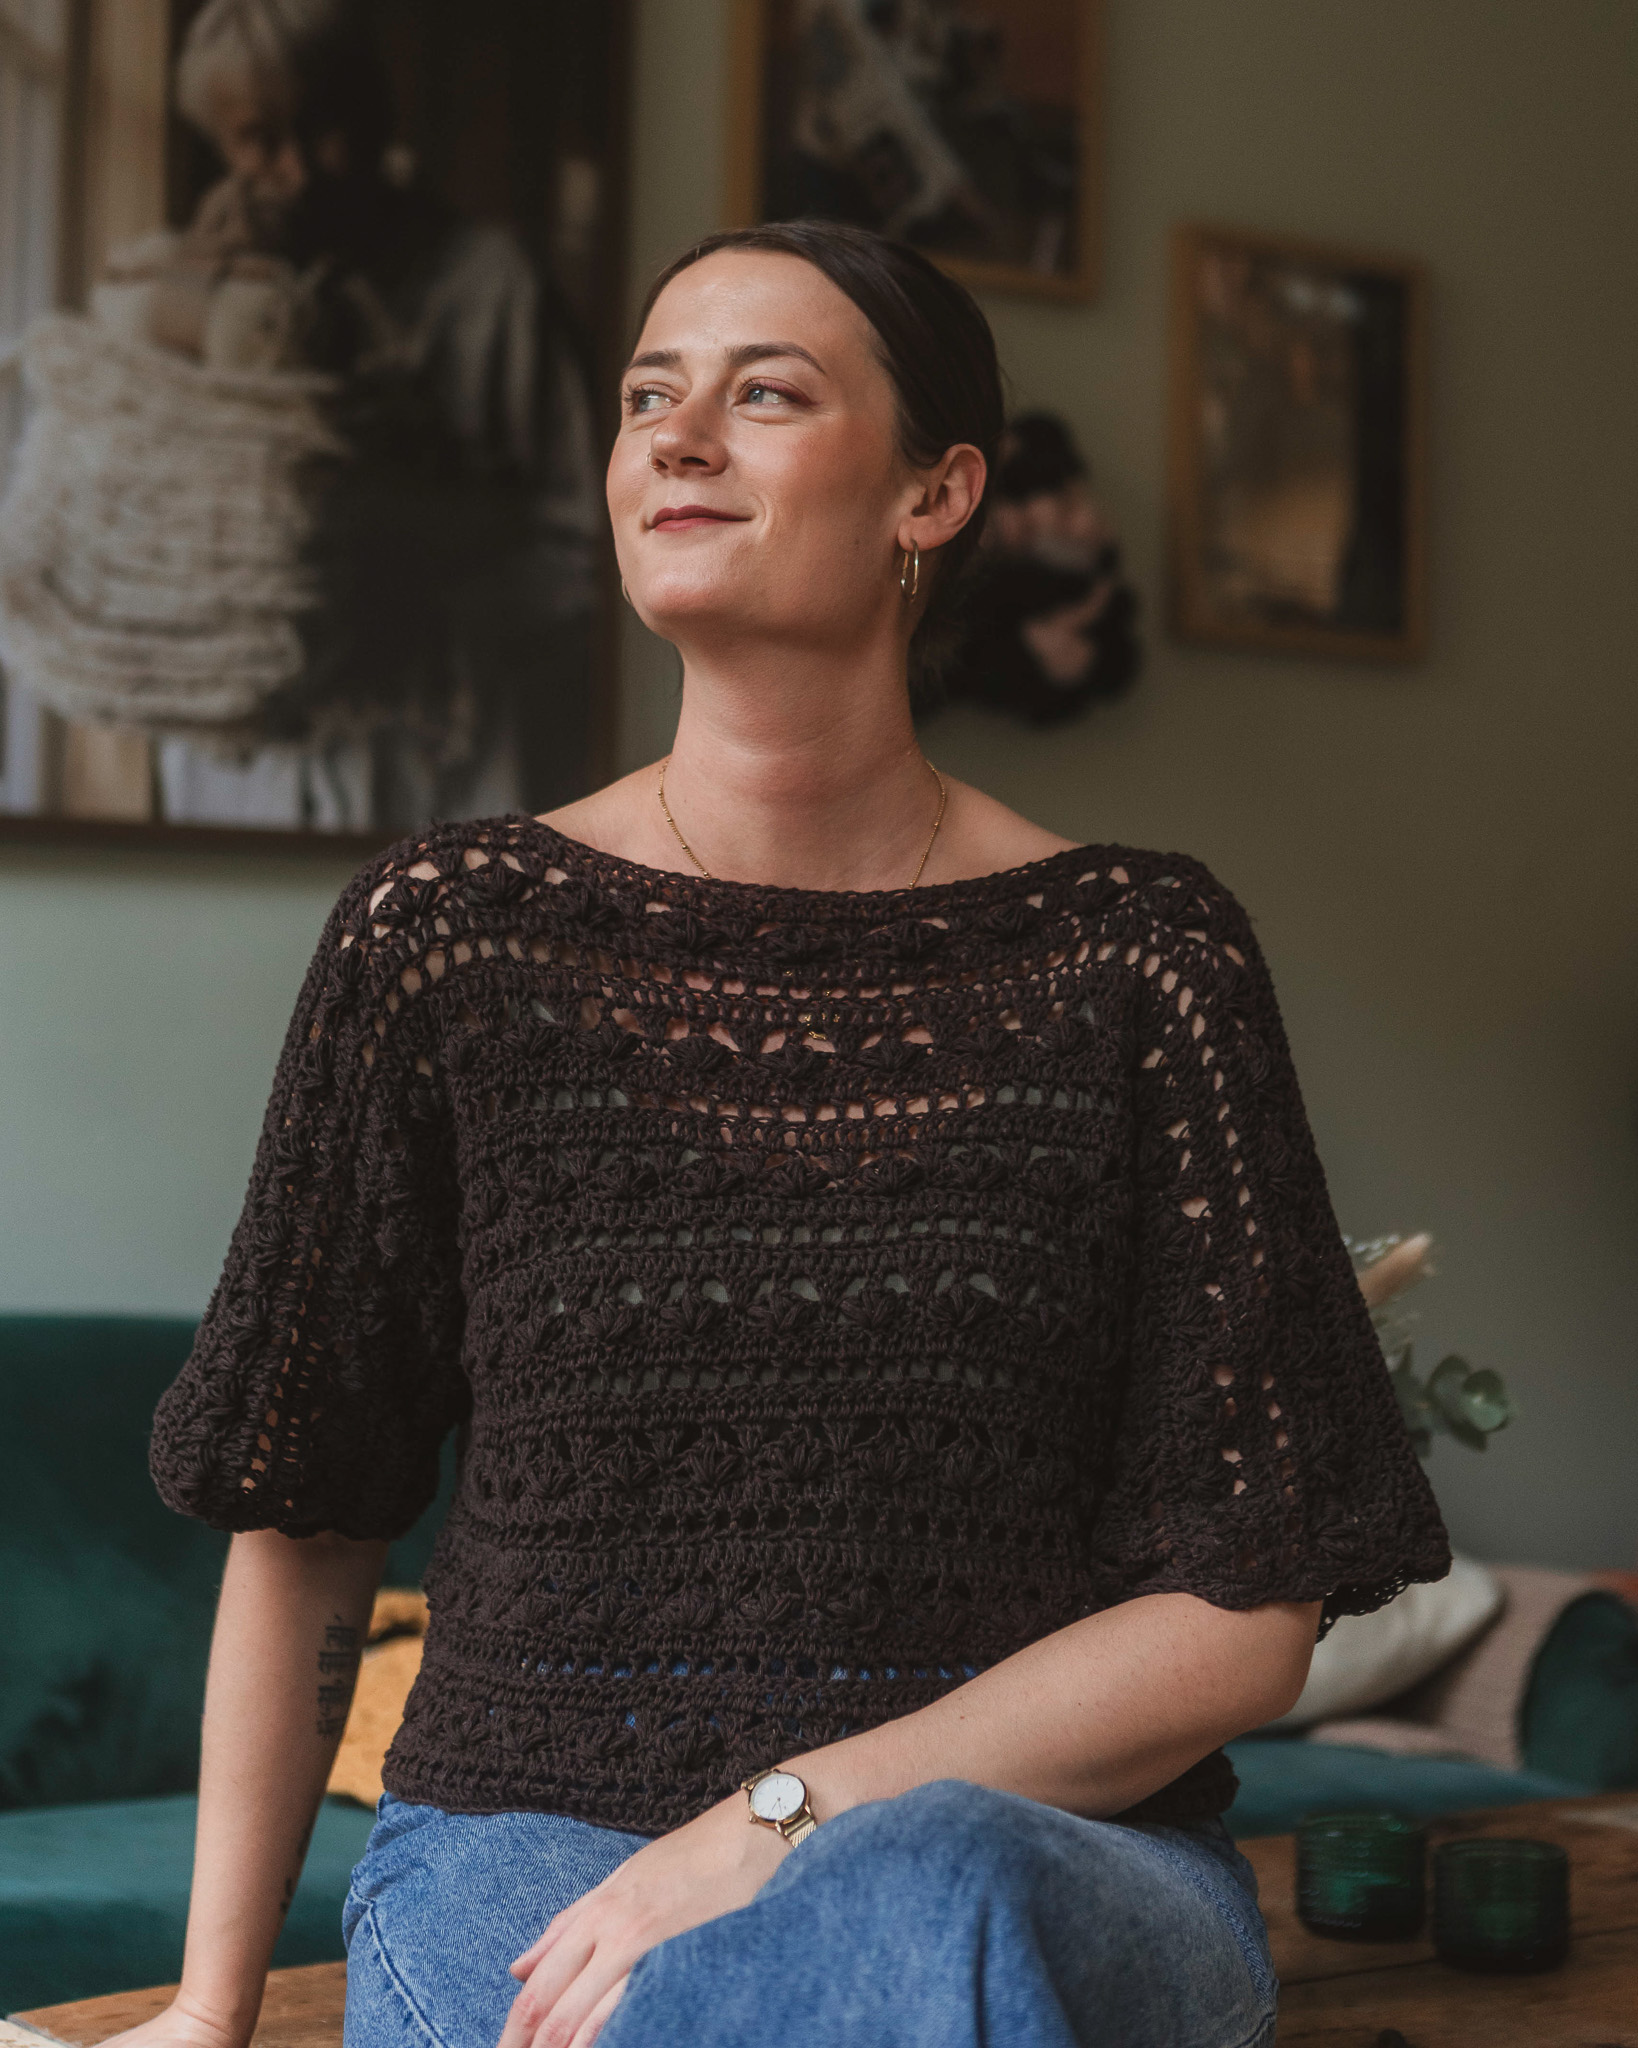
Cardigan with sunflowers “Zandra”
Crochet a Lovely Cardigan with Sunflower Squares 🌻
Don’t these sunflowers just brighten your day? Now you can crochet this lovely cardigan that goes with everything—and of course, you can choose different colors if you'd like. It's easy to adjust the size to your own measurements. You can either change the size of the crochet hook or add more rounds to the granny square. The instructions are written for sizes S, M, L, and XL. The cardigan in the instructions is crocheted using MYO’s Basic Wool, and the colors used are light brown, peach, yellow, and white.
Yarn Consumption: Approx. 900 g for size S, 1000 g for size M and 1100 g for size L
The specific amount needed of each color is listed in Step 1 of the instructions. Yarn consumption may vary depending on your crochet tension and the hook size you use. The above quantities are based on using a 5 mm crochet hook.
Please note that in this tutorial, we use videos from our technical school along with images.


.jpg)
Here's how to do it
To create the Zandra cardigan, crochet 16 granny squares, adding one extra round to the sides of 4 of the squares. Then, assemble the granny squares. After that, crochet the bottom ribbing of the cardigan, the ribbing around the collar, and finally the ribbing on the sleeve cuffs. Finish by sewing on 3 buttons. – Johanna K

This is what you need:
Here you can directly purchase the material for the product. Please note that the instruction is digital and appears here on the page (no written instruction).


.jpg)
Unleash your creativity
For only 85kr per month you get access to all our 300+ beginner-friendly instructions for crochet, knitting and macrame.
A perfect way to get started with your new hobby!

Information
One granny square crocheted in MYO Basic Wool with a 5 mm hook measures:
Size S: 20 cm wide/high
Size M: 22 cm wide/high
Size L: 23 cm wide/high
Size XL: 24 cm wide/high
The cardigan is designed to have a tight fit. If you prefer a looser or oversized fit, we recommend going up at least one size. You can also/and consider using a hook one size larger than recommended and follow the instructions for your chosen size.
In the instruction, I suggest adding more outer rounds to the granny squares for sizes M and L:
Size S: add 1 extra round
Size M: add 2 extra rounds
Size L: add 3 extra rounds
For size XL, I recommend switching to a 6 mm hook and following the same pattern as for size L.
If the sleeve length feels too short, you can either crochet two extra squares for each sleeve or add a few extra rounds of double crochet around the sleeve edge before adding the cuff.
Cardigan Measurements:

Yarn Consumption:

Step 1 – 12 squares + 4 squares
Crochet 12 granny squares (rounds 1–5). These squares will form the front panels and the sleeves of the cardigan. In addition to these, you’ll need to crochet 4 granny squares with modified sides, which will form the back panel. The instructions for these modifications are provided at the end of this section as Round 6 (for Size S), Round 7 (for Size M), and Round 8 (for Size L). These squares need to be wider because the front panels of the cardigan include an extra ribbed section.
The following instruction for rounds 1–5 apply to all sizes (S, M, L, XL):
Round 1 (light brown):
Start with a magic ring. Chain 3 (counts as the first double crochet). Work 15 more double crochets into the ring (for a total of 16 stitches including the initial chain 3). Join with a slip stitch to the 3rd chain of the beginning chain-3. Cut and fasten off
If you're unsure how to crochet a magic ring with double crochet, see the video below.

Round 2 (peach):
Join the new yarn with a slip stitch into any double crochet from the previous round. Chain 2, then work 1 puff stitch into the same stitch + chain 1.
If you’re unsure how to crochet a puff stitch, see the video below. Note! The video shows a puff stitch with 9 loops on the hook, but in this pattern, we use 7 loops on the hook.
Puff Stitch Instructions:
Yarn over, insert the hook into the stitch, yarn over again and pull up a loop. Repeat this 3 times in the same stitch (you should have 7 loops on the hook).
Yarn over one final time and pull through all 7 loops on the hook. Chain 1 to secure the puff stitch .

Work 1 puff stitch + 1 chain in each stitch all the way around. Join with a slip stitch to the 2nd chain at the beginning of the round. You should have a total of 16 puff stitches. Cut and fasten off the yarn.

Round 3 (yellow): Join the new yarn with a slip stitch into any chain-1 space from the previous round. Chain 4. This round consists of cluster stitches. The first cluster of the round is slightly different to account for the starting chain-4—you will repeat the cluster one fewer time than in the other clusters.
After the first cluster, chain 2, then work 1 cluster into the next chain-1 space. Repeat this pattern all the way around. Join with a slip stitch into the 4th chain of the beginning chain-4. You should have a total of 16 clusters. Cut and fasten off the yarn.
How to crochet a 3-Treble Cluster Stitch:
Yarn over twice, insert the hook into the space, yarn over and pull up a loop. Yarn over and pull through 2 loops, yarn over and pull through 2 loops again.
Repeat this two more times (a total of 3 partial trebles). You should now have 4 loops on the hook. Yarn over and pull through all 4 loops to complete the cluster.


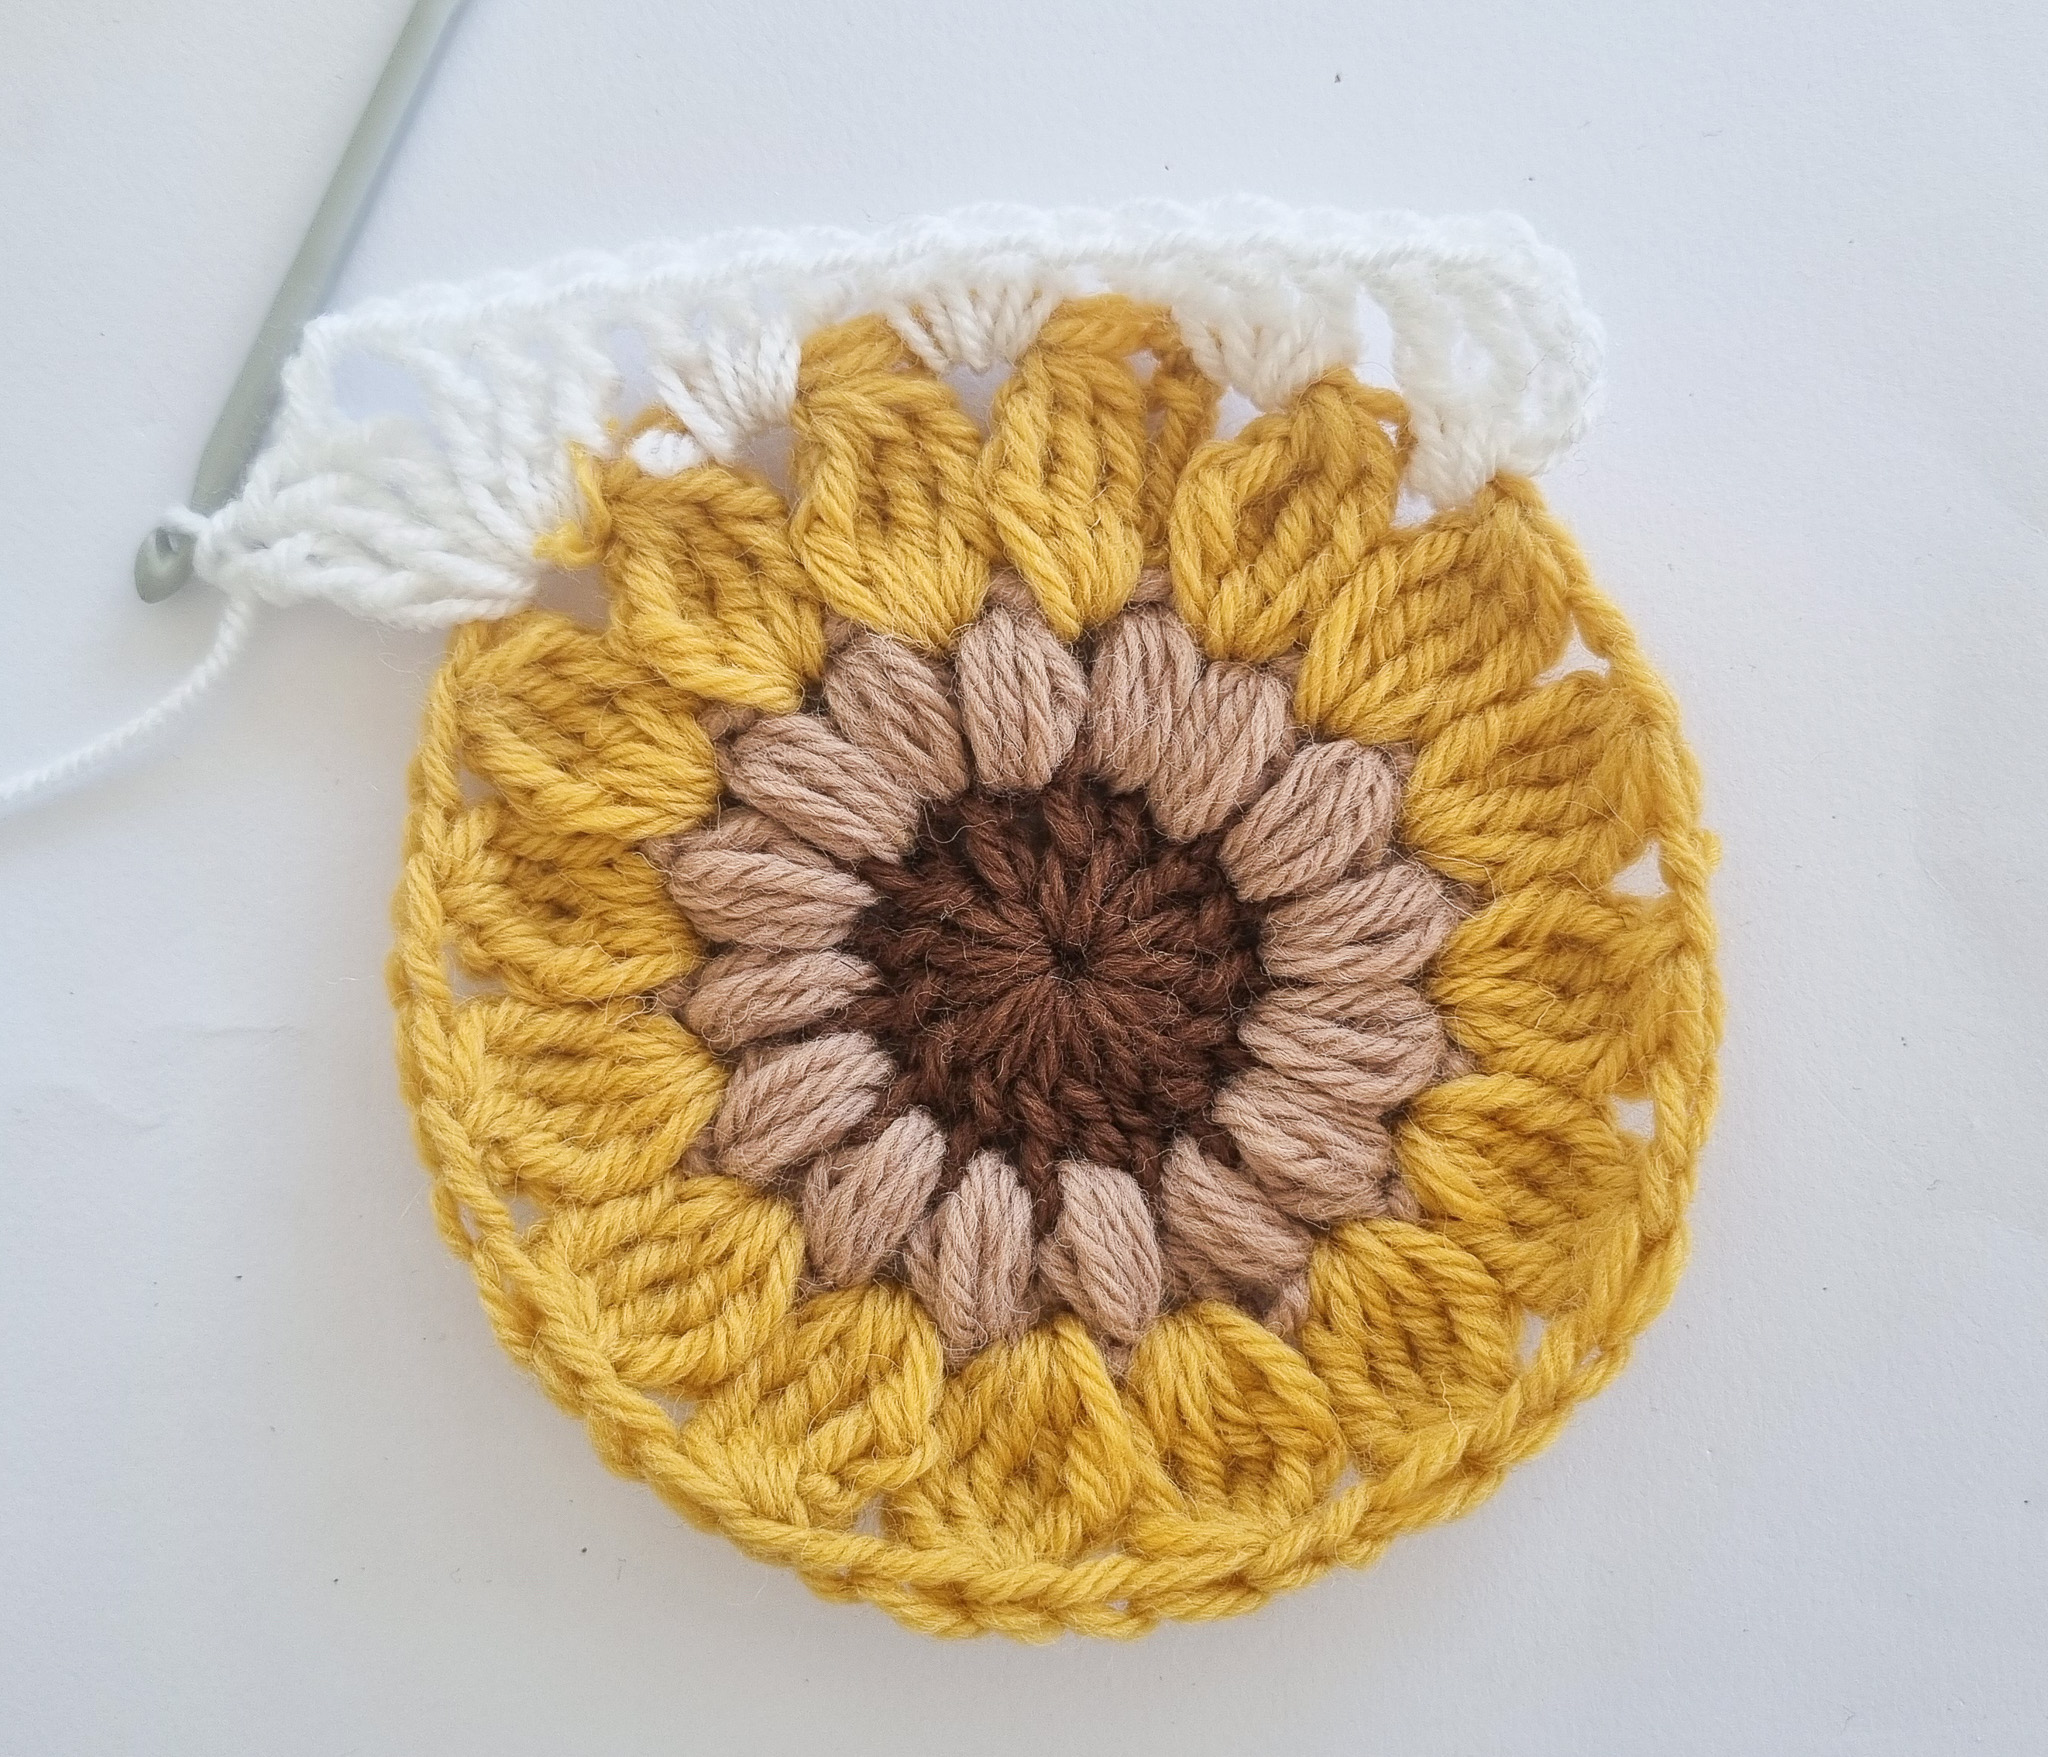
Round 4 (white): Join the new yarn with a slip stitch into any chain-2 space from the previous round. Chain 4 (counts as the first treble crochet). Work 2 treble crochets into the same space.
If you’re unsure how to crochet a treble crochet, see the video below.
Then, crochet the first side of the granny square. Work 3 double crochets into the next chain-2 space, 3 half double crochets into the following chain-2 space, and 3 double crochets into the next chain-2 space. This creates the first side of the granny square (see image below).
If you're unsure how to crochet a half double crochet, see the video below.
Now, work the first corner of the granny square. Work 3 double crochets, 3 chain stitches, and then 3 double crochets into the same space. This forms the first corner of the square. See first picture below.
Now, repeat the side pattern + corner pattern 2 more times to create the next 2 sides and corners of the granny square. Work the last side of the granny square in the same way as the other sides. See second picture below.
When you reach the last corner, work 3 double crochets, 3 chain stitches, and then join with a slip stitch into the 4th chain you made at the beginning of the round (see image below).
Do not cut the yarn.


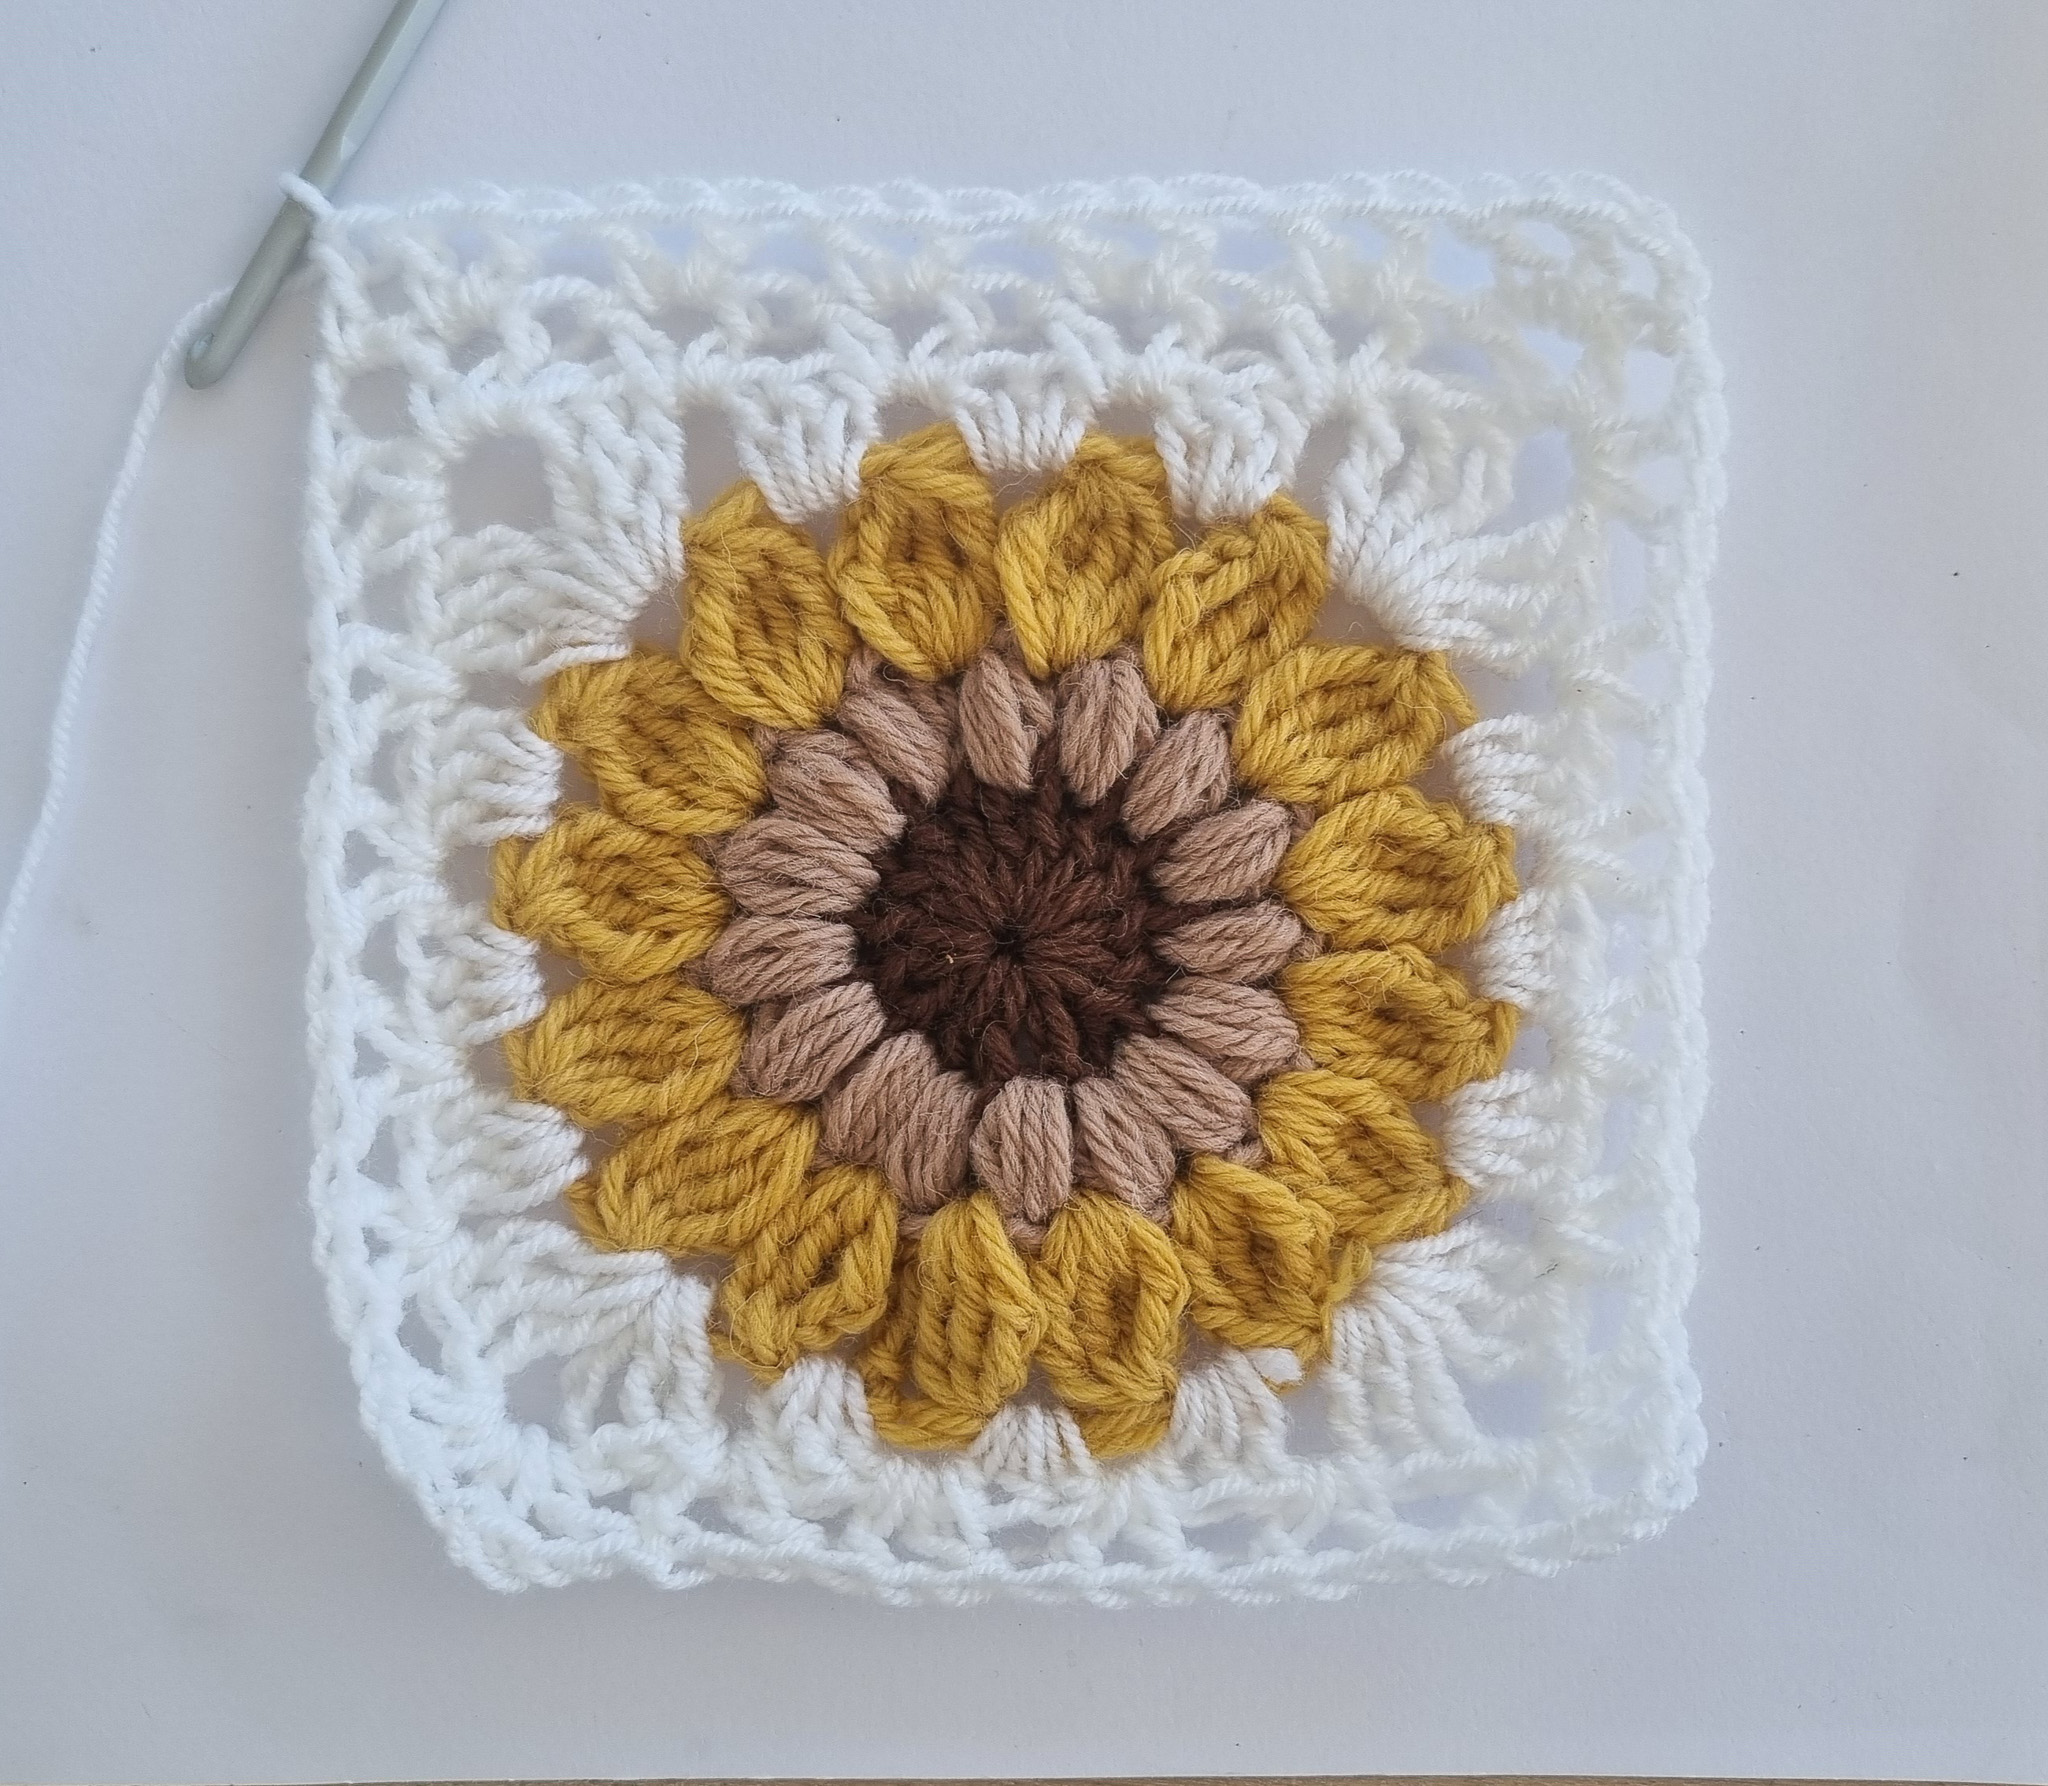
Round 5 (white): Work 3 slip stitches to reach the first space of the side of the granny square. If you're unsure how to crochet slip stitches, see the video below.

Chain 4 (counts as 1 double crochet and 1 chain). Work 1 double crochet into the same space. Work 1 double crochet, 1 chain, and 1 double crochet into the next space. Repeat this pattern until you reach the first corner.

Work 1 double crochet, 1 chain, and 1 double crochet into the corner. Chain 2. Then, work 1 double crochet, 1 chain, and 1 double crochet into the same corner space.

Repeat the pattern for the square's sides and corners all the way around. When you’ve completed the last corner, join with a slip stitch into the 3rd chain you made at the beginning of the round.

For Size S, cut and fasten off the yarn. Crochet 15 more identical granny squares (but 4 of them should have an extra round—see the next step).
For Size M – repeat Round 5 1 more time. For Size L, repeat Round 5 total of 2 more times.
Start with a slip stitch into the first "V" space (1 double crochet, 1 chain, 1 double crochet) from the previous round. Chain 4, then work 1 double crochet into the same space. Repeat the round as in Round 5. Work 1 V-stitch (1 double crochet, 1 chain, 1 double crochet) into each V space from the previous round. Work 1 V-stitch, 12 chain stitches, and 1 V-stitch into the corners.

Crochet 4 more squares with the following addition (for the back of the cardigan):
Round 6 (white): Join the new yarn with a slip stitch into the corner of the granny square. Chain 3 (counts as 1 double crochet). Work 1 double crochet, 1 chain, and 1 double crochet into the next V space. Repeat the pattern along the entire side. Finish with 1 double crochet into the second corner of the granny square. Cut and fasten off the yarn.
Repeat the same pattern on the opposite side.

ASSEMBLY OF THE SQUARES:
There are many ways to assemble and join the granny squares together. Below, we describe how to do a flat slip stitch seam. Of course, you can choose to join the squares with slip stitches, crochet single crochets, or sew them together if you prefer.
FLAT SLIP STITCH SEAM
Make a slip knot and place it on the hook. If you're unsure how to make a slip knot, see the video below.
Insert the hook into the back loop of the corner stitch on the right square (with the front of the granny square facing you). If you're unsure which is the back loop only, see the video below.
Make sure that your working yarn stays on the back side. Insert the hook into the back loop of the same stitch on the left square (stitch 4). Yarn over and pull through all loops on the hook. Repeat for the remaining stitches.
Arrange the squares according to the image description below.

You can decide for yourself in which order to join the squares. Below is a suggestion. Start by crocheting along the white arrows, then continue along the blue arrows. Remember to leave a gap without slip stitches; how big the opening is is up to you. This refers to how wide the neck opening should be. In the example above, I left 10 stitches from the outer edge.Finally, crochet along the pink arrows.Note the number of stitches to ensure you have the same on both sides.

Fasten off the yarn here for the neck opening:

Finally, crochet together the sides of the cardigan's body and the sleeve.

Cardigan's Lower Ribbing – Preparations
Before starting the ribbing itself, crochet an even number of single crochets along the lower edge of the cardigan.
Fasten off the yarn in the left lower corner of the cardigan. Crochet 1 single crochet into the same space. Then, crochet single crochets along the squares The second image below illustrates how to crochet single crochets along the seam of two granny squares. When you reach the right outer edge of the cardigan, fasten off and cut the yarn.


Ribbing at the bottom of the cardigan
Fasten the new yarn into the first stitch you crocheted in the previous round. Start by crocheting 9 chain stitches.

Row 1: Work single crochets into all the stitches, starting in the 2nd chain from the hook. Then, skip the first stitch on the edge of the cardigan. Next, crochet 2 slip stitches into the next 2 stitches on the edge of the cardigan. Turn. In total, you will have crocheted 8 single crochets in the chain and 2 slip stitches along the edge of the cardigan. Chain 1 and turn.

Row 2: Skip the slip stitches you just crocheted (on the ribbing, including the chain where you turned). Work single crochets into the back loop only up the ribbing again. Turn. In total, you will have crocheted 8 single crochets (on the ribbing).

Row 3: Chain 1. Work single crochets into the back loop only until you reach the edge of the cardigan. Work slip stitches into the next 2 stitches on the edge. Chain 1 and turn. In total, you will have 8 single crochets.

Row 4: Repeat Row 2-3, ending with Row 2. Do not cut the yarn. The next step is to crochet single crochets along the edge/neck opening of the cardigan as shown on the next page.
Cardigan Front Edge / Ribbing
Continue from where you finished the previous round (i.e., on the right edge of the cardigan) in the same way you crocheted along the lower edge of the cardigan with single crochets.
Crochet 1 single crochet into the outermost stitch of the lower ribbing.
Crochet 7 more single crochets along the ribbing.
Crochet 1 single crochet into the space between the ribbing and the granny square.
Continue up along the granny squares, around the neck opening. Note! Place 2 single crochets in the corner of the granny square when you reach the neck opening.
Continue crocheting single crochets down the left edge of the cardigan.
Crochet 1 final single crochet in the last stitch of the ribbing.
Fasten off and cut the yarn.
Fasten the new yarn into the first stitch you crocheted on the previous round (right side of the cardigan).
Crochet 9 chain stitches.
Crochet in the same way as you crocheted the ribbing along the bottom of the cardigan.
Continue until you reach the left side of the cardigan and its center point (see images below).


Now, crochet the first buttonhole for the cardigan.
Crochet 3 single crochets into the back loop only. Chain 2. Skip 2 single crochets, and then crochet another 3 single crochets into the back loop only. Chain 1 and turn. Crochet single crochets into the back loop only. Crochet 2 single crochets into the 2-chain space and another 3 single crochets into the back loop only (see images below).


Continue with the ribbing pattern for 12 rows.
Crochet 1 more buttonhole. Repeat the ribbing pattern for another 12 rows Crochet 1 buttonhole on the following row. Continue the ribbing pattern until you reach the bottom edge of the cardigan. ut and fasten off the yarn.
Attach the Buttons:
Place the buttons on the right side of the cardigan, at the same height as the buttonholes on the left side of the cardigan. Sew the buttons in place.
Cardigan Sleeve Ribbing
Fasten the yarn into a corner (the 2-chain space) of the granny square at the outer edge of the sleeve.
The first round will involve crocheting single crochets around the sleeve and reducing the opening. You can decide how large of an opening for the hand you want. Below is a suggestion that fits all sizes.
Chain 1 and crochet 1 single crochet into the same space. Crochet a decrease in the next two stitches. Crochet 1 single crochet in the next stitch. Repeat the pattern around the round. Crochet 1 slip stitch in the first stitch of the round.
If you’re unsure how to make a decrease, check the video below.
Crochet Sleeve Ribbing
Chain 9. Crochet the sleeve ribbing in the same way as the bottom and front edges of the cardigan.
Row 1: Crochet single crochets in all the chain stitches, starting in the second chain. Skip the first stitch on the edge of the cardigan. Crochet 2 slip stitches in the next 2 stitches. Crochet 1 chain stitch and turn. Total of 8 single crochets and 2 slip stitches.
Row 2: Skip the slip stitches. Crochet single crochets in the back loop up the ribbing. Turn. Total of 8 single crochets (on the ribbing). Crochet 1 chain stitch and turn.
Row 3: Crochet single crochets in the back loop until you reach the edge. Crochet slip stitches in the next 2 stitches on the edge. Crochet 1 chain stitch and turn. Total of 8 single crochets (on the ribbing).
Row 4: Repeat Row 2-3. Don’t cut the yarn.
When you have crocheted around the entire sleeve, you will join the ribbing edges together. This can be done with a crochet hook or a needle. Below, I explain how you can sew the ribbing edges together:
How to sew the ribbing edges together:
Sewing through the top of the seam on the edge helps prevent distortion and creates a neater appearance on the ribbing. Pick up the back loop and align it with the stitch on the opposite side. Continue across and sew through the same stitch. This will push up the tops of the stitches and keep the ribbing in place, with no visible seam. The needle will go under the two loops at the top of the stitch. Continue across until the seam is sewn securely. Sew through the two stitches at the edge. Tie a knot and sew the end in, weaving it neatly between the stitches. Fasten off, cut the yarn, and hide the end.
You’re finished! 🙂
CROCHET TERMS
Now it's time to crochet a lovely sunflower cardigan! 🌻
Information
A granny square crocheted in MYO Basic wool with a 5 mm crochet hook measures 20 cm wide/high for size S.
For size M, it measures 22 cm wide/high.
For size L, 23 cm wide/high.
For size XL, 24 cm wide/high.
In the instructions, I suggest adding extra outer round/s to the granny squares for sizes M and L:
- For size S: crochet 1 outer round
- For size M: crochet 2 outer rounds
- For size L: crochet 3 outer rounds
- For size XL: I recommend switching to a 6 mm crochet hook and following the same pattern as for size L.
The sizes are a tight fit, so if you prefer a looser fit or an oversized look, we recommend going up a few size and (or) using a crochet hook one size larger while still following the instructions for your chosen size.
If the sleeve part feels too short, you can crochet two additional squares for each sleeve or add a few extra rounds of double crochet around the sleeve ends before working the cuff.
Cardigan measurements:
Yarn consumption:
Abbreviations
MR = magic ring
ch = chain stitch
sl st = slip stitch
sc = single crochet
hdc = half double crochet
dc = double crochet
tr = treble crochet
blo = back loop only
ch sp = chain space
dc group = double crochet group
blo = back loop only
rep = repeat
puff = puff stitch
Puff stitch:
Yarn over, insert the hook into the stitch, yarn over and pull up a loop. Repeat this three times (you will have 7 loops on the hook). Yarn over and pull through all loops on the hook. Chain 1 to secure the puff stitch.
How to crochet a cluster - 3-Treble Cluster Stitch / Cluster:
Yarn over twice, insert the hook into the “hole,” yarn over and pull up a loop. *Yarn over and pull through 2 loops on the hook, yarn over and pull through 2 loops again*. Repeat from * to * two more times (a total of 3 partial trebles). You will have 4 loops on the hook. Yarn over and pull through all 4 loops.
Pattern
The following instructions for rounds 1–5 apply to all sizes (S, M, L, XL).
Round 1 (light brown): Begin with a MR. Ch 3 (counts as first dc), make 15 dc into the ring. Join with a sl st to the 3rd ch at the beginning of the round. (16) Fasten off and weave in the end.
Round 2 (peach): Join yarn with a sl st in any stitch from the previous round. Ch 2, make 1 puff stitch in the same stitch (don’t forget to ch 1 at the end of the puff). Work *1 puff stitch + ch 1* in each stitch around. Join with a sl st to the 2nd ch at the beginning of the round. 16 puff stitches total. Fasten off and weave in the end.
Round 3 (yellow): Join yarn with a sl st into any ch-1 space from the previous round. Ch 4. Now we will work cluster stitches. The first cluster is slightly different due to starting with ch 4 — so work one less partial treble than in the regular clusters. After the first cluster, *ch 2, work 1 cluster in the next ch-1 space*. Repeat the pattern between *...* all around. Join with a sl st to the 4th ch at the start of the round. 16 clusters total. Fasten off and weave in the end.
Round 4 (white): Join yarn with a sl st into any ch-2 space from the previous round. Ch 4 (counts as first tr), work 2 tr into the same space.
Now we begin the first side of the square:
In the next ch-2 space, work 3 dc.
In the next ch-2 space after that, work 3 hdc.
In the next ch-2 space, work 3 dc.
This forms the first side of the square.
Now the first corner: In the next ch-2 space, work 3 tr, ch 3, 3 tr — this creates the first corner.
Now repeat the side pattern + corner pattern 3 more times to create the remaining three sides and corners of the square. On the final corner, work 3 tr, ch 3, then join with a sl st into the 4th ch at the beginning of the round. Do not fasten off.
Round 5 (white): Work 3 sl sts to reach the first space along the side of the granny square. Ch 4 (counts as 1 dc and 1 ch), then work 1 dc into the same space.
*In the next space, work: 1 dc, ch 1, 1 dc.* Repeat this pattern across the side until you reach the first corner.
Round 5 (white, continued): In the corner space, work: 1 dc, ch 1, 1 dc, ch 2, 1 dc, ch 1, 1 dc. Repeat the side and corner pattern all the way around the square.
After completing the final corner, join with a sl st to the 3rd ch of the beginning ch-4.
For size S, fasten off and weave in the end. Make 15 more identical squares.
For size M: Repeat Round 5 1 more time.
For size L: Repeat Round 5 2 more times.
Start by joining with a sl st into the first V-space (1 dc, 1 ch, 1 dc) from the previous round. Ch 4, then work 1 dc into the same space. Repeat according to Round 5.
Work 1 V-stitch in each V-space from the previous round. In the corners, work: 1 V-stitch, ch 12, 1 V-stitch.
Make 4 more squares with the following addition (back of the cardigan):
Round 6 (white): Fasten new yarn with a sl st into the corner of the square. Ch 3 (counts as 1 dc), then work 1 dc, ch 1, 1 dc into the next V-space. Repeat this pattern along the entire side.
Finish with 1 dc in the second corner of the square. Fasten off and weave in the end.
Repeat the same process on the opposite side of the square. Work the same pattern on the opposite side.
JOINING THE SQUARES:
There are many ways to join granny squares. Below, I describe how to work a flat slip stitch join, following the method in the instructions. Of course, you can choose to crochet sc or sew the squares together if you prefer.
HOW TO DO A FLAT SLIP STITCH JOIN
- Make a slipknot and place it on your hook.
- Insert the hook into the back loop only (blo) of the corner stitch on the right square (with the front of the granny square facing you).
- Make sure your working yarn stays on the back side, then insert the hook into the blo of the same stitch on the left square.
- Yarn over and pull through all loops on the hook.
- Repeat for the remaining stitches.
Lay out the squares according to the image guide below. You can decide for yourself the order in which to join the squares. Below is a suggestion:
Start by joining along the white arrows, then continue along the blue arrows. Be sure to leave a space without joining (the size of the opening is up to you), meaning how wide the neck opening should be. In the example above, I left 10 sts from the outer edge. Finally, join along the pink arrows.
Fasten off the yarn here for the neck opening.
Finally, crochet the sides of the cardigan body and the sleeve together.
Cardigan Lower Ribbing - Preparation
Before working the ribbing itself, crochet an even number of sc stitches along the lower edge of the cardigan. Fasten off the yarn in the lower left corner of the cardigan. Crochet 1 sc in the same space. Crochet sc along the squares. When you reach the outer right edge of the cardigan, fasten off and cut the yarn.
Ribbing at the Bottom of the Cardigan
Fasten off new yarn in the first stitch you made in the previous round.
Start by crocheting 9 ch.
Row 1: Crochet sc into each ch, starting in the 2nd ch from the hook. Skip the first stitch on the edge of the cardigan. Then work 2 sl sts into the next 2 stitches. Turn. You will have crocheted 8 sc into the chain and 2 sl sts into the edge of the cardigan. Ch 1 and turn.
Row 2: Skip the sl sts you just made (on the ribbing, including the ch you turn with). Crochet sc into the blo up the ribbing again. Turn. You will have crocheted 8 sc (on the ribbing).
Row 3: Ch 1. Crochet sc into the blo until you reach the edge of the cardigan. Sl st into the next 2 stitches on the edge. Ch 1 and turn. You will have crocheted 8 sc.
Row 4: Repeat Row 2-3 and finish with Row 2. Do not fasten off the yarn. The next step is to crochet sc along the cardigan's edge/neck opening as shown on the next page.
Cardigan Front Edge / Ribbing
Continue from where you left off in the previous round (i.e., the right edge of the cardigan), and crochet around the front edge of the cardigan in the same way you worked around the bottom edge with sc.
Crochet 1 sc into the outermost stitch of the lower ribbing. Crochet 7 more sc along the ribbing. Crochet 1 sc into the space between the ribbing and the square. Continue up along the squares, around the neck opening. Note: Place 2 sc into the corner of the square when you reach the neck opening. Continue crocheting sc down the left edge of the cardigan. Crochet the last sc into the final stitch of the ribbing. Fasten off and cut the yarn.
Fasten new yarn into the first stitch you made in the previous round (right side of the cardigan). Ch 9. Crochet in the same way you worked the ribbing at the bottom of the cardigan. Continue until you reach the left side of the cardigan and its center.
Now you will make the cardigan's first buttonhole: Crochet 3 sc into the blo. Ch 2, skip 2 sc, then crochet 3 sc into the blo. Ch 1 and turn. Crochet sc into the blo. Crochet 2 sc into the ch-2 space, then crochet 3 sc into the blo.
Continue with the ribbing pattern for 12 rows. Crochet one more buttonhole. Repeat the ribbing pattern (12 rows) once more.
Crochet 1 buttonhole on the following row. Continue the ribbing pattern until you reach the bottom edge of the cardigan. Fasten off and weave in the yarn.
Place the buttons on the right side of the cardigan at the same height as the buttonholes on the left side. Attach the buttons.
Cardigan Sleeve Ribbing
Fasten the yarn into a corner (the ch-2 space) of the outermost stitch of the granny square on the sleeve. For the first round, we will crochet sc around the sleeve and decrease at the opening. You can decide how large you want the hand opening to be. The example here gives a suggestion that fits all sizes.
Round 1: Ch 1. 1 sc into the same space. 2 sc together in the next 2 stitches. 1 sc into the next stitch. Repeat around. Sl st into the first stitch of the round.
Crochet Sleeve Ribbing (same as the bottom edge and front edge of the cardigan)
Row 1: sc into each ch, starting in the 2nd ch from the hook. Skip the first stitch on the edge of the cardigan. 2 sl sts into the next 2 stitches. Ch 1 and turn. You will have crocheted 8 sc and 2 sl sts.
Row 2: Skip the sl sts. Sc into the blo up the ribbing again. Turn. You will have crocheted 8 sc (on the ribbing). Ch 1 and turn.
Row 3: Crochet sc into the blo until you reach the edge. Sl st into the next 2 stitches on the edge. Ch 1 and turn. You will have crocheted 8 sc.
Row 4: Repeat Row 2-3. Do not fasten off the yarn.
Finishing the Sleeve Ribbing: When you have crocheted around the entire sleeve, join the edges of the ribbing together. You can do this with your crochet hook or a needle.
To sew the ribbing edges together:
Sew through the top of the stitch on the edge to prevent distortion and create a cleaner look on the ribbing. Pick up the blo and align it with the stitch on the opposite side. Continue across and sew through the same stitches. This will push the top of the stitch and continue to shape the ribbing so that no visible seam shows. The needle should go under the two loops at the top of the stitch. Continue across until the seam is attached. Sew through the two stitches at the edge. Tie a knot and sew the end in, weaving it right between the stitches. Fasten off, cut the yarn, and hide the end.
You are finished!
The rights to this pattern belong to MYO Make Your Own. The pattern or its pictures may not be copied, shared or resold either in parts or in its entirety, but you may sell items you have crocheted from this pattern. If you have questions about the pattern, contact MYO at hello@makeyourown.se.
Information
One granny square crocheted in MYO Basic Wool with a 5 mm hook measures:
Size S: 20 cm wide/high
Size M: 22 cm wide/high
Size L: 23 cm wide/high
Size XL: 24 cm wide/high
The cardigan is designed to have a tight fit. If you prefer a looser or oversized fit, we recommend going up at least one size. You can also/and consider using a hook one size larger than recommended and follow the instructions for your chosen size.
In the instruction, I suggest adding more outer rounds to the granny squares for sizes M and L:
Size S: add 1 extra round
Size M: add 2 extra rounds
Size L: add 3 extra rounds
For size XL, I recommend switching to a 6 mm hook and following the same pattern as for size L.
If the sleeve length feels too short, you can either crochet two extra squares for each sleeve or add a few extra rounds of double crochet around the sleeve edge before adding the cuff.
Cardigan Measurements:
Yarn Consumption:
Step 1 – 12 squares + 4 squares
Crochet 12 granny squares (rounds 1–5). These squares will form the front panels and the sleeves of the cardigan. In addition to these, you’ll need to crochet 4 granny squares with modified sides, which will form the back panel. The instructions for these modifications are provided at the end of this section as Round 6 (for Size S), Round 7 (for Size M), and Round 8 (for Size L). These squares need to be wider because the front panels of the cardigan include an extra ribbed section.
The following instruction for rounds 1–5 apply to all sizes (S, M, L, XL):
Round 1 (light brown):
Start with a magic ring. Chain 3 (counts as the first double crochet). Work 15 more double crochets into the ring (for a total of 16 stitches including the initial chain 3). Join with a slip stitch to the 3rd chain of the beginning chain-3. Cut and fasten off
If you're unsure how to crochet a magic ring with double crochet, see the video below.
Round 2 (peach):
Join the new yarn with a slip stitch into any double crochet from the previous round. Chain 2, then work 1 puff stitch into the same stitch + chain 1.
If you’re unsure how to crochet a puff stitch, see the video below. Note! The video shows a puff stitch with 9 loops on the hook, but in this pattern, we use 7 loops on the hook.
Puff Stitch Instructions:
Yarn over, insert the hook into the stitch, yarn over again and pull up a loop. Repeat this 3 times in the same stitch (you should have 7 loops on the hook).
Yarn over one final time and pull through all 7 loops on the hook. Chain 1 to secure the puff stitch .
Work 1 puff stitch + 1 chain in each stitch all the way around. Join with a slip stitch to the 2nd chain at the beginning of the round. You should have a total of 16 puff stitches. Cut and fasten off the yarn.
Round 3 (yellow): Join the new yarn with a slip stitch into any chain-1 space from the previous round. Chain 4. This round consists of cluster stitches. The first cluster of the round is slightly different to account for the starting chain-4—you will repeat the cluster one fewer time than in the other clusters.
After the first cluster, chain 2, then work 1 cluster into the next chain-1 space. Repeat this pattern all the way around. Join with a slip stitch into the 4th chain of the beginning chain-4. You should have a total of 16 clusters. Cut and fasten off the yarn.
How to crochet a 3-Treble Cluster Stitch:
Yarn over twice, insert the hook into the space, yarn over and pull up a loop. Yarn over and pull through 2 loops, yarn over and pull through 2 loops again.
Repeat this two more times (a total of 3 partial trebles). You should now have 4 loops on the hook. Yarn over and pull through all 4 loops to complete the cluster.
Round 4 (white): Join the new yarn with a slip stitch into any chain-2 space from the previous round. Chain 4 (counts as the first treble crochet). Work 2 treble crochets into the same space.
If you’re unsure how to crochet a treble crochet, see the video below.
Then, crochet the first side of the granny square. Work 3 double crochets into the next chain-2 space, 3 half double crochets into the following chain-2 space, and 3 double crochets into the next chain-2 space. This creates the first side of the granny square (see image below).
If you're unsure how to crochet a half double crochet, see the video below.
Now, work the first corner of the granny square. Work 3 double crochets, 3 chain stitches, and then 3 double crochets into the same space. This forms the first corner of the square. See first picture below.
Now, repeat the side pattern + corner pattern 2 more times to create the next 2 sides and corners of the granny square. Work the last side of the granny square in the same way as the other sides. See second picture below.
When you reach the last corner, work 3 double crochets, 3 chain stitches, and then join with a slip stitch into the 4th chain you made at the beginning of the round (see image below).
Do not cut the yarn.
Round 5 (white): Work 3 slip stitches to reach the first space of the side of the granny square. If you're unsure how to crochet slip stitches, see the video below.
Chain 4 (counts as 1 double crochet and 1 chain). Work 1 double crochet into the same space. Work 1 double crochet, 1 chain, and 1 double crochet into the next space. Repeat this pattern until you reach the first corner.
Work 1 double crochet, 1 chain, and 1 double crochet into the corner. Chain 2. Then, work 1 double crochet, 1 chain, and 1 double crochet into the same corner space.
Repeat the pattern for the square's sides and corners all the way around. When you’ve completed the last corner, join with a slip stitch into the 3rd chain you made at the beginning of the round.
For Size S, cut and fasten off the yarn. Crochet 15 more identical granny squares (but 4 of them should have an extra round—see the next step).
For Size M – repeat Round 5 1 more time. For Size L, repeat Round 5 total of 2 more times.
Start with a slip stitch into the first "V" space (1 double crochet, 1 chain, 1 double crochet) from the previous round. Chain 4, then work 1 double crochet into the same space. Repeat the round as in Round 5. Work 1 V-stitch (1 double crochet, 1 chain, 1 double crochet) into each V space from the previous round. Work 1 V-stitch, 12 chain stitches, and 1 V-stitch into the corners.
Crochet 4 more squares with the following addition (for the back of the cardigan):
Round 6 (white): Join the new yarn with a slip stitch into the corner of the granny square. Chain 3 (counts as 1 double crochet). Work 1 double crochet, 1 chain, and 1 double crochet into the next V space. Repeat the pattern along the entire side. Finish with 1 double crochet into the second corner of the granny square. Cut and fasten off the yarn.
Repeat the same pattern on the opposite side.
ASSEMBLY OF THE SQUARES:
There are many ways to assemble and join the granny squares together. Below, we describe how to do a flat slip stitch seam. Of course, you can choose to join the squares with slip stitches, crochet single crochets, or sew them together if you prefer.
FLAT SLIP STITCH SEAM
Make a slip knot and place it on the hook. If you're unsure how to make a slip knot, see the video below.
Insert the hook into the back loop of the corner stitch on the right square (with the front of the granny square facing you). If you're unsure which is the back loop only, see the video below.
Make sure that your working yarn stays on the back side. Insert the hook into the back loop of the same stitch on the left square (stitch 4). Yarn over and pull through all loops on the hook. Repeat for the remaining stitches.
Arrange the squares according to the image description below.
You can decide for yourself in which order to join the squares. Below is a suggestion. Start by crocheting along the white arrows, then continue along the blue arrows. Remember to leave a gap without slip stitches; how big the opening is is up to you. This refers to how wide the neck opening should be. In the example above, I left 10 stitches from the outer edge.Finally, crochet along the pink arrows.Note the number of stitches to ensure you have the same on both sides.
Fasten off the yarn here for the neck opening:
Finally, crochet together the sides of the cardigan's body and the sleeve.
Cardigan's Lower Ribbing – Preparations
Before starting the ribbing itself, crochet an even number of single crochets along the lower edge of the cardigan.
Fasten off the yarn in the left lower corner of the cardigan. Crochet 1 single crochet into the same space. Then, crochet single crochets along the squares The second image below illustrates how to crochet single crochets along the seam of two granny squares. When you reach the right outer edge of the cardigan, fasten off and cut the yarn.
Ribbing at the bottom of the cardigan
Fasten the new yarn into the first stitch you crocheted in the previous round. Start by crocheting 9 chain stitches.
Row 1: Work single crochets into all the stitches, starting in the 2nd chain from the hook. Then, skip the first stitch on the edge of the cardigan. Next, crochet 2 slip stitches into the next 2 stitches on the edge of the cardigan. Turn. In total, you will have crocheted 8 single crochets in the chain and 2 slip stitches along the edge of the cardigan. Chain 1 and turn.
Row 2: Skip the slip stitches you just crocheted (on the ribbing, including the chain where you turned). Work single crochets into the back loop only up the ribbing again. Turn. In total, you will have crocheted 8 single crochets (on the ribbing).
Row 3: Chain 1. Work single crochets into the back loop only until you reach the edge of the cardigan. Work slip stitches into the next 2 stitches on the edge. Chain 1 and turn. In total, you will have 8 single crochets.
Row 4: Repeat Row 2-3, ending with Row 2. Do not cut the yarn. The next step is to crochet single crochets along the edge/neck opening of the cardigan as shown on the next page.
Cardigan Front Edge / Ribbing
Continue from where you finished the previous round (i.e., on the right edge of the cardigan) in the same way you crocheted along the lower edge of the cardigan with single crochets.
Crochet 1 single crochet into the outermost stitch of the lower ribbing.
Crochet 7 more single crochets along the ribbing.
Crochet 1 single crochet into the space between the ribbing and the granny square.
Continue up along the granny squares, around the neck opening. Note! Place 2 single crochets in the corner of the granny square when you reach the neck opening.
Continue crocheting single crochets down the left edge of the cardigan.
Crochet 1 final single crochet in the last stitch of the ribbing.
Fasten off and cut the yarn.
Fasten the new yarn into the first stitch you crocheted on the previous round (right side of the cardigan).
Crochet 9 chain stitches.
Crochet in the same way as you crocheted the ribbing along the bottom of the cardigan.
Continue until you reach the left side of the cardigan and its center point (see images below).
Now, crochet the first buttonhole for the cardigan.
Crochet 3 single crochets into the back loop only. Chain 2. Skip 2 single crochets, and then crochet another 3 single crochets into the back loop only. Chain 1 and turn. Crochet single crochets into the back loop only. Crochet 2 single crochets into the 2-chain space and another 3 single crochets into the back loop only (see images below).
Continue with the ribbing pattern for 12 rows.
Crochet 1 more buttonhole. Repeat the ribbing pattern for another 12 rows Crochet 1 buttonhole on the following row. Continue the ribbing pattern until you reach the bottom edge of the cardigan. ut and fasten off the yarn.
Attach the Buttons:
Place the buttons on the right side of the cardigan, at the same height as the buttonholes on the left side of the cardigan. Sew the buttons in place.
Cardigan Sleeve Ribbing
Fasten the yarn into a corner (the 2-chain space) of the granny square at the outer edge of the sleeve.
The first round will involve crocheting single crochets around the sleeve and reducing the opening. You can decide how large of an opening for the hand you want. Below is a suggestion that fits all sizes.
Chain 1 and crochet 1 single crochet into the same space. Crochet a decrease in the next two stitches. Crochet 1 single crochet in the next stitch. Repeat the pattern around the round. Crochet 1 slip stitch in the first stitch of the round.
If you’re unsure how to make a decrease, check the video below.
Crochet Sleeve Ribbing
Chain 9. Crochet the sleeve ribbing in the same way as the bottom and front edges of the cardigan.
Row 1: Crochet single crochets in all the chain stitches, starting in the second chain. Skip the first stitch on the edge of the cardigan. Crochet 2 slip stitches in the next 2 stitches. Crochet 1 chain stitch and turn. Total of 8 single crochets and 2 slip stitches.
Row 2: Skip the slip stitches. Crochet single crochets in the back loop up the ribbing. Turn. Total of 8 single crochets (on the ribbing). Crochet 1 chain stitch and turn.
Row 3: Crochet single crochets in the back loop until you reach the edge. Crochet slip stitches in the next 2 stitches on the edge. Crochet 1 chain stitch and turn. Total of 8 single crochets (on the ribbing).
Row 4: Repeat Row 2-3. Don’t cut the yarn.
When you have crocheted around the entire sleeve, you will join the ribbing edges together. This can be done with a crochet hook or a needle. Below, I explain how you can sew the ribbing edges together:
How to sew the ribbing edges together:
Sewing through the top of the seam on the edge helps prevent distortion and creates a neater appearance on the ribbing. Pick up the back loop and align it with the stitch on the opposite side. Continue across and sew through the same stitch. This will push up the tops of the stitches and keep the ribbing in place, with no visible seam. The needle will go under the two loops at the top of the stitch. Continue across until the seam is sewn securely. Sew through the two stitches at the edge. Tie a knot and sew the end in, weaving it neatly between the stitches. Fasten off, cut the yarn, and hide the end.
You’re finished! 🙂
CROCHET TERMS
Now it's time to crochet a lovely sunflower cardigan! 🌻
Information
A granny square crocheted in MYO Basic wool with a 5 mm crochet hook measures 20 cm wide/high for size S.
For size M, it measures 22 cm wide/high.
For size L, 23 cm wide/high.
For size XL, 24 cm wide/high.
In the instructions, I suggest adding extra outer round/s to the granny squares for sizes M and L:
- For size S: crochet 1 outer round
- For size M: crochet 2 outer rounds
- For size L: crochet 3 outer rounds
- For size XL: I recommend switching to a 6 mm crochet hook and following the same pattern as for size L.
The sizes are a tight fit, so if you prefer a looser fit or an oversized look, we recommend going up a few size and (or) using a crochet hook one size larger while still following the instructions for your chosen size.
If the sleeve part feels too short, you can crochet two additional squares for each sleeve or add a few extra rounds of double crochet around the sleeve ends before working the cuff.
Cardigan measurements:
Yarn consumption:
Abbreviations
MR = magic ring
ch = chain stitch
sl st = slip stitch
sc = single crochet
hdc = half double crochet
dc = double crochet
tr = treble crochet
blo = back loop only
ch sp = chain space
dc group = double crochet group
blo = back loop only
rep = repeat
puff = puff stitch
Puff stitch:
Yarn over, insert the hook into the stitch, yarn over and pull up a loop. Repeat this three times (you will have 7 loops on the hook). Yarn over and pull through all loops on the hook. Chain 1 to secure the puff stitch.
How to crochet a cluster - 3-Treble Cluster Stitch / Cluster:
Yarn over twice, insert the hook into the “hole,” yarn over and pull up a loop. *Yarn over and pull through 2 loops on the hook, yarn over and pull through 2 loops again*. Repeat from * to * two more times (a total of 3 partial trebles). You will have 4 loops on the hook. Yarn over and pull through all 4 loops.
Pattern
The following instructions for rounds 1–5 apply to all sizes (S, M, L, XL).
Round 1 (light brown): Begin with a MR. Ch 3 (counts as first dc), make 15 dc into the ring. Join with a sl st to the 3rd ch at the beginning of the round. (16) Fasten off and weave in the end.
Round 2 (peach): Join yarn with a sl st in any stitch from the previous round. Ch 2, make 1 puff stitch in the same stitch (don’t forget to ch 1 at the end of the puff). Work *1 puff stitch + ch 1* in each stitch around. Join with a sl st to the 2nd ch at the beginning of the round. 16 puff stitches total. Fasten off and weave in the end.
Round 3 (yellow): Join yarn with a sl st into any ch-1 space from the previous round. Ch 4. Now we will work cluster stitches. The first cluster is slightly different due to starting with ch 4 — so work one less partial treble than in the regular clusters. After the first cluster, *ch 2, work 1 cluster in the next ch-1 space*. Repeat the pattern between *...* all around. Join with a sl st to the 4th ch at the start of the round. 16 clusters total. Fasten off and weave in the end.
Round 4 (white): Join yarn with a sl st into any ch-2 space from the previous round. Ch 4 (counts as first tr), work 2 tr into the same space.
Now we begin the first side of the square:
In the next ch-2 space, work 3 dc.
In the next ch-2 space after that, work 3 hdc.
In the next ch-2 space, work 3 dc.
This forms the first side of the square.
Now the first corner: In the next ch-2 space, work 3 tr, ch 3, 3 tr — this creates the first corner.
Now repeat the side pattern + corner pattern 3 more times to create the remaining three sides and corners of the square. On the final corner, work 3 tr, ch 3, then join with a sl st into the 4th ch at the beginning of the round. Do not fasten off.
Round 5 (white): Work 3 sl sts to reach the first space along the side of the granny square. Ch 4 (counts as 1 dc and 1 ch), then work 1 dc into the same space.
*In the next space, work: 1 dc, ch 1, 1 dc.* Repeat this pattern across the side until you reach the first corner.
Round 5 (white, continued): In the corner space, work: 1 dc, ch 1, 1 dc, ch 2, 1 dc, ch 1, 1 dc. Repeat the side and corner pattern all the way around the square.
After completing the final corner, join with a sl st to the 3rd ch of the beginning ch-4.
For size S, fasten off and weave in the end. Make 15 more identical squares.
For size M: Repeat Round 5 1 more time.
For size L: Repeat Round 5 2 more times.
Start by joining with a sl st into the first V-space (1 dc, 1 ch, 1 dc) from the previous round. Ch 4, then work 1 dc into the same space. Repeat according to Round 5.
Work 1 V-stitch in each V-space from the previous round. In the corners, work: 1 V-stitch, ch 12, 1 V-stitch.
Make 4 more squares with the following addition (back of the cardigan):
Round 6 (white): Fasten new yarn with a sl st into the corner of the square. Ch 3 (counts as 1 dc), then work 1 dc, ch 1, 1 dc into the next V-space. Repeat this pattern along the entire side.
Finish with 1 dc in the second corner of the square. Fasten off and weave in the end.
Repeat the same process on the opposite side of the square. Work the same pattern on the opposite side.
JOINING THE SQUARES:
There are many ways to join granny squares. Below, I describe how to work a flat slip stitch join, following the method in the instructions. Of course, you can choose to crochet sc or sew the squares together if you prefer.
HOW TO DO A FLAT SLIP STITCH JOIN
- Make a slipknot and place it on your hook.
- Insert the hook into the back loop only (blo) of the corner stitch on the right square (with the front of the granny square facing you).
- Make sure your working yarn stays on the back side, then insert the hook into the blo of the same stitch on the left square.
- Yarn over and pull through all loops on the hook.
- Repeat for the remaining stitches.
Lay out the squares according to the image guide below. You can decide for yourself the order in which to join the squares. Below is a suggestion:
Start by joining along the white arrows, then continue along the blue arrows. Be sure to leave a space without joining (the size of the opening is up to you), meaning how wide the neck opening should be. In the example above, I left 10 sts from the outer edge. Finally, join along the pink arrows.
Fasten off the yarn here for the neck opening.
Finally, crochet the sides of the cardigan body and the sleeve together.
Cardigan Lower Ribbing - Preparation
Before working the ribbing itself, crochet an even number of sc stitches along the lower edge of the cardigan. Fasten off the yarn in the lower left corner of the cardigan. Crochet 1 sc in the same space. Crochet sc along the squares. When you reach the outer right edge of the cardigan, fasten off and cut the yarn.
Ribbing at the Bottom of the Cardigan
Fasten off new yarn in the first stitch you made in the previous round.
Start by crocheting 9 ch.
Row 1: Crochet sc into each ch, starting in the 2nd ch from the hook. Skip the first stitch on the edge of the cardigan. Then work 2 sl sts into the next 2 stitches. Turn. You will have crocheted 8 sc into the chain and 2 sl sts into the edge of the cardigan. Ch 1 and turn.
Row 2: Skip the sl sts you just made (on the ribbing, including the ch you turn with). Crochet sc into the blo up the ribbing again. Turn. You will have crocheted 8 sc (on the ribbing).
Row 3: Ch 1. Crochet sc into the blo until you reach the edge of the cardigan. Sl st into the next 2 stitches on the edge. Ch 1 and turn. You will have crocheted 8 sc.
Row 4: Repeat Row 2-3 and finish with Row 2. Do not fasten off the yarn. The next step is to crochet sc along the cardigan's edge/neck opening as shown on the next page.
Cardigan Front Edge / Ribbing
Continue from where you left off in the previous round (i.e., the right edge of the cardigan), and crochet around the front edge of the cardigan in the same way you worked around the bottom edge with sc.
Crochet 1 sc into the outermost stitch of the lower ribbing. Crochet 7 more sc along the ribbing. Crochet 1 sc into the space between the ribbing and the square. Continue up along the squares, around the neck opening. Note: Place 2 sc into the corner of the square when you reach the neck opening. Continue crocheting sc down the left edge of the cardigan. Crochet the last sc into the final stitch of the ribbing. Fasten off and cut the yarn.
Fasten new yarn into the first stitch you made in the previous round (right side of the cardigan). Ch 9. Crochet in the same way you worked the ribbing at the bottom of the cardigan. Continue until you reach the left side of the cardigan and its center.
Now you will make the cardigan's first buttonhole: Crochet 3 sc into the blo. Ch 2, skip 2 sc, then crochet 3 sc into the blo. Ch 1 and turn. Crochet sc into the blo. Crochet 2 sc into the ch-2 space, then crochet 3 sc into the blo.
Continue with the ribbing pattern for 12 rows. Crochet one more buttonhole. Repeat the ribbing pattern (12 rows) once more.
Crochet 1 buttonhole on the following row. Continue the ribbing pattern until you reach the bottom edge of the cardigan. Fasten off and weave in the yarn.
Place the buttons on the right side of the cardigan at the same height as the buttonholes on the left side. Attach the buttons.
Cardigan Sleeve Ribbing
Fasten the yarn into a corner (the ch-2 space) of the outermost stitch of the granny square on the sleeve. For the first round, we will crochet sc around the sleeve and decrease at the opening. You can decide how large you want the hand opening to be. The example here gives a suggestion that fits all sizes.
Round 1: Ch 1. 1 sc into the same space. 2 sc together in the next 2 stitches. 1 sc into the next stitch. Repeat around. Sl st into the first stitch of the round.
Crochet Sleeve Ribbing (same as the bottom edge and front edge of the cardigan)
Row 1: sc into each ch, starting in the 2nd ch from the hook. Skip the first stitch on the edge of the cardigan. 2 sl sts into the next 2 stitches. Ch 1 and turn. You will have crocheted 8 sc and 2 sl sts.
Row 2: Skip the sl sts. Sc into the blo up the ribbing again. Turn. You will have crocheted 8 sc (on the ribbing). Ch 1 and turn.
Row 3: Crochet sc into the blo until you reach the edge. Sl st into the next 2 stitches on the edge. Ch 1 and turn. You will have crocheted 8 sc.
Row 4: Repeat Row 2-3. Do not fasten off the yarn.
Finishing the Sleeve Ribbing: When you have crocheted around the entire sleeve, join the edges of the ribbing together. You can do this with your crochet hook or a needle.
To sew the ribbing edges together:
Sew through the top of the stitch on the edge to prevent distortion and create a cleaner look on the ribbing. Pick up the blo and align it with the stitch on the opposite side. Continue across and sew through the same stitches. This will push the top of the stitch and continue to shape the ribbing so that no visible seam shows. The needle should go under the two loops at the top of the stitch. Continue across until the seam is attached. Sew through the two stitches at the edge. Tie a knot and sew the end in, weaving it right between the stitches. Fasten off, cut the yarn, and hide the end.
You are finished!
The rights to this pattern belong to MYO Make Your Own. The pattern or its pictures may not be copied, shared or resold either in parts or in its entirety, but you may sell items you have crocheted from this pattern. If you have questions about the pattern, contact MYO at hello@makeyourown.se.
%20(5).jpg)
Share your creations with us
Thank you!
Your comment was sent!