
Slipover "Ingrid"
Crochet a warm slipover in wool.
Stay warm in the office, on the sofa or with when hanging out with friends. This nice and classic slipover is great for both work and home. This is a perfect project for those who are beginners and want to try making a piece of clothing. You can easily change the size of the slipover to suit you. You will need MYO Basic wool and a 6 mm crochet hook. The color of the picture is “cacao”. Other good accessories to have are tape measure, needle and markers.
Yarn Consumption: Approx 350g for size M. Yarn consumption is depending on what size you want and how tight you crochet.
Note that we in this instruction uses videos from out technique library. If you are looking for a full instruction video for a crocheted vest, we suggest the vest Hedvig


Here's how to do it
This is the perfect project for the beginner who wants to try making a piece of clothing. First, a front and a back piece are crocheted, which are then crocheted together. When the pieces are assembled, the ribbed edge is added at the neckline, at the shoulders and at the bottom edge of the slipover. This slipover is easy and fun to make as it goes pretty fast. The number of stitches in the instruction text below results in size M but it is easy to create exactly the size you want using a tape measure. One tip is to measure the size of a sweater you have at home that sits the way you want it, and copy those measurements. Good luck! /Johanna H
%20(4).jpg)
This is what you need:
Here you can directly purchase the material for the product. Please note that the instruction is digital and appears here on the page (no written instruction).


.jpg)
Your next favorite project is waiting
Get access to this pattern and over 300 other beginner-friendly projects for crochet, knitting, and macramé.
Then 85 SEK/month. Cancel anytime.

TIP: How to get the right size for your garment
1. Make a Gauge Swatch and Measure Your Gauge
Crochet a gauge swatch using the stitch pattern specified in the pattern and measure how many stitches fit within 10 cm (4 inches). Once you know your gauge, you can calculate how many stitches you need to achieve the desired width of your garment.
How to do it: Chain enough stitches to make a swatch approximately 12–15 cm (5–6 inches) wide, then crochet at least three rows. Measure a section that is 10 cm (4 inches) wide and count the number of stitches within that section.
Once you know the number of stitches per 10 cm (4 inches), divide that number by 10 to find the number of stitches per centimeter. Then multiply this number by the desired width of your garment in centimeters. The result tells you how many stitches you need to start with to achieve the desired width.
Note: Be sure to adjust the stitch count according to the pattern instructions. Some patterns, for example, require an even number of stitches or a stitch count that is a multiple of a specific number.
2. Keep Your Crochet Tension in Mind
The size and drape of a garment—especially one made with double crochet stitches or other taller stitches—are greatly affected by your crochet tension and hook size. If you tend to crochet tightly, consider using a larger hook. This will help you achieve the correct measurements and create a fabric with a softer, more fluid drape.
Size
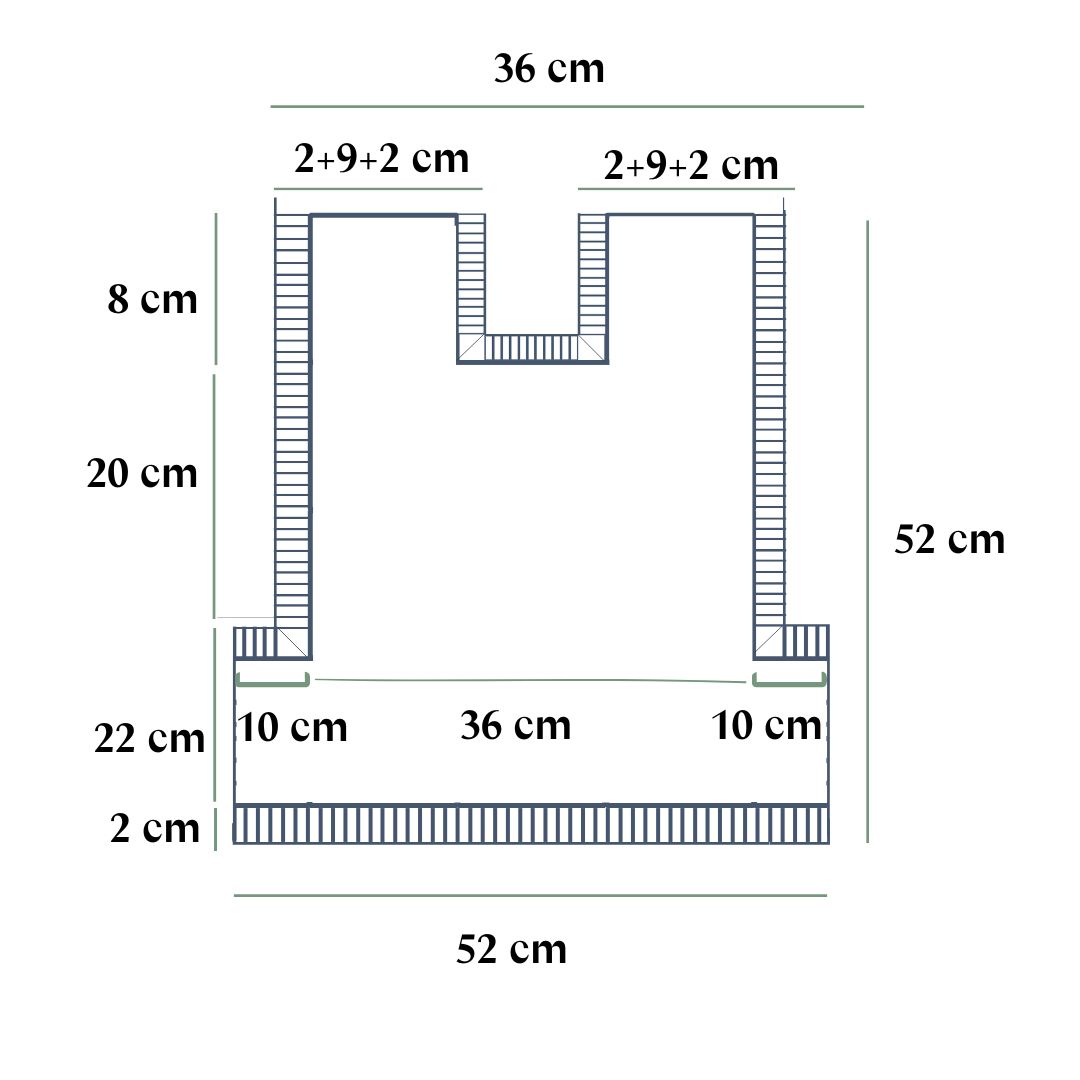
The front and back of the slipover in the picture are as wide as 50 cm, which corresponds to 50 stitches in width. It will be 100 cm in circumference on the slipover, where it is at its widest. Therefore, adjust the size with the number of chains stitches you create in the first chain. See the image below for measurements for size M as the instruction follows. All dimensions can be easily adjusted by adding or removing the number of double crochets/stitches. One double crochet corresponds to approximately 1 cm in width. One tip is to measure the size of a sweater you have at home that sits the way you want it, and copy those measurements.
Step 1 Front piece
The front piece can be divided into three different parts according to picture below. Adjust the portions in width and in length for the best fit. Remember that on the chest and shoulder part you need to think in about 1-2 cm more in width per side for the ribbed edge. The chest measures 32 cm without the ribbed edge and 35 cm with the edges.

LOWER CHEST PART (ROW 1-17)
Chain up the number of chain stitches you want + 3 chains (50+3). in a few rounds, 1 chain will equal approx. 1 cm. Do not measure directly after the chain as it will be misleading. Henceforth, the text will start from 50 stitches in width across the entire chest. Customize that figure according to what you want. If you are not sure how to crochet a slip knot or chain stitches, see below videos.
Row 1: Skip the first 4 stitches, they will correspond to the first double crochet. Make a double crochet in the 5th stitch from your crochet hook. Now you have made 2 double crochet in total. If you are not sure how to crochet a double crochet, see below video.

Keep making one double crochet in each chain so that you have a total of 50 double crochets. Chain 3 and turn. Chain 3 count as the first double crochet on the next row.

Round 2-17: Instead of going down with the needle in the stitch, i.e. between the 2 lines of the double crochet on the row below (which you usually crochet in), go down with the needle between the middle of the double crochet (further down). Crochet a double crochet as usual. Now you have 2 double crochet. Continue. Make sure you have 50 double crochet after each row.


Repeat until you have a total of 17 rows of double crochets. After about 3 rows, check that the width of the piece is the desired measurement, in this case 50 cm. After 17 rows, cut the yarn and pull through the yarn.
CHEST PART (ROW 18-32)
Lay the piece in front of you with the yarn end on row 17 to the right. Put a yarn marker (No. 1) between double crochet 8 and 9, counting from right to left. If you are crocheting another size, remember that you should have the same amount of holes between the edges and your marker.

Start from the left side and put a marker between double crochet 9 and 10 (to the right) (No. 2). You should then have 33 double crochet between your markers.

Row 18: Make a loop around your needle. Go down with the needle between double crochet 9 and 10 (in the gap to the left of marker No. 1). Chain 3. This counts as the first stitch on row 18. Continue making 31 double crochets until you arrive at the gap just before marker #2. You should then have 32 double crochet in total between the markers. Chain 3 and turn. Continue crocheting 32 double crochet in width for a total of 15 rows (18-32). Do not cut the yarn. Chain 3. If you choose to have a number of stitches other than 17: Strive to have as many gaps (not number of double crochet) before as after the breast portion. This is to make the breast part sit in the middle.
SHOULDER PART (ROW 33-37)
Continue in the same way as before but now it will be only 10 double crochet in width. Repeat 5 rows in total. Cut yarn. Now one shoulder is ready. Make a loop around the hook and go through the top loop of the double crochet (note not between the double crochets). This is the first double crochet, see picture below.

Then do the second double crochet on the row below and continue until you have a total of 10 double crochets. Between the shoulders you should be able to count up to 13 double crochets (12 spaces between the double crochets).

Repeat until you have 5 rows total and your shoulders look the same. Cut the yarn.
STEP 2 - Back part
The back piece should be crocheted in the same way as the front piece except that the chest part is longer and the shoulder parts are shorter, see picture below. Instead of crocheting the chest section in 15 rows, it is crocheted in 19 rows. The shoulder sections will be only 1 row instead of 5 rows. Otherwise, do exactly the same as on the front. See chart for number of rows.

When you're done, it should look like this:

STEP 3 - Crochet around
You should crochet a row of single crochet around all sides of the front and back piece. If you are not sure how to crochet single crochet then see below video. Start at the bottom right corner (where you have a yarn end) and crochet a round around the piece. Note that at the corners at row 17/18 it should be filled in with a wedge so that the curve becomes rounder. See instruction and photos below. In the other corners, 3 stitches are crocheted in the same stitch. Start with a loop around the crochet hook and attach to the corner.


Then start crocheting single crochet at the very first edge. Try to find stitches in the double crochet instead of going around the whole double crochet, see picture.

Make about 2 single crochet per double crochet, trying to make the piece turn out straight. That is, do not do too many or too few so that the side bends. Repeat the number you do on the first side (row 1-17) on the other 3 sides (row 1-17). These 4 sides should then be crocheted together and a matching number of stitches will make it look better when attaching together. The number of stitches you have is less important, the importance is that the four sides have the same number. When you reach the first corner, make 3 stitches in the corner and continue around.

Crochet until you have 2 stitches left before the marker.

Now you should start making the first wedge in the “armpit”. Make a half double crochet in the next stitch, then a double crochet in the stitch after, and in the stitch with the marker, make a treble crochet. If you are not sure how to crochet a half double crochet or a treble crochet, see below videos.

Do one more treble crochet in the next gap (the same one that lap 18 starts in).

Make a double crochet in the first double crochet on row 18. Then make a half double crochet in the next double crochet in the row above.

Continue to crochet single crochet all the way up to the shoulder, in the same way as before. Now you do not need to keep track of the number of stitches, but aim for the side to be straight. In the corners, make 3 single crochet in the same, except for the “lower” corners of the neckline, where crochet one stitch in each side without increase.

When you arrive at the next “armpit”, make one more wedge. You do it the same way as before but backwards as you will be crocheting from top to bottom this time instead of bottom up.

After the “armpit” comes the lower chest again. Remember to try to match the number of stitches that you made on the first side of the torso.

Crochet all the way around until you arrive at your first stitch. Crochet 2 more in the same stitch to get three in the corner. Cut the yarn and fasten off. Do the same on the front and back cover.

STEP 4 - Crochet the pieces together
You should crochet the pieces together on the lower chest part (where you made the same number of stitches), as well as over the shoulders. This method provides a relatively flat seam that allows the seam not to stand up too much. It can be a good idea to start by crocheting both shoulders together first and then the lower chest part. When finished with the lower chest part seam, it can transition directly into the rib. The text below will illustrate the seam and the same technique applies to the shoulders. There are different ways to crochet, see the below video if you are unsure. Note that we crochet slip stitches instead of single crochet, as shown in the video below.
Do this:
Place the pieces next to each other with the nice sides up. Make a slip knot. Start at the bottom corner and go through a stitch on both pieces. Pick up the slip knot and pull through the loops. Pick up yarn and pull through, now you have a start.


A tip to make the stitch more flat is to hold the yarn under and between the pieces in the way shown in the picture. Enter through the first front loop only (the loop that is down towards the table, see picture). Then go through the back loop only of the second piece (the loop that is down towards the table, see picture). Make a wrap with the yarn around the needle and pull through both loops (a slip stitch).


Repeat in this way. Go through the top piece first and then the bottom piece and make a slip stitch. Constantly hold the thread between the pieces and down along the table/under the pieces.

You can also hold the pieces together in this way. If you happen to have made an uneven number of stitches so that you get one to much on the end, then go through one stitch on one side and two of the other side, before pulling the yarn through. When it's done, it looks like this. If you started by crocheting the shoulders together, now you can make ribs right after finished with attaching the slipover and therefore do not need to cut off and fasten the thread.


STEP 5 - Crochet ribbed edge
Now it's time to crochet the ribbed edges. If you want your edge with more elastic, you can choose to go down one size on the crochet hook. The ribbed edges of the pictures are made in the same crochet hook as the other parts of the slipover (crochet hook 6). All three edges are crocheted using the same technique and with the same number of stitches (the width of the rib). Here you can completely choose the number of stitches that suits you to get the width you want.
How to crochet a ribbed edge:
Always start the rib at one edge/side of the slipover and avoid the middle of the pieces as you may see a joint. The shoulder rib starts where the torso seam ends. Continue with the loop that you have after the seam. If you have cut off the thread from the seam, you can make a slip knot and go through the edge at the seam, making a start there.
Step 1: Make a chain with the number of chain stitches you wish +1, in this example 3+1 stitches (4 pieces).

Step 2: Skip the first chain and crochet 3 single crochets back along the chain down towards the slipover. Make 2 slip stitches in the hem of the shirt. Turn the shirt over.

Step 3: Skip the 2 slip stitches you just made and crochet 3 slip stitches in back loop only (the one furthest from you). Chain 1. Turn the shirt over. If you are not sure which is the back loop only, see below video.


Step 4: Skip the chain, crochet 3 single crochets in the back loop only (the one farthest from you). Make 2 slip stitches in the hem of the sweater, turn the sweater over.


Repeat steps 3 and 4 until you are back at the start. Note that when you have the front of the slipover up and crochet against the slipover, you make single crochets, and when you have the back side up and crochet away from the edge, you make slip stitches. Check that you have continued 3 stitches in width from time to time, it is easy to lose a stitch after a few rows and then the edge will be skewed.
Closing
Make a slip stitch in the first stitch of the sweater where you started.


Now you should crochet the two ends together with slip stitches. You do this by laying the ends next to each other and crocheting through the bow layers at the same time. Cut the yarn and attach the thread to the inside of the ribbon/slipover.

Once you have made the ribs in the same way for the neckline and the lower edge as well as fasten all the yarn tails, your slipover is ready! We recommend blocking your slipover, it's not a must but it gets a straighter shape and better fit. See step 10.
If you don't want to block, GOOD job with your slipover and we hope you are happy with the result :)
BLOCK
You can block in many different ways. Here I will explain a simple way to do it. What you need are needles and a substrate to attach the needles to. There is special blocking equipment to buy but you usually have something at home that you can use. I use a yoga mat, but a steadier sofa cushion also goes well.
1: Soak the garment in water. You can choose to wash the garment in wool detergent if you have it. The garment may appear soaked just a few minutes after you put it in water, but the innermost fibers need a little longer.
2: Press out as much water as possible. You can wrap the garment in a towel and press as much as you can. Avoid twisting the garment.
3: Drag and shape the garment to the desired size.
4. Stick the needle into the desired shape. Be sure to put needles in the corners and along the edges to avoid C-shapes along the edge. You may also need to attach some needles along the neckline as well to get a desired shape.
5. Allow to dry completely before removing the needles. Takes 1-2 days.
6. Finished!
Explanation Using US Crochet Terms
This part of the instructions consists only of crochet terminology. If you need help along the way, see the simpler section.
Abbreviations
sk = skip
st = stitch
ch = chain
dc = double crochet
hdc = half double crochet
tr = treble crochet
sl st = slip stitch
sc = single crochet
TIPS — Getting the Right Size for Your Garment
1. Make a gauge swatch and measure your gauge
Crochet a swatch using the technique specified in the pattern and measure how many stitches fit into 10 cm (4"). Using your gauge, you can then calculate how many stitches you need to get the desired width of the garment.
Here’s how: Chain approximately 12–15 cm (5–6") and crochet at least three rows. Then measure an area that is 10 cm (4") wide and count how many stitches fit within that area.
Once you have counted the number of stitches in 10 cm (4"), divide that number by 10. This gives you the number of stitches per centimeter. Then multiply this number by the width in centimeters you want your project to be. The result shows how many stitches you need to chain to achieve the desired width of the garment.
Note! Adjust the number of stitches according to the instructions in the pattern. Some patterns, for example, require an even number of stitches or that the stitch count be divisible by a certain number.
2. Consider how tightly or loosely you crochet
Clothing, and especially garments containing double crochet or other “looser” stitches, are greatly affected by both your crochet tension and your choice of hook. If you crochet tightly, it may be a good idea to go up a hook size to achieve the correct measurements and a softer drape.
Size
The front and back pieces of the slipover shown in the picture are 50 cm (20") wide at their widest point, which corresponds to 50 stitches in width in our example. This makes the slipover 100 cm (39.5") in circumference at its widest point.
It is a good idea to make a gauge swatch as explained above so that you can check whether 50 stitches also equals 50 cm (20") for you.
Adjust the size by changing the number of chains you make in the foundation chain. See the image below for the measurements for size M, which the instructions follow.
The measurements may vary depending on how tightly or loosely you crochet, which is why we recommend reading the tips above if you have not already done so.
All measurements can easily be adjusted by adding or removing double crochets/stitches. One double crochet corresponds to approximately 1 cm (⅜") in width. Check this on your gauge swatch.
One tip is to measure a sweater you already own that fits the way you want it to and copy those measurements.
Front Piece
The front piece can be divided into three different sections, as shown in the diagram below. Adjust the sections in width and length for the best fit.
Remember that in the chest and shoulder sections, you need to allow for approximately 1–2 cm (⅜–¾") of additional width on each side for the ribbed edging.
The body section measures 32 cm (12½") without the ribbed edging and 35 cm (13¾") including the edging.
Keep in mind that these measurements are for size M. If you want a larger or smaller size, add or remove chains from the body section while following the shape shown in the image.
Body section (Rows 1–17)
Chain the number of stitches you want + 3 ch (50 + 3). Keep in mind that 1 ch will correspond to approximately 1 cm (⅜") after a few rows. Do not measure immediately after making the foundation chain, as this can be misleading. From this point onward, the instructions will be based on 50 stitches across the entire body section. Adjust this number according to the size you want.
Row 1: Sk 4 sts (this corresponds to the first dc). Make 1 dc in the 5th ch from the hook (2 dc total). Work 1 dc in each ch across (50 dc). Ch 3, turn. The ch-3 counts as the first dc of the next row.
Rows 2–17: Instead of inserting your hook into the stitch, between the two top loops of the dc in the row below (where you would normally crochet), insert your hook between the posts of the dc stitches, further down. Work 1 dc (you now have 2 dc). Repeat in the same way across the row. You should have 50 dc after each row.
Repeat until you have a total of 17 rows of dc. After approximately 3 rows, check the width of the piece to make sure it is the desired measurement — in this case, 50 cm (20"). Fasten off.
Chest section (Rows 18–32)
Place the piece in front of you with the yarn tail from Row 17 on the right. Place a stitch marker (No. 1) between dc 8 and 9, counting from right to left.
Then start from the left side and count over to dc 9 and 10 (toward the right). Place a stitch marker between these stitches (No. 2). You should now have 33 sts between your markers.
Row 18: Start between dc 9 and 10 (in the space immediately to the left of marker No. 1). Ch 3 (counts as the first st of Row 18). Continue making 31 more dc until you reach the space immediately before marker No. 2. You should now have 32 sts total between the markers. Ch 3 and turn. Continue working 32 dc across for a total of 15 rows (Rows 18–32). Do not fasten off. Ch 3.
If you choose to have a different number of stitches than 17, aim to have the same number of spaces (not the number of sts) before and after the chest section. This will ensure that the chest section is centered.
Shoulder section (Rows 33–37)
Continue in the same way as before, but now work only 10 sts across. Repeat for a total of 5 rows, then fasten off.
One shoulder is now complete. Begin by inserting your hook through the top loop of the outermost dc (NOTE: not between the stitches). This is the first st.
Then make the 2nd st between sts 1 and 2 on the row below, and continue until you have a total of 10 sts.
Between the shoulders, you should be able to count 13 sts (12 spaces between the sts).
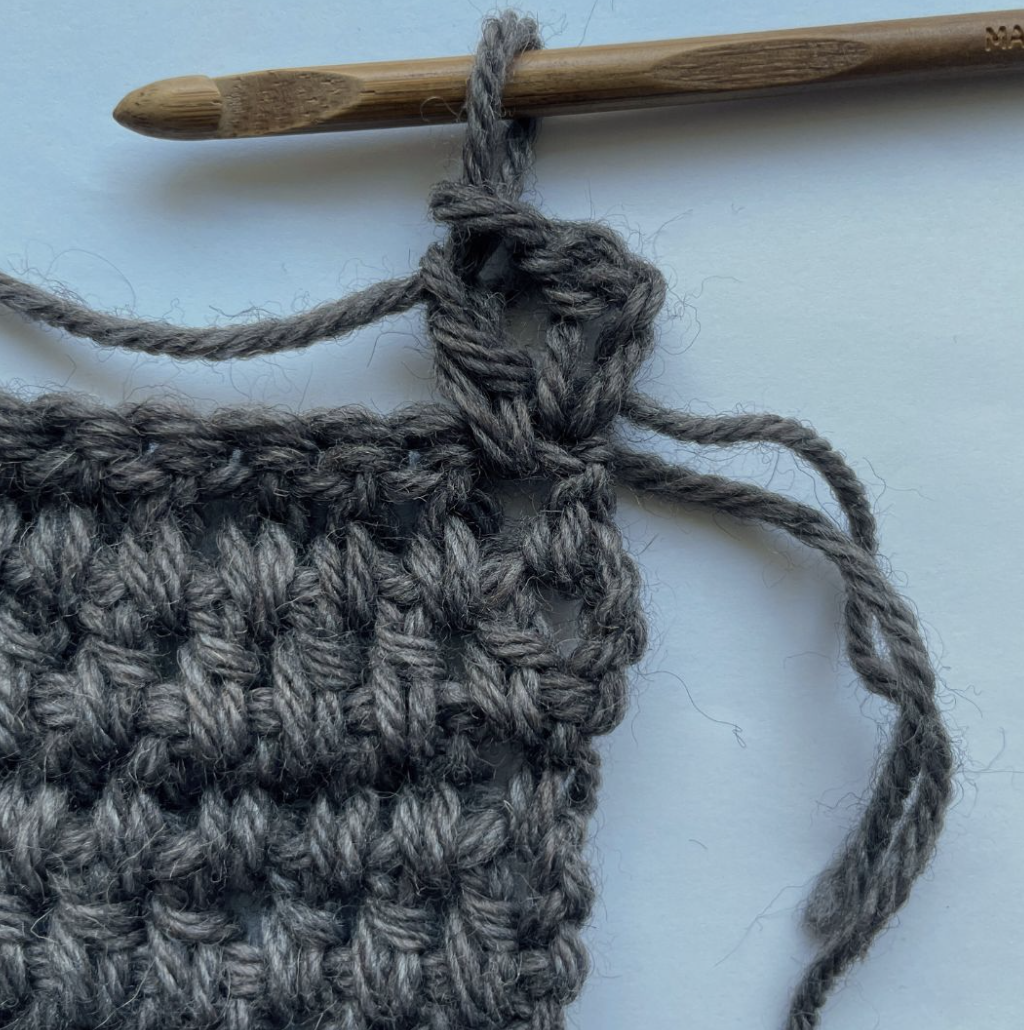
Repeat until you have a total of 5 rows and both shoulders look the same. Fasten off.
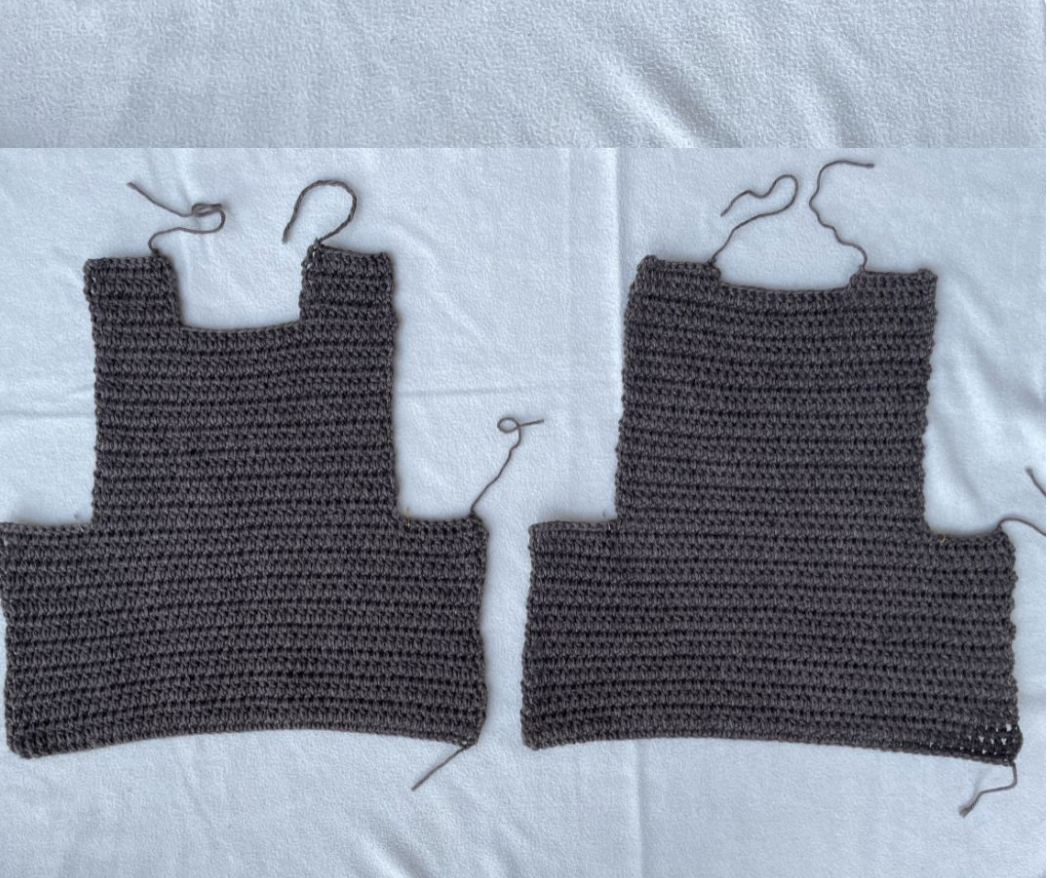
Back piece
The back piece is crocheted in the same way as the front piece, except that the chest section is longer and the shoulder sections are shorter. See the diagram.
Instead of crocheting the chest section for 15 rows, crochet it for 19 rows.
The shoulder sections are only 1 row instead of 5 rows.
Otherwise, follow the exact same instructions as for the front piece. See the diagram for the number of rows.
When you are finished, it should look like this:
Crochet around the edges
Now crochet one round of sc around all sides of both the front and back pieces. Start in the lower right corner (where you have a yarn tail) and crochet all the way around.
Note that at the corners between Rows 17 and 18, you need to fill in a so-called wedge so that the curve becomes more rounded. In all other corners, work 3 sc into the same stitch.
Then begin crocheting sc along the first edge. Tip: Try to find the stitches in the dc rather than crocheting around the entire post of the dc.
Work approximately 2 sc per dc, and try to keep the piece straight. In other words, do not make too many or too few stitches, as this will cause the side to curve.
The number of stitches you make on the first side (Rows 1–17) should be repeated on the other 3 sides (approximately 1–17). These 4 sides will later be joined together, so matching stitch counts will make joining easier.
The exact number is less important, as long as all 4 sides have the same number of stitches.
When you reach the first corner, work 3 sc into the corner and continue around.
Crochet until you have 2 stitches remaining before the marker.
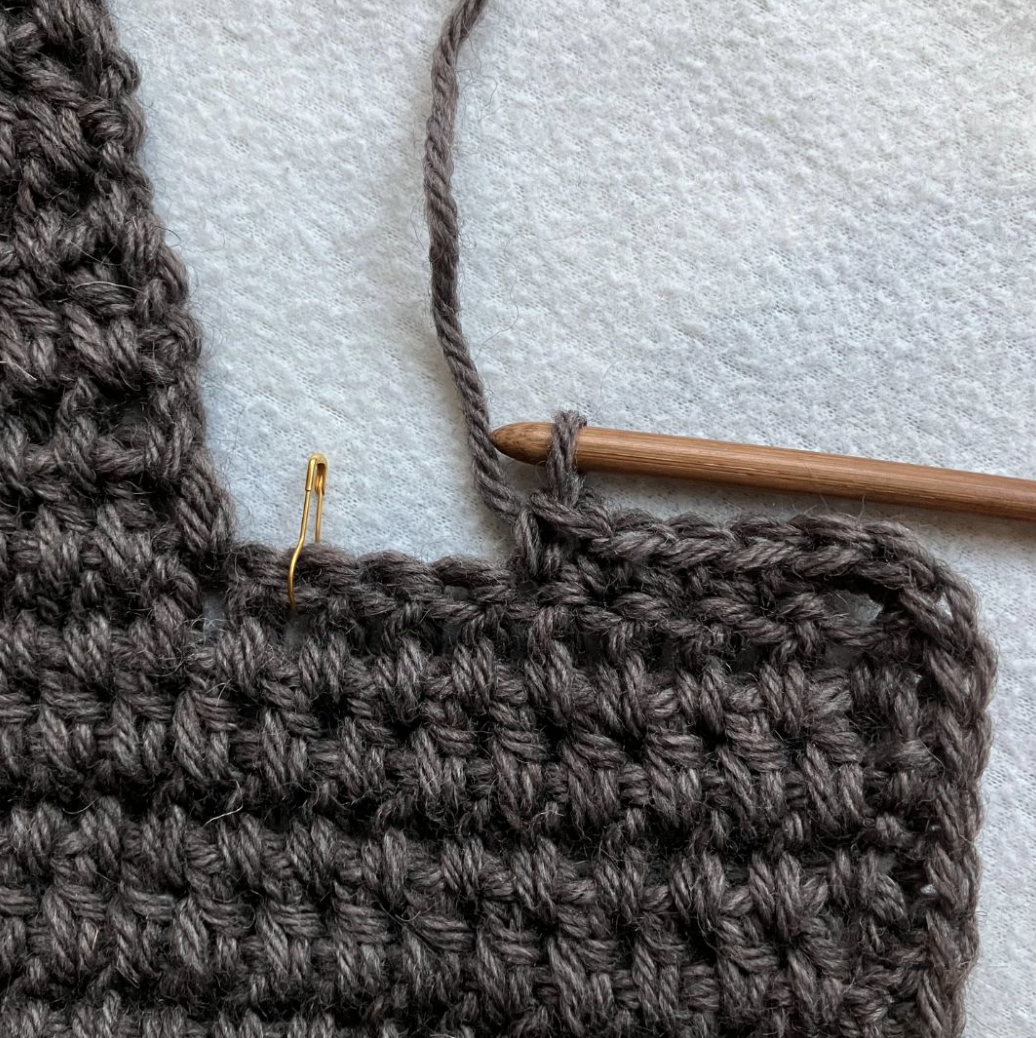
Now you will make the first wedge in the “armhole.” Make 1 hdc in the next st, then 1 dc in the next st. In the st with the marker, make 1 tr.

Work 1 tr in the next space (the same space where Row 18 begins).

Work 1 dc in the first st of Row 18 (the chain). Then make 1 hdc in the next st on the row above.
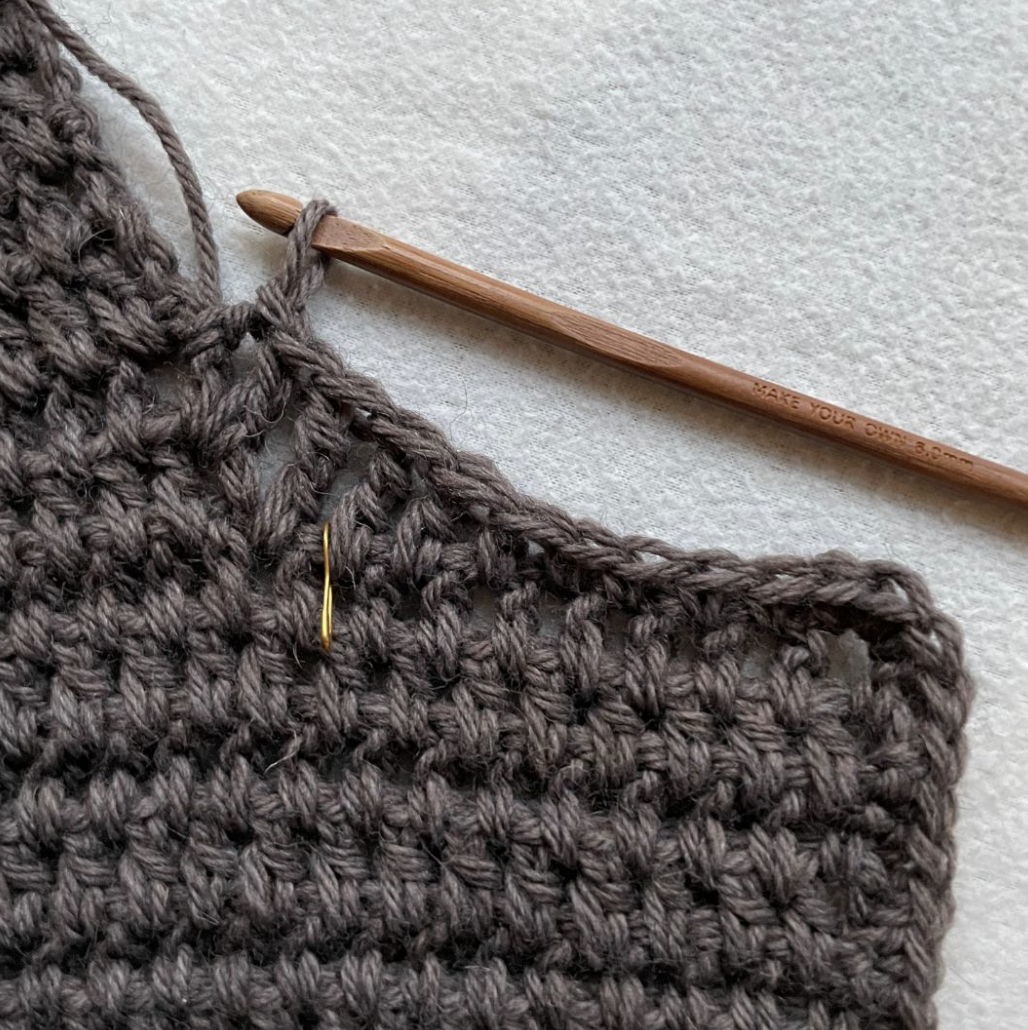
Continue working sc all the way up toward the shoulder, in the same way as before. You do not need to keep track of the stitch count now, but aim to keep the side straight.
At the corners, work 3 sc in the same stitch, except at the “lower” corners of the neckline, where you work 1 stitch into each side without increasing.

When you reach the next “armhole,” make another wedge. Do this in the same way as before, but in reverse, since you are now crocheting from the top down instead of from the bottom up.
After the “armhole,” you will reach the body section again. Remember to try to match the number of stitches you made on the first side of the body section.
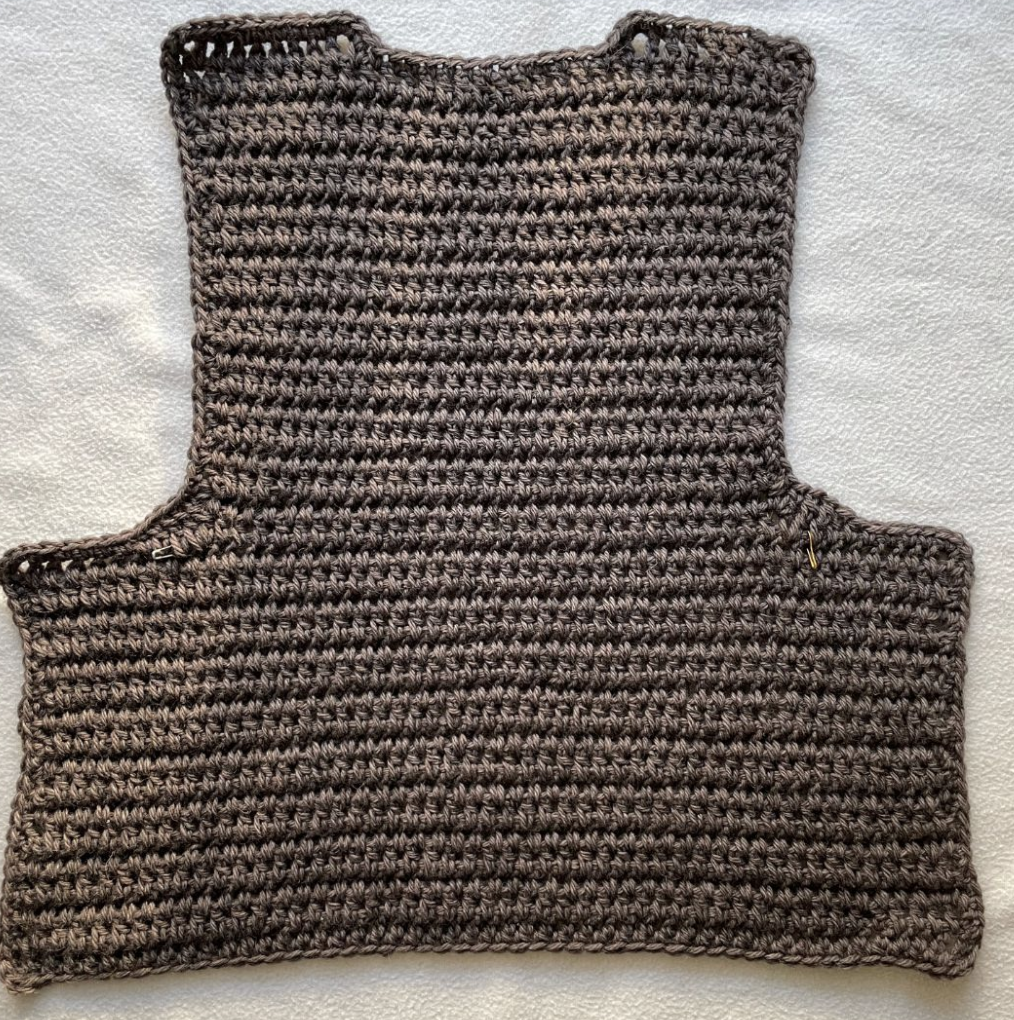
Continue crocheting all the way around until you reach your first stitch. Work 2 more sc in the same stitch to make 3 sc in the corner. Fasten off and weave in the end. Do the same for both the front and back pieces.
Joining the pieces
Now you will crochet the pieces together along the sides of the body section (where you made the same number of stitches) and across the shoulders.
This method creates a relatively flat seam, so the seam does not stick out or become too bulky.
It can be helpful to start by joining both shoulders first and then join one body section at a time. Once the body seam is finished, you can continue directly into the ribbing.
The instructions below demonstrate the body seam, but the same technique applies to the shoulders. There are several ways to join crochet pieces, so if you prefer to crochet or sew them together using another method, that is also fine.
Here's how:
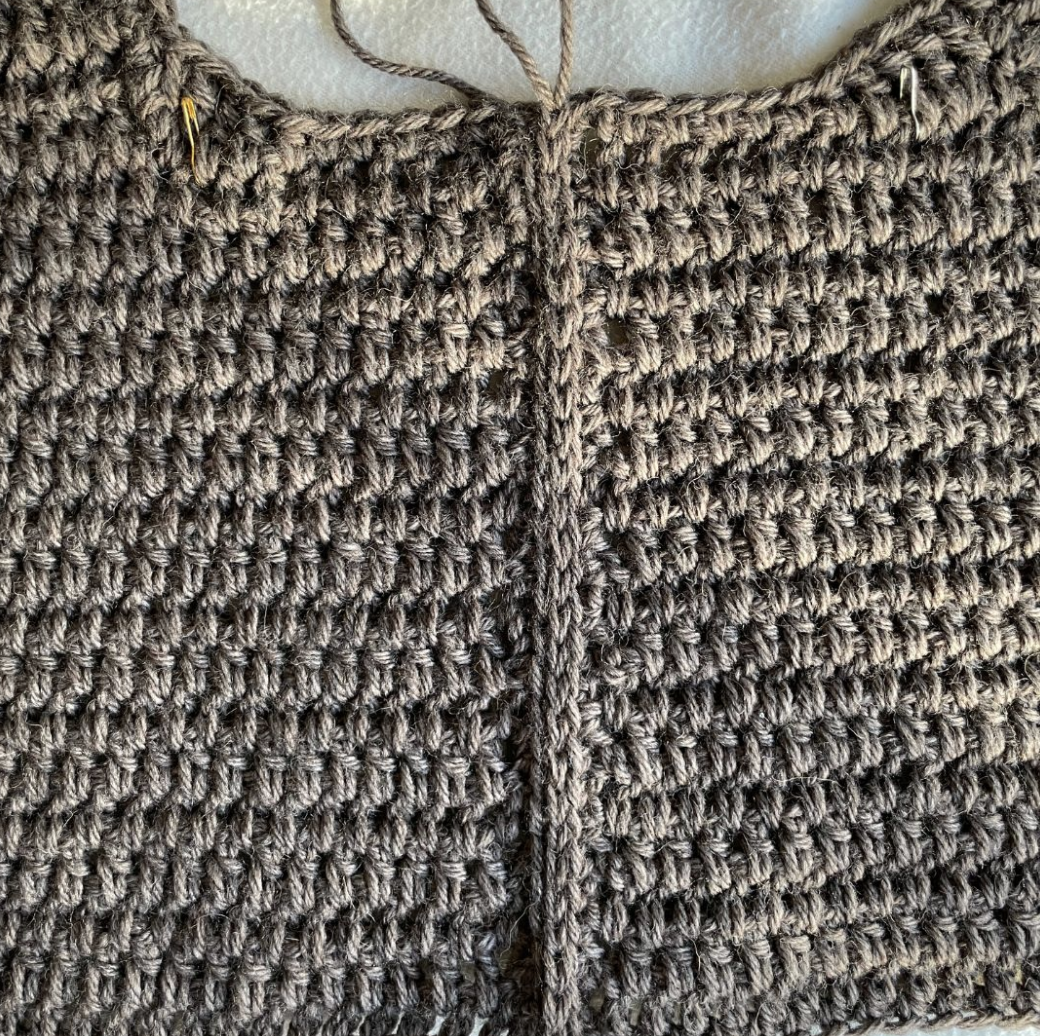
Place the pieces next to each other with the right sides facing up. Start at the bottom corner and insert your hook through one loop of each piece.
A tip for getting a flatter seam is to keep the yarn underneath and between the pieces, as shown in the image.
Insert your hook through the first front loop (the loop closest to the table). Then insert your hook through the back loop of the second piece (the loop closest to the table) and make 1 sl st.
Repeat in the same way. Go through
Ribbed edging
Now it is time to crochet the ribbed edges. If you want your edging to have more stretch, you can go down one hook size. The ribbed edges shown in the pictures were made using the same hook as the rest of the slipover (6 mm). All 3 edges are crocheted using the same technique and the same number of stitches (the width of the ribbing). Here you can choose whatever number of stitches works for you to achieve the width you want.
How to crochet the ribbed edging:
Always start the ribbing at an edge/side of the slipover and avoid starting in the middle of the pieces, as a seam may be visible. The shoulder ribbing starts where the body seam ends. Continue with the loop you have after the seam. If you have fastened off the seam, make a slipknot, insert your hook into the edge at the seam, and start there.
Step 1: Chain the desired number of stitches + 1. In this example, 3 + 1 ch = 4 ch.
Step 2: Skip the first ch, then work 3 sc back along the chain toward the vest. Make 2 sl st into the edge. Turn the vest.
Step 3: Skip the 2 sl sts you just made and work 3 sl st through the back loop only (the loop furthest away from you). Ch 1, turn.
Step 4: Skip the ch, work 3 sc through the back loop only. Make 2 sl st into the edge, turn.
Repeat Steps 3 and 4 until you have worked all the way around.
Note that when the front of the sweater is facing up and you are crocheting toward the sweater, you work sc. When the back is facing up and you are crocheting away from the edge, you work sl st.
Check occasionally that you still have 3 stitches across the width of the ribbing. It is easy to accidentally lose 1 stitch after several rows, which will cause the edging to become crooked.
Finishing
Make 1 sl st into the first stitch of the vest where you began.
Now join the two ends together with sl sts. Place the ends next to each other and crochet through both layers at the same time.
Fasten off and weave in the yarn end on the inside of the ribbing/sweater.

Once you have made the ribbing around the neckline and bottom edge in the same way and woven in all the ends, your slipover is finished!
We recommend blocking your slipover. It is not required, but it will give the garment a straighter shape and better fit. See Step 10.
If you do not want to block it, GREAT job on your slipover, and we hope you are happy with it! :)
Blocking
There are many different ways to block a garment. Here is one simple method.
You will need pins and a surface that you can stick the pins into. There is special blocking equipment available to buy, but you can often use something you already have at home. I use a yoga mat, but a firm sofa cushion also works well.
1: Soak the garment in water. You can choose to wash the garment with wool detergent if you have some. Let it soak for a while so that the innermost fibers become thoroughly wet. The garment may appear completely soaked just a minute after placing it in water, but the innermost fibers need a little longer.
2: Press out as much water as possible. You can roll the garment in a towel and press out as much water as you can. Avoid twisting the garment.
3: Stretch and shape the garment to the desired size.
4: Pin it into the desired shape. Be careful to place pins in the corners and along the edges to prevent the edges from forming C-shapes. You may also need to place a few pins around the neckline to achieve the desired shape.
5: Allow it to dry completely before removing the pins. This takes 1–2 days.
6: Finished!
The rights to this pattern belong to MYO Make Your Own. The pattern or its pictures may not be copied, shared or resold either in parts or in its entirety, but you may sell items you have crocheted from this pattern. If you have questions about the pattern, contact MYO at hello@makeyourown.se.
TIP: How to get the right size for your garment
1. Make a Gauge Swatch and Measure Your Gauge
Crochet a gauge swatch using the stitch pattern specified in the pattern and measure how many stitches fit within 10 cm (4 inches). Once you know your gauge, you can calculate how many stitches you need to achieve the desired width of your garment.
How to do it: Chain enough stitches to make a swatch approximately 12–15 cm (5–6 inches) wide, then crochet at least three rows. Measure a section that is 10 cm (4 inches) wide and count the number of stitches within that section.
Once you know the number of stitches per 10 cm (4 inches), divide that number by 10 to find the number of stitches per centimeter. Then multiply this number by the desired width of your garment in centimeters. The result tells you how many stitches you need to start with to achieve the desired width.
Note: Be sure to adjust the stitch count according to the pattern instructions. Some patterns, for example, require an even number of stitches or a stitch count that is a multiple of a specific number.
2. Keep Your Crochet Tension in Mind
The size and drape of a garment—especially one made with double crochet stitches or other taller stitches—are greatly affected by your crochet tension and hook size. If you tend to crochet tightly, consider using a larger hook. This will help you achieve the correct measurements and create a fabric with a softer, more fluid drape.
Size
The front and back of the slipover in the picture are as wide as 50 cm, which corresponds to 50 stitches in width. It will be 100 cm in circumference on the slipover, where it is at its widest. Therefore, adjust the size with the number of chains stitches you create in the first chain. See the image below for measurements for size M as the instruction follows. All dimensions can be easily adjusted by adding or removing the number of double crochets/stitches. One double crochet corresponds to approximately 1 cm in width. One tip is to measure the size of a sweater you have at home that sits the way you want it, and copy those measurements.
Step 1 Front piece
The front piece can be divided into three different parts according to picture below. Adjust the portions in width and in length for the best fit. Remember that on the chest and shoulder part you need to think in about 1-2 cm more in width per side for the ribbed edge. The chest measures 32 cm without the ribbed edge and 35 cm with the edges.
LOWER CHEST PART (ROW 1-17)
Chain up the number of chain stitches you want + 3 chains (50+3). in a few rounds, 1 chain will equal approx. 1 cm. Do not measure directly after the chain as it will be misleading. Henceforth, the text will start from 50 stitches in width across the entire chest. Customize that figure according to what you want. If you are not sure how to crochet a slip knot or chain stitches, see below videos.
Row 1: Skip the first 4 stitches, they will correspond to the first double crochet. Make a double crochet in the 5th stitch from your crochet hook. Now you have made 2 double crochet in total. If you are not sure how to crochet a double crochet, see below video.
Keep making one double crochet in each chain so that you have a total of 50 double crochets. Chain 3 and turn. Chain 3 count as the first double crochet on the next row.
Round 2-17: Instead of going down with the needle in the stitch, i.e. between the 2 lines of the double crochet on the row below (which you usually crochet in), go down with the needle between the middle of the double crochet (further down). Crochet a double crochet as usual. Now you have 2 double crochet. Continue. Make sure you have 50 double crochet after each row.
Repeat until you have a total of 17 rows of double crochets. After about 3 rows, check that the width of the piece is the desired measurement, in this case 50 cm. After 17 rows, cut the yarn and pull through the yarn.
CHEST PART (ROW 18-32)
Lay the piece in front of you with the yarn end on row 17 to the right. Put a yarn marker (No. 1) between double crochet 8 and 9, counting from right to left. If you are crocheting another size, remember that you should have the same amount of holes between the edges and your marker.
Start from the left side and put a marker between double crochet 9 and 10 (to the right) (No. 2). You should then have 33 double crochet between your markers.
Row 18: Make a loop around your needle. Go down with the needle between double crochet 9 and 10 (in the gap to the left of marker No. 1). Chain 3. This counts as the first stitch on row 18. Continue making 31 double crochets until you arrive at the gap just before marker #2. You should then have 32 double crochet in total between the markers. Chain 3 and turn. Continue crocheting 32 double crochet in width for a total of 15 rows (18-32). Do not cut the yarn. Chain 3. If you choose to have a number of stitches other than 17: Strive to have as many gaps (not number of double crochet) before as after the breast portion. This is to make the breast part sit in the middle.
SHOULDER PART (ROW 33-37)
Continue in the same way as before but now it will be only 10 double crochet in width. Repeat 5 rows in total. Cut yarn. Now one shoulder is ready. Make a loop around the hook and go through the top loop of the double crochet (note not between the double crochets). This is the first double crochet, see picture below.
Then do the second double crochet on the row below and continue until you have a total of 10 double crochets. Between the shoulders you should be able to count up to 13 double crochets (12 spaces between the double crochets).
Repeat until you have 5 rows total and your shoulders look the same. Cut the yarn.
STEP 2 - Back part
The back piece should be crocheted in the same way as the front piece except that the chest part is longer and the shoulder parts are shorter, see picture below. Instead of crocheting the chest section in 15 rows, it is crocheted in 19 rows. The shoulder sections will be only 1 row instead of 5 rows. Otherwise, do exactly the same as on the front. See chart for number of rows.
When you're done, it should look like this:
STEP 3 - Crochet around
You should crochet a row of single crochet around all sides of the front and back piece. If you are not sure how to crochet single crochet then see below video. Start at the bottom right corner (where you have a yarn end) and crochet a round around the piece. Note that at the corners at row 17/18 it should be filled in with a wedge so that the curve becomes rounder. See instruction and photos below. In the other corners, 3 stitches are crocheted in the same stitch. Start with a loop around the crochet hook and attach to the corner.
Then start crocheting single crochet at the very first edge. Try to find stitches in the double crochet instead of going around the whole double crochet, see picture.
Make about 2 single crochet per double crochet, trying to make the piece turn out straight. That is, do not do too many or too few so that the side bends. Repeat the number you do on the first side (row 1-17) on the other 3 sides (row 1-17). These 4 sides should then be crocheted together and a matching number of stitches will make it look better when attaching together. The number of stitches you have is less important, the importance is that the four sides have the same number. When you reach the first corner, make 3 stitches in the corner and continue around.
Crochet until you have 2 stitches left before the marker.
Now you should start making the first wedge in the “armpit”. Make a half double crochet in the next stitch, then a double crochet in the stitch after, and in the stitch with the marker, make a treble crochet. If you are not sure how to crochet a half double crochet or a treble crochet, see below videos.
Do one more treble crochet in the next gap (the same one that lap 18 starts in).
Make a double crochet in the first double crochet on row 18. Then make a half double crochet in the next double crochet in the row above.
Continue to crochet single crochet all the way up to the shoulder, in the same way as before. Now you do not need to keep track of the number of stitches, but aim for the side to be straight. In the corners, make 3 single crochet in the same, except for the “lower” corners of the neckline, where crochet one stitch in each side without increase.
When you arrive at the next “armpit”, make one more wedge. You do it the same way as before but backwards as you will be crocheting from top to bottom this time instead of bottom up.
After the “armpit” comes the lower chest again. Remember to try to match the number of stitches that you made on the first side of the torso.
Crochet all the way around until you arrive at your first stitch. Crochet 2 more in the same stitch to get three in the corner. Cut the yarn and fasten off. Do the same on the front and back cover.
STEP 4 - Crochet the pieces together
You should crochet the pieces together on the lower chest part (where you made the same number of stitches), as well as over the shoulders. This method provides a relatively flat seam that allows the seam not to stand up too much. It can be a good idea to start by crocheting both shoulders together first and then the lower chest part. When finished with the lower chest part seam, it can transition directly into the rib. The text below will illustrate the seam and the same technique applies to the shoulders. There are different ways to crochet, see the below video if you are unsure. Note that we crochet slip stitches instead of single crochet, as shown in the video below.
Do this:
Place the pieces next to each other with the nice sides up. Make a slip knot. Start at the bottom corner and go through a stitch on both pieces. Pick up the slip knot and pull through the loops. Pick up yarn and pull through, now you have a start.
A tip to make the stitch more flat is to hold the yarn under and between the pieces in the way shown in the picture. Enter through the first front loop only (the loop that is down towards the table, see picture). Then go through the back loop only of the second piece (the loop that is down towards the table, see picture). Make a wrap with the yarn around the needle and pull through both loops (a slip stitch).
Repeat in this way. Go through the top piece first and then the bottom piece and make a slip stitch. Constantly hold the thread between the pieces and down along the table/under the pieces.
You can also hold the pieces together in this way. If you happen to have made an uneven number of stitches so that you get one to much on the end, then go through one stitch on one side and two of the other side, before pulling the yarn through. When it's done, it looks like this. If you started by crocheting the shoulders together, now you can make ribs right after finished with attaching the slipover and therefore do not need to cut off and fasten the thread.
STEP 5 - Crochet ribbed edge
Now it's time to crochet the ribbed edges. If you want your edge with more elastic, you can choose to go down one size on the crochet hook. The ribbed edges of the pictures are made in the same crochet hook as the other parts of the slipover (crochet hook 6). All three edges are crocheted using the same technique and with the same number of stitches (the width of the rib). Here you can completely choose the number of stitches that suits you to get the width you want.
How to crochet a ribbed edge:
Always start the rib at one edge/side of the slipover and avoid the middle of the pieces as you may see a joint. The shoulder rib starts where the torso seam ends. Continue with the loop that you have after the seam. If you have cut off the thread from the seam, you can make a slip knot and go through the edge at the seam, making a start there.
Step 1: Make a chain with the number of chain stitches you wish +1, in this example 3+1 stitches (4 pieces).
Step 2: Skip the first chain and crochet 3 single crochets back along the chain down towards the slipover. Make 2 slip stitches in the hem of the shirt. Turn the shirt over.
Step 3: Skip the 2 slip stitches you just made and crochet 3 slip stitches in back loop only (the one furthest from you). Chain 1. Turn the shirt over. If you are not sure which is the back loop only, see below video.
Step 4: Skip the chain, crochet 3 single crochets in the back loop only (the one farthest from you). Make 2 slip stitches in the hem of the sweater, turn the sweater over.
Repeat steps 3 and 4 until you are back at the start. Note that when you have the front of the slipover up and crochet against the slipover, you make single crochets, and when you have the back side up and crochet away from the edge, you make slip stitches. Check that you have continued 3 stitches in width from time to time, it is easy to lose a stitch after a few rows and then the edge will be skewed.
Closing
Make a slip stitch in the first stitch of the sweater where you started.
Now you should crochet the two ends together with slip stitches. You do this by laying the ends next to each other and crocheting through the bow layers at the same time. Cut the yarn and attach the thread to the inside of the ribbon/slipover.
Once you have made the ribs in the same way for the neckline and the lower edge as well as fasten all the yarn tails, your slipover is ready! We recommend blocking your slipover, it's not a must but it gets a straighter shape and better fit. See step 10.
If you don't want to block, GOOD job with your slipover and we hope you are happy with the result :)
BLOCK
You can block in many different ways. Here I will explain a simple way to do it. What you need are needles and a substrate to attach the needles to. There is special blocking equipment to buy but you usually have something at home that you can use. I use a yoga mat, but a steadier sofa cushion also goes well.
1: Soak the garment in water. You can choose to wash the garment in wool detergent if you have it. The garment may appear soaked just a few minutes after you put it in water, but the innermost fibers need a little longer.
2: Press out as much water as possible. You can wrap the garment in a towel and press as much as you can. Avoid twisting the garment.
3: Drag and shape the garment to the desired size.
4. Stick the needle into the desired shape. Be sure to put needles in the corners and along the edges to avoid C-shapes along the edge. You may also need to attach some needles along the neckline as well to get a desired shape.
5. Allow to dry completely before removing the needles. Takes 1-2 days.
6. Finished!
Explanation Using US Crochet Terms
This part of the instructions consists only of crochet terminology. If you need help along the way, see the simpler section.
Abbreviations
sk = skip
st = stitch
ch = chain
dc = double crochet
hdc = half double crochet
tr = treble crochet
sl st = slip stitch
sc = single crochet
TIPS — Getting the Right Size for Your Garment
1. Make a gauge swatch and measure your gauge
Crochet a swatch using the technique specified in the pattern and measure how many stitches fit into 10 cm (4"). Using your gauge, you can then calculate how many stitches you need to get the desired width of the garment.
Here’s how: Chain approximately 12–15 cm (5–6") and crochet at least three rows. Then measure an area that is 10 cm (4") wide and count how many stitches fit within that area.
Once you have counted the number of stitches in 10 cm (4"), divide that number by 10. This gives you the number of stitches per centimeter. Then multiply this number by the width in centimeters you want your project to be. The result shows how many stitches you need to chain to achieve the desired width of the garment.
Note! Adjust the number of stitches according to the instructions in the pattern. Some patterns, for example, require an even number of stitches or that the stitch count be divisible by a certain number.
2. Consider how tightly or loosely you crochet
Clothing, and especially garments containing double crochet or other “looser” stitches, are greatly affected by both your crochet tension and your choice of hook. If you crochet tightly, it may be a good idea to go up a hook size to achieve the correct measurements and a softer drape.
Size
The front and back pieces of the slipover shown in the picture are 50 cm (20") wide at their widest point, which corresponds to 50 stitches in width in our example. This makes the slipover 100 cm (39.5") in circumference at its widest point.
It is a good idea to make a gauge swatch as explained above so that you can check whether 50 stitches also equals 50 cm (20") for you.
Adjust the size by changing the number of chains you make in the foundation chain. See the image below for the measurements for size M, which the instructions follow.
The measurements may vary depending on how tightly or loosely you crochet, which is why we recommend reading the tips above if you have not already done so.
All measurements can easily be adjusted by adding or removing double crochets/stitches. One double crochet corresponds to approximately 1 cm (⅜") in width. Check this on your gauge swatch.
One tip is to measure a sweater you already own that fits the way you want it to and copy those measurements.
Front Piece
The front piece can be divided into three different sections, as shown in the diagram below. Adjust the sections in width and length for the best fit.
Remember that in the chest and shoulder sections, you need to allow for approximately 1–2 cm (⅜–¾") of additional width on each side for the ribbed edging.
The body section measures 32 cm (12½") without the ribbed edging and 35 cm (13¾") including the edging.
Keep in mind that these measurements are for size M. If you want a larger or smaller size, add or remove chains from the body section while following the shape shown in the image.
Body section (Rows 1–17)
Chain the number of stitches you want + 3 ch (50 + 3). Keep in mind that 1 ch will correspond to approximately 1 cm (⅜") after a few rows. Do not measure immediately after making the foundation chain, as this can be misleading. From this point onward, the instructions will be based on 50 stitches across the entire body section. Adjust this number according to the size you want.
Row 1: Sk 4 sts (this corresponds to the first dc). Make 1 dc in the 5th ch from the hook (2 dc total). Work 1 dc in each ch across (50 dc). Ch 3, turn. The ch-3 counts as the first dc of the next row.
Rows 2–17: Instead of inserting your hook into the stitch, between the two top loops of the dc in the row below (where you would normally crochet), insert your hook between the posts of the dc stitches, further down. Work 1 dc (you now have 2 dc). Repeat in the same way across the row. You should have 50 dc after each row.
Repeat until you have a total of 17 rows of dc. After approximately 3 rows, check the width of the piece to make sure it is the desired measurement — in this case, 50 cm (20"). Fasten off.
Chest section (Rows 18–32)
Place the piece in front of you with the yarn tail from Row 17 on the right. Place a stitch marker (No. 1) between dc 8 and 9, counting from right to left.
Then start from the left side and count over to dc 9 and 10 (toward the right). Place a stitch marker between these stitches (No. 2). You should now have 33 sts between your markers.
Row 18: Start between dc 9 and 10 (in the space immediately to the left of marker No. 1). Ch 3 (counts as the first st of Row 18). Continue making 31 more dc until you reach the space immediately before marker No. 2. You should now have 32 sts total between the markers. Ch 3 and turn. Continue working 32 dc across for a total of 15 rows (Rows 18–32). Do not fasten off. Ch 3.
If you choose to have a different number of stitches than 17, aim to have the same number of spaces (not the number of sts) before and after the chest section. This will ensure that the chest section is centered.
Shoulder section (Rows 33–37)
Continue in the same way as before, but now work only 10 sts across. Repeat for a total of 5 rows, then fasten off.
One shoulder is now complete. Begin by inserting your hook through the top loop of the outermost dc (NOTE: not between the stitches). This is the first st.
Then make the 2nd st between sts 1 and 2 on the row below, and continue until you have a total of 10 sts.
Between the shoulders, you should be able to count 13 sts (12 spaces between the sts).
Repeat until you have a total of 5 rows and both shoulders look the same. Fasten off.
Back piece
The back piece is crocheted in the same way as the front piece, except that the chest section is longer and the shoulder sections are shorter. See the diagram.
Instead of crocheting the chest section for 15 rows, crochet it for 19 rows.
The shoulder sections are only 1 row instead of 5 rows.
Otherwise, follow the exact same instructions as for the front piece. See the diagram for the number of rows.
When you are finished, it should look like this:
Crochet around the edges
Now crochet one round of sc around all sides of both the front and back pieces. Start in the lower right corner (where you have a yarn tail) and crochet all the way around.
Note that at the corners between Rows 17 and 18, you need to fill in a so-called wedge so that the curve becomes more rounded. In all other corners, work 3 sc into the same stitch.
Then begin crocheting sc along the first edge. Tip: Try to find the stitches in the dc rather than crocheting around the entire post of the dc.
Work approximately 2 sc per dc, and try to keep the piece straight. In other words, do not make too many or too few stitches, as this will cause the side to curve.
The number of stitches you make on the first side (Rows 1–17) should be repeated on the other 3 sides (approximately 1–17). These 4 sides will later be joined together, so matching stitch counts will make joining easier.
The exact number is less important, as long as all 4 sides have the same number of stitches.
When you reach the first corner, work 3 sc into the corner and continue around.
Crochet until you have 2 stitches remaining before the marker.
Now you will make the first wedge in the “armhole.” Make 1 hdc in the next st, then 1 dc in the next st. In the st with the marker, make 1 tr.
Work 1 tr in the next space (the same space where Row 18 begins).
Work 1 dc in the first st of Row 18 (the chain). Then make 1 hdc in the next st on the row above.
Continue working sc all the way up toward the shoulder, in the same way as before. You do not need to keep track of the stitch count now, but aim to keep the side straight.
At the corners, work 3 sc in the same stitch, except at the “lower” corners of the neckline, where you work 1 stitch into each side without increasing.
When you reach the next “armhole,” make another wedge. Do this in the same way as before, but in reverse, since you are now crocheting from the top down instead of from the bottom up.
After the “armhole,” you will reach the body section again. Remember to try to match the number of stitches you made on the first side of the body section.
Continue crocheting all the way around until you reach your first stitch. Work 2 more sc in the same stitch to make 3 sc in the corner. Fasten off and weave in the end. Do the same for both the front and back pieces.
Joining the pieces
Now you will crochet the pieces together along the sides of the body section (where you made the same number of stitches) and across the shoulders.
This method creates a relatively flat seam, so the seam does not stick out or become too bulky.
It can be helpful to start by joining both shoulders first and then join one body section at a time. Once the body seam is finished, you can continue directly into the ribbing.
The instructions below demonstrate the body seam, but the same technique applies to the shoulders. There are several ways to join crochet pieces, so if you prefer to crochet or sew them together using another method, that is also fine.
Here's how:
Place the pieces next to each other with the right sides facing up. Start at the bottom corner and insert your hook through one loop of each piece.
A tip for getting a flatter seam is to keep the yarn underneath and between the pieces, as shown in the image.
Insert your hook through the first front loop (the loop closest to the table). Then insert your hook through the back loop of the second piece (the loop closest to the table) and make 1 sl st.
Repeat in the same way. Go through
Ribbed edging
Now it is time to crochet the ribbed edges. If you want your edging to have more stretch, you can go down one hook size. The ribbed edges shown in the pictures were made using the same hook as the rest of the slipover (6 mm). All 3 edges are crocheted using the same technique and the same number of stitches (the width of the ribbing). Here you can choose whatever number of stitches works for you to achieve the width you want.
How to crochet the ribbed edging:
Always start the ribbing at an edge/side of the slipover and avoid starting in the middle of the pieces, as a seam may be visible. The shoulder ribbing starts where the body seam ends. Continue with the loop you have after the seam. If you have fastened off the seam, make a slipknot, insert your hook into the edge at the seam, and start there.
Step 1: Chain the desired number of stitches + 1. In this example, 3 + 1 ch = 4 ch.
Step 2: Skip the first ch, then work 3 sc back along the chain toward the vest. Make 2 sl st into the edge. Turn the vest.
Step 3: Skip the 2 sl sts you just made and work 3 sl st through the back loop only (the loop furthest away from you). Ch 1, turn.
Step 4: Skip the ch, work 3 sc through the back loop only. Make 2 sl st into the edge, turn.
Repeat Steps 3 and 4 until you have worked all the way around.
Note that when the front of the sweater is facing up and you are crocheting toward the sweater, you work sc. When the back is facing up and you are crocheting away from the edge, you work sl st.
Check occasionally that you still have 3 stitches across the width of the ribbing. It is easy to accidentally lose 1 stitch after several rows, which will cause the edging to become crooked.
Finishing
Make 1 sl st into the first stitch of the vest where you began.
Now join the two ends together with sl sts. Place the ends next to each other and crochet through both layers at the same time.
Fasten off and weave in the yarn end on the inside of the ribbing/sweater.
Once you have made the ribbing around the neckline and bottom edge in the same way and woven in all the ends, your slipover is finished!
We recommend blocking your slipover. It is not required, but it will give the garment a straighter shape and better fit. See Step 10.
If you do not want to block it, GREAT job on your slipover, and we hope you are happy with it! :)
Blocking
There are many different ways to block a garment. Here is one simple method.
You will need pins and a surface that you can stick the pins into. There is special blocking equipment available to buy, but you can often use something you already have at home. I use a yoga mat, but a firm sofa cushion also works well.
1: Soak the garment in water. You can choose to wash the garment with wool detergent if you have some. Let it soak for a while so that the innermost fibers become thoroughly wet. The garment may appear completely soaked just a minute after placing it in water, but the innermost fibers need a little longer.
2: Press out as much water as possible. You can roll the garment in a towel and press out as much water as you can. Avoid twisting the garment.
3: Stretch and shape the garment to the desired size.
4: Pin it into the desired shape. Be careful to place pins in the corners and along the edges to prevent the edges from forming C-shapes. You may also need to place a few pins around the neckline to achieve the desired shape.
5: Allow it to dry completely before removing the pins. This takes 1–2 days.
6: Finished!
The rights to this pattern belong to MYO Make Your Own. The pattern or its pictures may not be copied, shared or resold either in parts or in its entirety, but you may sell items you have crocheted from this pattern. If you have questions about the pattern, contact MYO at hello@makeyourown.se.
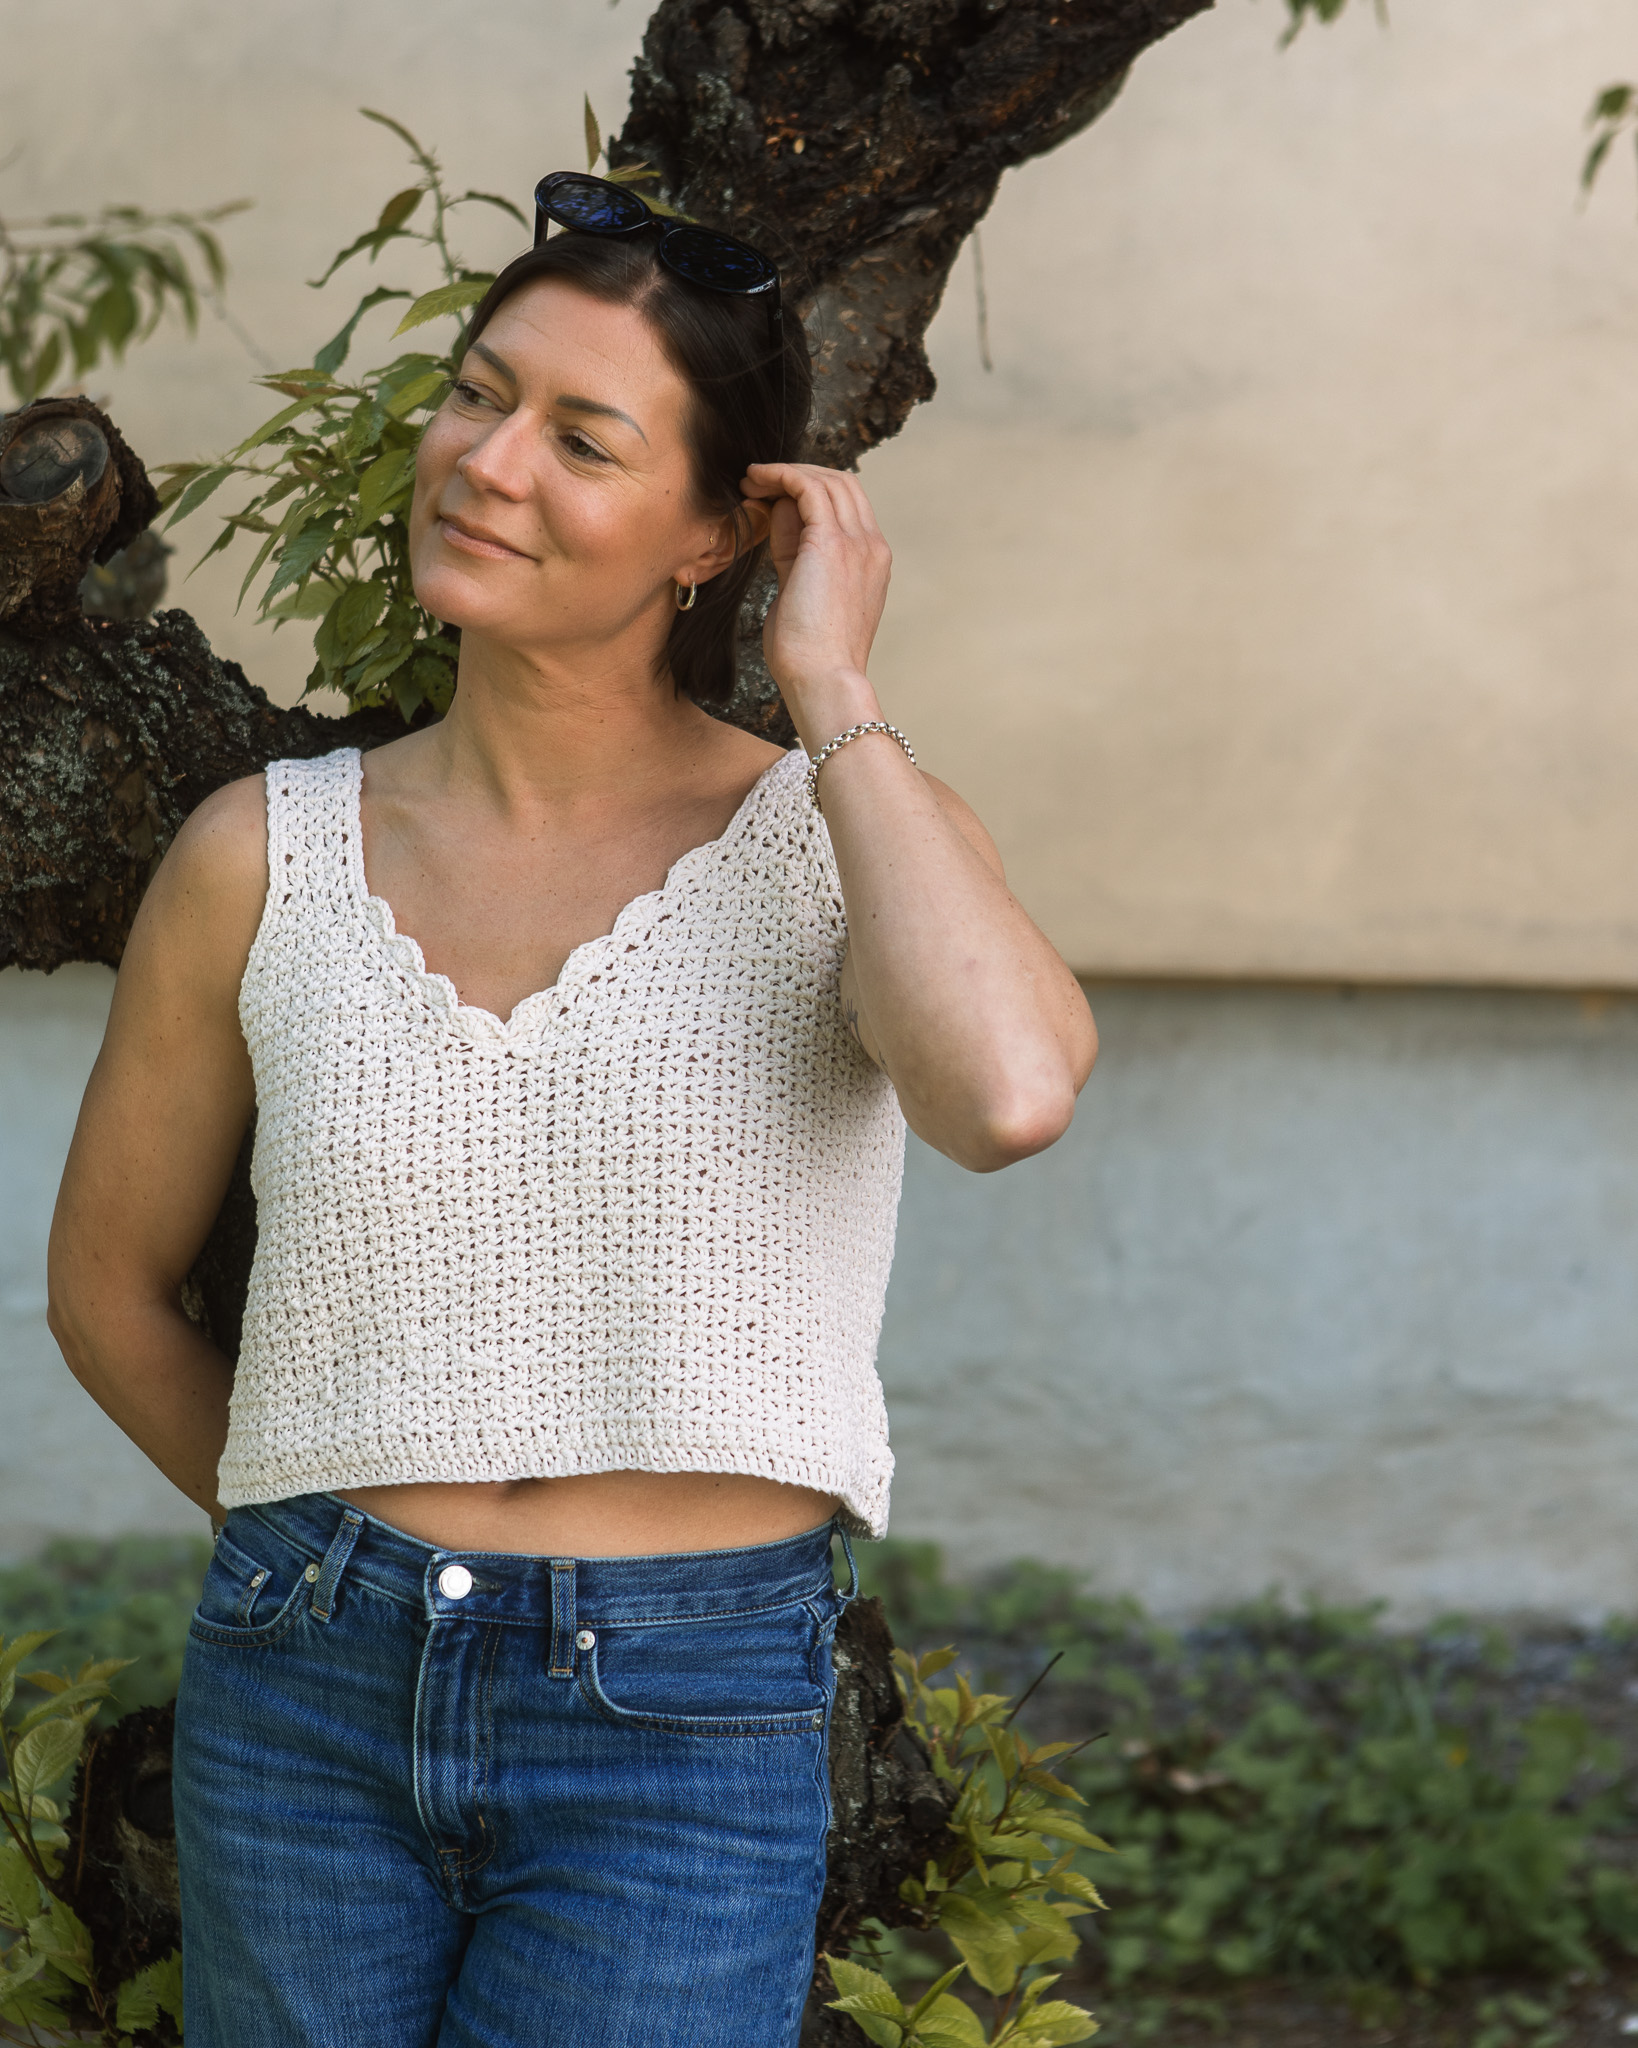

Share your creations with us
Thank you!
Your comment was sent!