Crochet cardigan “Nenja”
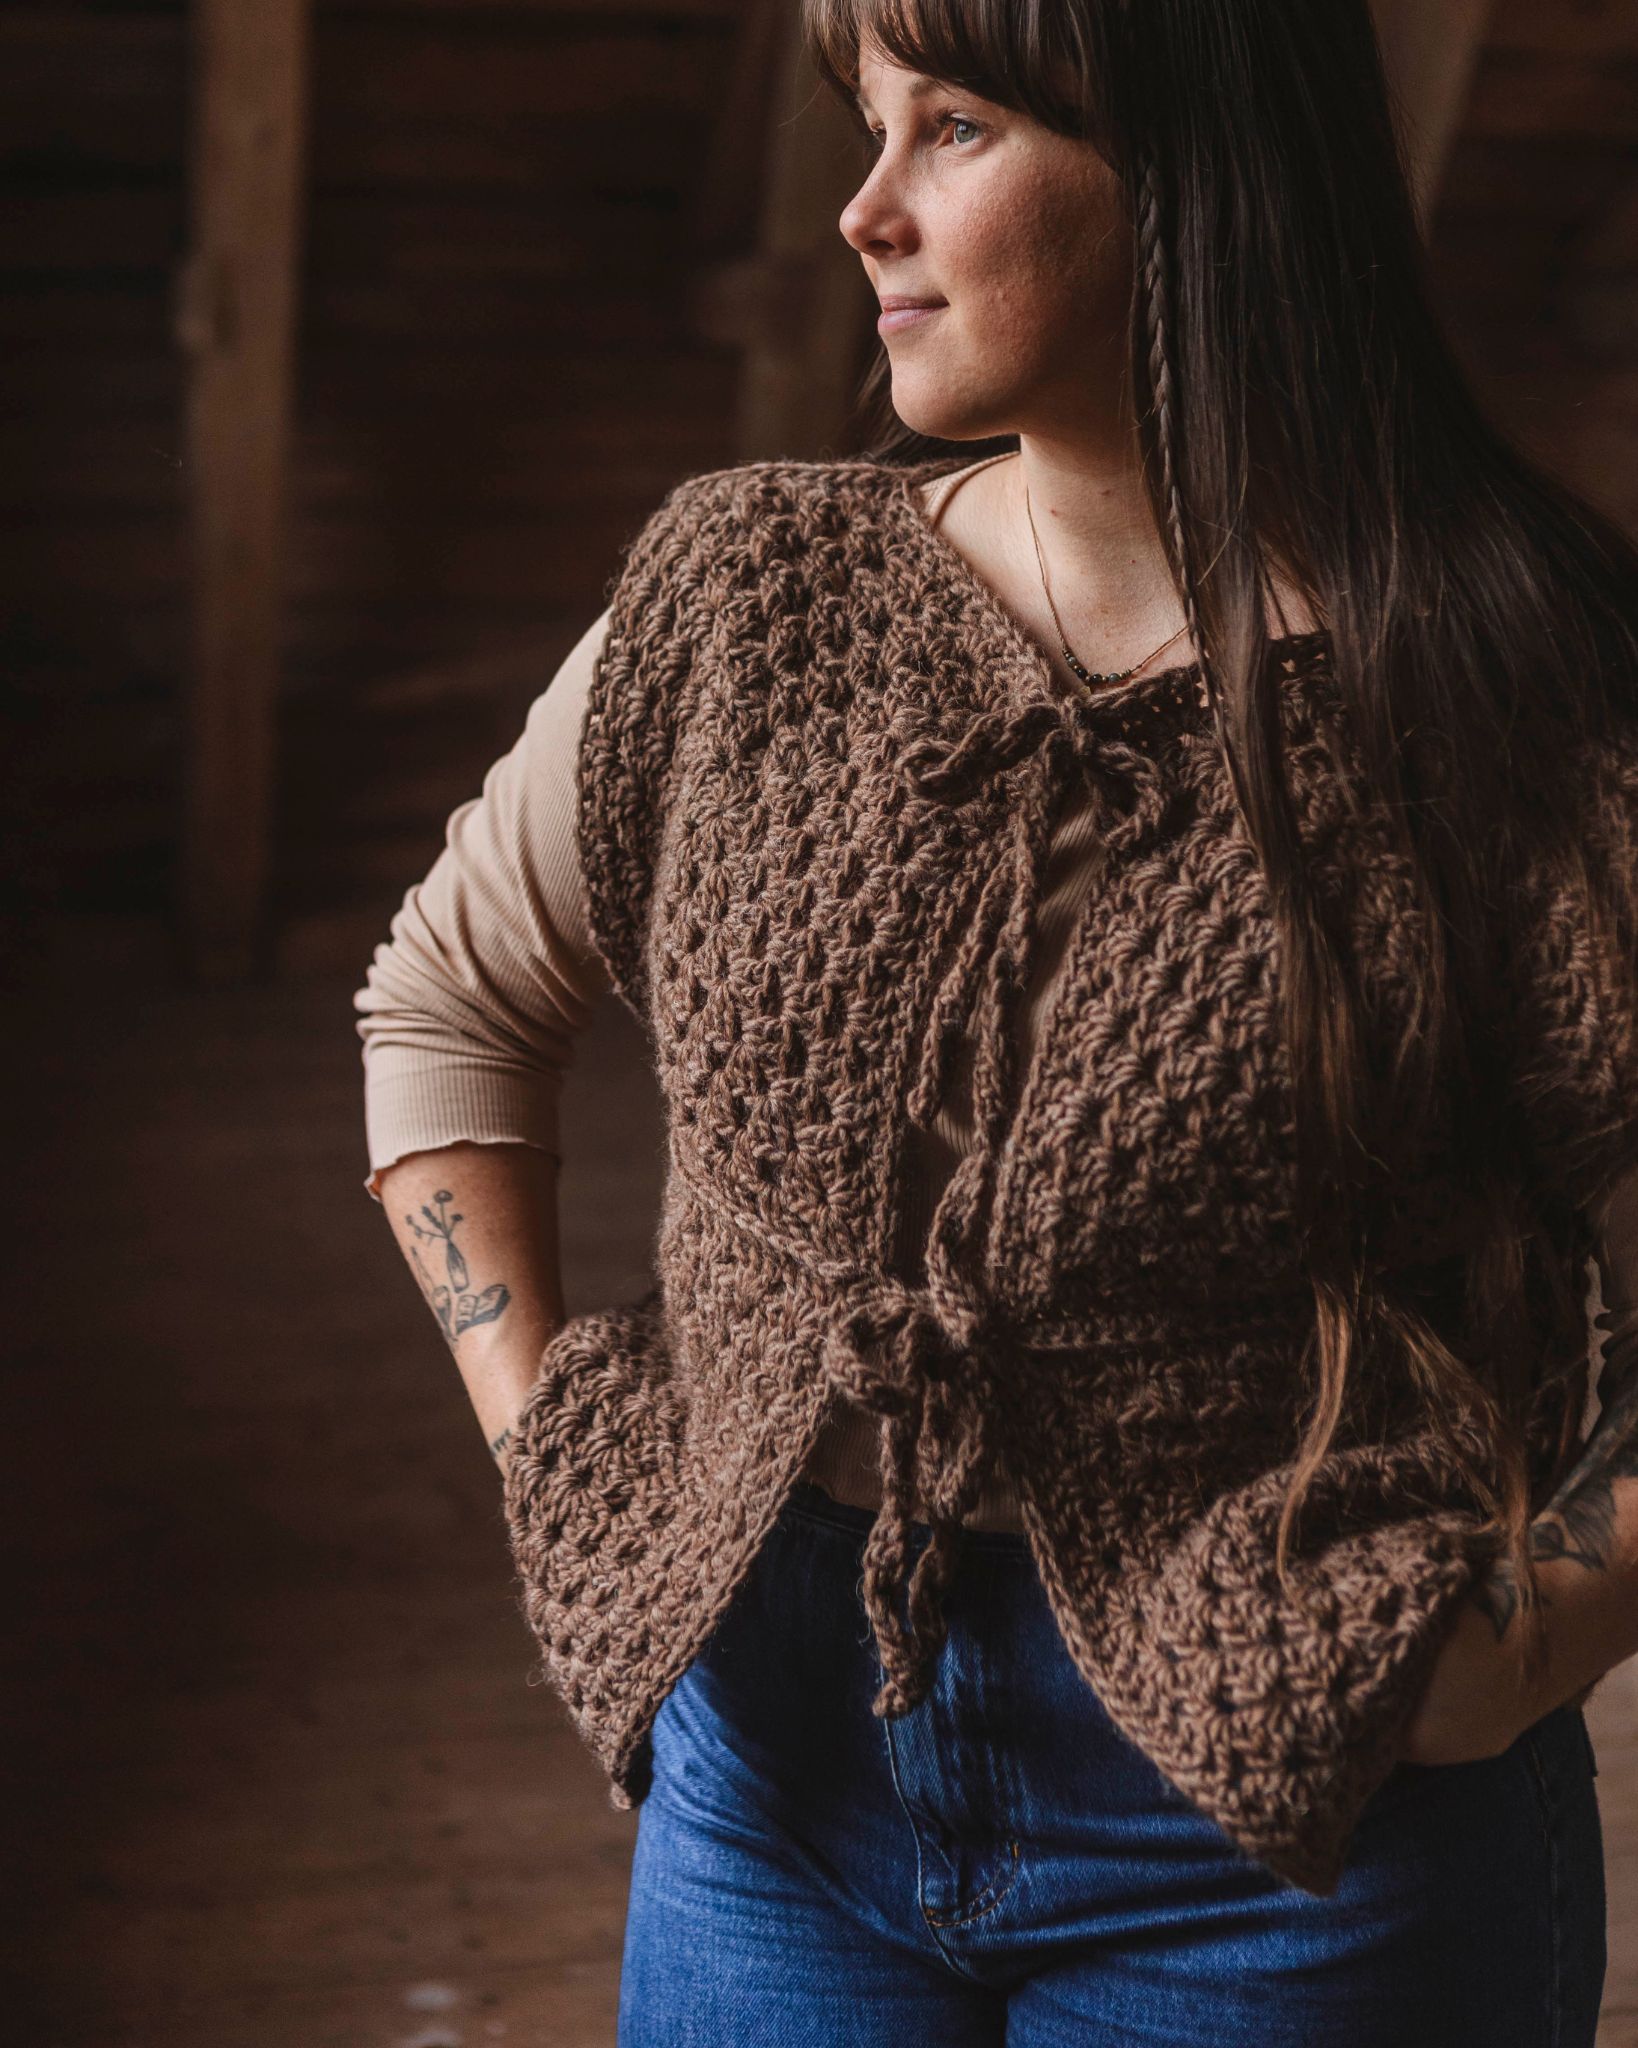
Crochet this simple and beautiful cardigan in granny squares!
With MYO Chunky wool and crochet hook 10 (alt. 12 mm) you can crochet this super trendy and stylish cardigan in granny squares. The instruction is simple and we have technology videos along the way to help you if you are not sure how to do any of the parts. So this tutorial does not have a long video, but don't worry - our technique videos will help you get your cardigan together!
Yarn consumption: For size S/M you need about 1150 g, about 11-12 yarn roles. For the white part you need 8 roles of yarn and the remaining 3-4 yarn roles are the colors you want in the center of your grandmother squares.
Note that we in this instruction uses videos from out technique library. If you are looking for a full instruction video for a crocheted vest, we suggest the cardigan Linnea.

This is what you need:
Here you can directly purchase the material for the product. Please note that the instruction is digital and appears here on the page (no written instruction).


Here's how to do it
This is how you do it What you need to make the cardigan is MYO Chunky Wool and a crochet hook 10 or 12. For reference, the cardigan in the picture is size S/M and to get it you choose crochet hook size 10. If you want to make an L/XL, you crochet with needle no. 12. You will crochet 16 granny squares in total which you will then assemble. You finish by crocheting ribbons so you can close the cardigan. You can choose to tie the ribbon only at the top or only in the middle, or both. Good luck! / Salli

Crochet granny squares
Start by crocheting 16 granny squares with the color combinations you want. If you are not sure how to make a granny square, see video below. Add 2 rounds to the square in the video and you will get the same size that is crocheted in this cardigan. There will be a total of 5 rounds. The size of the square should be around 24-26 cm per side (size S/M).
For a larger size, use a larger crochet hook or add more rounds so that the squares become larger. For a smaller size, crochet less than 8 rounds. Two squares in width should cover your back and go down a bit onto your arms. The model is oversized.
Round 1: Crochet a magic ring and in the ring you start with 3 chain stitches, then you crochet 2 double crochets. This will be the first double crochets pair. Then crochet two chain stitches. Repeat this (3 double crochets+2 chain stitches) a total of 4 times. Finish with a slip stitch in the third chain stitch from the start.
Round 2: Change color. Start in one hole and in each hole you crochet three double crochets, two chain stitches, three double crochets, this forms the corners. Do not crochet a chain stitch between the corners. Finish with a slip stitch in the third chain stitch from the start.
Round 3: Change color. Start in a hole where you crocheted two chain stitches. In this hole (the corner) you must crochet three double crochets, two chain stitches, three double crochets. The next hole will be a hole between the corners, here you crochet three double crochets. Then crochet the next corner in the same way as the first and continue in the same way. The corners are therefore crocheted with three double crochets, two chain stitches and three double crochets in the same hole. Between the corners you crochet three double crochets. Finish with a slip stitch in the third chain stitch from the start.
Rounds 4-5: Crochet in the same way as round 3, all corners are crocheted with three double crochets, two chain stitches and three treble crochets in the same hole and between the corners you crochet three double crochets. Finish in the same way as above. In the cardigan in the picture, we have used the same color on the last round of all squares.
Assembling
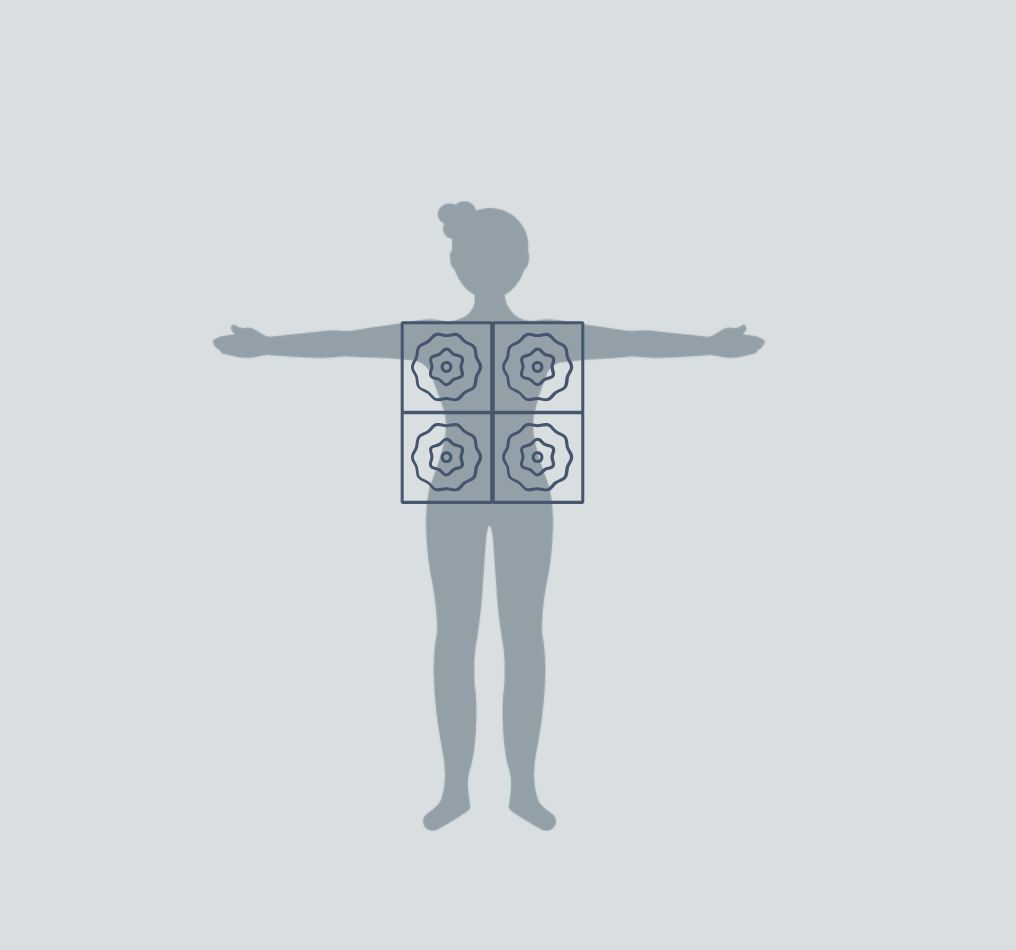
Step 1. When you are finished with your squares, you place them as shown below and crochet all the squares together. Crochet the squares together on the wrong side of the squares (keep the fine sides towards each other when crocheting together).
Crochet in the stitches that are closest to each other. So in the back loop of the first square and the front loop of the back square. When you have done this, you will get a large piece with all the squares that fit together. ATTENTION! DO NOT crochet together the squares marked in blue in the scheme below (that is the opening of your cardigan). Watch the video below to see the technique you can use to crochet the squares together. There are several techniques and you can use the technique you think is the best, this is just an example.
Step 2. After you crochet all the squares together, follow the steps below on how to assemble the entire piece with all the squares into a cardigan.
a) Crochet the black/grey parts together. This will be a sleeve.
b) Crochet the red parts together. This will be the second sleeve.
c) Crochet the pink parts together. This is below the sleeve and will be the side of your cardigan.
d) Crochet the beige parts together. This is below the other sleeve and will be the other side of your cardigan.
Now you have assembled the entire cardigan.

Final step is to crochet ribbons so that you can tie your cardigan.
Row 1: Crochet a chain of chain stitches, as far as you wish your ribbon. Watch the video if you are not sure how to crochet a chain.
Row 2: Turn and crochet single crochet stitches in all chain stitches starting in the second chain stitch. Crochet all the way until the end of your chain. See below video if you are unsure how to crochet single crochet.
In total, crochet 2 rows per ribbon. You crochet a total of 4 ribbons if you want to be able to tie both at the top of the neck and at the waist.
Then fasten them at the top of the neck and at the waist on each side of the cardigan. See the picture in step 4 how it looks when it is finished.
Hope you like your cardigan! :)
.jpeg)
Abbreviations
MR = magic ring
st/sts = stitch
sc = single crochet
ch = chain stitch
sl st= slip stitch
dc = double crochet
(...) = indicates the number of stitches in the current round
*...* = Repeat everything within *...* the specified number of times
Pattern
We start by crocheting all 16 granny squares in different colors. We have chosen to crochet the last round of all squares in the same color (main color).
Granny Squares
Make 16 squares.
Make 1 MR.
Round 1: Ch 3 (replaces 1 dc), 2 dc, 2 ch, *3 dc, ch 2* x3, finish with 1 sl st in the 3rd ch from the beginning of the round. There should be 12 dc on this round.
Change color or continue with the same color.
Round 2: Start with 1 sl st in a corner. Ch 3 (replaces 1 dc), 2 dc, 2 ch, 3 dc, *jump to the next corner, 3 dc, ch 2, 3 dc* x3, finish with 1 sl st in the 3rd ch from the beginning of the round, fasten off. There should be 24 dc on this round.
Change color or continue with the same color.
Round 3: Start with 1 sl st in the hole in the middle of a side (not in a corner), ch 3 (replaces 1 dc), 2 dc, *jump to the next corner, 3 dc, ch 2, 3 dc, jump to the next “hole” on the side, 3 dc* x3, jump to the next corner, 3 dc, ch 2, 3 dc, finish with 1 sl st in the 3rd ch from the beginning of the round, fasten off. There should be 36 dc on this round.
Change color or continue with the same color.
Round 4: Do the same as round 3, i.e., 3 dc in each “hole,” 3 dc, 2 ch, 3 dc in each corner, fasten off and cut the yarn. There should be 48 dc on this round.
Change color or continue with the same color.
Round 5: Do the same as round 4, i.e., 3 dc in each “hole,” 3 dc, 2 ch, 3 dc in each corner, fasten off and cut the yarn. There should be 60 dc on this round.
After round 5, the square should measure approximately 26 cm x 26 cm. Sometimes you may need to add one or two more rounds to reach the same size (this is due to the fact that we all crochet with different tension).
Assembly
Step 1: Once you are done with your squares, arrange them as shown in the diagram below and crochet all the squares together.
Crochet the squares on the right side of the squares (keep the wrong sides facing each other while crocheting them together). Crochet into the stitches that are closest to each other. So, in the back loop of the first square and the front loop of the back square. Once you’ve done this, you’ll have a large piece with all the squares attached.
Note: DO NOT crochet together the squares with blue markings in the diagram below (this is the opening of your cardigan). Watch the video below to see the technique you can use for joining the squares. There are multiple techniques, and you can use the technique you think is the prettiest, this is just one example.
Step 2: After you crochet all the squares together, follow the steps below to assemble the entire piece with all the squares into a cardigan.
a) Crochet the black/grey pieces together. This will become one sleeve.
b) Crochet the red pieces together. This will become the second sleeve.
c) Crochet the pink pieces together. This is below the sleeve and will become the side of your cardigan.
d) Crochet the beige pieces together. This is below the second sleeve and will become the other side of your cardigan.
Now you have assembled the entire cardigan!

The final step is to crochet ties so that you can tie your cardigan.
Row 1: Crochet a ch, as long as you want your tie to be.
Row 2: Turn and crochet sc in each ch, starting in the 2nd ch. Crochet all the way to the end of the chain.
In total, you crochet 2 rows per tie. You will crochet a total of 4 ties if you want to be able to tie both at the neck and at the waist.
Then, attach them at the neck and waist on each side of the cardigan. See the picture in Step 4 to see how it should look when it’s done.
Your cardigan is finished :)
Crochet granny squares
Start by crocheting 16 granny squares with the color combinations you want. If you are not sure how to make a granny square, see video below. Add 2 rounds to the square in the video and you will get the same size that is crocheted in this cardigan. There will be a total of 5 rounds. The size of the square should be around 24-26 cm per side (size S/M).
For a larger size, use a larger crochet hook or add more rounds so that the squares become larger. For a smaller size, crochet less than 8 rounds. Two squares in width should cover your back and go down a bit onto your arms. The model is oversized.

Round 1: Crochet a magic ring and in the ring you start with 3 chain stitches, then you crochet 2 double crochets. This will be the first double crochets pair. Then crochet two chain stitches. Repeat this (3 double crochets+2 chain stitches) a total of 4 times. Finish with a slip stitch in the third chain stitch from the start.
Round 2: Change color. Start in one hole and in each hole you crochet three double crochets, two chain stitches, three double crochets, this forms the corners. Do not crochet a chain stitch between the corners. Finish with a slip stitch in the third chain stitch from the start.
Round 3: Change color. Start in a hole where you crocheted two chain stitches. In this hole (the corner) you must crochet three double crochets, two chain stitches, three double crochets. The next hole will be a hole between the corners, here you crochet three double crochets. Then crochet the next corner in the same way as the first and continue in the same way. The corners are therefore crocheted with three double crochets, two chain stitches and three double crochets in the same hole. Between the corners you crochet three double crochets. Finish with a slip stitch in the third chain stitch from the start.
Rounds 4-5: Crochet in the same way as round 3, all corners are crocheted with three double crochets, two chain stitches and three treble crochets in the same hole and between the corners you crochet three double crochets. Finish in the same way as above. In the cardigan in the picture, we have used the same color on the last round of all squares.
Assembling
Step 1. When you are finished with your squares, you place them as shown below and crochet all the squares together. Crochet the squares together on the wrong side of the squares (keep the fine sides towards each other when crocheting together).
Crochet in the stitches that are closest to each other. So in the back loop of the first square and the front loop of the back square. When you have done this, you will get a large piece with all the squares that fit together. ATTENTION! DO NOT crochet together the squares marked in blue in the scheme below (that is the opening of your cardigan). Watch the video below to see the technique you can use to crochet the squares together. There are several techniques and you can use the technique you think is the best, this is just an example.
Step 2. After you crochet all the squares together, follow the steps below on how to assemble the entire piece with all the squares into a cardigan.
a) Crochet the black/grey parts together. This will be a sleeve.
b) Crochet the red parts together. This will be the second sleeve.
c) Crochet the pink parts together. This is below the sleeve and will be the side of your cardigan.
d) Crochet the beige parts together. This is below the other sleeve and will be the other side of your cardigan.
Now you have assembled the entire cardigan.

Final step is to crochet ribbons so that you can tie your cardigan.
Row 1: Crochet a chain of chain stitches, as far as you wish your ribbon. Watch the video if you are not sure how to crochet a chain.
Row 2: Turn and crochet single crochet stitches in all chain stitches starting in the second chain stitch. Crochet all the way until the end of your chain. See below video if you are unsure how to crochet single crochet.
In total, crochet 2 rows per ribbon. You crochet a total of 4 ribbons if you want to be able to tie both at the top of the neck and at the waist.
Then fasten them at the top of the neck and at the waist on each side of the cardigan. See the picture in step 4 how it looks when it is finished.
Hope you like your cardigan! :)
.jpeg)
Abbreviations
MR = magic ring
st/sts = stitch
sc = single crochet
ch = chain stitch
sl st= slip stitch
dc = double crochet
(...) = indicates the number of stitches in the current round
*...* = Repeat everything within *...* the specified number of times
Pattern
We start by crocheting all 16 granny squares in different colors. We have chosen to crochet the last round of all squares in the same color (main color).
Granny Squares
Make 16 squares.
Make 1 MR.
Round 1: Ch 3 (replaces 1 dc), 2 dc, 2 ch, *3 dc, ch 2* x3, finish with 1 sl st in the 3rd ch from the beginning of the round. There should be 12 dc on this round.
Change color or continue with the same color.
Round 2: Start with 1 sl st in a corner. Ch 3 (replaces 1 dc), 2 dc, 2 ch, 3 dc, *jump to the next corner, 3 dc, ch 2, 3 dc* x3, finish with 1 sl st in the 3rd ch from the beginning of the round, fasten off. There should be 24 dc on this round.
Change color or continue with the same color.
Round 3: Start with 1 sl st in the hole in the middle of a side (not in a corner), ch 3 (replaces 1 dc), 2 dc, *jump to the next corner, 3 dc, ch 2, 3 dc, jump to the next “hole” on the side, 3 dc* x3, jump to the next corner, 3 dc, ch 2, 3 dc, finish with 1 sl st in the 3rd ch from the beginning of the round, fasten off. There should be 36 dc on this round.
Change color or continue with the same color.
Round 4: Do the same as round 3, i.e., 3 dc in each “hole,” 3 dc, 2 ch, 3 dc in each corner, fasten off and cut the yarn. There should be 48 dc on this round.
Change color or continue with the same color.
Round 5: Do the same as round 4, i.e., 3 dc in each “hole,” 3 dc, 2 ch, 3 dc in each corner, fasten off and cut the yarn. There should be 60 dc on this round.
After round 5, the square should measure approximately 26 cm x 26 cm. Sometimes you may need to add one or two more rounds to reach the same size (this is due to the fact that we all crochet with different tension).
Assembly
Step 1: Once you are done with your squares, arrange them as shown in the diagram below and crochet all the squares together.
Crochet the squares on the right side of the squares (keep the wrong sides facing each other while crocheting them together). Crochet into the stitches that are closest to each other. So, in the back loop of the first square and the front loop of the back square. Once you’ve done this, you’ll have a large piece with all the squares attached.
Note: DO NOT crochet together the squares with blue markings in the diagram below (this is the opening of your cardigan). Watch the video below to see the technique you can use for joining the squares. There are multiple techniques, and you can use the technique you think is the prettiest, this is just one example.
Step 2: After you crochet all the squares together, follow the steps below to assemble the entire piece with all the squares into a cardigan.
a) Crochet the black/grey pieces together. This will become one sleeve.
b) Crochet the red pieces together. This will become the second sleeve.
c) Crochet the pink pieces together. This is below the sleeve and will become the side of your cardigan.
d) Crochet the beige pieces together. This is below the second sleeve and will become the other side of your cardigan.
Now you have assembled the entire cardigan!

The final step is to crochet ties so that you can tie your cardigan.
Row 1: Crochet a ch, as long as you want your tie to be.
Row 2: Turn and crochet sc in each ch, starting in the 2nd ch. Crochet all the way to the end of the chain.
In total, you crochet 2 rows per tie. You will crochet a total of 4 ties if you want to be able to tie both at the neck and at the waist.
Then, attach them at the neck and waist on each side of the cardigan. See the picture in Step 4 to see how it should look when it’s done.
Your cardigan is finished :)
The rights to this pattern belong to MYO Make Your Own. The pattern or its pictures may not be copied, shared or resold either in parts or in its entirety, but you may sell items you have crocheted from this pattern. If you have questions about the pattern, contact MYO at hello@makeyourown.se.


%20(11).jpg)
%20(5).jpg)

