
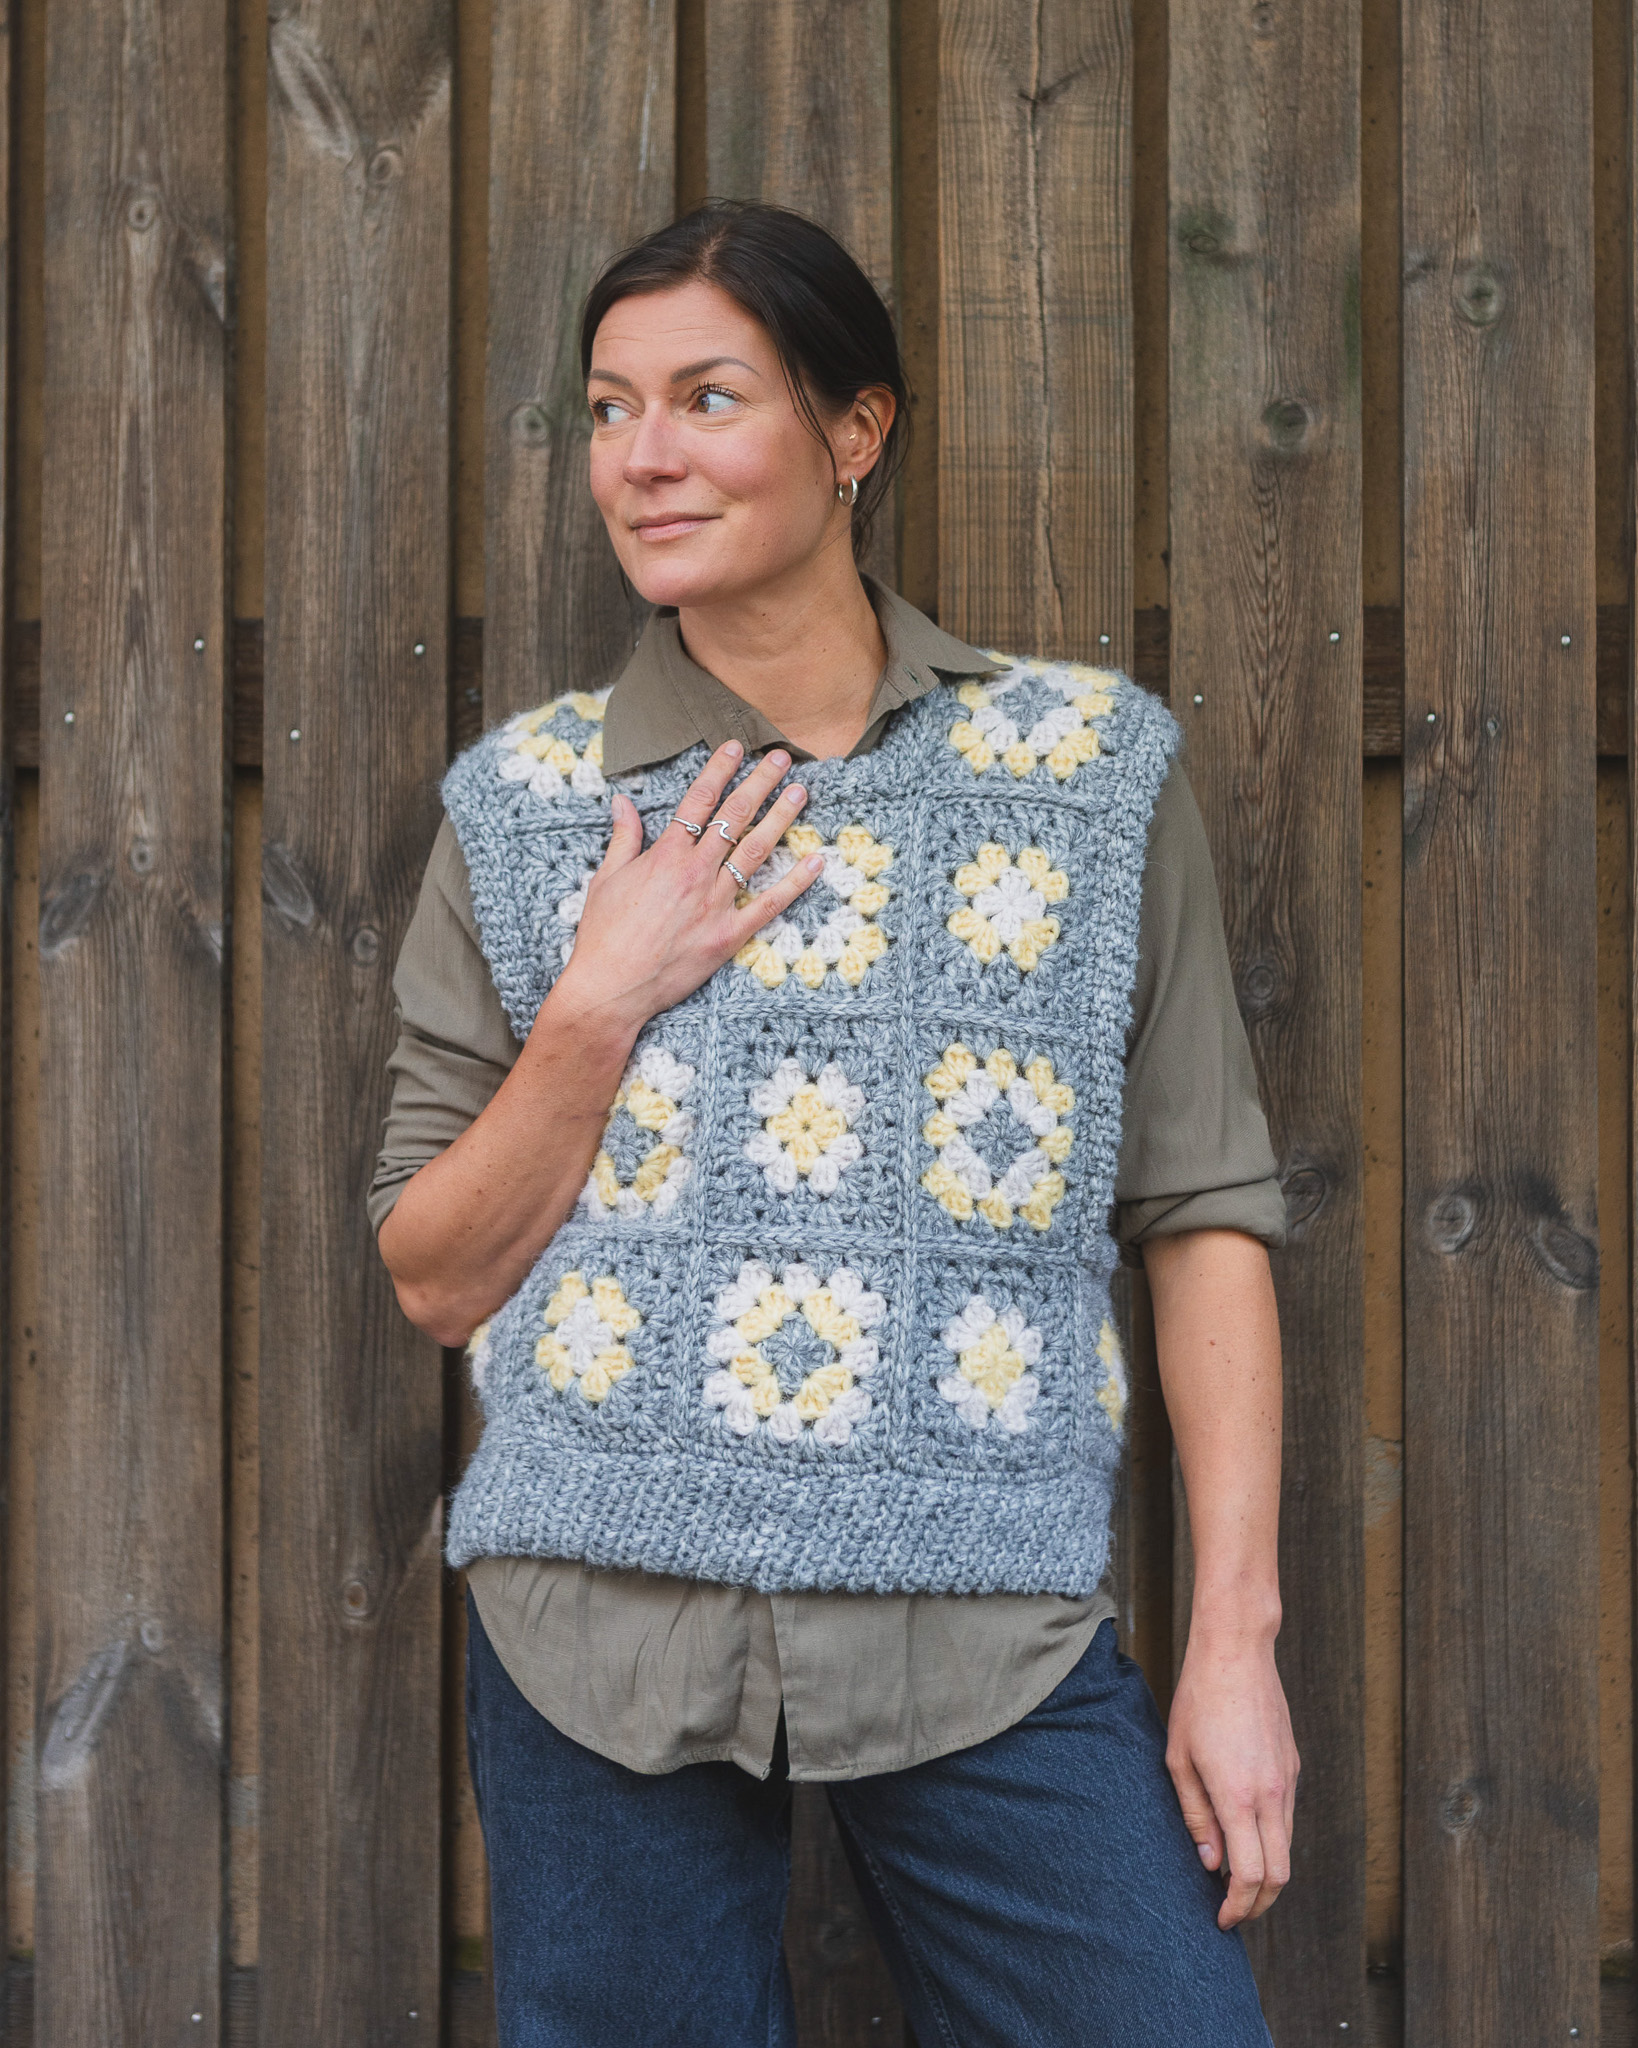
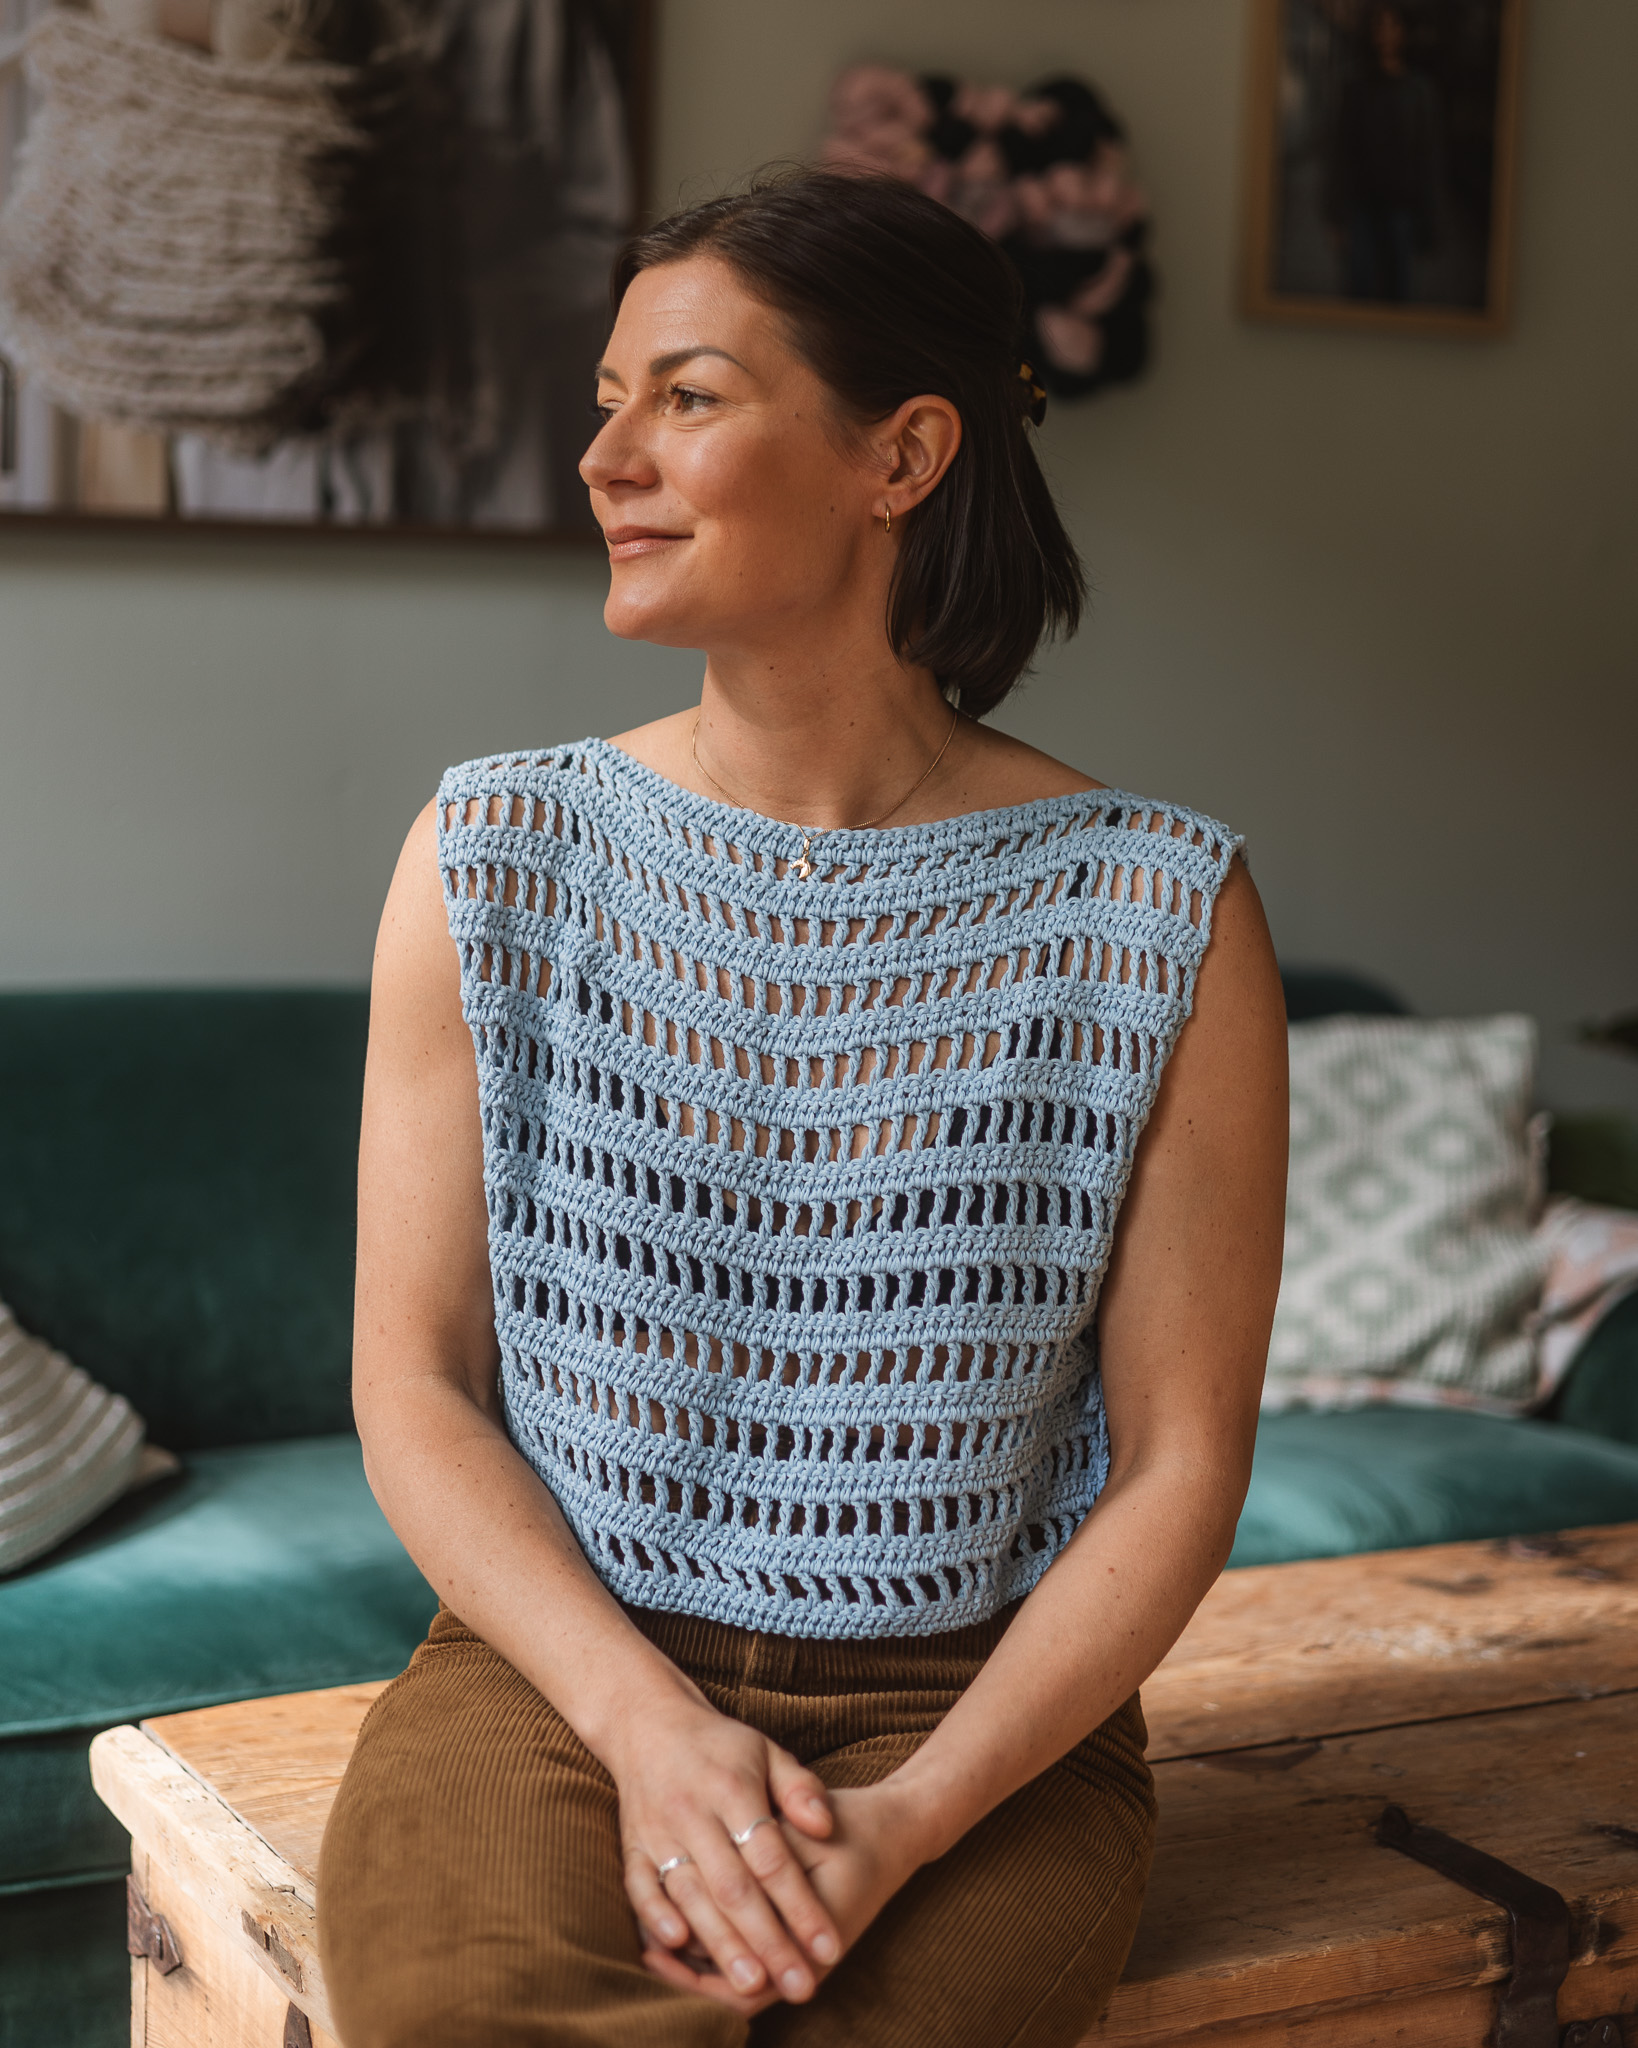
Slipover "Rut"
Crochet a cozy slipover in granny squares.
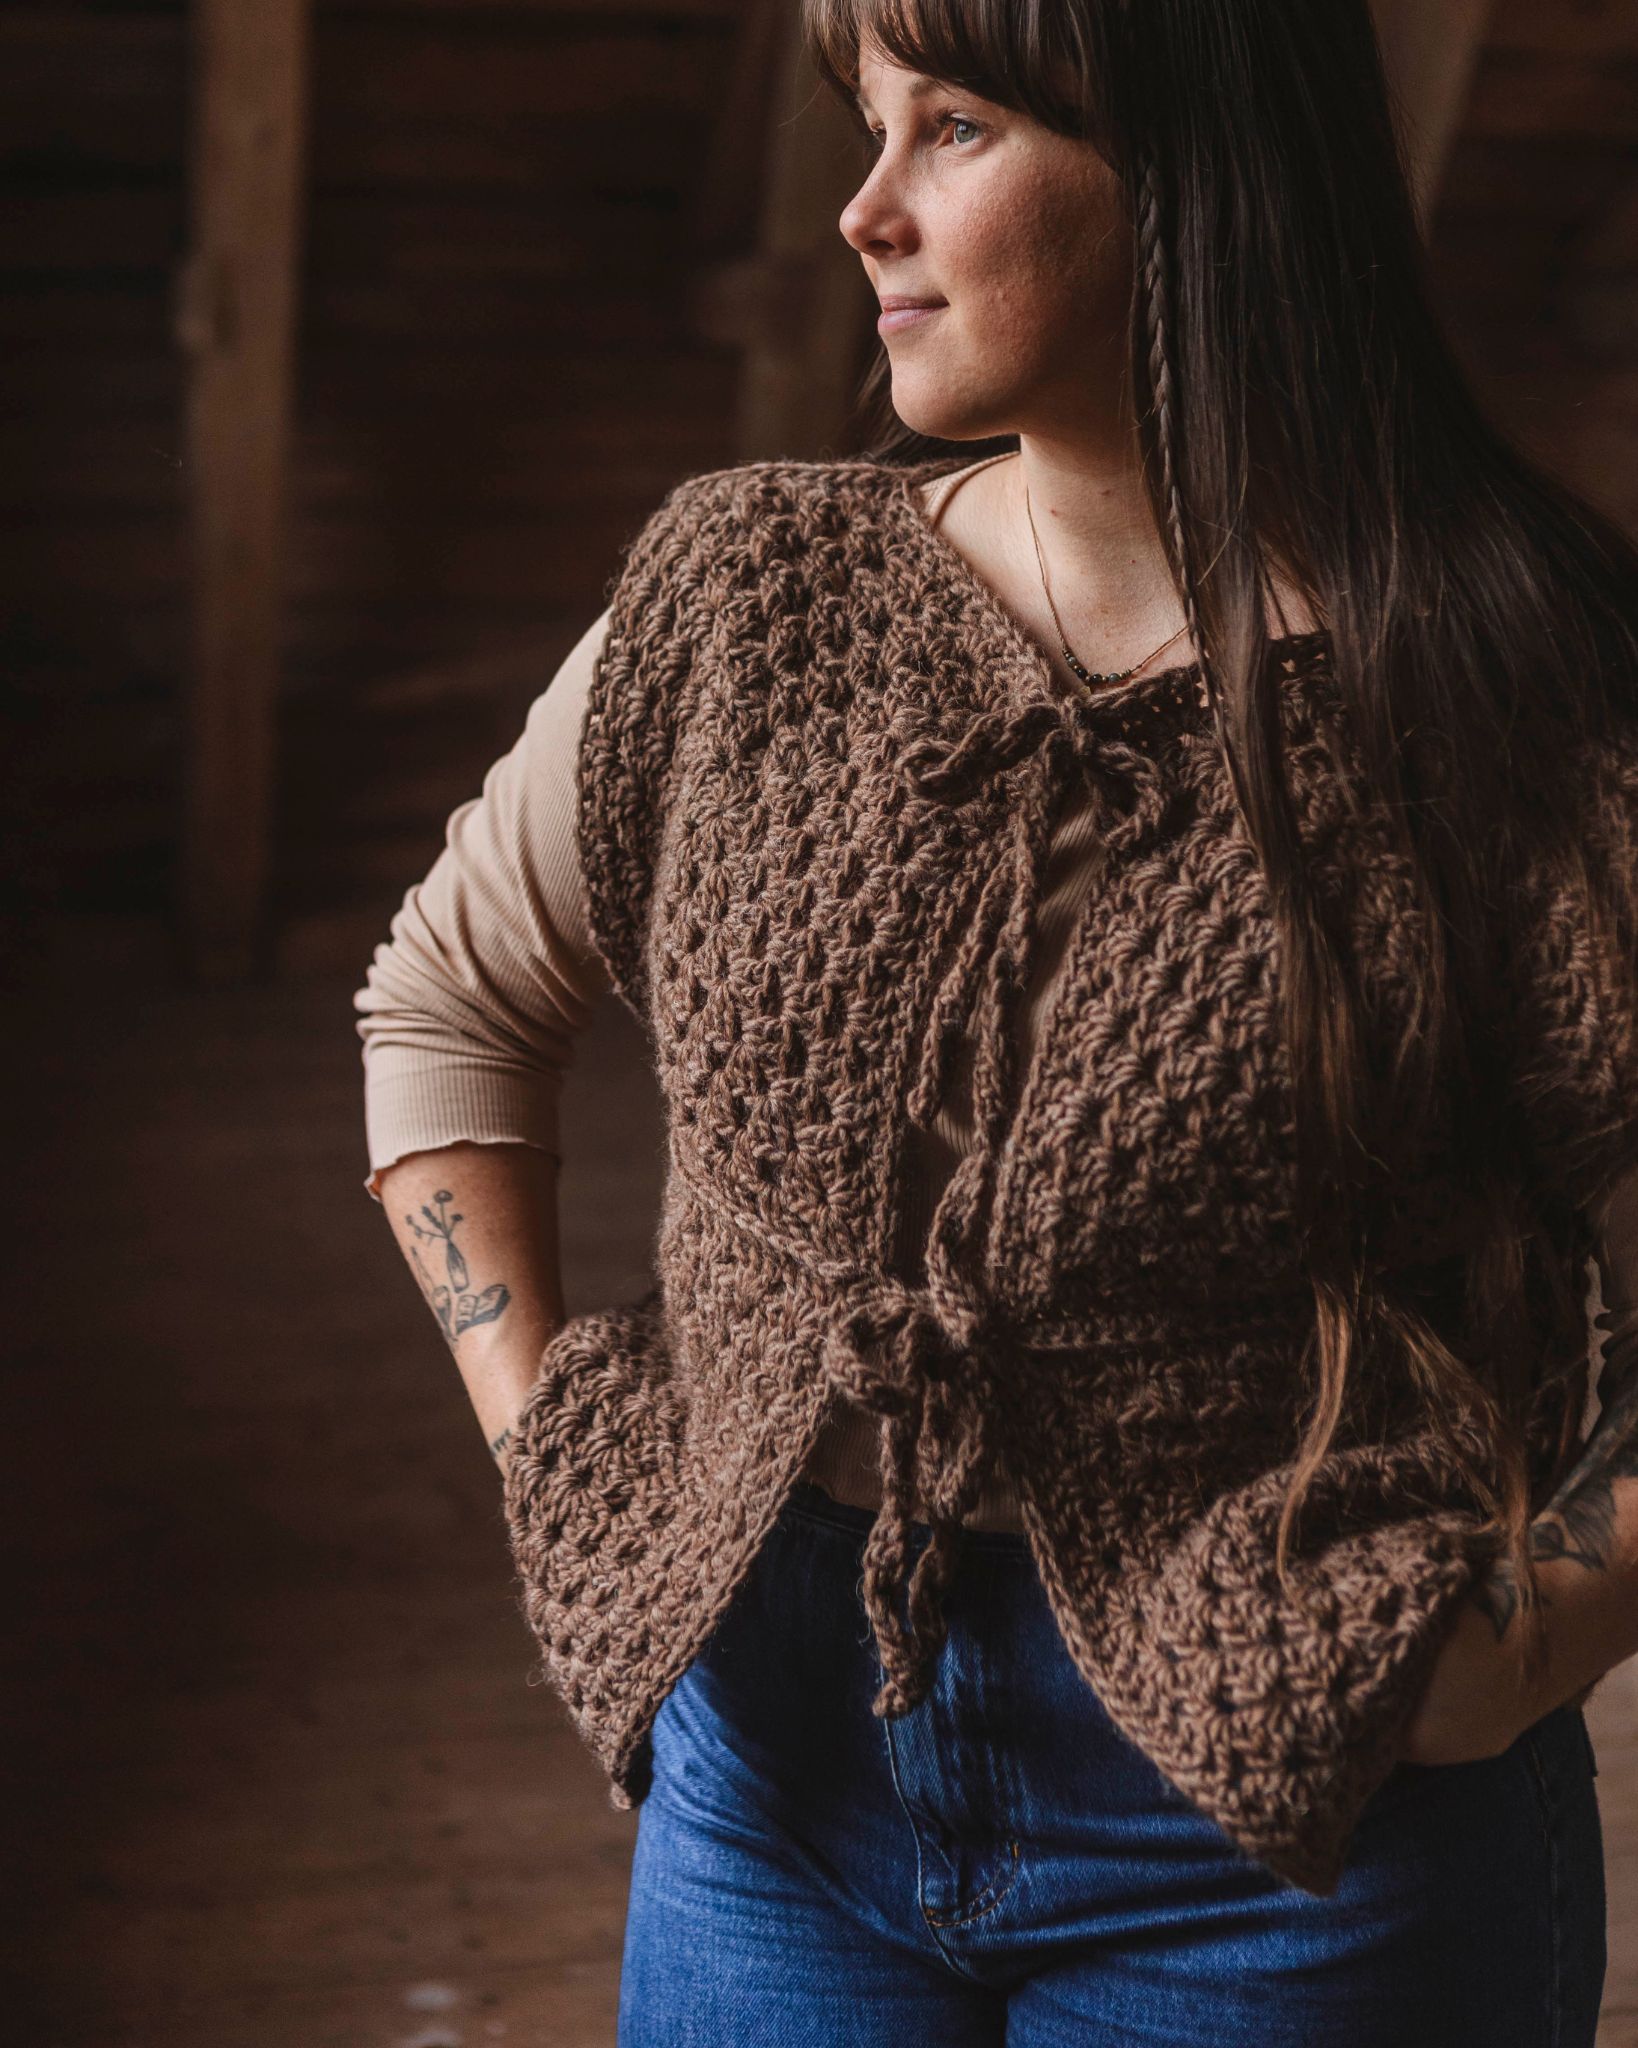
This slipover is crocheted with granny squares in MYOs Basic Wool. It's a beginner-friendly pattern where you only need to focus on two techniques, granny squares and a ribbed edge. You can easily resize the slipover. You can choose between different color combinations to make the slipover completely in your taste! In addition to MYO Basic Wool, you will also need a crochet hook 5-7 mm (see table under step 1 for detailed info). It can also be useful to have a tape measure and a needle. The colors used in this instruction are beige, light gray, dark gray and peach. During the pattern you will have the help of technique videos. You can also use our Dreamy Blend yarn together with crochet hook 5-6 mm.
Yarn Consumption: 500-800 g, depending on the size. For size M (as in the picture), a total of 5 skeins are needed, two in base color and one skein per additional colors in the granny squares. See step 1 for more detailed info. If you use Dreamy Blend you need (size M) approx. 5 skeins of main color and 1-1.5 skeins per additional colors in the granny squares (if you have 3 additional colours). The yarn consumption depends on how tight you crochet.
Note that we in this instruction uses videos from out technique library. If you are looking for a full instruction video for a crocheted vest, we suggest the vest hedvig.
Here's how to do it
This cozy slipover is easy to crochet! You start with granny squares and then you crochet them all together according to our guide in the pattern. Last, crochet the ribbed edges. You can easily resize the slipover by changing the size of the granny squares. In the instruction you will find a sizing guide for sizes XS-XXL as well as information on yarn consumption per size. If you want to get the slipover straighter, there is even a simple guide on how to “wet stretch” or “block” the slipover at the end of the instruction. But it is completely optional, it will be nice even without blocking. Good luck! /Johanna H
%20(4).jpg)
This is what you need:
Here you can directly purchase the material for the product. Please note that the instruction is digital and appears here on the page (no written instruction).


.jpg)
Unleash your creativity
For only 85kr per month you get access to all our 300+ beginner-friendly instructions for crochet, knitting and macrame.
A perfect way to get started with your new hobby!

Size Chart
Below you will find a size chart. If you are a beginner, it is recommended to use a 6 mm crochet hook for MYOs Basic wool. Then you can choose to crochet 3, 4 or 5 rounds to change the size. See table below for measurements. For reference, the slipover in the photo is size M, crocheted with a crochet hook size 6 and 4 rounds per square.
Note! If you use Dreamy blend yarn make sure the size of the square is the same as the size chart although the crochet hook and rounds might differ. For size M in Dreamy blend we used hook 5 mm.
If you are used to crocheting, you can experiment with different sizes of crochet hooks and number of rounds to find the size and look that suits you best. Note that the different crochet patterns affect how tight the square will be, see the photo below. The smaller the size of the crochet hook, the tighter the square.
Before you start, make a square and measure the width of the square to see what size it corresponds to in the table as well as measures A, B, C and the hip measurement. The hip measure is the circumference where the slipover is at its widest, which corresponds to 8 squares in width. If a square measures 10 cm, the hip measurement will be 80 cm.


Yarn Consumption
The slipover in the picture (size M) weighs about 420 g. All other weights are estimated and may vary.

STEP 1 - granny squares
Choose a color as the base color. With the base color you will crochet the outermost row of each square, the ribbed edges and use for the matching of the squares. On the slipover in the photo, the base color is beige.
Once you have made a square in which you are satisfied with the size, you can start crocheting more squares of the same size. In total, you should have 25 granny squares by the time you're done.

Granny Square
If you are not sure how to make a granny square, you can take a look at the video below. NOTE! In the video we crochet 2 chain stitches but in this pattern it is only 1!
Note! How many rows you will crochet depends on the size that you are making. See above.
Round 1: Crochet a magic ring and in the ring you start with 3 chain stitches, then you crochet 2 double crochets. This will be the first double crochets pair. Then crochet 1 chain stitch. Repeat this (3 double crochets+1 chain stitches) a total of 4 times. Finish with a slip stitch in the 3rd chain stitch from the start.
Round 2: Change color. Start in one hole and in each hole you crochet 3 double crochets, 1 chain stitch, 3 double crochets, this forms the corners. Do not crochet a chain stitch between the corners. Finish with a slip stitch in the 3rd chain stitch from the start.
Round 3: Change color. Start in a hole where you crocheted 1 chain stitch in. In this hole (the corner) you must crochet 3 double crochets, 1 chain stitches, 3 double crochets. The next hole will be a hole between the corners, here you crochet 3 double crochets. Then crochet the next corner in the same way as the first and continue in the same way. The corners are therefore crocheted with 3 double crochets, 1 chain stitch and 3 double crochets in the same hole. Between the corners you crochet 3 double crochets. Finish with a slip stitch in the 3rd chain stitch from the start.
Rounds 4-5: Crochet in the same way as round 3, all corners are crocheted with 3 double crochets, 1 chain stitches and 3 treble crochets in the same hole and between the corners you crochet 3 double crochets. Finish in the same way as above. In the slipover in the picture, we have used the same color on the last round of all squares.
Fasten all the yarn ends and cut off.
Tip:
If you want to get the squares a little extra square and with pointed corners, you can block the finished squares. You can skip this step if you don't want to. The advantage of blocking is that you get a finer shape in the end. See the bottom of step 10 for an instruction on a simple way to block.
STEP 2 - crochet the squares together
Lay out the squares according to the picture below. Follow the pictures to see the order in which you crochet them together.
.jpeg)
Here's how to crochet the squares together:
Start by crocheting together as shown in picture 1 below. If you need help with a video instruction of the technique, see below video. NOTE! In this slipover we have used slip stitches instead of single crochets shown in the video, it is up to you what you use. Put two squares with the wrong sides together so that the nice sides are outward. Start by making a slip knot around the crochet hook and go down with the crochet hook in one corner through both squares. Pick up yarn and pull through straight away. Now you have a started in a corner, see below picture on how to continue.


From now on, go down the back loop only of the square closest to you, and go down the front loop only of the square furthest from you (the two loop closest together in the middle).
You should then have three loops on the crochet hook as in the photo below. Pick up yarn and pull through all three loops directly. Now you've made a slip stitch through both granny squares. Continue.


Bring up two new squares and continue in the same way. When you have crocheted three in total in width (6 squares in total), you are done with the first horizontal part. Cut the yarn and start over in the same way with the next row. See above picture.
After you have crocheted the squares together as shown in picture 1, proceed in the same way as shown in the pictures below.
Picture 2: You have crocheted together 12 squares. Crochet these 12 squares together with vertical stitches in the same way. When you come to a “junction” where 4 squares meet, crochet over the horizontal seam. Try to find stitches as tightly as possible before and after the “junction” to avoid the formation of holes in the corners.
.jpeg)
Picture 3 combines vertical and horizontal seams. You can also choose to divide them into two vertical seams and one horizontal.
.jpeg)
.jpeg)
.jpeg)
Continue crocheting the squares together:
.jpeg)
.jpeg)
STEP 3 - ribbed edge
It's time to crochet the ribbed edges. If you want your edge with more elastic, you can choose to go down one size on your crochet hook. The ribbed edges in the picture are made in the same crochet hook as the squares (crochet hook 6).
All three edges are crocheted using the same technique, what differs is the number of stitches to bring to different widths. Choose the number that suits you.
Bottom edge = 9 stitches
Neckline= 4 stitches
Shoulder= 3 stitches
How to crochet a ribbed edge
1. Start by crocheting a row of single crochet around the edge where we will crochet a ribbed edge. Do not cut the yarn when you have crocheted one round. If you need help with how to crochet single crochet, see below video.
a) For neck and shoulders= start the round somewhere at the back/on the edge. Avoid starting at the front when you may see a splice.
(b) For bottom edge= start in the side where you want the opening of the rib. If you prefer a ribbing that goes all the way around such as for the neck and shoulders, follow the instructions as above.
Continue in the next step.
Note! when you have the front of the slipover up and crochet against the slipover you make single crochets, and when you have the back side up and crochet away from the ribbed edge you make slip stitches.
Check repeatedly that you have continued 9/4/3 stitches in width all the time, it is easy to lose a stitch after a few rows and then the edge will be skewed.
2. Make a chain with the number of chain stitches you wish +1, in this example 9+1 stitches (10 in total). If you crochet the neckline, make 4+1 (5 in total) and if you make the shoulders you make 3+1 (4 in total). See the video below how to make chain stitches.

3. Skip the first chain and crochet 9 single crochet back along the chain down towards the sweater. Make 2 slip stitches on the edge of the slipover. Are you unsure how to crochet slip stitches then see below video. Turn the slipover over.

.jpeg)
.jpeg)
4. Skip the 2 slip stitches you just made and crochet 9 slip stitches in back loop only (the one furthest from you). Make a chain and turn the slipover over. If you are not sure which is the back loop only, see below video.

5. Skip one chain, crochet 9 single crochet in back loop only (the one furthest from you). Make two slip stitches in the edge of the slipover, turn the slipover over.
Closing
Neck/shoulders:
If you want to crochet the ends together to get a full ribbing, crochet the two ends together with slip stitches. You do this by laying the ends next to each other and crocheting through the both layers at the same time. Cut the yarn and attach the yarn to the inside of the ribbing/slipover.
Slits:
When you reach the first slits, it is enough to make a slip stitch on the edge of the slipover, after step 5 (9 single crochets). Then start over from step 2 (with a chain). See pictures below.
When you reach the second slits, finish in the same way as in the first slots with a slip stitch in the edge of the slipover. Cut the yarn and fasten off.
Now your slipover is finished! Do you want to block your slipover - see the next step. If you block, you get a straighter shape on your slipover. This can be useful, above all, to achieve a straighter rib edge at the slits. This is up to you if you want to do.


BLOCK
You can block in many different ways. Here I will explain a simple way to do it. What you need are needles and a substrate to attach the needles to. There is special blocking equipment to buy but you usually have something at home that you can use. I use a yoga mat, but a steadier sofa cushion also goes well.
1: Soak the garment in water. You can choose to wash the garment in wool detergent if you have it. Let the slipover lay in water for a bit of time so the fibers are soaked. The garment may appear soaked just a few minutes after you put it in water, but the innermost fibers need a little longer.
2: Squeeze out as much water as possible. You can wrap the garment in a towel and press as much as you can. Avoid twisting the garment.
3: Pull gently and shape the garment/square to the desired size.
4. Stick the needle into the desired shape. If you block squares, be sure to put needles in the corners to bring the pointed shapes as well as straight edges. I put mine edge to edge in a grid to get them reasonably the same size. You can also block them on top of each other but the advantage of blocking them one by one is that it dries faster.
If you block the entire sweater, be sure to put needles in the corners and along the edges to avoid C-shapes along the edge. You may also need to attach some needles along the neckline as well to get a desired shape.
5. Allow to dry completely before removing the needles. Takes 1-2 days.
6. Finished!

.jpeg)
The rights to this pattern belong to MYO Make Your Own. The pattern or its pictures may not be copied, shared or resold either in parts or in its entirety, but you may sell items you have crocheted from this pattern. If you have questions about the pattern, contact MYO at hello@makeyourown.se.
Size Chart
Below you will find a size chart. If you are a beginner, it is recommended to use a 6 mm crochet hook for MYOs Basic wool. Then you can choose to crochet 3, 4 or 5 rounds to change the size. See table below for measurements. For reference, the slipover in the photo is size M, crocheted with a crochet hook size 6 and 4 rounds per square.
Note! If you use Dreamy blend yarn make sure the size of the square is the same as the size chart although the crochet hook and rounds might differ. For size M in Dreamy blend we used hook 5 mm.
If you are used to crocheting, you can experiment with different sizes of crochet hooks and number of rounds to find the size and look that suits you best. Note that the different crochet patterns affect how tight the square will be, see the photo below. The smaller the size of the crochet hook, the tighter the square.
Before you start, make a square and measure the width of the square to see what size it corresponds to in the table as well as measures A, B, C and the hip measurement. The hip measure is the circumference where the slipover is at its widest, which corresponds to 8 squares in width. If a square measures 10 cm, the hip measurement will be 80 cm.
Yarn Consumption
The slipover in the picture (size M) weighs about 420 g. All other weights are estimated and may vary.
STEP 1 - granny squares
Choose a color as the base color. With the base color you will crochet the outermost row of each square, the ribbed edges and use for the matching of the squares. On the slipover in the photo, the base color is beige.
Once you have made a square in which you are satisfied with the size, you can start crocheting more squares of the same size. In total, you should have 25 granny squares by the time you're done.
Granny Square
If you are not sure how to make a granny square, you can take a look at the video below. NOTE! In the video we crochet 2 chain stitches but in this pattern it is only 1!
Note! How many rows you will crochet depends on the size that you are making. See above.
Round 1: Crochet a magic ring and in the ring you start with 3 chain stitches, then you crochet 2 double crochets. This will be the first double crochets pair. Then crochet 1 chain stitch. Repeat this (3 double crochets+1 chain stitches) a total of 4 times. Finish with a slip stitch in the 3rd chain stitch from the start.
Round 2: Change color. Start in one hole and in each hole you crochet 3 double crochets, 1 chain stitch, 3 double crochets, this forms the corners. Do not crochet a chain stitch between the corners. Finish with a slip stitch in the 3rd chain stitch from the start.
Round 3: Change color. Start in a hole where you crocheted 1 chain stitch in. In this hole (the corner) you must crochet 3 double crochets, 1 chain stitches, 3 double crochets. The next hole will be a hole between the corners, here you crochet 3 double crochets. Then crochet the next corner in the same way as the first and continue in the same way. The corners are therefore crocheted with 3 double crochets, 1 chain stitch and 3 double crochets in the same hole. Between the corners you crochet 3 double crochets. Finish with a slip stitch in the 3rd chain stitch from the start.
Rounds 4-5: Crochet in the same way as round 3, all corners are crocheted with 3 double crochets, 1 chain stitches and 3 treble crochets in the same hole and between the corners you crochet 3 double crochets. Finish in the same way as above. In the slipover in the picture, we have used the same color on the last round of all squares.
Fasten all the yarn ends and cut off.
Tip:
If you want to get the squares a little extra square and with pointed corners, you can block the finished squares. You can skip this step if you don't want to. The advantage of blocking is that you get a finer shape in the end. See the bottom of step 10 for an instruction on a simple way to block.
STEP 2 - crochet the squares together
Lay out the squares according to the picture below. Follow the pictures to see the order in which you crochet them together.
Here's how to crochet the squares together:
Start by crocheting together as shown in picture 1 below. If you need help with a video instruction of the technique, see below video. NOTE! In this slipover we have used slip stitches instead of single crochets shown in the video, it is up to you what you use. Put two squares with the wrong sides together so that the nice sides are outward. Start by making a slip knot around the crochet hook and go down with the crochet hook in one corner through both squares. Pick up yarn and pull through straight away. Now you have a started in a corner, see below picture on how to continue.
From now on, go down the back loop only of the square closest to you, and go down the front loop only of the square furthest from you (the two loop closest together in the middle).
You should then have three loops on the crochet hook as in the photo below. Pick up yarn and pull through all three loops directly. Now you've made a slip stitch through both granny squares. Continue.
Bring up two new squares and continue in the same way. When you have crocheted three in total in width (6 squares in total), you are done with the first horizontal part. Cut the yarn and start over in the same way with the next row. See above picture.
After you have crocheted the squares together as shown in picture 1, proceed in the same way as shown in the pictures below.
Picture 2: You have crocheted together 12 squares. Crochet these 12 squares together with vertical stitches in the same way. When you come to a “junction” where 4 squares meet, crochet over the horizontal seam. Try to find stitches as tightly as possible before and after the “junction” to avoid the formation of holes in the corners.
Picture 3 combines vertical and horizontal seams. You can also choose to divide them into two vertical seams and one horizontal.
Continue crocheting the squares together:
STEP 3 - ribbed edge
It's time to crochet the ribbed edges. If you want your edge with more elastic, you can choose to go down one size on your crochet hook. The ribbed edges in the picture are made in the same crochet hook as the squares (crochet hook 6).
All three edges are crocheted using the same technique, what differs is the number of stitches to bring to different widths. Choose the number that suits you.
Bottom edge = 9 stitches
Neckline= 4 stitches
Shoulder= 3 stitches
How to crochet a ribbed edge
1. Start by crocheting a row of single crochet around the edge where we will crochet a ribbed edge. Do not cut the yarn when you have crocheted one round. If you need help with how to crochet single crochet, see below video.
a) For neck and shoulders= start the round somewhere at the back/on the edge. Avoid starting at the front when you may see a splice.
(b) For bottom edge= start in the side where you want the opening of the rib. If you prefer a ribbing that goes all the way around such as for the neck and shoulders, follow the instructions as above.
Continue in the next step.
Note! when you have the front of the slipover up and crochet against the slipover you make single crochets, and when you have the back side up and crochet away from the ribbed edge you make slip stitches.
Check repeatedly that you have continued 9/4/3 stitches in width all the time, it is easy to lose a stitch after a few rows and then the edge will be skewed.
2. Make a chain with the number of chain stitches you wish +1, in this example 9+1 stitches (10 in total). If you crochet the neckline, make 4+1 (5 in total) and if you make the shoulders you make 3+1 (4 in total). See the video below how to make chain stitches.
3. Skip the first chain and crochet 9 single crochet back along the chain down towards the sweater. Make 2 slip stitches on the edge of the slipover. Are you unsure how to crochet slip stitches then see below video. Turn the slipover over.
4. Skip the 2 slip stitches you just made and crochet 9 slip stitches in back loop only (the one furthest from you). Make a chain and turn the slipover over. If you are not sure which is the back loop only, see below video.
5. Skip one chain, crochet 9 single crochet in back loop only (the one furthest from you). Make two slip stitches in the edge of the slipover, turn the slipover over.
Closing
Neck/shoulders:
If you want to crochet the ends together to get a full ribbing, crochet the two ends together with slip stitches. You do this by laying the ends next to each other and crocheting through the both layers at the same time. Cut the yarn and attach the yarn to the inside of the ribbing/slipover.
Slits:
When you reach the first slits, it is enough to make a slip stitch on the edge of the slipover, after step 5 (9 single crochets). Then start over from step 2 (with a chain). See pictures below.
When you reach the second slits, finish in the same way as in the first slots with a slip stitch in the edge of the slipover. Cut the yarn and fasten off.
Now your slipover is finished! Do you want to block your slipover - see the next step. If you block, you get a straighter shape on your slipover. This can be useful, above all, to achieve a straighter rib edge at the slits. This is up to you if you want to do.
BLOCK
You can block in many different ways. Here I will explain a simple way to do it. What you need are needles and a substrate to attach the needles to. There is special blocking equipment to buy but you usually have something at home that you can use. I use a yoga mat, but a steadier sofa cushion also goes well.
1: Soak the garment in water. You can choose to wash the garment in wool detergent if you have it. Let the slipover lay in water for a bit of time so the fibers are soaked. The garment may appear soaked just a few minutes after you put it in water, but the innermost fibers need a little longer.
2: Squeeze out as much water as possible. You can wrap the garment in a towel and press as much as you can. Avoid twisting the garment.
3: Pull gently and shape the garment/square to the desired size.
4. Stick the needle into the desired shape. If you block squares, be sure to put needles in the corners to bring the pointed shapes as well as straight edges. I put mine edge to edge in a grid to get them reasonably the same size. You can also block them on top of each other but the advantage of blocking them one by one is that it dries faster.
If you block the entire sweater, be sure to put needles in the corners and along the edges to avoid C-shapes along the edge. You may also need to attach some needles along the neckline as well to get a desired shape.
5. Allow to dry completely before removing the needles. Takes 1-2 days.
6. Finished!
The rights to this pattern belong to MYO Make Your Own. The pattern or its pictures may not be copied, shared or resold either in parts or in its entirety, but you may sell items you have crocheted from this pattern. If you have questions about the pattern, contact MYO at hello@makeyourown.se.
%20(5).jpg)
Share your creations with us
Thank you!
Your comment was sent!