
Crochet shirt "Leah"
Crochet a Stylish Short-Sleeved Shirt
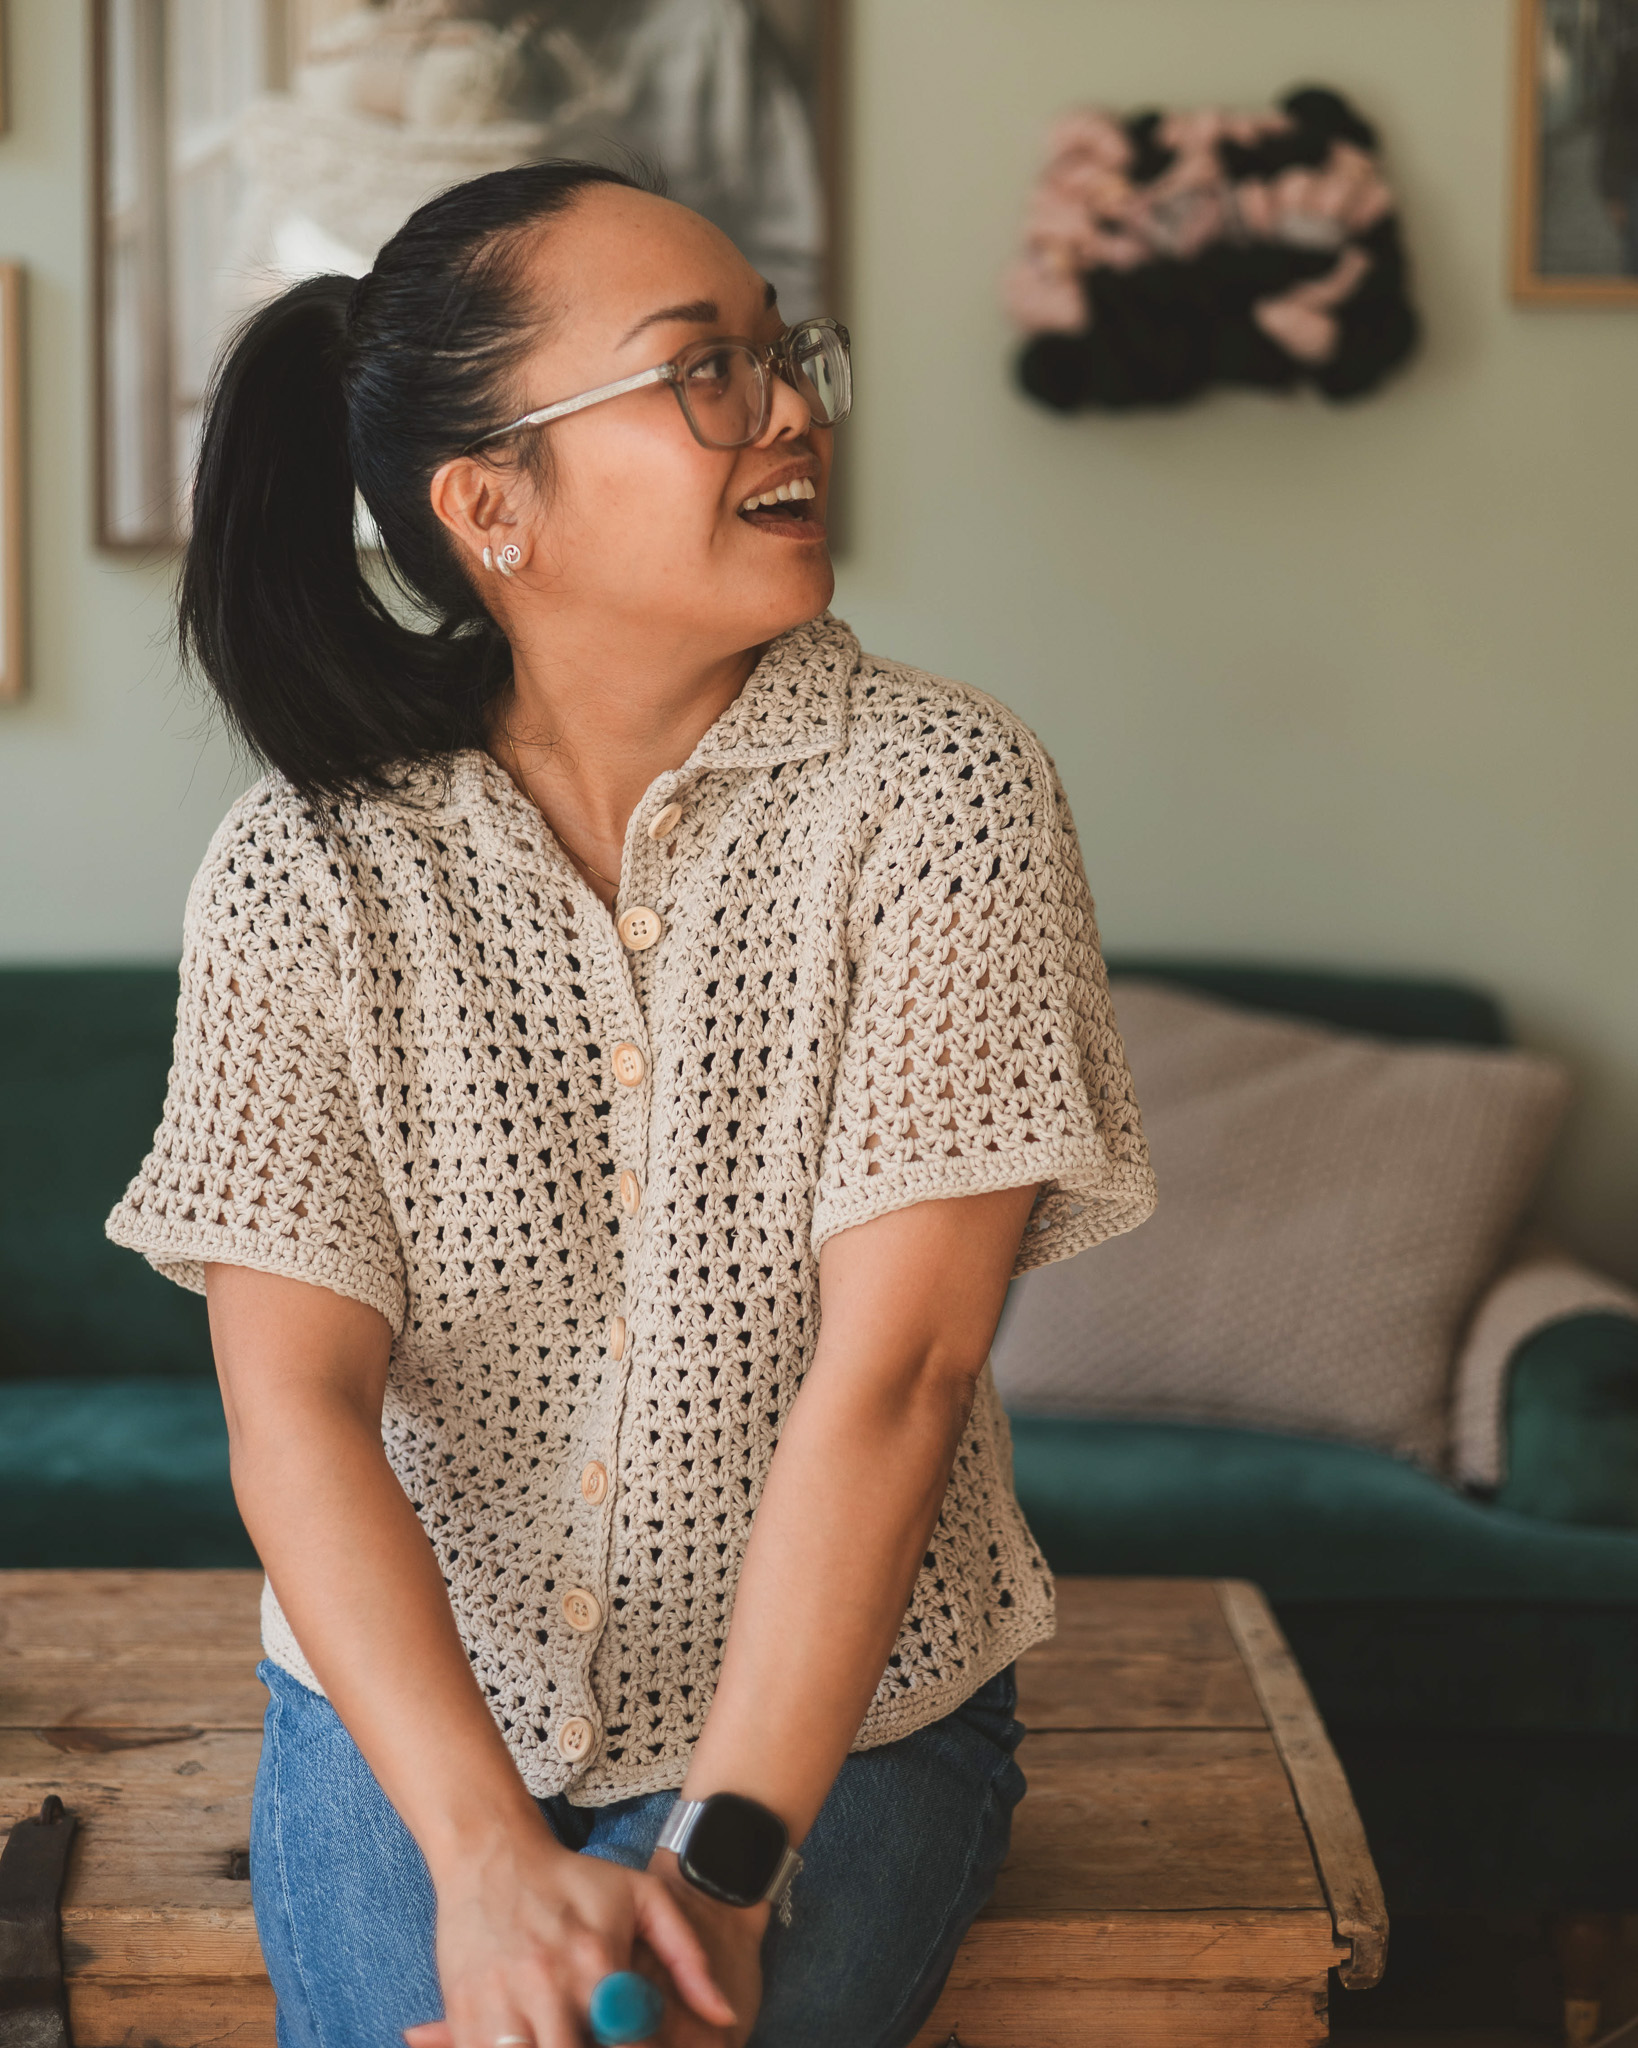
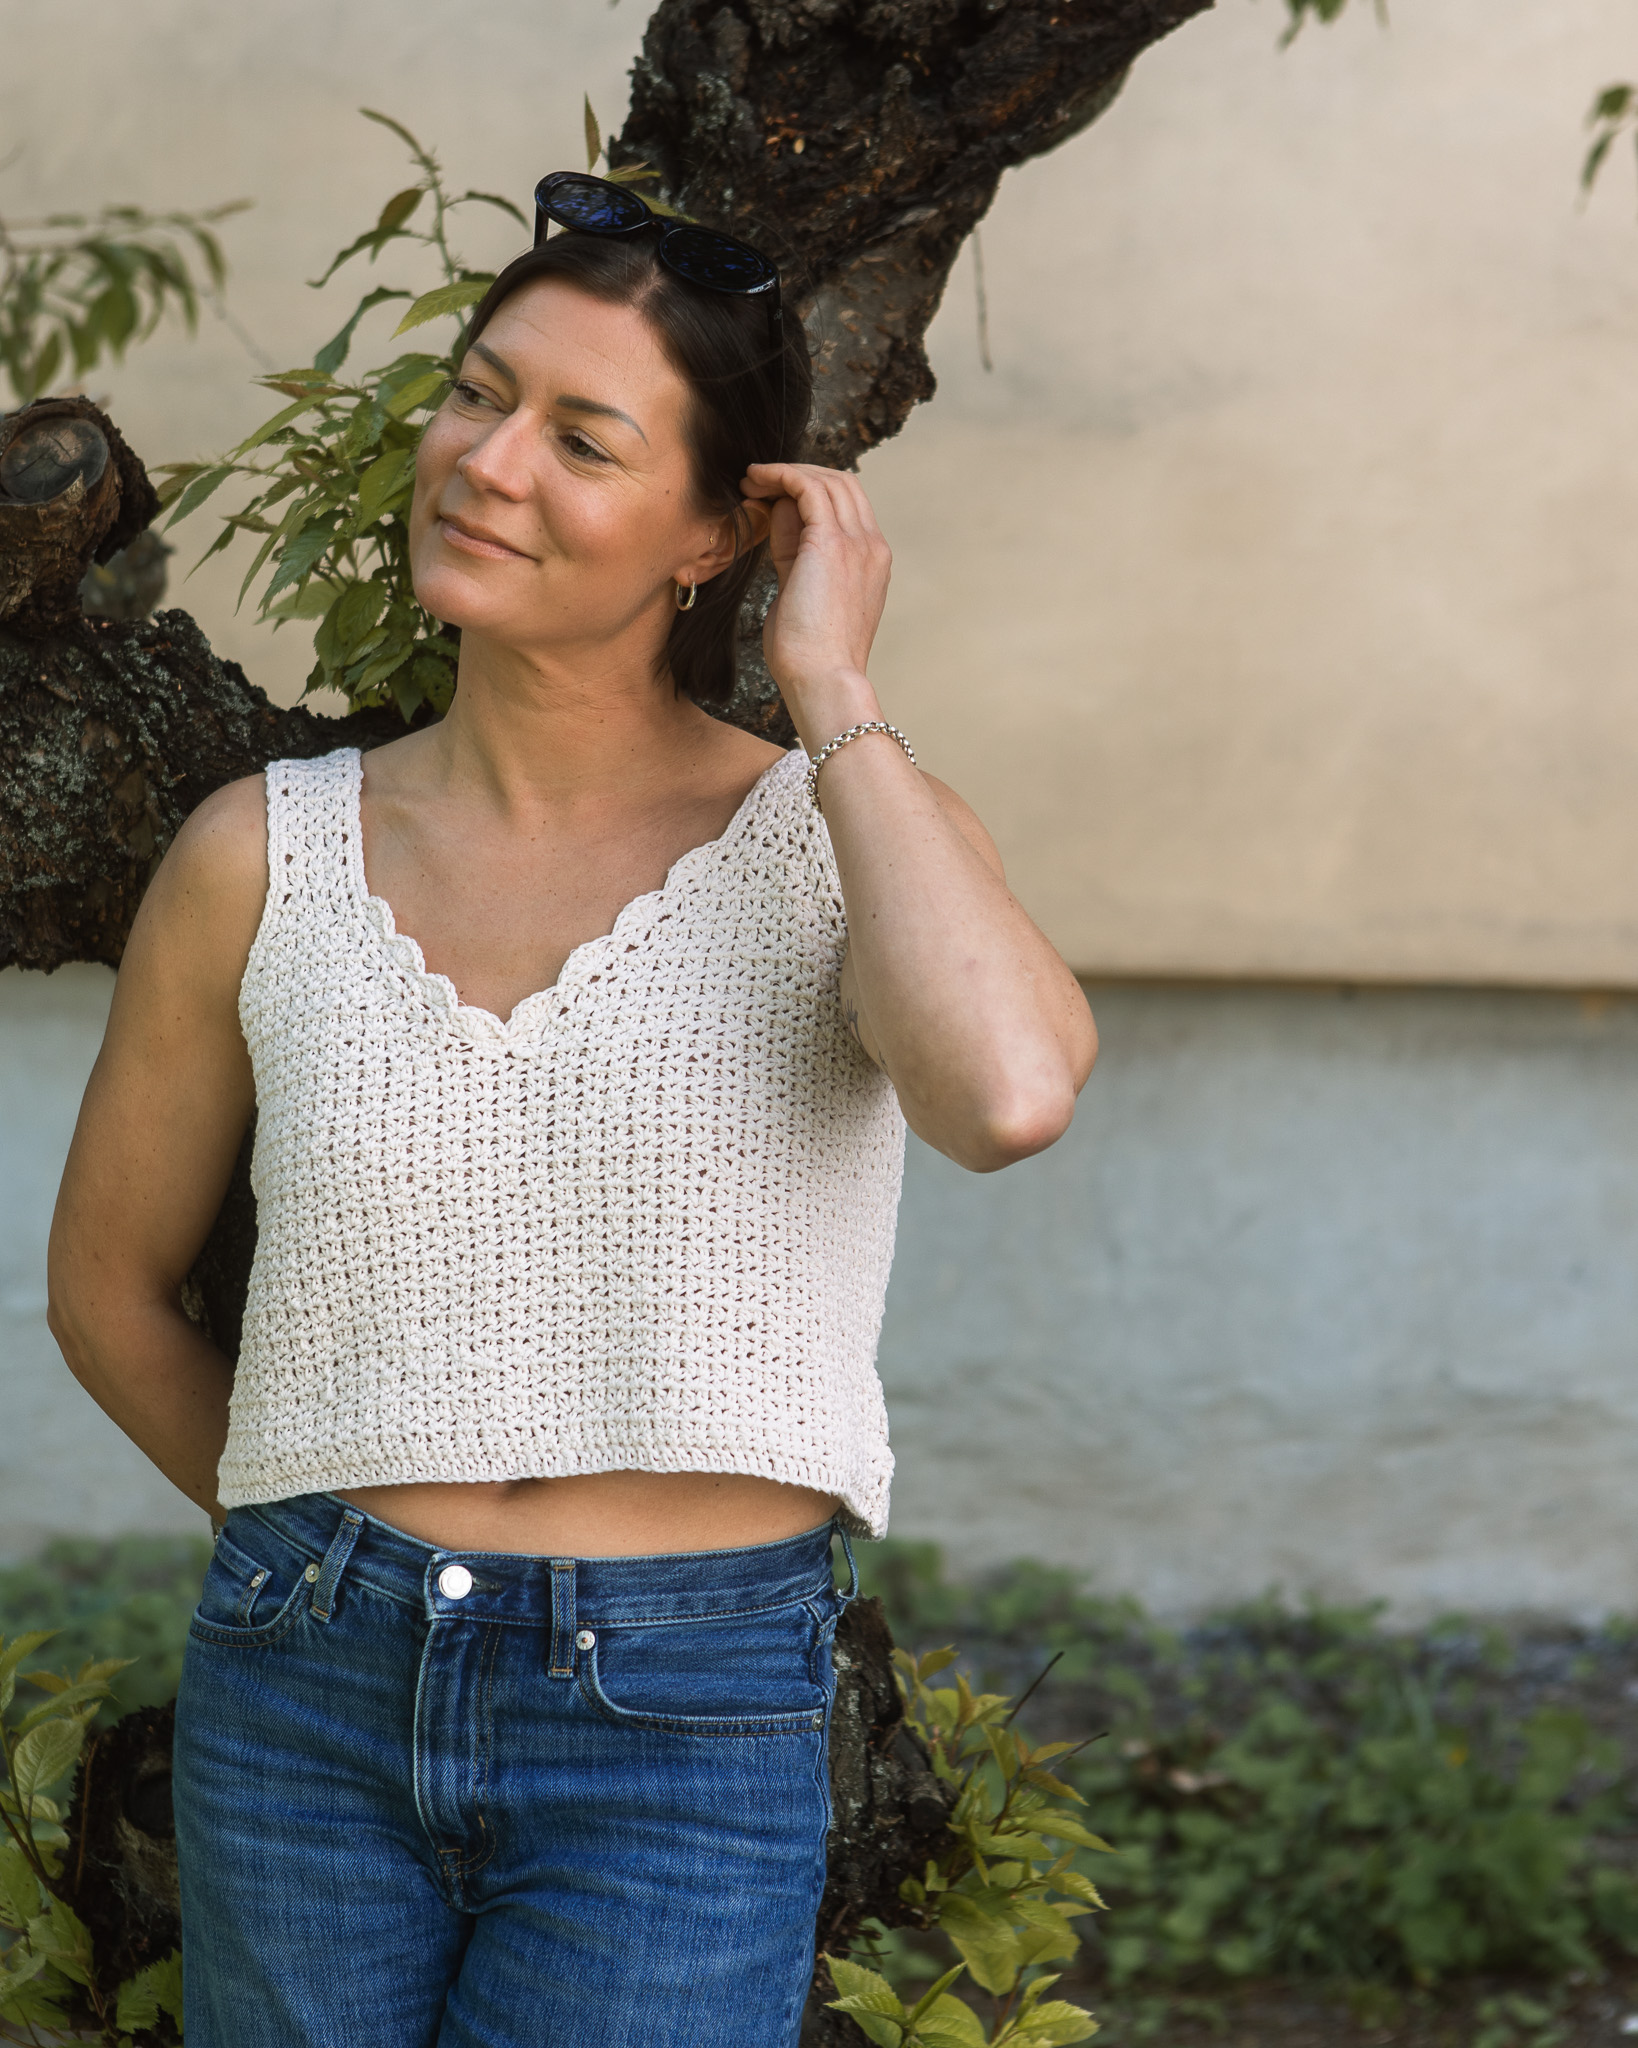
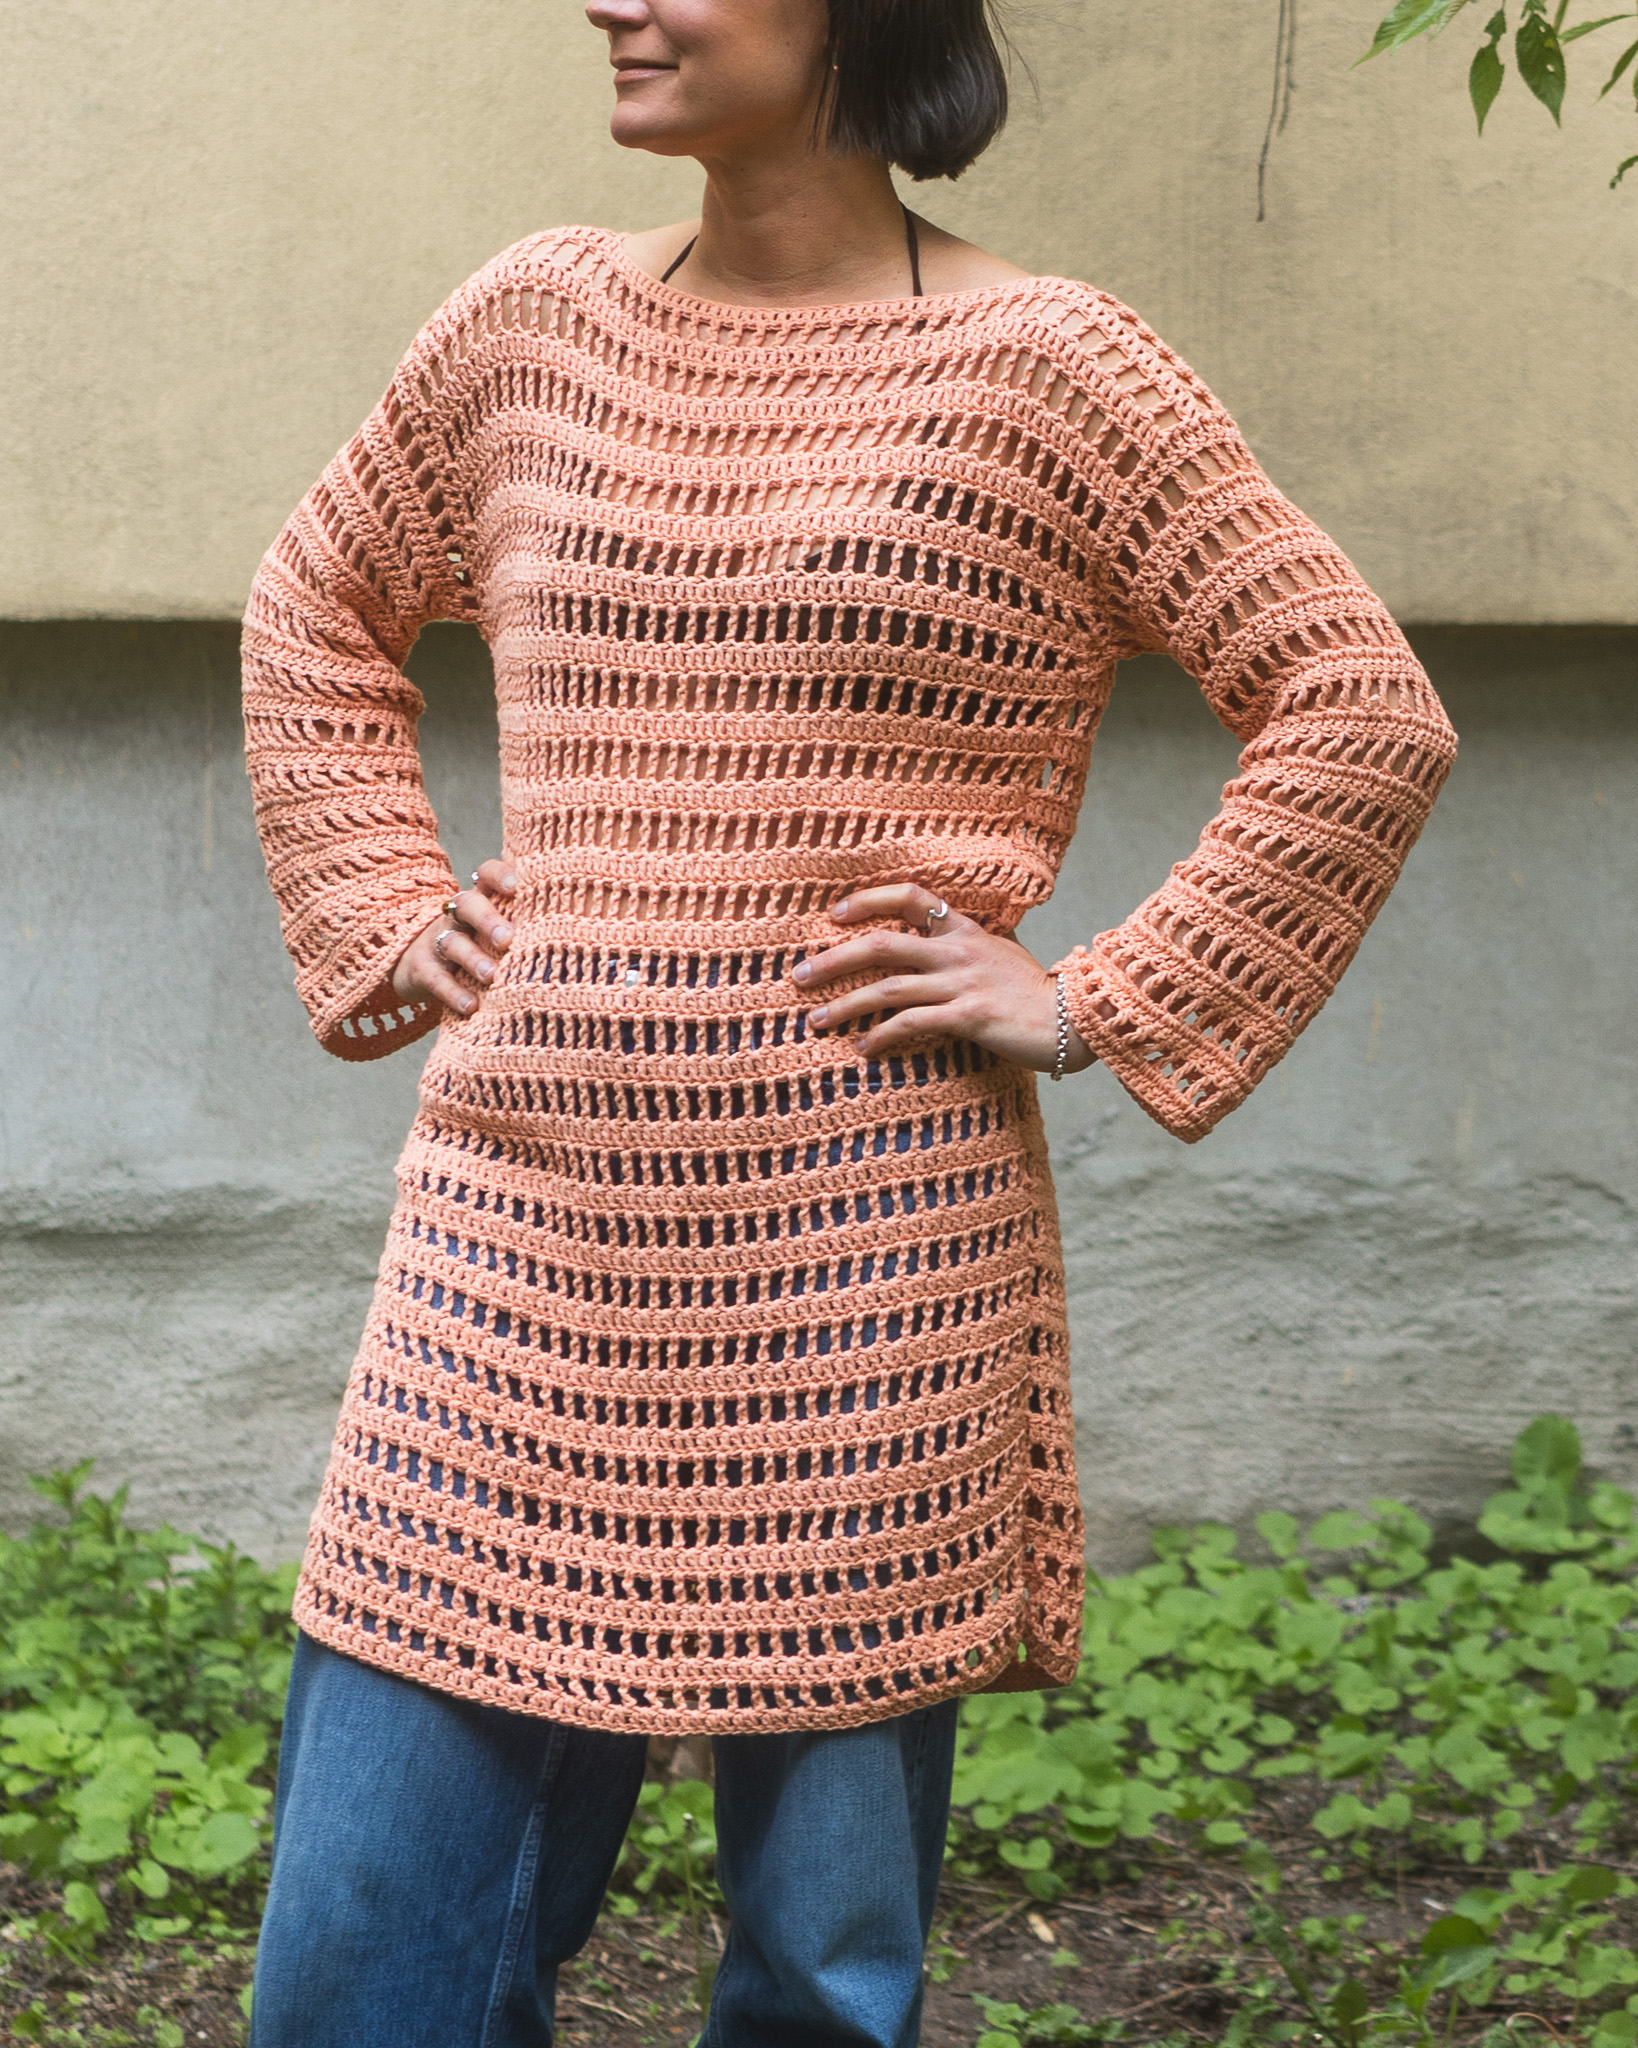
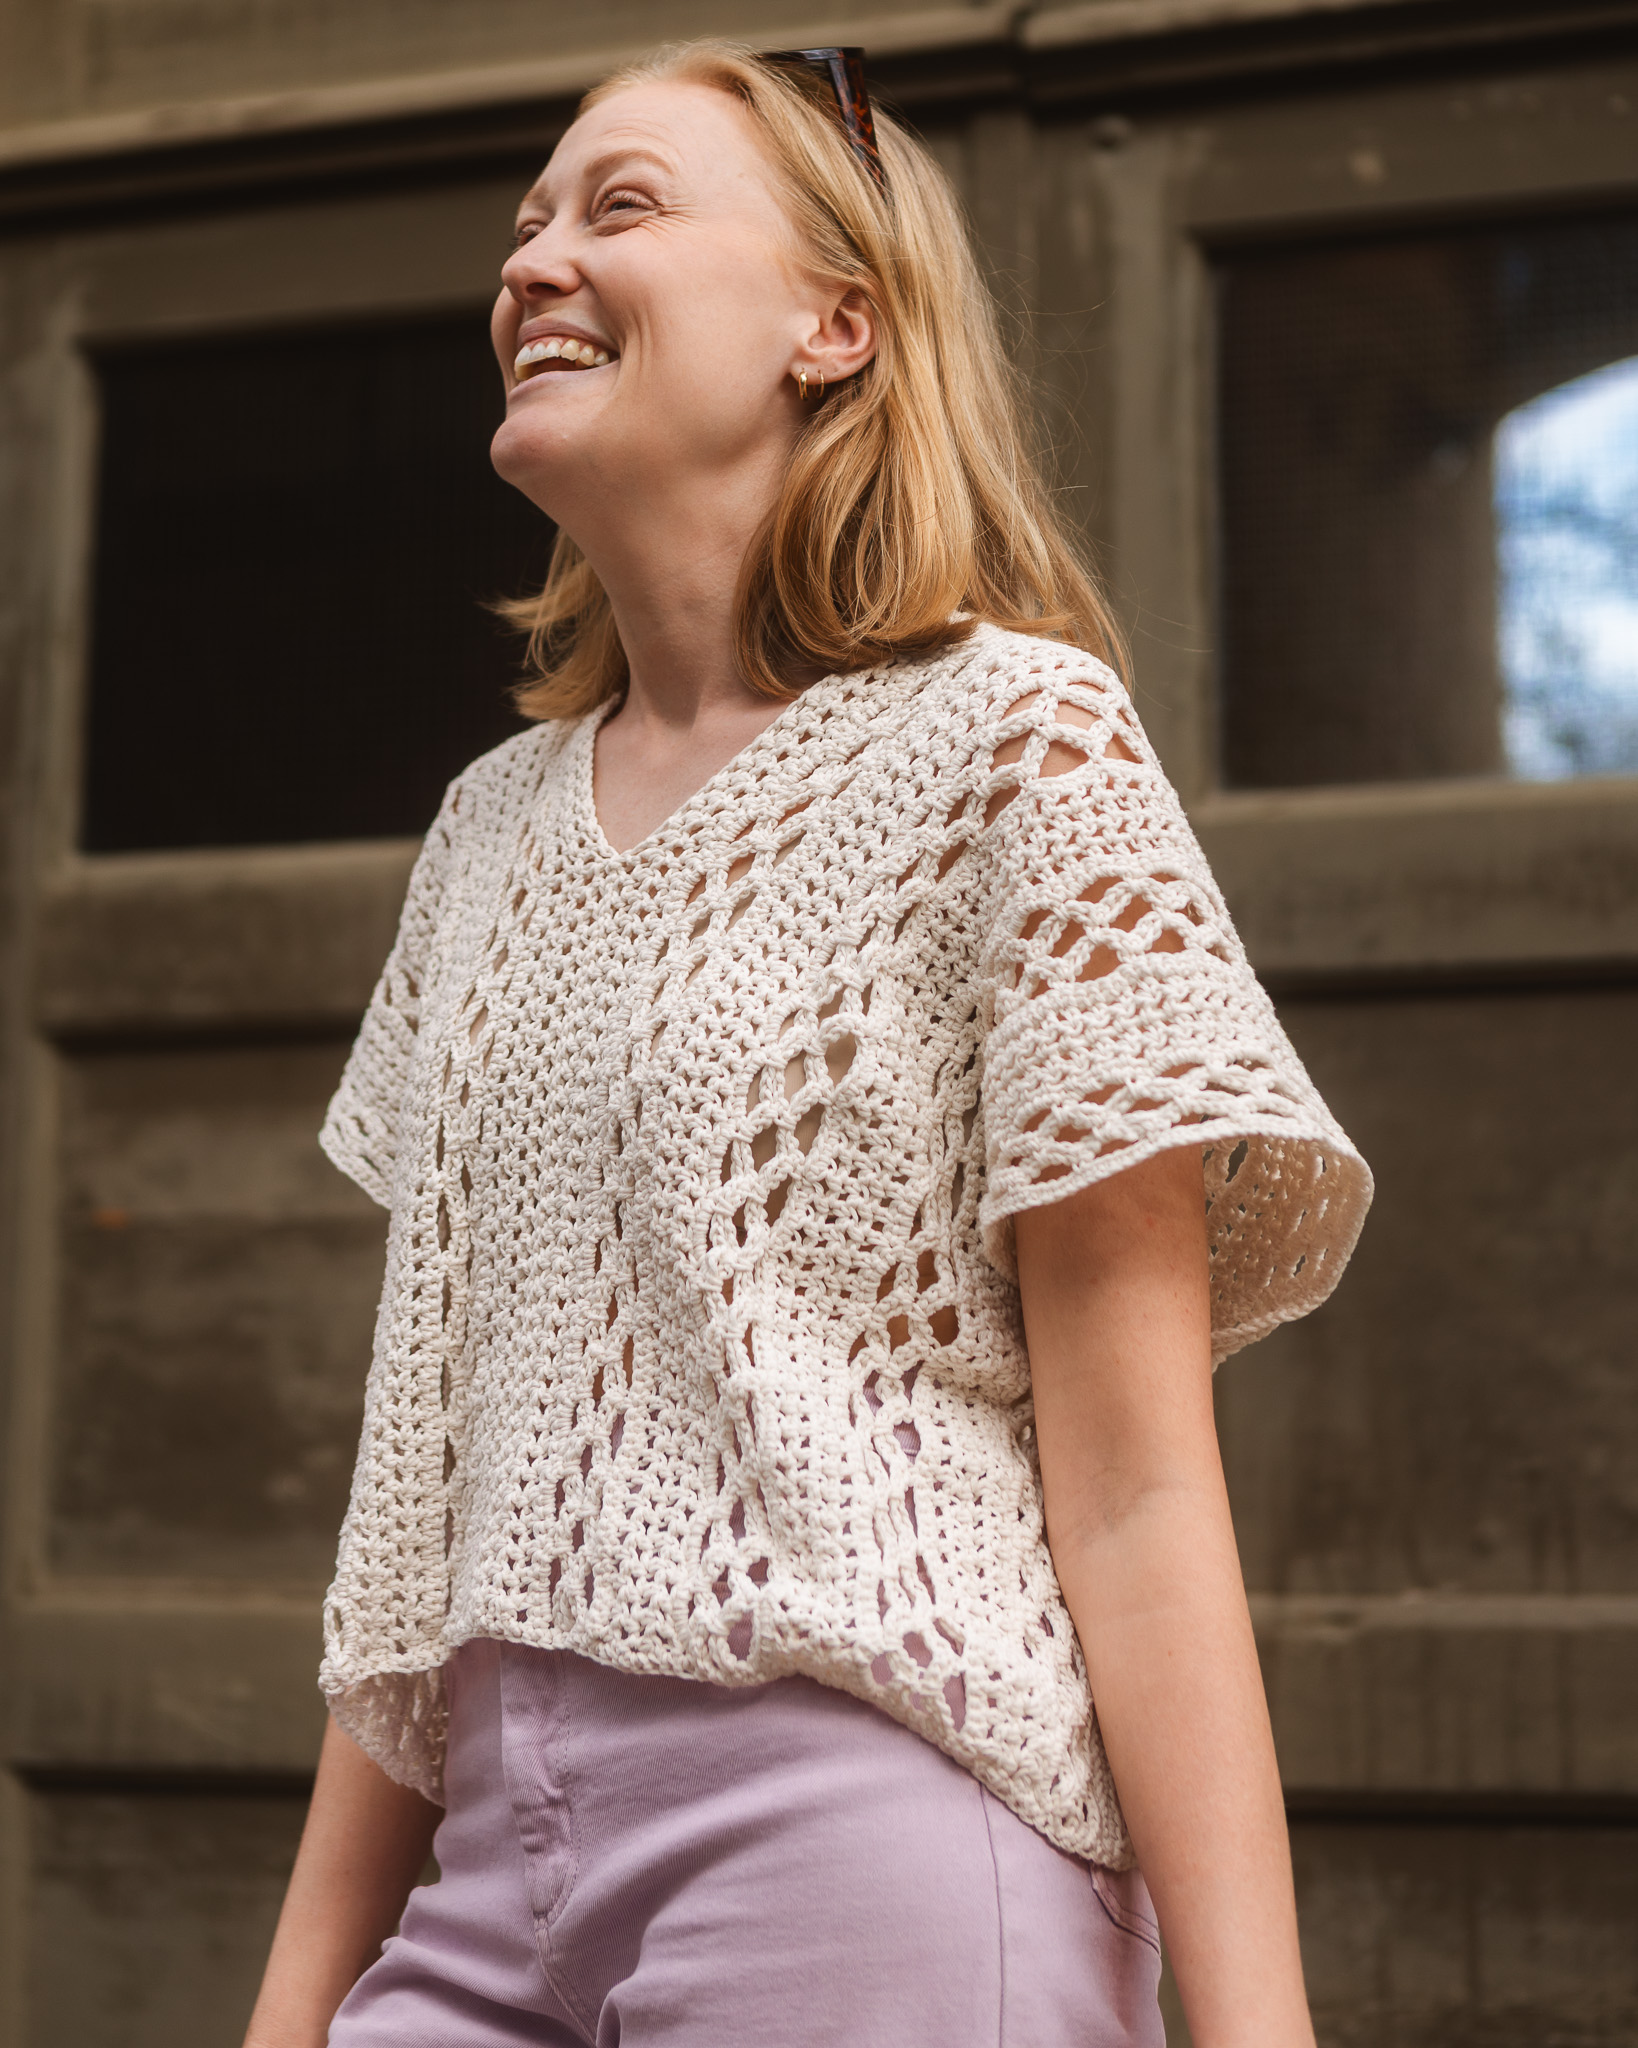
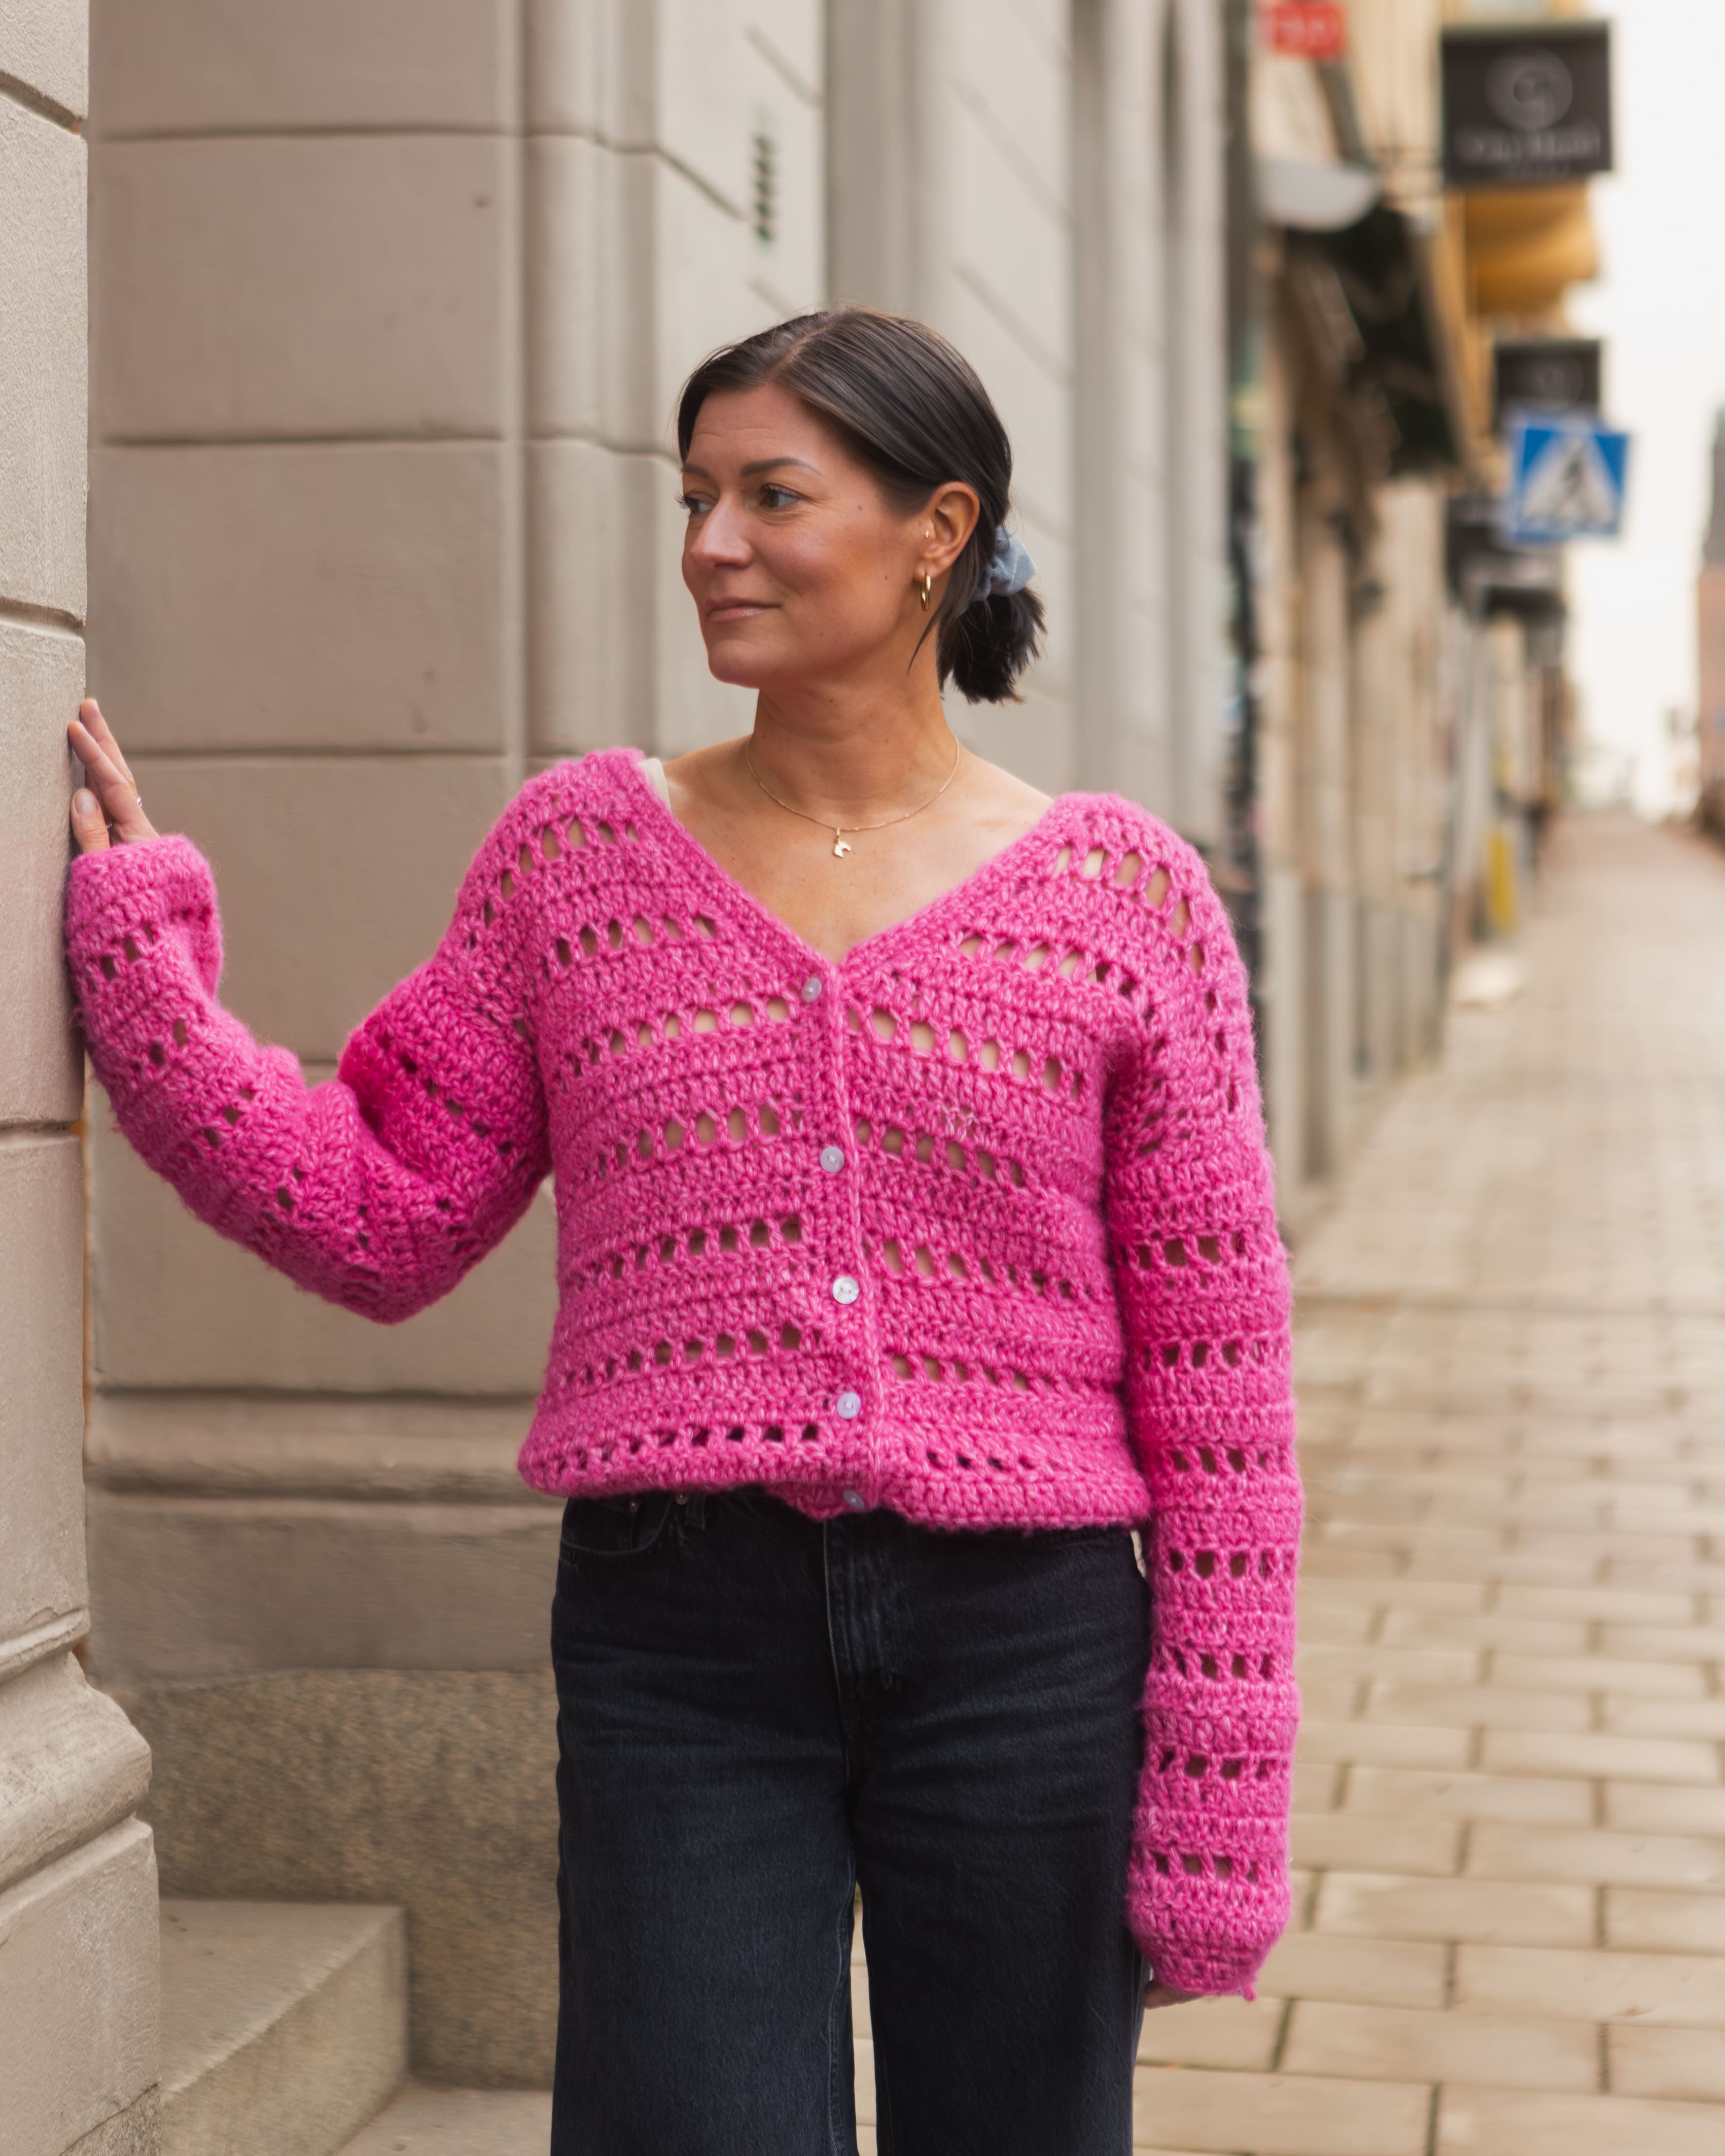
Here comes a pattern for a super stylish and trendy crocheted short-sleeved shirt! It’s a fun pattern where you'll learn how to crochet double crochet groups (granny clusters). The pattern is written for size M/L, but suggestions are also included for sizes XS/S and L/XL. The pattern can also be adjusted to your specific measurements so you can achieve the perfect fit just for you. You will need: MYO Cotton Cloud yarn, scissors, measuring tape, yarn needle for weaving in ends, buttons, and stitch markers.
Yarn Consumption: Approximately 450 g for size M/L.
Please note that in this pattern, we use videos from our technique school along with pictures.


.jpg)
Here's how to do it
The t-shirt is crocheted in one back piece and two front pieces that are then joined together. The collar and the two sleeves are crocheted directly onto the shirt, and once you've sewn on the buttons, you're done. I hope you’ll give it a try and make your own t-shirt! Good luck! / Johanna
%20(4).jpg)
This is what you need:
Here you can directly purchase the material for the product. Please note that the instruction is digital and appears here on the page (no written instruction).

Cotton Cloud | 100 g
A slightly thinner cotton yarn that works perfectly for clothes, accessories and amigurumi.
Buy product
.jpg)
Unleash your creativity
For only 85kr per month you get access to all our 300+ beginner-friendly instructions for crochet, knitting and macrame.
A perfect way to get started with your new hobby!

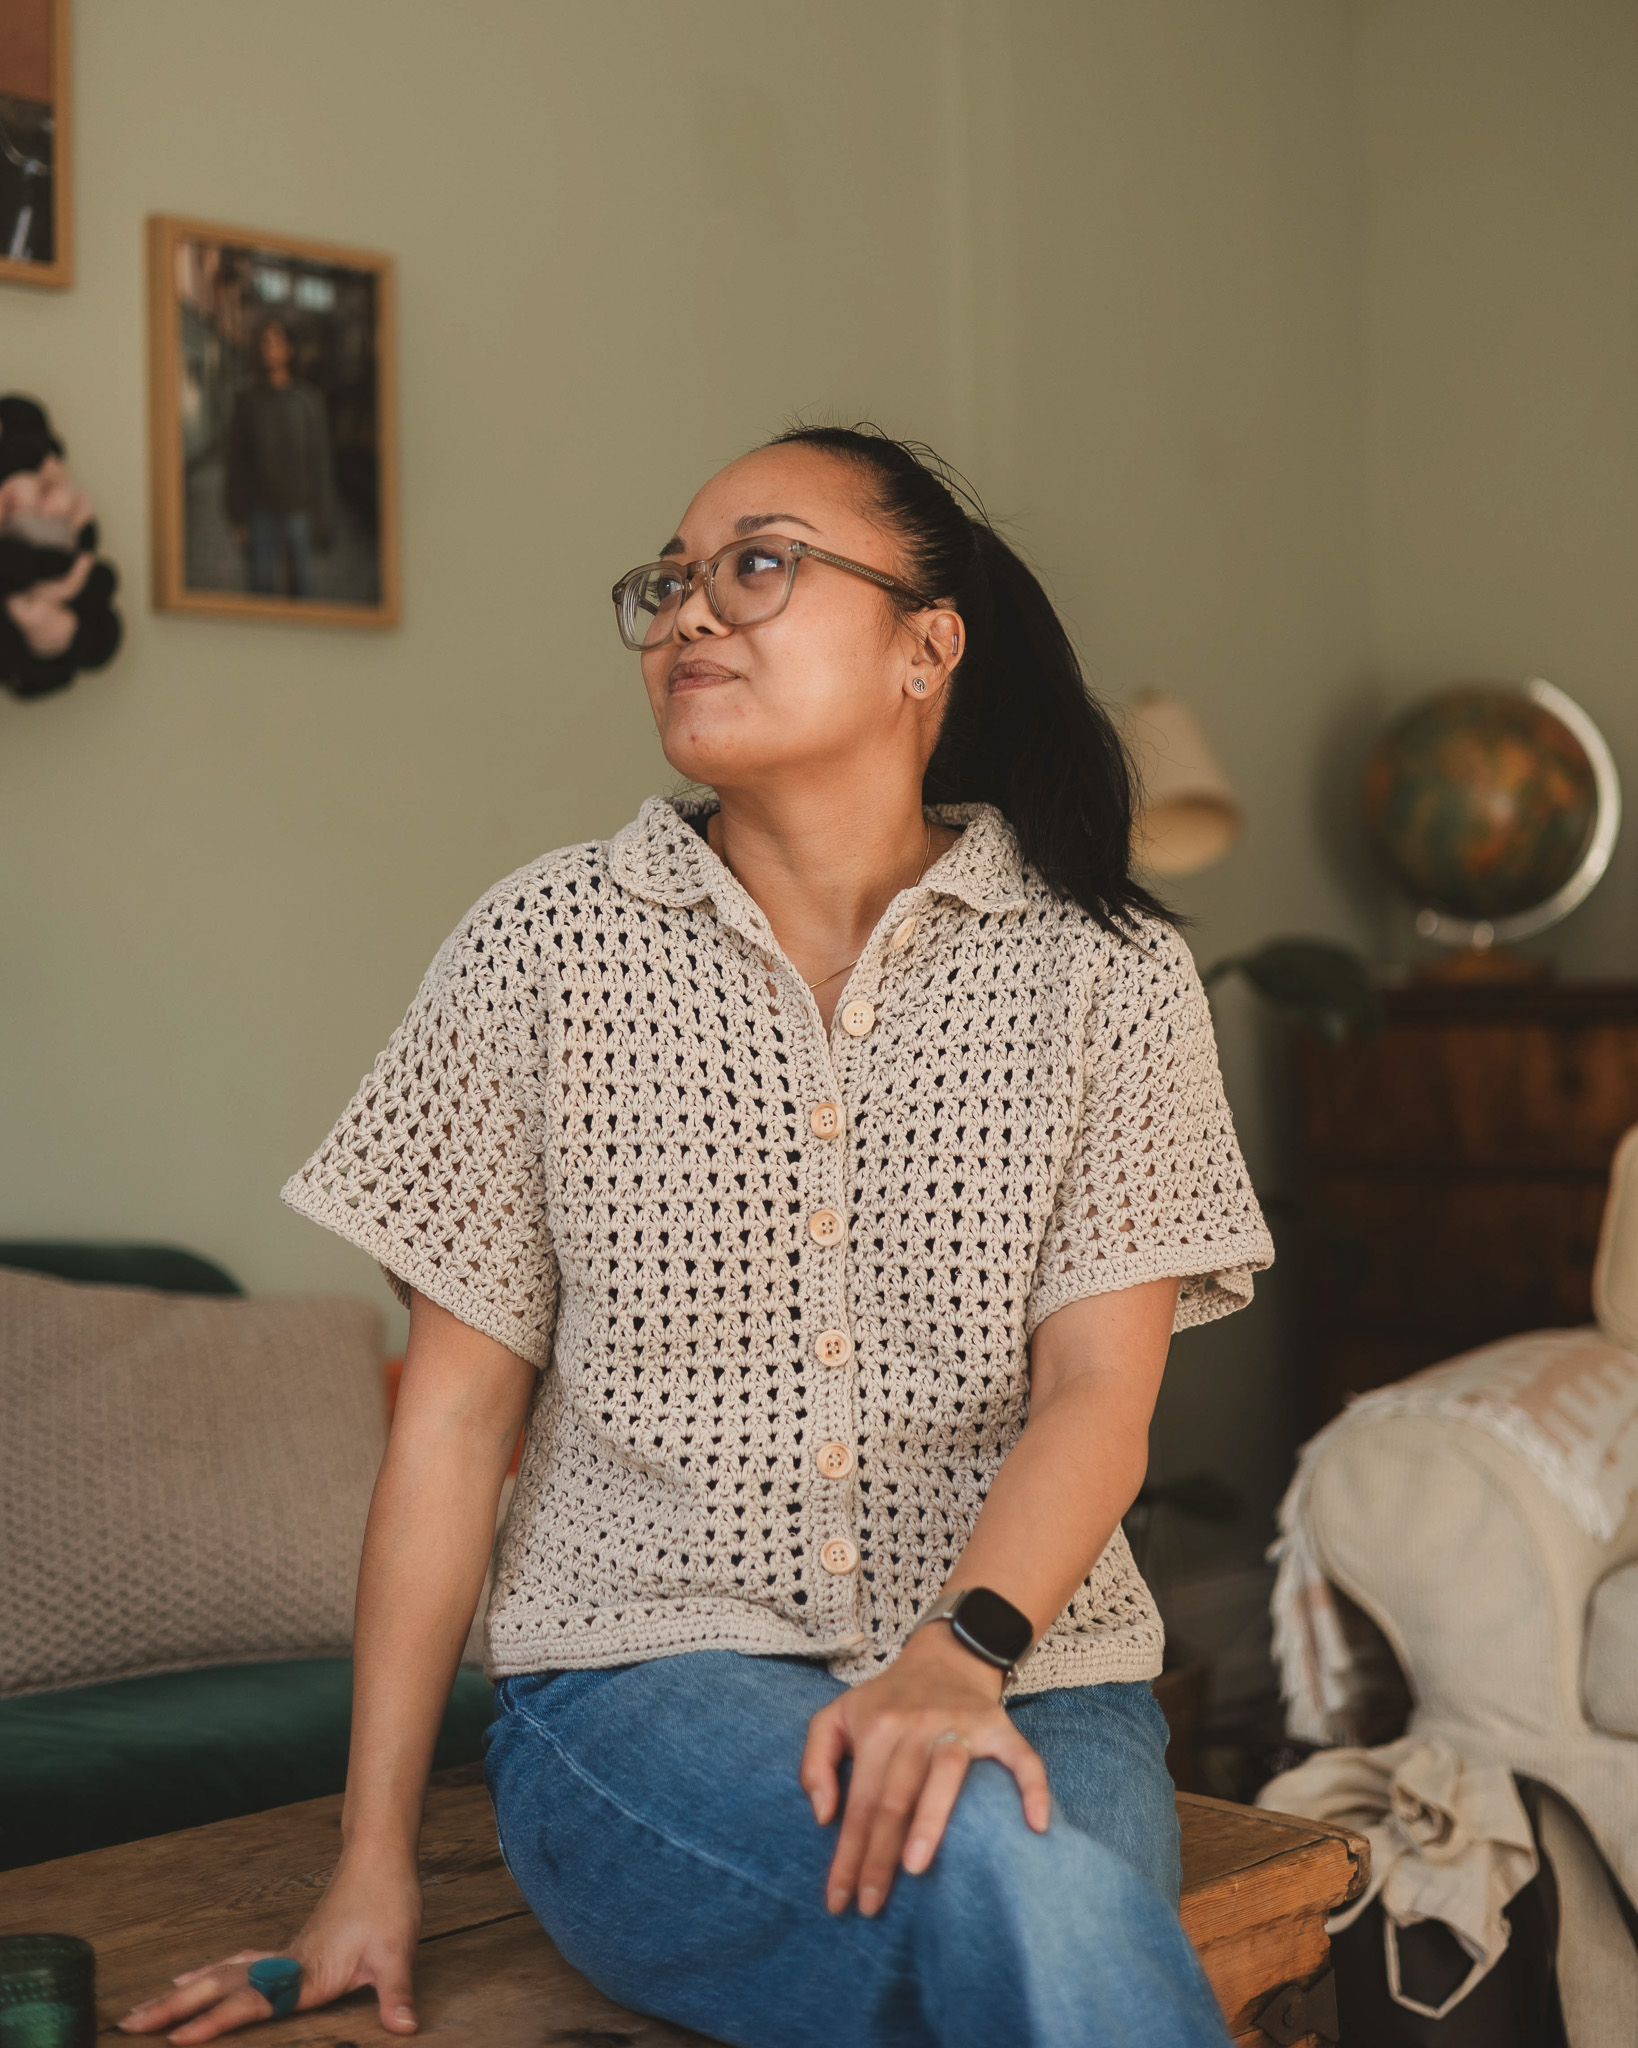
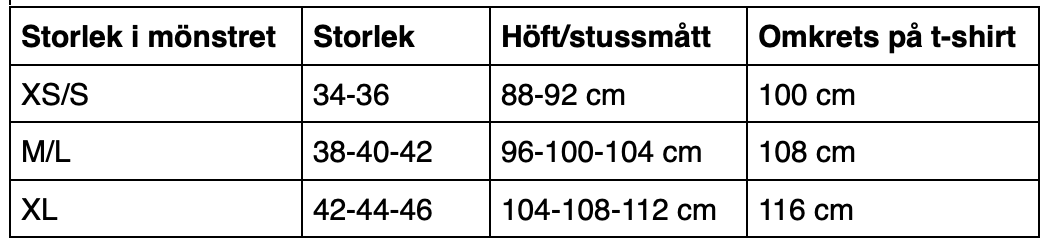
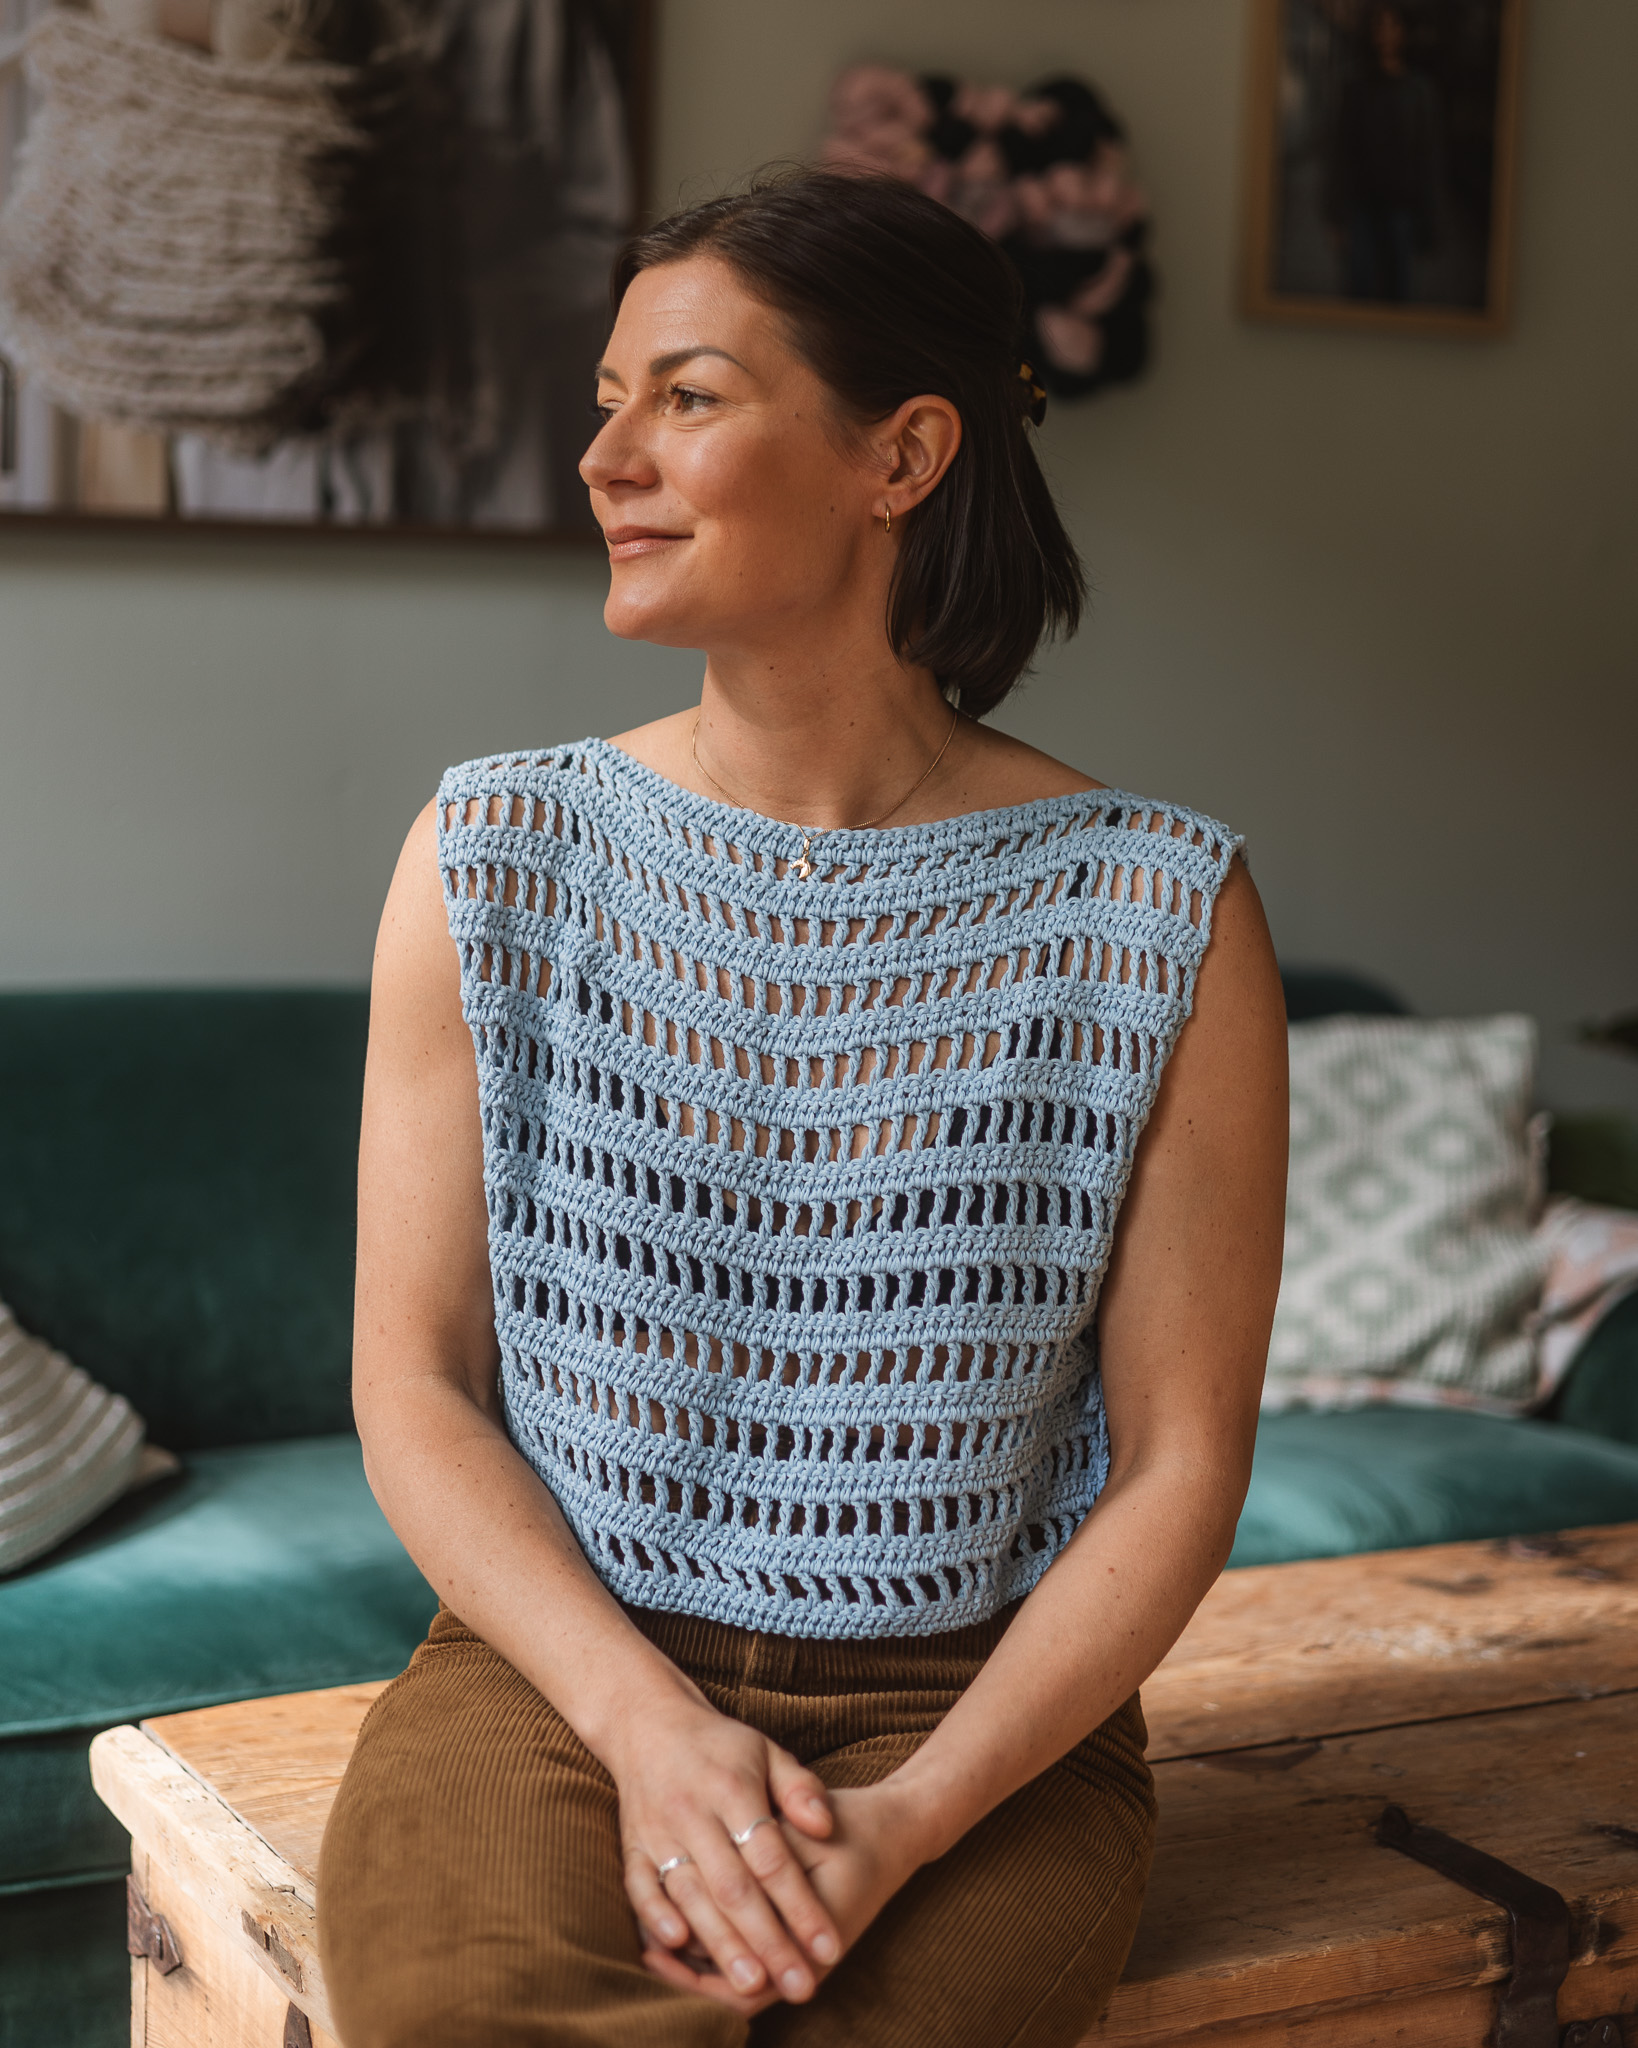
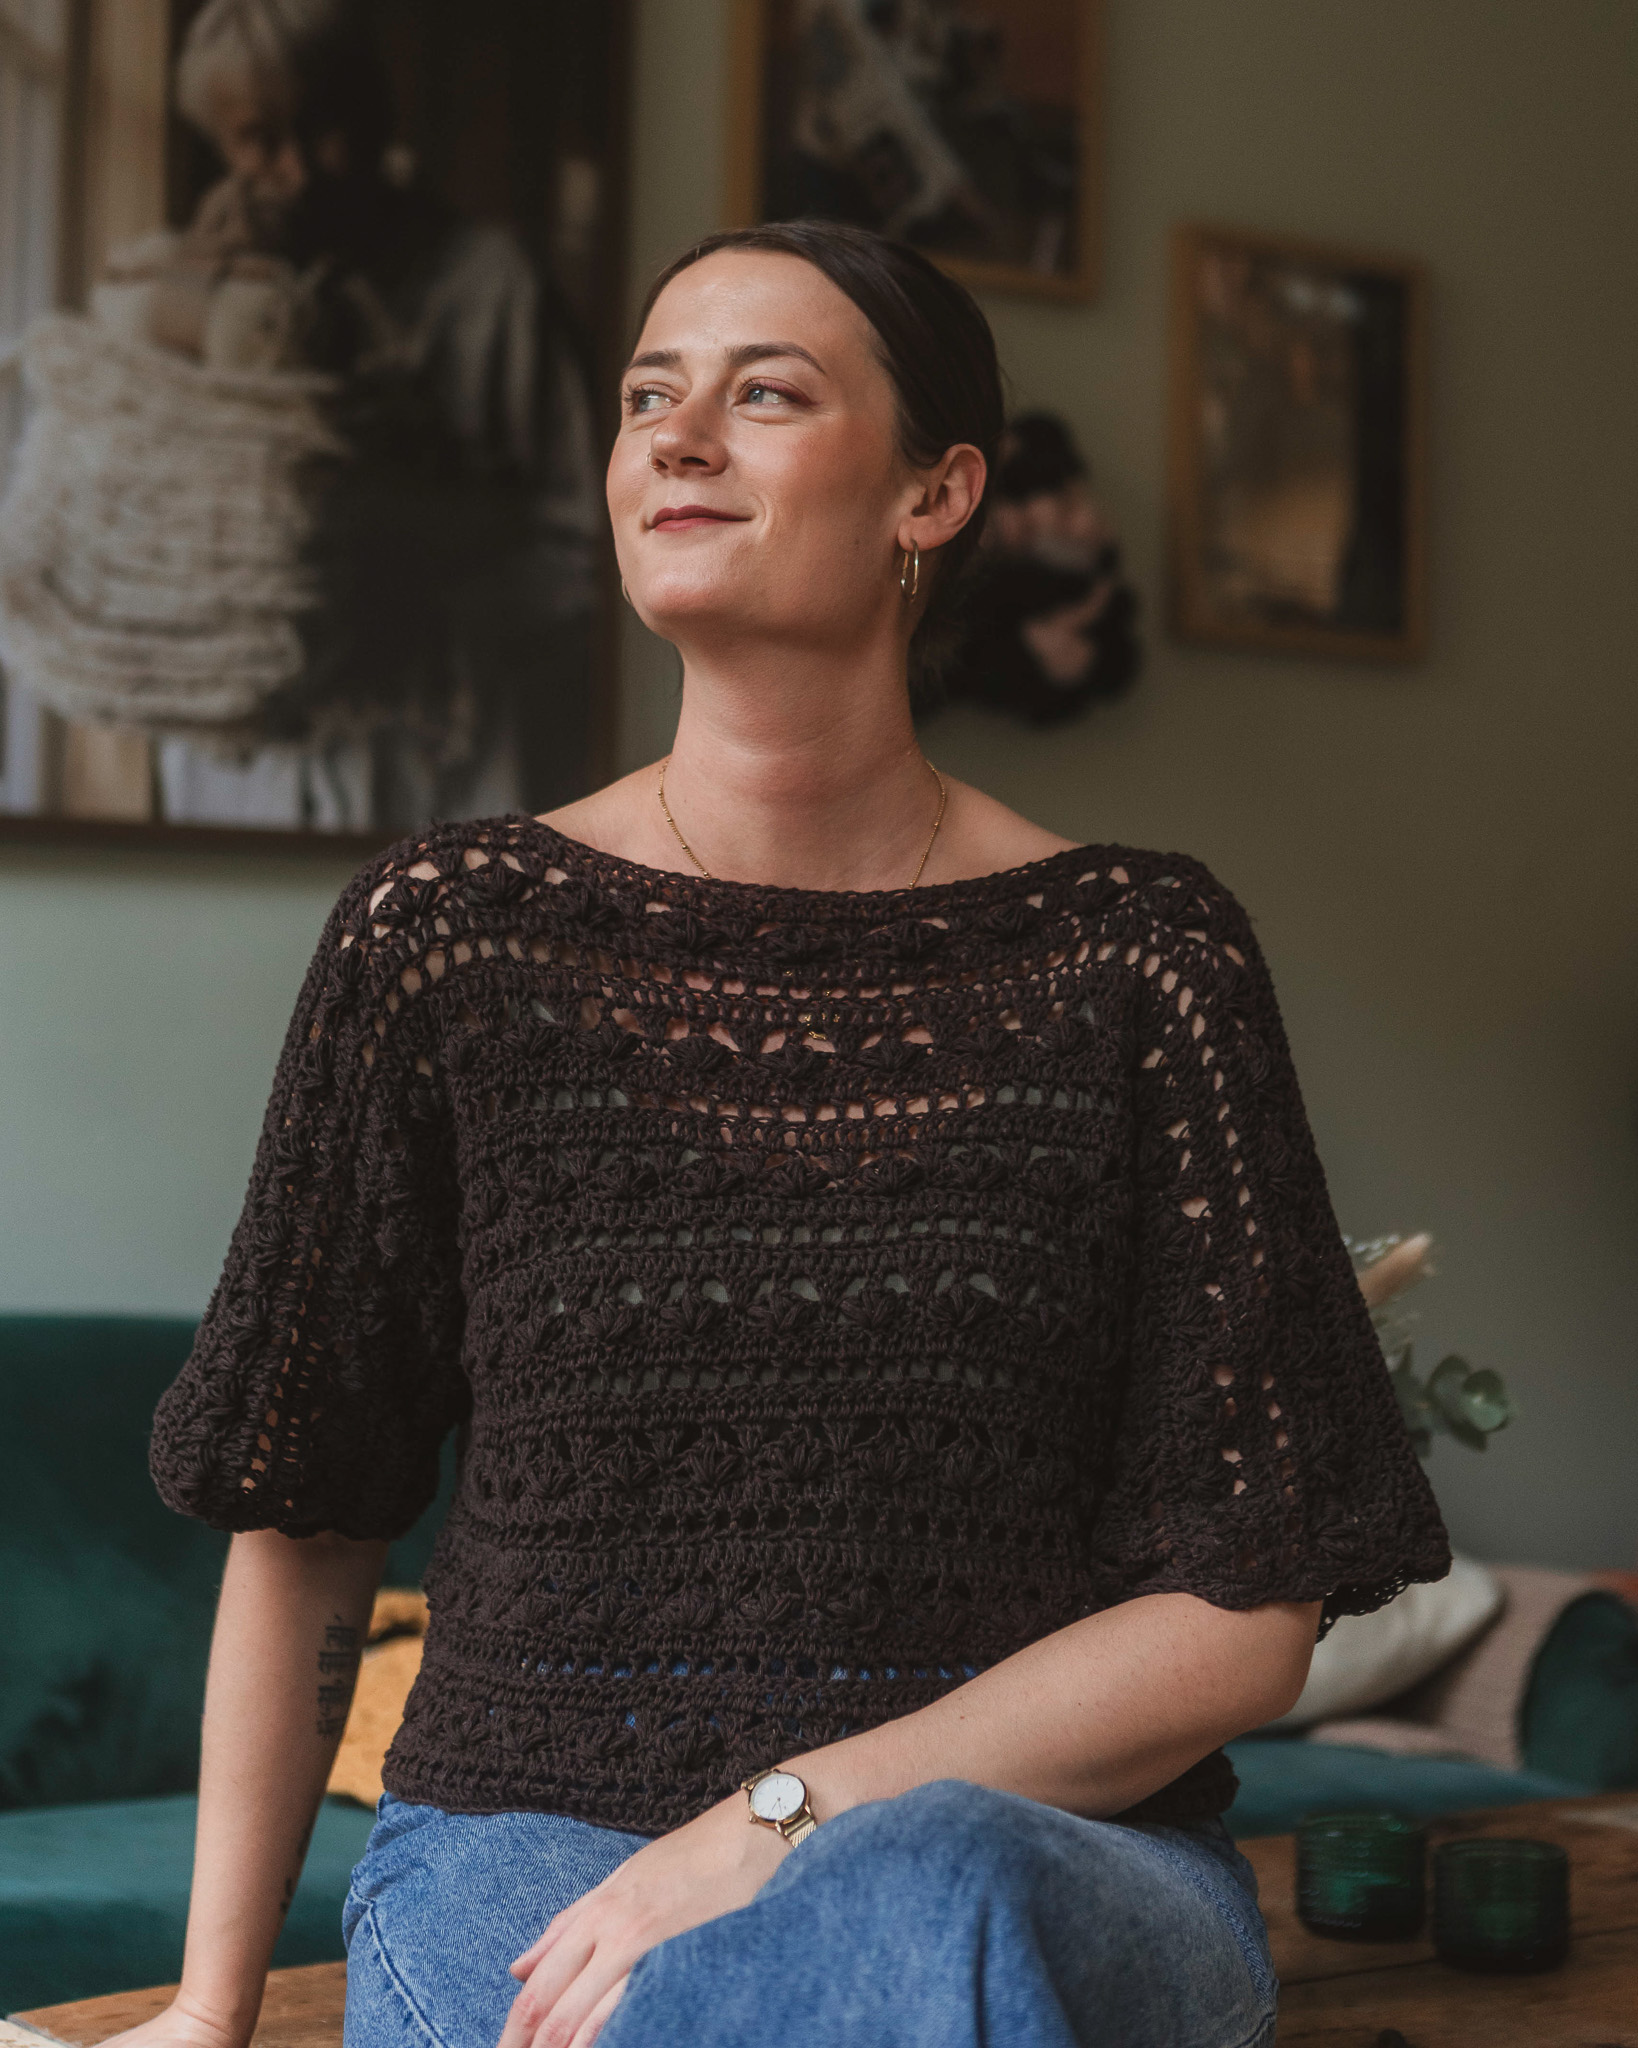
The pattern is written for size M/L (the t-shirt in the photo), but it can be adjusted to fit your measurements if you wish. There are also suggestions for two other sizes included in the pattern.
The pattern is written for size M/L, with smaller and larger sizes shown in parentheses ( ), i.e. M/L (XS/S, XL). This shirt should be crocheted slightly loosely to give it a nice drape and create a soft garment.
Image below: Measurements of the sweater/shirt in size M/L (cm).
(Gauge: 10 × 10 cm = 16 double crochets wide, 7 rows.)
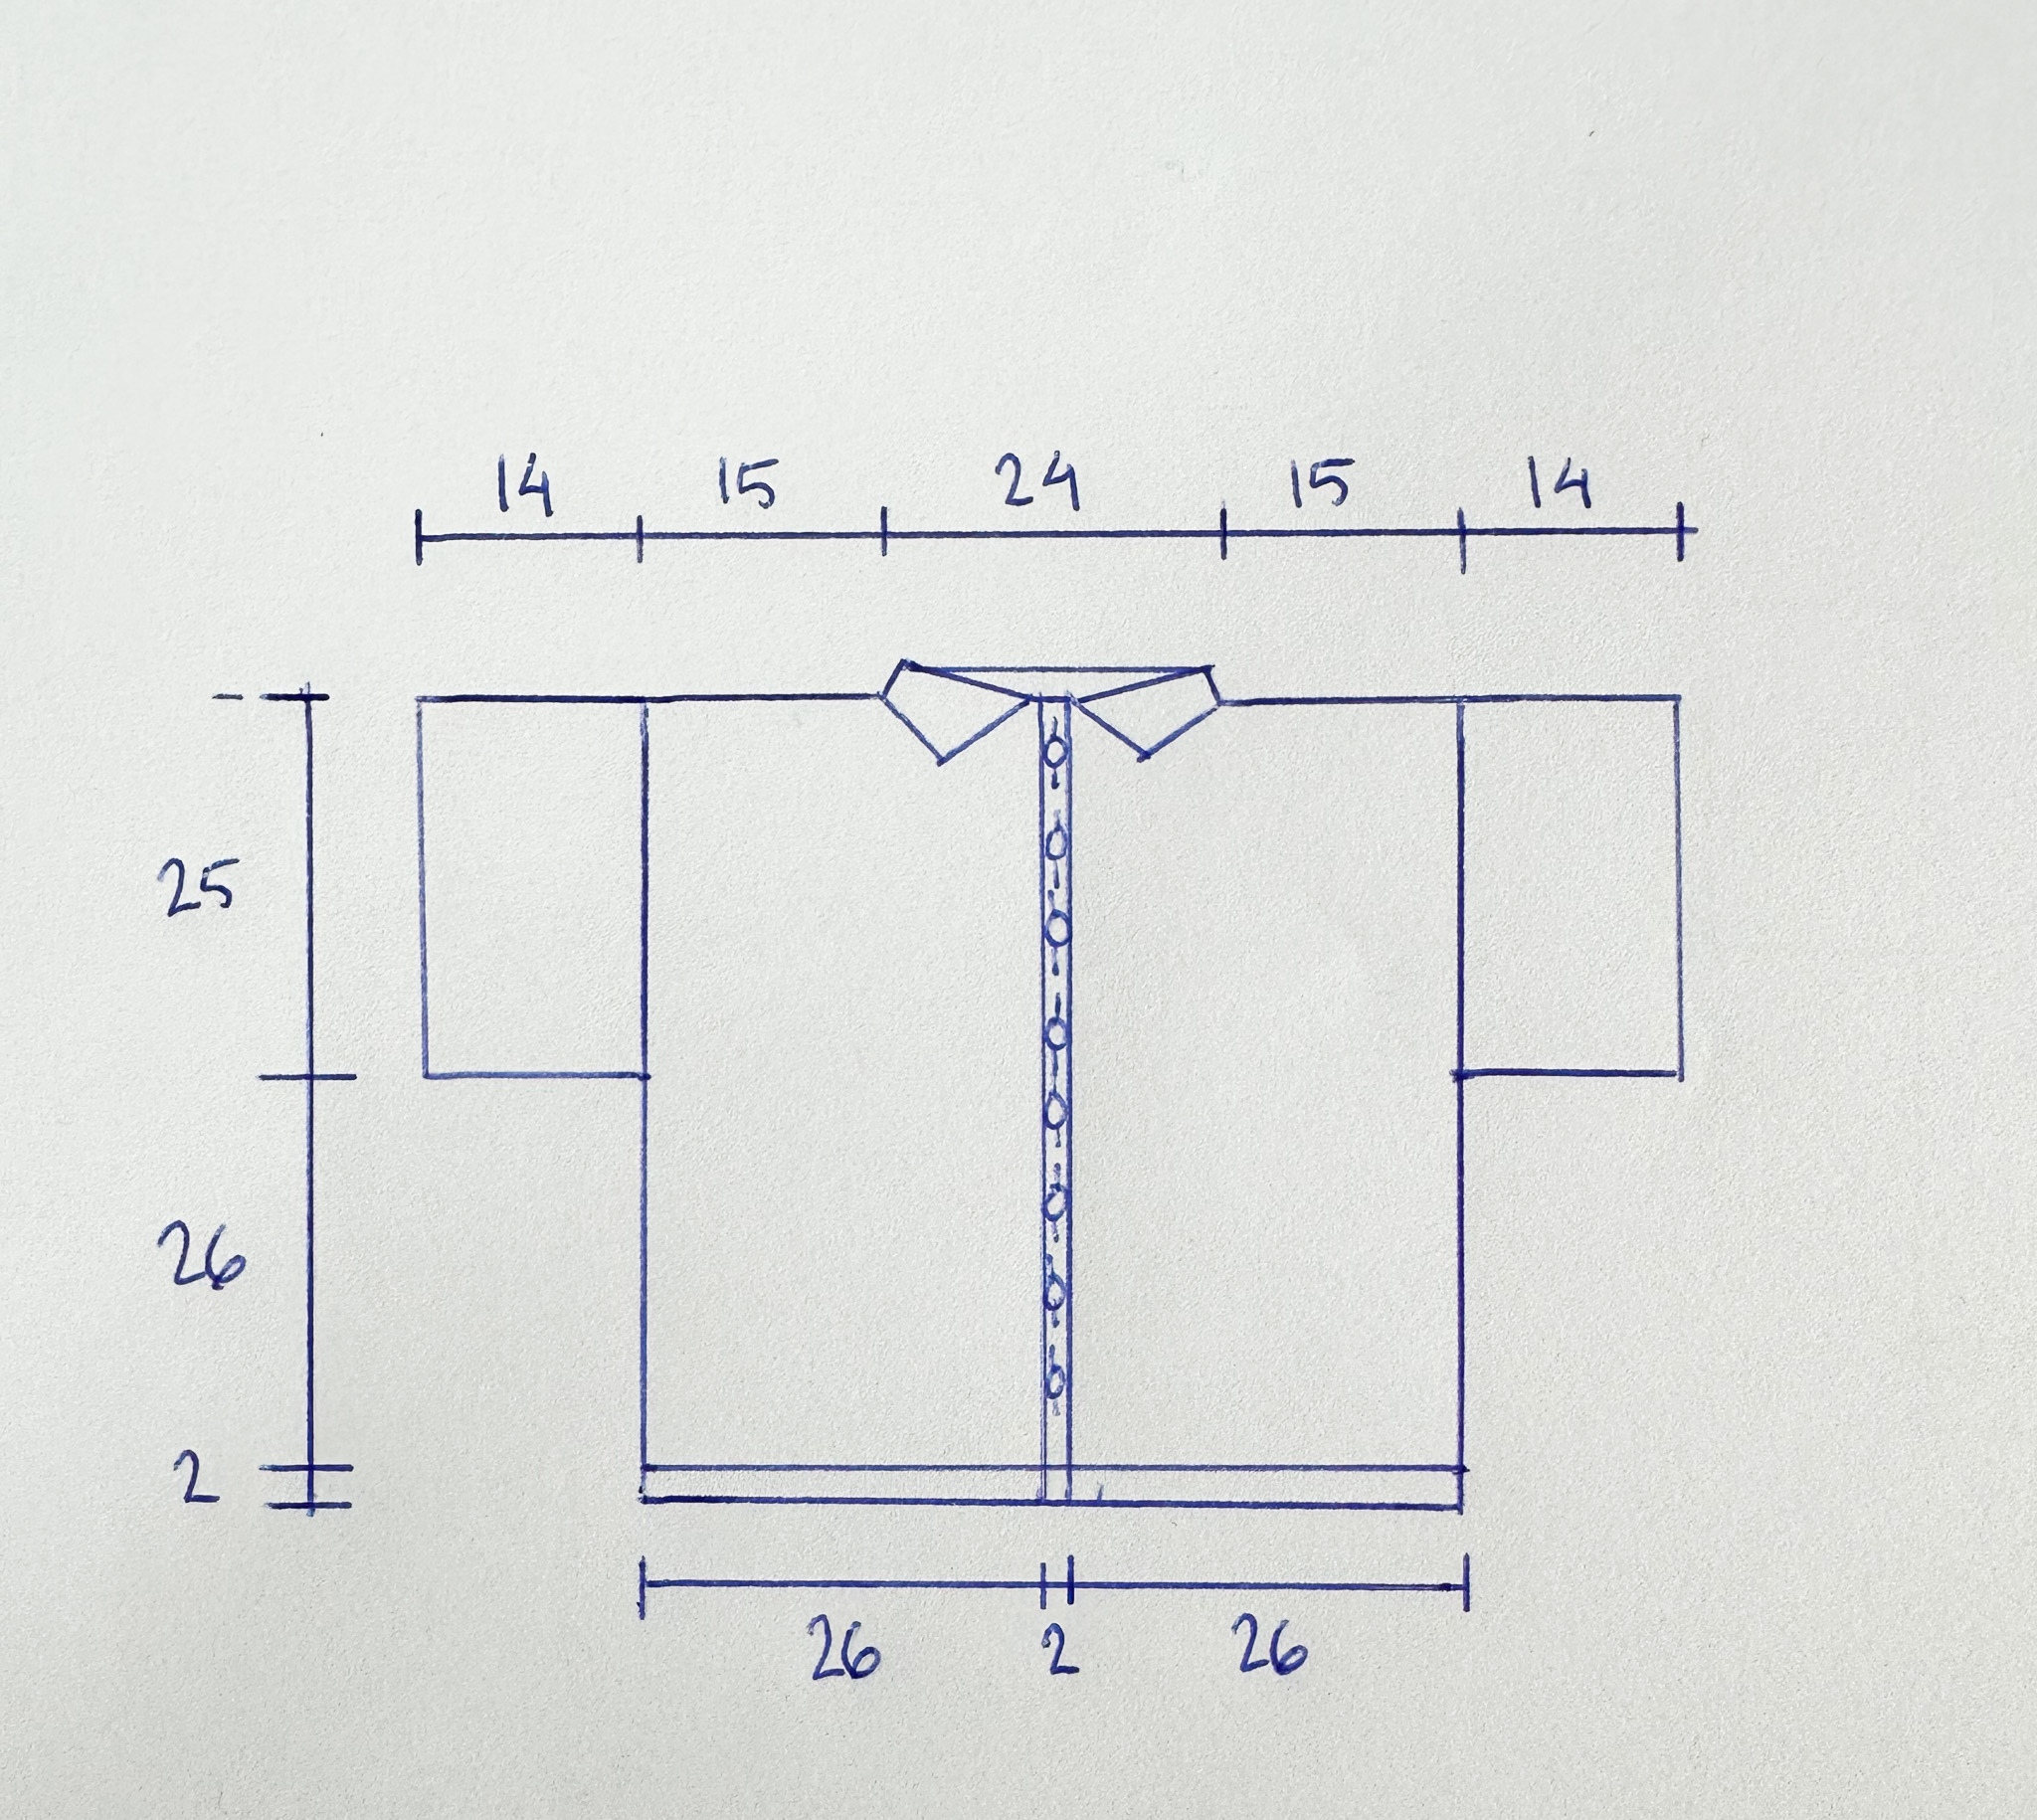
Start by measuring your hip circumference — that is, the widest part around your hips. This t-shirt has a straight fit, meaning it doesn’t have a defined waist. Therefore, the circumference of the shirt's body should be slightly larger than your hip measurement.
This is where you can adjust the fit by adding more centimeters to the width if you want a more oversized look.
Tip: Take a measuring tape and form a circle with it (using the measurement you’re planning to use) around your hips. This gives you a sense of whether the fit feels right or if you should size up or down. You can also measure the circumference of a shirt you already own for comparison.
Front Panels (make 2)
Foundation: Chain 47 (44, 50) stitches.
If you want to crochet according to your own measurements rather than the sizes described in the pattern, chain a multiple of 3 + 5, according to your desired width. For example, chain 41 stitches if you want the panel narrower, or 53 if you want it wider.
If you're unsure how to crochet a chain, see the video below.
If you need help on how to corchet row 1-2, see video below.
Row 1: Skip the first 4 chains closest to the hook and start in the 5th chain.
*Yarn over and pull up a loop so that you have 3 loops on the hook. Yarn over again and pull through 2 of the loops. Now you have 2 loops on the hook. Skip the next stitch, yarn over again and pull up a loop so that you have 4 loops on the hook. Yarn over and pull through 2 loops. Now you have 3 loops on the hook. Yarn over once more and pull through all the loops. This is called a double crochet group (or cluster).
Chain 2*. Repeat from * to * until there is 1 chain left at the end of the row.
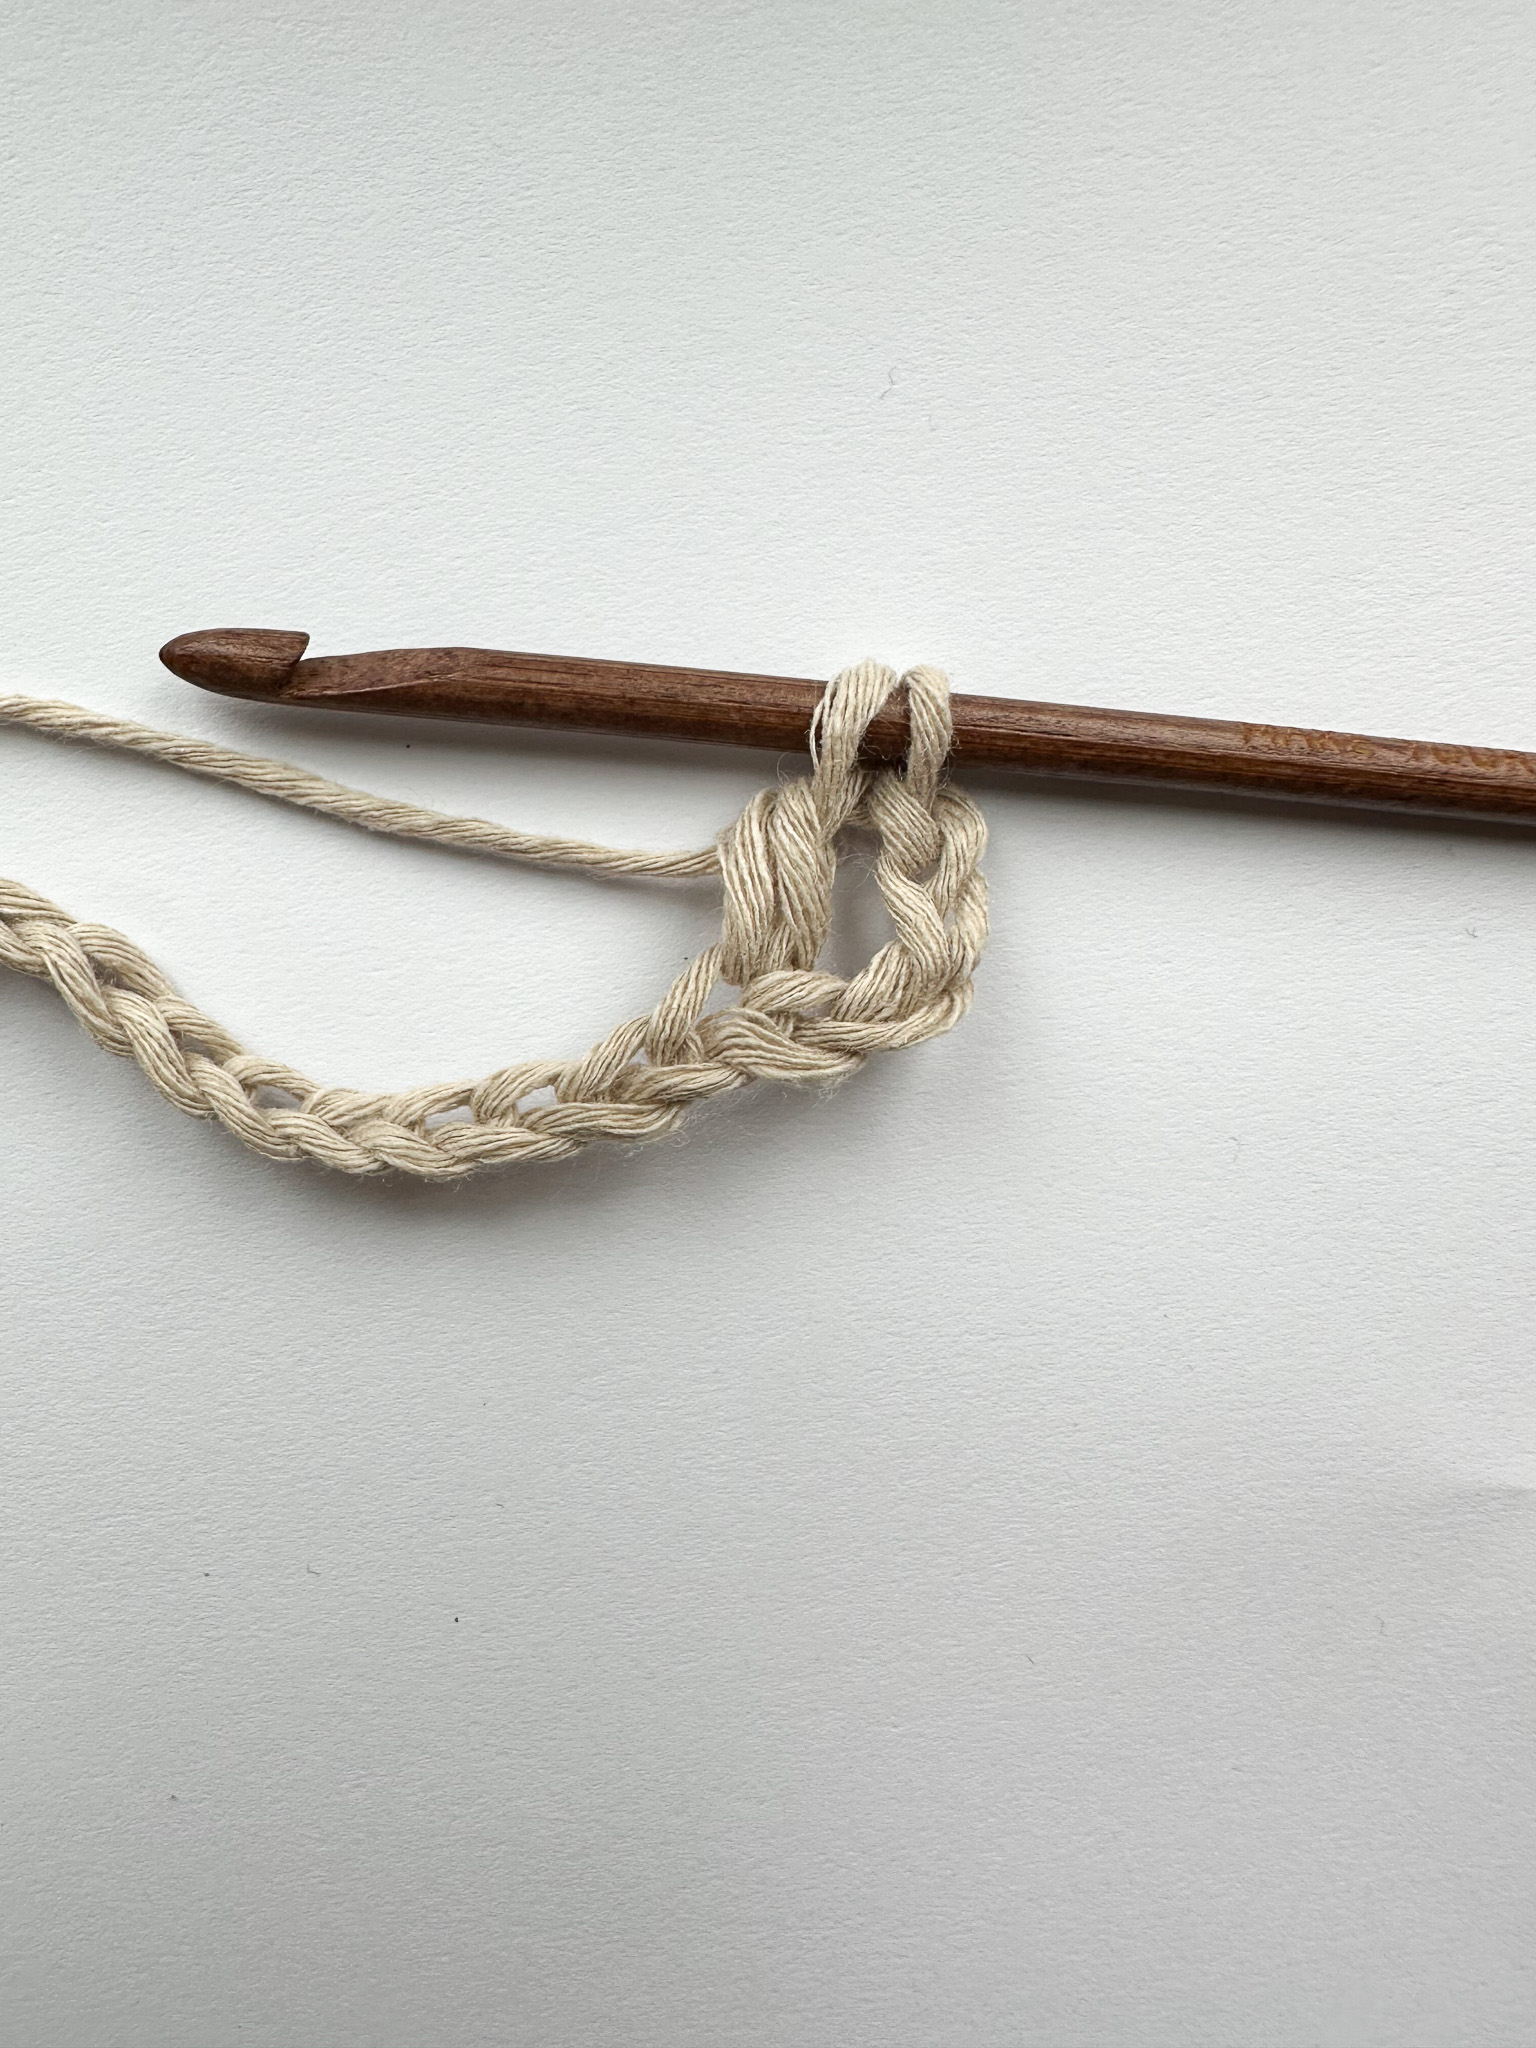
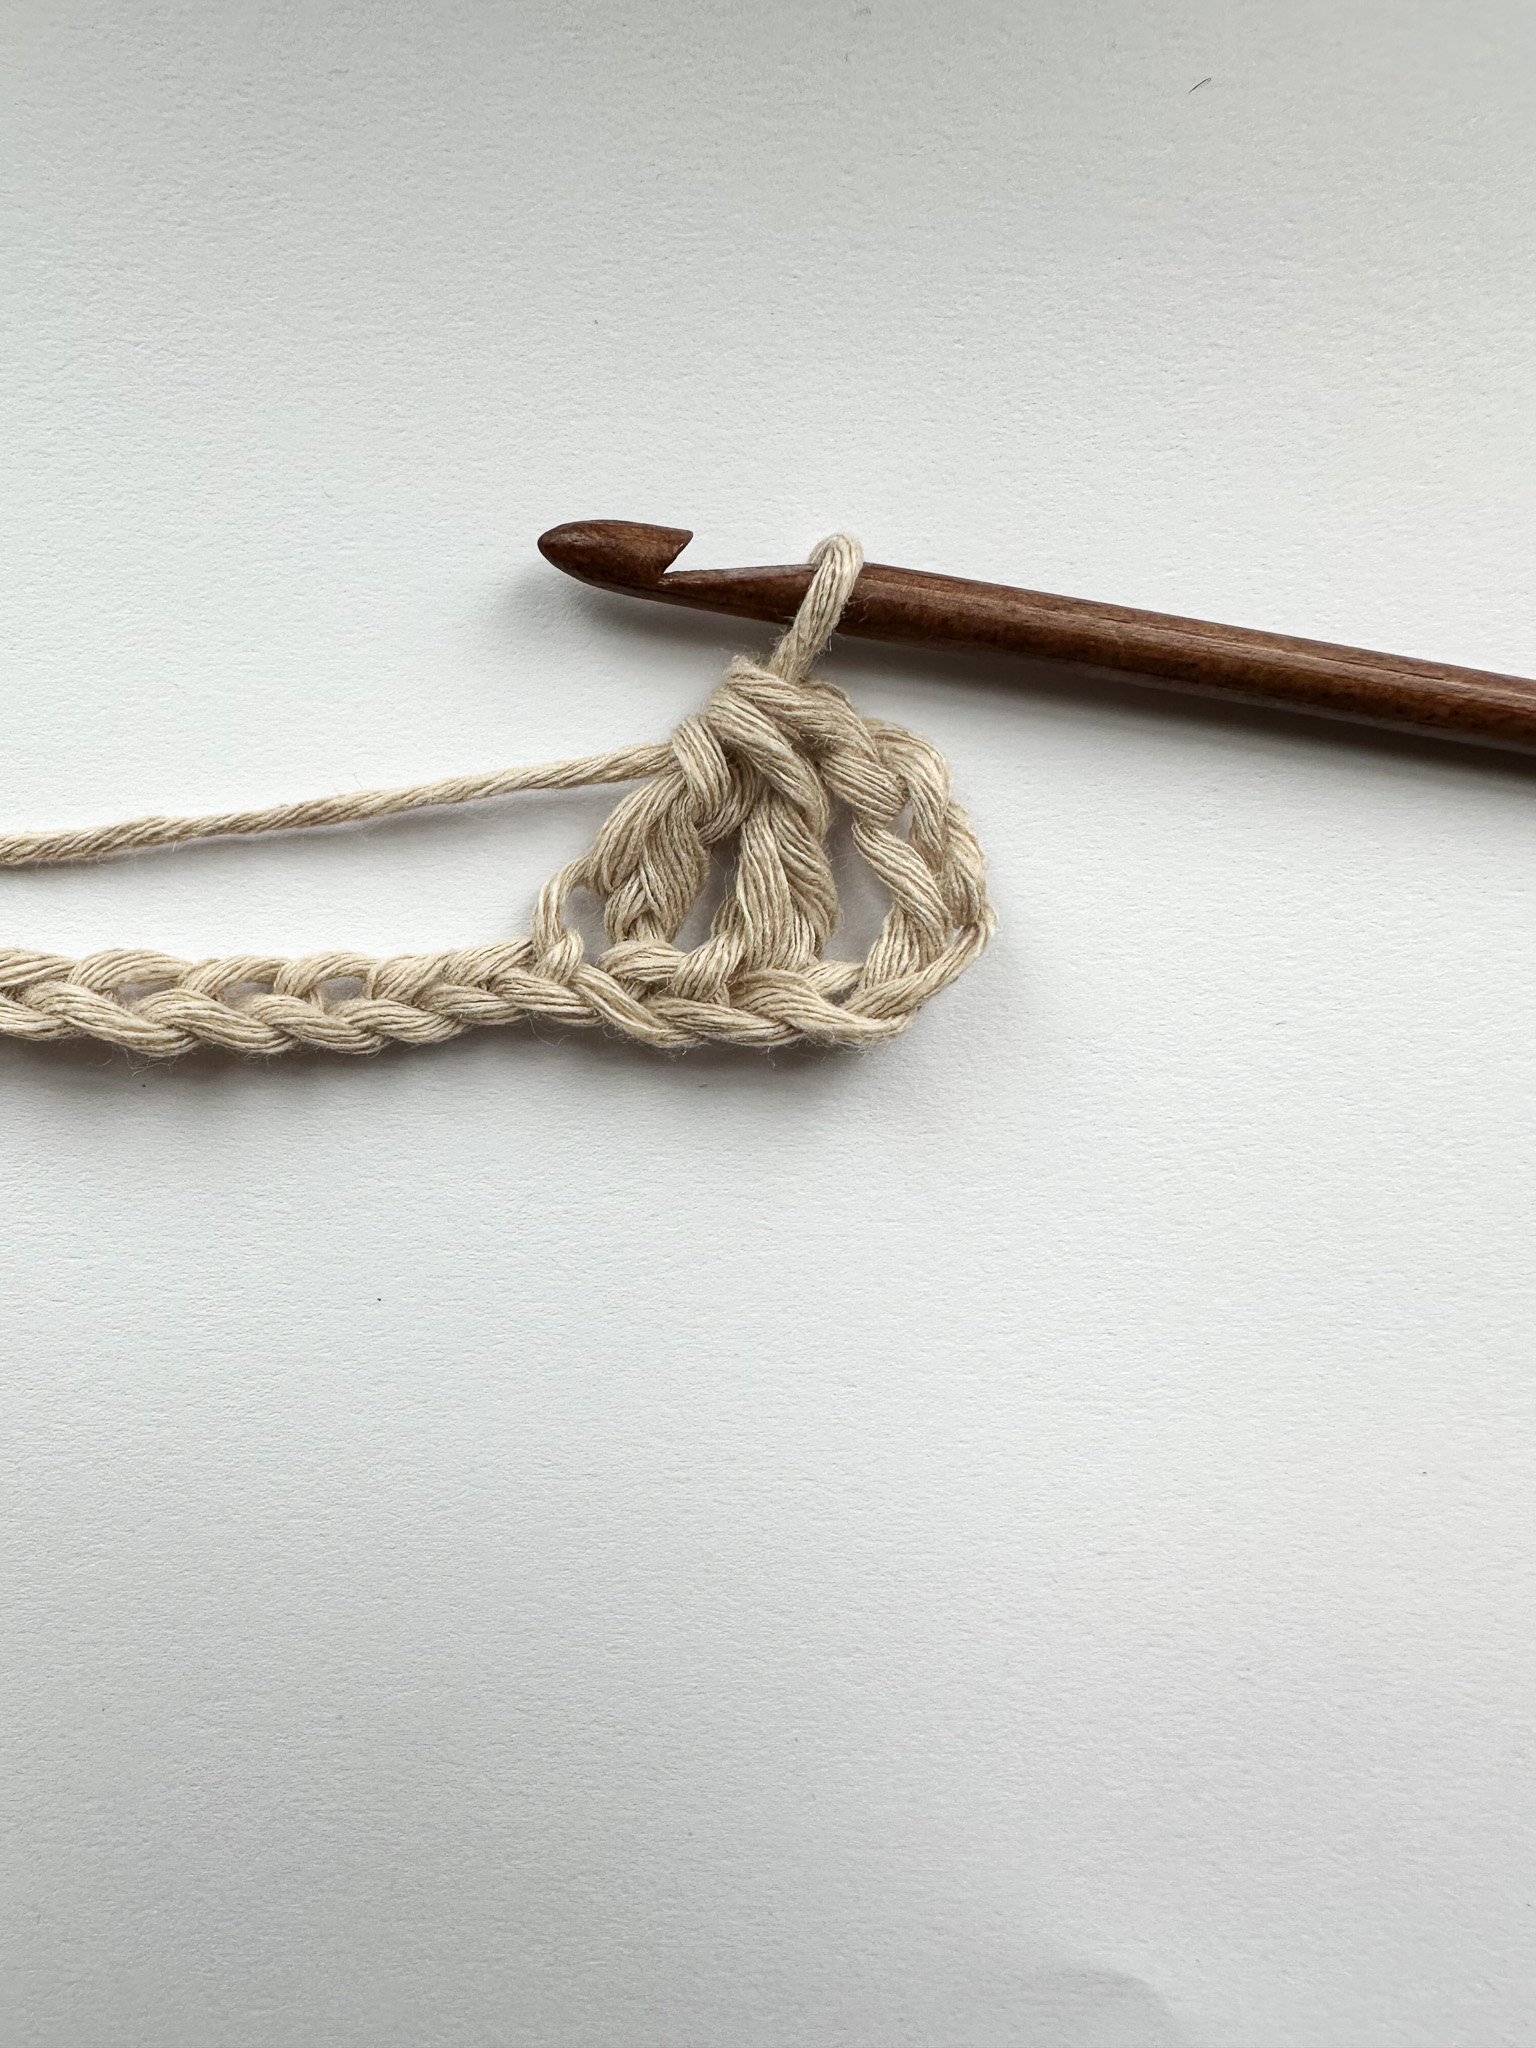
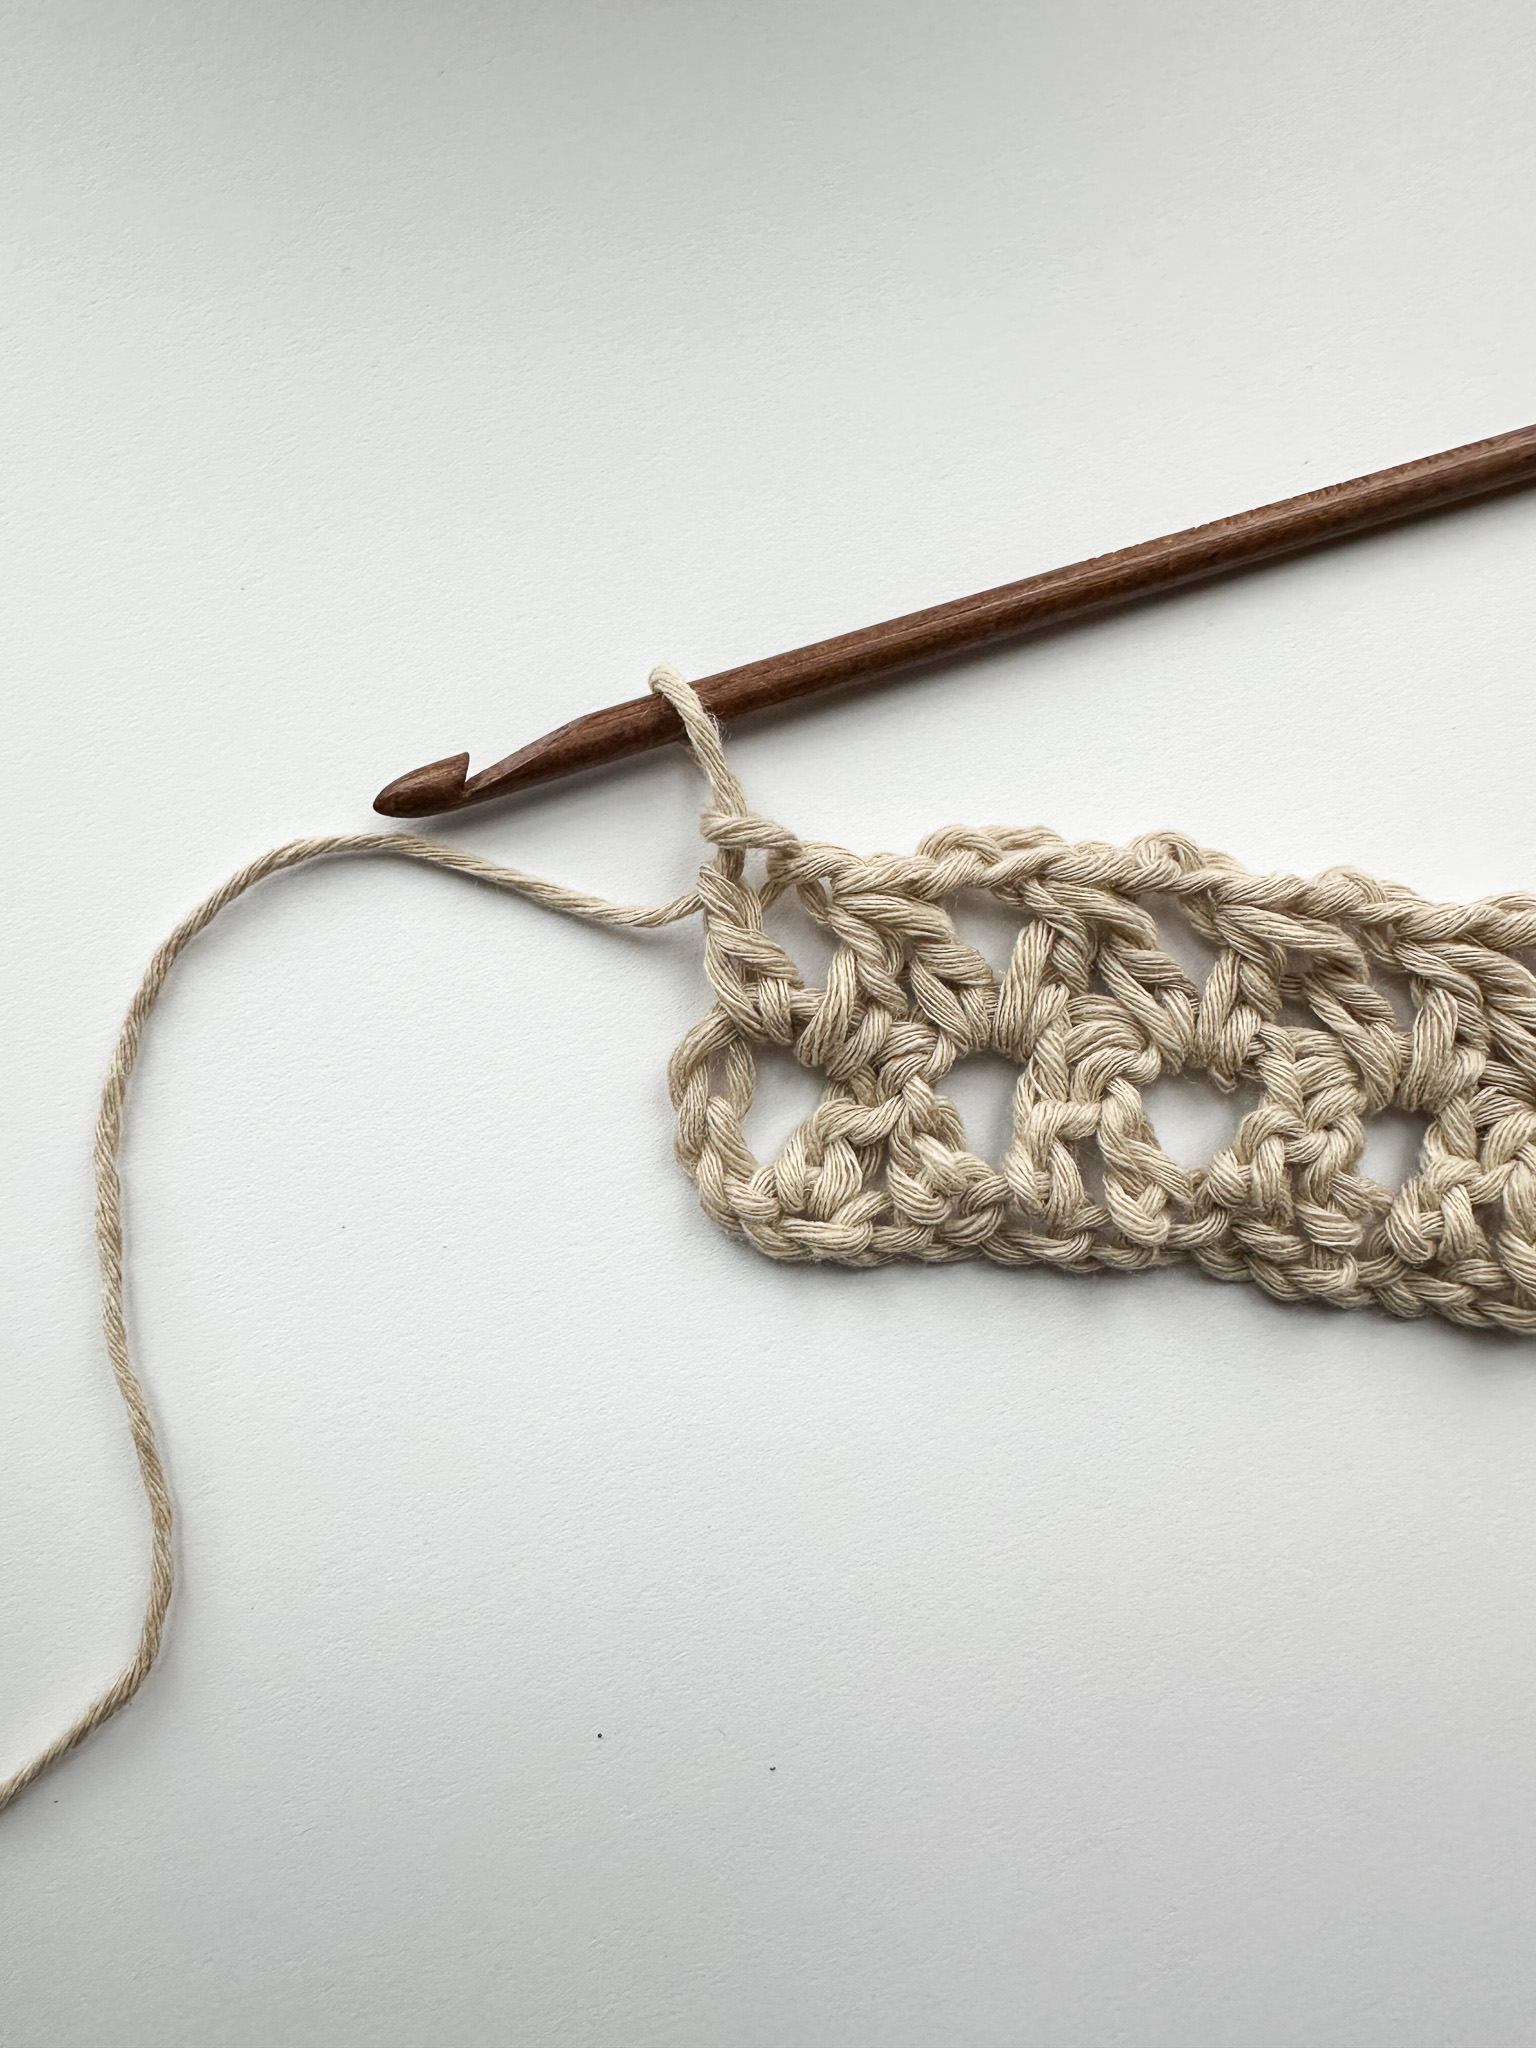
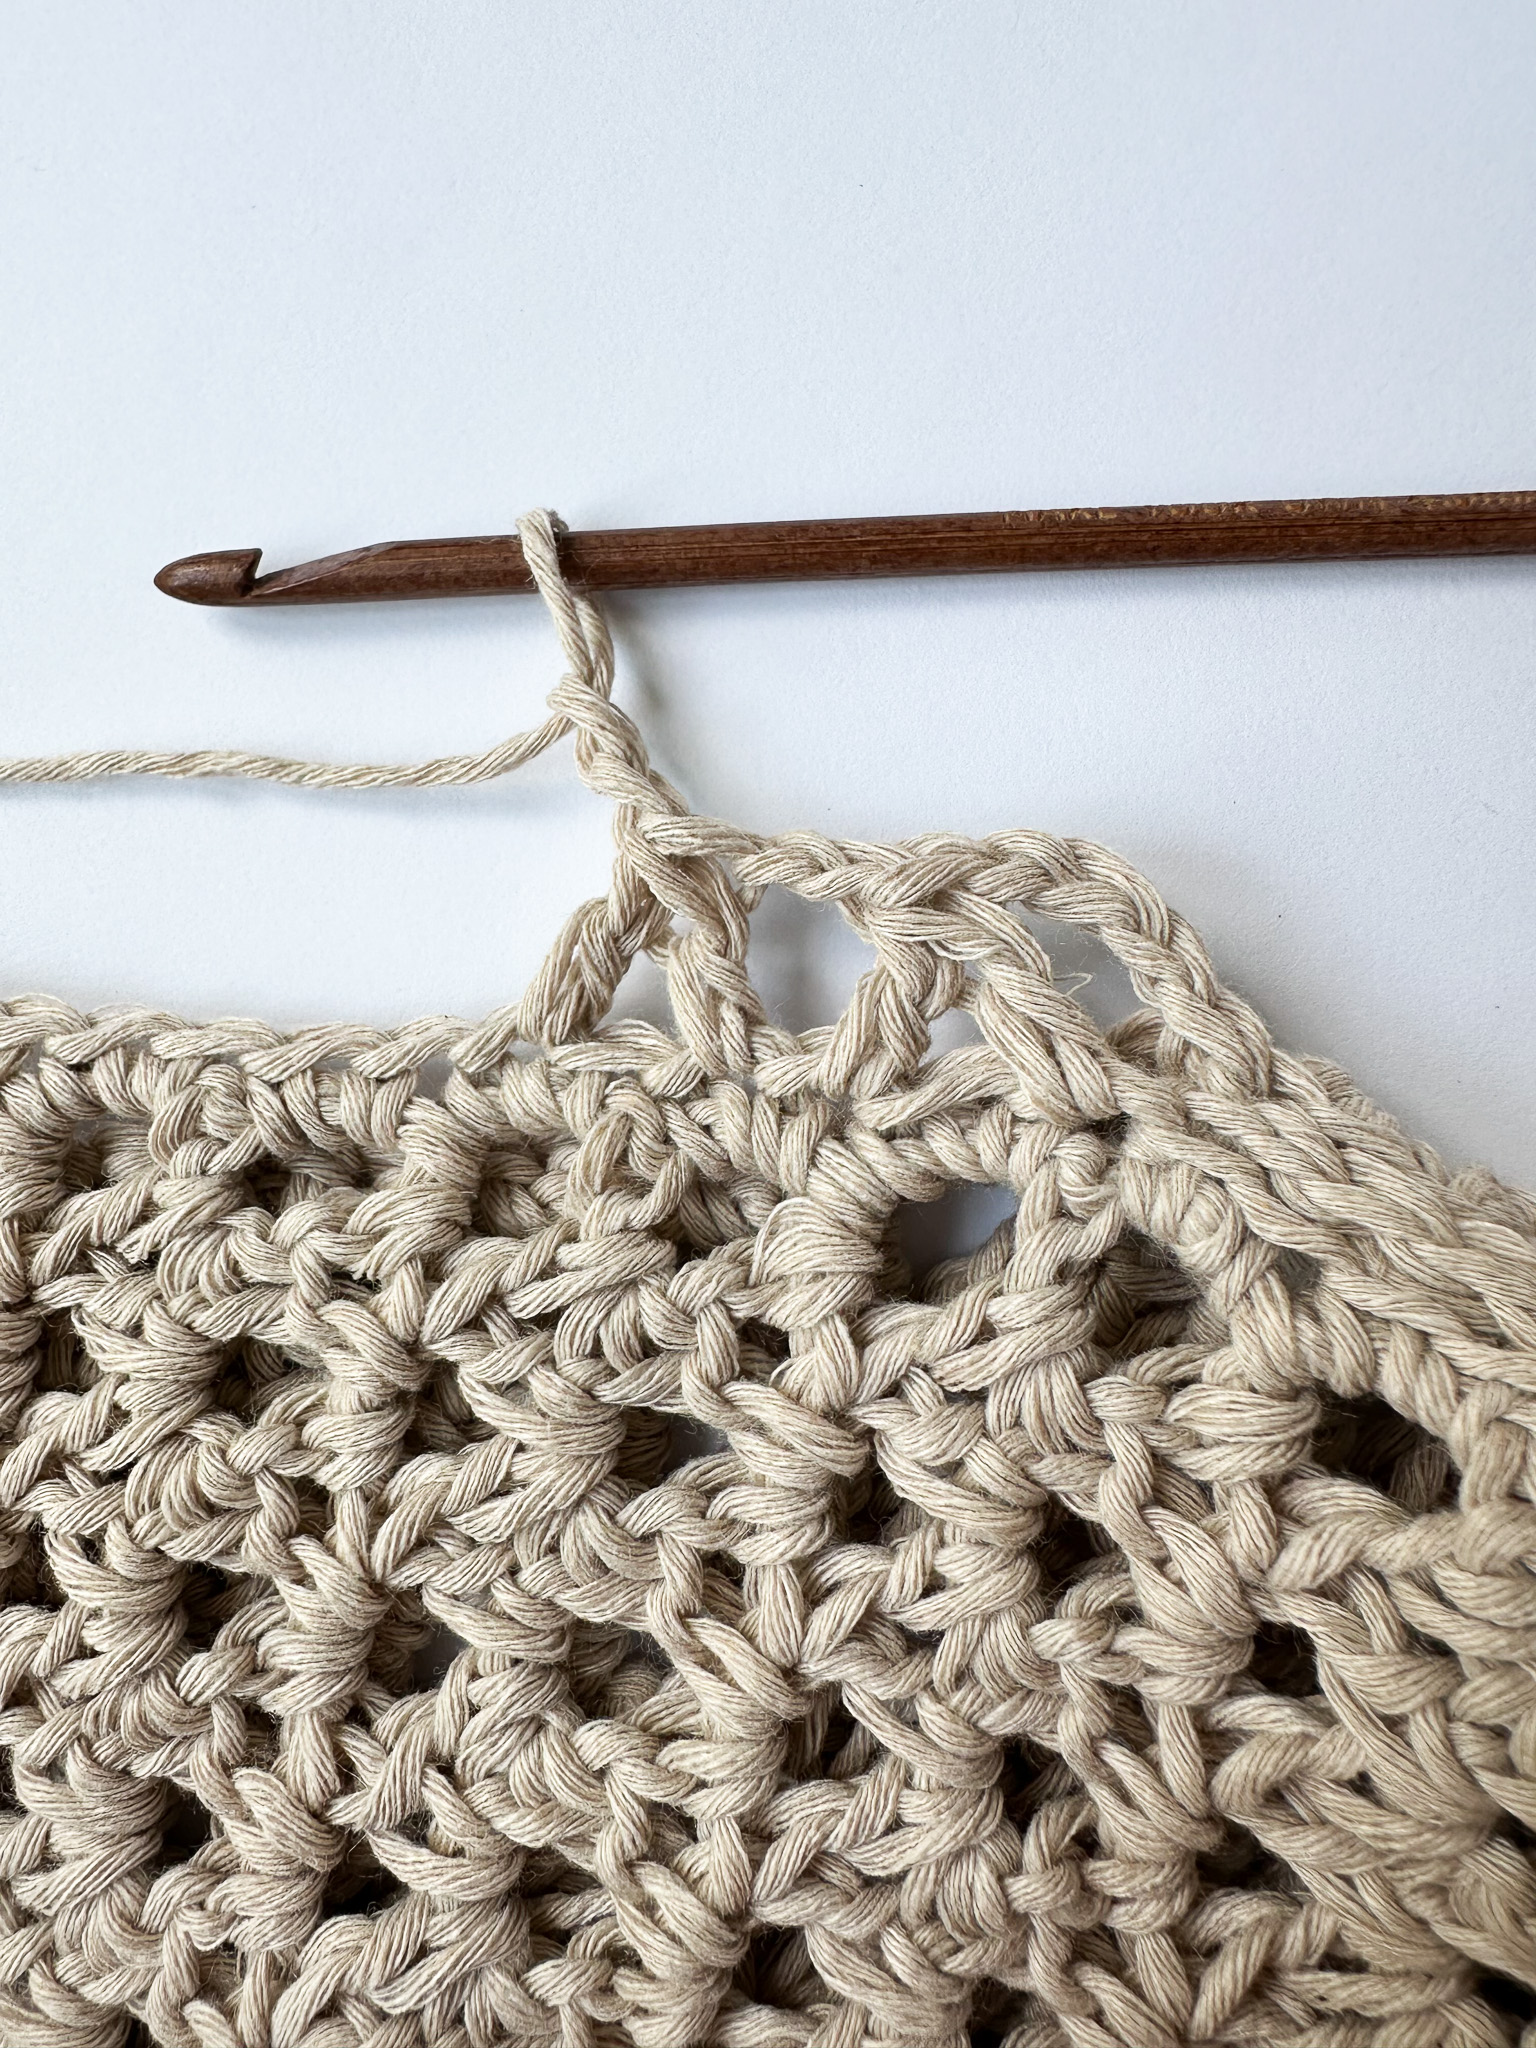
Chain one and make one double crochet in the last chain. Finish the row by chaining 4, then turn your work.
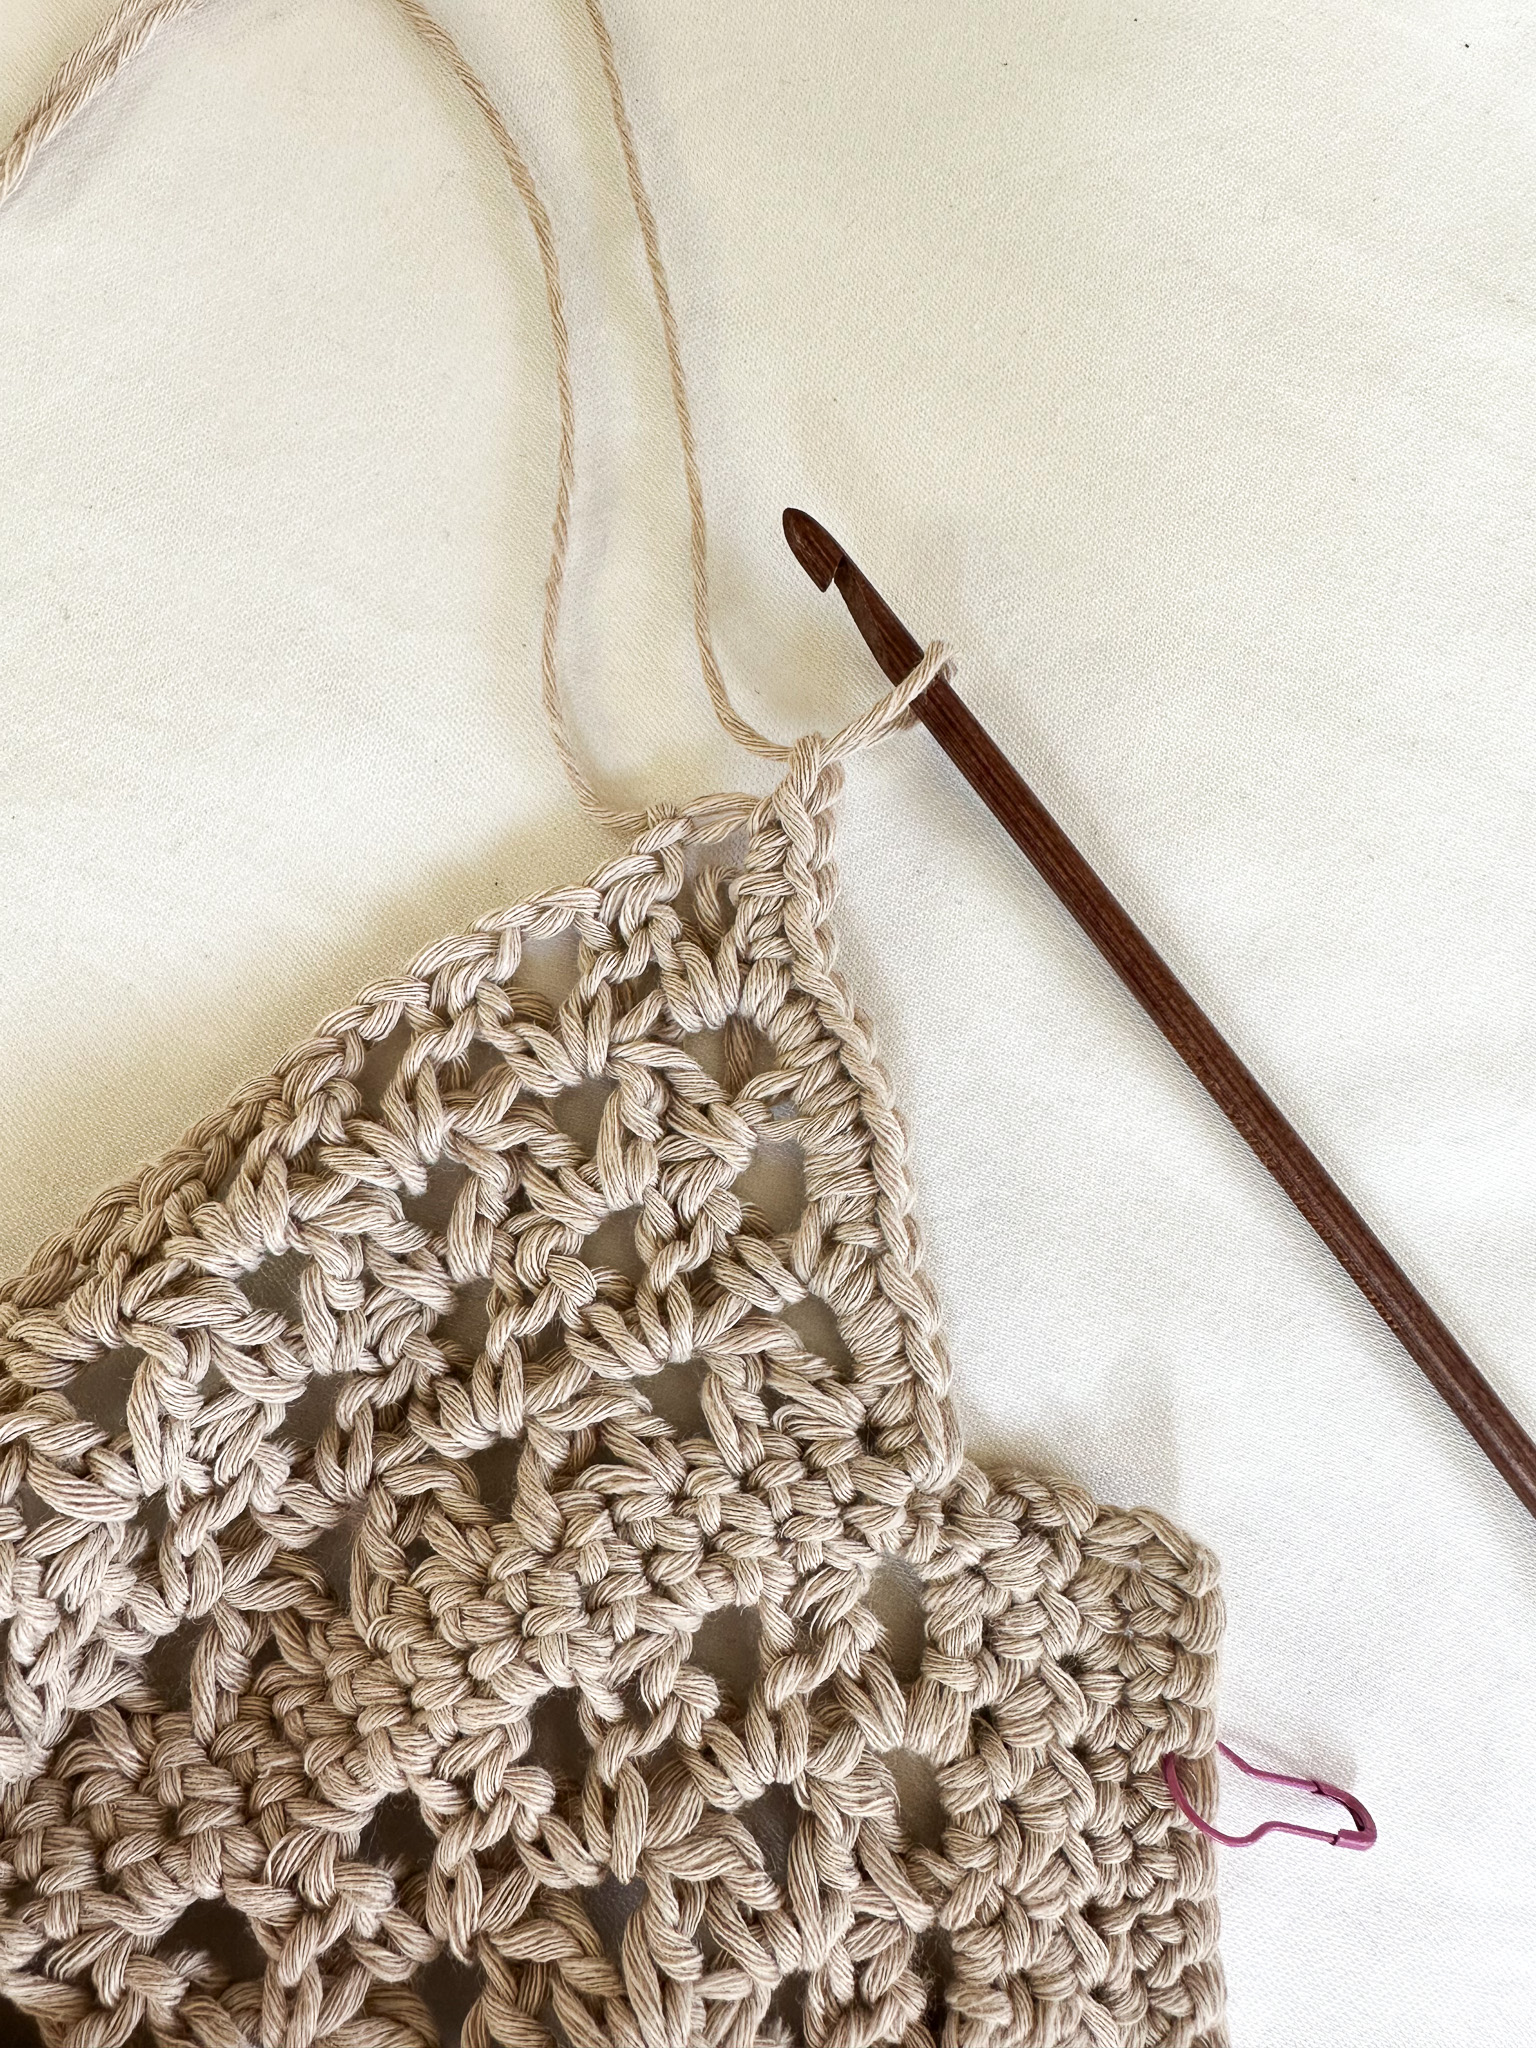
The image below shows the final double crochet of Row 1.
You should now have a total of 14 (13, 15) double crochet groups on the first row. Each group looks like an upside-down "V".
You will maintain this same number of groups on all following rows for the front panel.
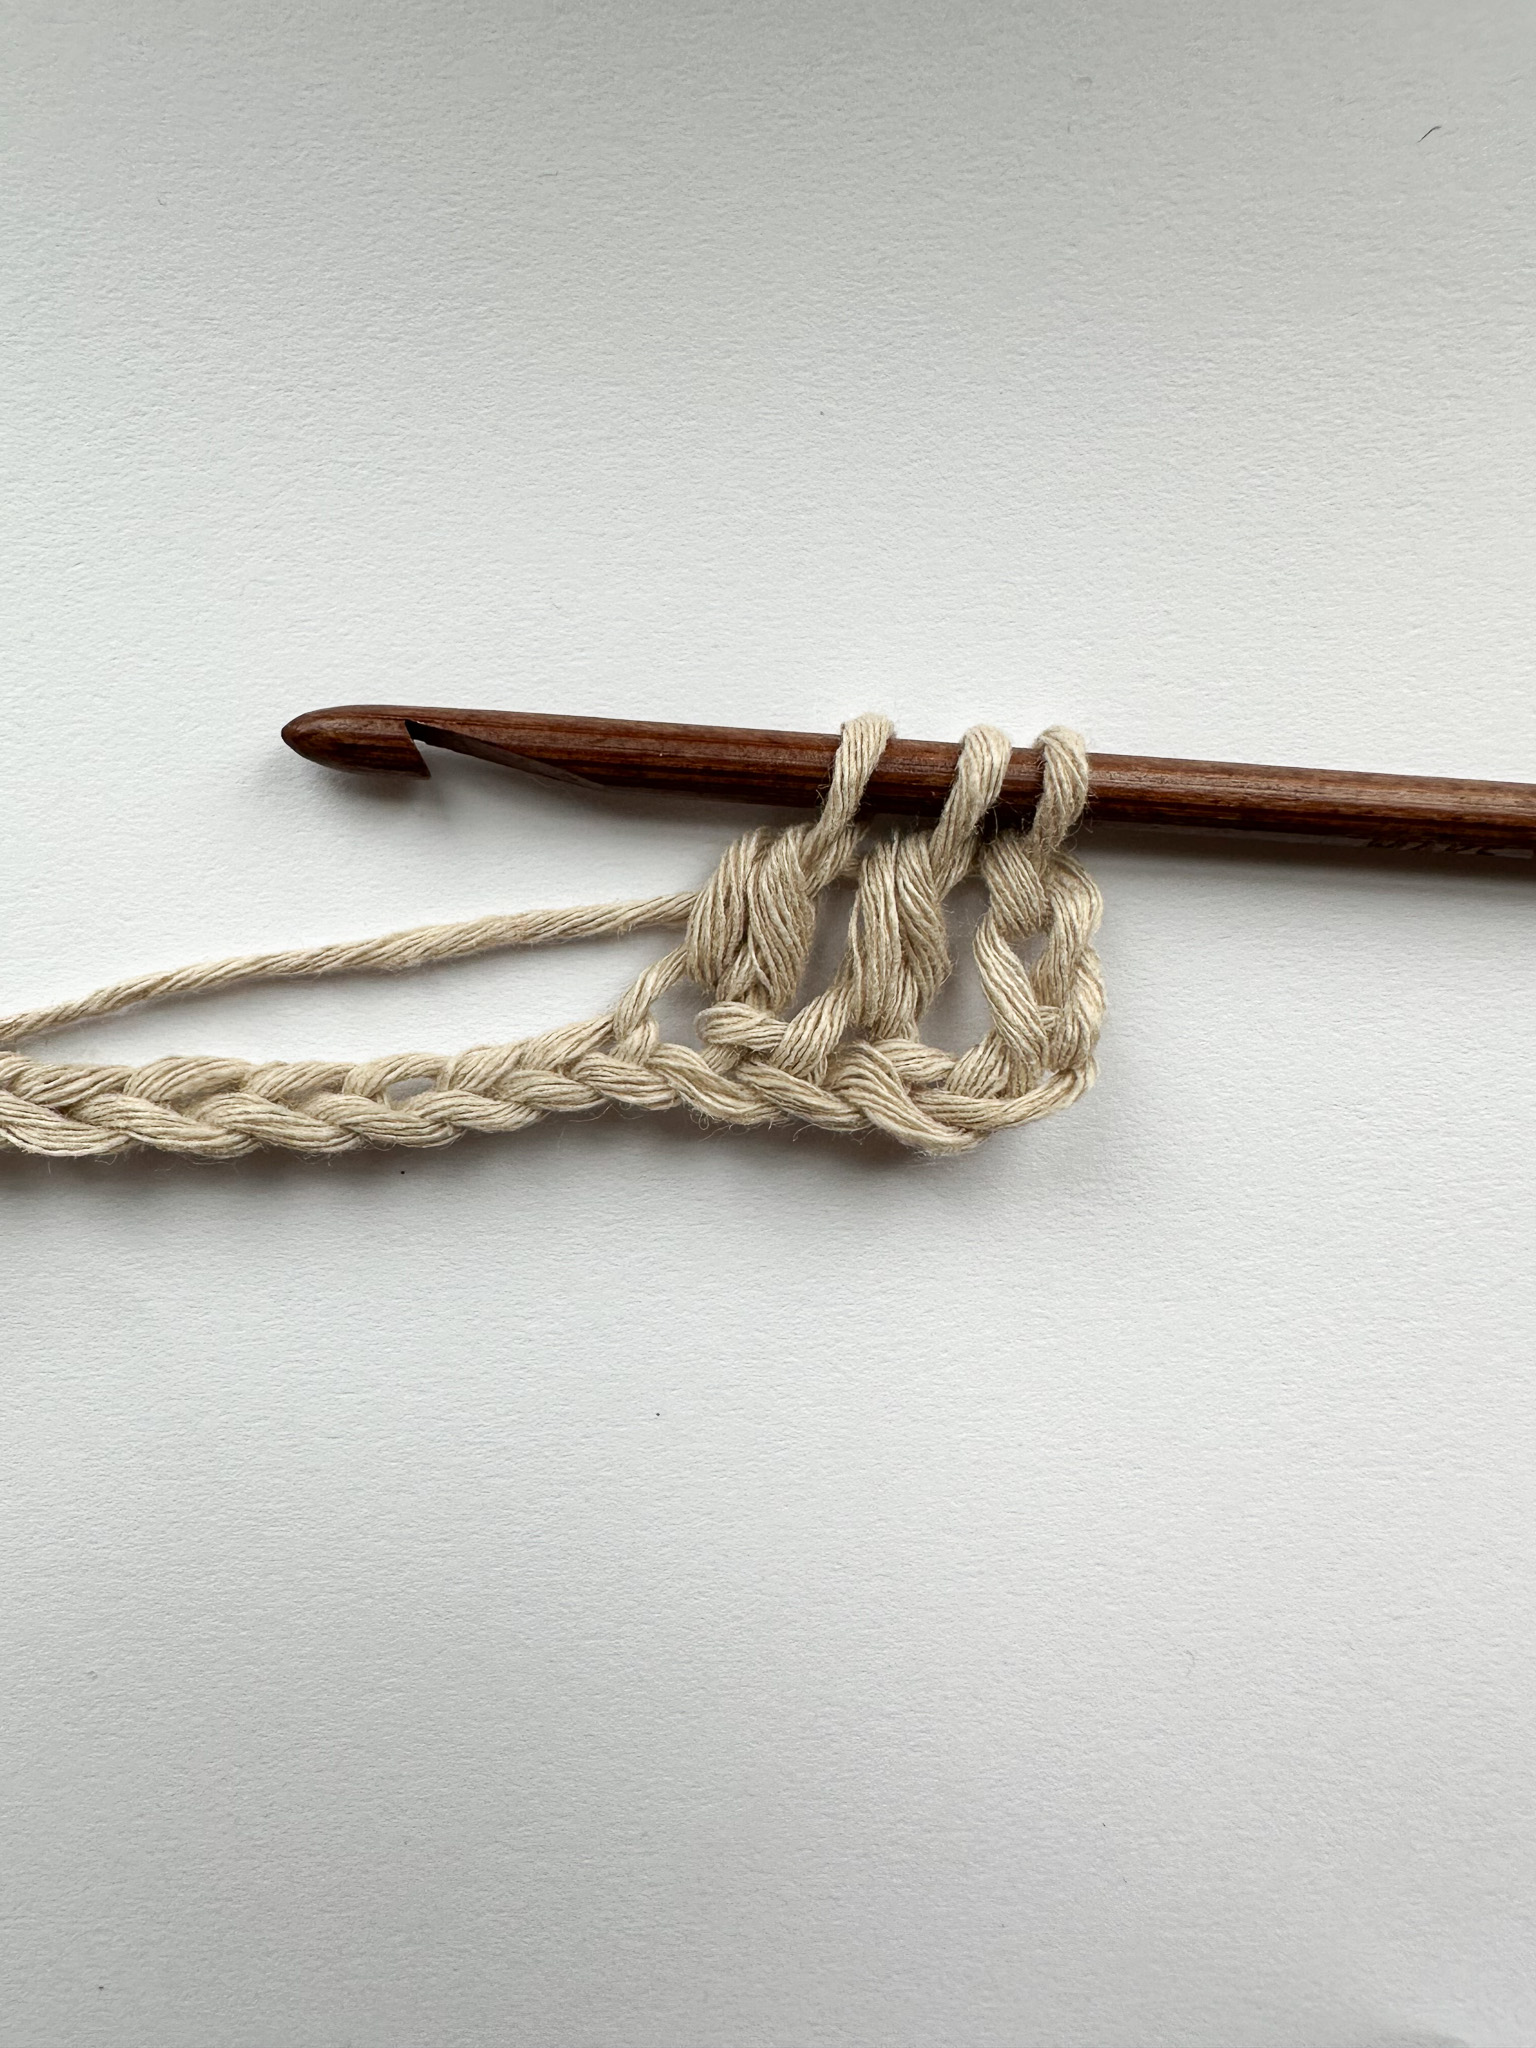
Row 2: In this row, continue creating double crochet groups in the spaces between the groups from the previous row. This way, the upside-down V shapes will stack directly on top of each other.
Insert your hook to the right of the first group, and make the first double crochet.
Make the second double crochet to the left side of the previous double crochet group.Complete the group by crocheting the stitches together, then chain 2.
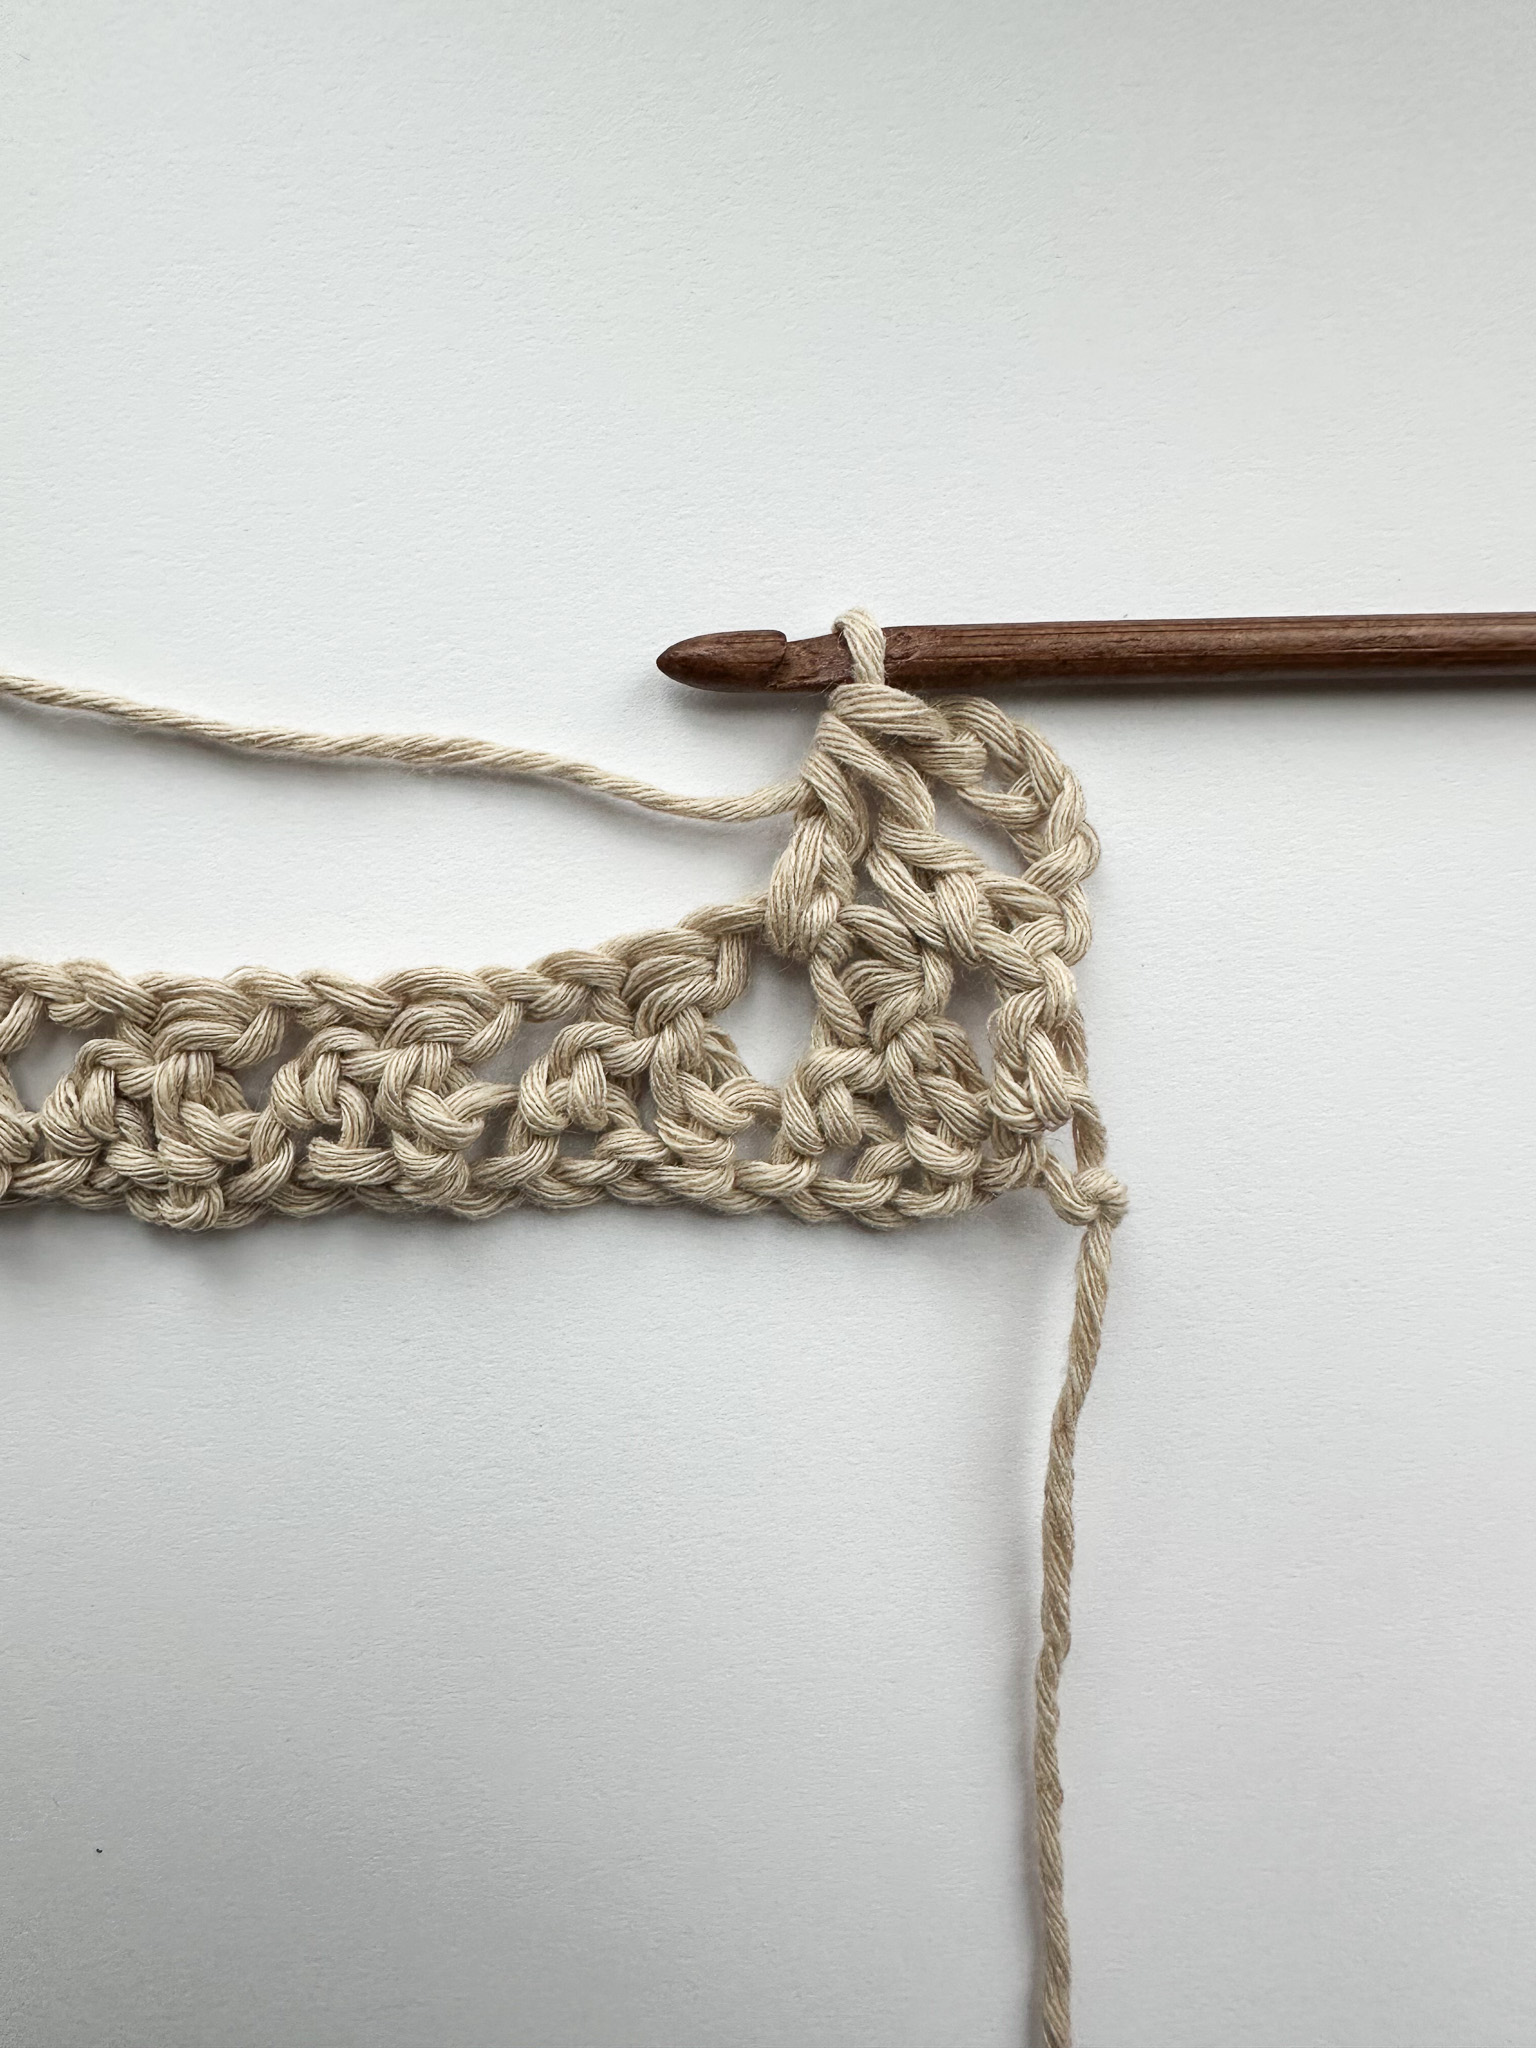
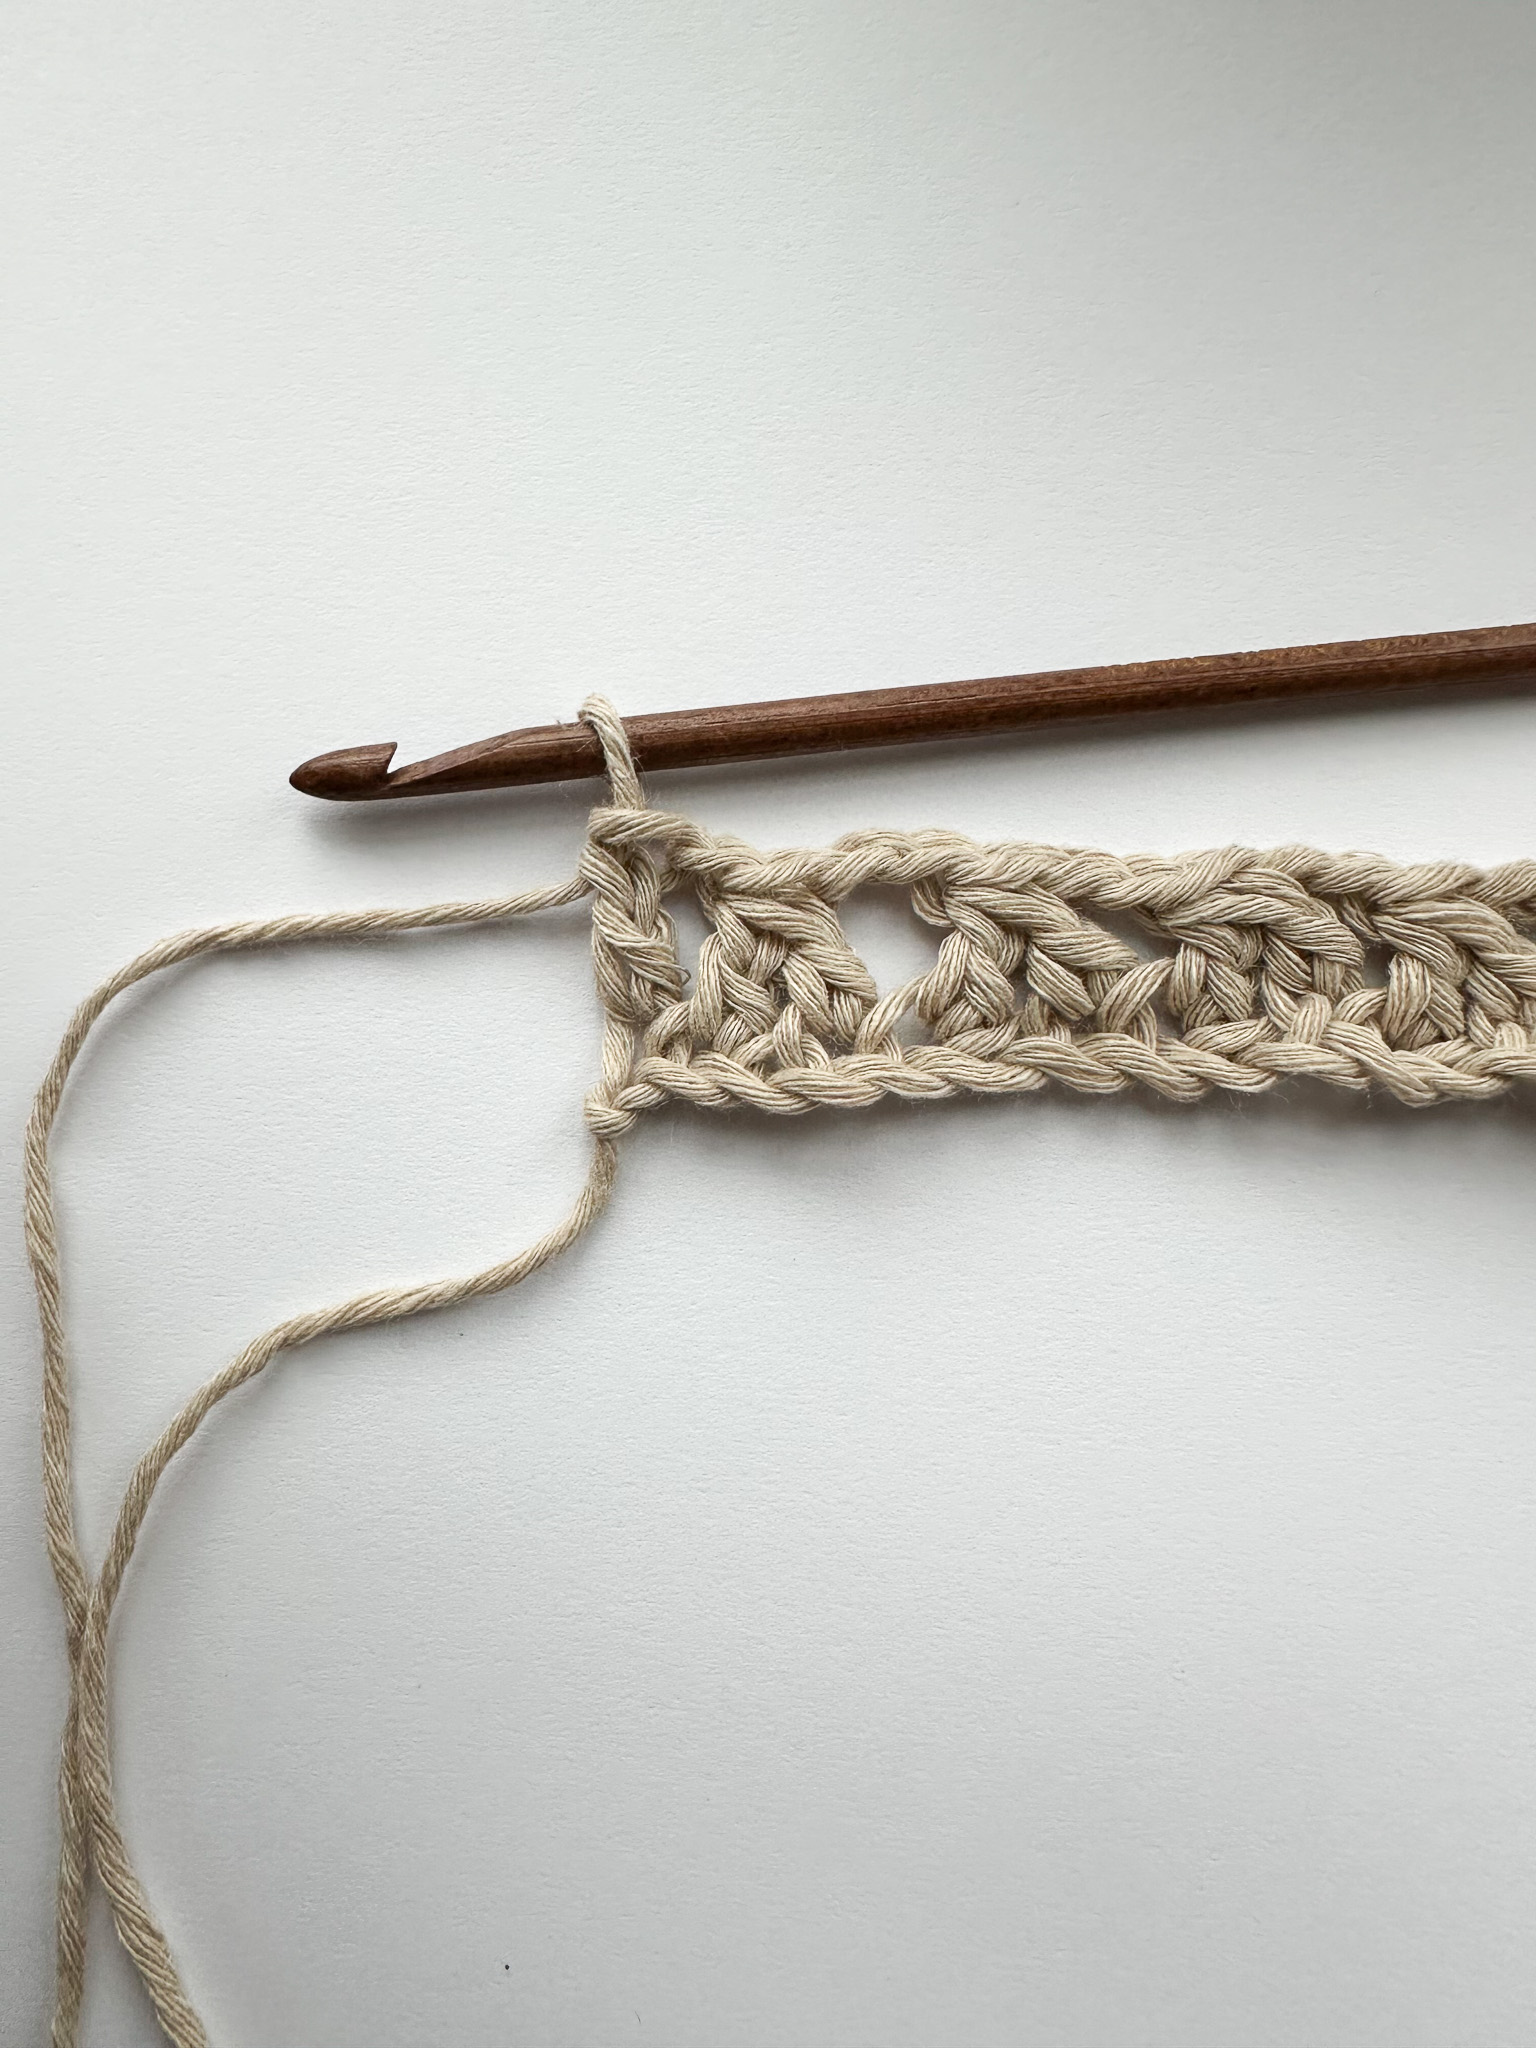
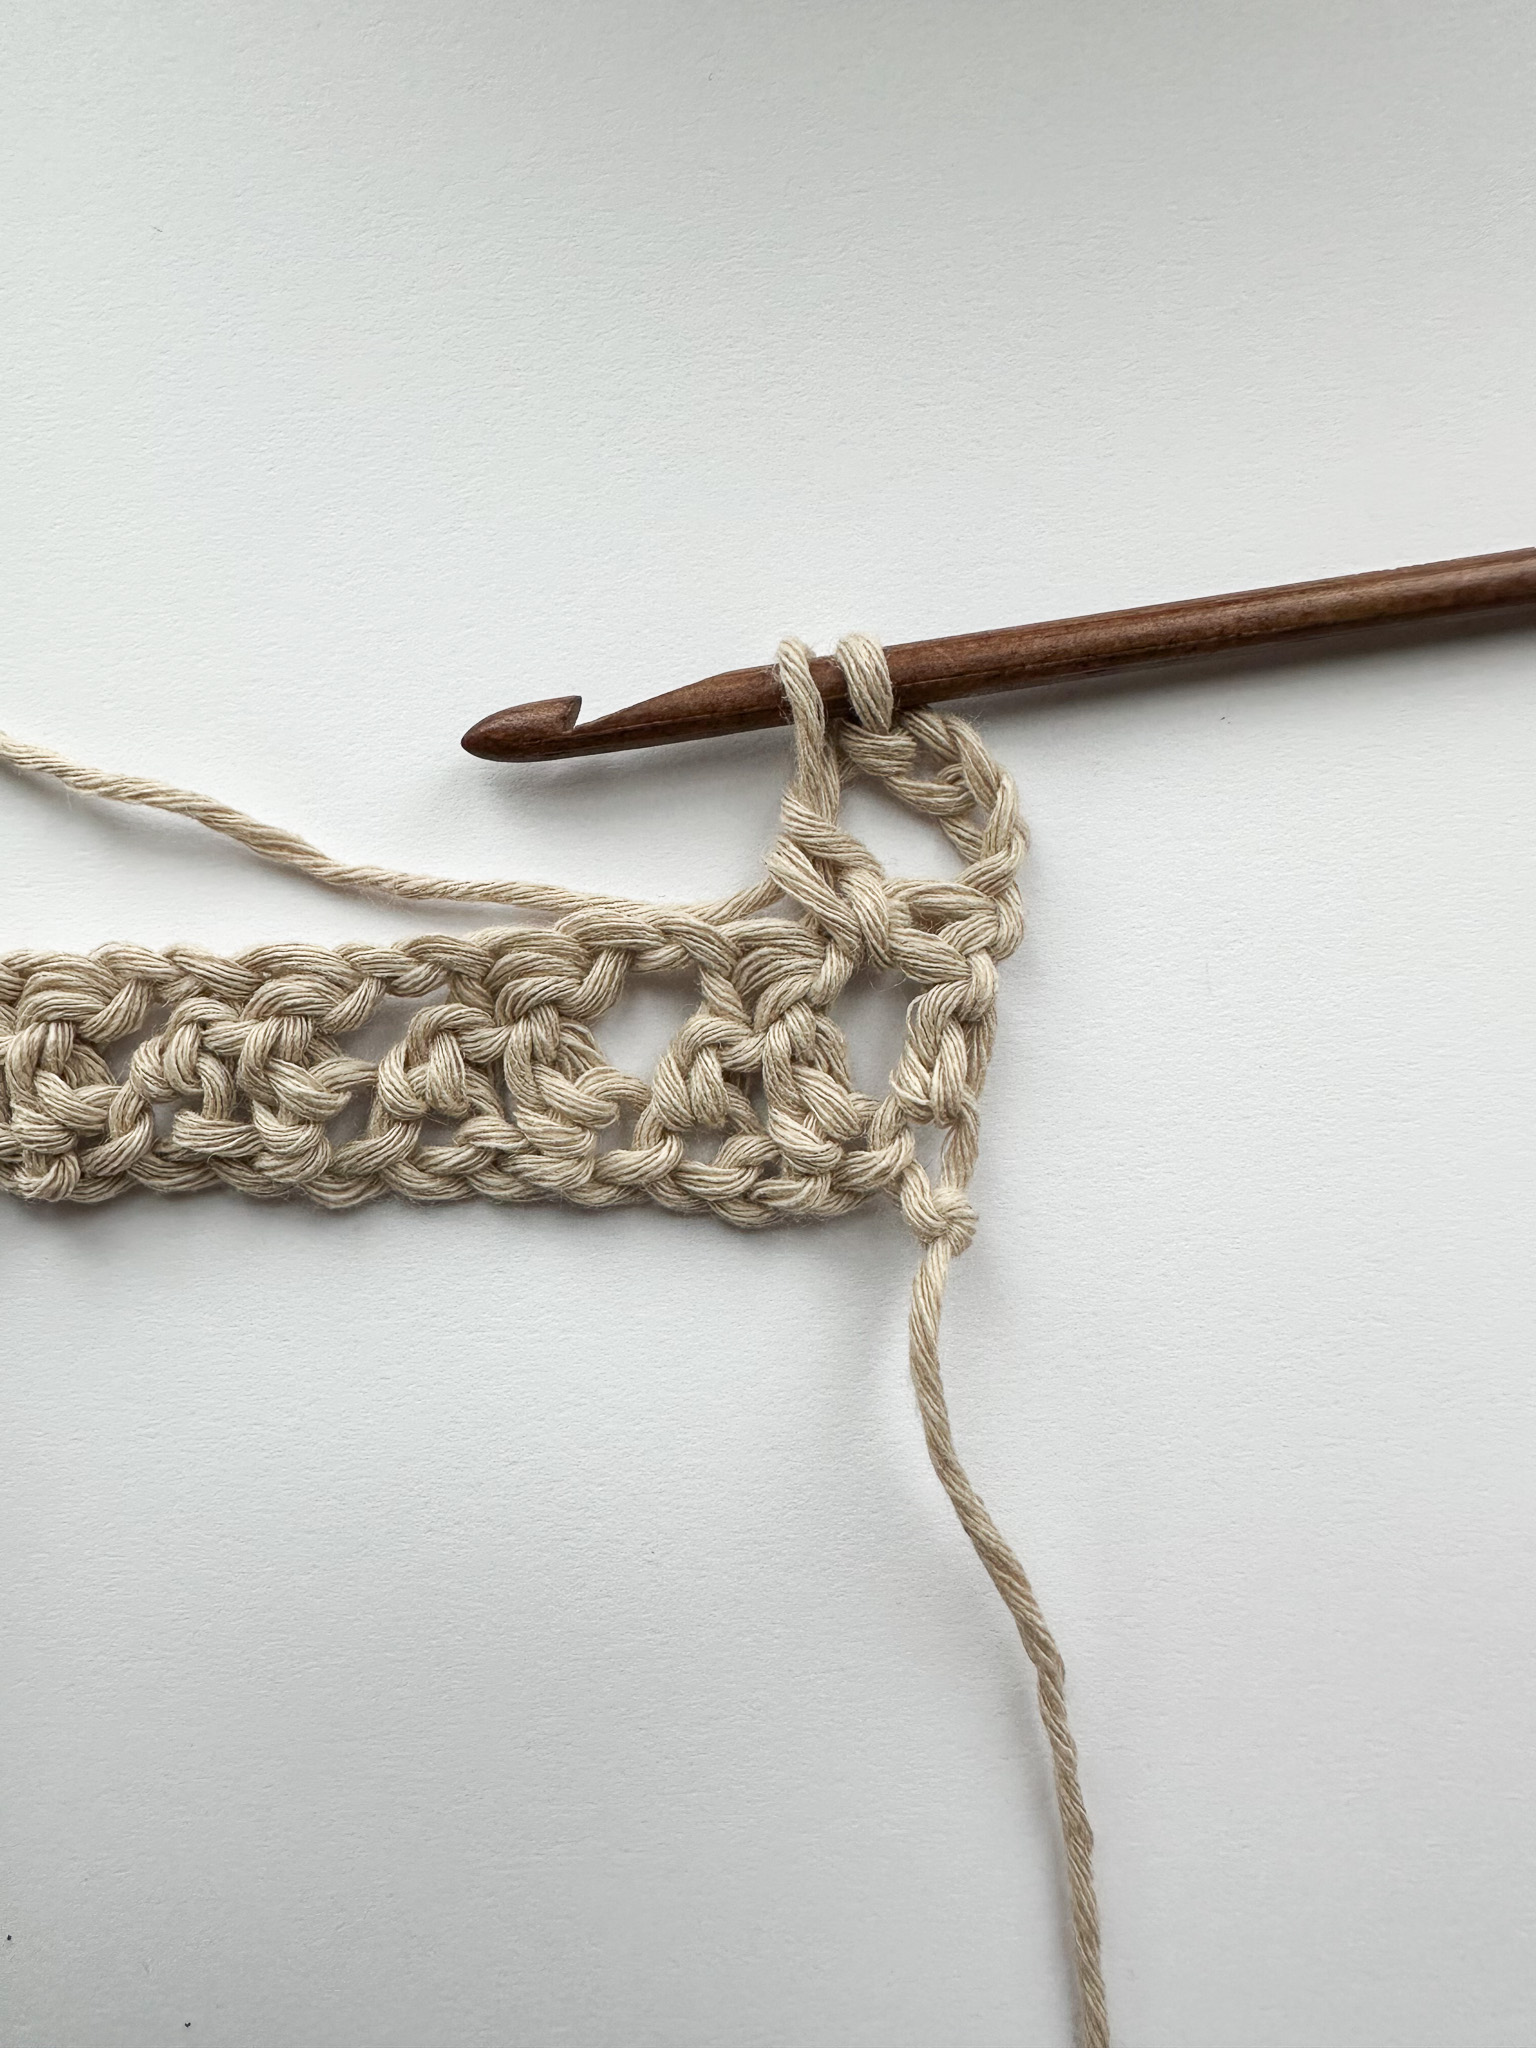
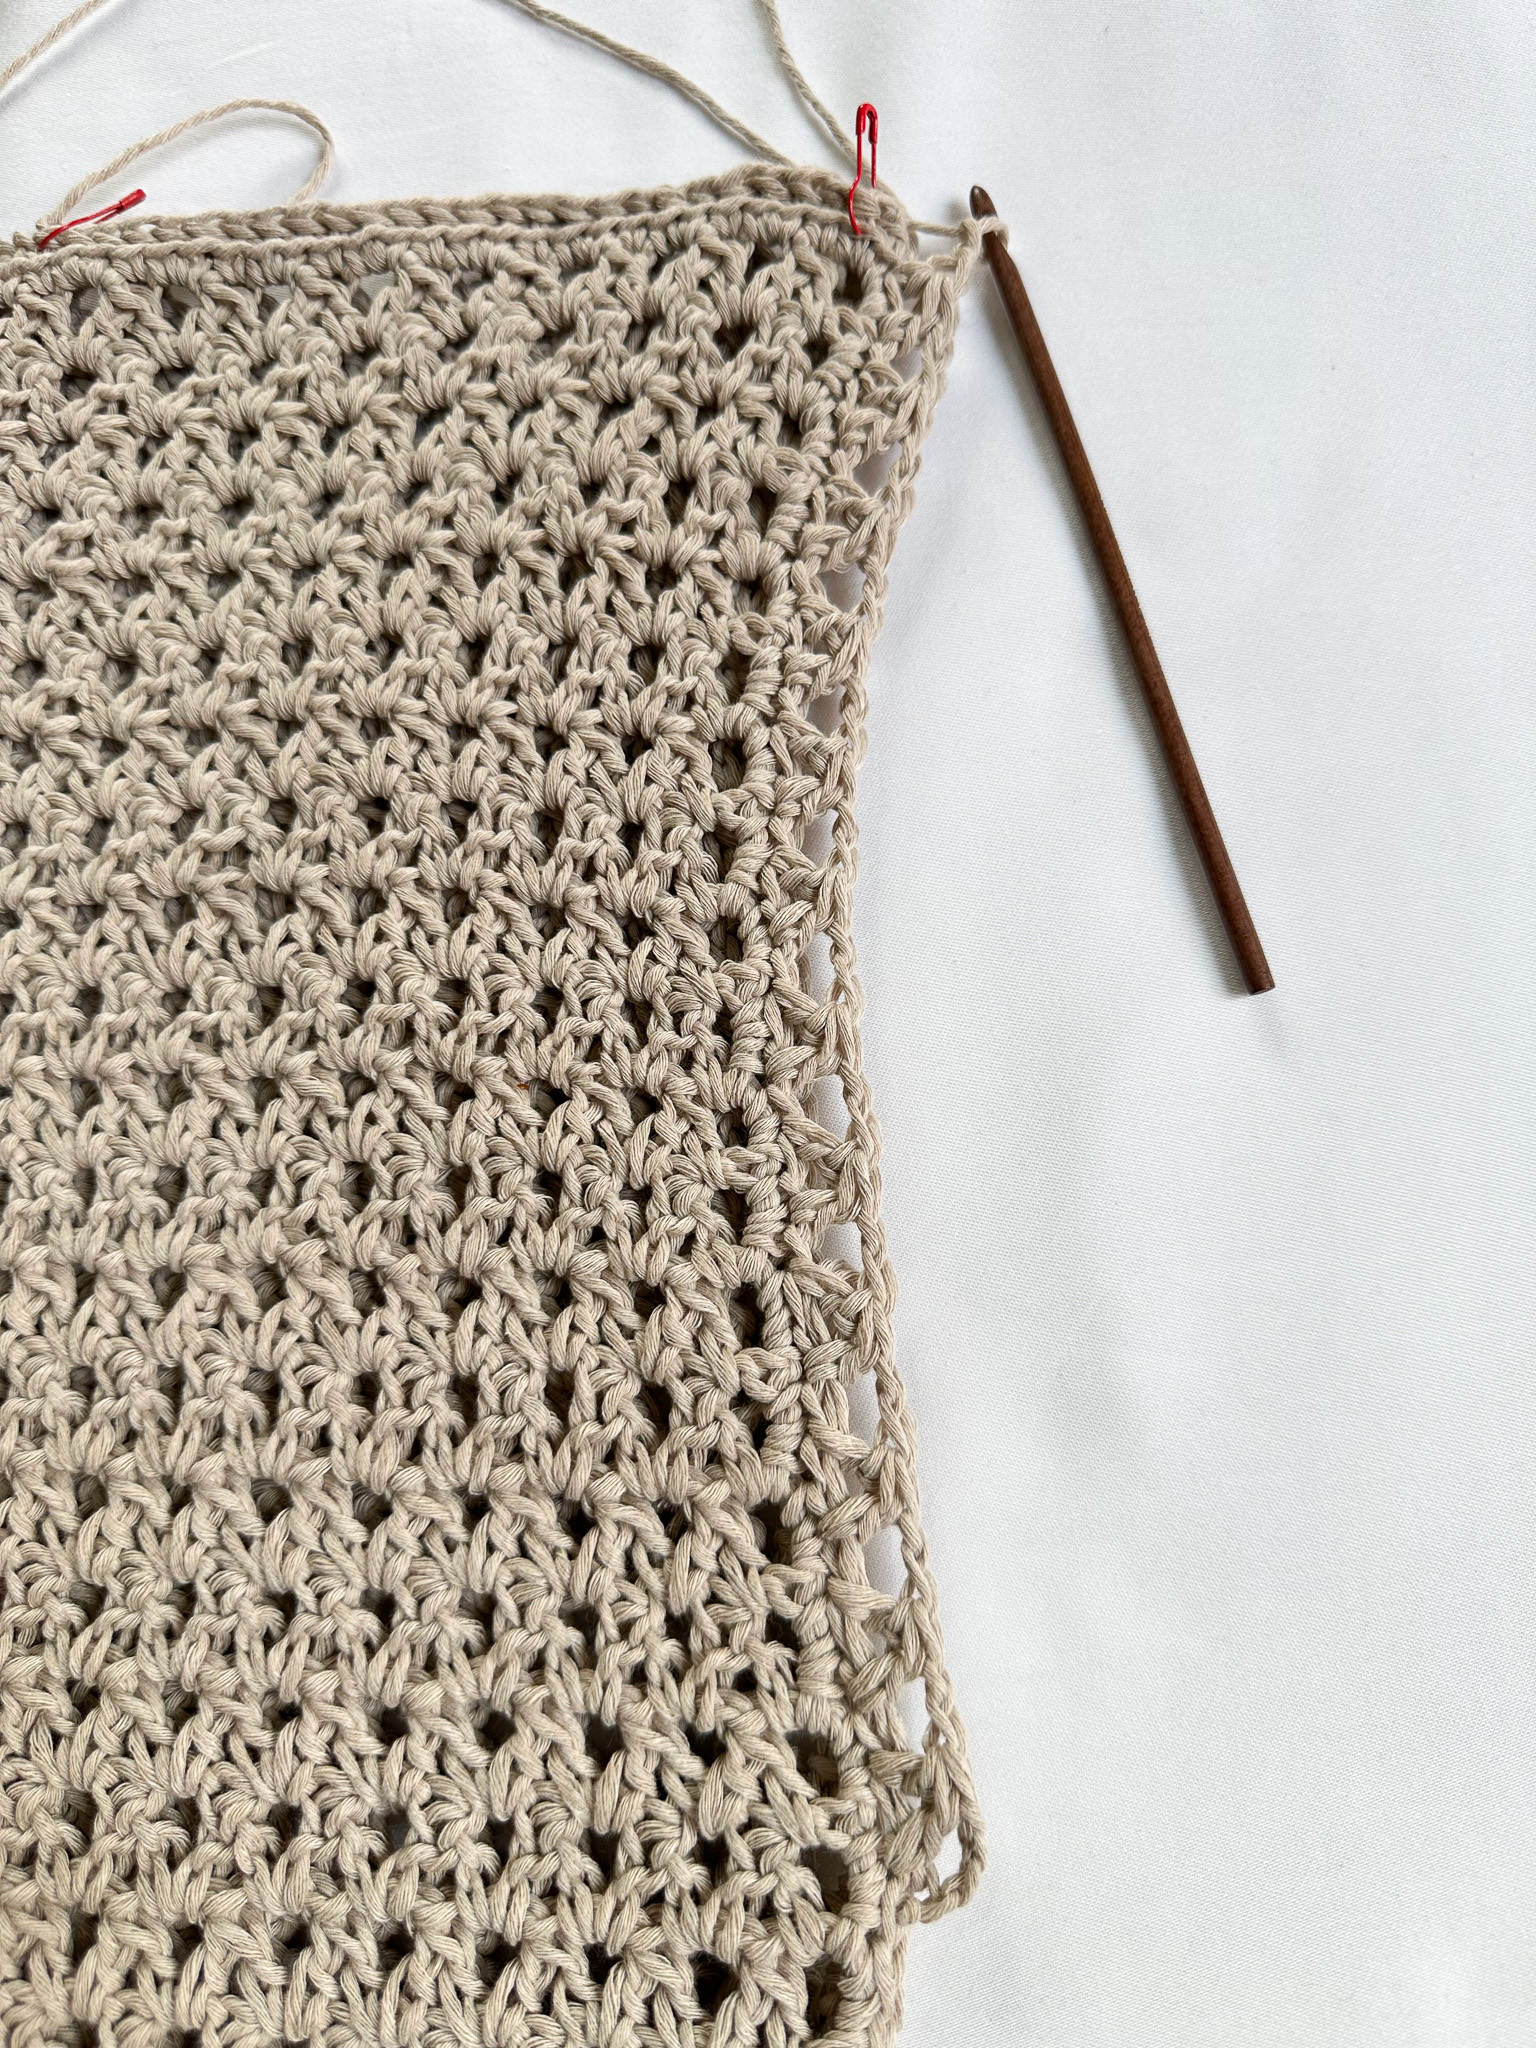
For the next double crochet group, insert your hook to the right side of the next group and make the first double crochet, then make the second double crochet to the left side of the group. Continue this way across the row and finish with chain one and then double crochet in the last stitch of the row.
Chain 4 and turn your work.
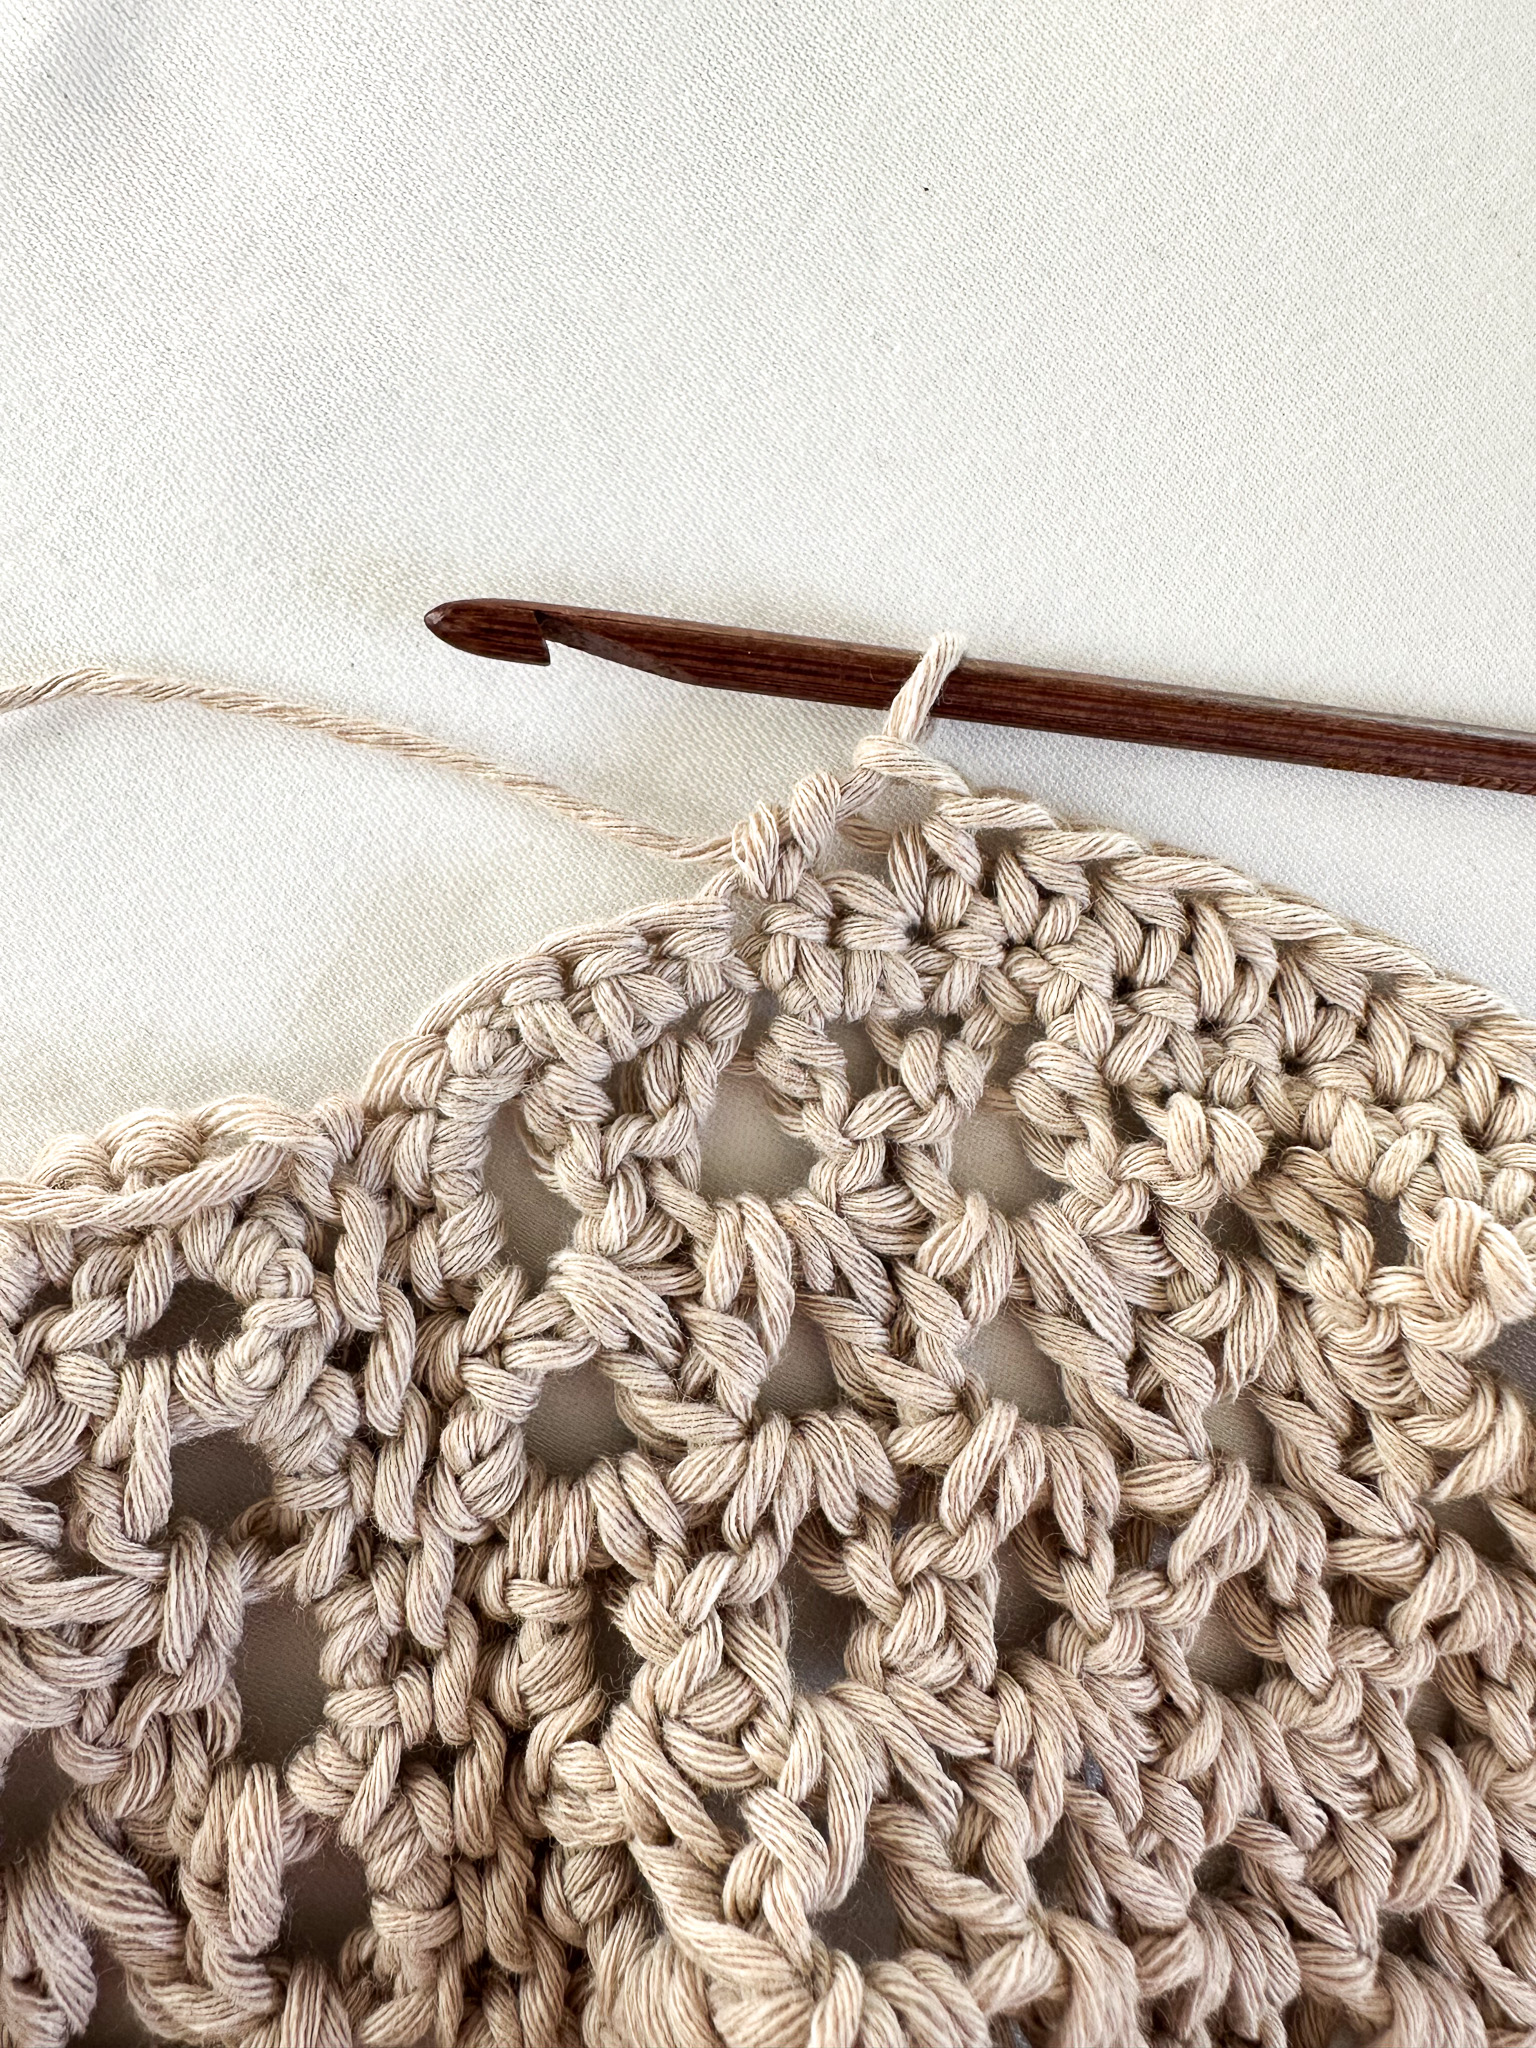
The image below shows the last double crochet of Row 2.
Rows 3–35: Repeat Row 2 until you have a total of 35 (35, 37) rows in length (or more/fewer rows if you want to make it longer/shorter). Each row is approximately 1.5 cm. 35 rows equal about 51 cm, and 37 rows about 54 cm.
At the bottom, a 2 cm border will be added. Therefore, the front panels will be 53 (53, 56) cm long.
Here you can measure from the top of your shoulder down to your hip where you want the shirt to end, to check if the length fits.
After a few rows, it’s a good idea to double-check the width. Keep in mind that the pattern and yarn are somewhat elastic, so you may need to stretch the piece to get the correct measurement. The pieces will widen when wearing the shirt.
The width should be 26 (24, 28) cm.
Cut the yarn and fasten off on the first piece. After completing the second piece, do not cut the yarn; continue directly to Step 2 for the left front panel.
If you’re unsure how to fasten off, see the video below.
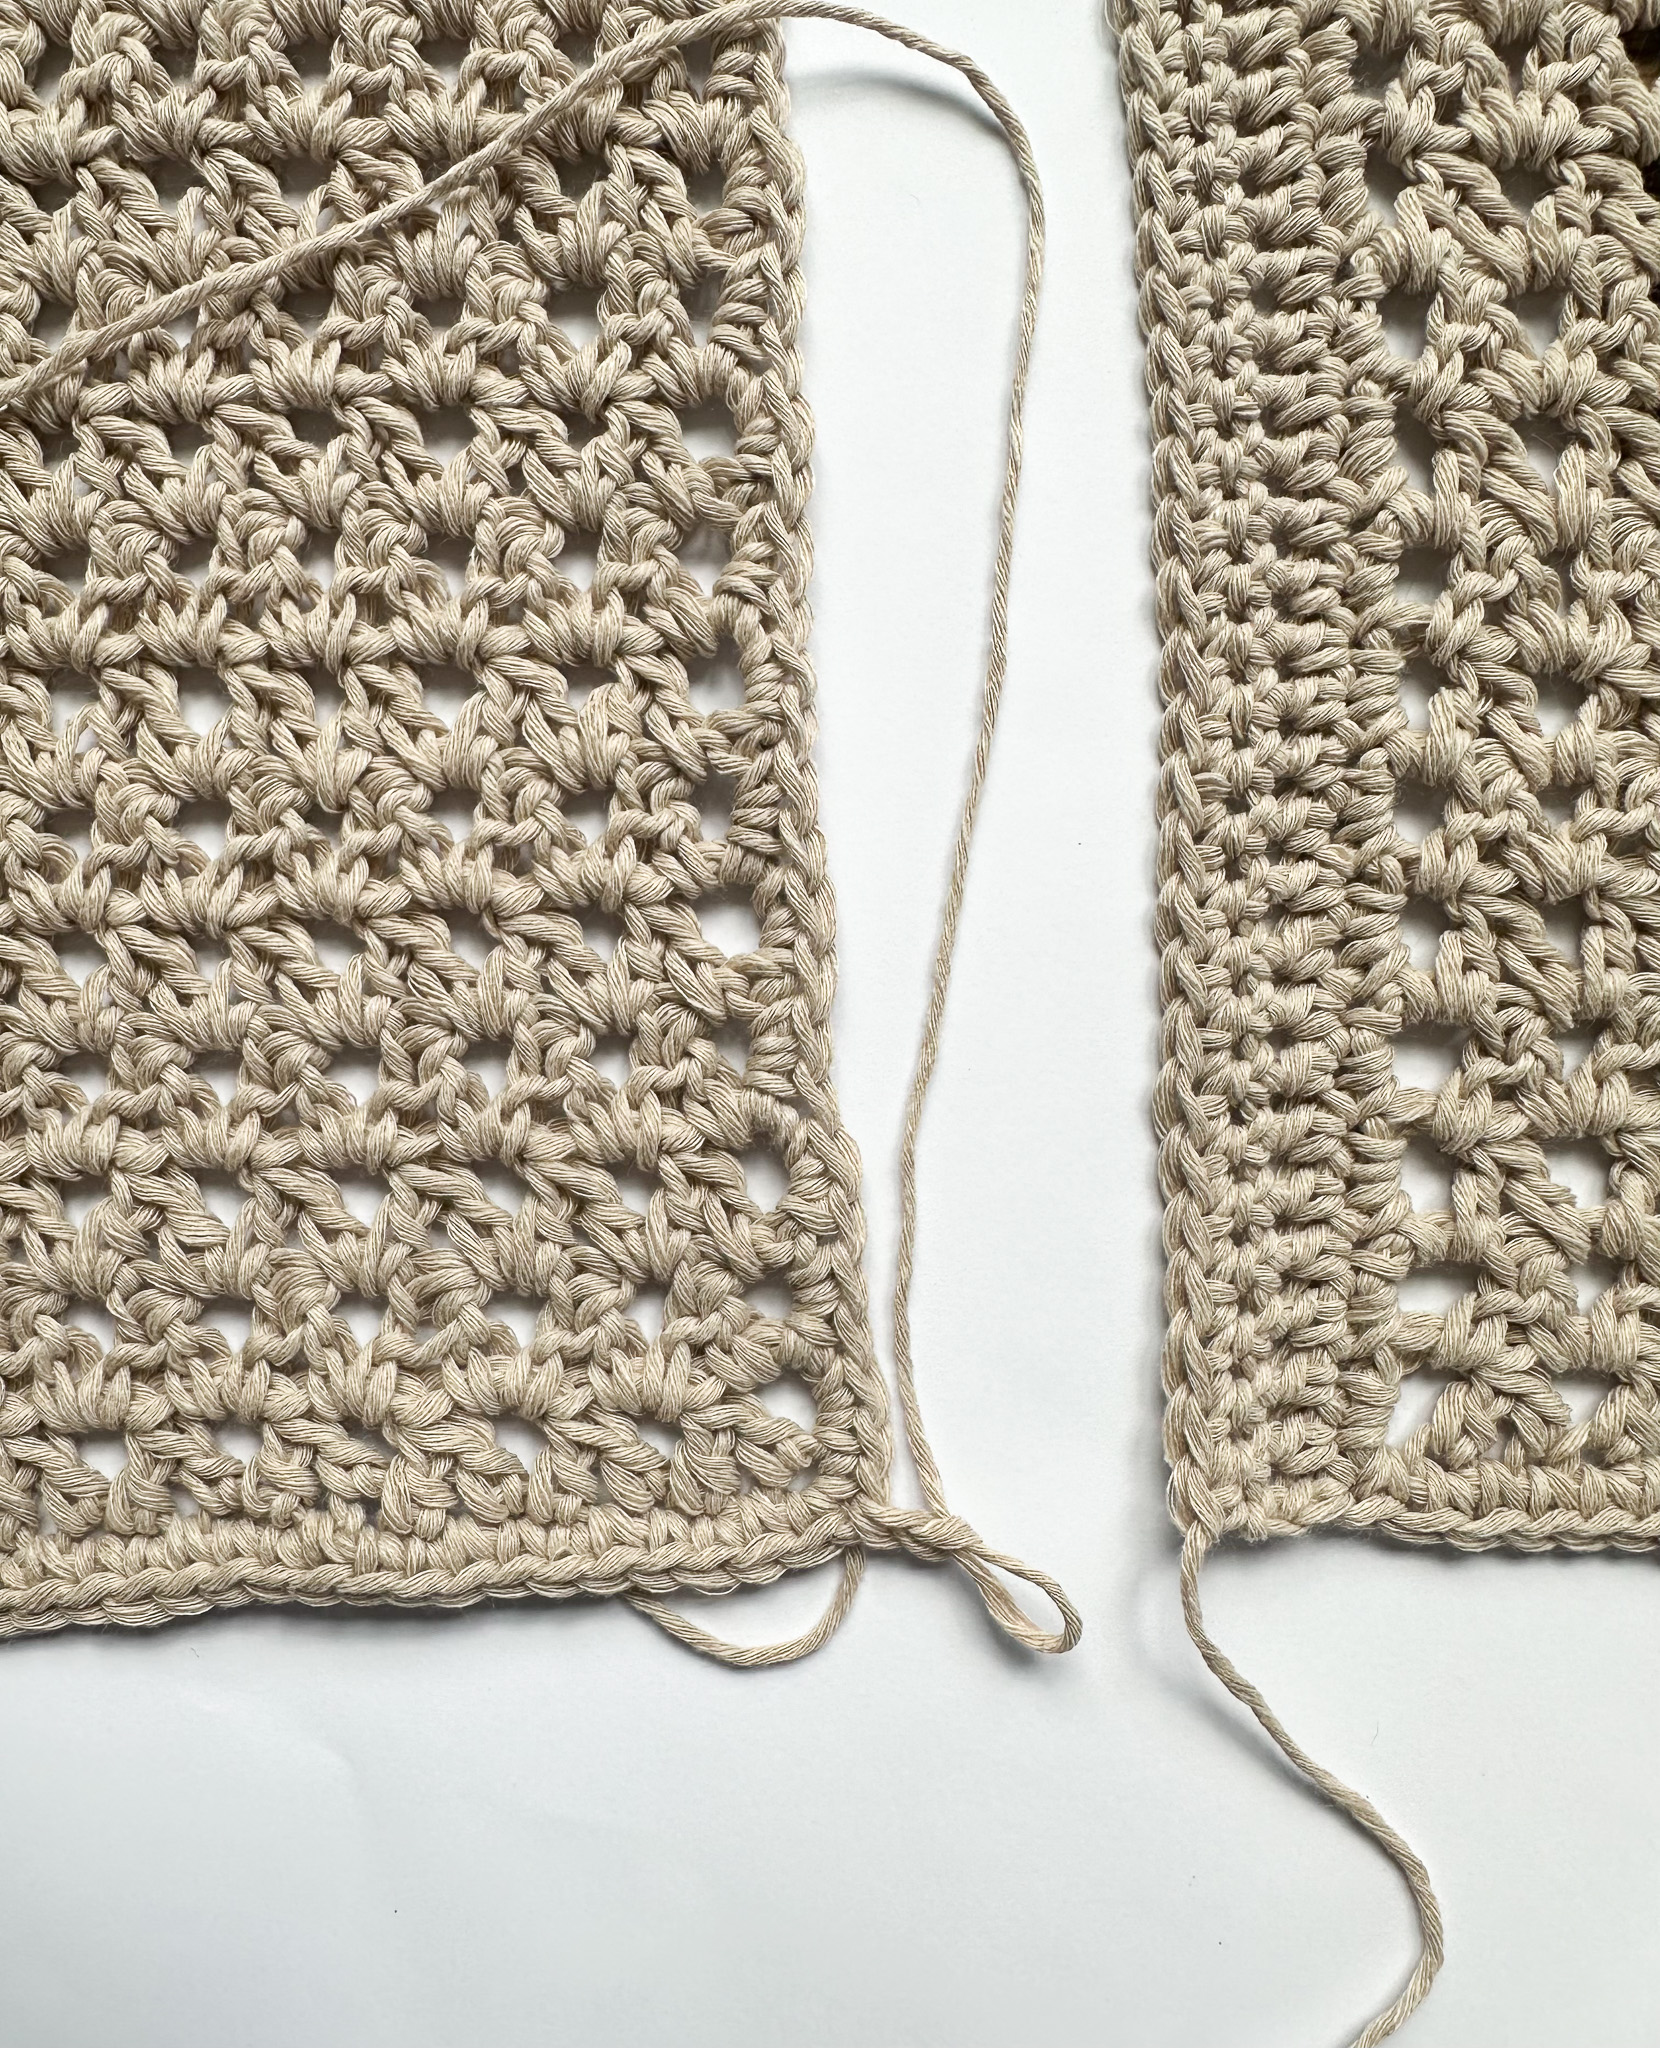
Edging around the Front Panel
Now you will crochet an edging around the entire piece, and then make the edges along the shirt opening, which will either become buttonholes or the edge where the buttons will be sewn on.
Note that the different pieces are worked differently, and you start at different points on the piece.
Make sure to check that the pattern is oriented the same way on both pieces — that is, the double crochet groups form upside-down “V” shapes.
Left Front Panel (button side)
Start at the top left corner where you ended the previous step. Make one chain stitch, then crochet single crochets along the long side. Make 2 single crochets around each finished double crochet/stitch.
If you’re unsure how to crochet single crochets, see the video below.
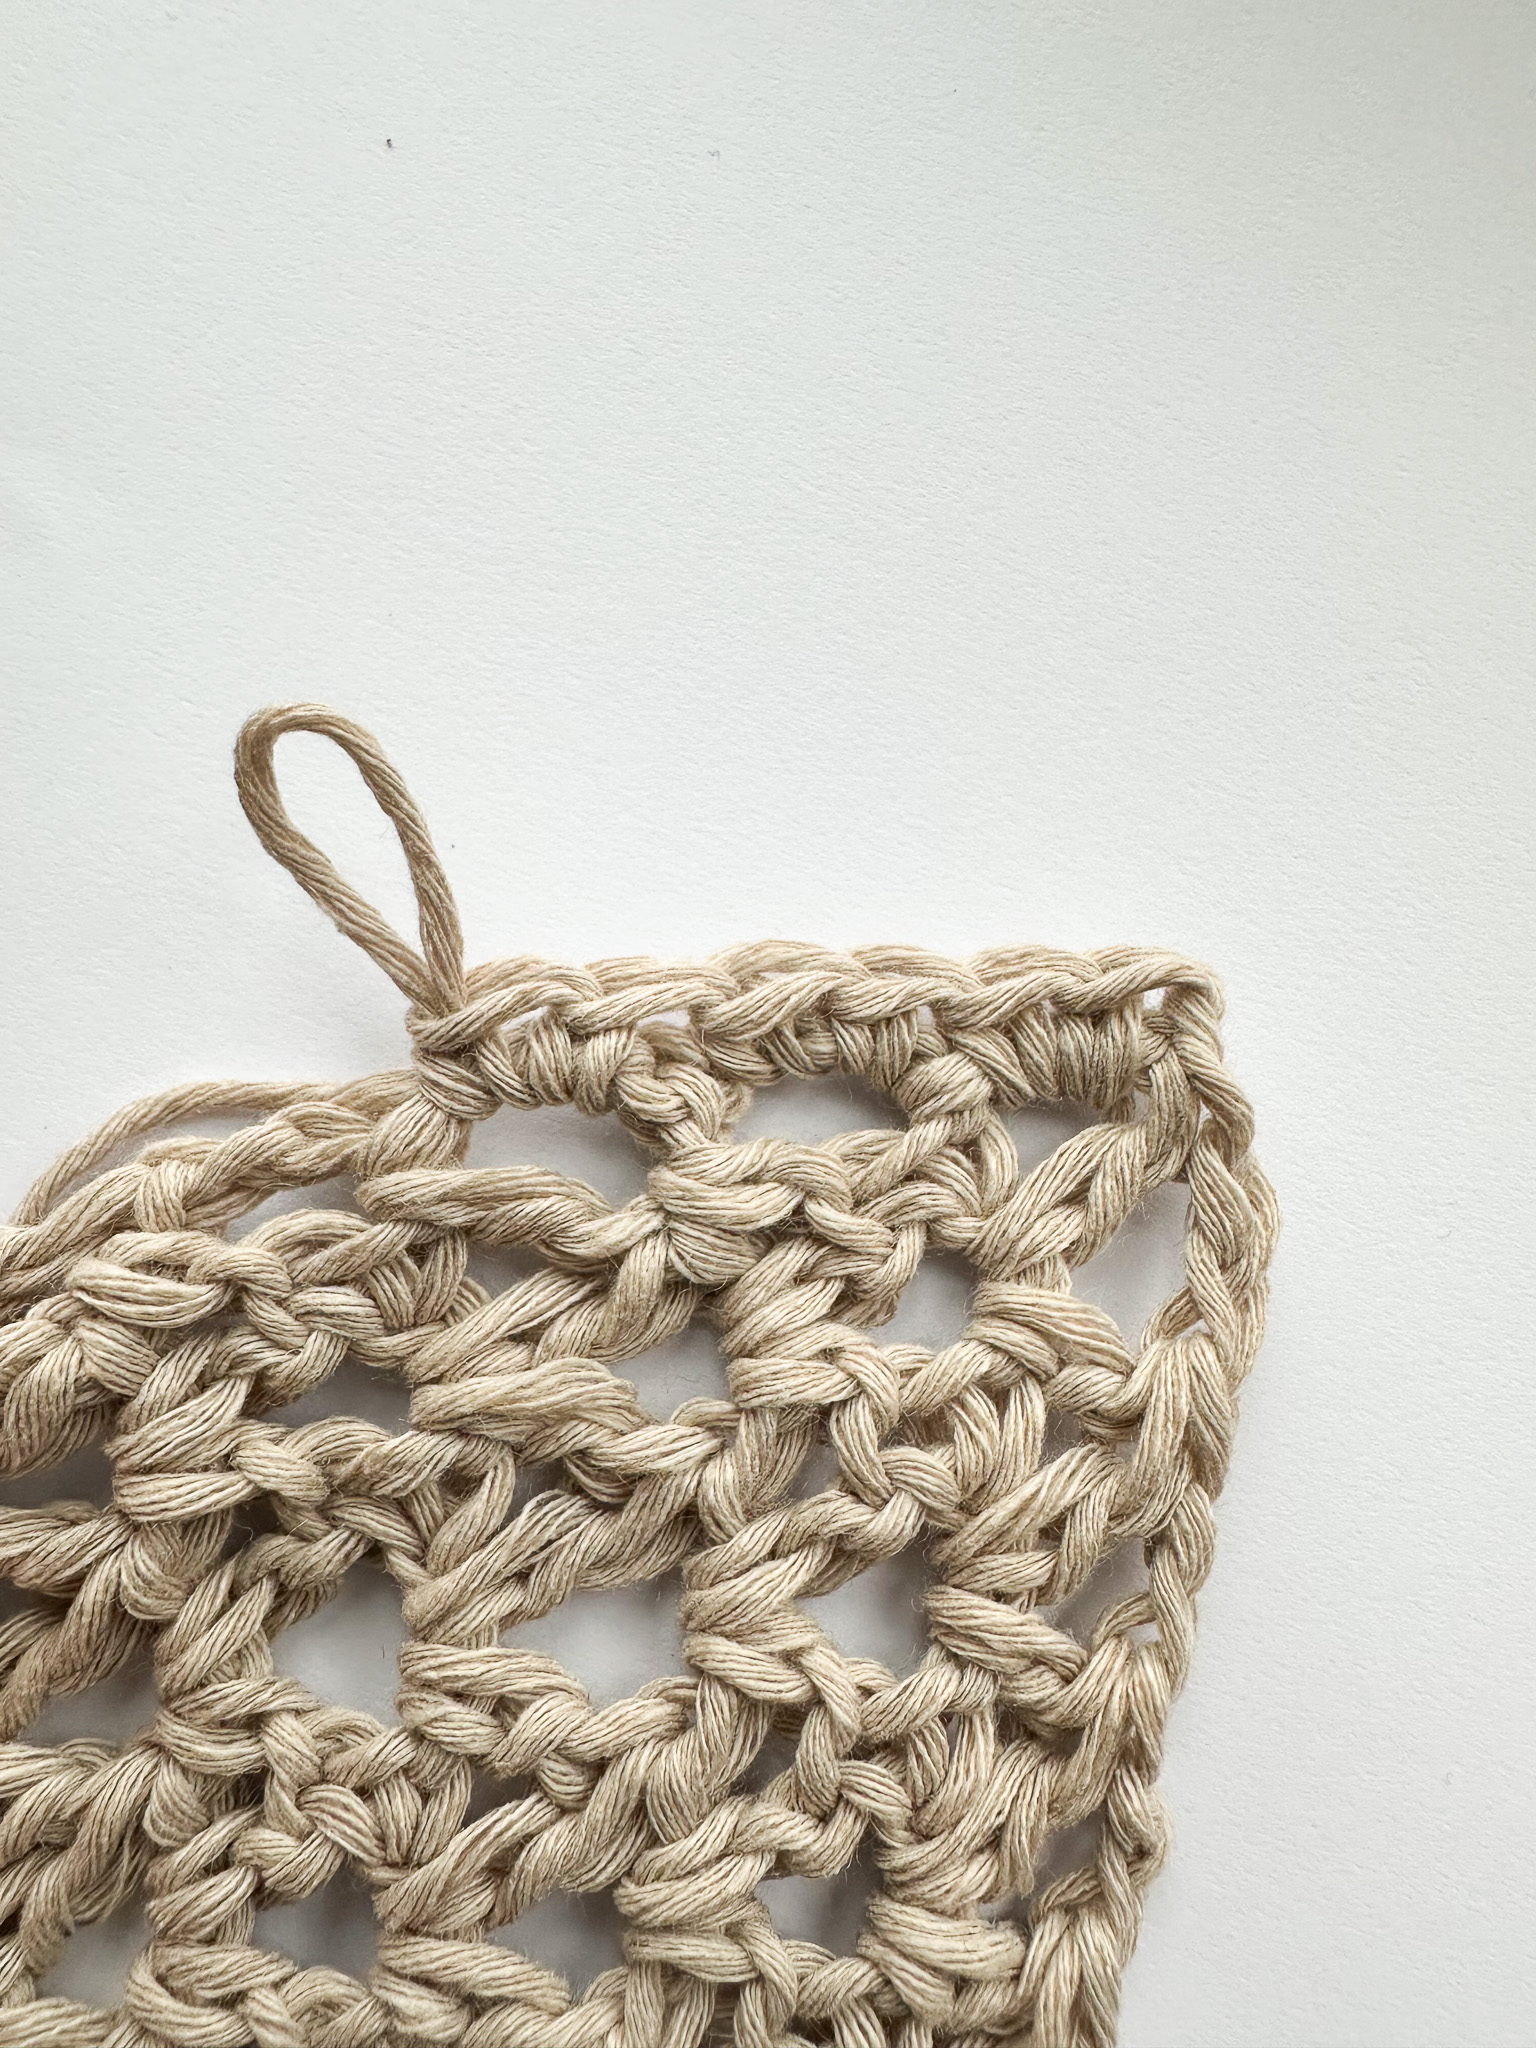
Make an extra single crochet in the corner. Then crochet single crochets along the bottom short side.
Make one single crochet in each double crochet and one single crochet in the spaces between the double crochets.
Make an extra stitch in the corner. Continue along the long side the same way as the first long side, including an extra stitch in the corner.
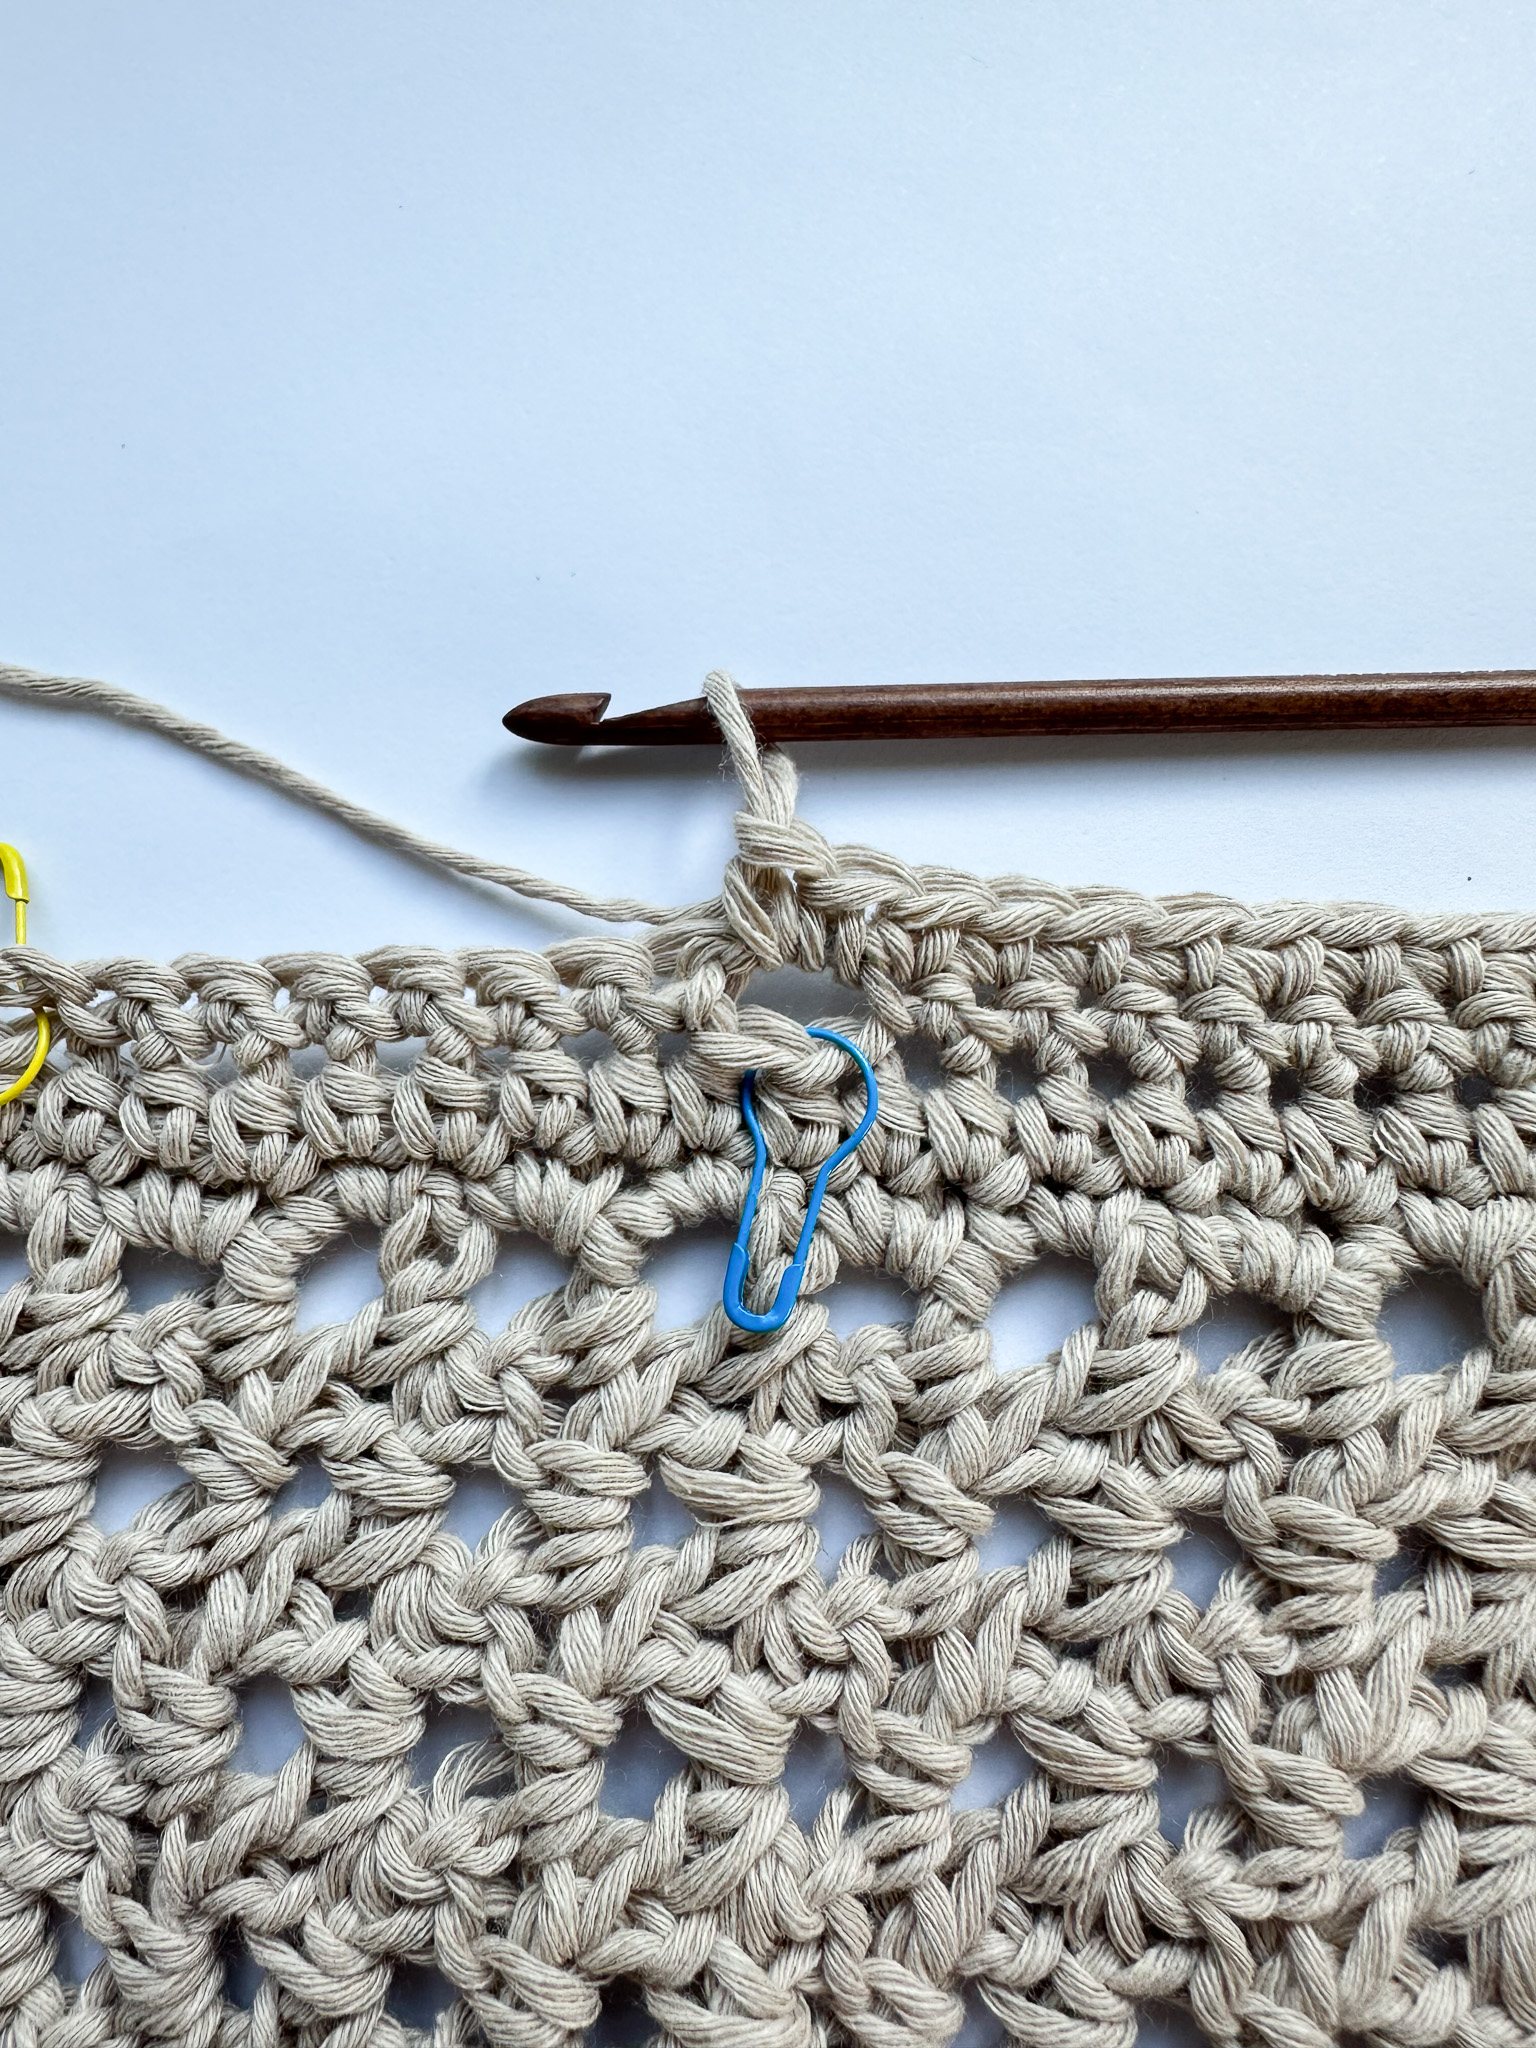
On the top edge of the piece, crochet one single crochet in the top of each double crochet group and two single crochets around the spaces between the groups.
Now you are back where you started, at the top left corner.
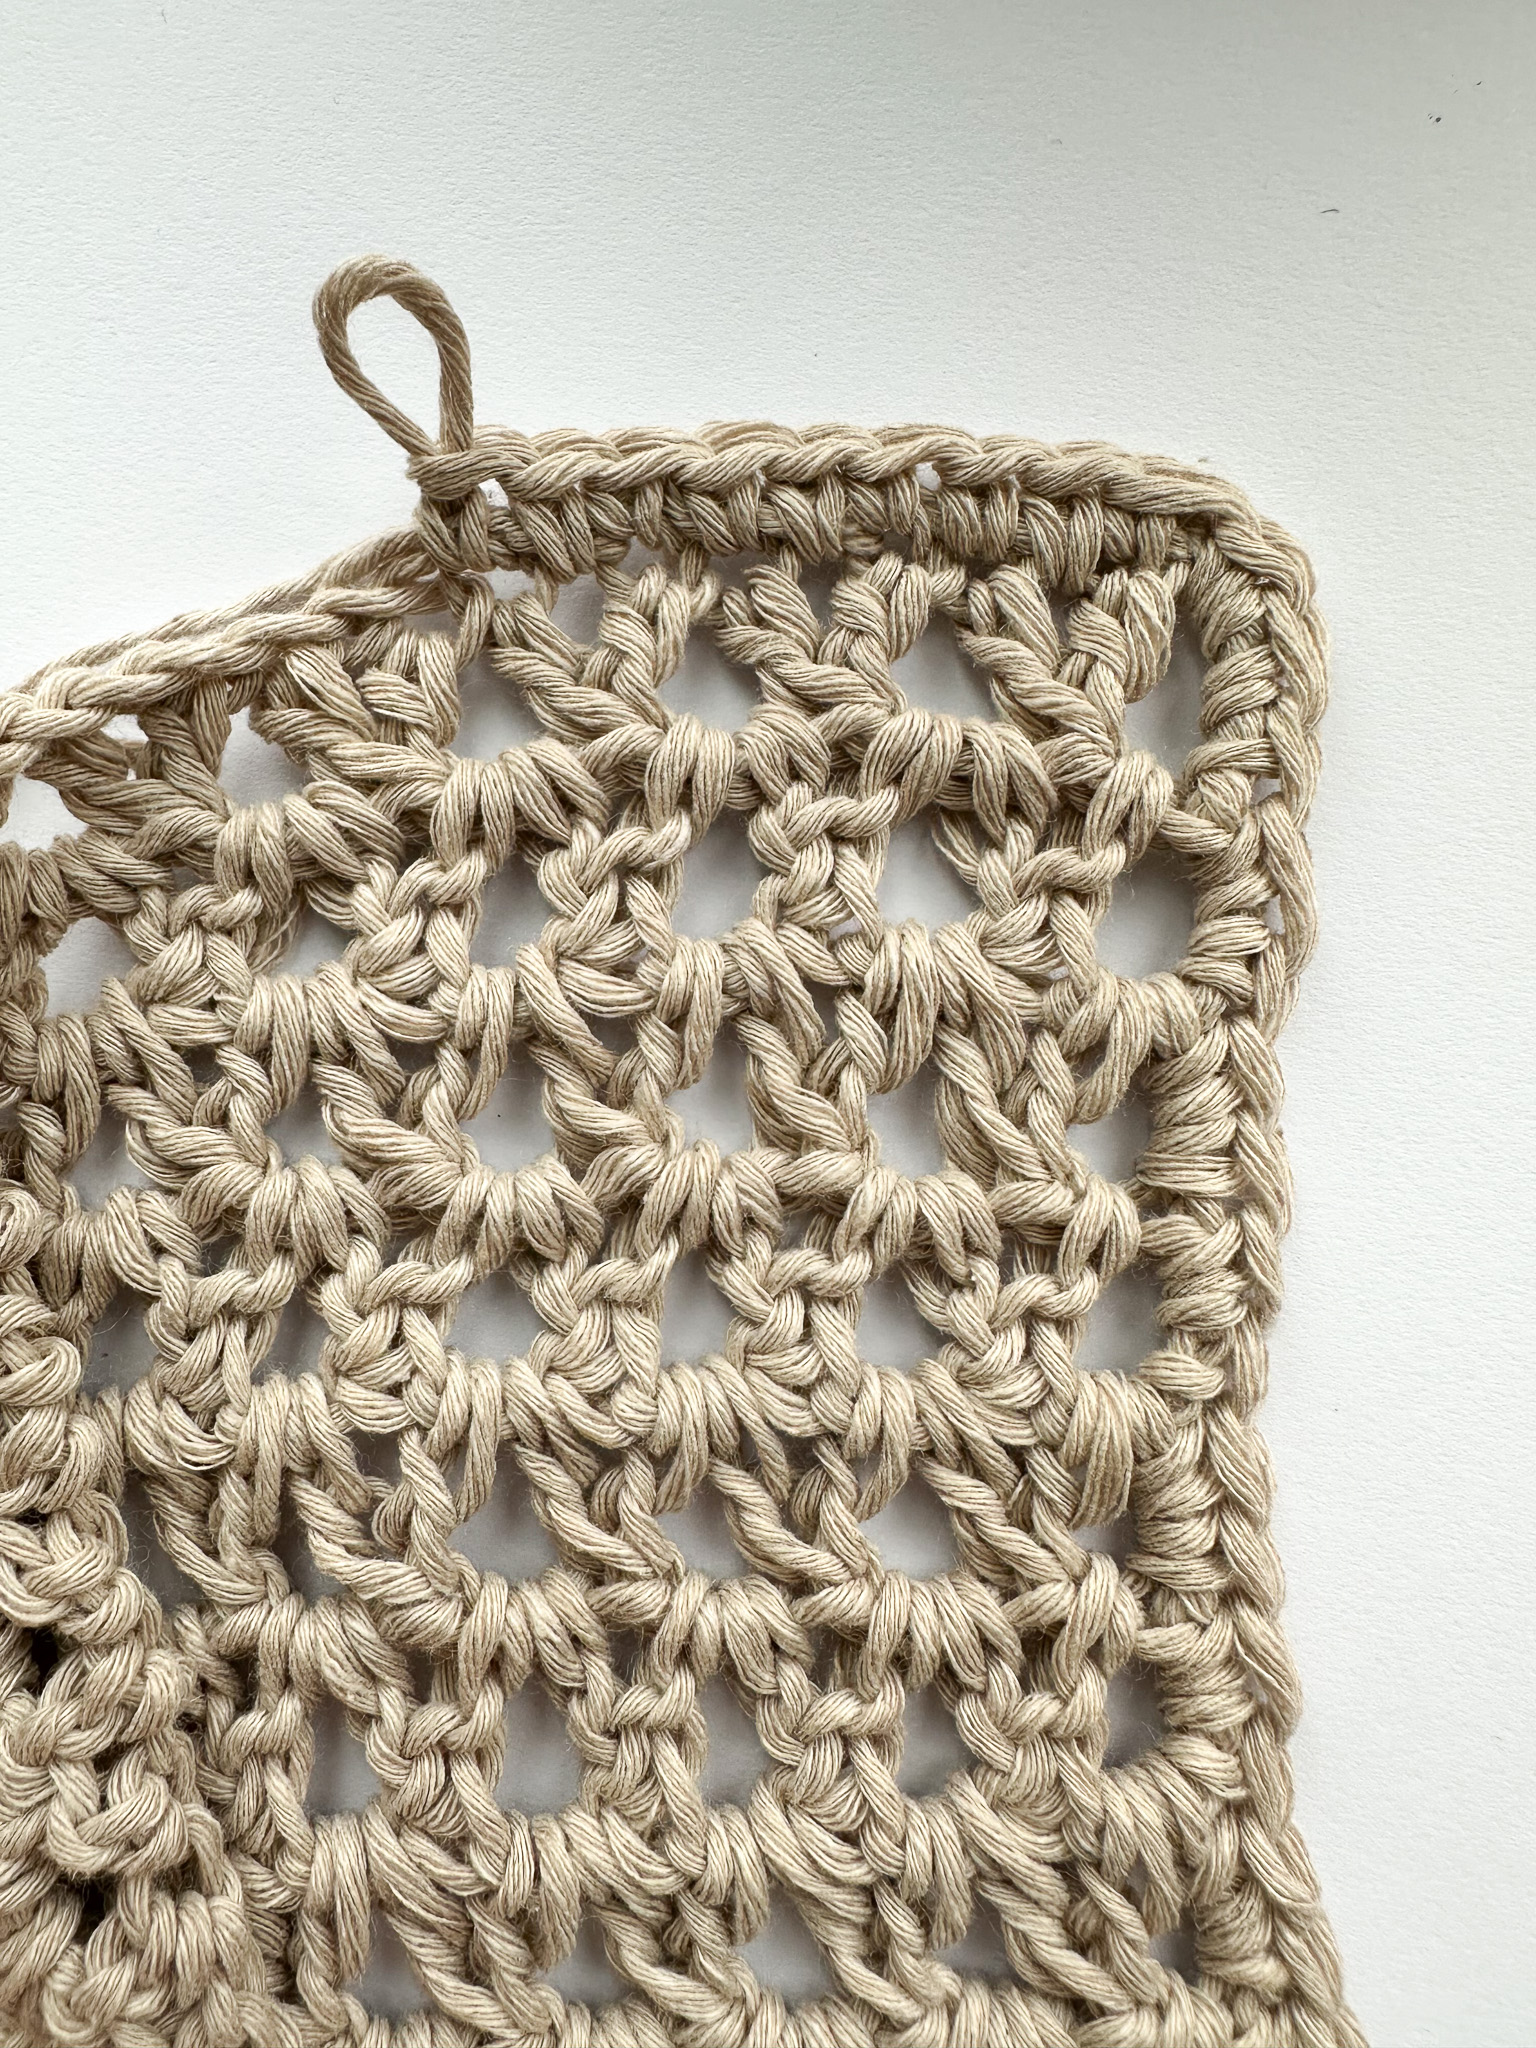
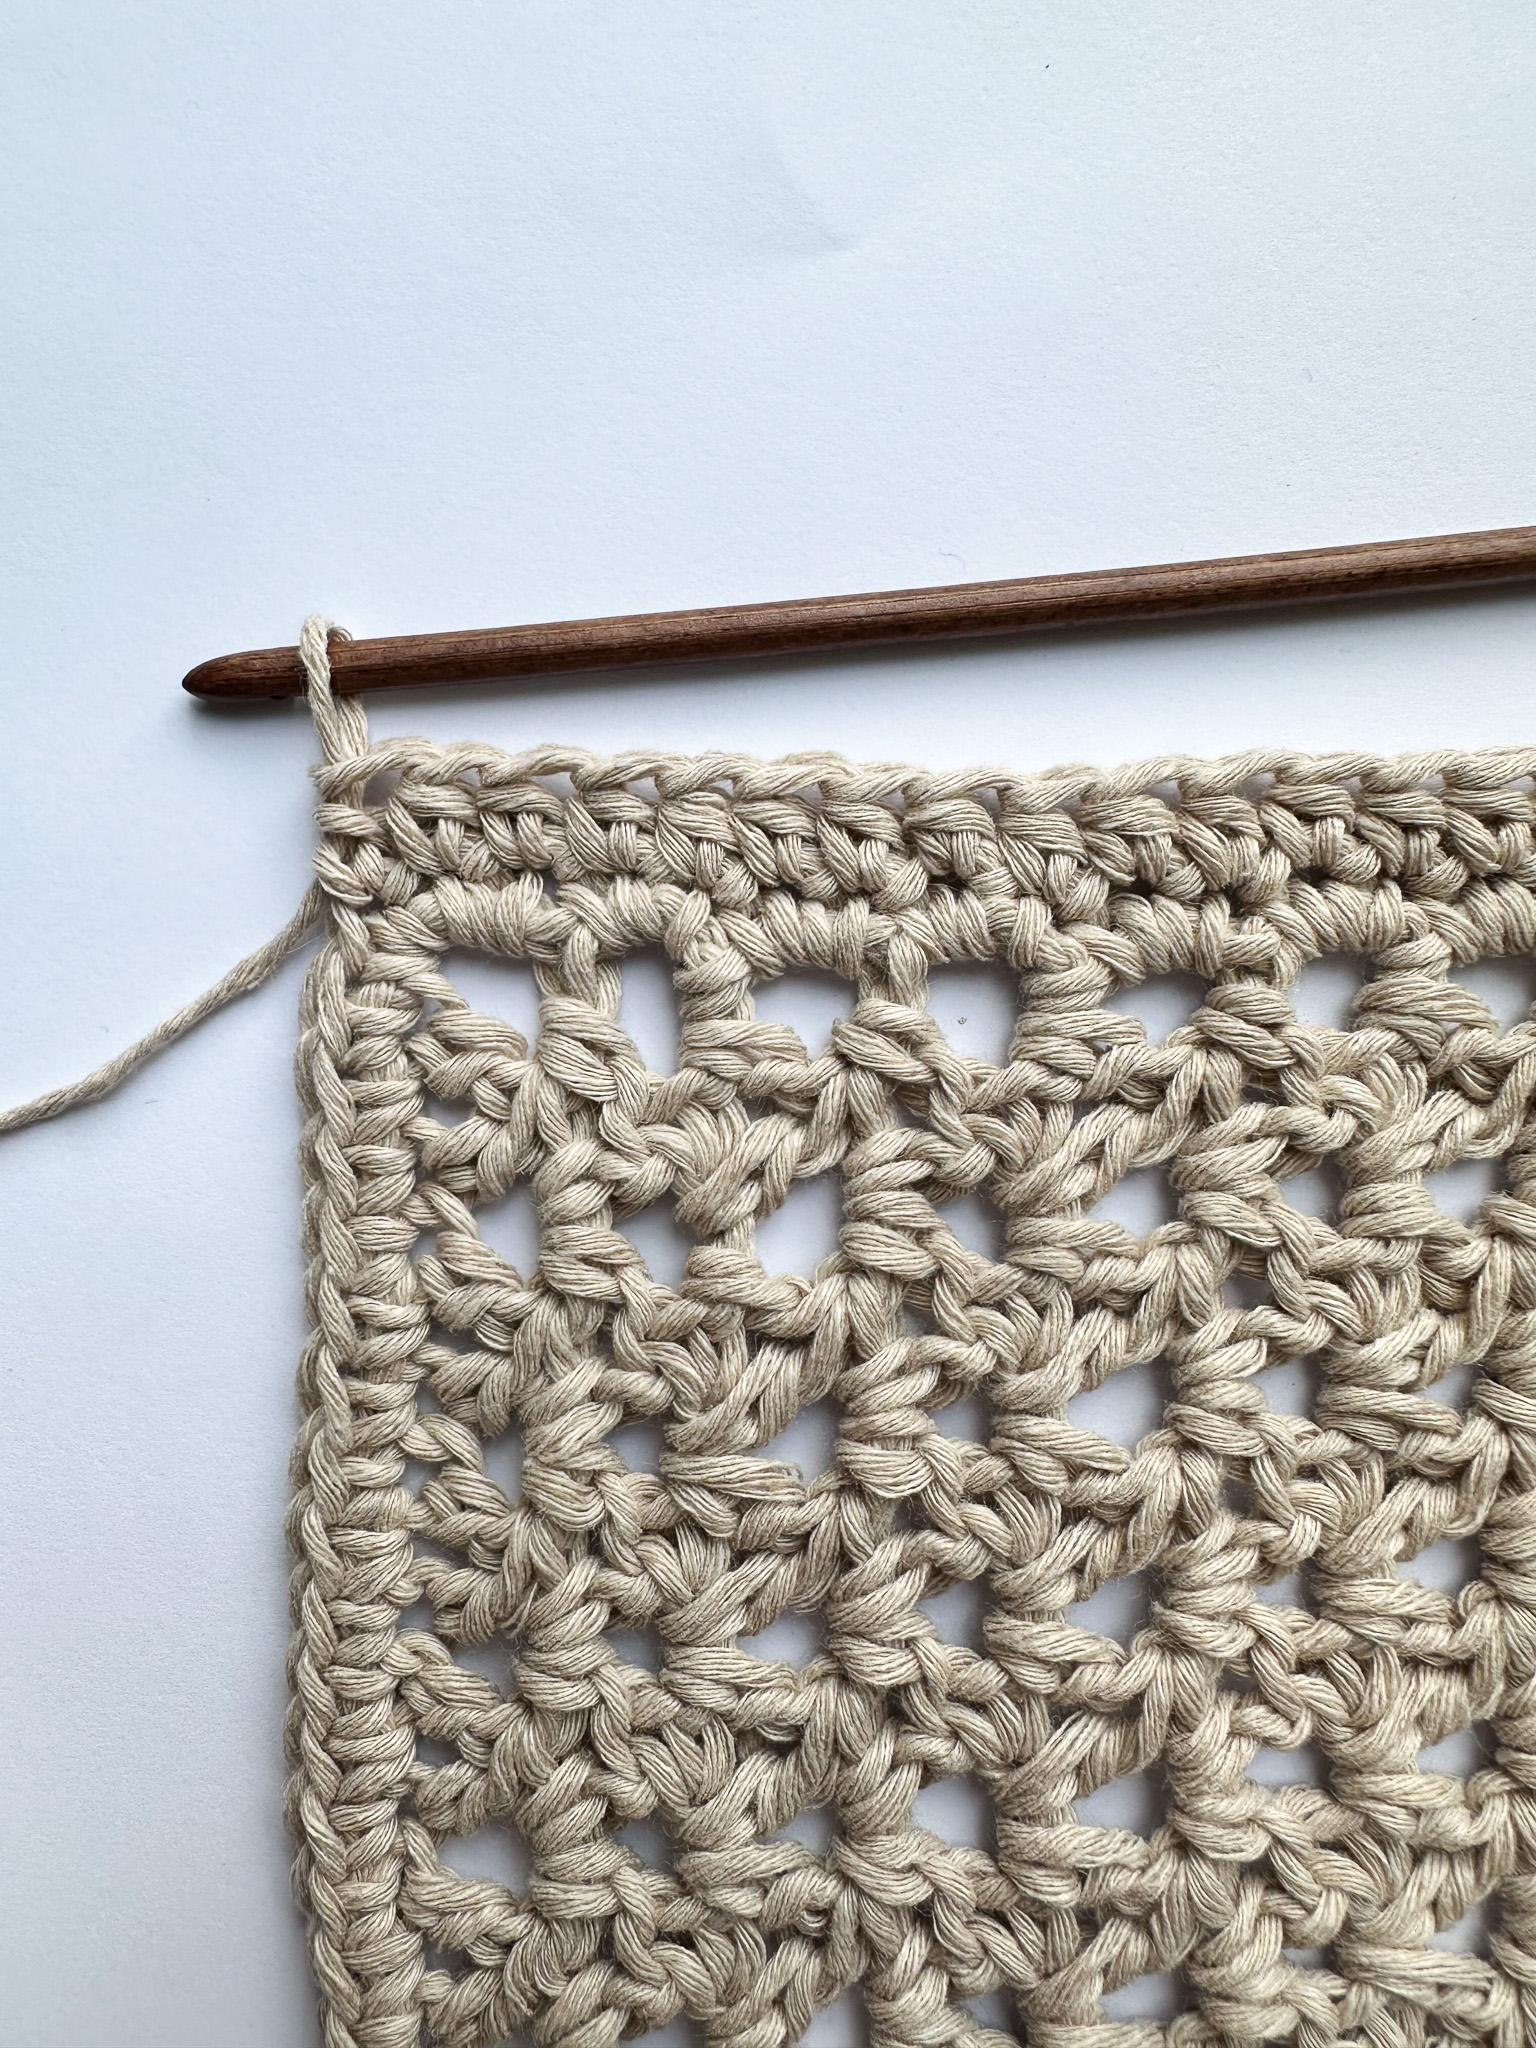
Row 1: Chain 2. Then crochet half double crochets along the first long side.
Make one chain stitch and turn the piece.
Row 2: Crochet single crochets along the long side. Make one chain stitch and turn.
Row 3: Crochet one more row of single crochets.
Cut the yarn and fasten off.
Right Front Panel (buttonhole side)
Make a loop and pick up the yarn loop at the bottom right corner, along the long side that will have the buttonholes. Crochet one round of single crochets around the entire piece, in the same way as for the left panel.
If you’re unsure how to make a slip knot, see the video below.
Row 1: Chain 2. Then crochet half double crochets along the first long side. Make one chain stitch and turn the piece.
If you’re unsure how to crochet half double crochets, see the video below.
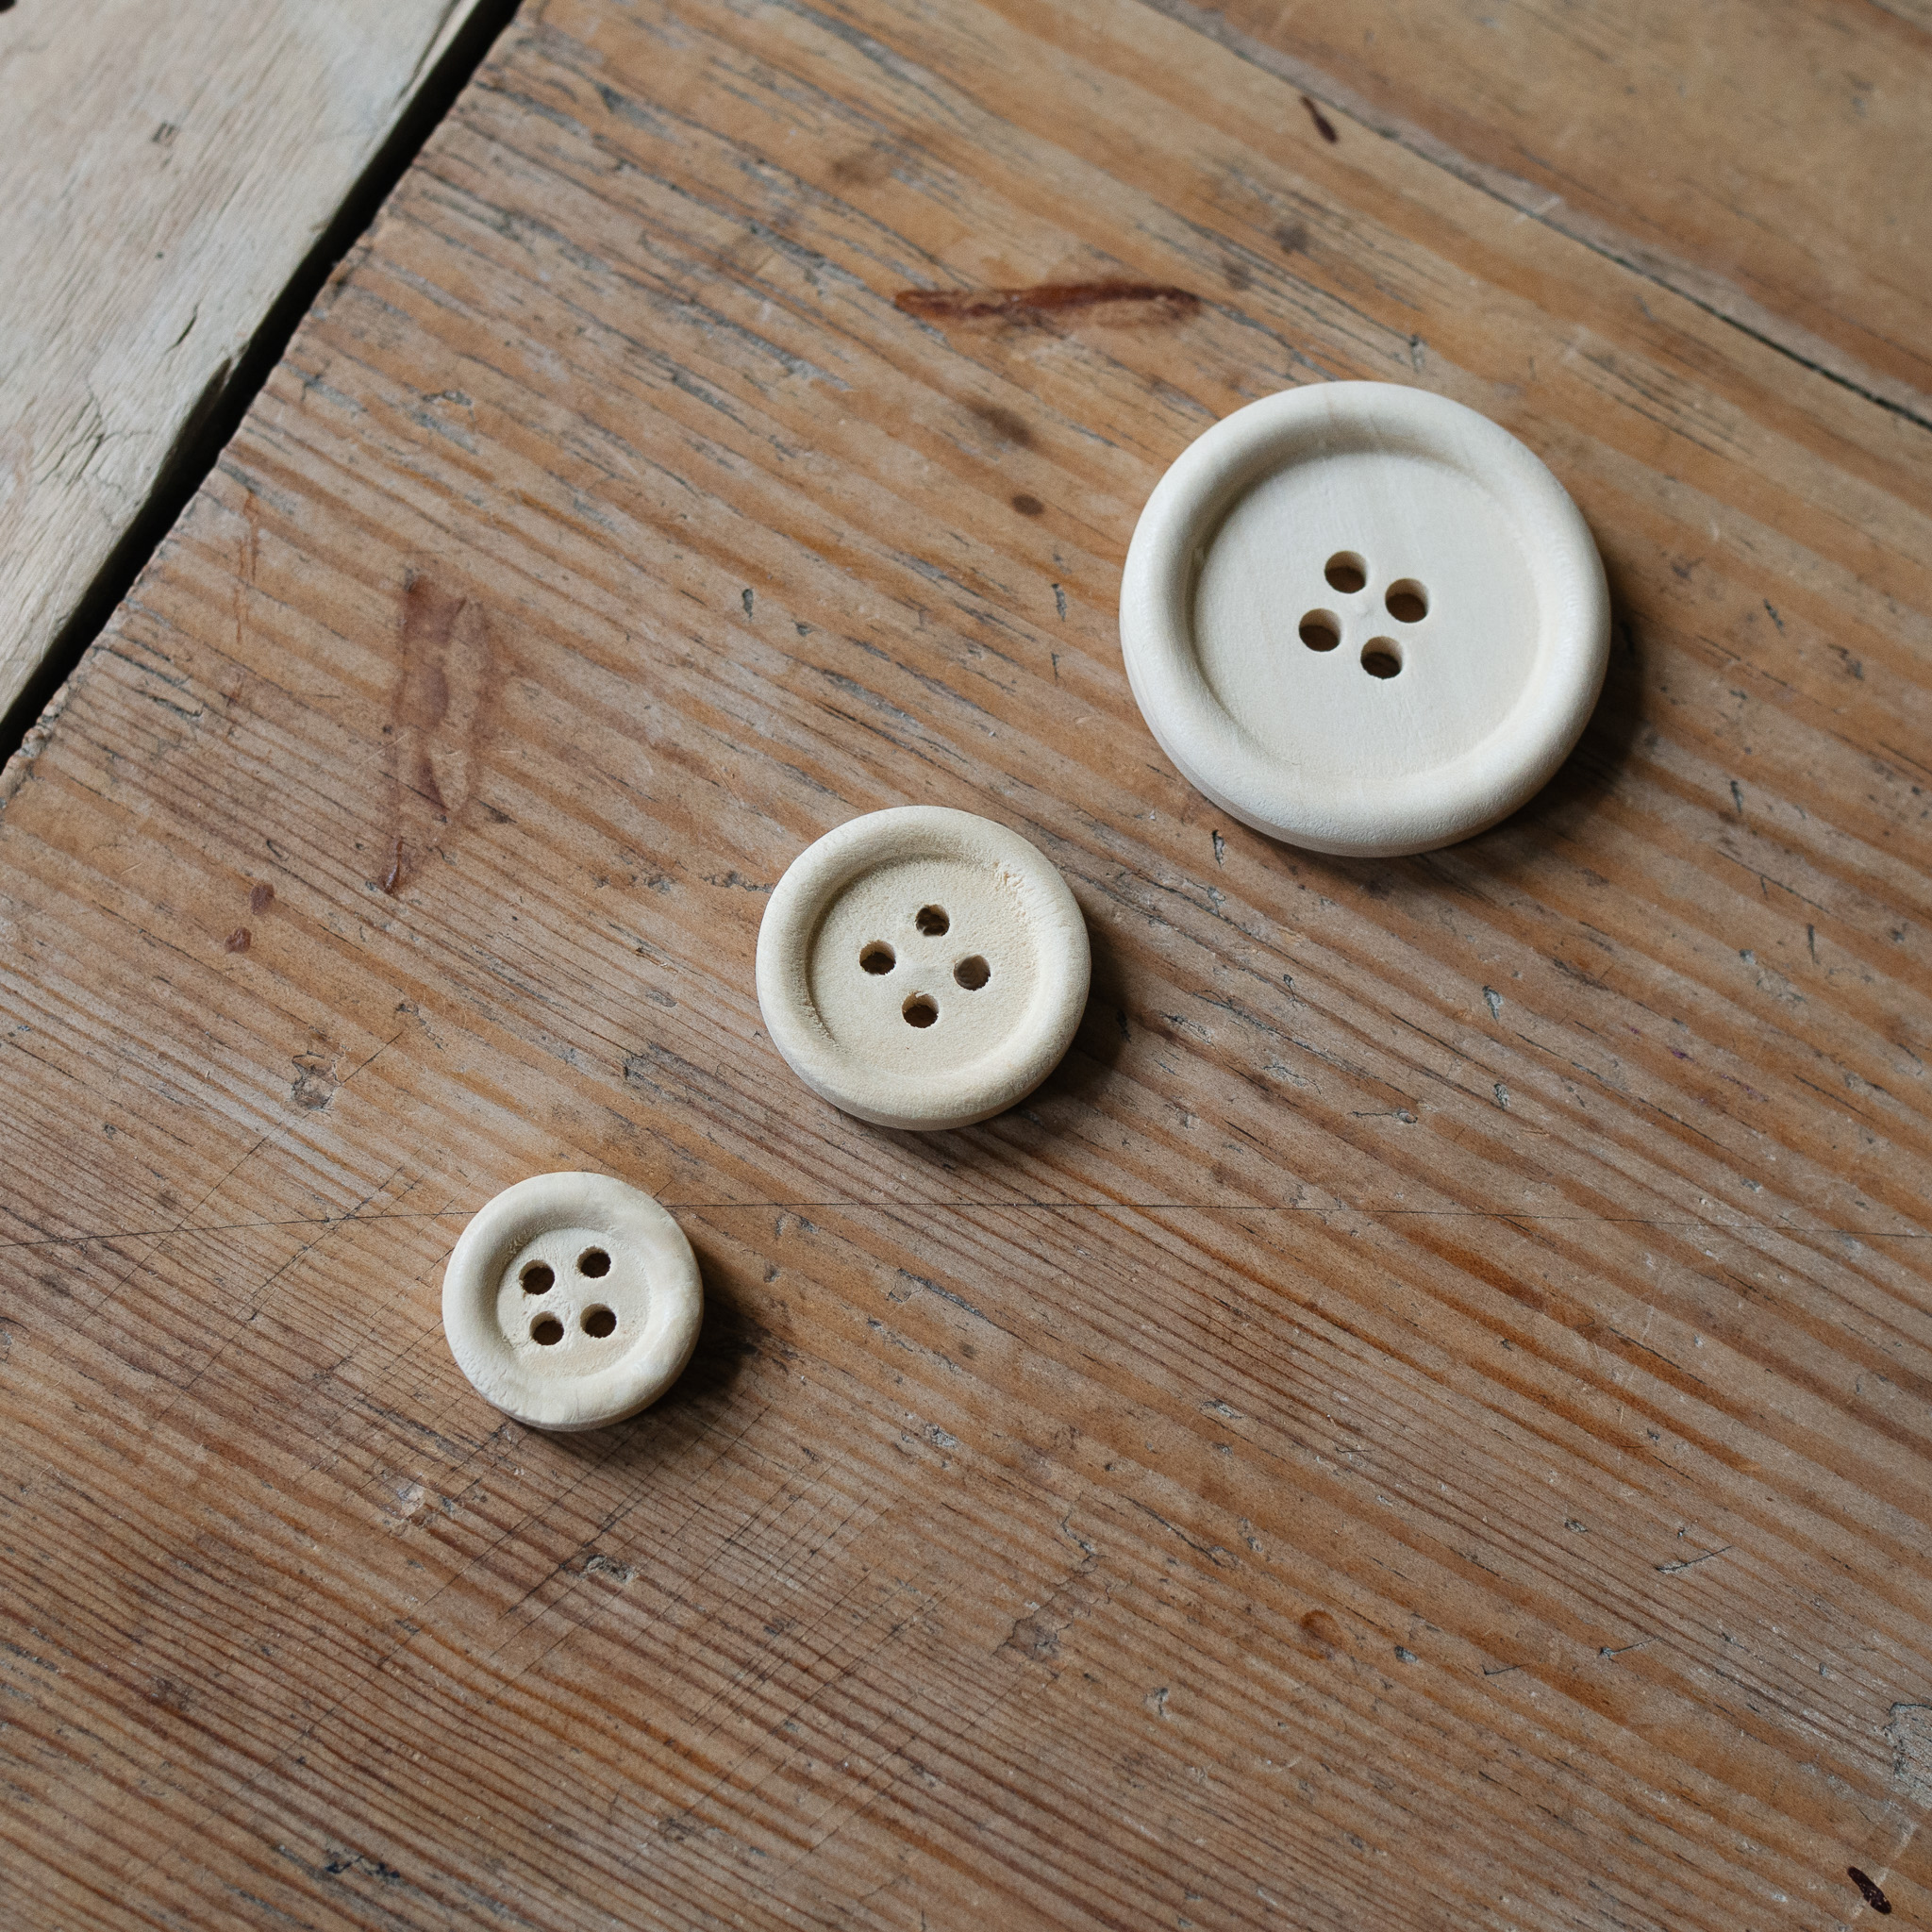
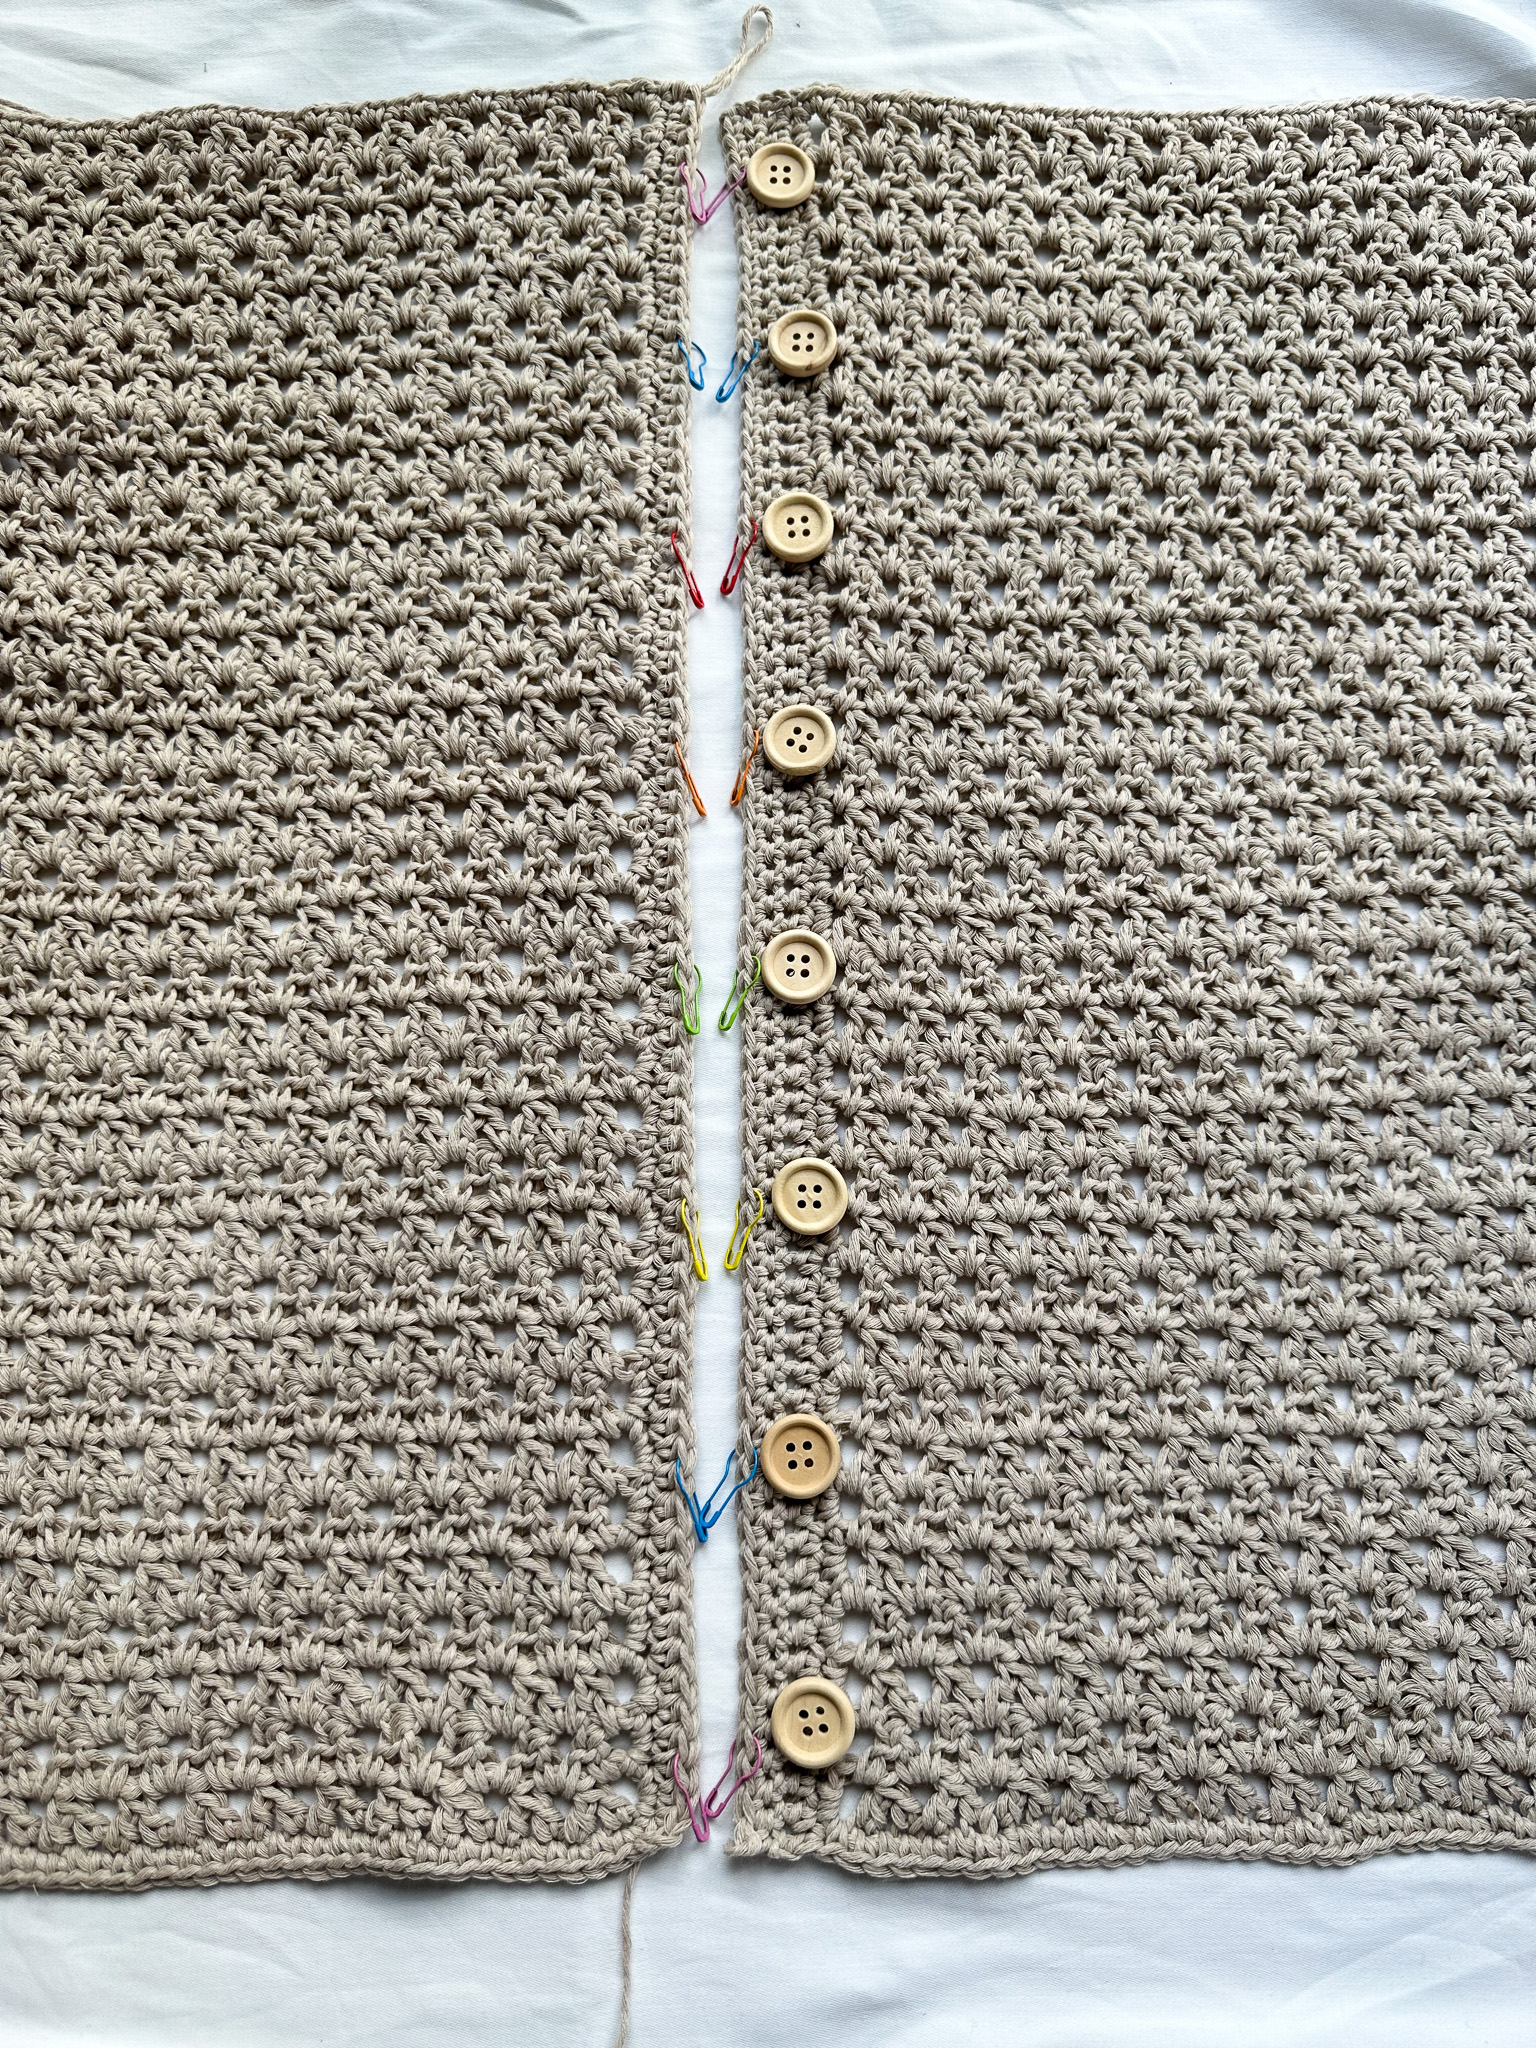
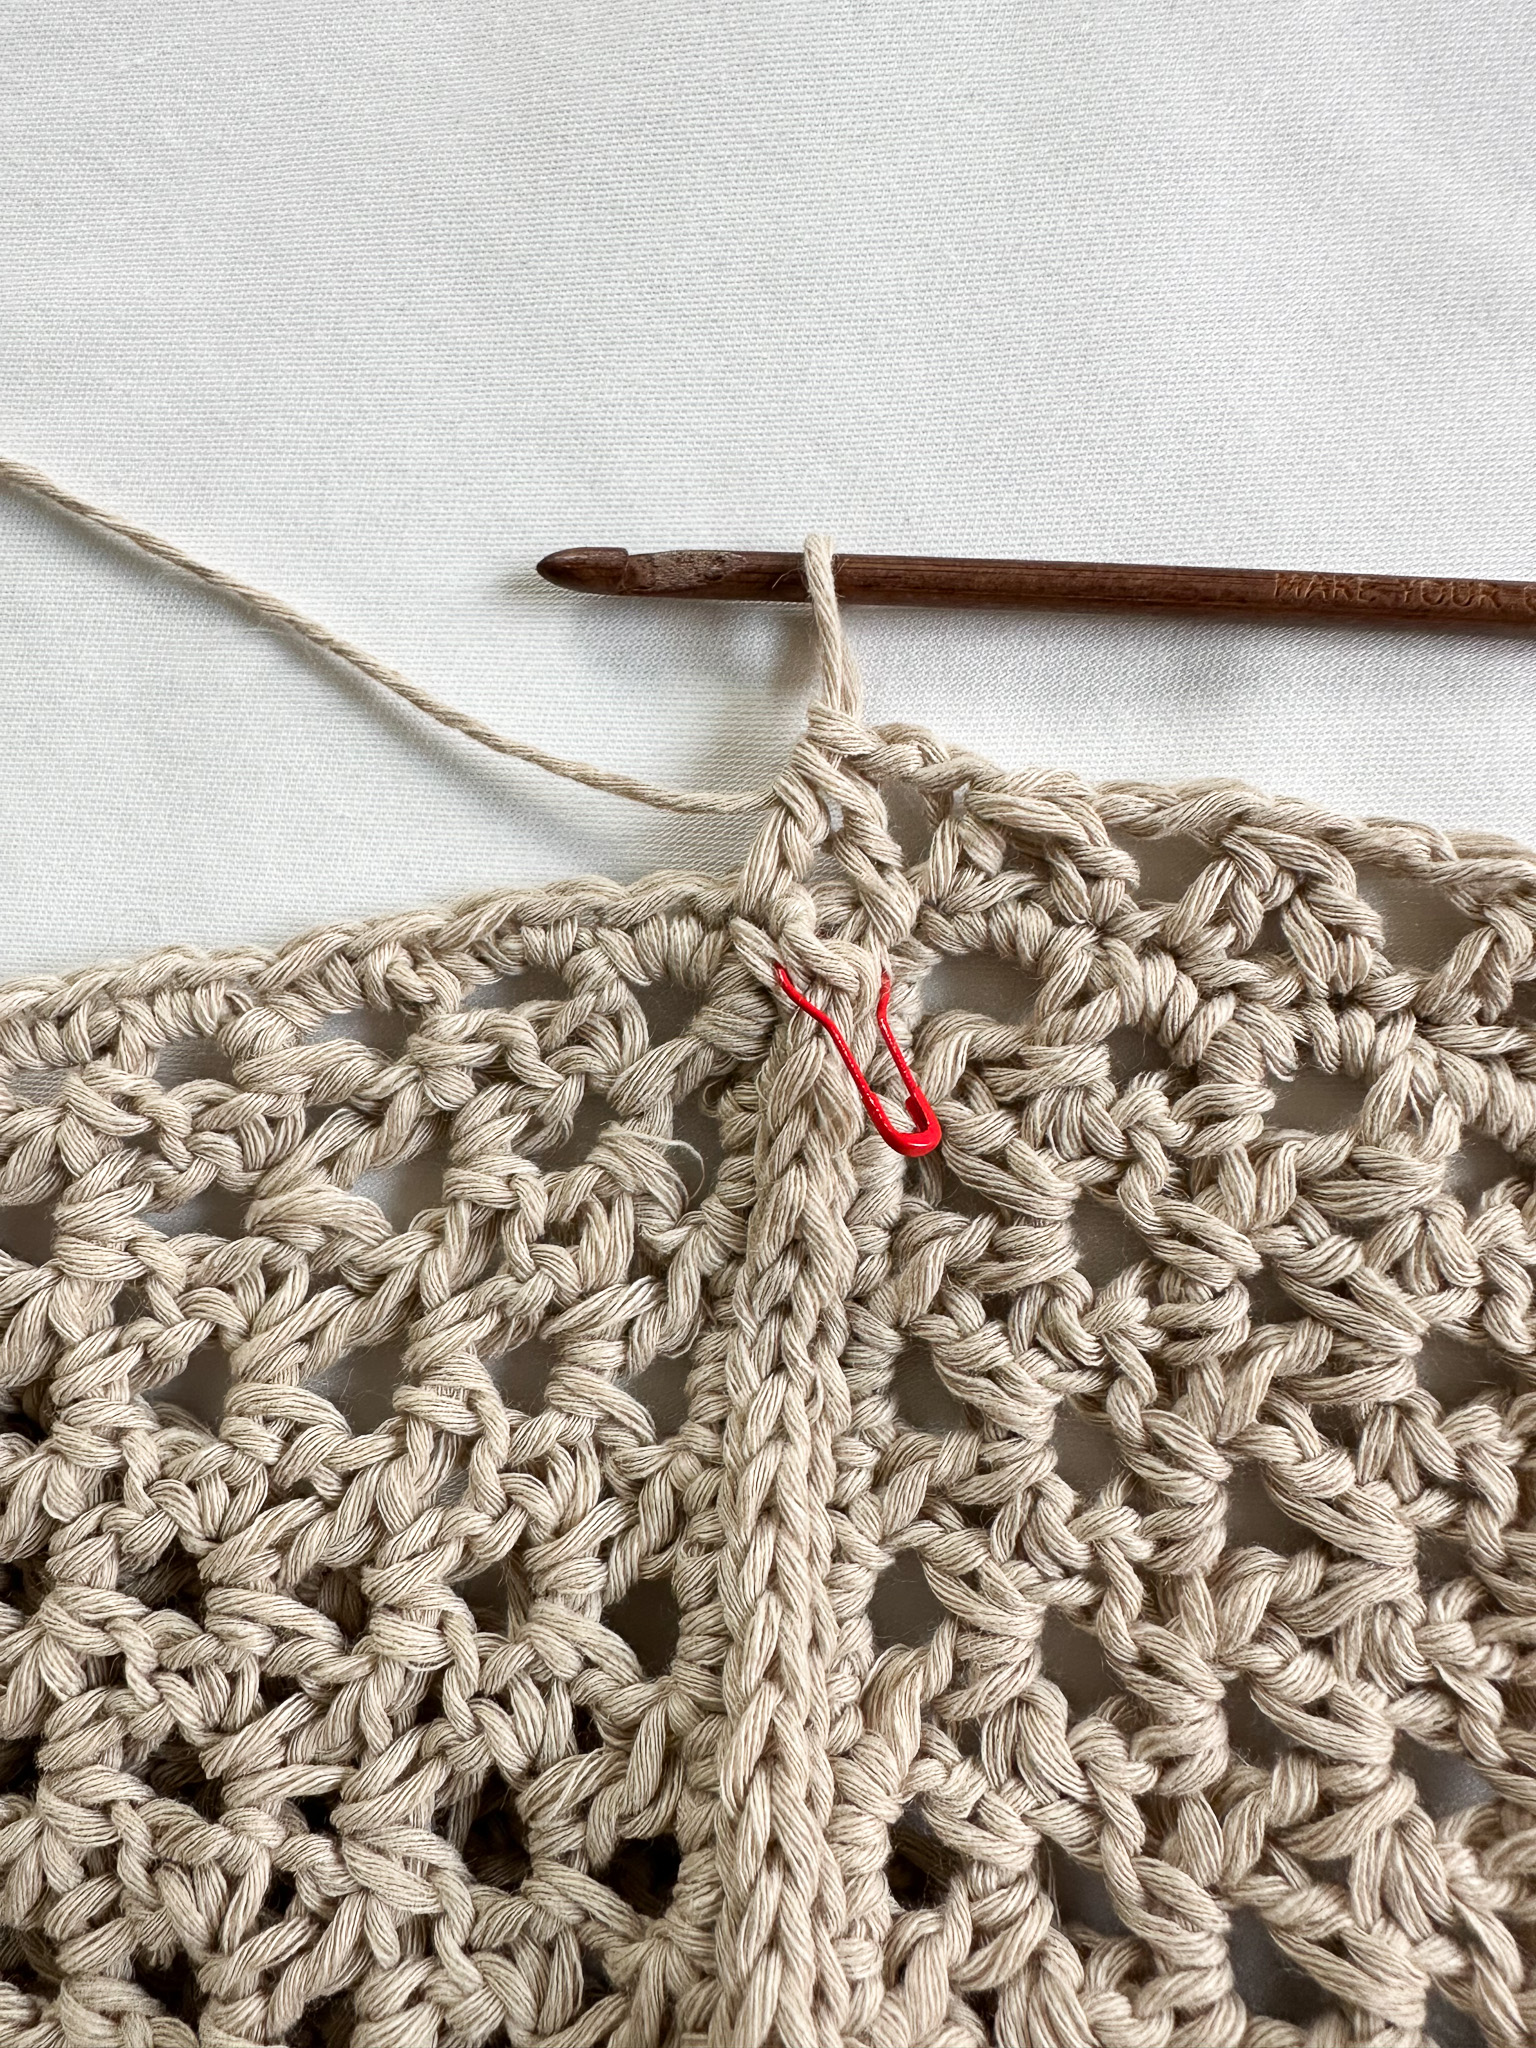
Now lay both pieces out in front of you and place the number of buttons you want on the left front panel. In the picture, there is about 6 cm between the centers of the buttons.
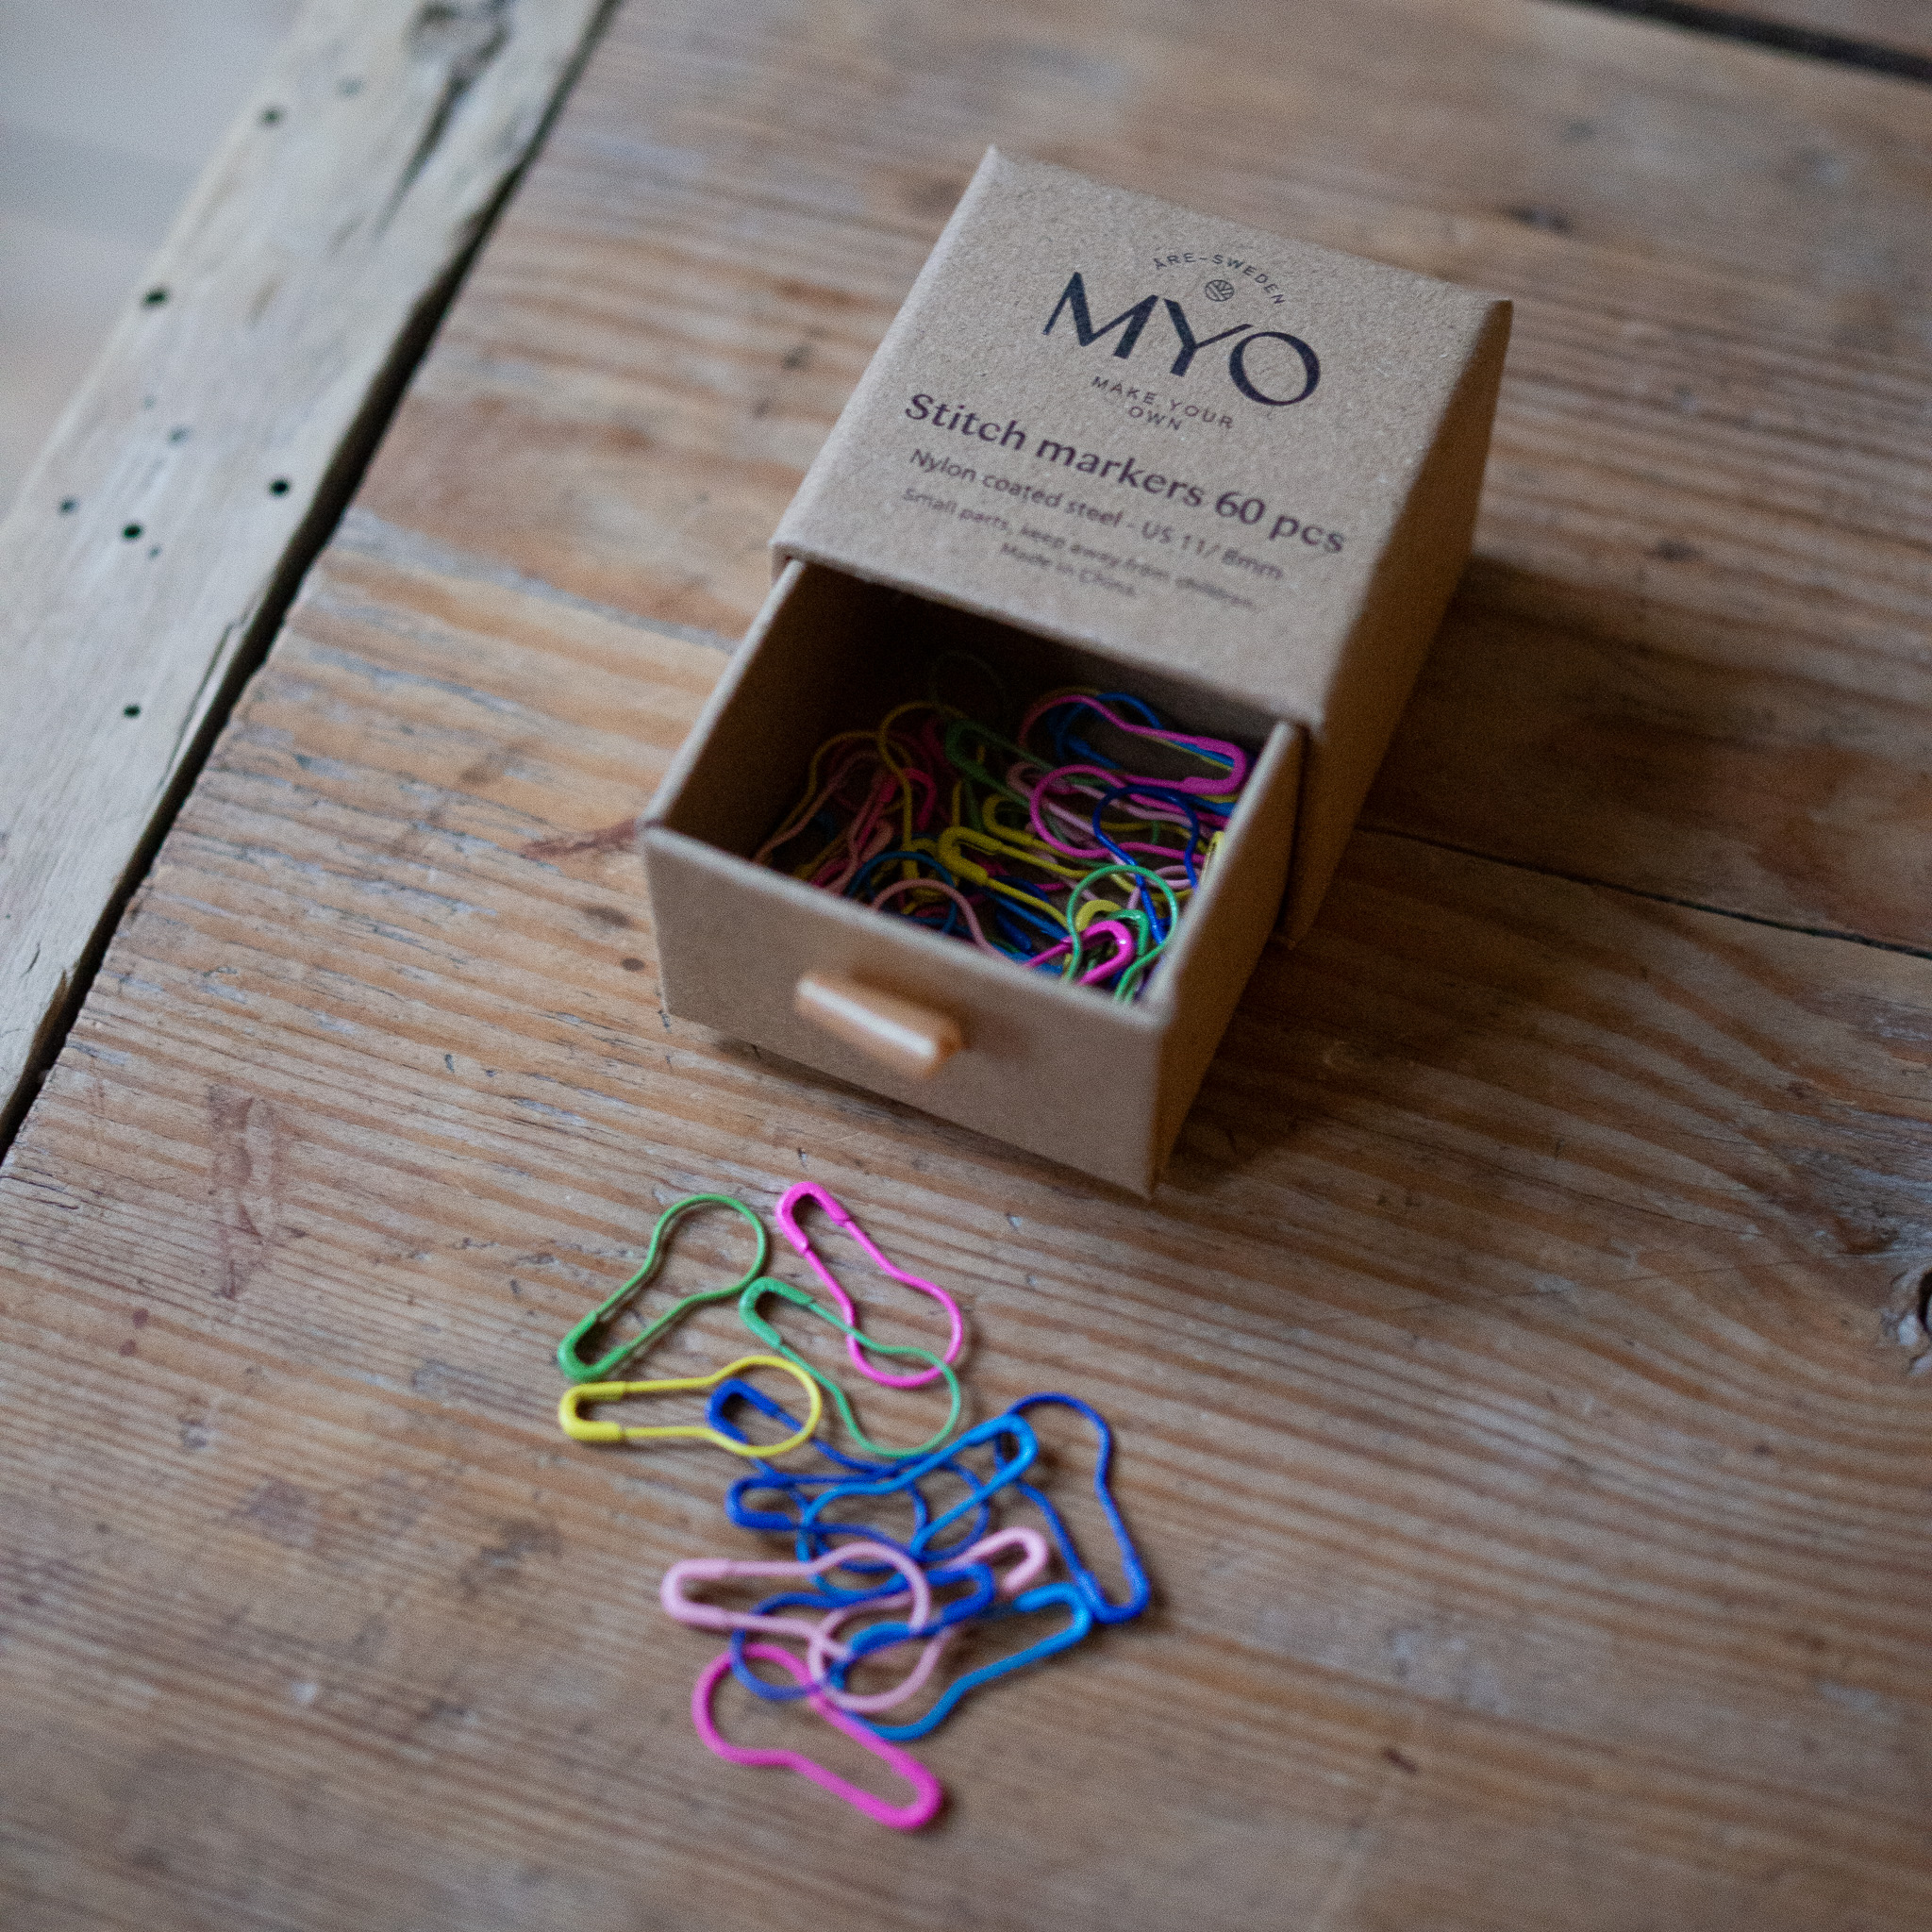
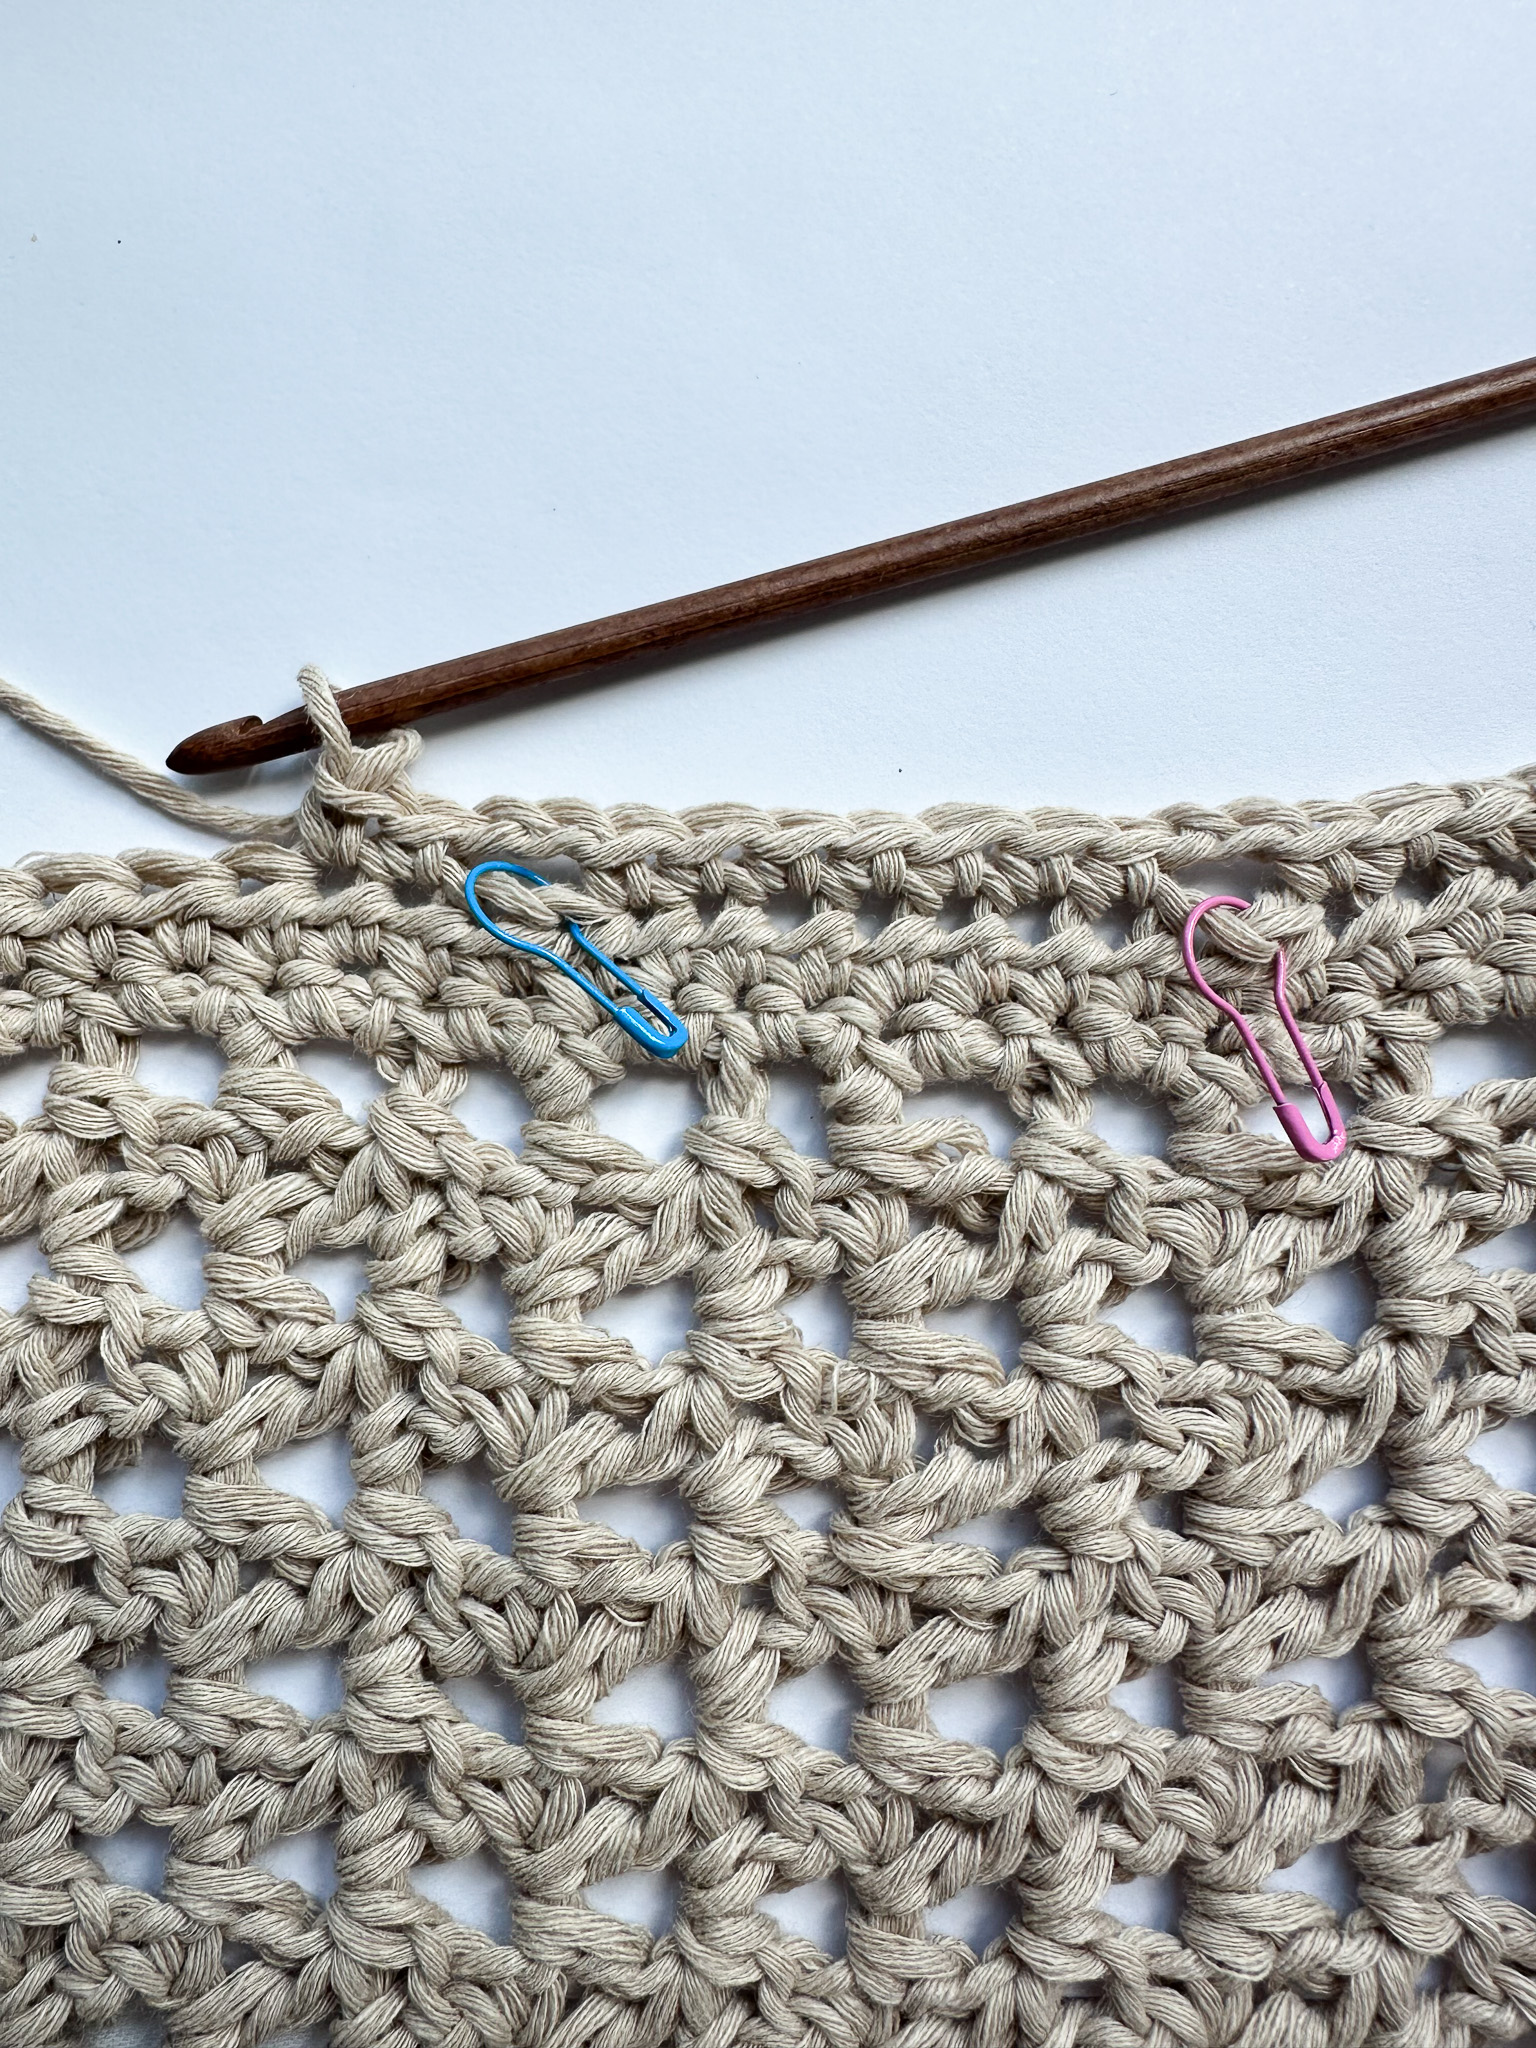
Attach stitch markers to both pieces to mark the button placement.
Row 2: Crochet single crochets along the long side. At a marker, skip 2 stitches and chain 2 instead. This creates the buttonholes.
Chain 1 and turn.
Row 3: Crochet one more row of single crochets. At the buttonholes, make two single crochets around the chain stitches.
Cut the yarn and fasten off.
Back Panel
This piece is crocheted the same way as the front panels, with the difference that it should be wider: 54 (50, 58) cm.
Therefore, chain 95 (89, 101) stitches. This will correspond to 30 (28, 32) double crochet groups.
If you have adjusted the measurements, make sure the back panel matches the combined width of the front panels when laid side by side, slightly overlapping as they will when the buttons are fastened.
Crochet a total of 35 (35, 37) rows (or the same number as the front panels), then crochet one round of single crochets around the piece.
Cut the yarn and fasten off.
Joining the Pieces
Now all three pieces will be crocheted together at the sides and shoulders.
Lay the back panel upside down (with the right side facing down) and place the front panels on top with the right sides facing up.
Make sure the double crochet groups are oriented the same way — that is, upside-down “V” shapes.
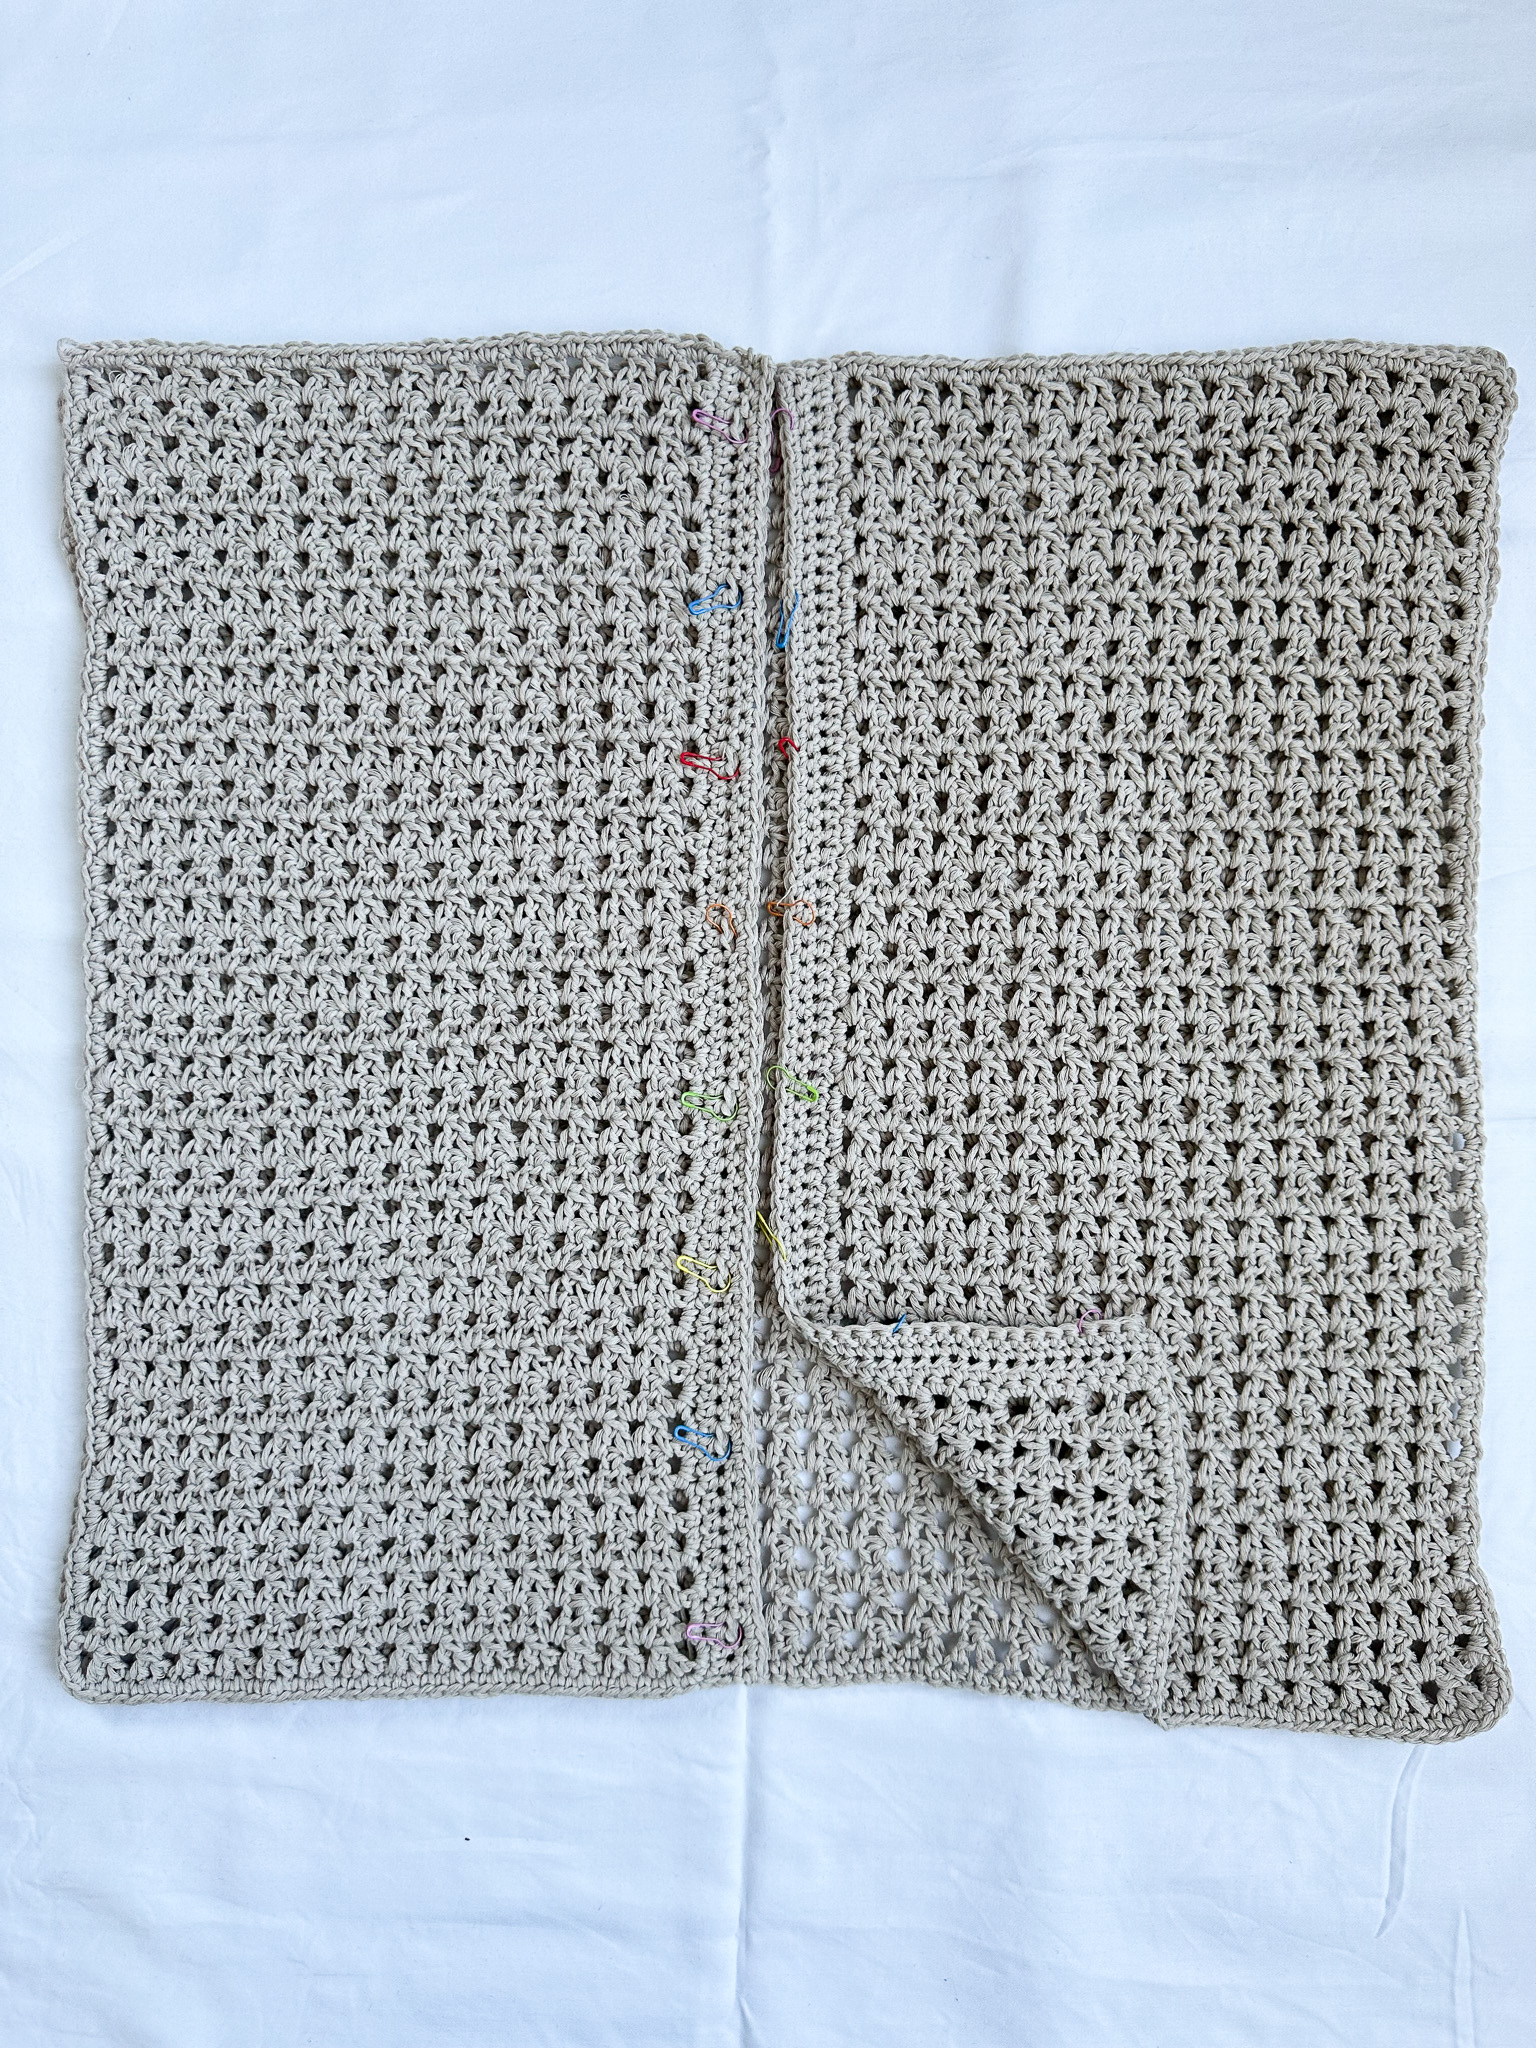
Place stitch markers to hold both pieces together at the bottom corners where the back panel meets the front panels.
Then count up 18 (18, 19) double crochet groups/rows and place a marker there (through both pieces). This point marks the armhole and where the sleeve will begin.
Skip 17 (17, 18) rows, then place markers at both upper corners by the shoulders.
If you have chosen to make the pieces shorter or longer than 35–37 rows, you may need to adjust the number of rows up or down depending on where you want the armhole to be.
Now you will mark the shoulder seams. Place markers 9 (8, 9) double crochet groups in from each respective corner.
The last 5 (5, 6) double crochet groups nearest the shirt opening will not be joined; they will form the neck/head opening.

Put on the shirt and check that the points where the stitch markers hold the pieces together are comfortable, both at the neckline and the sleeves.
Crochet the pieces together between the markers at the sides and shoulders.
Joining Method: The method used creates a relatively flat seam, which prevents the seam from sticking out too much.
There are different ways to join pieces — see the video below ("Attach Squares") if you’re unsure.
Note that we use slip stitches instead of single crochets, as shown in the video.
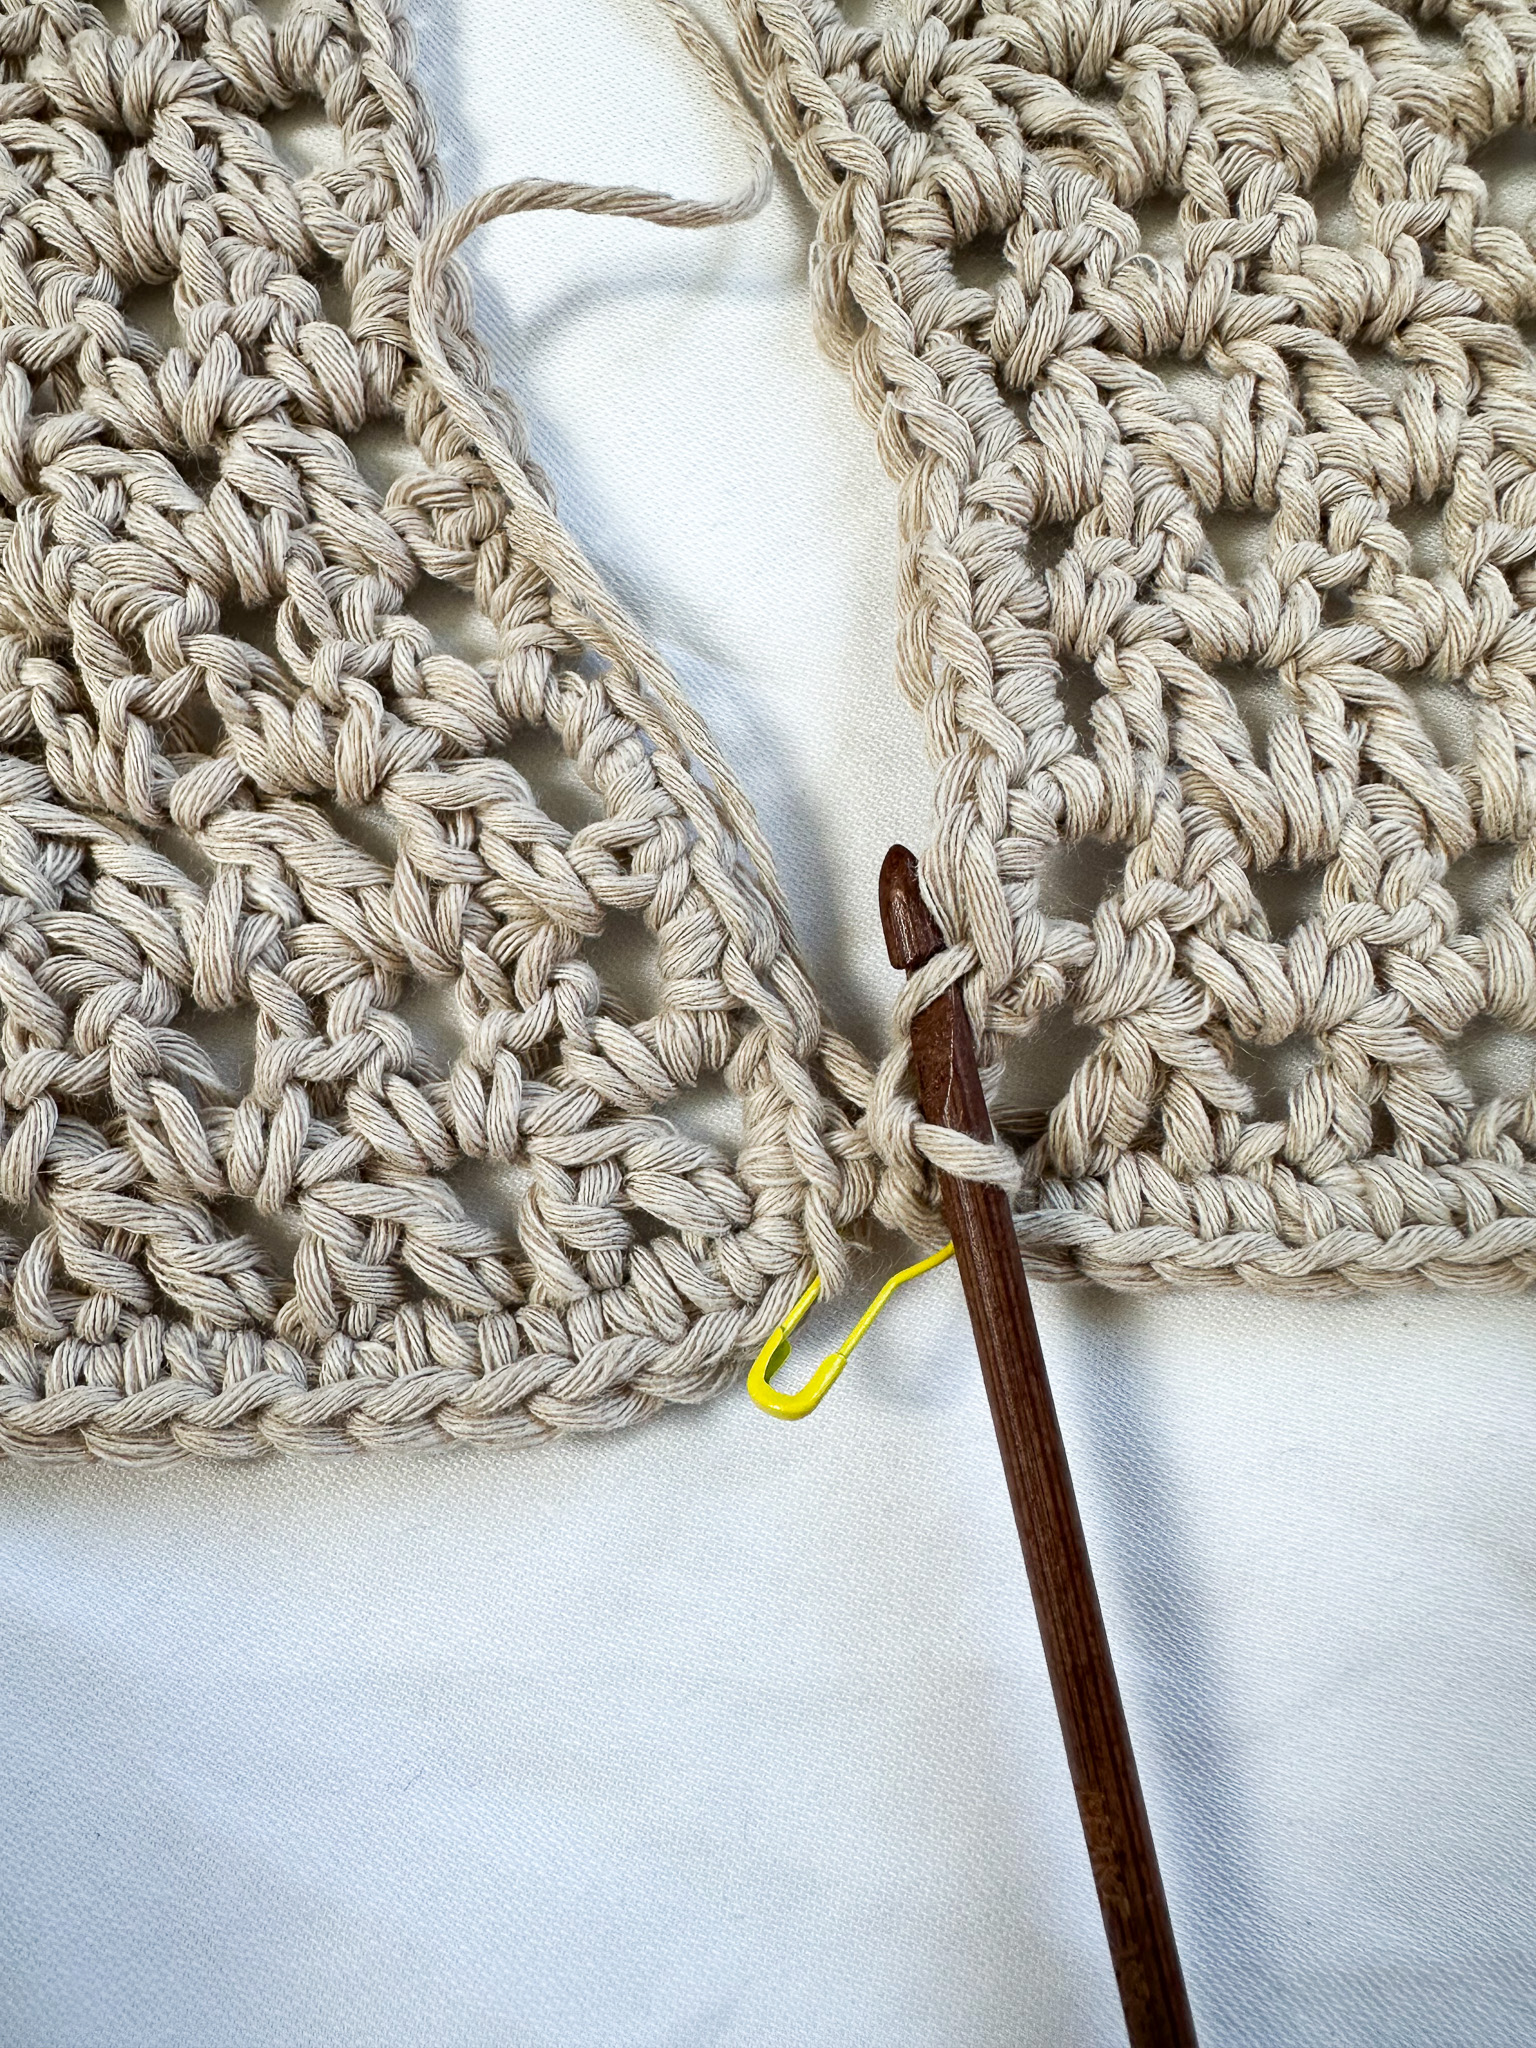
Make a slip knot.
Start at the bottom corner and insert your hook through a stitch loop of both pieces. Grab the slip knot and pull it through the loops. Yarn over and pull through — now you have a starting point.
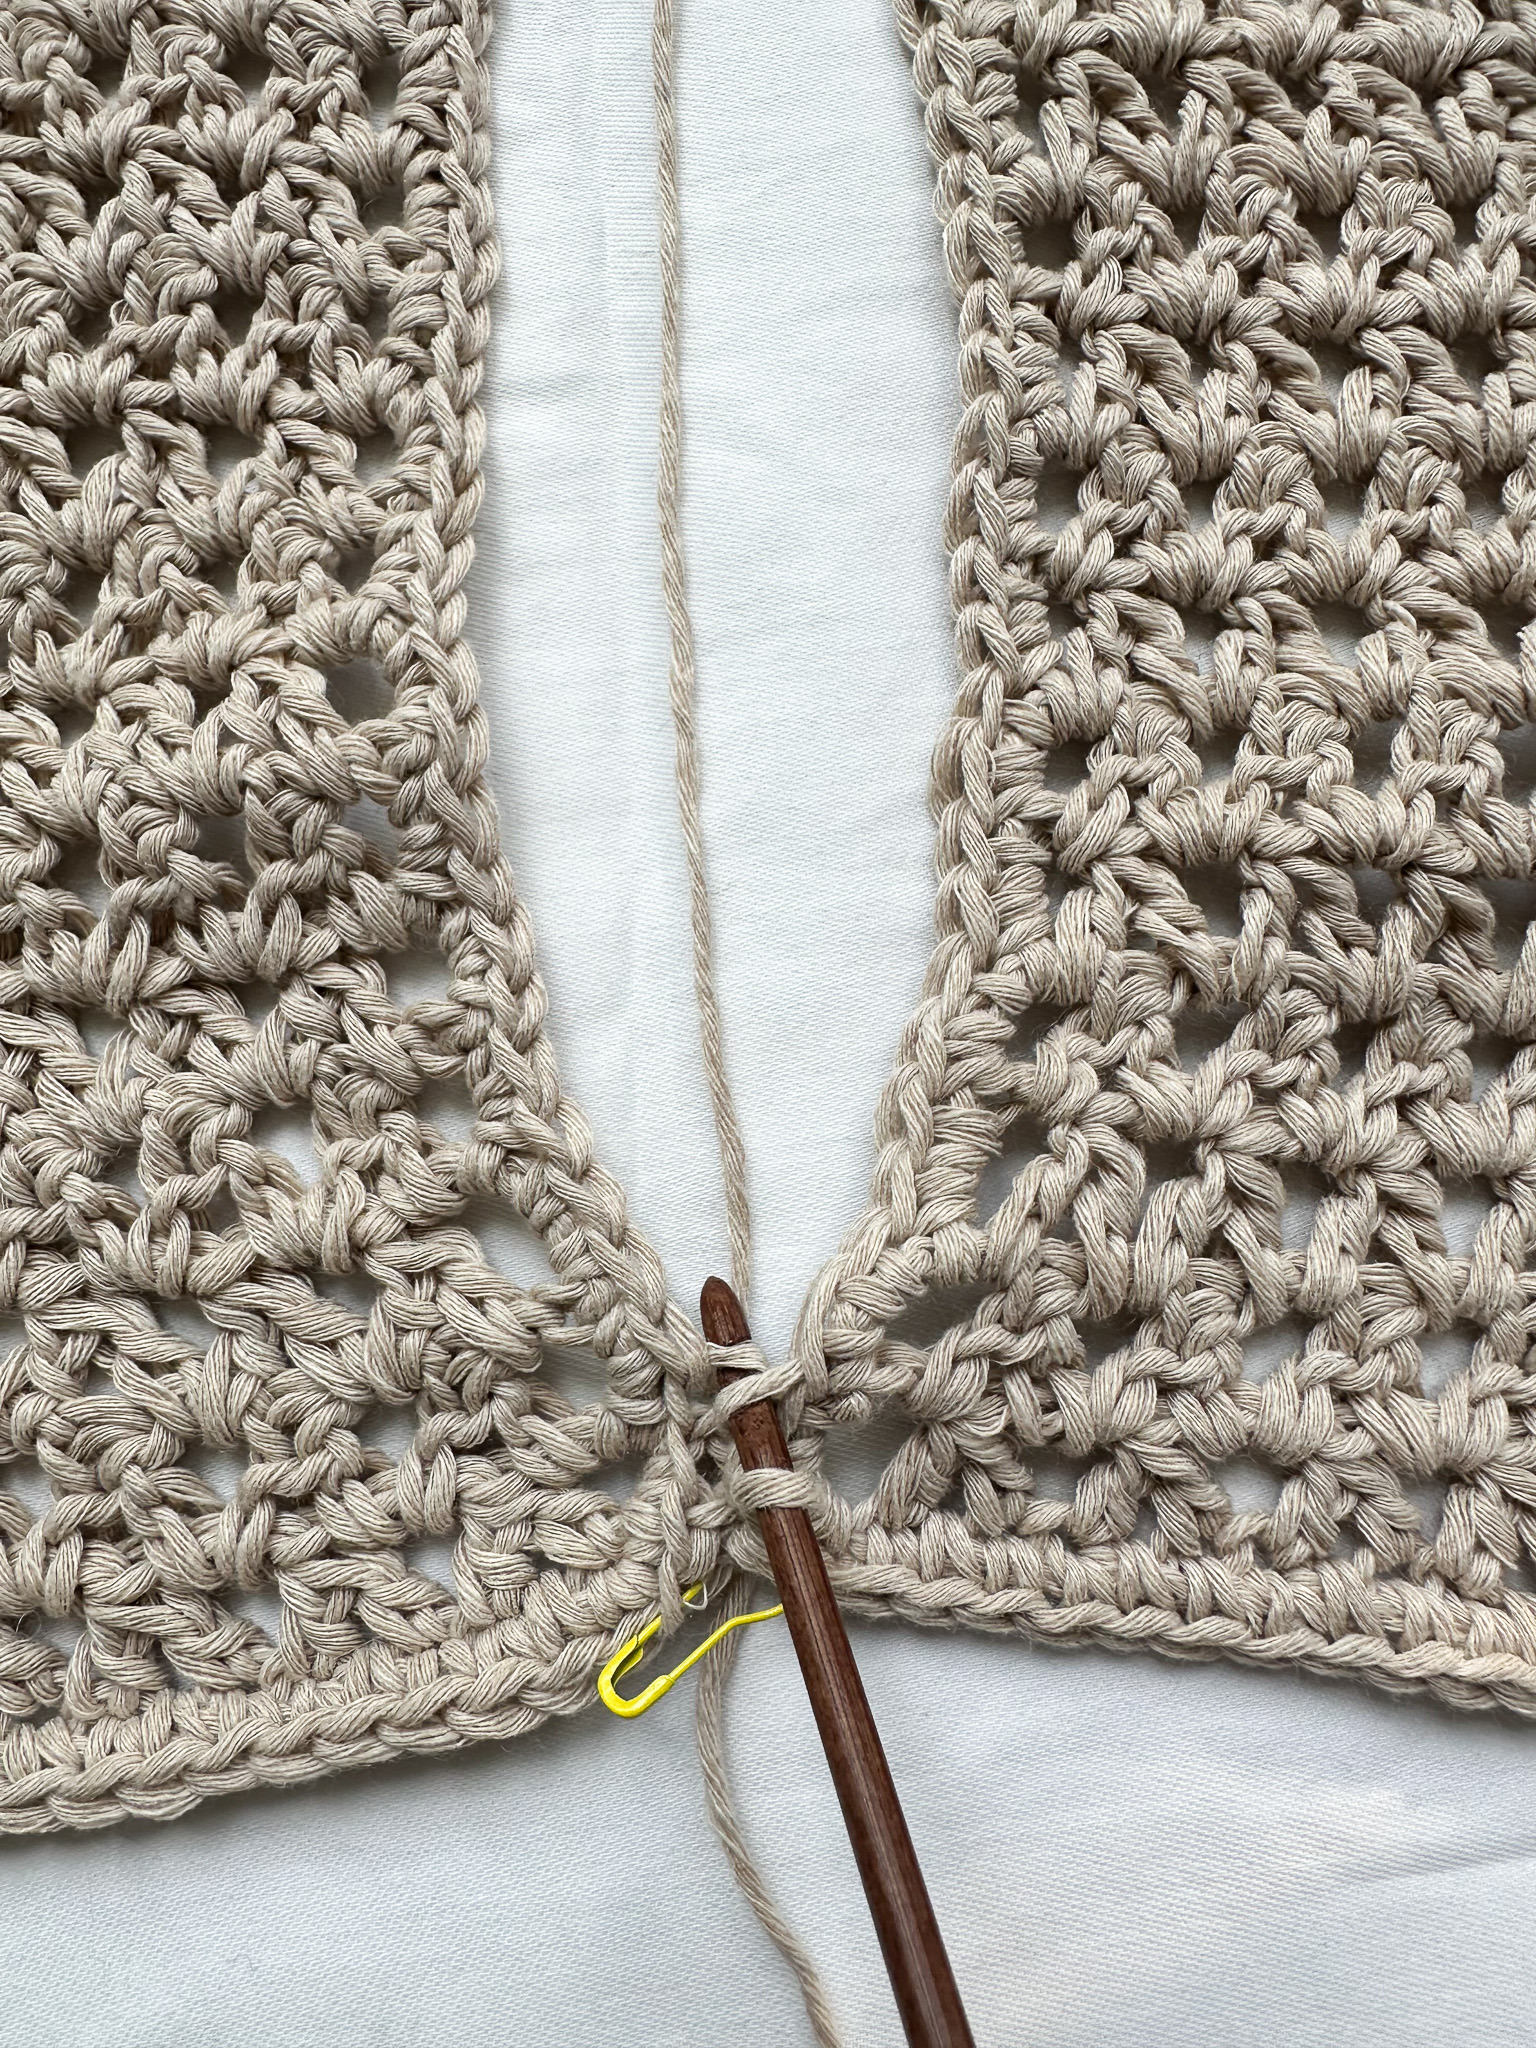
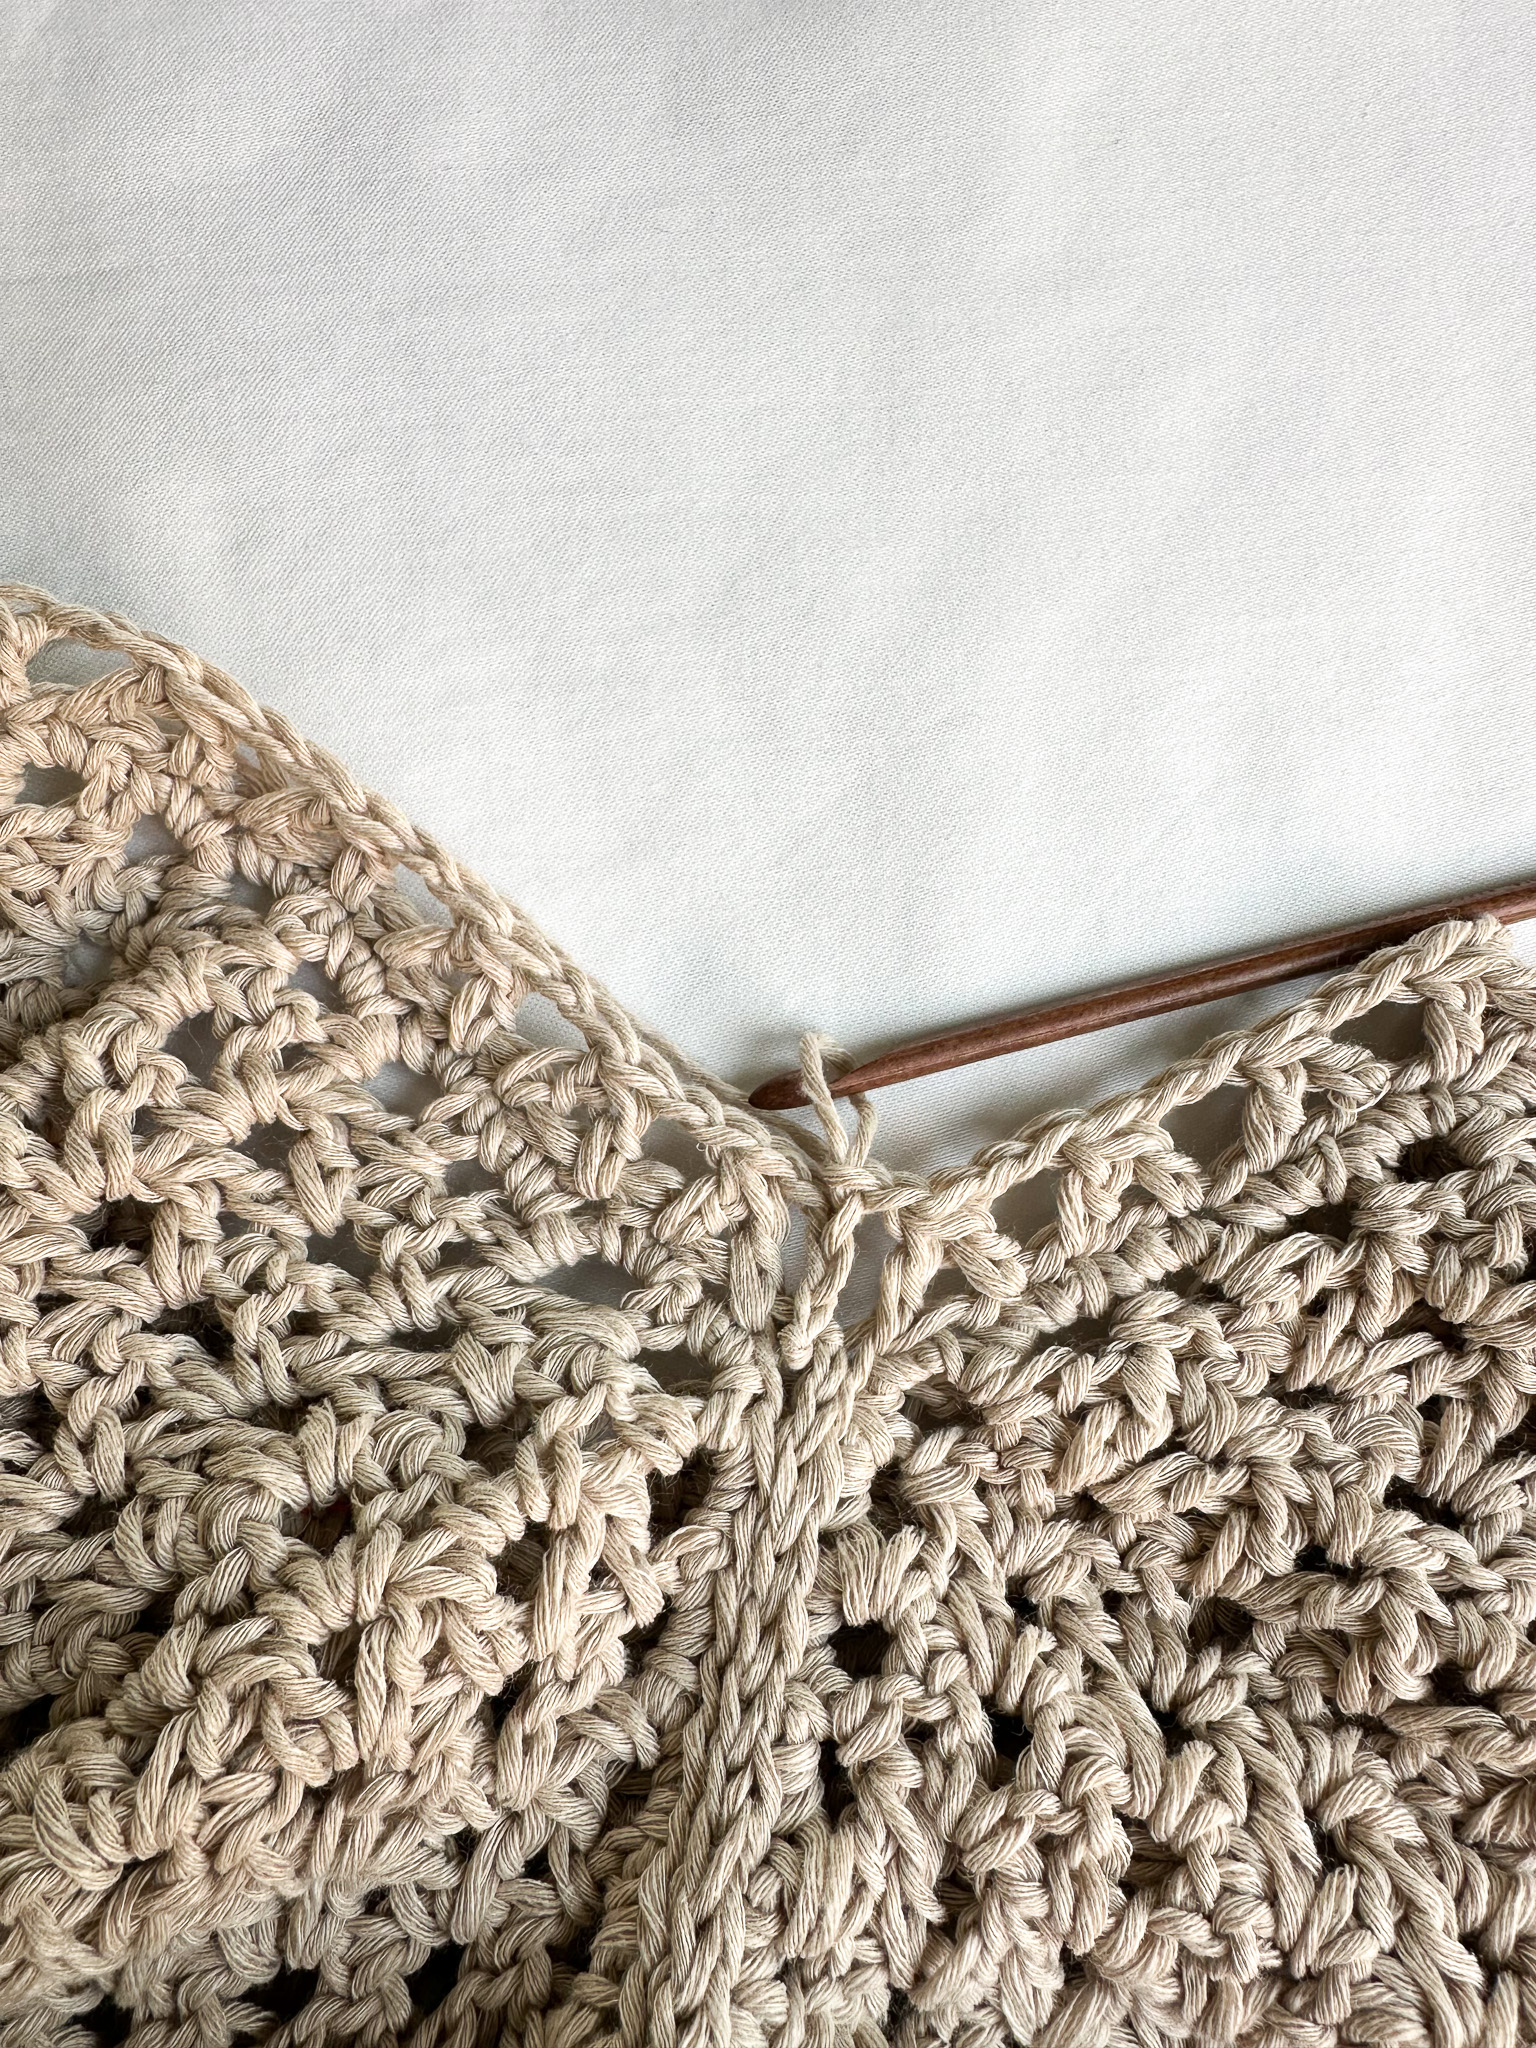
A tip for a flatter seam is to hold the yarn under and between the pieces as shown in the picture.
Insert your hook into the first back loop of the first piece (the loop facing down toward the table) and yarn over. Then insert the hook into the first back loop of the second piece (also the loop facing down) and yarn over. Yarn over again and pull through both loops on the hook (this creates a slip stitch).
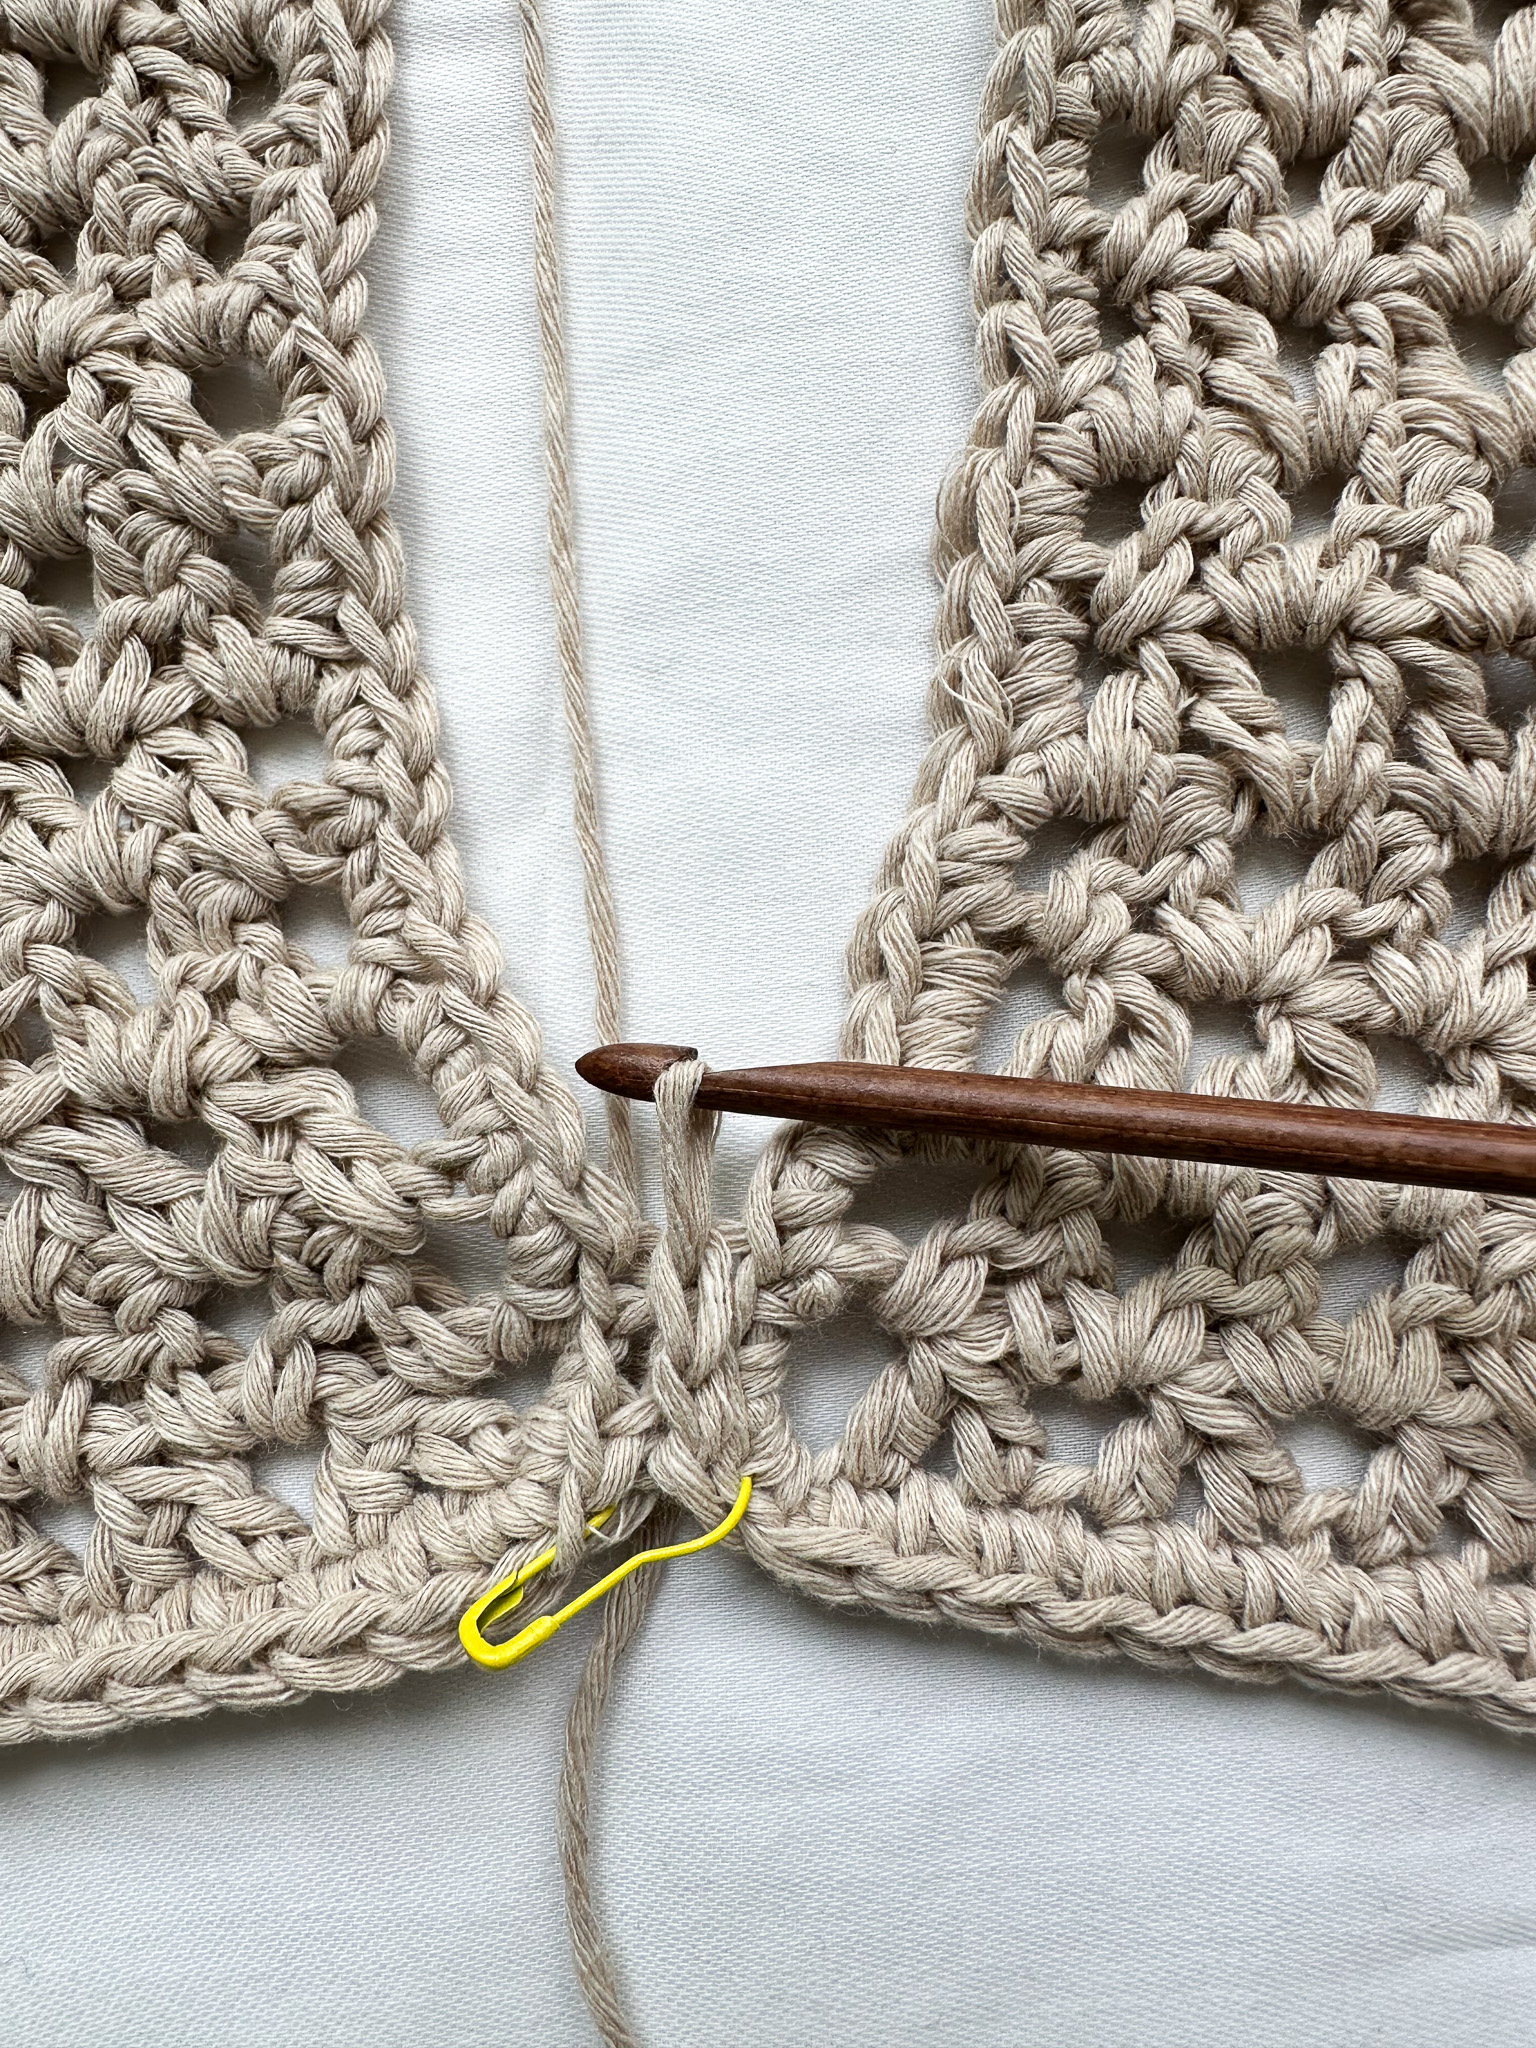
Repeat the entire seam in this way. Check occasionally that the double crochet groups/rows on the front and back pieces align evenly.
When you reach the next stitch marker, cut the yarn and fasten off.
Sleeves (make 2)
When crocheting the sleeves, a seam will form where the rounds join. Therefore, start the rounds at the armhole so the seam is as inconspicuous as possible.
Round 1: Make a slip knot and pick up the loop at the armhole. Chain 4 and then continue with double crochet groups around the entire round, just like Row 1 on the front/back pieces.
You should have 12 (12, 13) double crochet groups on one side of the sleeve before you reach the shoulder seam.
Make a double crochet group at the shoulder seam.
Then make 12 (12, 13) double crochet groups on the other side of the sleeve.Finish the round with a slip stitch in the 3rd chain of the chain you started the round with.
You should have a total of 25 (25, 27) double crochet groups.
If you left more or fewer rows for the armhole opening, you may need to adjust the number of double crochet groups around the sleeve.
Rounds 2–9: Now crochet a total of 8 rounds with double crochet groups, as in Row 2 on the front/back pieces, with the difference that you finish each round with a slip stitch in the 3rd chain of the chain you started the round with.
Make more or fewer rounds if you want a different sleeve length. Keep in mind that a 1.5 cm edging will be added (Rounds 10–11).
Round 10: Chain 2 and then crochet one round of half double crochets. When you have gone all the way around, make a slip stitch in the second chain at the beginning of the round.
Round 11: Chain 1 and crochet one round of single crochets. Make a slip stitch at the beginning of the round, cut the yarn, and fasten off.
Collar
The collar starts crocheting at the top right corner of the right front piece, just to the left of the center edge with the buttonholes.
Round 1: Make a slip knot and pull up a loop right at the edge of the center edge. Crochet single crochets along the entire edge where the collar will be. Finish the round with a chain stitch and turn.
You should have a total of 76 (76, 88) single crochets. 76 (76, 88) single crochets correspond to 25 (25, 29) double crochet groups:
- 5 (5, 6) on each front piece
- 1 on each shoulder seam
- 13 (13, 15) on the back piece
Adjust the number of single crochets, preferably at the shoulder seams, to end up with a total of 76 (76, 88) single crochets.
If you made a different width on the front/back pieces, you can adjust the collar size by crocheting single crochets divisible by 3 plus 1, for example, a total of 73 or 91. 73 single crochets will give 24 double crochet groups (3 x 24) + 1.
Round 2: Crochet 76 (76, 88) single crochets. Make 4 chain stitches and turn.
Round 3: Crochet 25 (25, 29) double crochet groups as in Row 1 on the front/back pieces. Start the first double crochet in the first stitch of the round. Finish with a double crochet in the last stitch. Make 4 chain stitches and turn.
Rounds 4–6: Continue crocheting double crochet groups as in Row 2 on the front/back pieces. Cut the yarn and fasten off.
Edge:
Pick up a new loop at the beginning of Round 1 on the collar, on the inside of the left front piece. Crochet single crochets around the entire collar and finish with a slip stitch in the edge. To make the corners of the collar pointed, make 2 chain stitches between the single crochets at the corners.
Cut the yarn and fasten off.
Lower Edge
Round 1: Along this round, decreases are needed to prevent the edge from becoming wavy. A total of 22 (22, 26) decreases should be evenly distributed during the first round: approximately 6 (6, 7) on each front piece and 10 (10, 12) on the back piece.
Start at the lower corner of the piece with the buttonholes, but from the inside of the shirt. Pick up a loop in the corner and make 2 chain stitches. Make 3 half double crochets in the next 3 stitches. Now skip one stitch (leave it unworked), which creates a decrease.
Now make 8 more half double crochets and then skip one stitch. Continue skipping about every 9th stitch to achieve a total of 6 (6, 7) decreases on each front piece and 10 (10, 12) on the back piece.
In total, you should have about 166 (166, 174) half double crochets after the first round. The exact number isn’t critical; what matters is that the edge stays fairly straight and doesn’t become wavy or flared.
If the edge becomes flared or wavy, you will need to make more decreases. Try to spread them evenly along the edge.
Make one chain stitch and turn.
Round 2: Crochet one round of single crochets, matching the number of half double crochets from the previous round. Cut the yarn and fasten off.
Sew on your buttons using a suitable needle and thread size according to the size of the buttonholes. I chose sewing thread and a regular sewing needle. Start with the top button and the bottom button. Then work your way toward the middle. This way, you ensure that the buttons and buttonholes align evenly and don’t look crooked.
Tip: To achieve a nice fit, it is recommended to block your finished t-shirt, but of course, this is completely optional!
Now your shirt is finished! Great job ☺
Instruction text (advanced): This part of the pattern consists of crochet terms. See the simpler section if you need more help along the way.
Abbreviations:
sc = single crochet
hdc = half double crochet
dc = double crochet
dc2tog = 2 double crochets together (a double crochet cluster)
sl st = slip stitch
ch = chain
sk = skip
blo = back loop only
(..) = total number of stitches in the round
*…* = Repeat what is stated within the asterisks
Step 1
The pattern is written for M/L (the t-shirt in the picture) but can be adapted exactly as you wish according to your measurements if you want. There are also suggestions for two other sizes in the pattern. The pattern is written for size M/L with smaller and larger sizes in parentheses ( ), i.e., M/L (XS/S, XL).
This shirt should be crocheted slightly loosely to give it a nice drape and create a soft garment.
Image below: Measurements of the sweater/shirt in size M/L (cm).
(Gauge: 10 × 10 cm = 16 double crochets wide, 7 rows.)
Start by measuring your hip/buttock circumference, that is, where you are widest around your hips. This t-shirt has a straight cut, meaning it has no waist shaping. Therefore, the circumference of the shirt’s body needs to be a bit larger than your hip measurement. Here you can adjust the fit by adding more centimeters to the circumference if you want it to be even more oversized.
Tip: Take a measuring tape and make a circle with it (using the desired measurement) around your hips. This way, you can get a sense of whether the fit will be good or if you need to go up or down a size. You can also measure the circumference of a t-shirt you already have at home.
Front pieces (make 2)
Foundation: Ch 47 (44, 50), turn. If you want to work to your own measurements instead of the sizes in the pattern, ch a multiple of 3 + 5, for your desired width. For example, ch 41 for narrower or 53 for wider.
Double crochet cluster (dc2tog): On the first row, skip one chain between each group of double crochets. On the following rows, work the double crochet clusters into the spaces between the clusters from the previous row.
Row 1: Sk 4 ch, dc2tog, ch 2 repeat 14 (13, 15) times, 1 dc. (Total 14 (13, 15) dc groups on the row). Ch 4, turn
Rows 2–35 (35, 37): *dc2tog in the next two ch-2 spaces, ch 2* x 14 (13, 15) times, 1 dc in last space. Ch 4, turn.
Repeat Row 2 until you have a total of 35 (35, 37) rows in length (or more/fewer rows if you want it longer/shorter). Each row is about 1.5 cm.
35 rows ≈ 51 cm, 37 rows ≈ 54 cm. Add a 2 cm border at the bottom. The front pieces will then be 53 (53, 56) cm long.
Measure from the top of your shoulder down to the hip where you want the shirt to end to check the length. After a few rows, it’s a good idea to check the width. Remember the pattern and yarn are slightly stretchy, so you may need to gently stretch the piece to get the correct measurement. The piece will get wider when you wear the shirt. The width should be about 26 (24, 28) cm.
Cut and fasten off the yarn on the first piece. After the second piece, do not cut off; continue directly to Step 2 for the left front piece.
Step 2: Edging around the front piece
Now you will crochet an edge around the entire piece, then make the edges on the shirt opening that will become either buttonholes or the edge where the buttons are sewn on.
Note: The different pieces are done in different ways and start at different places on the piece. Make sure the pattern is facing the same way on both pieces, meaning the dc clusters form upright and inverted V’s.
Left front piece (button side)
Start at the top left corner where you finished Step 1.
Long sides: Ch 1, then sc evenly along the long side (2 sc around each dc/row). Make an extra sc in the corner.
Bottom short side: Work 1 sc in each dc and in each ch-space between the clusters. Make an extra sc in the corner.
Top short side:
Work 1 sc in each dc cluster, 2 sc in the ch between clusters. You’ve now worked one round around.
Row 1: Ch 2, hdc along the long side. Ch 1, turn.
Row 2: Work 1 sc along the long side. Ch 1, turn.
Row 3: Work 1 sc along the long side. Fasten off.
Right front piece (buttonhole side):
Join yarn at the bottom right corner along the long side that will have the buttonholes. Work 1 round of sc all around the piece, same as the left front piece.
Row 1: Ch 2, hdc along the long side. Ch 1, turn.
Lay both pieces out in front of you and place the desired number of buttons on the left front piece. In the picture, there’s about 6 cm (2.4 inches) between the centers of the buttons. Attach stitch markers to both pieces to mark the placement of the buttons.
Row 2: Crochet sc along the long side. At each marker: yo twice, ch 2. This creates the buttonholes. Ch 1, turn.
Row 3: Crochet sc along the long edge. 2 sc around the ch spaces. Fasten off and weave in ends.
Step 3 Back Piece
This piece is crocheted the same way as the front pieces, but it should be wider, 54 (50, 58) cm. Chain 95 (89, 101) sts. This corresponds to 30 (28, 32) dc groups.
If you have adjusted measurements, make sure the back piece width matches the combined width of the front pieces when laid side by side, overlapping slightly as they will when buttoned. Crochet a total of 35 (35, 37) rows (or the same number as front pieces), then crochet one round of sc around. Fasten off and weave in ends.
Step 4 Joining the Pieces
Now all 3 pieces are crocheted together at the sides and shoulders. Lay the back piece upside down (right side down) and place the front pieces on top with the right sides up. Make sure the dc groups face the correct direction, i.e., right side up and upside-down V’s.
Place stitch markers to hold both pieces together at the bottom corners where the back and front pieces meet. Count up 18 (18, 19) dc groups/rows and place a marker there (through both pieces). This marks the armhole and where the sleeve will start.
Skip 17 (17, 18) rows and then place markers at both top corners by the shoulders.
If you have made the pieces shorter or longer than 35-37 rows, you may need to adjust the number of rows up or down based on where you want the armhole to be.Now mark the shoulder seams. Place markers 9 (8, 9) dc groups in from each corner.The last 5 (5, 6) dc groups closest to the neckline/opening should not be joined, as they form the neck opening.
Try on the sweater and check that the points where the stitch markers hold the pieces together fit well, both at the neckline and the sleeves.
Join the pieces between the markers at the sides and shoulders.
Joining method: This method creates a relatively flat seam so it doesn’t stick out too much. There are different ways to join.
Pick up yarn at a corner (through both pieces).
Make 1 sl st through the back loops of both pieces.
A tip for a flatter seam is to hold the yarn under and between the pieces as shown in the picture.
Repeat the entire seam this way. Check occasionally that the dc groups/rows on the front and back pieces line up evenly. When you reach the next stitch marker, cut the yarn and fasten off.
Step 5
Sleeves (make 2)
When crocheting the sleeves, a seam will form where the rounds join. Start the rounds at the underarm so the seam is as inconspicuous as possible.
Round 1: Pick up the loop in the underarm. Ch 4, *2 dc tog, ch 2* repeat 25 (25, 27) times, sl st in 3rd ch at the beginning of the round. You should have a total of 25 (25, 27) dc groups.
If you left more or fewer rows for the armhole opening, you may need to adjust the number of dc groups around the sleeve.
Rounds 2–9: Ch 4, '2 dc tog in the first two ch spaces, ch 2* x 14 (13, 15) times, sl st in 3rd ch at the beginning of the round.
Make more or fewer rounds if you want a different sleeve length. Note that there will be a border of 1.5 cm (rounds 10–11).
Round 10: Ch 2, hdc around. Sl st in 2nd ch at beginning of round.
Round 11: Ch 1, sc around. Sl st in 1st ch at beginning of round. Cut yarn and fasten off.
Step 6 Collar
The collar is started at the top right corner of the right front piece, just left of the center edge with the buttonholes.
Round 1: Join yarn and work 76 (76, 88) sc along where the collar will be. Ch 1, turn. 76 (76, 88) sc corresponds to 25 (25, 29) dc groups; 5 (5, 6) dc on each front piece, 1 dc on each shoulder seam, and 13 (13, 15) dc on the back piece. Adjust the number of sc, preferably at the shoulder seams, to end with a total of 76 (76, 88) sc.
If you made a different width on the front/back pieces, you can adjust the collar size by working a number of sc divisible by 3, plus 1 (e.g., 73 or 91). 73 sc will give 24 dc groups (3 x 24) + 1.
Round 2: Work 76 (76, 88) sc. Ch 4, turn.
Round 3: Ch 4, *2 dc tog, ch 2* repeat 25 (25, 29) times, 1 dc. (Total 25 (25, 29) dc groups on the round). Ch 4, turn.
Rounds 4–6: *2 dc tog in the first two ch spaces, ch 2* x 25 (25, 29) times, 1 dc. Ch 4, turn. Cut yarn and fasten off.
Border:
Pick up a new loop at the beginning of round 1 on the collar, on the inside of the left front piece. Work sc around the entire collar and finish with a sl st in the edge. To get pointed corners on the collar, make 2 ch in the corners. Cut yarn and fasten off.
Step 7 Bottom Edge
On the first round, decreases are needed to prevent the edge from becoming wavy. A total of 22 (22, 26) decreases should be evenly distributed throughout the first round—about 6 (6, 7) on each front piece and 10 (10, 12) on the back piece.
Start at the bottom corner of the piece with the buttonholes, working from the inside of the shirt. Approximately:
Round 1: Ch 2, 3 hdc, *skip 1 st, 8 hdc* x22 (22, 25) times, 4 hdc. Ch 1, turn.
You should have about 166 (166, 174) hdc after the first round. The exact number isn’t crucial; the important part is that the edge is fairly straight and not wavy or flared. If the edge is flared/wavy, you’ll need to add more decreases. Try to spread them evenly along the edge.
Round 2: Sc along the edge, working the same number of stitches as the hdc from round 1. Fasten off and weave in ends.
Step 8:
Sew on your buttons using a needle and thread suitable for the buttonhole size. I used regular sewing thread and a sewing needle. Start with the top and bottom buttons, then work your way toward the middle. This ensures the buttons and buttonholes are evenly spaced and don’t look crooked.
Tip: For a neat fit, it’s recommended to block your finished t-shirt, but of course, that’s optional!
Your shirt is now finished! Great job! ☺
The rights to this pattern belong to MYO Make Your Own. The pattern or its pictures may not be copied, shared or resold either in parts or in its entirety, but you may sell items you have crocheted from this pattern. If you have questions about the pattern, contact MYO at hello@makeyourown.se.
The pattern is written for size M/L (the t-shirt in the photo), but it can be adjusted to fit your measurements if you wish. There are also suggestions for two other sizes included in the pattern.
The pattern is written for size M/L, with smaller and larger sizes shown in parentheses ( ), i.e. M/L (XS/S, XL). This shirt should be crocheted slightly loosely to give it a nice drape and create a soft garment.
Image below: Measurements of the sweater/shirt in size M/L (cm).
(Gauge: 10 × 10 cm = 16 double crochets wide, 7 rows.)
Start by measuring your hip circumference — that is, the widest part around your hips. This t-shirt has a straight fit, meaning it doesn’t have a defined waist. Therefore, the circumference of the shirt's body should be slightly larger than your hip measurement.
This is where you can adjust the fit by adding more centimeters to the width if you want a more oversized look.
Tip: Take a measuring tape and form a circle with it (using the measurement you’re planning to use) around your hips. This gives you a sense of whether the fit feels right or if you should size up or down. You can also measure the circumference of a shirt you already own for comparison.
Front Panels (make 2)
Foundation: Chain 47 (44, 50) stitches.
If you want to crochet according to your own measurements rather than the sizes described in the pattern, chain a multiple of 3 + 5, according to your desired width. For example, chain 41 stitches if you want the panel narrower, or 53 if you want it wider.
If you're unsure how to crochet a chain, see the video below.
If you need help on how to corchet row 1-2, see video below.
Row 1: Skip the first 4 chains closest to the hook and start in the 5th chain.
*Yarn over and pull up a loop so that you have 3 loops on the hook. Yarn over again and pull through 2 of the loops. Now you have 2 loops on the hook. Skip the next stitch, yarn over again and pull up a loop so that you have 4 loops on the hook. Yarn over and pull through 2 loops. Now you have 3 loops on the hook. Yarn over once more and pull through all the loops. This is called a double crochet group (or cluster).
Chain 2*. Repeat from * to * until there is 1 chain left at the end of the row.
Chain one and make one double crochet in the last chain. Finish the row by chaining 4, then turn your work.
The image below shows the final double crochet of Row 1.
You should now have a total of 14 (13, 15) double crochet groups on the first row. Each group looks like an upside-down "V".
You will maintain this same number of groups on all following rows for the front panel.
Row 2: In this row, continue creating double crochet groups in the spaces between the groups from the previous row. This way, the upside-down V shapes will stack directly on top of each other.
Insert your hook to the right of the first group, and make the first double crochet.
Make the second double crochet to the left side of the previous double crochet group.Complete the group by crocheting the stitches together, then chain 2.
For the next double crochet group, insert your hook to the right side of the next group and make the first double crochet, then make the second double crochet to the left side of the group. Continue this way across the row and finish with chain one and then double crochet in the last stitch of the row.
Chain 4 and turn your work.
The image below shows the last double crochet of Row 2.
Rows 3–35: Repeat Row 2 until you have a total of 35 (35, 37) rows in length (or more/fewer rows if you want to make it longer/shorter). Each row is approximately 1.5 cm. 35 rows equal about 51 cm, and 37 rows about 54 cm.
At the bottom, a 2 cm border will be added. Therefore, the front panels will be 53 (53, 56) cm long.
Here you can measure from the top of your shoulder down to your hip where you want the shirt to end, to check if the length fits.
After a few rows, it’s a good idea to double-check the width. Keep in mind that the pattern and yarn are somewhat elastic, so you may need to stretch the piece to get the correct measurement. The pieces will widen when wearing the shirt.
The width should be 26 (24, 28) cm.
Cut the yarn and fasten off on the first piece. After completing the second piece, do not cut the yarn; continue directly to Step 2 for the left front panel.
If you’re unsure how to fasten off, see the video below.
Edging around the Front Panel
Now you will crochet an edging around the entire piece, and then make the edges along the shirt opening, which will either become buttonholes or the edge where the buttons will be sewn on.
Note that the different pieces are worked differently, and you start at different points on the piece.
Make sure to check that the pattern is oriented the same way on both pieces — that is, the double crochet groups form upside-down “V” shapes.
Left Front Panel (button side)
Start at the top left corner where you ended the previous step. Make one chain stitch, then crochet single crochets along the long side. Make 2 single crochets around each finished double crochet/stitch.
If you’re unsure how to crochet single crochets, see the video below.
Make an extra single crochet in the corner. Then crochet single crochets along the bottom short side.
Make one single crochet in each double crochet and one single crochet in the spaces between the double crochets.
Make an extra stitch in the corner. Continue along the long side the same way as the first long side, including an extra stitch in the corner.
On the top edge of the piece, crochet one single crochet in the top of each double crochet group and two single crochets around the spaces between the groups.
Now you are back where you started, at the top left corner.
Row 1: Chain 2. Then crochet half double crochets along the first long side.
Make one chain stitch and turn the piece.
Row 2: Crochet single crochets along the long side. Make one chain stitch and turn.
Row 3: Crochet one more row of single crochets.
Cut the yarn and fasten off.
Right Front Panel (buttonhole side)
Make a loop and pick up the yarn loop at the bottom right corner, along the long side that will have the buttonholes. Crochet one round of single crochets around the entire piece, in the same way as for the left panel.
If you’re unsure how to make a slip knot, see the video below.
Row 1: Chain 2. Then crochet half double crochets along the first long side. Make one chain stitch and turn the piece.
If you’re unsure how to crochet half double crochets, see the video below.
Now lay both pieces out in front of you and place the number of buttons you want on the left front panel. In the picture, there is about 6 cm between the centers of the buttons.
Attach stitch markers to both pieces to mark the button placement.
Row 2: Crochet single crochets along the long side. At a marker, skip 2 stitches and chain 2 instead. This creates the buttonholes.
Chain 1 and turn.
Row 3: Crochet one more row of single crochets. At the buttonholes, make two single crochets around the chain stitches.
Cut the yarn and fasten off.
Back Panel
This piece is crocheted the same way as the front panels, with the difference that it should be wider: 54 (50, 58) cm.
Therefore, chain 95 (89, 101) stitches. This will correspond to 30 (28, 32) double crochet groups.
If you have adjusted the measurements, make sure the back panel matches the combined width of the front panels when laid side by side, slightly overlapping as they will when the buttons are fastened.
Crochet a total of 35 (35, 37) rows (or the same number as the front panels), then crochet one round of single crochets around the piece.
Cut the yarn and fasten off.
Joining the Pieces
Now all three pieces will be crocheted together at the sides and shoulders.
Lay the back panel upside down (with the right side facing down) and place the front panels on top with the right sides facing up.
Make sure the double crochet groups are oriented the same way — that is, upside-down “V” shapes.
Place stitch markers to hold both pieces together at the bottom corners where the back panel meets the front panels.
Then count up 18 (18, 19) double crochet groups/rows and place a marker there (through both pieces). This point marks the armhole and where the sleeve will begin.
Skip 17 (17, 18) rows, then place markers at both upper corners by the shoulders.
If you have chosen to make the pieces shorter or longer than 35–37 rows, you may need to adjust the number of rows up or down depending on where you want the armhole to be.
Now you will mark the shoulder seams. Place markers 9 (8, 9) double crochet groups in from each respective corner.
The last 5 (5, 6) double crochet groups nearest the shirt opening will not be joined; they will form the neck/head opening.
Put on the shirt and check that the points where the stitch markers hold the pieces together are comfortable, both at the neckline and the sleeves.
Crochet the pieces together between the markers at the sides and shoulders.
Joining Method: The method used creates a relatively flat seam, which prevents the seam from sticking out too much.
There are different ways to join pieces — see the video below ("Attach Squares") if you’re unsure.
Note that we use slip stitches instead of single crochets, as shown in the video.
Make a slip knot.
Start at the bottom corner and insert your hook through a stitch loop of both pieces. Grab the slip knot and pull it through the loops. Yarn over and pull through — now you have a starting point.
A tip for a flatter seam is to hold the yarn under and between the pieces as shown in the picture.
Insert your hook into the first back loop of the first piece (the loop facing down toward the table) and yarn over. Then insert the hook into the first back loop of the second piece (also the loop facing down) and yarn over. Yarn over again and pull through both loops on the hook (this creates a slip stitch).
Repeat the entire seam in this way. Check occasionally that the double crochet groups/rows on the front and back pieces align evenly.
When you reach the next stitch marker, cut the yarn and fasten off.
Sleeves (make 2)
When crocheting the sleeves, a seam will form where the rounds join. Therefore, start the rounds at the armhole so the seam is as inconspicuous as possible.
Round 1: Make a slip knot and pick up the loop at the armhole. Chain 4 and then continue with double crochet groups around the entire round, just like Row 1 on the front/back pieces.
You should have 12 (12, 13) double crochet groups on one side of the sleeve before you reach the shoulder seam.
Make a double crochet group at the shoulder seam.
Then make 12 (12, 13) double crochet groups on the other side of the sleeve.Finish the round with a slip stitch in the 3rd chain of the chain you started the round with.
You should have a total of 25 (25, 27) double crochet groups.
If you left more or fewer rows for the armhole opening, you may need to adjust the number of double crochet groups around the sleeve.
Rounds 2–9: Now crochet a total of 8 rounds with double crochet groups, as in Row 2 on the front/back pieces, with the difference that you finish each round with a slip stitch in the 3rd chain of the chain you started the round with.
Make more or fewer rounds if you want a different sleeve length. Keep in mind that a 1.5 cm edging will be added (Rounds 10–11).
Round 10: Chain 2 and then crochet one round of half double crochets. When you have gone all the way around, make a slip stitch in the second chain at the beginning of the round.
Round 11: Chain 1 and crochet one round of single crochets. Make a slip stitch at the beginning of the round, cut the yarn, and fasten off.
Collar
The collar starts crocheting at the top right corner of the right front piece, just to the left of the center edge with the buttonholes.
Round 1: Make a slip knot and pull up a loop right at the edge of the center edge. Crochet single crochets along the entire edge where the collar will be. Finish the round with a chain stitch and turn.
You should have a total of 76 (76, 88) single crochets. 76 (76, 88) single crochets correspond to 25 (25, 29) double crochet groups:
- 5 (5, 6) on each front piece
- 1 on each shoulder seam
- 13 (13, 15) on the back piece
Adjust the number of single crochets, preferably at the shoulder seams, to end up with a total of 76 (76, 88) single crochets.
If you made a different width on the front/back pieces, you can adjust the collar size by crocheting single crochets divisible by 3 plus 1, for example, a total of 73 or 91. 73 single crochets will give 24 double crochet groups (3 x 24) + 1.
Round 2: Crochet 76 (76, 88) single crochets. Make 4 chain stitches and turn.
Round 3: Crochet 25 (25, 29) double crochet groups as in Row 1 on the front/back pieces. Start the first double crochet in the first stitch of the round. Finish with a double crochet in the last stitch. Make 4 chain stitches and turn.
Rounds 4–6: Continue crocheting double crochet groups as in Row 2 on the front/back pieces. Cut the yarn and fasten off.
Edge:
Pick up a new loop at the beginning of Round 1 on the collar, on the inside of the left front piece. Crochet single crochets around the entire collar and finish with a slip stitch in the edge. To make the corners of the collar pointed, make 2 chain stitches between the single crochets at the corners.
Cut the yarn and fasten off.
Lower Edge
Round 1: Along this round, decreases are needed to prevent the edge from becoming wavy. A total of 22 (22, 26) decreases should be evenly distributed during the first round: approximately 6 (6, 7) on each front piece and 10 (10, 12) on the back piece.
Start at the lower corner of the piece with the buttonholes, but from the inside of the shirt. Pick up a loop in the corner and make 2 chain stitches. Make 3 half double crochets in the next 3 stitches. Now skip one stitch (leave it unworked), which creates a decrease.
Now make 8 more half double crochets and then skip one stitch. Continue skipping about every 9th stitch to achieve a total of 6 (6, 7) decreases on each front piece and 10 (10, 12) on the back piece.
In total, you should have about 166 (166, 174) half double crochets after the first round. The exact number isn’t critical; what matters is that the edge stays fairly straight and doesn’t become wavy or flared.
If the edge becomes flared or wavy, you will need to make more decreases. Try to spread them evenly along the edge.
Make one chain stitch and turn.
Round 2: Crochet one round of single crochets, matching the number of half double crochets from the previous round. Cut the yarn and fasten off.
Sew on your buttons using a suitable needle and thread size according to the size of the buttonholes. I chose sewing thread and a regular sewing needle. Start with the top button and the bottom button. Then work your way toward the middle. This way, you ensure that the buttons and buttonholes align evenly and don’t look crooked.
Tip: To achieve a nice fit, it is recommended to block your finished t-shirt, but of course, this is completely optional!
Now your shirt is finished! Great job ☺
Instruction text (advanced): This part of the pattern consists of crochet terms. See the simpler section if you need more help along the way.
Abbreviations:
sc = single crochet
hdc = half double crochet
dc = double crochet
dc2tog = 2 double crochets together (a double crochet cluster)
sl st = slip stitch
ch = chain
sk = skip
blo = back loop only
(..) = total number of stitches in the round
*…* = Repeat what is stated within the asterisks
Step 1
The pattern is written for M/L (the t-shirt in the picture) but can be adapted exactly as you wish according to your measurements if you want. There are also suggestions for two other sizes in the pattern. The pattern is written for size M/L with smaller and larger sizes in parentheses ( ), i.e., M/L (XS/S, XL).
This shirt should be crocheted slightly loosely to give it a nice drape and create a soft garment.
Image below: Measurements of the sweater/shirt in size M/L (cm).
(Gauge: 10 × 10 cm = 16 double crochets wide, 7 rows.)
Start by measuring your hip/buttock circumference, that is, where you are widest around your hips. This t-shirt has a straight cut, meaning it has no waist shaping. Therefore, the circumference of the shirt’s body needs to be a bit larger than your hip measurement. Here you can adjust the fit by adding more centimeters to the circumference if you want it to be even more oversized.
Tip: Take a measuring tape and make a circle with it (using the desired measurement) around your hips. This way, you can get a sense of whether the fit will be good or if you need to go up or down a size. You can also measure the circumference of a t-shirt you already have at home.
Front pieces (make 2)
Foundation: Ch 47 (44, 50), turn. If you want to work to your own measurements instead of the sizes in the pattern, ch a multiple of 3 + 5, for your desired width. For example, ch 41 for narrower or 53 for wider.
Double crochet cluster (dc2tog): On the first row, skip one chain between each group of double crochets. On the following rows, work the double crochet clusters into the spaces between the clusters from the previous row.
Row 1: Sk 4 ch, dc2tog, ch 2 repeat 14 (13, 15) times, 1 dc. (Total 14 (13, 15) dc groups on the row). Ch 4, turn
Rows 2–35 (35, 37): *dc2tog in the next two ch-2 spaces, ch 2* x 14 (13, 15) times, 1 dc in last space. Ch 4, turn.
Repeat Row 2 until you have a total of 35 (35, 37) rows in length (or more/fewer rows if you want it longer/shorter). Each row is about 1.5 cm.
35 rows ≈ 51 cm, 37 rows ≈ 54 cm. Add a 2 cm border at the bottom. The front pieces will then be 53 (53, 56) cm long.
Measure from the top of your shoulder down to the hip where you want the shirt to end to check the length. After a few rows, it’s a good idea to check the width. Remember the pattern and yarn are slightly stretchy, so you may need to gently stretch the piece to get the correct measurement. The piece will get wider when you wear the shirt. The width should be about 26 (24, 28) cm.
Cut and fasten off the yarn on the first piece. After the second piece, do not cut off; continue directly to Step 2 for the left front piece.
Step 2: Edging around the front piece
Now you will crochet an edge around the entire piece, then make the edges on the shirt opening that will become either buttonholes or the edge where the buttons are sewn on.
Note: The different pieces are done in different ways and start at different places on the piece. Make sure the pattern is facing the same way on both pieces, meaning the dc clusters form upright and inverted V’s.
Left front piece (button side)
Start at the top left corner where you finished Step 1.
Long sides: Ch 1, then sc evenly along the long side (2 sc around each dc/row). Make an extra sc in the corner.
Bottom short side: Work 1 sc in each dc and in each ch-space between the clusters. Make an extra sc in the corner.
Top short side:
Work 1 sc in each dc cluster, 2 sc in the ch between clusters. You’ve now worked one round around.
Row 1: Ch 2, hdc along the long side. Ch 1, turn.
Row 2: Work 1 sc along the long side. Ch 1, turn.
Row 3: Work 1 sc along the long side. Fasten off.
Right front piece (buttonhole side):
Join yarn at the bottom right corner along the long side that will have the buttonholes. Work 1 round of sc all around the piece, same as the left front piece.
Row 1: Ch 2, hdc along the long side. Ch 1, turn.
Lay both pieces out in front of you and place the desired number of buttons on the left front piece. In the picture, there’s about 6 cm (2.4 inches) between the centers of the buttons. Attach stitch markers to both pieces to mark the placement of the buttons.
Row 2: Crochet sc along the long side. At each marker: yo twice, ch 2. This creates the buttonholes. Ch 1, turn.
Row 3: Crochet sc along the long edge. 2 sc around the ch spaces. Fasten off and weave in ends.
Step 3 Back Piece
This piece is crocheted the same way as the front pieces, but it should be wider, 54 (50, 58) cm. Chain 95 (89, 101) sts. This corresponds to 30 (28, 32) dc groups.
If you have adjusted measurements, make sure the back piece width matches the combined width of the front pieces when laid side by side, overlapping slightly as they will when buttoned. Crochet a total of 35 (35, 37) rows (or the same number as front pieces), then crochet one round of sc around. Fasten off and weave in ends.
Step 4 Joining the Pieces
Now all 3 pieces are crocheted together at the sides and shoulders. Lay the back piece upside down (right side down) and place the front pieces on top with the right sides up. Make sure the dc groups face the correct direction, i.e., right side up and upside-down V’s.
Place stitch markers to hold both pieces together at the bottom corners where the back and front pieces meet. Count up 18 (18, 19) dc groups/rows and place a marker there (through both pieces). This marks the armhole and where the sleeve will start.
Skip 17 (17, 18) rows and then place markers at both top corners by the shoulders.
If you have made the pieces shorter or longer than 35-37 rows, you may need to adjust the number of rows up or down based on where you want the armhole to be.Now mark the shoulder seams. Place markers 9 (8, 9) dc groups in from each corner.The last 5 (5, 6) dc groups closest to the neckline/opening should not be joined, as they form the neck opening.
Try on the sweater and check that the points where the stitch markers hold the pieces together fit well, both at the neckline and the sleeves.
Join the pieces between the markers at the sides and shoulders.
Joining method: This method creates a relatively flat seam so it doesn’t stick out too much. There are different ways to join.
Pick up yarn at a corner (through both pieces).
Make 1 sl st through the back loops of both pieces.
A tip for a flatter seam is to hold the yarn under and between the pieces as shown in the picture.
Repeat the entire seam this way. Check occasionally that the dc groups/rows on the front and back pieces line up evenly. When you reach the next stitch marker, cut the yarn and fasten off.
Step 5
Sleeves (make 2)
When crocheting the sleeves, a seam will form where the rounds join. Start the rounds at the underarm so the seam is as inconspicuous as possible.
Round 1: Pick up the loop in the underarm. Ch 4, *2 dc tog, ch 2* repeat 25 (25, 27) times, sl st in 3rd ch at the beginning of the round. You should have a total of 25 (25, 27) dc groups.
If you left more or fewer rows for the armhole opening, you may need to adjust the number of dc groups around the sleeve.
Rounds 2–9: Ch 4, '2 dc tog in the first two ch spaces, ch 2* x 14 (13, 15) times, sl st in 3rd ch at the beginning of the round.
Make more or fewer rounds if you want a different sleeve length. Note that there will be a border of 1.5 cm (rounds 10–11).
Round 10: Ch 2, hdc around. Sl st in 2nd ch at beginning of round.
Round 11: Ch 1, sc around. Sl st in 1st ch at beginning of round. Cut yarn and fasten off.
Step 6 Collar
The collar is started at the top right corner of the right front piece, just left of the center edge with the buttonholes.
Round 1: Join yarn and work 76 (76, 88) sc along where the collar will be. Ch 1, turn. 76 (76, 88) sc corresponds to 25 (25, 29) dc groups; 5 (5, 6) dc on each front piece, 1 dc on each shoulder seam, and 13 (13, 15) dc on the back piece. Adjust the number of sc, preferably at the shoulder seams, to end with a total of 76 (76, 88) sc.
If you made a different width on the front/back pieces, you can adjust the collar size by working a number of sc divisible by 3, plus 1 (e.g., 73 or 91). 73 sc will give 24 dc groups (3 x 24) + 1.
Round 2: Work 76 (76, 88) sc. Ch 4, turn.
Round 3: Ch 4, *2 dc tog, ch 2* repeat 25 (25, 29) times, 1 dc. (Total 25 (25, 29) dc groups on the round). Ch 4, turn.
Rounds 4–6: *2 dc tog in the first two ch spaces, ch 2* x 25 (25, 29) times, 1 dc. Ch 4, turn. Cut yarn and fasten off.
Border:
Pick up a new loop at the beginning of round 1 on the collar, on the inside of the left front piece. Work sc around the entire collar and finish with a sl st in the edge. To get pointed corners on the collar, make 2 ch in the corners. Cut yarn and fasten off.
Step 7 Bottom Edge
On the first round, decreases are needed to prevent the edge from becoming wavy. A total of 22 (22, 26) decreases should be evenly distributed throughout the first round—about 6 (6, 7) on each front piece and 10 (10, 12) on the back piece.
Start at the bottom corner of the piece with the buttonholes, working from the inside of the shirt. Approximately:
Round 1: Ch 2, 3 hdc, *skip 1 st, 8 hdc* x22 (22, 25) times, 4 hdc. Ch 1, turn.
You should have about 166 (166, 174) hdc after the first round. The exact number isn’t crucial; the important part is that the edge is fairly straight and not wavy or flared. If the edge is flared/wavy, you’ll need to add more decreases. Try to spread them evenly along the edge.
Round 2: Sc along the edge, working the same number of stitches as the hdc from round 1. Fasten off and weave in ends.
Step 8:
Sew on your buttons using a needle and thread suitable for the buttonhole size. I used regular sewing thread and a sewing needle. Start with the top and bottom buttons, then work your way toward the middle. This ensures the buttons and buttonholes are evenly spaced and don’t look crooked.
Tip: For a neat fit, it’s recommended to block your finished t-shirt, but of course, that’s optional!
Your shirt is now finished! Great job! ☺
The rights to this pattern belong to MYO Make Your Own. The pattern or its pictures may not be copied, shared or resold either in parts or in its entirety, but you may sell items you have crocheted from this pattern. If you have questions about the pattern, contact MYO at hello@makeyourown.se.
%20(5).jpg)
Share your creations with us
Thank you!
Your comment was sent!