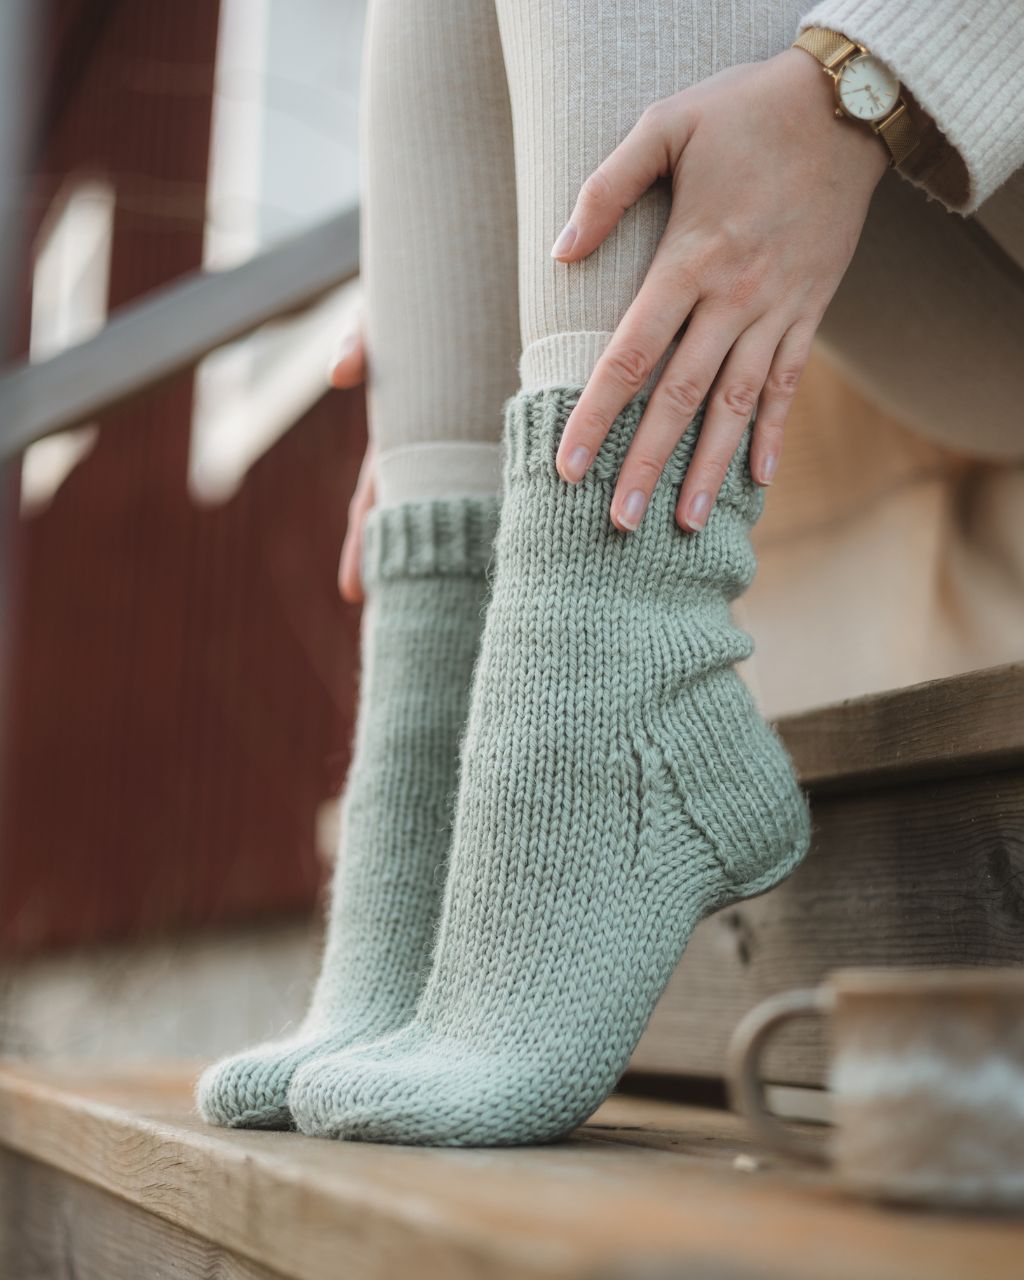
För alla som vill njuta av premiumfunktioner och exklusivt innehåll har vi skapat ett medlemskap som hjälper oss att utveckla sajten vidare. Vi har redan nu publicerat nya funktioner till sajten som du kan testa gratis i 7 dagar, när du skapar ett konto.

Med MYO's medlemskap får du tillgång till alla instruktioner på den här sidan, men även medlemserbjudanden och förtur till nya produktlanseringar. Läs mer om medlemskapet via länken nedan.

Buy your material here

You can buy the materials and needles we use at makeyourown.semakeyourown.se

Go to shop
Copyright © 2022 Make Your Own
Please verify your email address by clicking on the link sent to youremail@gmail.com or resubmit.
patterns

Socks “Hilma”

Crochet these cozy and warm socks!

Crochet these cozy socks that keep your feet warm. These socks have a beautiful pattern and match the pattern of the “Hulda” sweater. The socks can be customized in size and made smaller or larger. There is a slightly more difficult part in the pattern, the heel, but there are pictures to follow along the way. You will need MYO Basic wool, crochet hook 5 mm and stitch marker (stitch markers/yarn ends/hairpins). In the pictures we have used the color “beige”.

Yarn Consumption: 2 skeins of MYO Basic wool for size 38. The yarn consumption depends on how tight you crochet.

Note that we in this instruction uses videos from out technique library.

Socks “Hilma”

This is what you need:

MYO Basic wool | 100g

Basic wool - Wool yarn

Köp produkt

Crochet hook 5mm

Bamboo Crochet Hook

Köp produkt

Here's how to do it

Before starting this pattern, read through all parts to get an overview of the pattern. This pattern is crocheted both in a spiral and in rows. The parts that is crocheted in rows are the heel and ribs. You can easily customize the size of the socks. If the socks are too short before the heel, then continue to repeat round 4 and lap 5 until the part covers the top of your foot. If you think the socks feel too tight, crochet with a larger crochet hook (6mm). If you think the socks are too wide (if you crochet loosely) then crochet with a smaller crochet needle (4mm). The sock corresponds to size 38. The crochet property for an area of 10 x 10 cm is 14 herringbone double crochets/12 rounds. The heel is crocheted in rows, then we switch back to rounds (continuing where we left off) to finish the ankle and leg part. You can decide the height of the sock yourself by adjusting the number of rounds according to the desired height. Hope you will be happy with your result! /Johanna

Johanna Karlsson

Sign up to see the full instruction

This instruction is exclusive content for those who have an active membership with MYO. By being a member, you get access to all our 100+ instructions, technology tips, etc., but also membership offers and priority to new product launches. At the same time, you help us develop the instructions page further and release new instructions every week.

Becoming a member is easy and works like a subscription (price: 80 kr/mo), if you want to test our instructions first, we have a number of free instructions available for everyone.

Welcome to our wonderful team of creators! /The Girls from MYO

Steg 1

INFO:

If the sock feels too loose or tight, you can switch to either a smaller or larger crochet hook. Chain 3 count as one double crochet.
At the end of each round, turn your work and when you turn the work, turn the work from the right to the left side, see the video if in doubt.


Toe and Foot

We start by crocheting the toe part on the socks. After round 4, you can measure your work and see if you need to crochet more rounds to get a larger size.

Start by making a magic ring.

Round 1 (right side): Chain 3. Crochet 9 herringbone double crochets into the magic ring. Tighten the hole so that the hole closes, using the small end of yarn that remains from the start. Finish round 1 with 1 slip stitch in the 3rd chain you did at the beginning. Turn the work over as described above. A total of 10 herringbone double crochets (9 herringbone souble crochet + the chain at the beginning). A tip is to mark this slip stitch that you crocheted, use a yarn end, hair needle or marker.

If you are not sure how to crochet herringbone double cropchets, see the video below. The video also shows how to crochet a magic ring, chain stitches and how to finish and start the next round.

Round 1 done
Steg 2

Round 2 (wrong side): Chain 3. Skip the slip stitches we did on previous round (see picture below). If you have marked the slip mask from round 1, you will easily see which stitch you skip. You can remove the marker immediately after you crochet the first herringbone double crochet.

Crochet 2 herringbone double crochet in the following stitch, thus two in the same stitch. Repeat this 8 times, i.e. 2 herringbone double crochet in each stitch the whole round. You have crocheted 18 herringbone double crochet plus the chain, which counts as a double crochet. You will now crochet the 20th herringbone double crochet in the round. This is done in the same stitch as you did the 3 chain stitches (see picture or video above). Finish the round with 1 slip stitch in the 3rd chain you made at the beginning. If you want, you can mark the slip stitch so it will be easier to see where to start the next round. Turn.

In total, you have 20 stitches on your round. See below pictures for guide.

First herringbone double crochet on round 2, skip the slip stitch from previous round.
Where the arrow shows you make the last herringbone double crochet.
Round 2 done.
Steg 3

Round 3 (right side): Chain 3.

Skip the slip stitch from previous round, just like we did on the previous round. Crochet 2 herringbone double crochet in the following stitch. In the stitch after, you crochet 1 herringbone double crochet. After that, crochet 2 herringbone double crochet in the same stitch again. So every two stitches you make two herringbone double crochet and every other stitch you make 1 herringbone double crochet. Repeat until you are at the end.

Crochet the last herringbone double crochet in the same stitch as you made your 3 chain stitches. Finish with 1 slip mask in the 3rd chain you made at the beginning. Turn. In total, you have 30 stitches on the round.

The beginning of round 3
For reference, our work measures 8.5 cm after round 3.

Round 4 (wrong side): Chain 3. Skip the slip stitch from previous round. Crochet a herringbone double crochet in each stitch all the way round. Make 1 more herringbone double crochet in the same stitch as you did your 3 chain stitches. Finish with 1 slip mask in the 3rd chain you made at the beginning. Turn. In total, you have 30 stitches on the round.

Round 5 (Right Side): Chain 3. Skip the slip stitch from previous round. Crochet a herringbone double crochet in each stitch all the way round. Make 1 more herringbone double crochet in the same stitch as you did 3 chain stitches. Finish with 1 slip mask in the 3rd chain you made at the beginning. Turn. In total, you have 30 stitches on the round.
Round 5-13: Repeat round 4-5. Repeat until you are ready to start with the heel. Measure on your foot.

NOTE! If you want a larger size, repeat round 4 and turn 5 a number of times until the crocheted part covers the top of your foot and you are ready to crochet the heel.

Round 4 done.
Steg 4

Start with the heel - crochet in rows

Row 1: Crochet single crochet in only 18 of the stitches (in total you have 18 single crochet). Mark the first stitch, that you crocheted, with a stitch marker, yarn end or hairpin. If you are not sure how to crochet a single crochet, then see the video below.

Row 1 is ready, put a marker in your first stitch.

Row 2: Now turn work but not with a chain. Skip the first stitch and then crochet single crochet in the remaining 17 stitches (in total you have 17 stitches). Mark the first stitch you crocheted with a marker.

Turn and begin row 2.

Row 3: Turn over (do not make a chain). Skip the first stitch and start crocheting the stitch after. Crochet single crochet in the remaining 16 stitches (in total you will have 16 stitches). Mark the first stitch with a marker.

Row 4: Turn over (do not make a chain). Skip the first stitch and start crocheting the stitch after. Crochet single crochet in the remaining 15 stitches (in total you will have 15 stitches). Highlight the first stitch with a marker.

Row 5: Turn over (do not make a chain). Skip the first stitch and start crocheting the stitch after. Crochet single crochet in the remaining 14 stitches (in total you will have 14 stitches). Highlight the first stitch with a marker.

Continue on to the next step.

Steg 5

Row 6: Turn (do not make a chain). Skip the first stitch and start crocheting the stitch after. Crochet single crochet in the remaining 13 stitches (in total you will have 13 stitches). Mark the first stitch with a marker.

Row 7: Turn (do not make a chain). Skip the first stitch and start crocheting the stitch after. Crochet single crochet in the remaining 12 stitches (in total you will have 12 stitches). Mark the first stitch with a marker.

Row 8: Turn (do not make a chain). Skip the first stitch and start crocheting the stitch after. Crochet single crochet in the remaining 11 stitches (in total you will have 11 stitches). Mark the first stitch with a marker.

Row 9: Turn (do not make a chain). Skip the first stitch and start crocheting the stitch after. Crochet single crochet in the remaining 10 stitches (in total you will have 10 stitches). Mark the first stitch with a marker (we will not crochet a slip stitch in this stitch later, but it is still good for visability).

Now we will close (or “turn”) the heel.

Row 9 done and you have 9 markers, one for each row.
Steg 6

Row 10: Chain 1 and turn the work over. Crochet single crochet in all 10 stitches. Then crochet 1 slip stitch in the stitch that you marked out with a marker 2 rows down (in total you have crocheted 11 stitches including the slip stitch).

Row 10 before crocheting a slip stitch.
You crochet the slip stitch in the marker 2 rows down. The top marker was only for visability, not one we crochet a slip stitch in.

Row 11: Chain 1 and turn the work over. Crochet single crochet in all 11 stitches. Then crochet 1 slip stitch in the stitch that you marked out with a marker 2 rows down (in total you have crocheted 12 stitches including the slip stitch).

Row 12: Chain 1 and turn the work over. Crochet single crochet in all 12 stitches. Then crochet 1 slip stitch in the stitch that you marked out with a marker 2 rows down (in total you have crocheted 13 stitches including the slip stitch).

Row 13: Chain 1 and turn the work over. Crochet single crochet n all 13 stitches. Then crochet 1 slip stitch in the stitch that you marked out with a marker 2 rows down (in total you have crocheted 14 stitches including the slip stitch).

Row 14: Chain 1 and turn the work over. Crochet single crochet in all 14 stitches. Then crochet 1 slip stitch in the stitch that you marked out with a marker 2 rows down (in total you have crocheted 15 stitches including the slip stitch).

Row 15: Chain 1 and turn the work over. Crochet single crochet  in all 15 stitches. Then crochet 1 slip stitch in the stitch that you marked out with a marker 2 rows down (in total you have crocheted 16 stitches including the slip stitch).

Steg 7

Row 16: Chain 1 and turn the work over. Crochet single crochet in all 16 stitches. Then crochet 1 slip stitch in the stitch that you marked out with a marker 2 rows down (in total you have crocheted 17 stitches including the slip stitch). Note.! Leave the marker in place so you can more easily see where to place the crochet hook on round 1 in next step later in the pattern.

Round 16, make slip mask in the marker and leave the marker in place.


Row 17: Chain 1 and turn the work over. Crochet single crochet in all 17 stitches. Then crochet 1 slip stitch in the stitch that you marked out with a marker 2 rows down (in total you have crocheted 18 stitches including the slip stitch). Note.! Leave the marker in place to make it easier to see where to place the crochet hook on round 1 in next step later in the pattern.

Round 17 done.
Steg 8

Sock shank

You should be looking at the “right side” and ready to start again with Herringbone double crochet.

Lap 1: Crochet 3 air stitches and turn over. Skip the slip stitch. Crochet Herringbone double crochet along the heel. When you reach the left side of the heel, place the Herringbone double crochet in the space below the marker, as described in the picture below and continue with the Herringbone double crochet lengthwise along the top of the foot. Crochet a Herringbone double crochet under the marker on the right side where the arrow in the picture shows in the picture below. Crochet 1 more Herringbone double crochet in the same stitch as you did chain 3 stitches. Finish with 1 slip stitch in the 3rd chain you made at the beginning. Turn. In total, you have 30 stitches.

Round 1, chain 3 and then turn.
This is what round 1 looks like after you've turned the work.
Continue making a herringbone double crochet where the arrow shows.
When you are at the right side marker, make a herringbone double crochet with the arrow showing.

Laps 2-5: Proceed from the pattern in the “Toe and foot part”. Repeat turns 3-4.

Steg 9

Ribbing on the sock

When you are done with the sock shank and have finished with round 5, we will start with the ribbing at the top of the socks.

Start by chaining 17. If you want a higher rib, you can chain more than 17. Then keep in mind that you do not have the same number of stitches as in this pattern.

chain 17

Row 1: We will crochet back down the chain. Skip the first stitch and start in the 2nd chain and crochet single crochet in all chain stitches. Then skip the first stitch on the edge of the sock shank. Then crochet two slip stitches in the next two stitches on the sock shank. Turn the work over and crochet upwards again. In total, you have 16 stitches in the row.

The photo shows that we have crocheted single crochets down and are on the edge of the sock, skipping the first stitch on the sock shaft.
After skipping one stitch, crochet two slip stitches in the next two stitches.

Row 2: Skip the slip stitches you just crocheted. Now you are going to crochet single crochet again but this time you are crocheting in back loop only up on the ribs again. If you are not sure how to crochet the back loop only, see the video below. Turn. A total of 16 stitches (on the ribs).

Single crochet in the back loop only up on the rib again.
Steg 10

Row 3: Chain 1, single crochet in back loop only until you are at start. Crochet 2 slip stitches in the next 2 stitches on the edge. Turn. In total, you have 16 stitches (on the ribs).

Row 4-32: Repeat row 2-3 and finish with row 2.

Now the rib is ready and the next step is to crochet both sides of the rib together, so that the rib turns round and forms a circle. Crochet slip stitches through both sides of the rib so that the rib closes. Cut off and fasten the yarn. If you are not sure how to fasten the yarn tails, see the video below.

Now your first sock is ready, just crochet another one: ) Hope you like your new socks!

The rights to this pattern belong to MYO Make Your Own. The pattern or its pictures may not be copied, shared or resold either in parts or in its entirety, but you may sell items you have crocheted from this pattern. If you have questions about the pattern, contact MYO at hello@makeyourown.se.

Socks “Hilma”

Crochet these cozy and warm socks!

Crochet these cozy socks that keep your feet warm. These socks have a beautiful pattern and match the pattern of the “Hulda” sweater. The socks can be customized in size and made smaller or larger. There is a slightly more difficult part in the pattern, the heel, but there are pictures to follow along the way. You will need MYO Basic wool, crochet hook 5 mm and stitch marker (stitch markers/yarn ends/hairpins). In the pictures we have used the color “beige”.

Yarn Consumption: 2 skeins of MYO Basic wool for size 38. The yarn consumption depends on how tight you crochet.

Note that we in this instruction uses videos from out technique library.

Socks “Hilma”
Steg 1

INFO:

If the sock feels too loose or tight, you can switch to either a smaller or larger crochet hook. Chain 3 count as one double crochet.
At the end of each round, turn your work and when you turn the work, turn the work from the right to the left side, see the video if in doubt.


Toe and Foot

We start by crocheting the toe part on the socks. After round 4, you can measure your work and see if you need to crochet more rounds to get a larger size.

Start by making a magic ring.

Round 1 (right side): Chain 3. Crochet 9 herringbone double crochets into the magic ring. Tighten the hole so that the hole closes, using the small end of yarn that remains from the start. Finish round 1 with 1 slip stitch in the 3rd chain you did at the beginning. Turn the work over as described above. A total of 10 herringbone double crochets (9 herringbone souble crochet + the chain at the beginning). A tip is to mark this slip stitch that you crocheted, use a yarn end, hair needle or marker.

If you are not sure how to crochet herringbone double cropchets, see the video below. The video also shows how to crochet a magic ring, chain stitches and how to finish and start the next round.

Round 1 done
Steg 2

Round 2 (wrong side): Chain 3. Skip the slip stitches we did on previous round (see picture below). If you have marked the slip mask from round 1, you will easily see which stitch you skip. You can remove the marker immediately after you crochet the first herringbone double crochet.

Crochet 2 herringbone double crochet in the following stitch, thus two in the same stitch. Repeat this 8 times, i.e. 2 herringbone double crochet in each stitch the whole round. You have crocheted 18 herringbone double crochet plus the chain, which counts as a double crochet. You will now crochet the 20th herringbone double crochet in the round. This is done in the same stitch as you did the 3 chain stitches (see picture or video above). Finish the round with 1 slip stitch in the 3rd chain you made at the beginning. If you want, you can mark the slip stitch so it will be easier to see where to start the next round. Turn.

In total, you have 20 stitches on your round. See below pictures for guide.

First herringbone double crochet on round 2, skip the slip stitch from previous round.
Where the arrow shows you make the last herringbone double crochet.
Round 2 done.
Steg 3

Round 3 (right side): Chain 3.

Skip the slip stitch from previous round, just like we did on the previous round. Crochet 2 herringbone double crochet in the following stitch. In the stitch after, you crochet 1 herringbone double crochet. After that, crochet 2 herringbone double crochet in the same stitch again. So every two stitches you make two herringbone double crochet and every other stitch you make 1 herringbone double crochet. Repeat until you are at the end.

Crochet the last herringbone double crochet in the same stitch as you made your 3 chain stitches. Finish with 1 slip mask in the 3rd chain you made at the beginning. Turn. In total, you have 30 stitches on the round.

The beginning of round 3
For reference, our work measures 8.5 cm after round 3.

Round 4 (wrong side): Chain 3. Skip the slip stitch from previous round. Crochet a herringbone double crochet in each stitch all the way round. Make 1 more herringbone double crochet in the same stitch as you did your 3 chain stitches. Finish with 1 slip mask in the 3rd chain you made at the beginning. Turn. In total, you have 30 stitches on the round.

Round 5 (Right Side): Chain 3. Skip the slip stitch from previous round. Crochet a herringbone double crochet in each stitch all the way round. Make 1 more herringbone double crochet in the same stitch as you did 3 chain stitches. Finish with 1 slip mask in the 3rd chain you made at the beginning. Turn. In total, you have 30 stitches on the round.
Round 5-13: Repeat round 4-5. Repeat until you are ready to start with the heel. Measure on your foot.

NOTE! If you want a larger size, repeat round 4 and turn 5 a number of times until the crocheted part covers the top of your foot and you are ready to crochet the heel.

Round 4 done.
Steg 4

Start with the heel - crochet in rows

Row 1: Crochet single crochet in only 18 of the stitches (in total you have 18 single crochet). Mark the first stitch, that you crocheted, with a stitch marker, yarn end or hairpin. If you are not sure how to crochet a single crochet, then see the video below.

Row 1 is ready, put a marker in your first stitch.

Row 2: Now turn work but not with a chain. Skip the first stitch and then crochet single crochet in the remaining 17 stitches (in total you have 17 stitches). Mark the first stitch you crocheted with a marker.

Turn and begin row 2.

Row 3: Turn over (do not make a chain). Skip the first stitch and start crocheting the stitch after. Crochet single crochet in the remaining 16 stitches (in total you will have 16 stitches). Mark the first stitch with a marker.

Row 4: Turn over (do not make a chain). Skip the first stitch and start crocheting the stitch after. Crochet single crochet in the remaining 15 stitches (in total you will have 15 stitches). Highlight the first stitch with a marker.

Row 5: Turn over (do not make a chain). Skip the first stitch and start crocheting the stitch after. Crochet single crochet in the remaining 14 stitches (in total you will have 14 stitches). Highlight the first stitch with a marker.

Continue on to the next step.

Steg 5

Row 6: Turn (do not make a chain). Skip the first stitch and start crocheting the stitch after. Crochet single crochet in the remaining 13 stitches (in total you will have 13 stitches). Mark the first stitch with a marker.

Row 7: Turn (do not make a chain). Skip the first stitch and start crocheting the stitch after. Crochet single crochet in the remaining 12 stitches (in total you will have 12 stitches). Mark the first stitch with a marker.

Row 8: Turn (do not make a chain). Skip the first stitch and start crocheting the stitch after. Crochet single crochet in the remaining 11 stitches (in total you will have 11 stitches). Mark the first stitch with a marker.

Row 9: Turn (do not make a chain). Skip the first stitch and start crocheting the stitch after. Crochet single crochet in the remaining 10 stitches (in total you will have 10 stitches). Mark the first stitch with a marker (we will not crochet a slip stitch in this stitch later, but it is still good for visability).

Now we will close (or “turn”) the heel.

Row 9 done and you have 9 markers, one for each row.
Steg 6

Row 10: Chain 1 and turn the work over. Crochet single crochet in all 10 stitches. Then crochet 1 slip stitch in the stitch that you marked out with a marker 2 rows down (in total you have crocheted 11 stitches including the slip stitch).

Row 10 before crocheting a slip stitch.
You crochet the slip stitch in the marker 2 rows down. The top marker was only for visability, not one we crochet a slip stitch in.

Row 11: Chain 1 and turn the work over. Crochet single crochet in all 11 stitches. Then crochet 1 slip stitch in the stitch that you marked out with a marker 2 rows down (in total you have crocheted 12 stitches including the slip stitch).

Row 12: Chain 1 and turn the work over. Crochet single crochet in all 12 stitches. Then crochet 1 slip stitch in the stitch that you marked out with a marker 2 rows down (in total you have crocheted 13 stitches including the slip stitch).

Row 13: Chain 1 and turn the work over. Crochet single crochet n all 13 stitches. Then crochet 1 slip stitch in the stitch that you marked out with a marker 2 rows down (in total you have crocheted 14 stitches including the slip stitch).

Row 14: Chain 1 and turn the work over. Crochet single crochet in all 14 stitches. Then crochet 1 slip stitch in the stitch that you marked out with a marker 2 rows down (in total you have crocheted 15 stitches including the slip stitch).

Row 15: Chain 1 and turn the work over. Crochet single crochet  in all 15 stitches. Then crochet 1 slip stitch in the stitch that you marked out with a marker 2 rows down (in total you have crocheted 16 stitches including the slip stitch).

Steg 7

Row 16: Chain 1 and turn the work over. Crochet single crochet in all 16 stitches. Then crochet 1 slip stitch in the stitch that you marked out with a marker 2 rows down (in total you have crocheted 17 stitches including the slip stitch). Note.! Leave the marker in place so you can more easily see where to place the crochet hook on round 1 in next step later in the pattern.

Round 16, make slip mask in the marker and leave the marker in place.


Row 17: Chain 1 and turn the work over. Crochet single crochet in all 17 stitches. Then crochet 1 slip stitch in the stitch that you marked out with a marker 2 rows down (in total you have crocheted 18 stitches including the slip stitch). Note.! Leave the marker in place to make it easier to see where to place the crochet hook on round 1 in next step later in the pattern.

Round 17 done.
Steg 8

Sock shank

You should be looking at the “right side” and ready to start again with Herringbone double crochet.

Lap 1: Crochet 3 air stitches and turn over. Skip the slip stitch. Crochet Herringbone double crochet along the heel. When you reach the left side of the heel, place the Herringbone double crochet in the space below the marker, as described in the picture below and continue with the Herringbone double crochet lengthwise along the top of the foot. Crochet a Herringbone double crochet under the marker on the right side where the arrow in the picture shows in the picture below. Crochet 1 more Herringbone double crochet in the same stitch as you did chain 3 stitches. Finish with 1 slip stitch in the 3rd chain you made at the beginning. Turn. In total, you have 30 stitches.

Round 1, chain 3 and then turn.
This is what round 1 looks like after you've turned the work.
Continue making a herringbone double crochet where the arrow shows.
When you are at the right side marker, make a herringbone double crochet with the arrow showing.

Laps 2-5: Proceed from the pattern in the “Toe and foot part”. Repeat turns 3-4.

Steg 9

Ribbing on the sock

When you are done with the sock shank and have finished with round 5, we will start with the ribbing at the top of the socks.

Start by chaining 17. If you want a higher rib, you can chain more than 17. Then keep in mind that you do not have the same number of stitches as in this pattern.

chain 17

Row 1: We will crochet back down the chain. Skip the first stitch and start in the 2nd chain and crochet single crochet in all chain stitches. Then skip the first stitch on the edge of the sock shank. Then crochet two slip stitches in the next two stitches on the sock shank. Turn the work over and crochet upwards again. In total, you have 16 stitches in the row.

The photo shows that we have crocheted single crochets down and are on the edge of the sock, skipping the first stitch on the sock shaft.
After skipping one stitch, crochet two slip stitches in the next two stitches.

Row 2: Skip the slip stitches you just crocheted. Now you are going to crochet single crochet again but this time you are crocheting in back loop only up on the ribs again. If you are not sure how to crochet the back loop only, see the video below. Turn. A total of 16 stitches (on the ribs).

Single crochet in the back loop only up on the rib again.
Steg 10

Row 3: Chain 1, single crochet in back loop only until you are at start. Crochet 2 slip stitches in the next 2 stitches on the edge. Turn. In total, you have 16 stitches (on the ribs).

Row 4-32: Repeat row 2-3 and finish with row 2.

Now the rib is ready and the next step is to crochet both sides of the rib together, so that the rib turns round and forms a circle. Crochet slip stitches through both sides of the rib so that the rib closes. Cut off and fasten the yarn. If you are not sure how to fasten the yarn tails, see the video below.

Now your first sock is ready, just crochet another one: ) Hope you like your new socks!

The rights to this pattern belong to MYO Make Your Own. The pattern or its pictures may not be copied, shared or resold either in parts or in its entirety, but you may sell items you have crocheted from this pattern. If you have questions about the pattern, contact MYO at hello@makeyourown.se.