
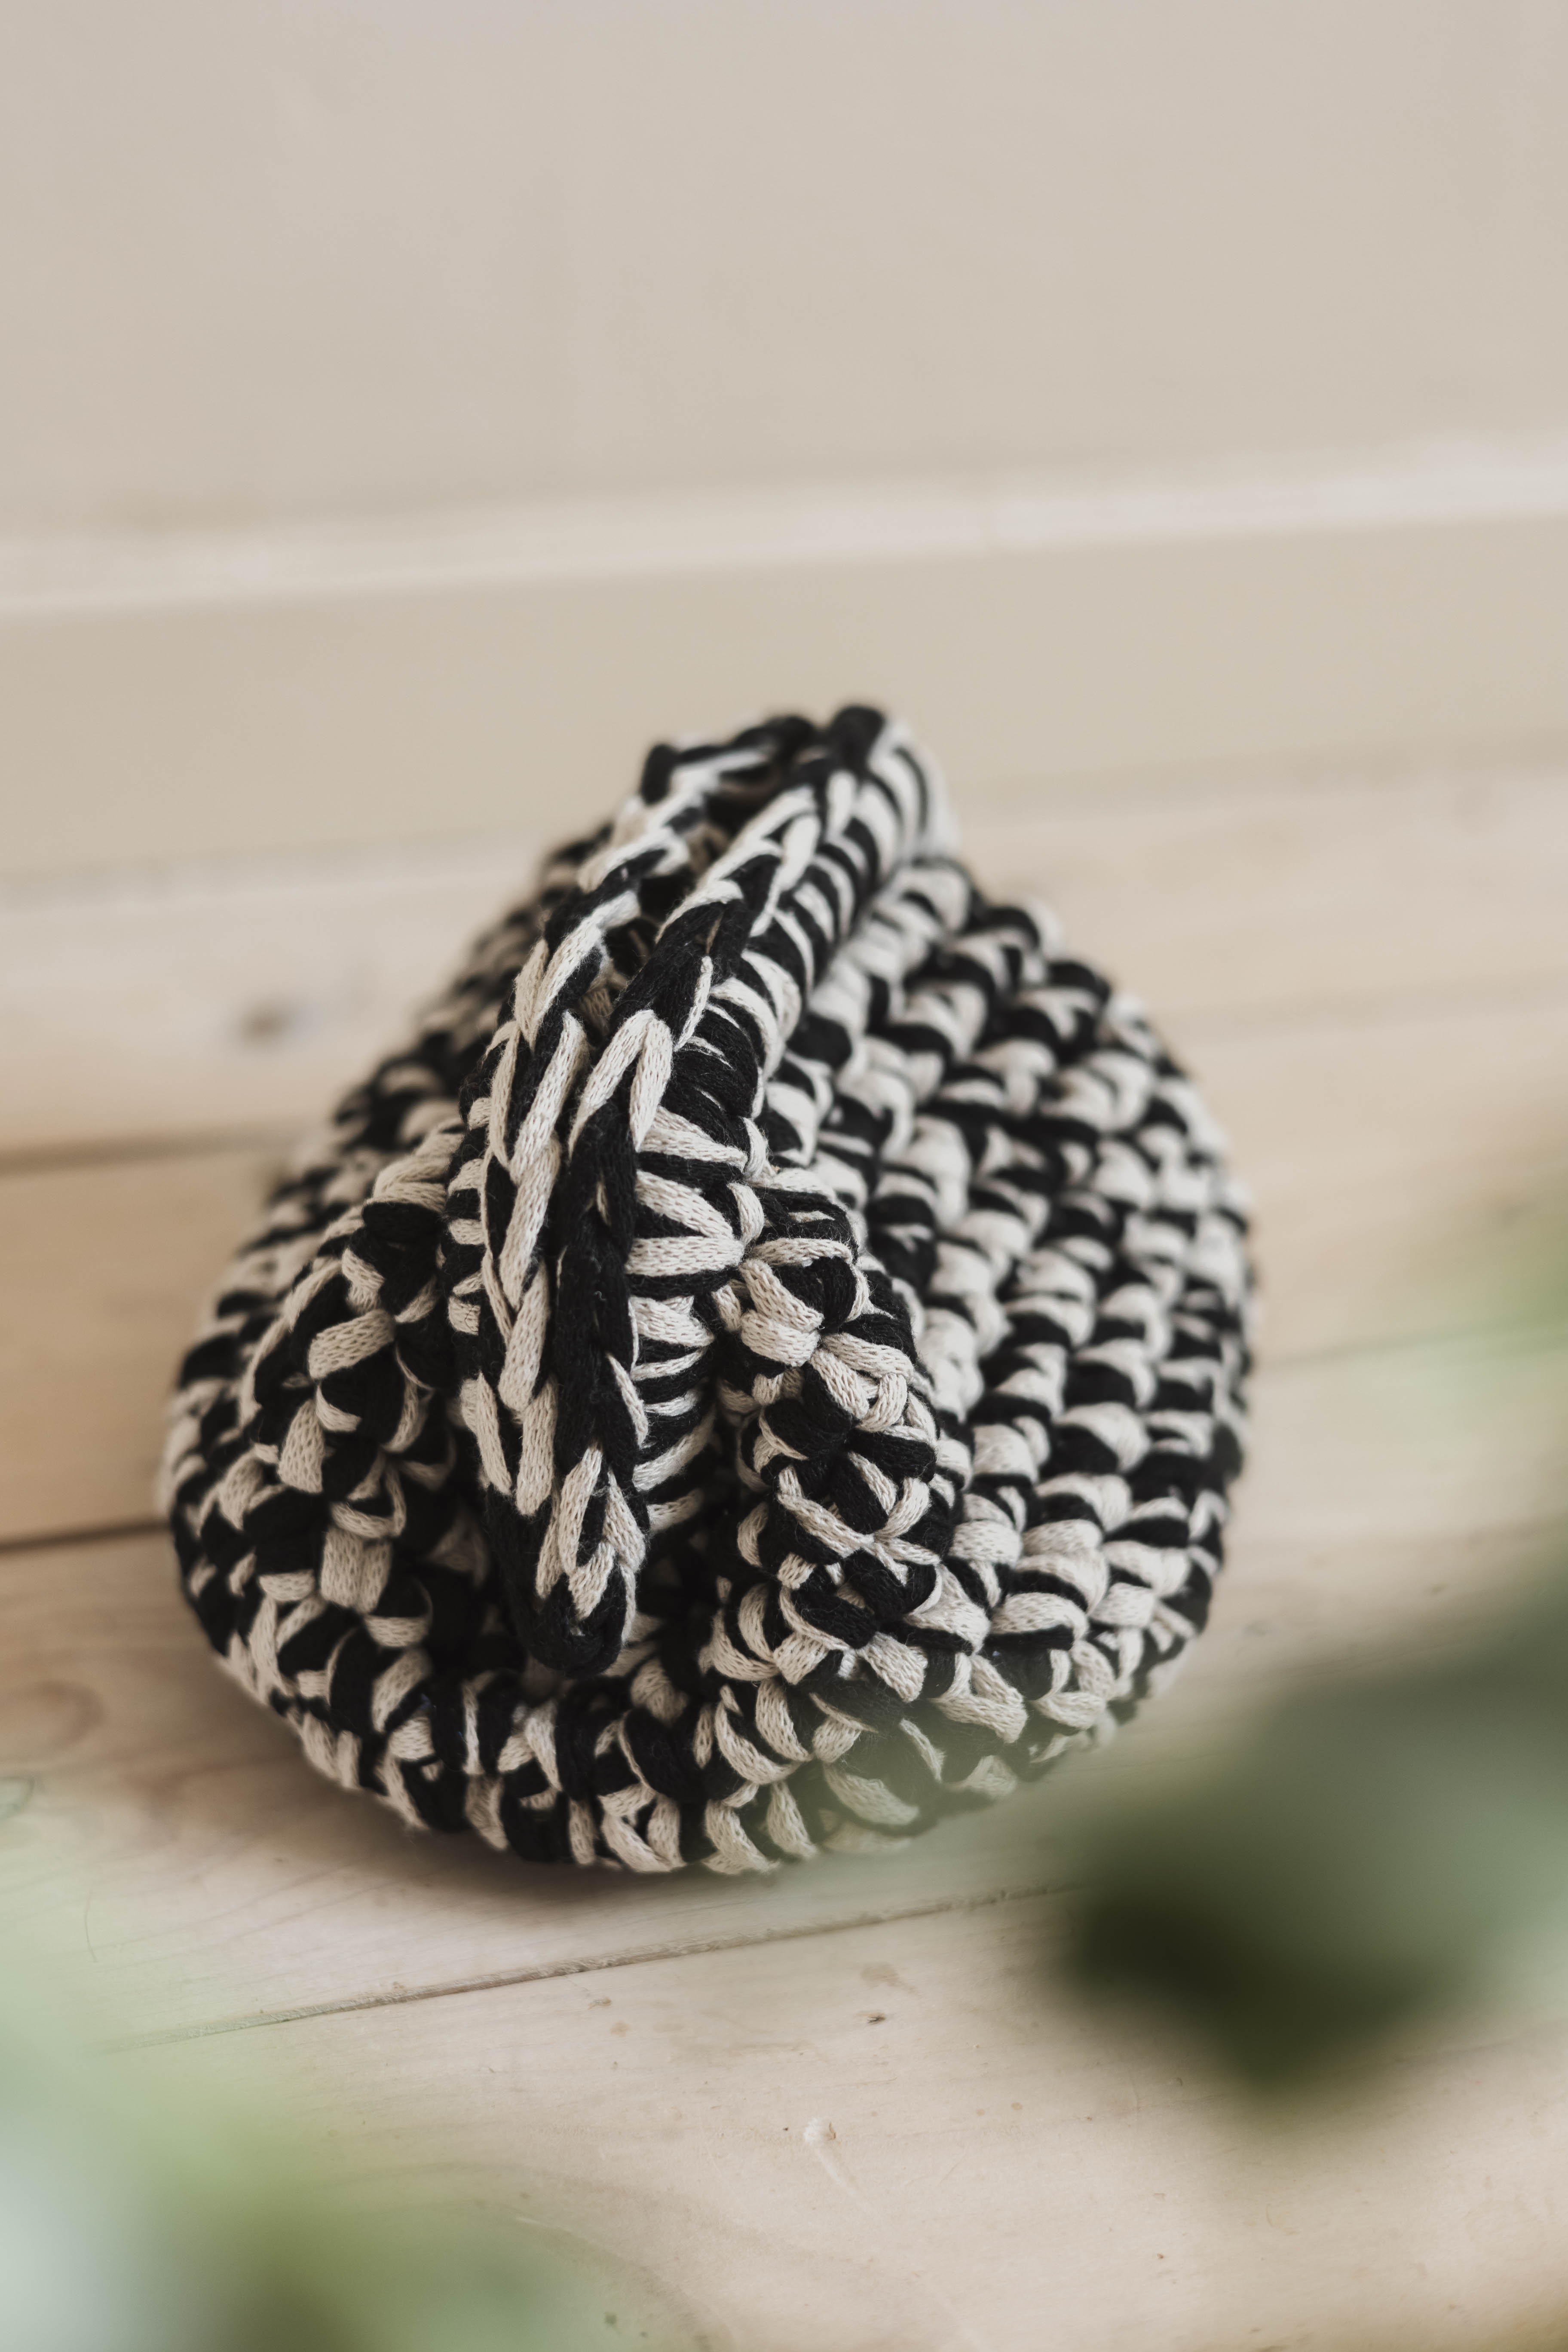
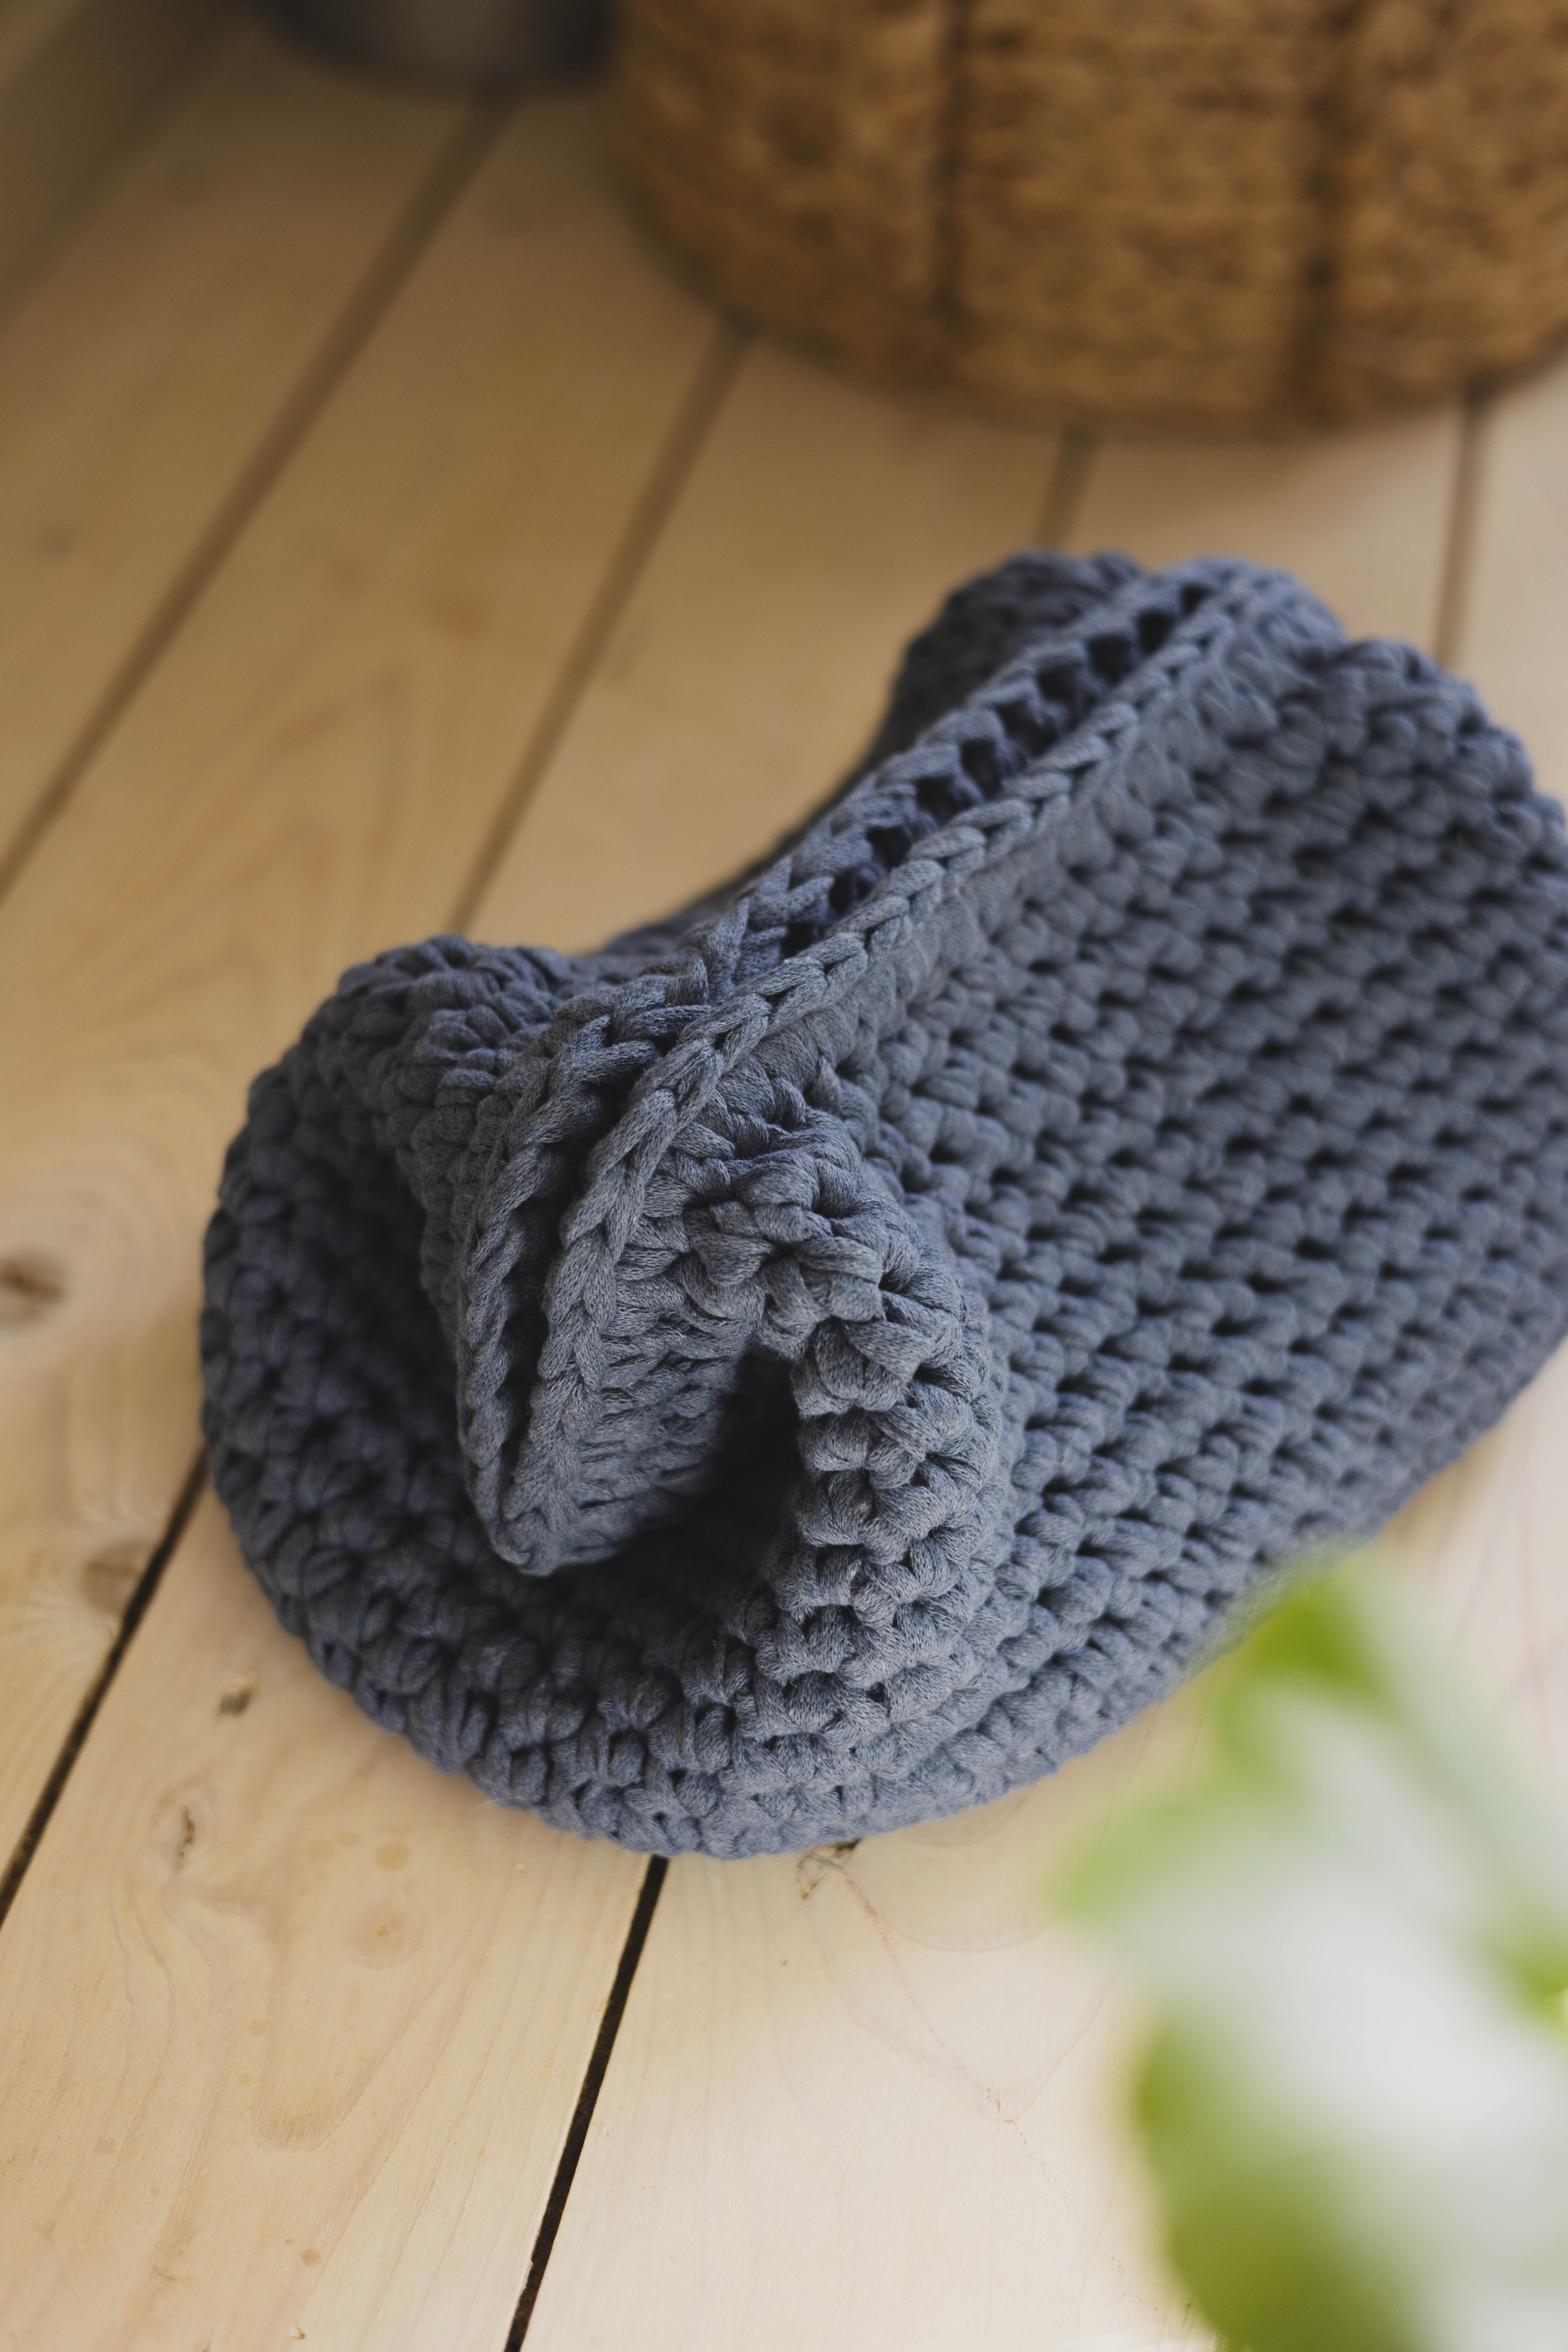
Sunflower bag “Junie”
Crochet a beautiful bag in sunflowers 🌻
This bag is suitable for beginners and we go through all the steps together. It is made of 13 sunflower squares which are assembled into a bag. The bag is crocheted in EKO Nano Tube yarn and a 6 mm crochet hook. The colors we use in the video are yellow, cacao and greige, but you can choose your own color combination among all 25 colors that we have for our yarn EKO Nano.
Yarn consumption: 550 g (depending on how tight you crochet)


Here's how to do it
For those of you who love squares, this bag will fit perfectly! Choose your colors, strong and colorful or more neutral, the choice is entirely yours. The bag can be crocheted in as many colors as you want, making it unique. Why not mix lots of colors and make it an even more of a pop of color. The bag in the video measures about 35 x 35 cm (from the bottom to the first peak). Of the brown yarn, about 50 g of yarn is used and of the yellow yarn about 150 g of yarn, the rest is crocheted in the basic color. Good luck and feel free to share your bag:) /creator Lizette

This is what you need:
Here you can directly purchase the material for the product. Please note that the instruction is digital and appears here on the page (no written instruction).


.jpg)
Unleash your creativity
For only 85kr per month you get access to all our 300+ beginner-friendly instructions for crochet, knitting and macrame.
A perfect way to get started with your new hobby!

We start by crocheting 14 squares. The squares will be about 13 x 13 cm in size depending on how hard you crochet.
Inner Ring
Start with color 1. Hold the yarn in your left hand. Twist the yarn around your fingers (left hand) three times. Use your crochet hook to go under the first two loops and hook the third with your crochet hook. Pick up the yarn again and pull under the two finger loops, hook the yarn onto the crochet hook and pull through. Now the loop on the crochet hook hold the inner ring together and you can proceed below.
Round 1: Ch 2 (this chain replaces the first half double crochet). After that, crochet 11 half double crochets in the inner ring.
A half double crochet is crocheted by taking yarn over your crochet hook and go down with the crochet hook into the inner ring, pick up yarn and pull through (you have three loops on your crochet hook), pick up yarn and pull through all three loops. You have now crocheted a half double crochet.
Crochet a total of 11 half double crochets plus a chain of two loops at the beginning. Finish by going down in the third loop you made at the beginning. Pick up yarn and pull through both loops directly. Leave 10 cm of yarn end and cut.
Round 2: Start by making a slip knot around your crochet hook. One way you can do this is to wrap the yarn around your index and middle finger and then pull the yarn up so that it creates a loop. Tighten around your crochet hook.
Go down the stitch between the first and second half double crochet, pick up the yarn and pull through both loops. Chain 2. Go down in the same stitch and crochet a double crochet but you should not do the last pull through i.e. you take the yarn over the crochet and go down with the crochet hook into the stitch, pick up yarn and pull through (you have 3 loops on your crochet hook), pick up yarn and pull through two loops (you have two loops left on your crochet hook). Do the same thing one more time so that you then have three loops on the crochet hook. Pick up yarn and pull through all loops. Chain 1. Now you have crocheted one “leaf”.
Yarn over and go down the next stitch and do the same thing. You don't have to chain 3 in the beginning but you crochet 3 "half" double crochets instead of Ch 3+ 2 "half" double crochets. Do this 11 times (don't forget a chain 1 in between). Finish by going down the 3rd chain of the first chain, pick up the yarn and pull through. When you're done, you should have 12 leaves.
Leave 10 cm of yarn end and cut off.
Round 3 - making the square shape
Hole 1: Make a slip knot around your crochet hook and start in a 'hole' (between two leaves) and chain 3. Then crochet 2 double crochets in the same hole.
A double crochet is crocheted by taking yarn over your crochet hook and go down with your crochet hook into the inner ring, pick up the yarn and pull through (you have 3 loops on your crochet hook), pick up yarn and pull through two loops, pick up yarn and pull through the last 2 loops. You have now crocheted a double crochet.
In hole 1 you have chain 3 and 2 double crochets.
Do not chain 1 between the double crochets.
Hole 2: Crochet 3 double crochets.
Hole 3: Now you should crochet treble crochets. Take yarn over your crochet hook twice (you have three loops) and go down in the hole and pick up the yarn and pull through. Yarn over again and pull through 2 loops. Yarn over and pull through two loops again and yan over one last time and pull through the last 2 loops. Do the same thing 2 more times. Chain 2, and then 3 treble crochets in the same hole. This is the first corner.
Repeat holes 1-3 three times more so you have four sides. Finish by going through the first stitch on the lap, picking up yarn and pulling through all loops. Cut off and fasten the yarn tails.
Fasten all the yarn tails. Tie the remaining tail in a knot around the last loop (or with another yarn end) on the backside of the square to prevent it from going up. Hide the tail by fastening it through a few closeby loops.
Join the finished squares
When all squares are complete, join them together in your preferred order. Suggestion on the pictures below.
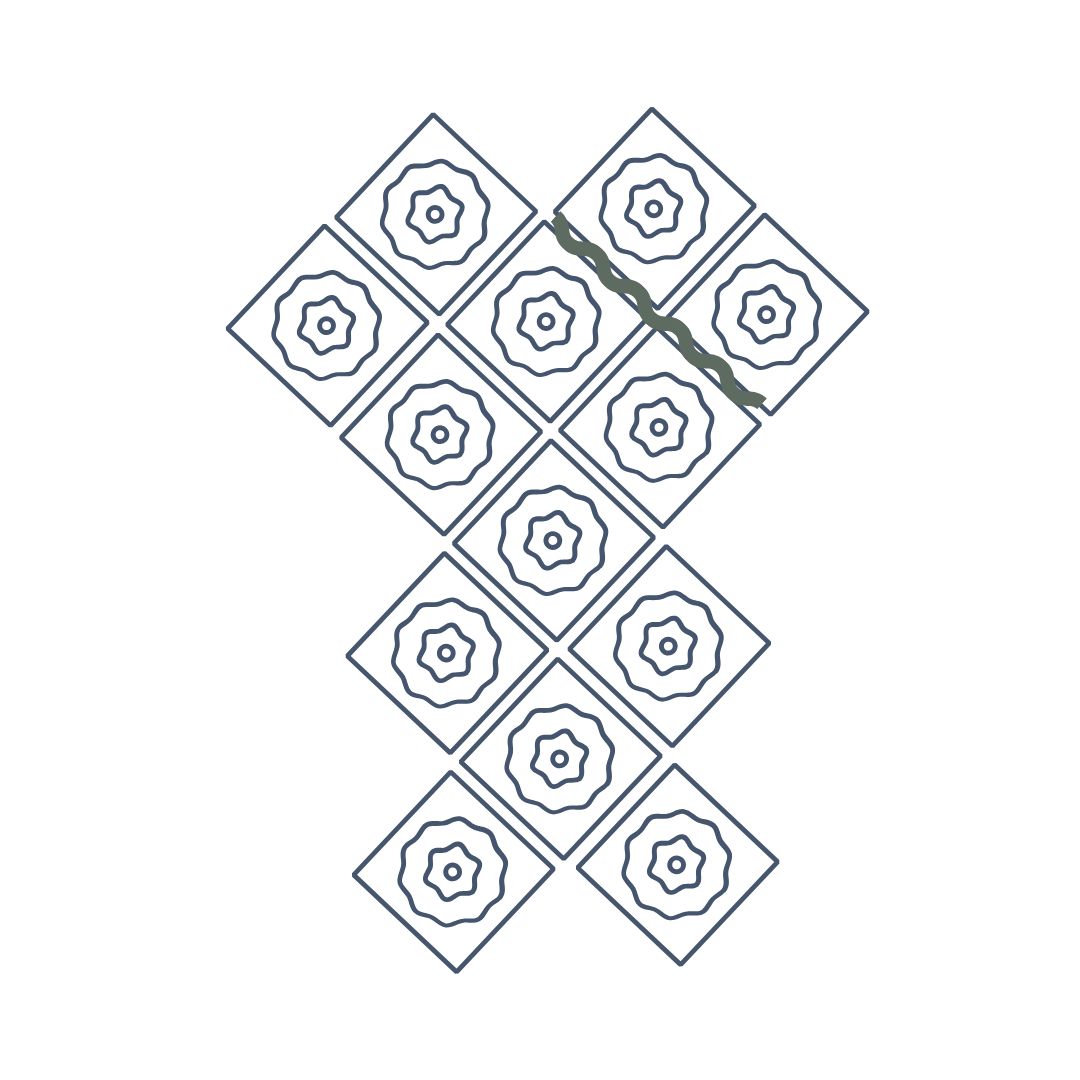
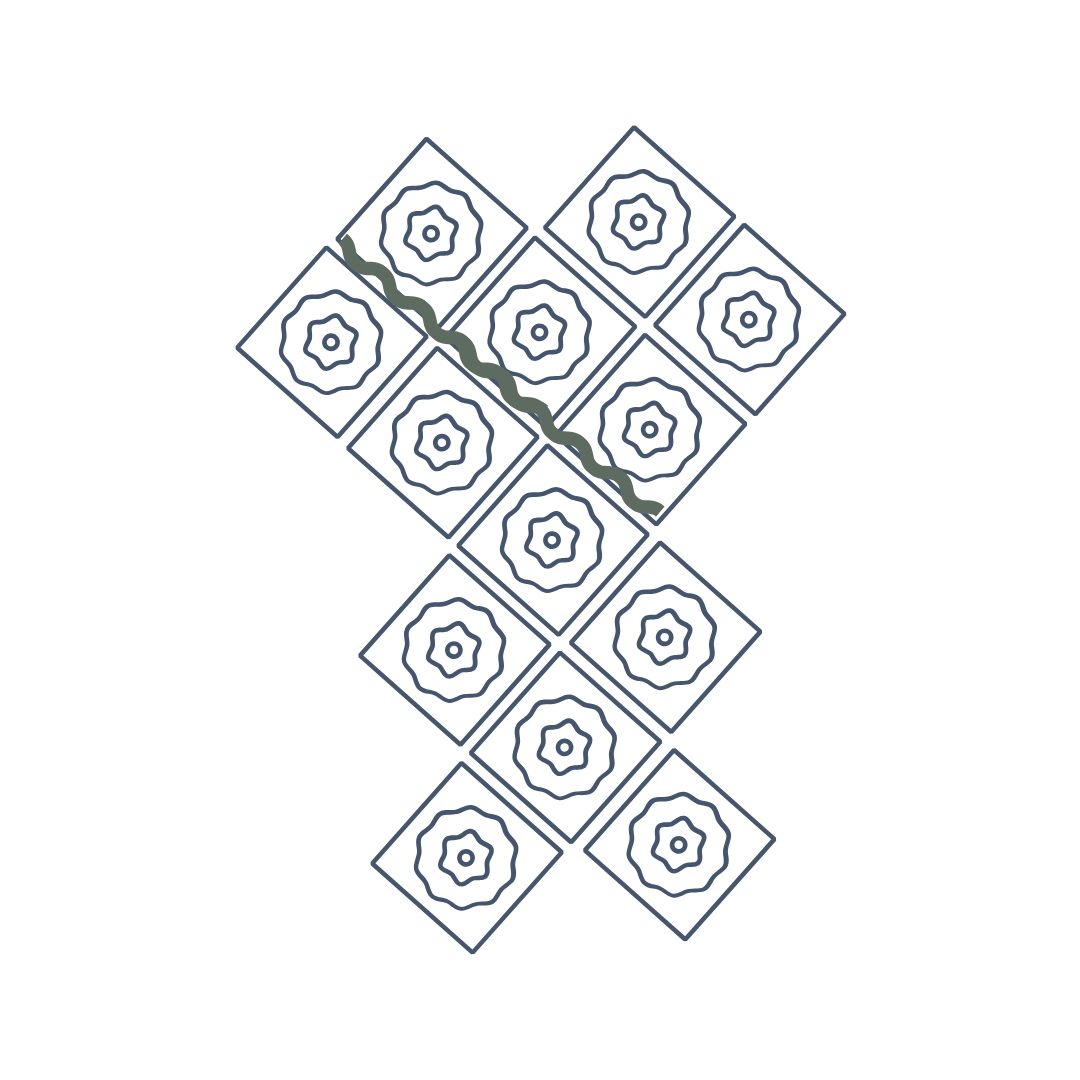
Place 2 squares together, wrong side against wrong side. Make a slip knot, insert hook in a corner ch-sp on both squares. Insert hook in the loops closest to you on each square and work 1 sl st.
Continue working sl st in the loops closest to you across all squares until you reach the end.
Finish with ch 1, cut yarn, and fasten off.
Work 1 round of sc around the top edge of the bag. You may work additional rounds if desired.
Then begin at one of the lowest points and work 1 sc in each st. In each “point,” work 3 sc in the center st. When you reach the next lowest point, skip 1 st/ch-sp.
Continue in the same way until you are back where you started.
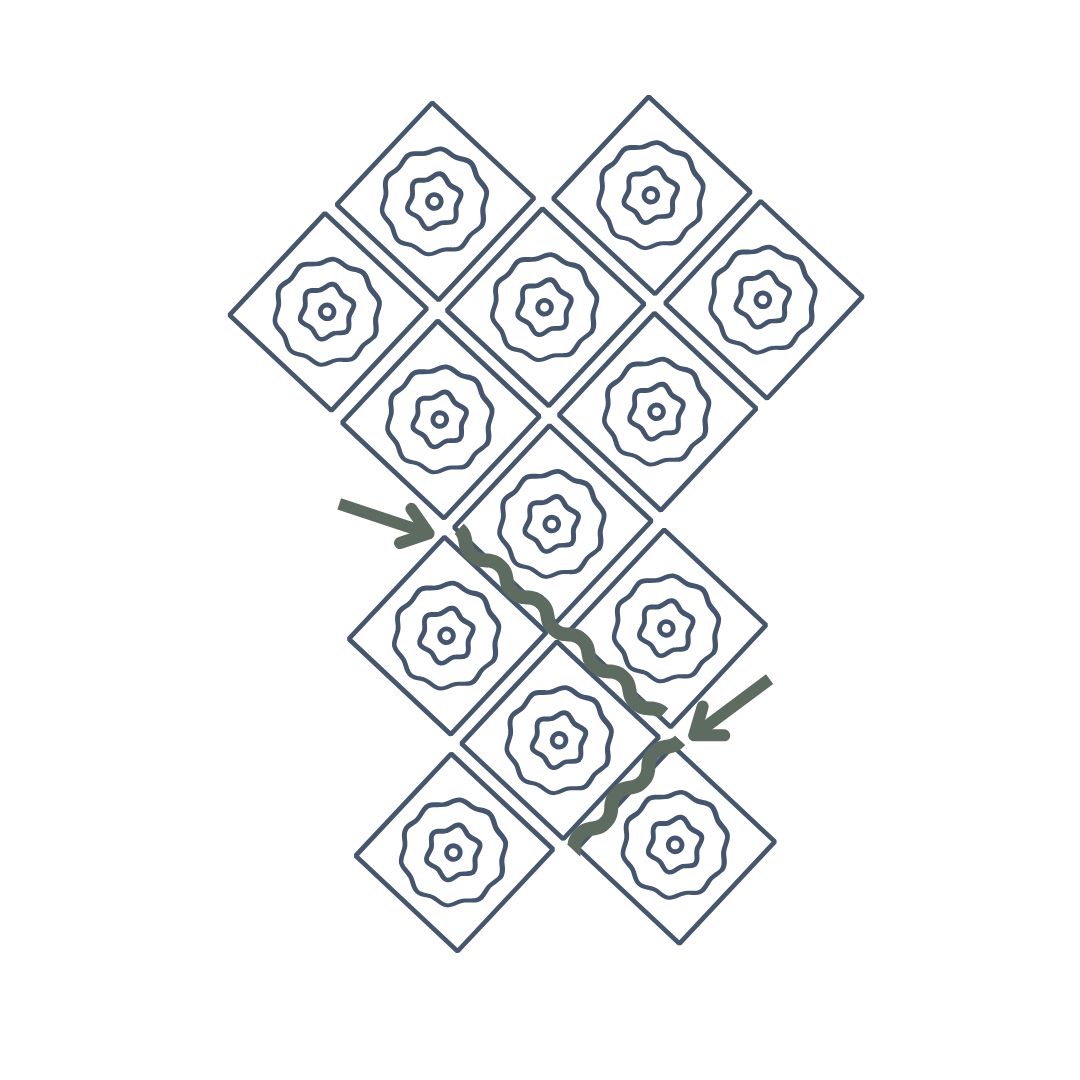
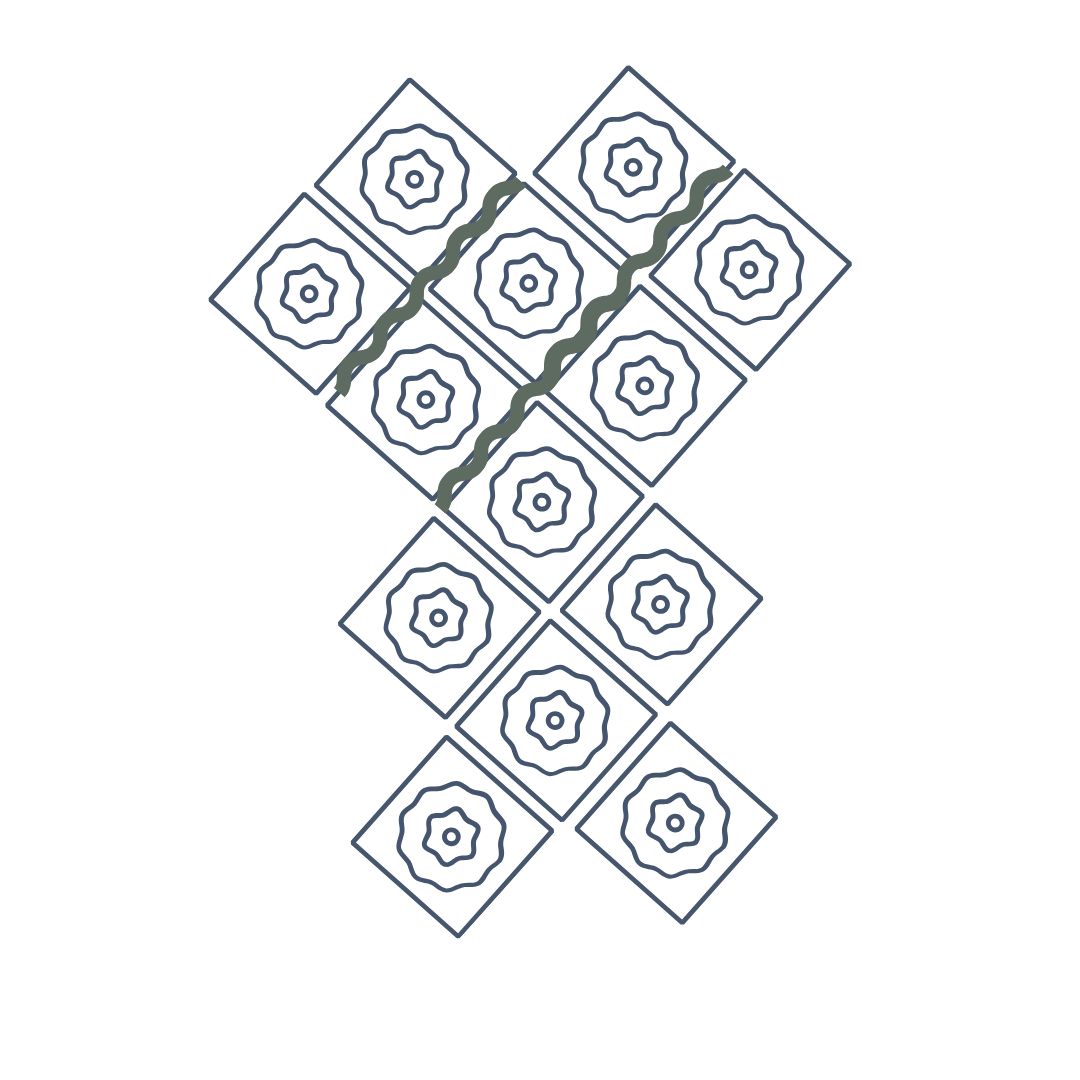
Now proceed by attaching below squares and crochet in the same way (and with the same technique) as you just used.
Now, we will crochet several squares together at the same time. These are divided into the two below images so start with image 4.
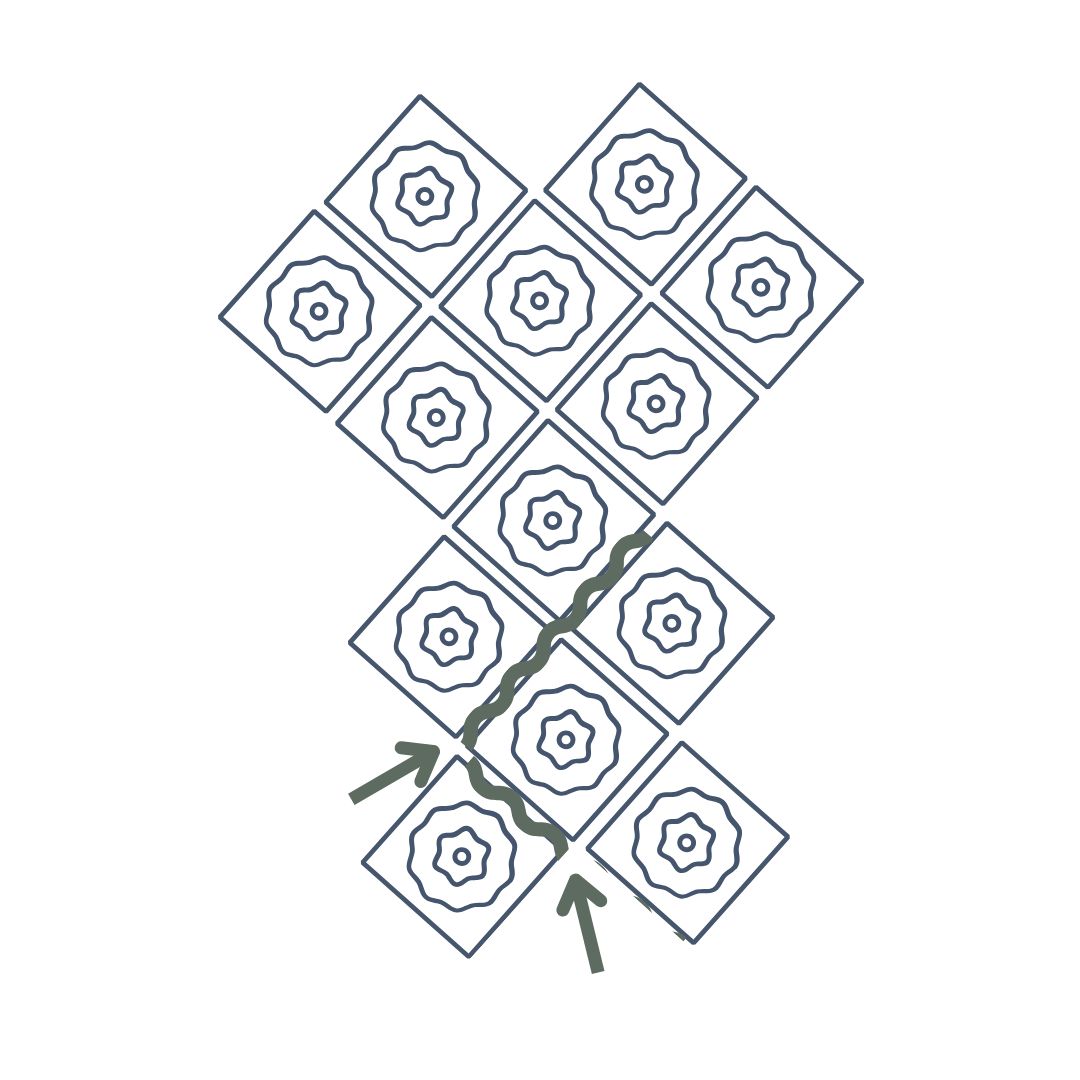
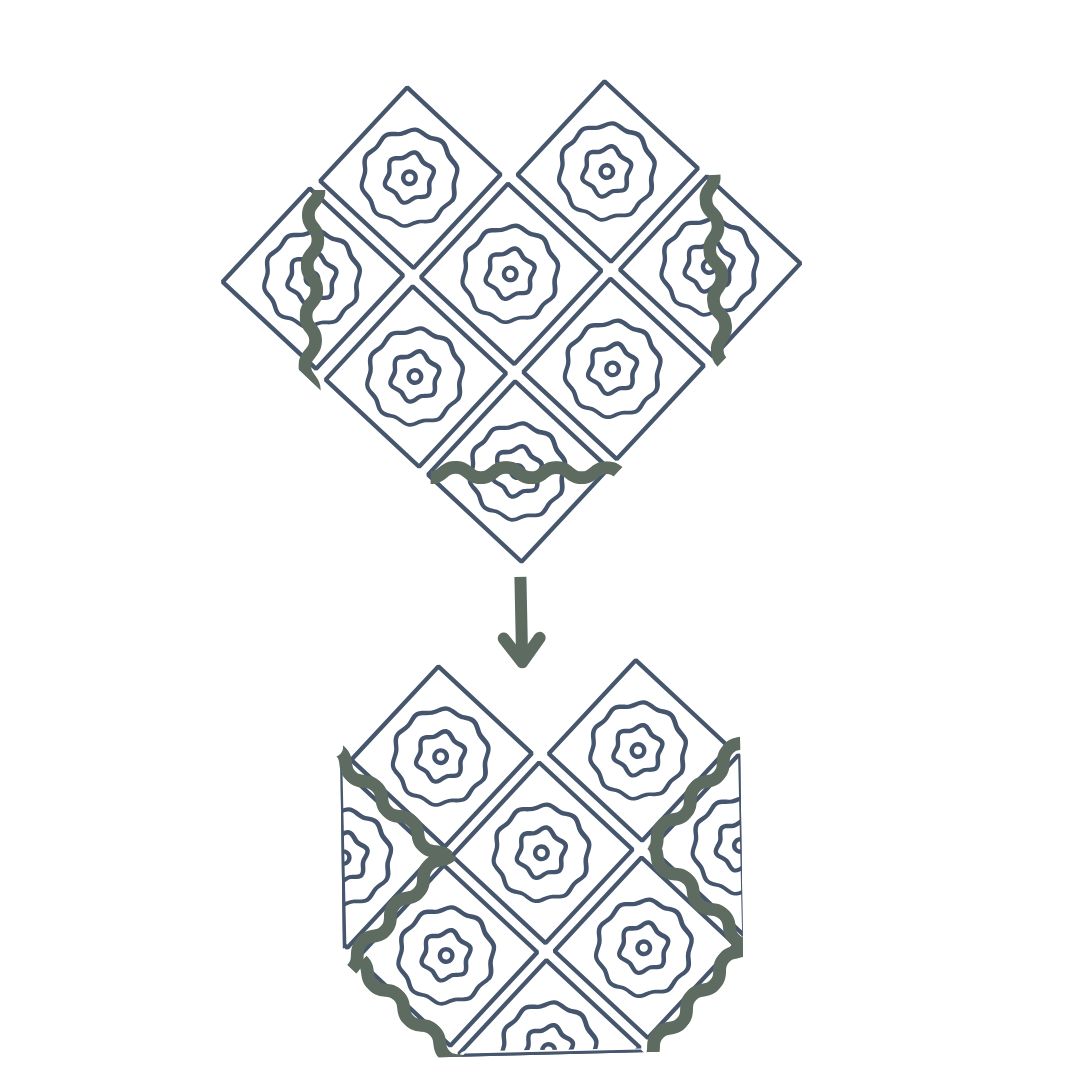
The last part of the assembling of all the squares, see below picture.
Final part of the assembly of the bag
Now we will fold the bag and crochet the sides of the bag. Se picture below how to fold and how to attach.
Shoulder straps
Work single crochet stitches until you reach the first point. There, make chain stitches— as many as you need to achieve the desired strap length (keep in mind that the straps may stretch slightly over time). For reference, there are 42 chain stitches in the video tutorial.
When you are satisfied with the number of chain stitches, insert your hook into the center stitch of the next point and continue working single crochet stitches until you reach the center stitch of the following point. There, begin the second shoulder strap. Make the same number of chain stitches as for the first strap.
Insert your hook into the center stitch of the last point and continue working single crochet stitches until you are back at the starting point.
Continue by working one single crochet stitch in each stitch all the way around, including across the chain stitches. Then work as many additional rounds as you like to achieve the desired thickness.
Cut the yarn and fasten off.
You are done!
Crochet Terms – US Terminology
If you need help along the way, refer to our simplified version of this pattern. In this case, there are no supporting images, so we recommend checking out the full-length video tutorial as well as the photos in the easy version for assembly.
Abbreviations:
MR = magic ring
st = stitch
ch = chain
sl st = slip stitch
sc = single crochet
hdc = half double crochet
dc = double crochet
tr = treble crochet
sp = space
flo = front loop only
yo = yarn over
(…) = indicates the stitch count at the end of the round
*…* = repeat everything between … the number of times indicated
Leaf: A leaf is made by crocheting 4 double crochets together in the same stitch. The 4 stitches are joined both at the top and the bottom, forming a circular shape. It is made as follows:
- Yarn over and insert the hook into the stitch. Yarn over and pull through so that you have three loops on the hook.
- Yarn over again and pull through the first two loops. You should now have 2 loops left. You have now made your first double crochet (but skip the final yarn-over-and-pull-through step).
- Repeat steps 1 and 2 until you have 3 double crochets / 43 loops on the hook.
- Yarn over and pull through all 4 loops.
Note! The first leaf of the round begins with 3 chain stitches instead of a double crochet.
Pattern
Start with the color you want in the center of your squares. Make 1 MR.
Round 1: Ch 2 (counts as 1 hdc), 11 hdc in MR, sl st in 2nd ch. Cut yarn and fasten off.
Change color.
Round 2: Attach yarn with 1 sl st in the first st of the previous round. Work Leaf x12. in same st. Sl st in first st of the round. Cut yarn and fasten off. You should have 12 Leaves in this round.
Change color.
Round 3: Attach yarn with 1 sl st in a sp (between clusters) from the previous round. Ch 3 (counts as 1 dc), 2 dc in same sp. In next sp, 3 dc. Skip to next sp. Work 3 tr, ch 2, 3 tr (forms a corner).
*3 dc in next sp, 3 dc in next sp. In next sp work 3 tr, ch 2, 3 tr* × 3. Sl st in 3rd ch at beginning of round. Cut yarn and fasten off.
Join the finished squares
When all squares are complete, join them together in your preferred order.
Place 2 squares together, wrong side against wrong side. Make a slip knot, insert hook in a corner ch-sp on both squares. Insert hook in the loops closest to you on each square and work 1 sl st.
Continue working sl st in the loops closest to you across all squares until you reach the end.
Finish with ch 1, cut yarn, and fasten off.
Work 1 round of sc around the top edge of the bag. You may work additional rounds if desired.
Then begin at one of the lowest points and work 1 sc in each st. In each “point,” work 3 sc in the center st. When you reach the next lowest point, skip 1 st/ch-sp.
Continue in the same way until you are back where you started.
Then fold the bag as shown in the image below and crochet the sides of the bag together.
Handles
Round 1: Crochet 1 round around with sc around the top edge of the bag. You can choose to crochet more than one round if you prefer.
Round 2: 1 sc in each st around.
Round 3: Continue with sc until you reach the top of the 1st peak. Ch as many as you prefer to form the first handle (for reference: 42 ch in the video).
When you're happy with the number of ch, skip to the st at the top of the 2nd peak and continue with sc until you reach the next peak. There, make the 2nd handle with the same number of ch as the 1st. Join with sc in the last peak and continue with sc to the beginning of the round.
Rows 4–5: 1 sc in each st around. Repeat as many rounds as you'd like to achieve your preferred handle thickness.
Your bag is now finished! We hope you love it — feel free to share your creation by tagging @makeyourown.se 🧶
The rights to this pattern belong to MYO Make Your Own. The pattern or its pictures may not be copied, shared or resold either in parts or in its entirety, but you may sell items you have crocheted from this pattern. If you have questions about the pattern, contact MYO at hello@makeyourown.se.
We start by crocheting 14 squares. The squares will be about 13 x 13 cm in size depending on how hard you crochet.
Inner Ring
Start with color 1. Hold the yarn in your left hand. Twist the yarn around your fingers (left hand) three times. Use your crochet hook to go under the first two loops and hook the third with your crochet hook. Pick up the yarn again and pull under the two finger loops, hook the yarn onto the crochet hook and pull through. Now the loop on the crochet hook hold the inner ring together and you can proceed below.
Round 1: Ch 2 (this chain replaces the first half double crochet). After that, crochet 11 half double crochets in the inner ring.
A half double crochet is crocheted by taking yarn over your crochet hook and go down with the crochet hook into the inner ring, pick up yarn and pull through (you have three loops on your crochet hook), pick up yarn and pull through all three loops. You have now crocheted a half double crochet.
Crochet a total of 11 half double crochets plus a chain of two loops at the beginning. Finish by going down in the third loop you made at the beginning. Pick up yarn and pull through both loops directly. Leave 10 cm of yarn end and cut.
Round 2: Start by making a slip knot around your crochet hook. One way you can do this is to wrap the yarn around your index and middle finger and then pull the yarn up so that it creates a loop. Tighten around your crochet hook.
Go down the stitch between the first and second half double crochet, pick up the yarn and pull through both loops. Chain 2. Go down in the same stitch and crochet a double crochet but you should not do the last pull through i.e. you take the yarn over the crochet and go down with the crochet hook into the stitch, pick up yarn and pull through (you have 3 loops on your crochet hook), pick up yarn and pull through two loops (you have two loops left on your crochet hook). Do the same thing one more time so that you then have three loops on the crochet hook. Pick up yarn and pull through all loops. Chain 1. Now you have crocheted one “leaf”.
Yarn over and go down the next stitch and do the same thing. You don't have to chain 3 in the beginning but you crochet 3 "half" double crochets instead of Ch 3+ 2 "half" double crochets. Do this 11 times (don't forget a chain 1 in between). Finish by going down the 3rd chain of the first chain, pick up the yarn and pull through. When you're done, you should have 12 leaves.
Leave 10 cm of yarn end and cut off.
Round 3 - making the square shape
Hole 1: Make a slip knot around your crochet hook and start in a 'hole' (between two leaves) and chain 3. Then crochet 2 double crochets in the same hole.
A double crochet is crocheted by taking yarn over your crochet hook and go down with your crochet hook into the inner ring, pick up the yarn and pull through (you have 3 loops on your crochet hook), pick up yarn and pull through two loops, pick up yarn and pull through the last 2 loops. You have now crocheted a double crochet.
In hole 1 you have chain 3 and 2 double crochets.
Do not chain 1 between the double crochets.
Hole 2: Crochet 3 double crochets.
Hole 3: Now you should crochet treble crochets. Take yarn over your crochet hook twice (you have three loops) and go down in the hole and pick up the yarn and pull through. Yarn over again and pull through 2 loops. Yarn over and pull through two loops again and yan over one last time and pull through the last 2 loops. Do the same thing 2 more times. Chain 2, and then 3 treble crochets in the same hole. This is the first corner.
Repeat holes 1-3 three times more so you have four sides. Finish by going through the first stitch on the lap, picking up yarn and pulling through all loops. Cut off and fasten the yarn tails.
Fasten all the yarn tails. Tie the remaining tail in a knot around the last loop (or with another yarn end) on the backside of the square to prevent it from going up. Hide the tail by fastening it through a few closeby loops.
Join the finished squares
When all squares are complete, join them together in your preferred order. Suggestion on the pictures below.
Place 2 squares together, wrong side against wrong side. Make a slip knot, insert hook in a corner ch-sp on both squares. Insert hook in the loops closest to you on each square and work 1 sl st.
Continue working sl st in the loops closest to you across all squares until you reach the end.
Finish with ch 1, cut yarn, and fasten off.
Work 1 round of sc around the top edge of the bag. You may work additional rounds if desired.
Then begin at one of the lowest points and work 1 sc in each st. In each “point,” work 3 sc in the center st. When you reach the next lowest point, skip 1 st/ch-sp.
Continue in the same way until you are back where you started.
Now proceed by attaching below squares and crochet in the same way (and with the same technique) as you just used.
Now, we will crochet several squares together at the same time. These are divided into the two below images so start with image 4.
The last part of the assembling of all the squares, see below picture.
Final part of the assembly of the bag
Now we will fold the bag and crochet the sides of the bag. Se picture below how to fold and how to attach.
Shoulder straps
Work single crochet stitches until you reach the first point. There, make chain stitches— as many as you need to achieve the desired strap length (keep in mind that the straps may stretch slightly over time). For reference, there are 42 chain stitches in the video tutorial.
When you are satisfied with the number of chain stitches, insert your hook into the center stitch of the next point and continue working single crochet stitches until you reach the center stitch of the following point. There, begin the second shoulder strap. Make the same number of chain stitches as for the first strap.
Insert your hook into the center stitch of the last point and continue working single crochet stitches until you are back at the starting point.
Continue by working one single crochet stitch in each stitch all the way around, including across the chain stitches. Then work as many additional rounds as you like to achieve the desired thickness.
Cut the yarn and fasten off.
You are done!
Crochet Terms – US Terminology
If you need help along the way, refer to our simplified version of this pattern. In this case, there are no supporting images, so we recommend checking out the full-length video tutorial as well as the photos in the easy version for assembly.
Abbreviations:
MR = magic ring
st = stitch
ch = chain
sl st = slip stitch
sc = single crochet
hdc = half double crochet
dc = double crochet
tr = treble crochet
sp = space
flo = front loop only
yo = yarn over
(…) = indicates the stitch count at the end of the round
*…* = repeat everything between … the number of times indicated
Leaf: A leaf is made by crocheting 4 double crochets together in the same stitch. The 4 stitches are joined both at the top and the bottom, forming a circular shape. It is made as follows:
- Yarn over and insert the hook into the stitch. Yarn over and pull through so that you have three loops on the hook.
- Yarn over again and pull through the first two loops. You should now have 2 loops left. You have now made your first double crochet (but skip the final yarn-over-and-pull-through step).
- Repeat steps 1 and 2 until you have 3 double crochets / 43 loops on the hook.
- Yarn over and pull through all 4 loops.
Note! The first leaf of the round begins with 3 chain stitches instead of a double crochet.
Pattern
Start with the color you want in the center of your squares. Make 1 MR.
Round 1: Ch 2 (counts as 1 hdc), 11 hdc in MR, sl st in 2nd ch. Cut yarn and fasten off.
Change color.
Round 2: Attach yarn with 1 sl st in the first st of the previous round. Work Leaf x12. in same st. Sl st in first st of the round. Cut yarn and fasten off. You should have 12 Leaves in this round.
Change color.
Round 3: Attach yarn with 1 sl st in a sp (between clusters) from the previous round. Ch 3 (counts as 1 dc), 2 dc in same sp. In next sp, 3 dc. Skip to next sp. Work 3 tr, ch 2, 3 tr (forms a corner).
*3 dc in next sp, 3 dc in next sp. In next sp work 3 tr, ch 2, 3 tr* × 3. Sl st in 3rd ch at beginning of round. Cut yarn and fasten off.
Join the finished squares
When all squares are complete, join them together in your preferred order.
Place 2 squares together, wrong side against wrong side. Make a slip knot, insert hook in a corner ch-sp on both squares. Insert hook in the loops closest to you on each square and work 1 sl st.
Continue working sl st in the loops closest to you across all squares until you reach the end.
Finish with ch 1, cut yarn, and fasten off.
Work 1 round of sc around the top edge of the bag. You may work additional rounds if desired.
Then begin at one of the lowest points and work 1 sc in each st. In each “point,” work 3 sc in the center st. When you reach the next lowest point, skip 1 st/ch-sp.
Continue in the same way until you are back where you started.
Then fold the bag as shown in the image below and crochet the sides of the bag together.
Handles
Round 1: Crochet 1 round around with sc around the top edge of the bag. You can choose to crochet more than one round if you prefer.
Round 2: 1 sc in each st around.
Round 3: Continue with sc until you reach the top of the 1st peak. Ch as many as you prefer to form the first handle (for reference: 42 ch in the video).
When you're happy with the number of ch, skip to the st at the top of the 2nd peak and continue with sc until you reach the next peak. There, make the 2nd handle with the same number of ch as the 1st. Join with sc in the last peak and continue with sc to the beginning of the round.
Rows 4–5: 1 sc in each st around. Repeat as many rounds as you'd like to achieve your preferred handle thickness.
Your bag is now finished! We hope you love it — feel free to share your creation by tagging @makeyourown.se 🧶
The rights to this pattern belong to MYO Make Your Own. The pattern or its pictures may not be copied, shared or resold either in parts or in its entirety, but you may sell items you have crocheted from this pattern. If you have questions about the pattern, contact MYO at hello@makeyourown.se.

Share your creations with us
Thank you!
Your comment was sent!