
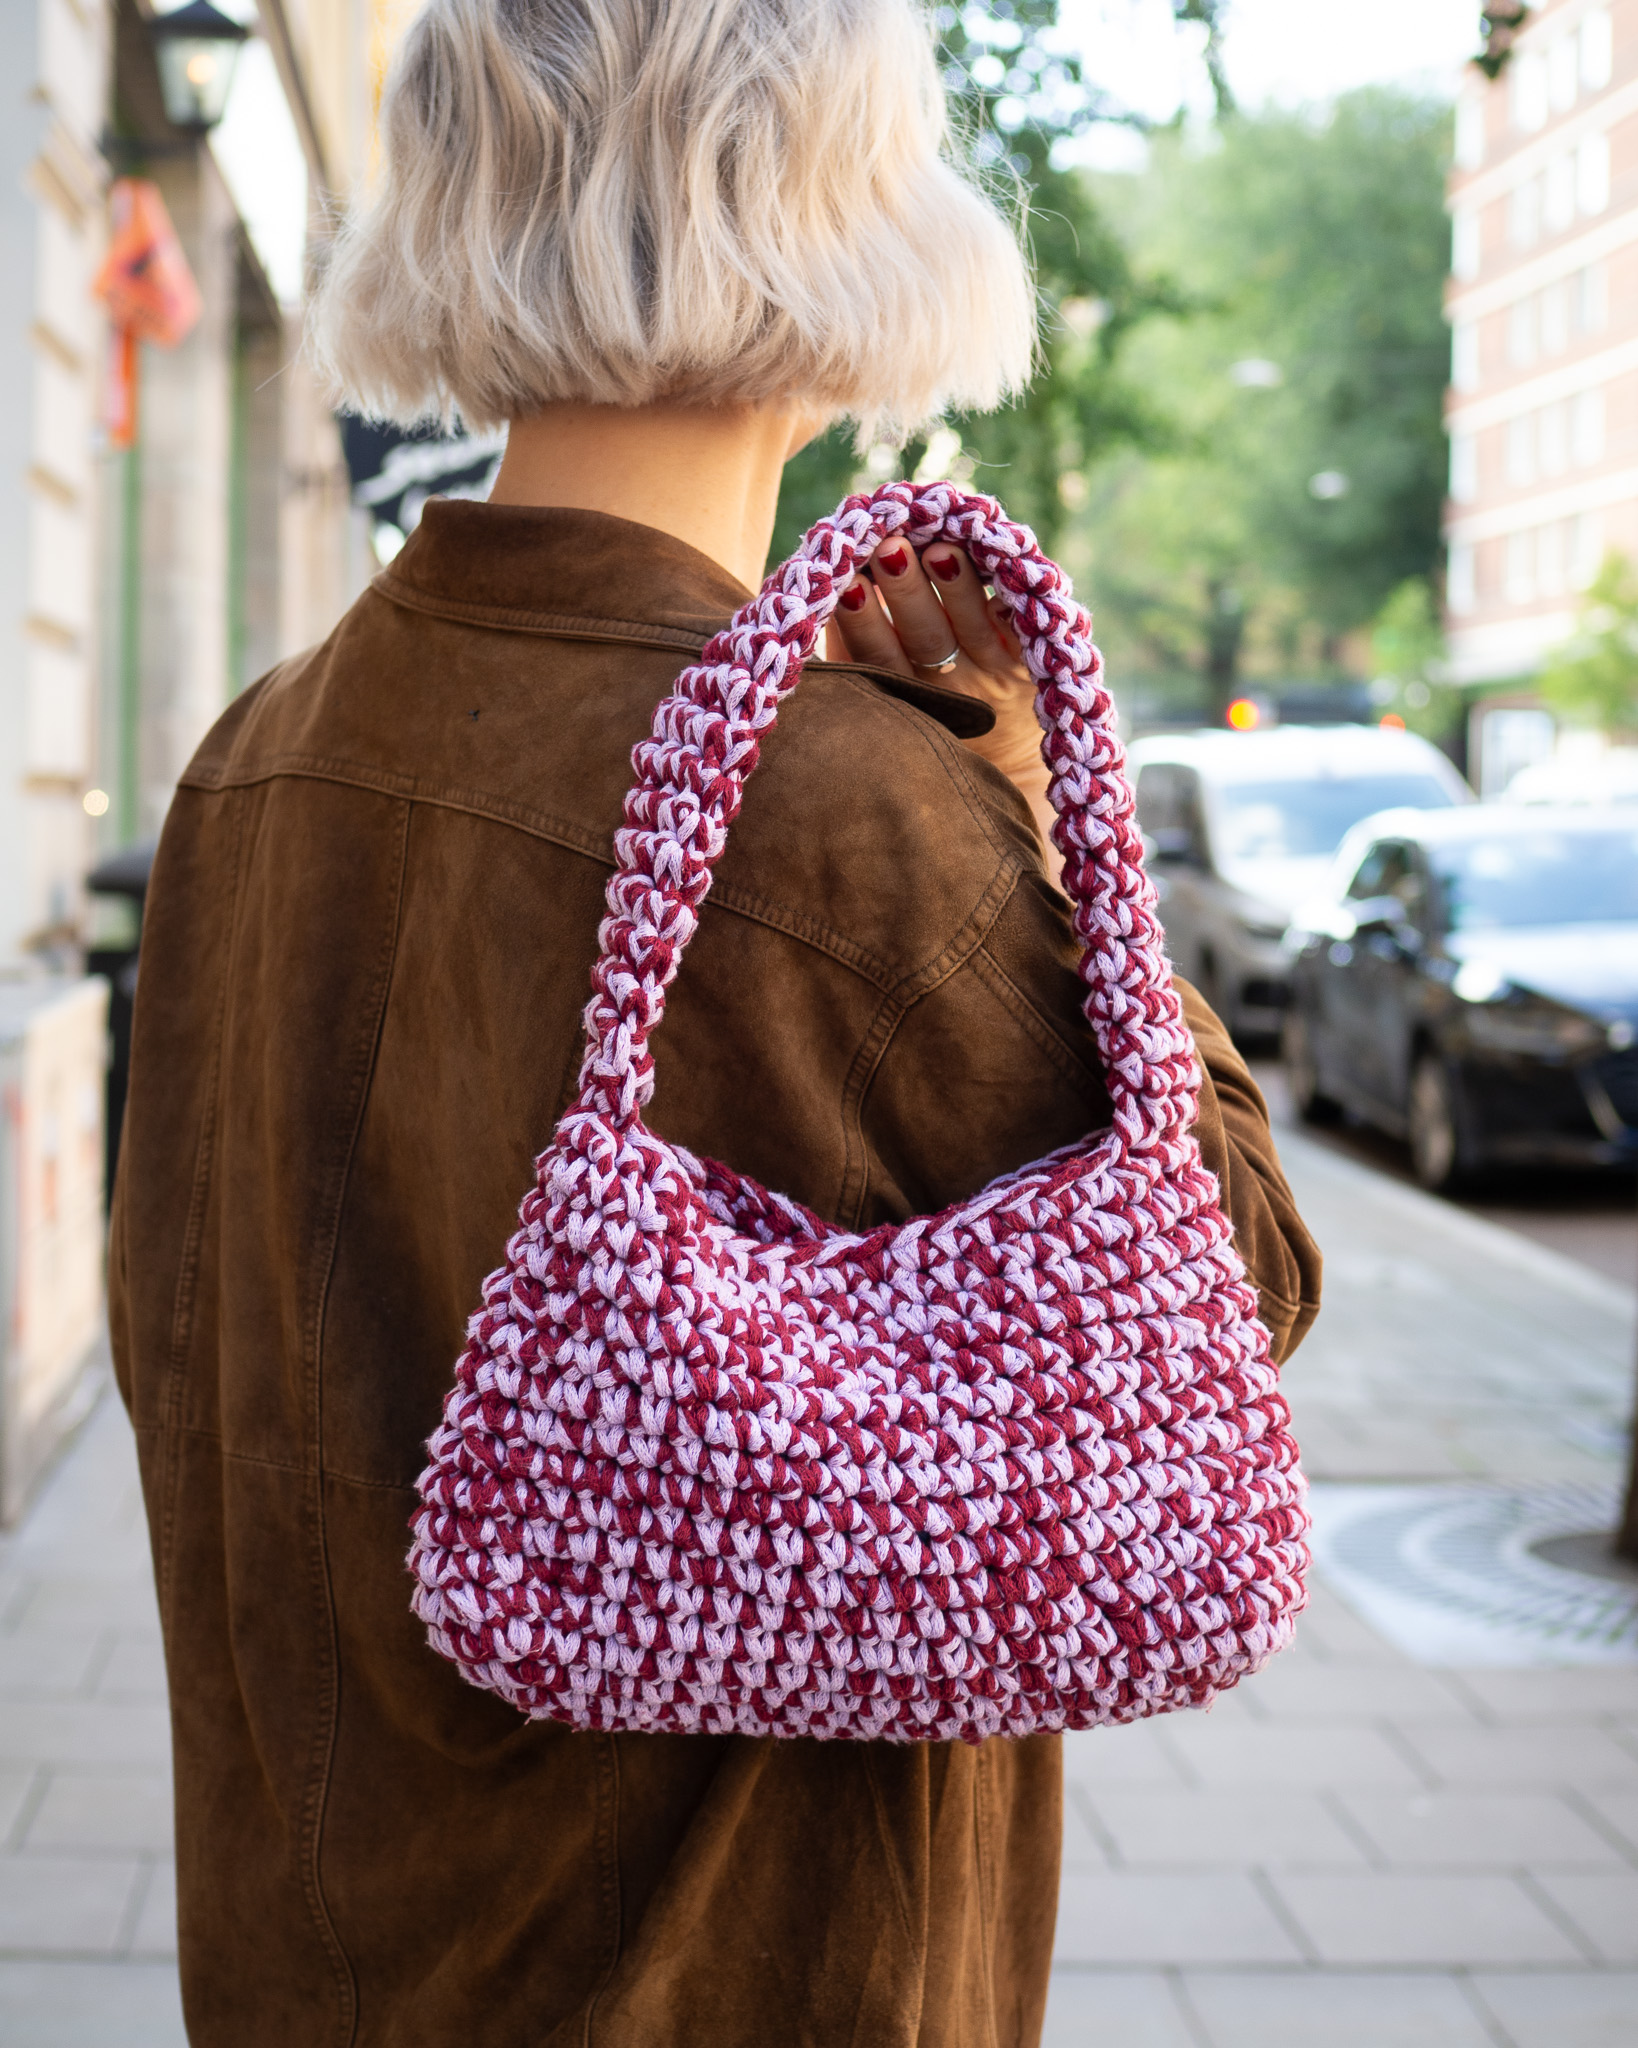
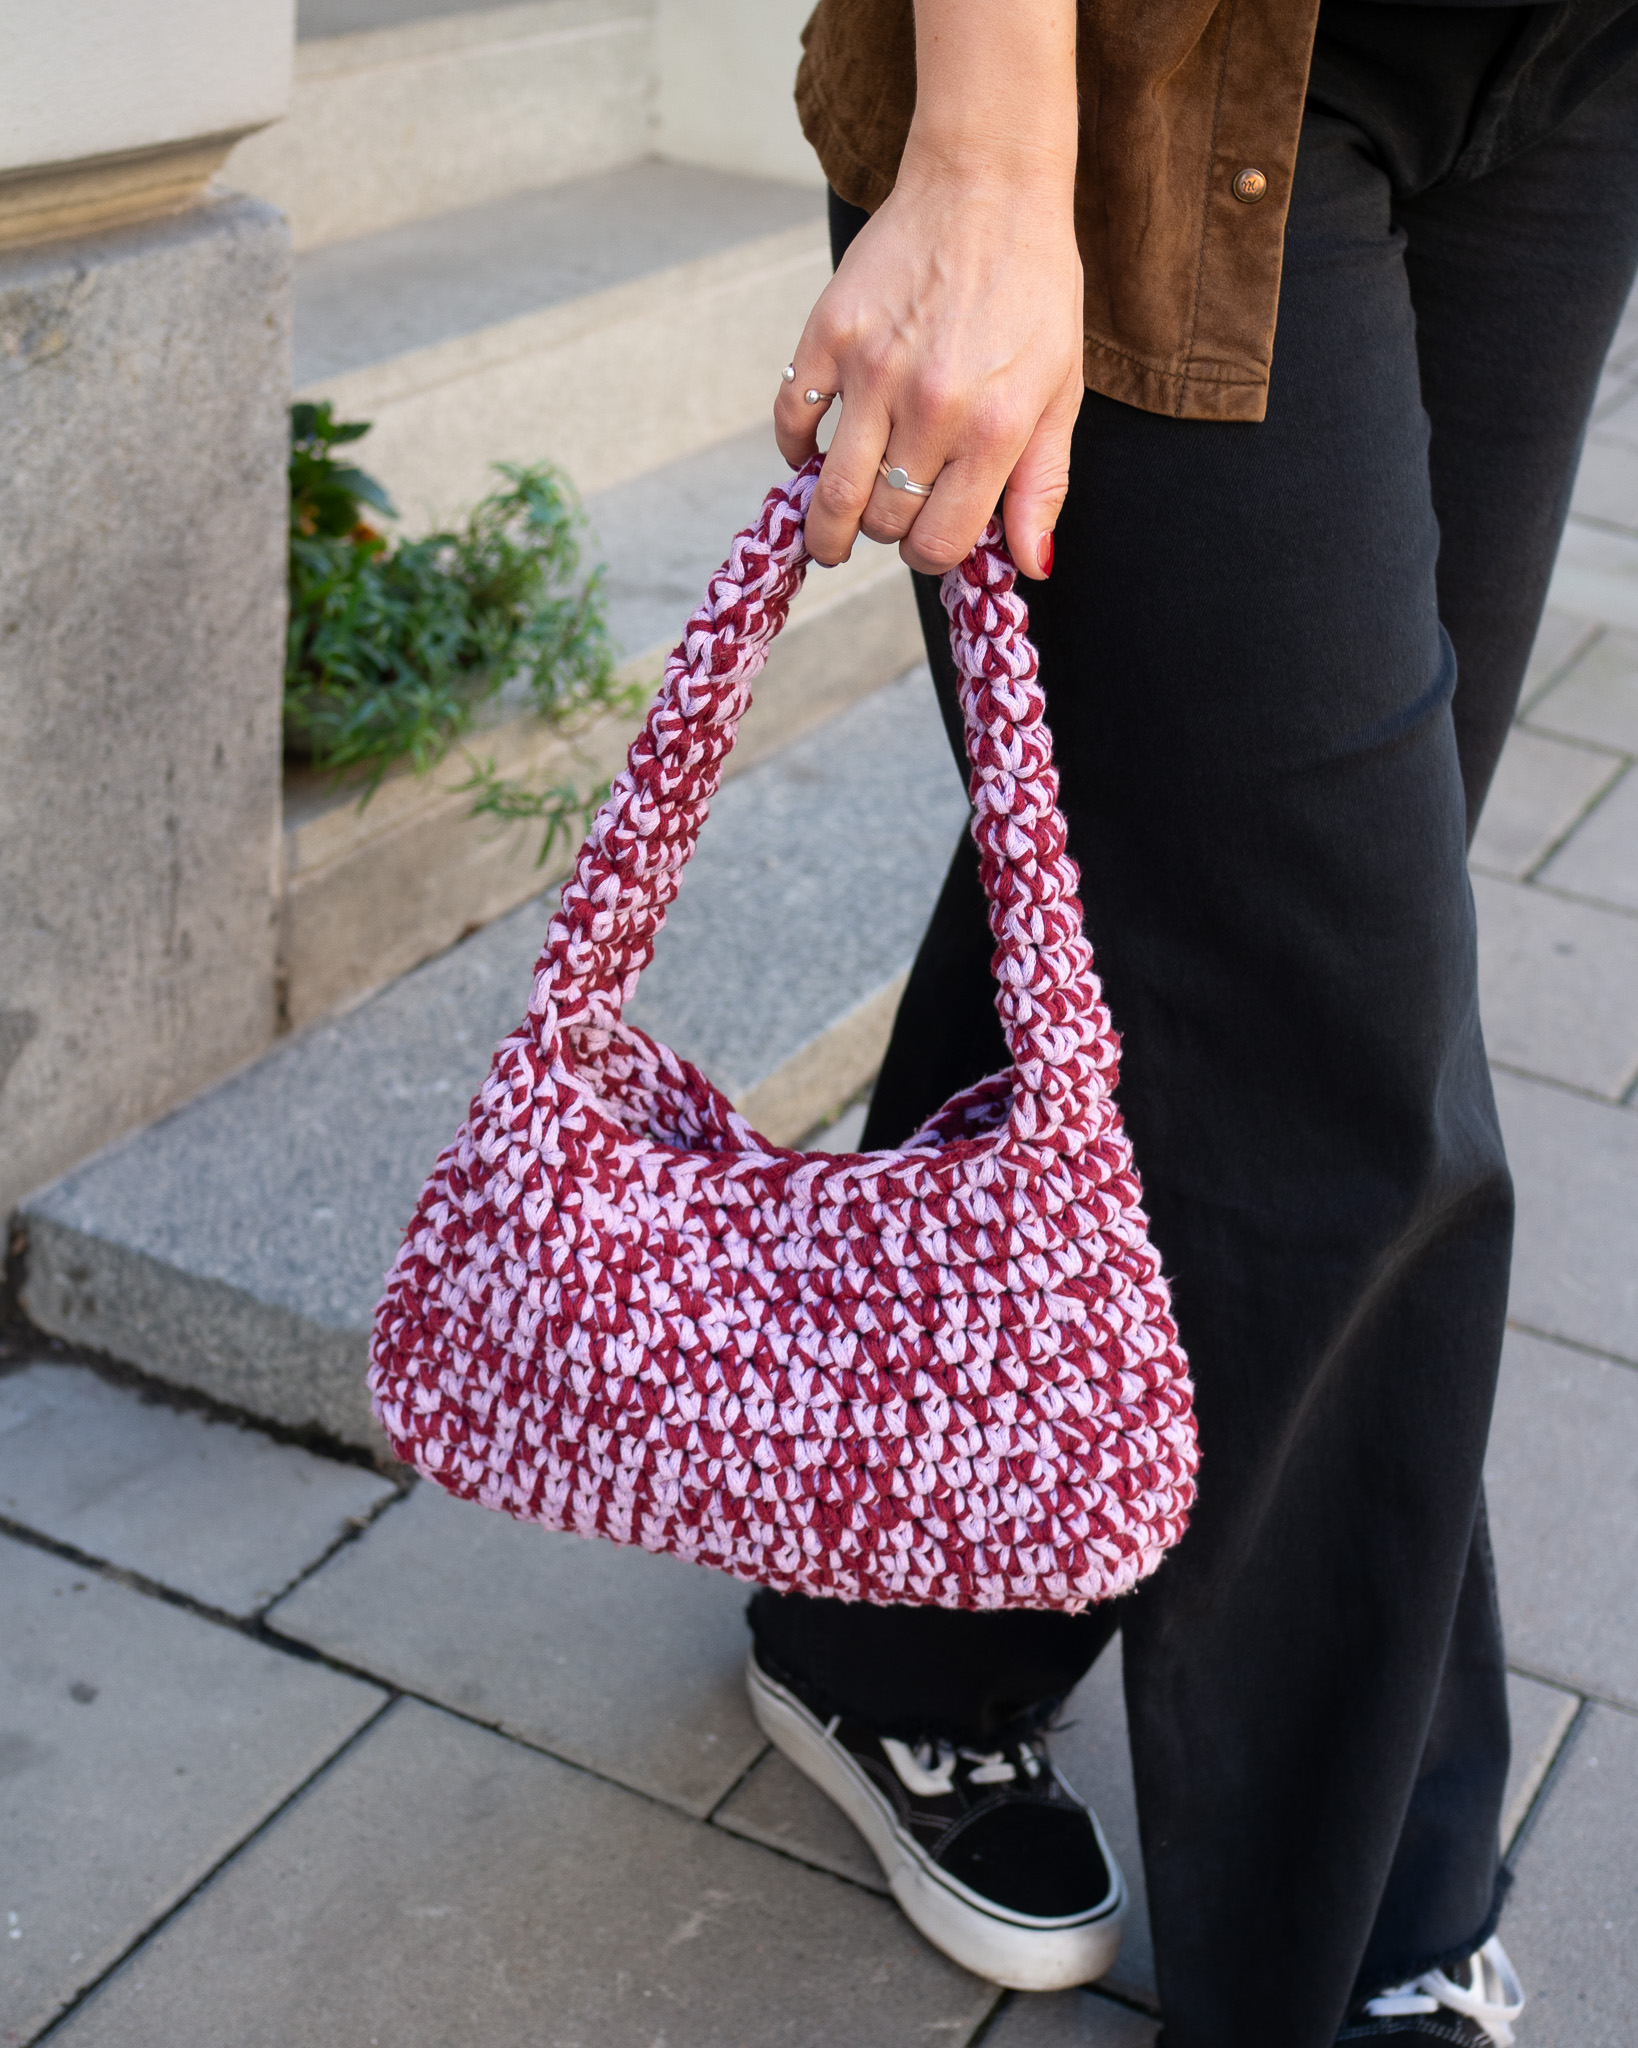
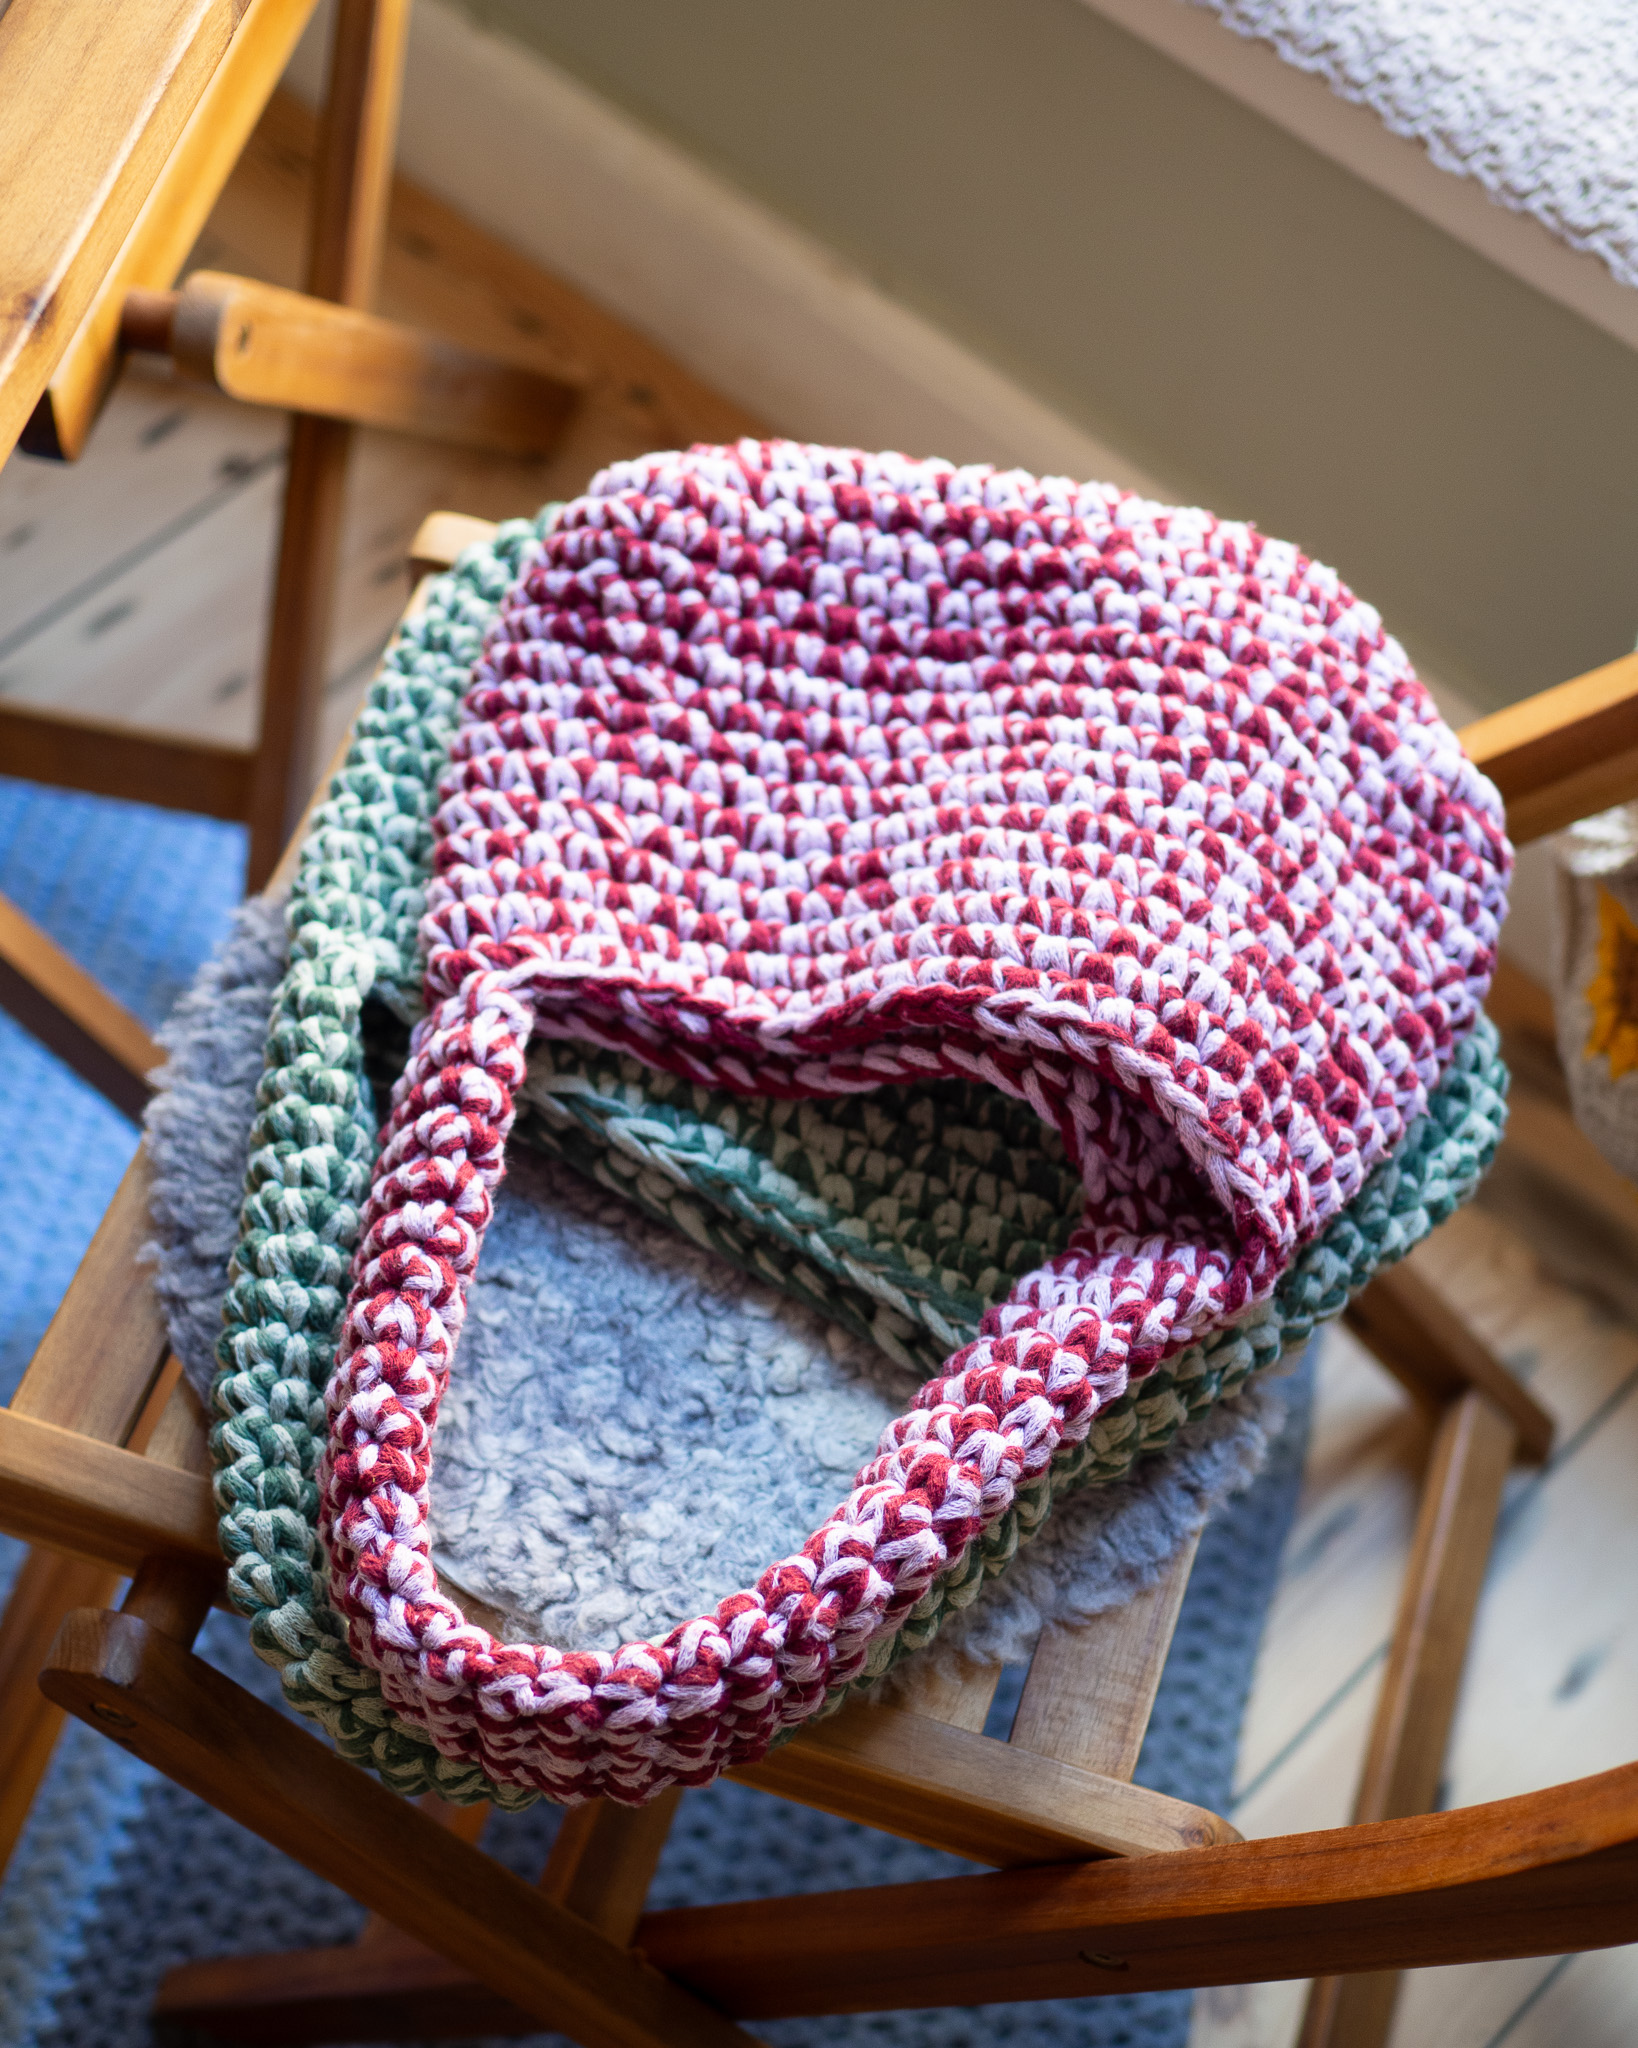
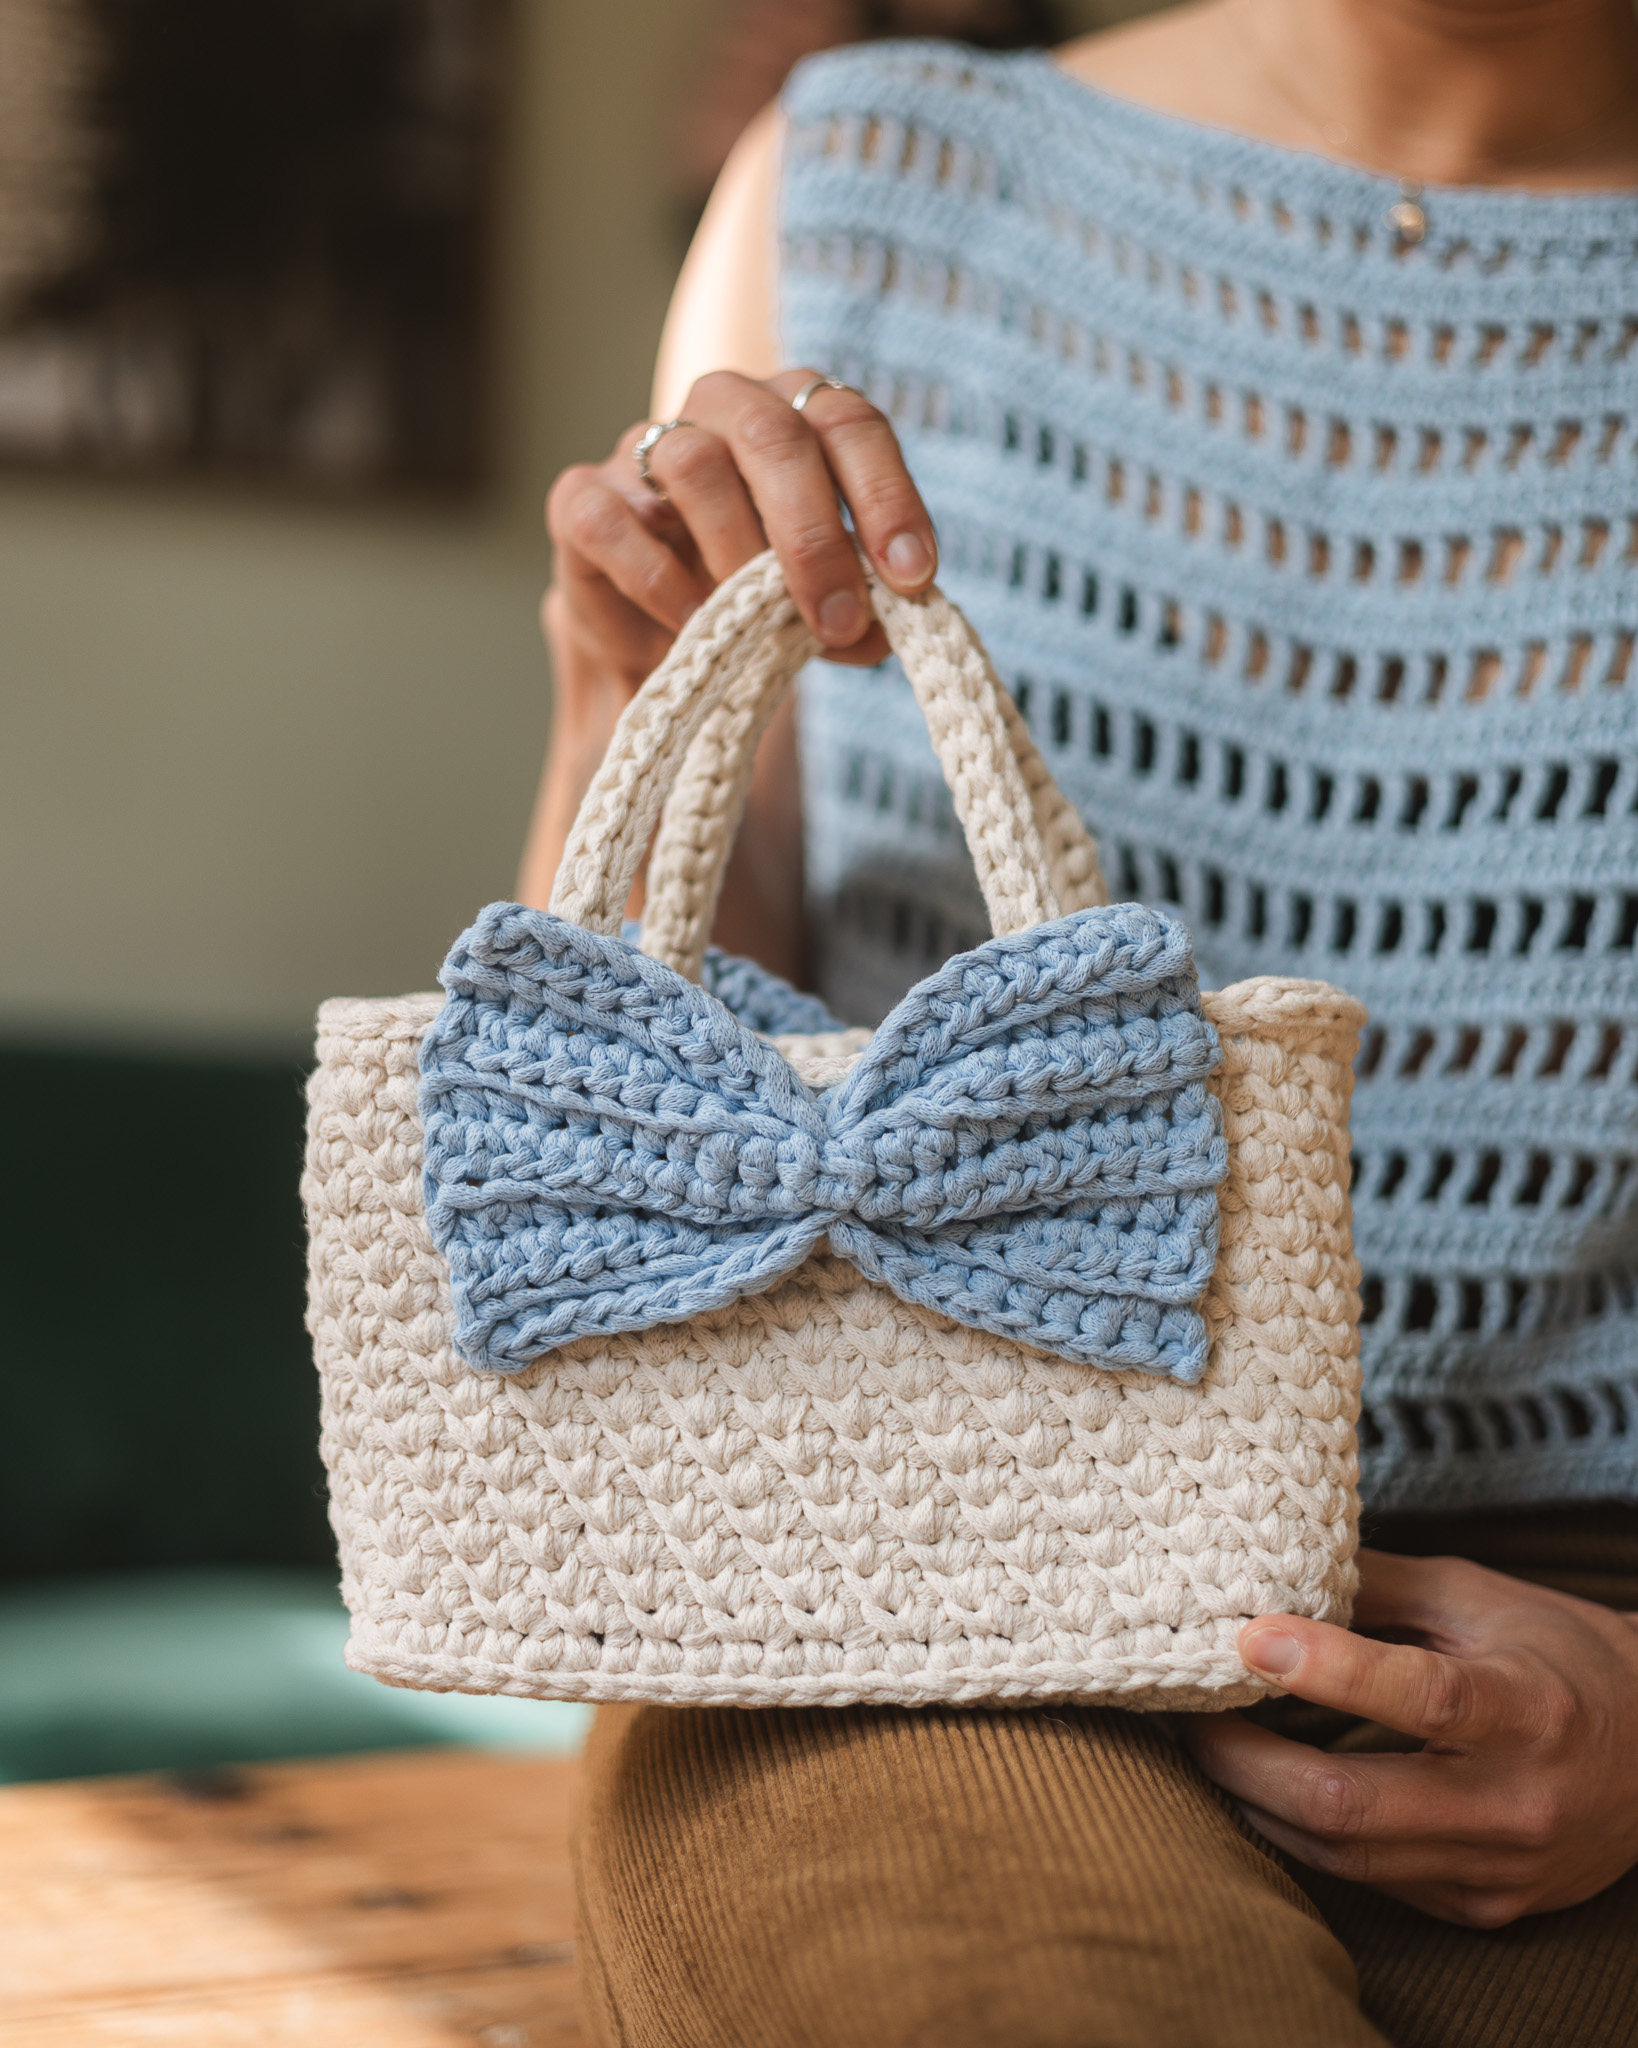
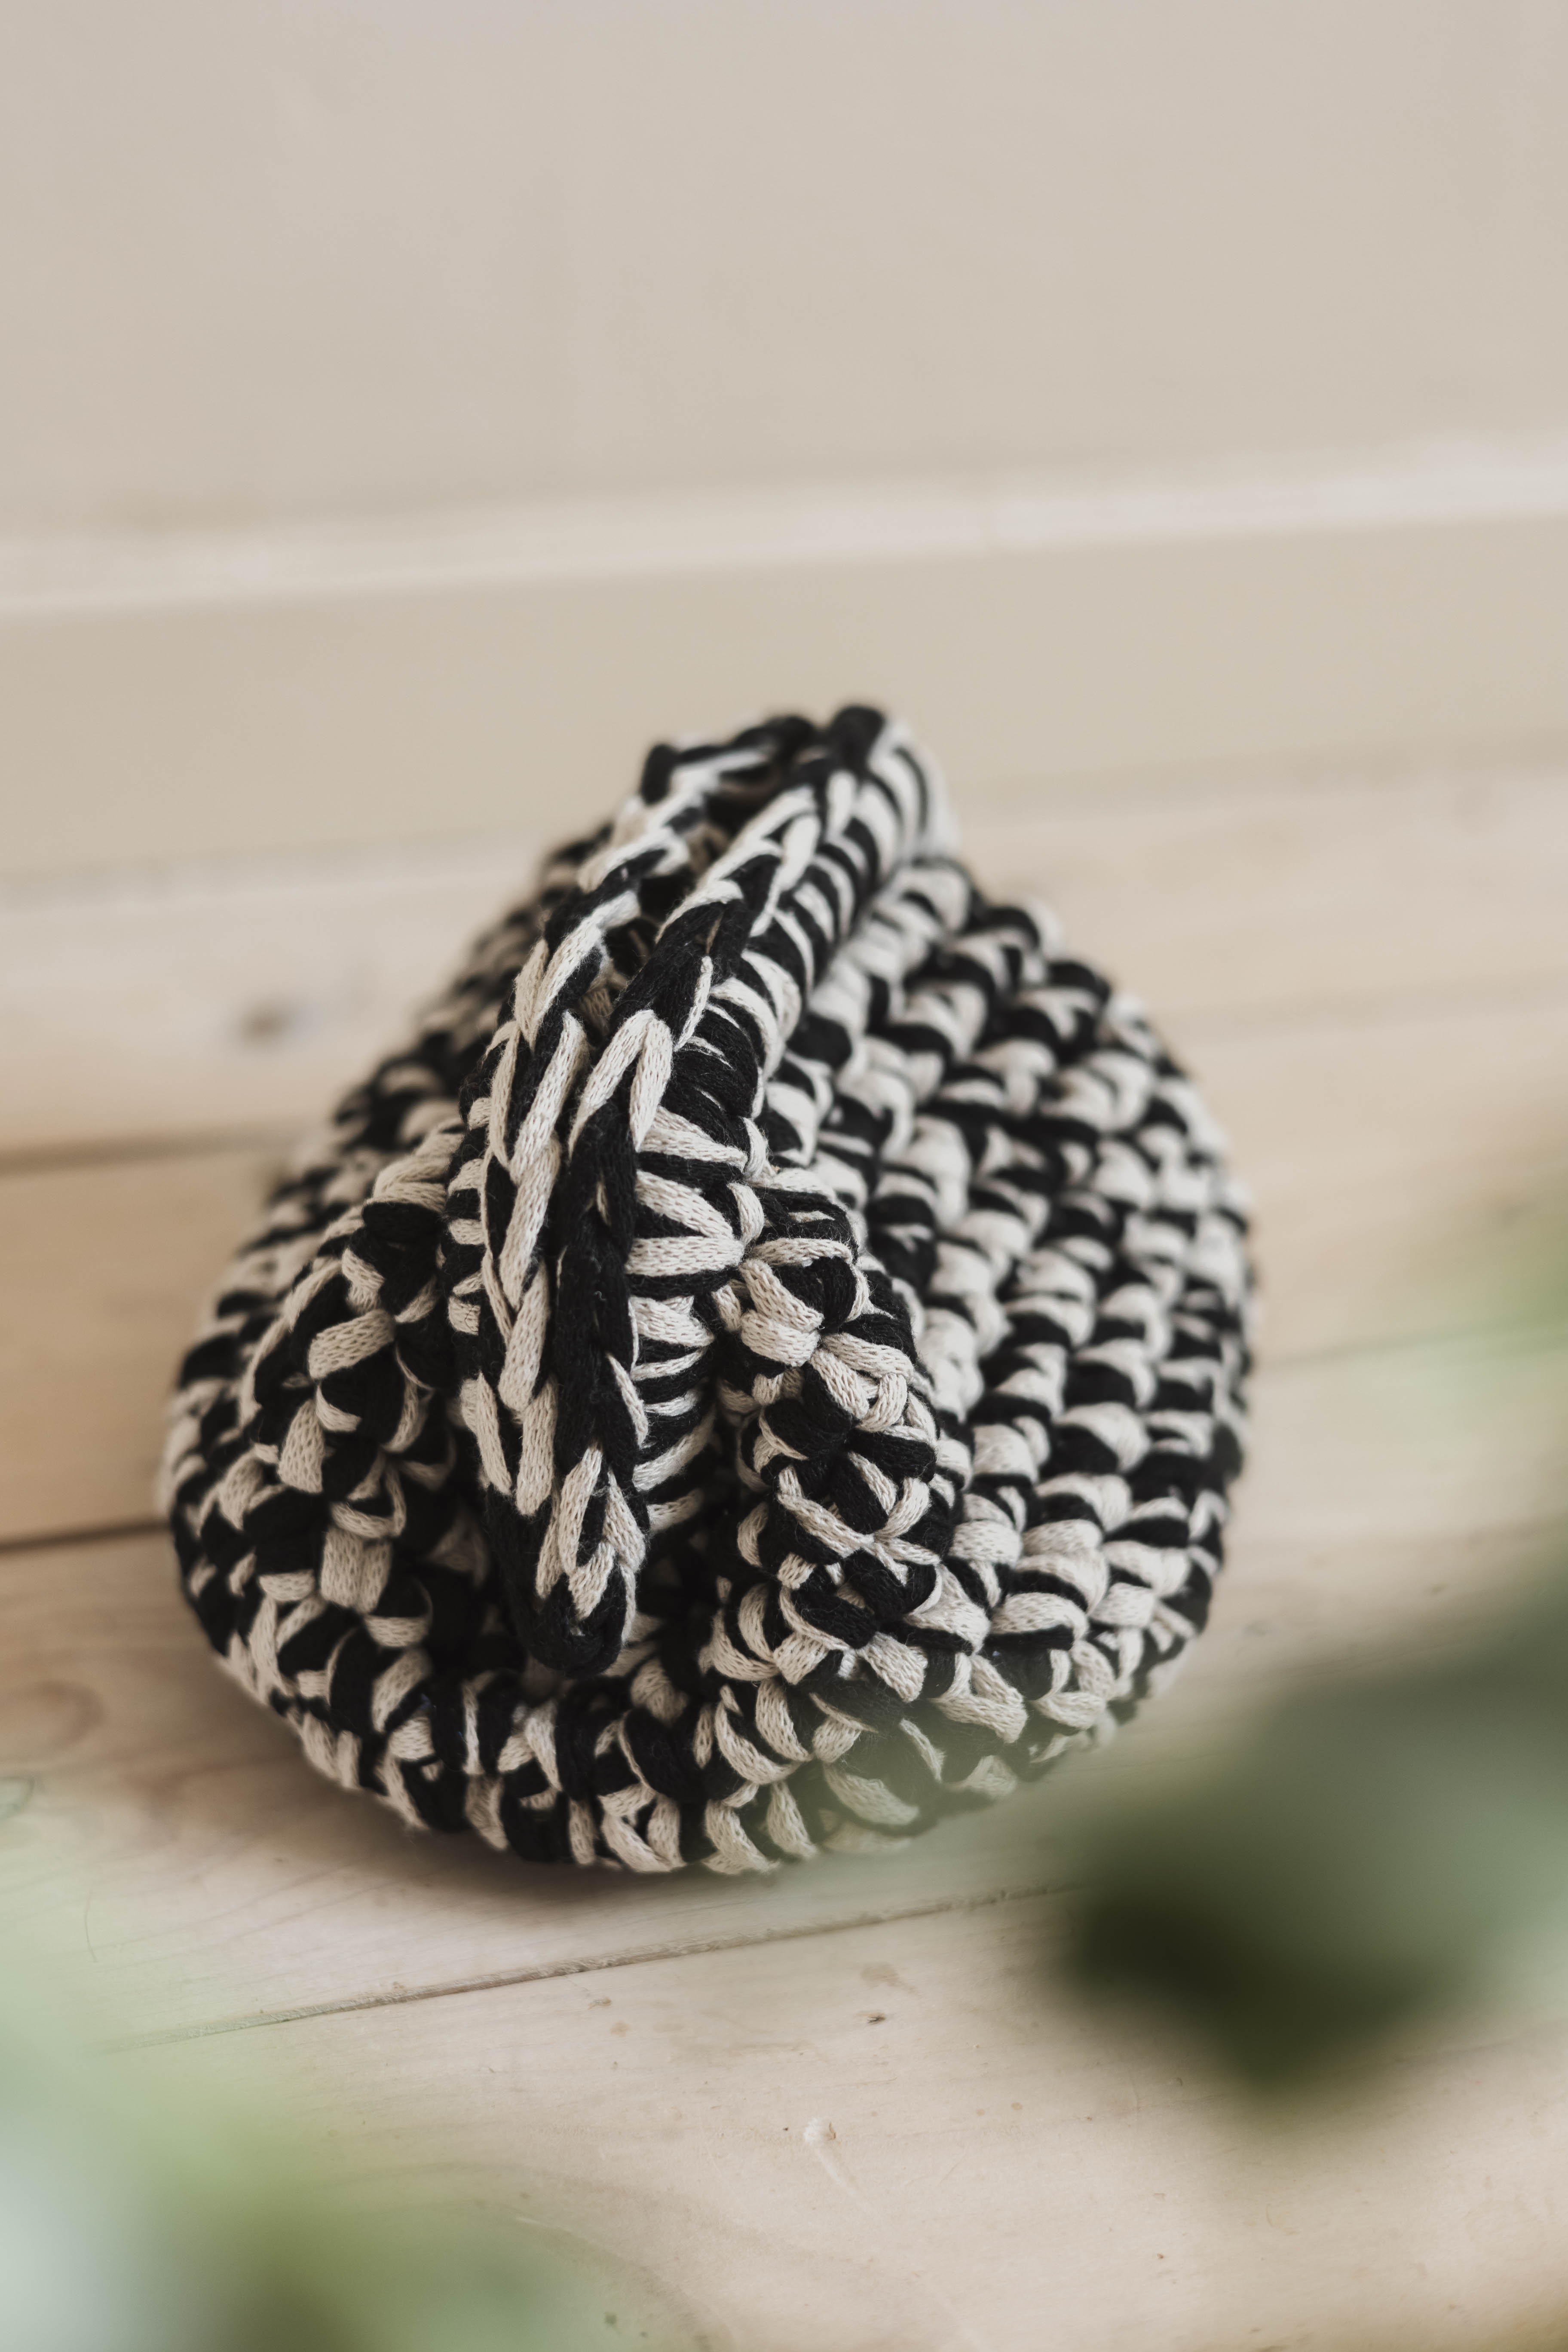
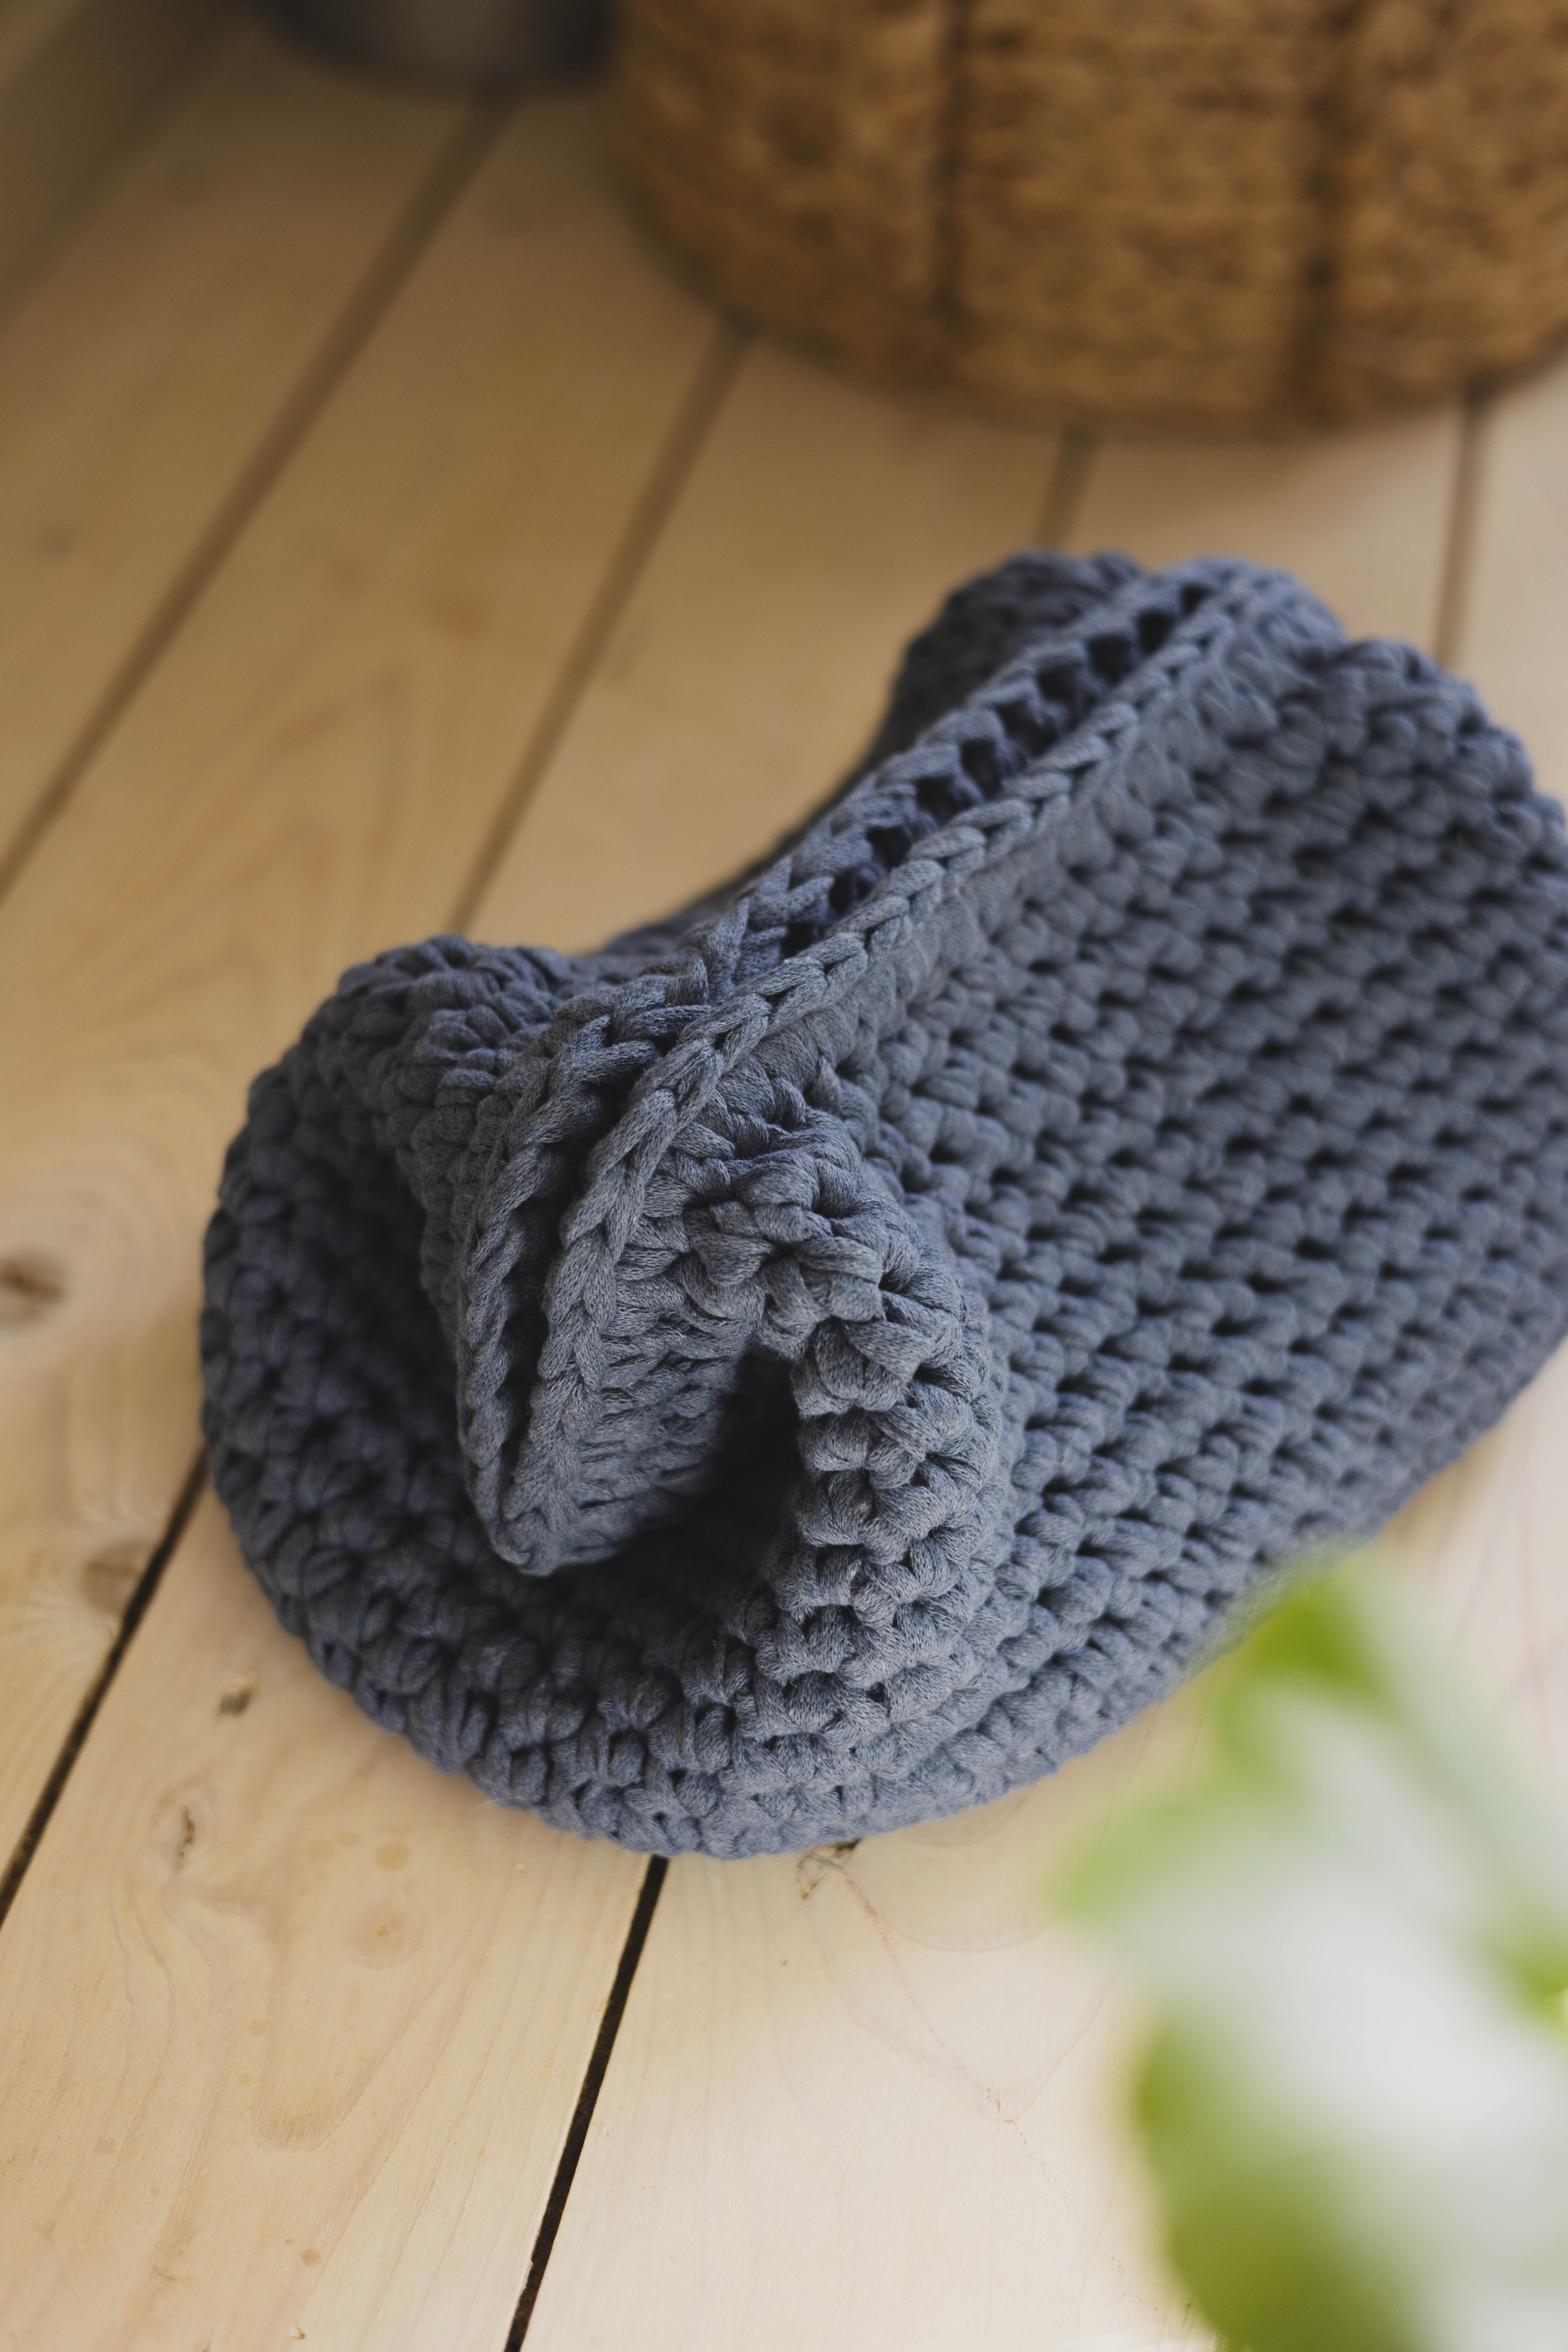
Crochet bag “Lill”
Crochet a Trendy Bag!
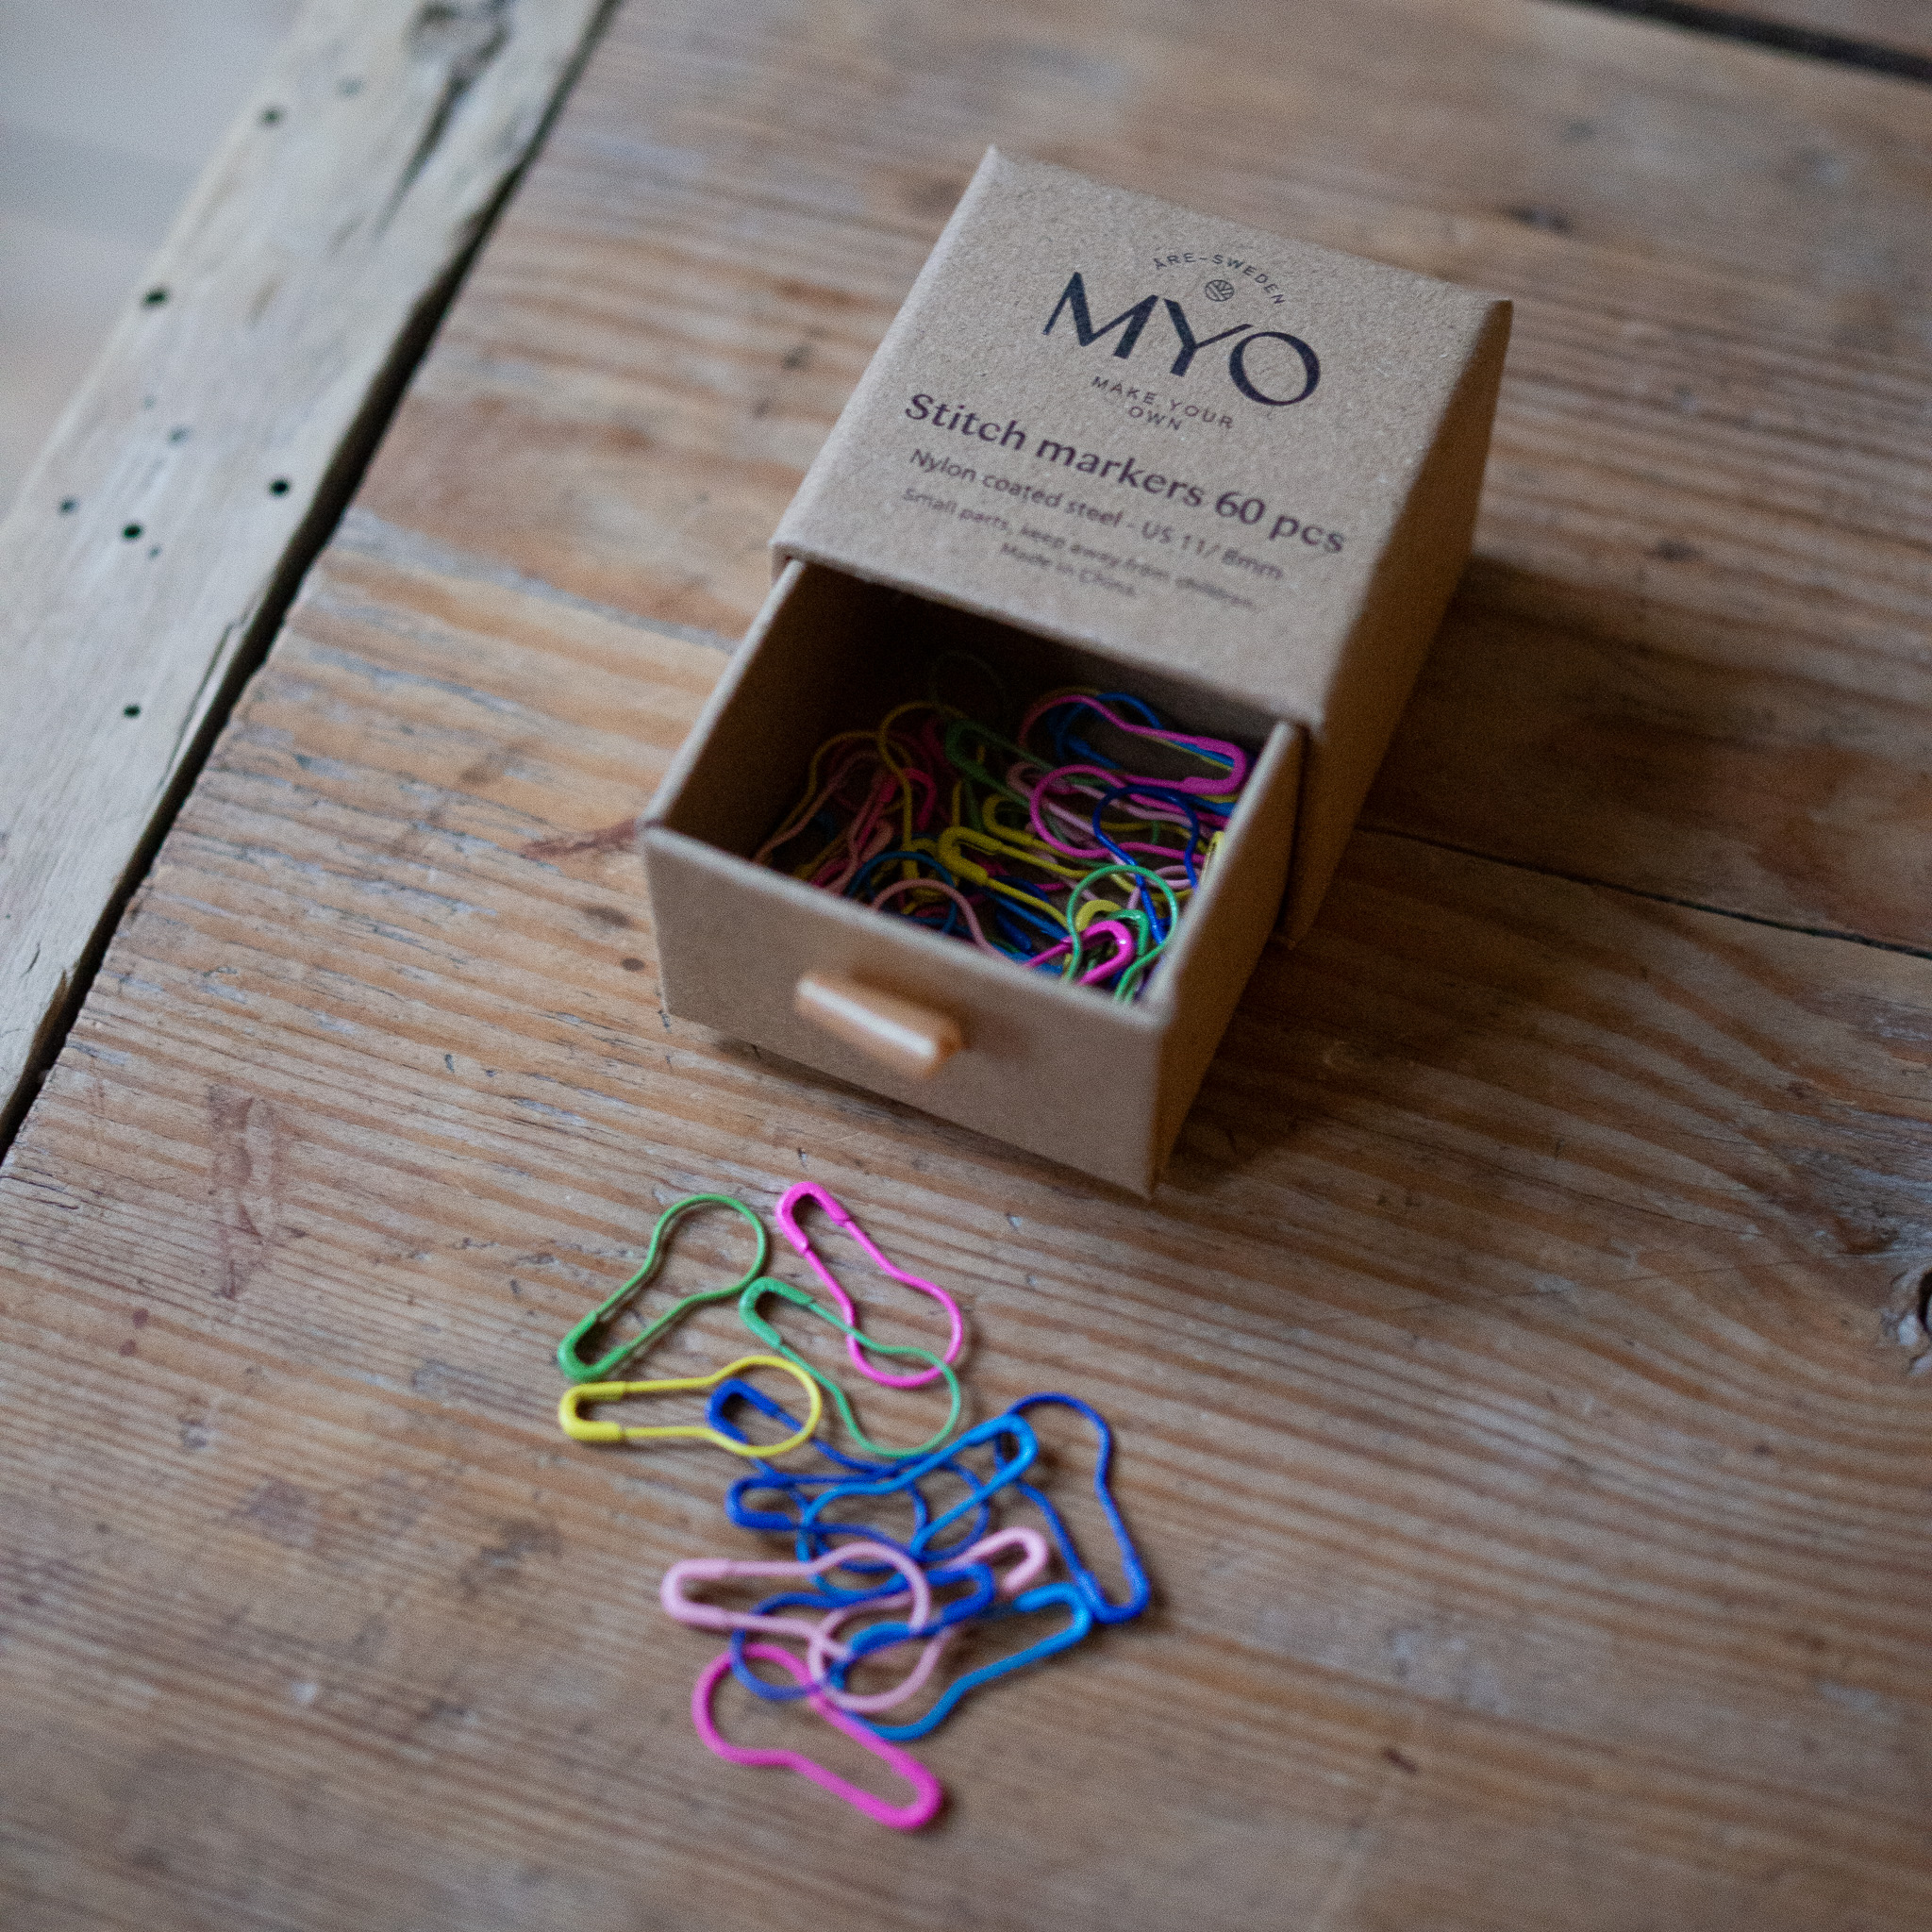
Crochet this simple yet stylish bag with us. This bag uses two colors of EKO Nano yarn – though of course, you can use two rolls of the same color if you prefer. The bag is crocheted in one piece, and you'll get video guidance on how to crochet the handle. In addition to EKO Nano, you’ll need an 8 mm crochet hook and four stitch markers. We used the colors “Lavender” and “Burgundy.”
Yarn Consumption: EKO Nano Tube Yarn Lavender – 300g and EKO Nano Tube Yarn Burgundy – 300g
Note: This pattern includes videos from our technique library along with step-by-step images.

Here's how to do it
The bag is crocheted in one piece, so you don’t need to cut any yarn until the project is finished – how great is that! /Alma

This is what you need:
Here you can directly purchase the material for the product. Please note that the instruction is digital and appears here on the page (no written instruction).


.jpg)
Unleash your creativity
For only 85kr per month you get access to all our 300+ beginner-friendly instructions for crochet, knitting and macrame.
A perfect way to get started with your new hobby!

Pattern
The bottom of the bag will be crocheted in an oval, and the rest of the pattern will be worked in a spiral.
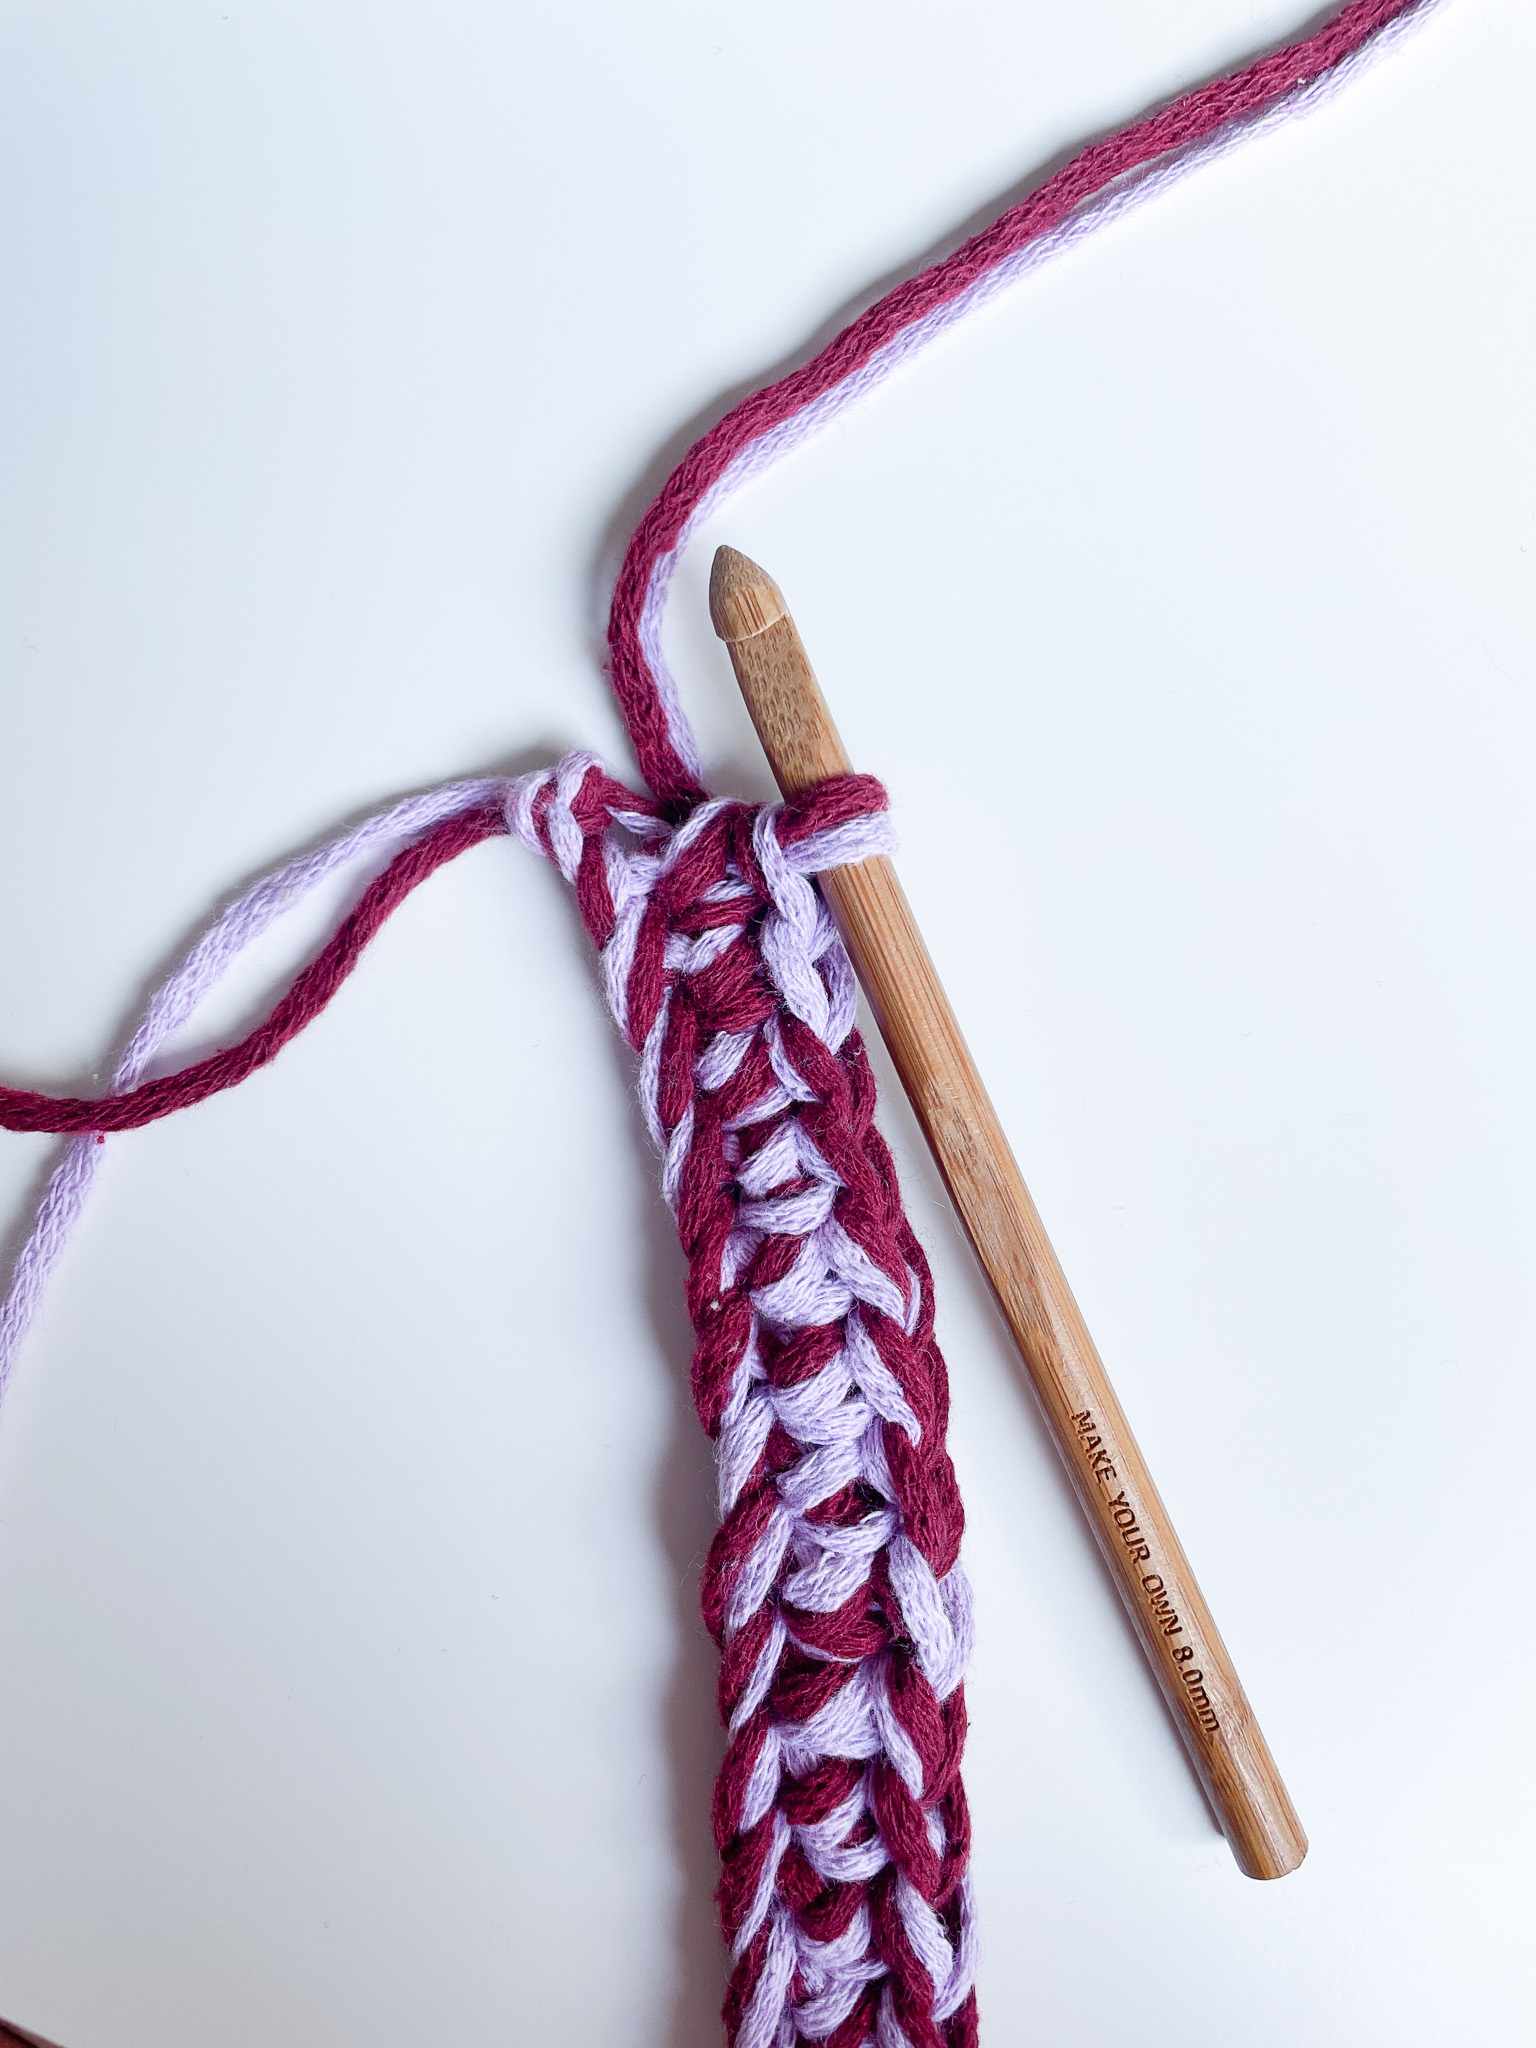
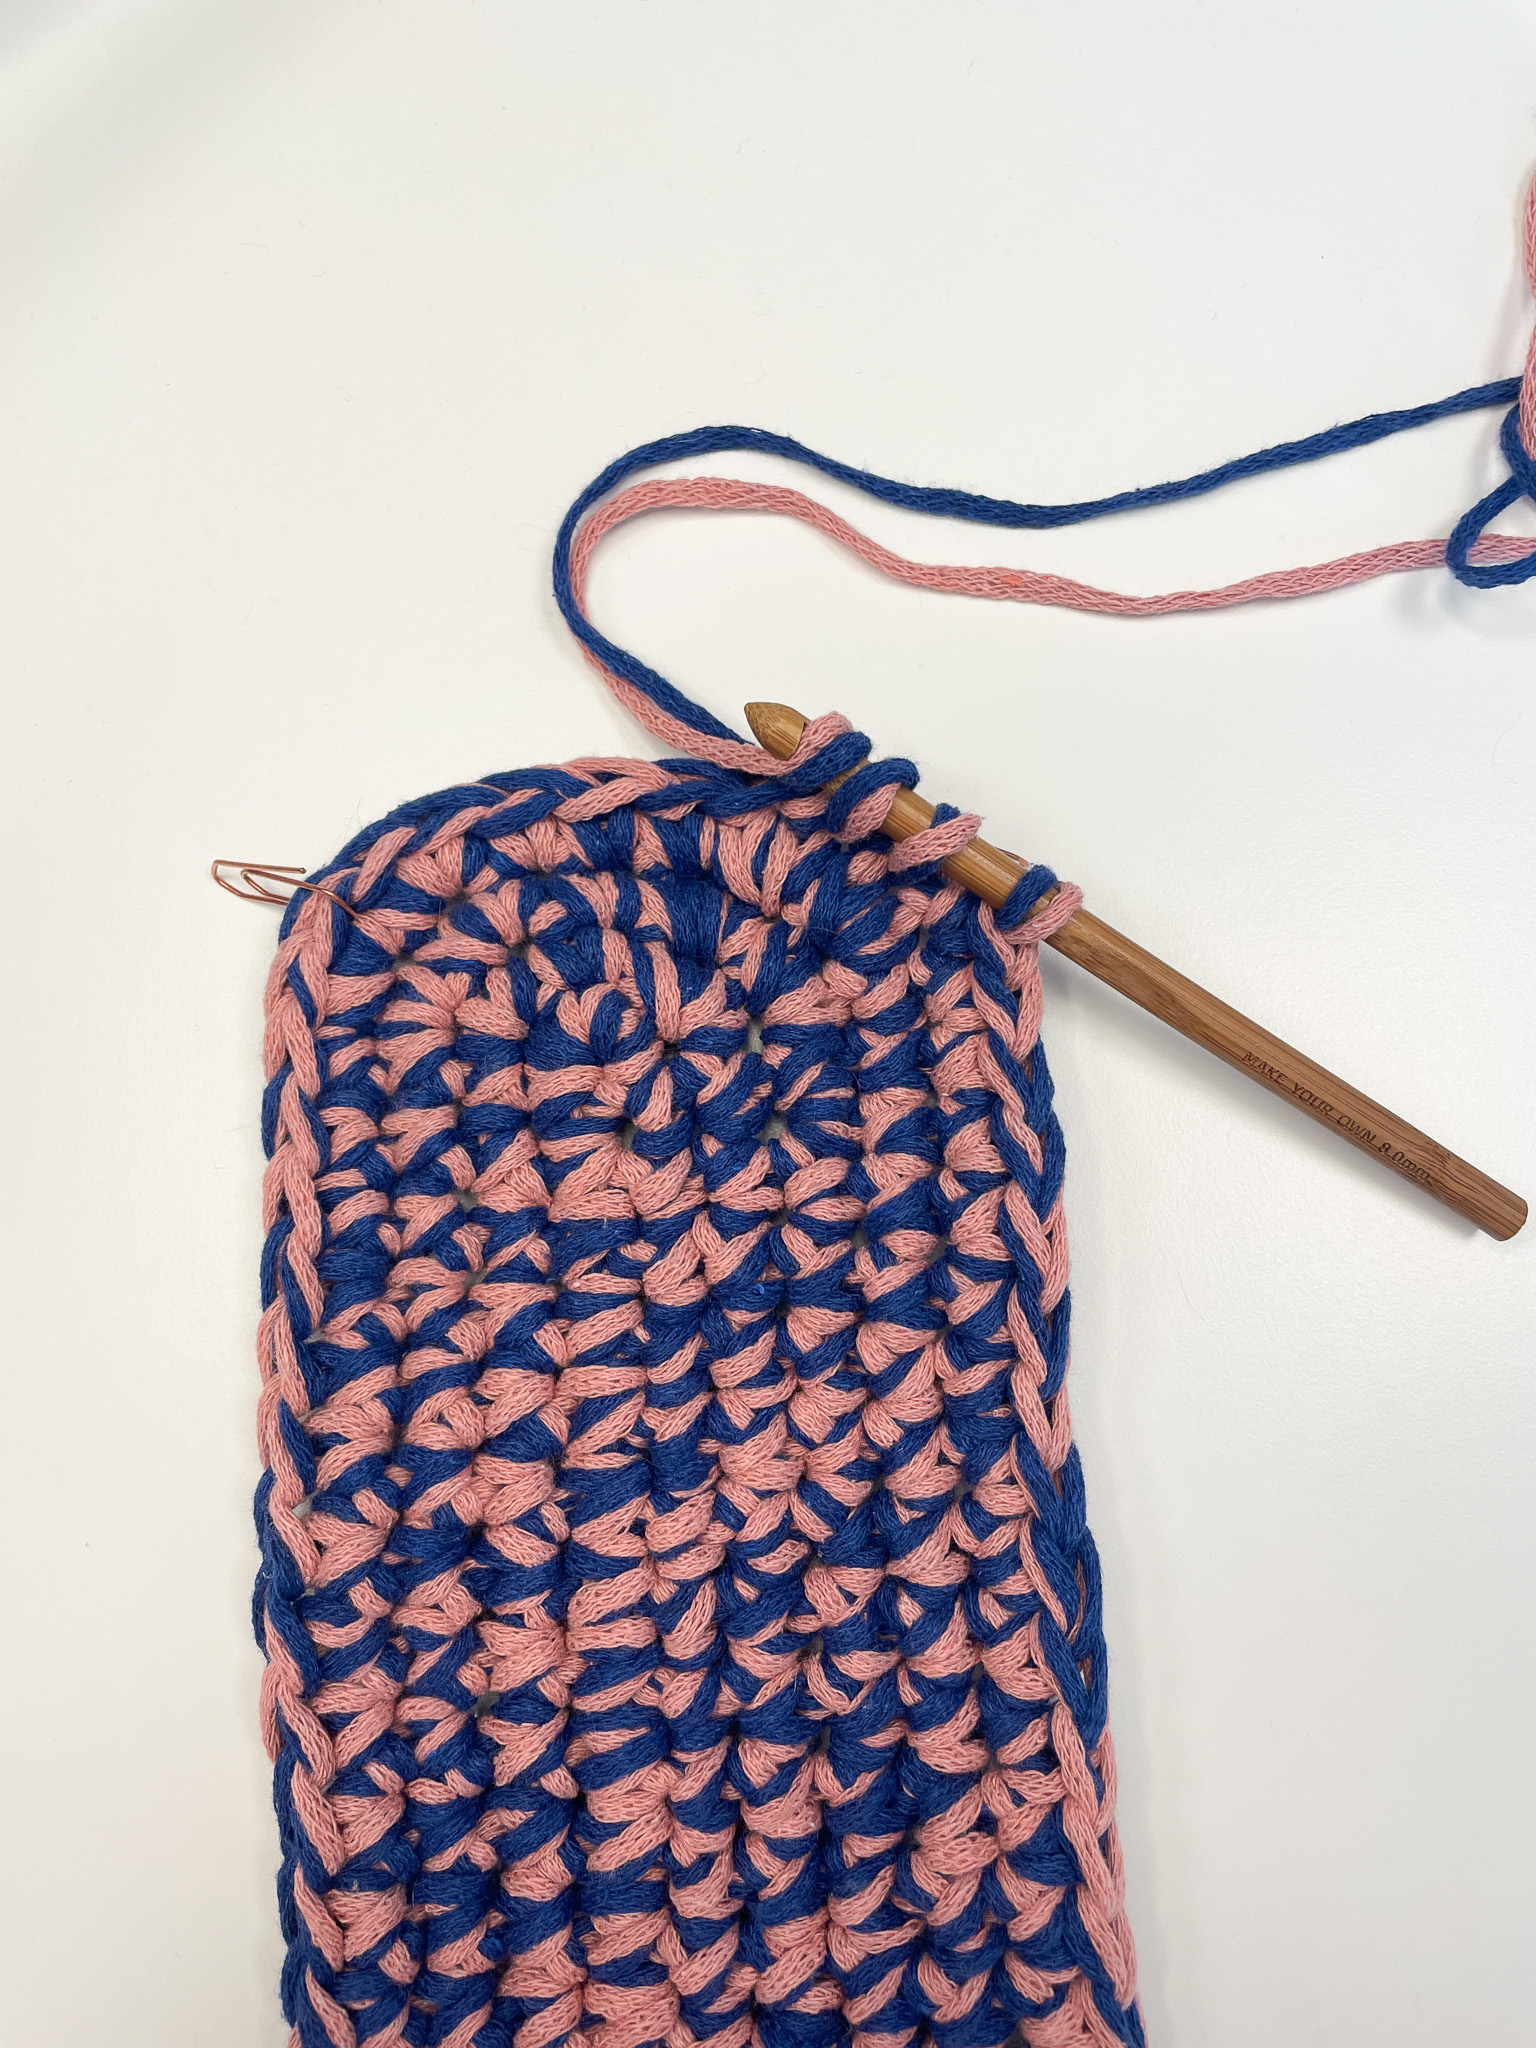
Start by crocheting 20 chain stitches to make a foundation chain. Place a stitch marker in the last chain stitch. If you're unsure how to crochet a chain, see the video below.

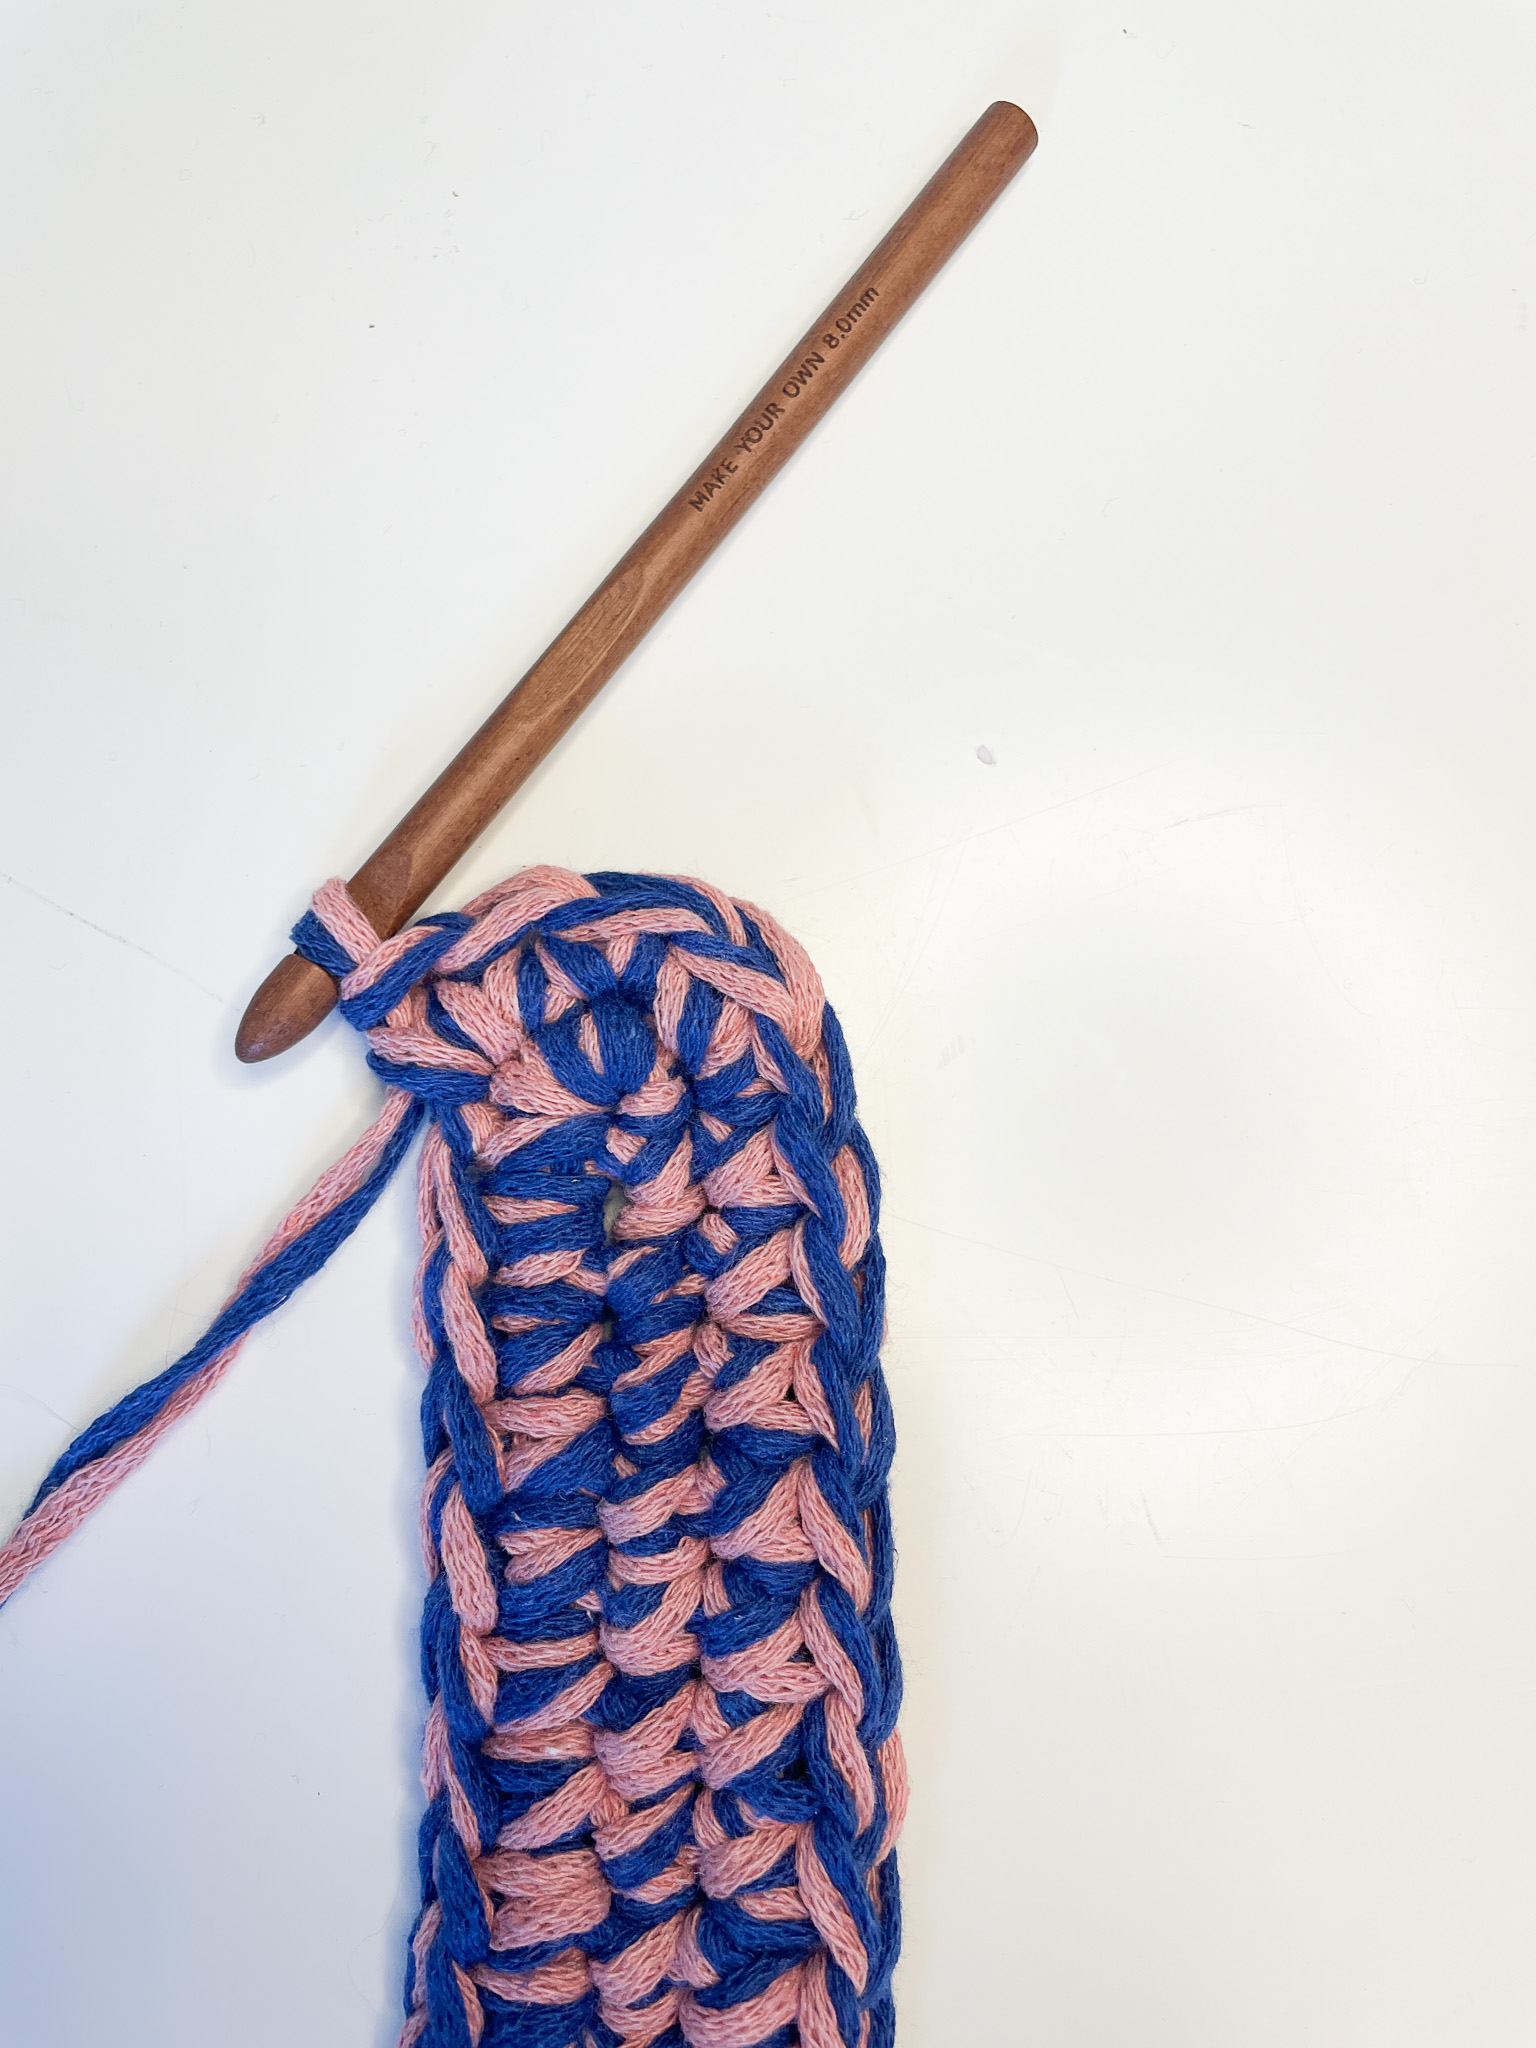
Round 1: Skip the first chain and start in the second stitch. Then crochet 18 single crochets. You will now have one stitch left on the chain. If you're unsure how to crochet single crochet stitches, see the video below.
Crochet three single crochets into the last stitch. This creates a rounded turn. Then continue crocheting along the other side of the chain.

Crochet 17 single crochets. You should now have one stitch PLUS the skipped chain from the beginning left before the round is complete.

In the second-to-last stitch (the chain stitch you skipped), crochet two single crochets. In the last stitch (the one with the marker), crochet one single crochet. Place a stitch marker in your last stitch to keep track of where the round begins and ends.

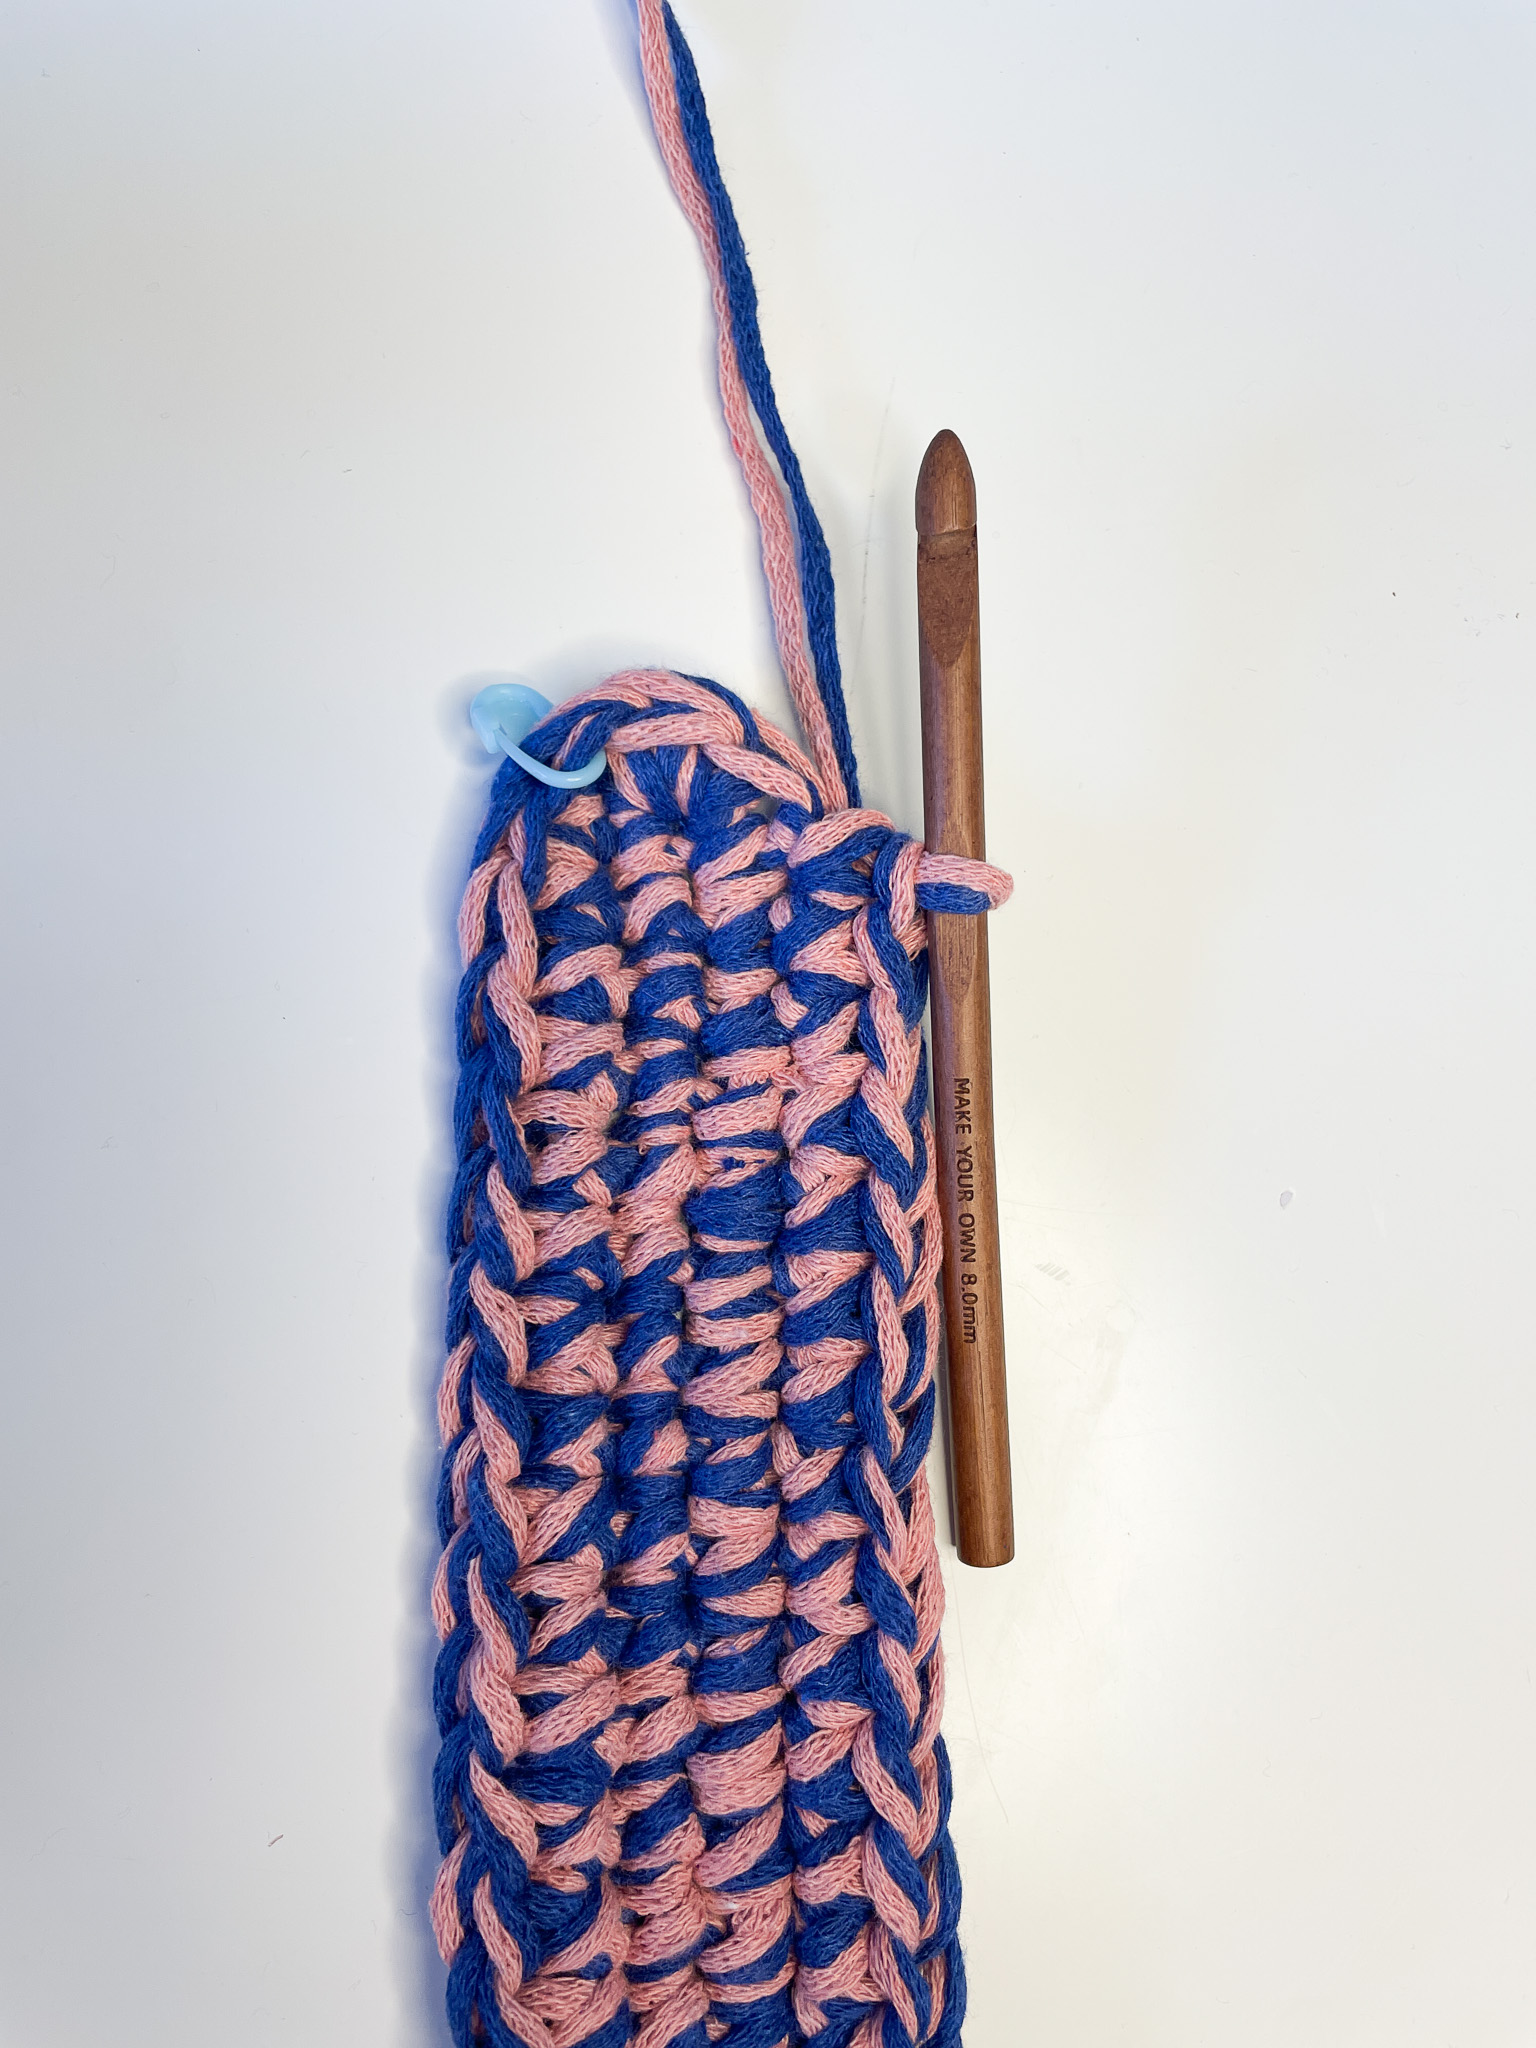
Round 2: Crochet 17 single crochets. You are now at the edge/rounded corner.
In the three corner stitches (which you can see in the image above as the round part of the row), crochet 2 single crochets in the next stitch, 1 single crochet in the following stitch, and 2 single crochets in the last of the three stitches.
Then crochet 17 single crochets. You should now have three stitches left in the round. Work the same as in the previous corner, i.e.: 2 single crochets in the first stitch, 1 single crochet in the next stitch, and 2 single crochets in the last stitch. Move and place the stitch marker in the last stitch of round 2.

Round 3: Crochet 17 single crochets.
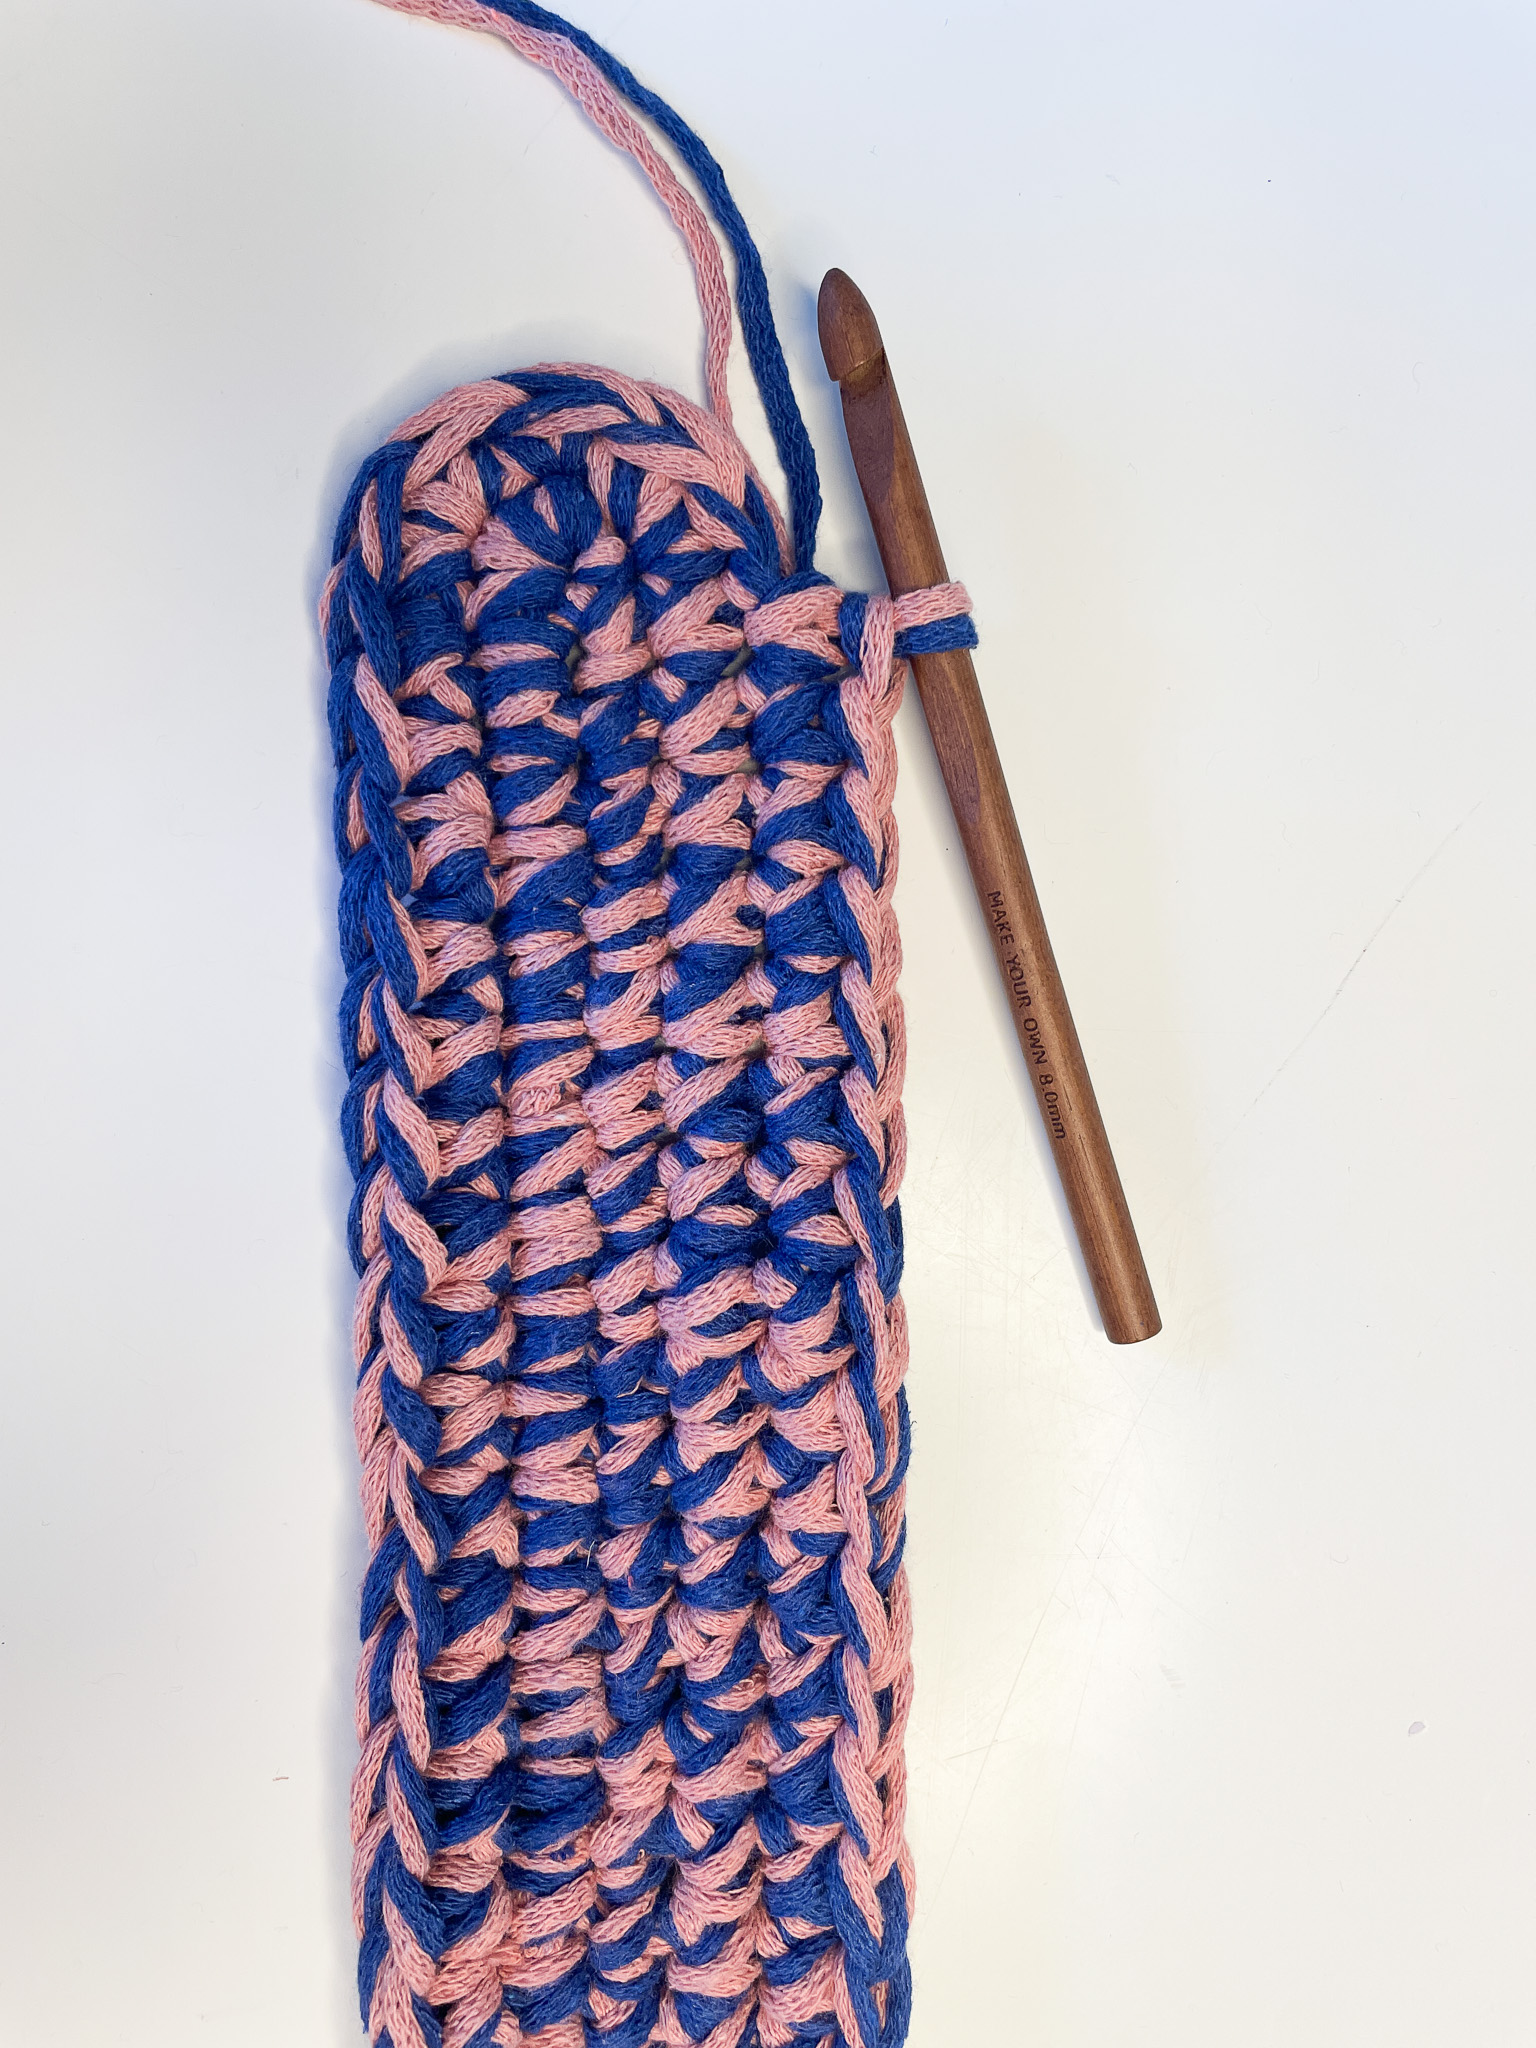
Crochet two single crochets in the same stitch in each of the next two stitches. Then crochet one single crochet in the following stitch. After that, crochet two single crochets in the same stitch in each of the next two stitches.

Crochet 17 single crochets.

In the last five stitches, crochet two single crochets in each of the first two stitches. Then crochet one single crochet in the next stitch. After that, crochet two single crochets in each of the following two stitches. Move your stitch marker to the last stitch of round 3.

Varv 4: Virka 18 fasta maskor.
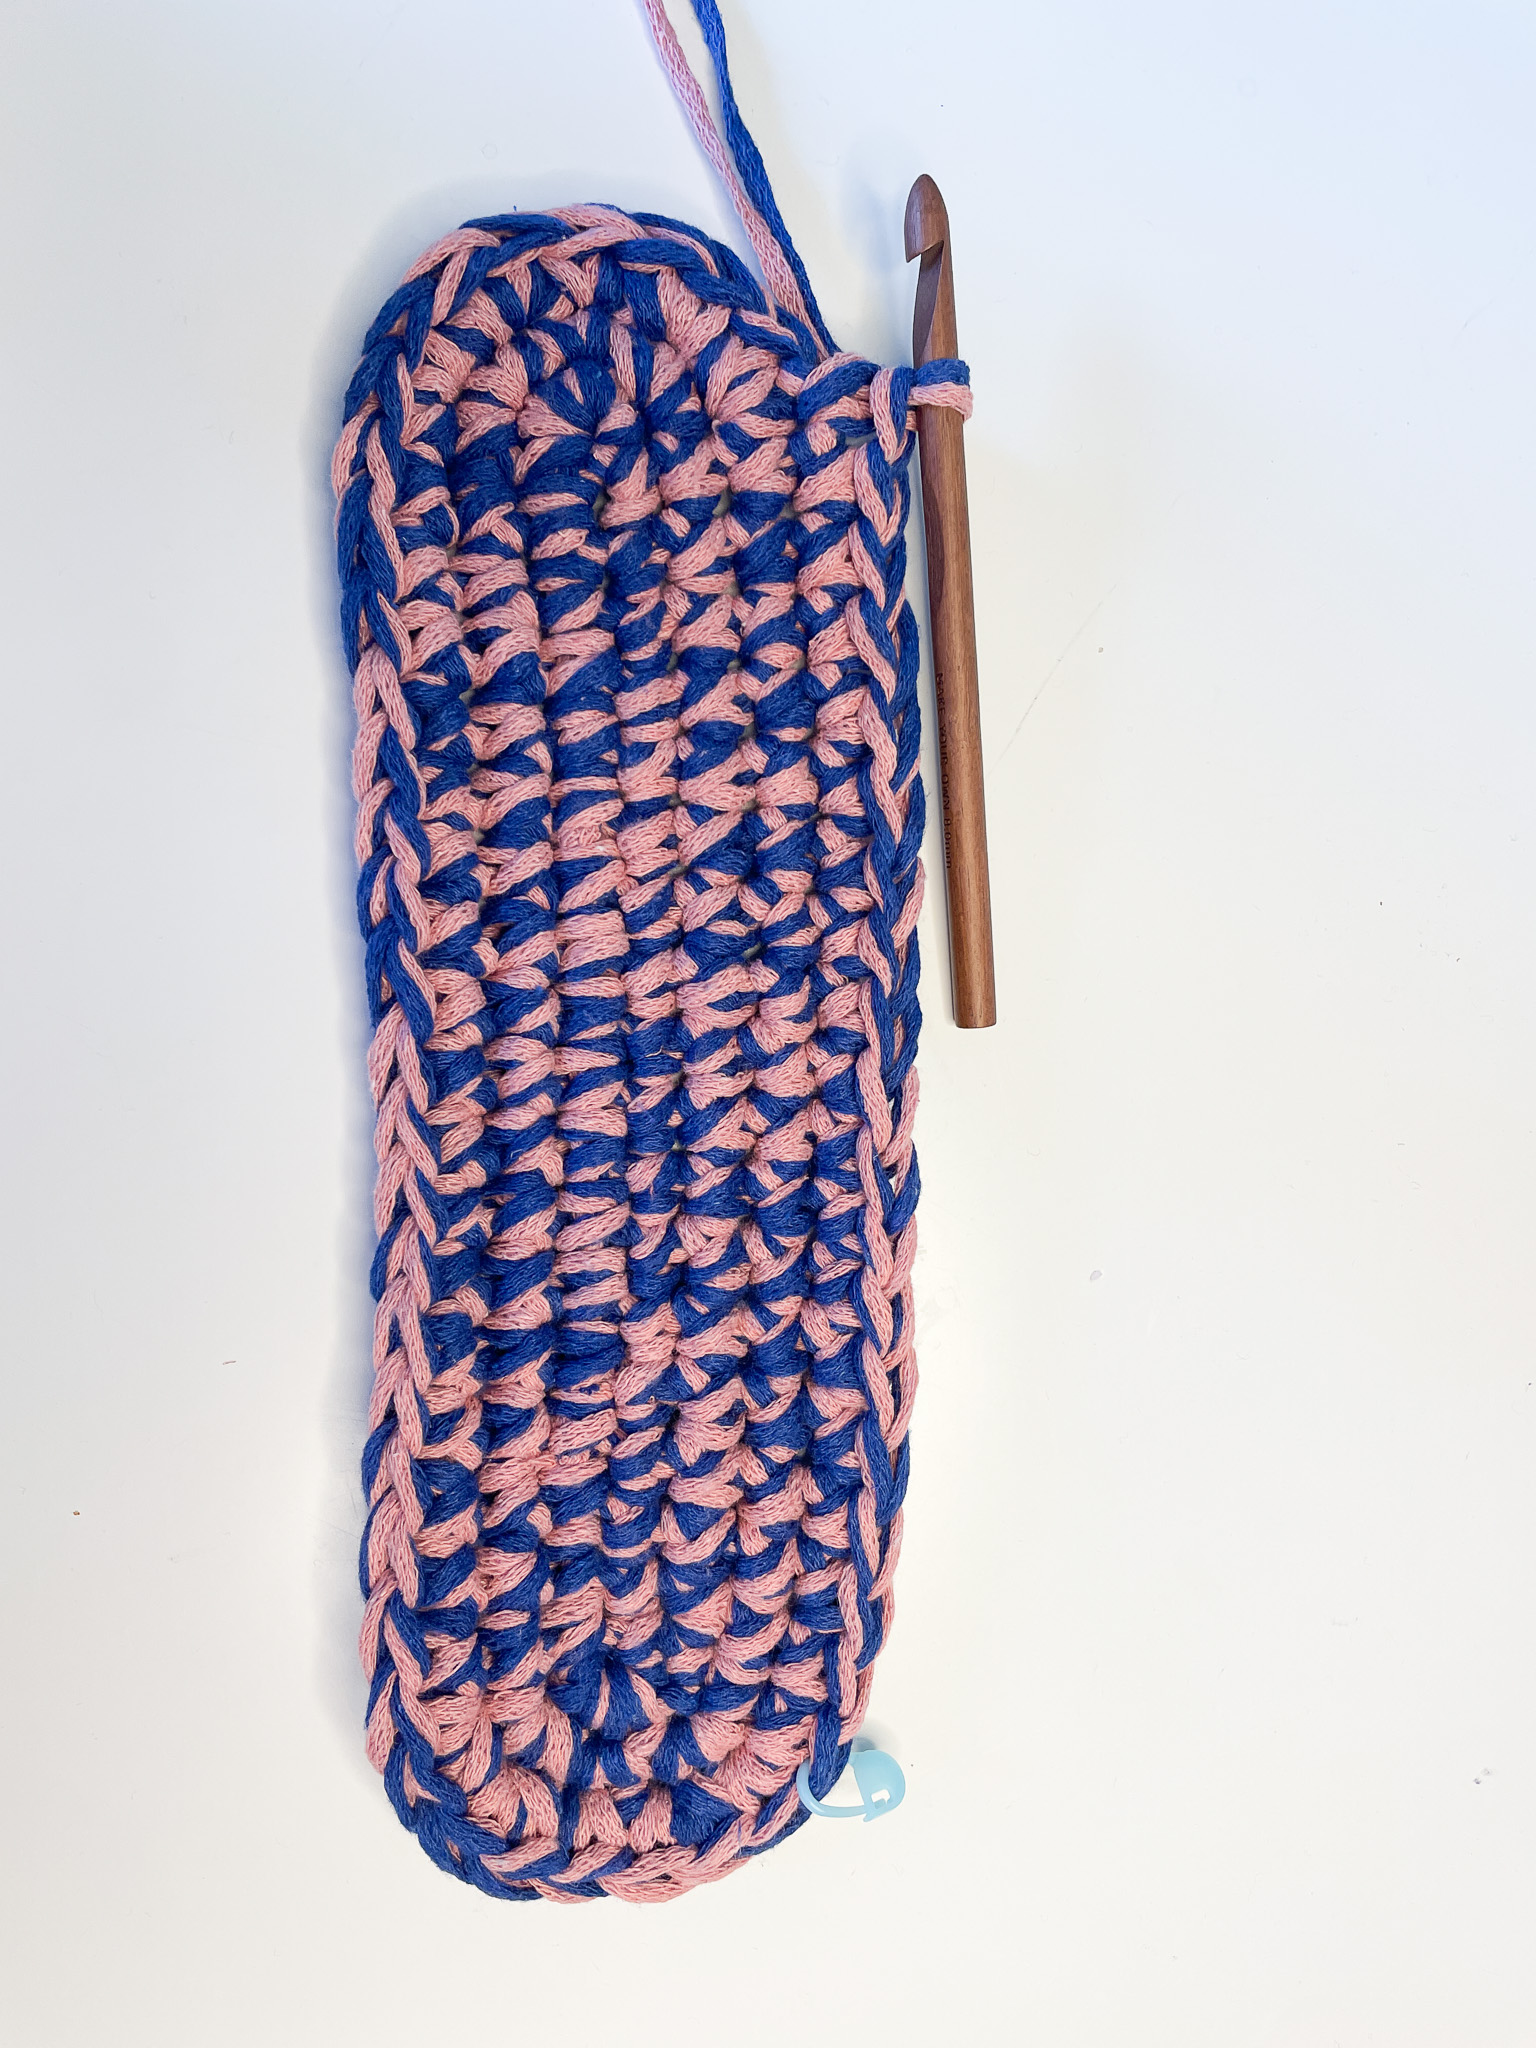
Crochet two single crochets in the next two stitches. Crochet one stitch in the following three stitches. Crochet two single crochets in the next two stitches.

Crochet 20 single crochets.

Crochet two single crochets in the next two stitches. Then crochet one stitch in the following three stitches. Then crochet two single crochets in the next two stitches.

THE BOTTOM IS DONE!
If you want to make the bottom larger, continue increasing in the corners in the same way as before, but with 5 single crochets between the increases in each corner.
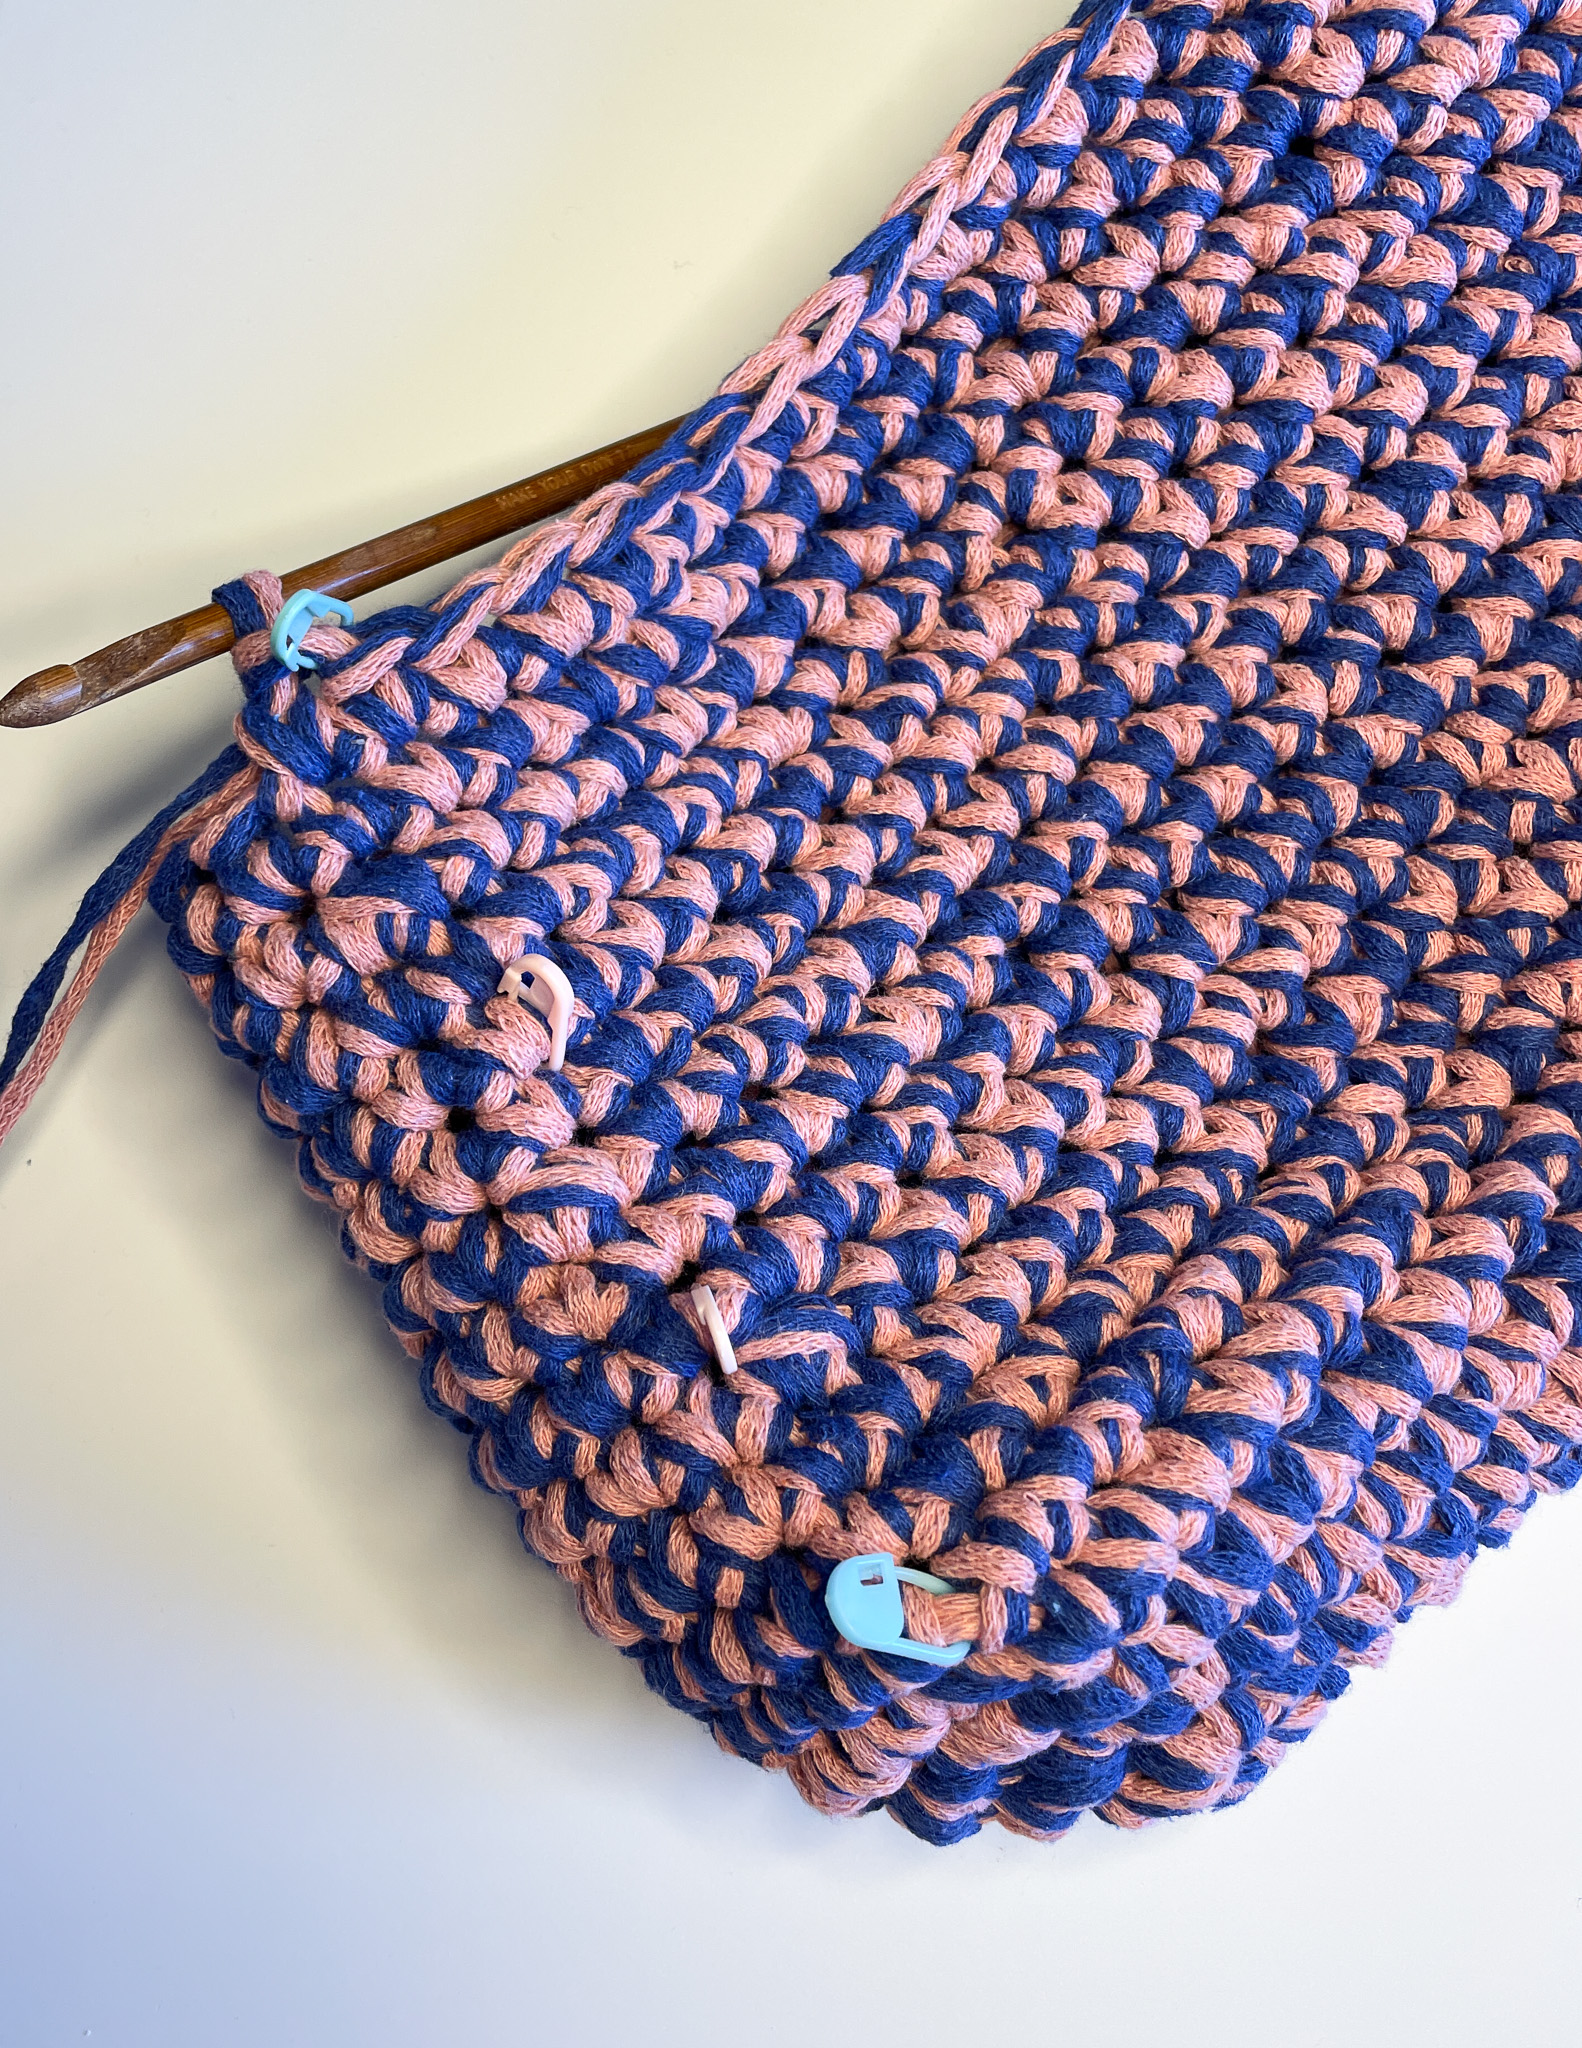
STEP 2 – The Body
Mark each corner (where you previously increased). Place two stitch markers in each corner, and there should be 8 stitches including the stitches where the markers are placed.

Round 5: Single crochet until you have one stitch left before the first marker. Here, make a decrease by yarn over and pulling through both that stitch and the stitch with the marker. Move the marker to the decrease. If you're unsure how to crochet a decrease, see the video below.

Now continue the same way on all four markers. That is, single crochet until you have one stitch left before the marker, then make a decrease in that stitch. You don’t need to place markers on the remaining decreases.
These decreases will give the bag a natural inward curve.


Now you need to flip the bag bottom so that you continue crocheting from the outside in.


Rounds 6-8: Crochet one single crochet in each stitch. Keep the marker in place so you can keep track of how many rounds you have crocheted.
Round 9: Now you will decrease in all 4 corners, just like before. Place markers in all 4 corners and decrease the same way as in round 5. After making your decreases, keep only the marker in the first decrease you made.


Round 10-12: Crochet one single crochet in each stitch. Keep the marker in place so you can keep track of how many rounds you have worked.
Round 13: Now decrease in all 4 corners again, the same way as in round 9. After your decreases, keep the marker in your first decrease.
Round 14-16: Crochet one single crochet in each stitch. Keep the markers in place so you can keep track of how many rounds you have worked.
Round 17: Decrease in all 4 corners again, the same way as in round 9. After your decreases, keep the marker in your first decrease.
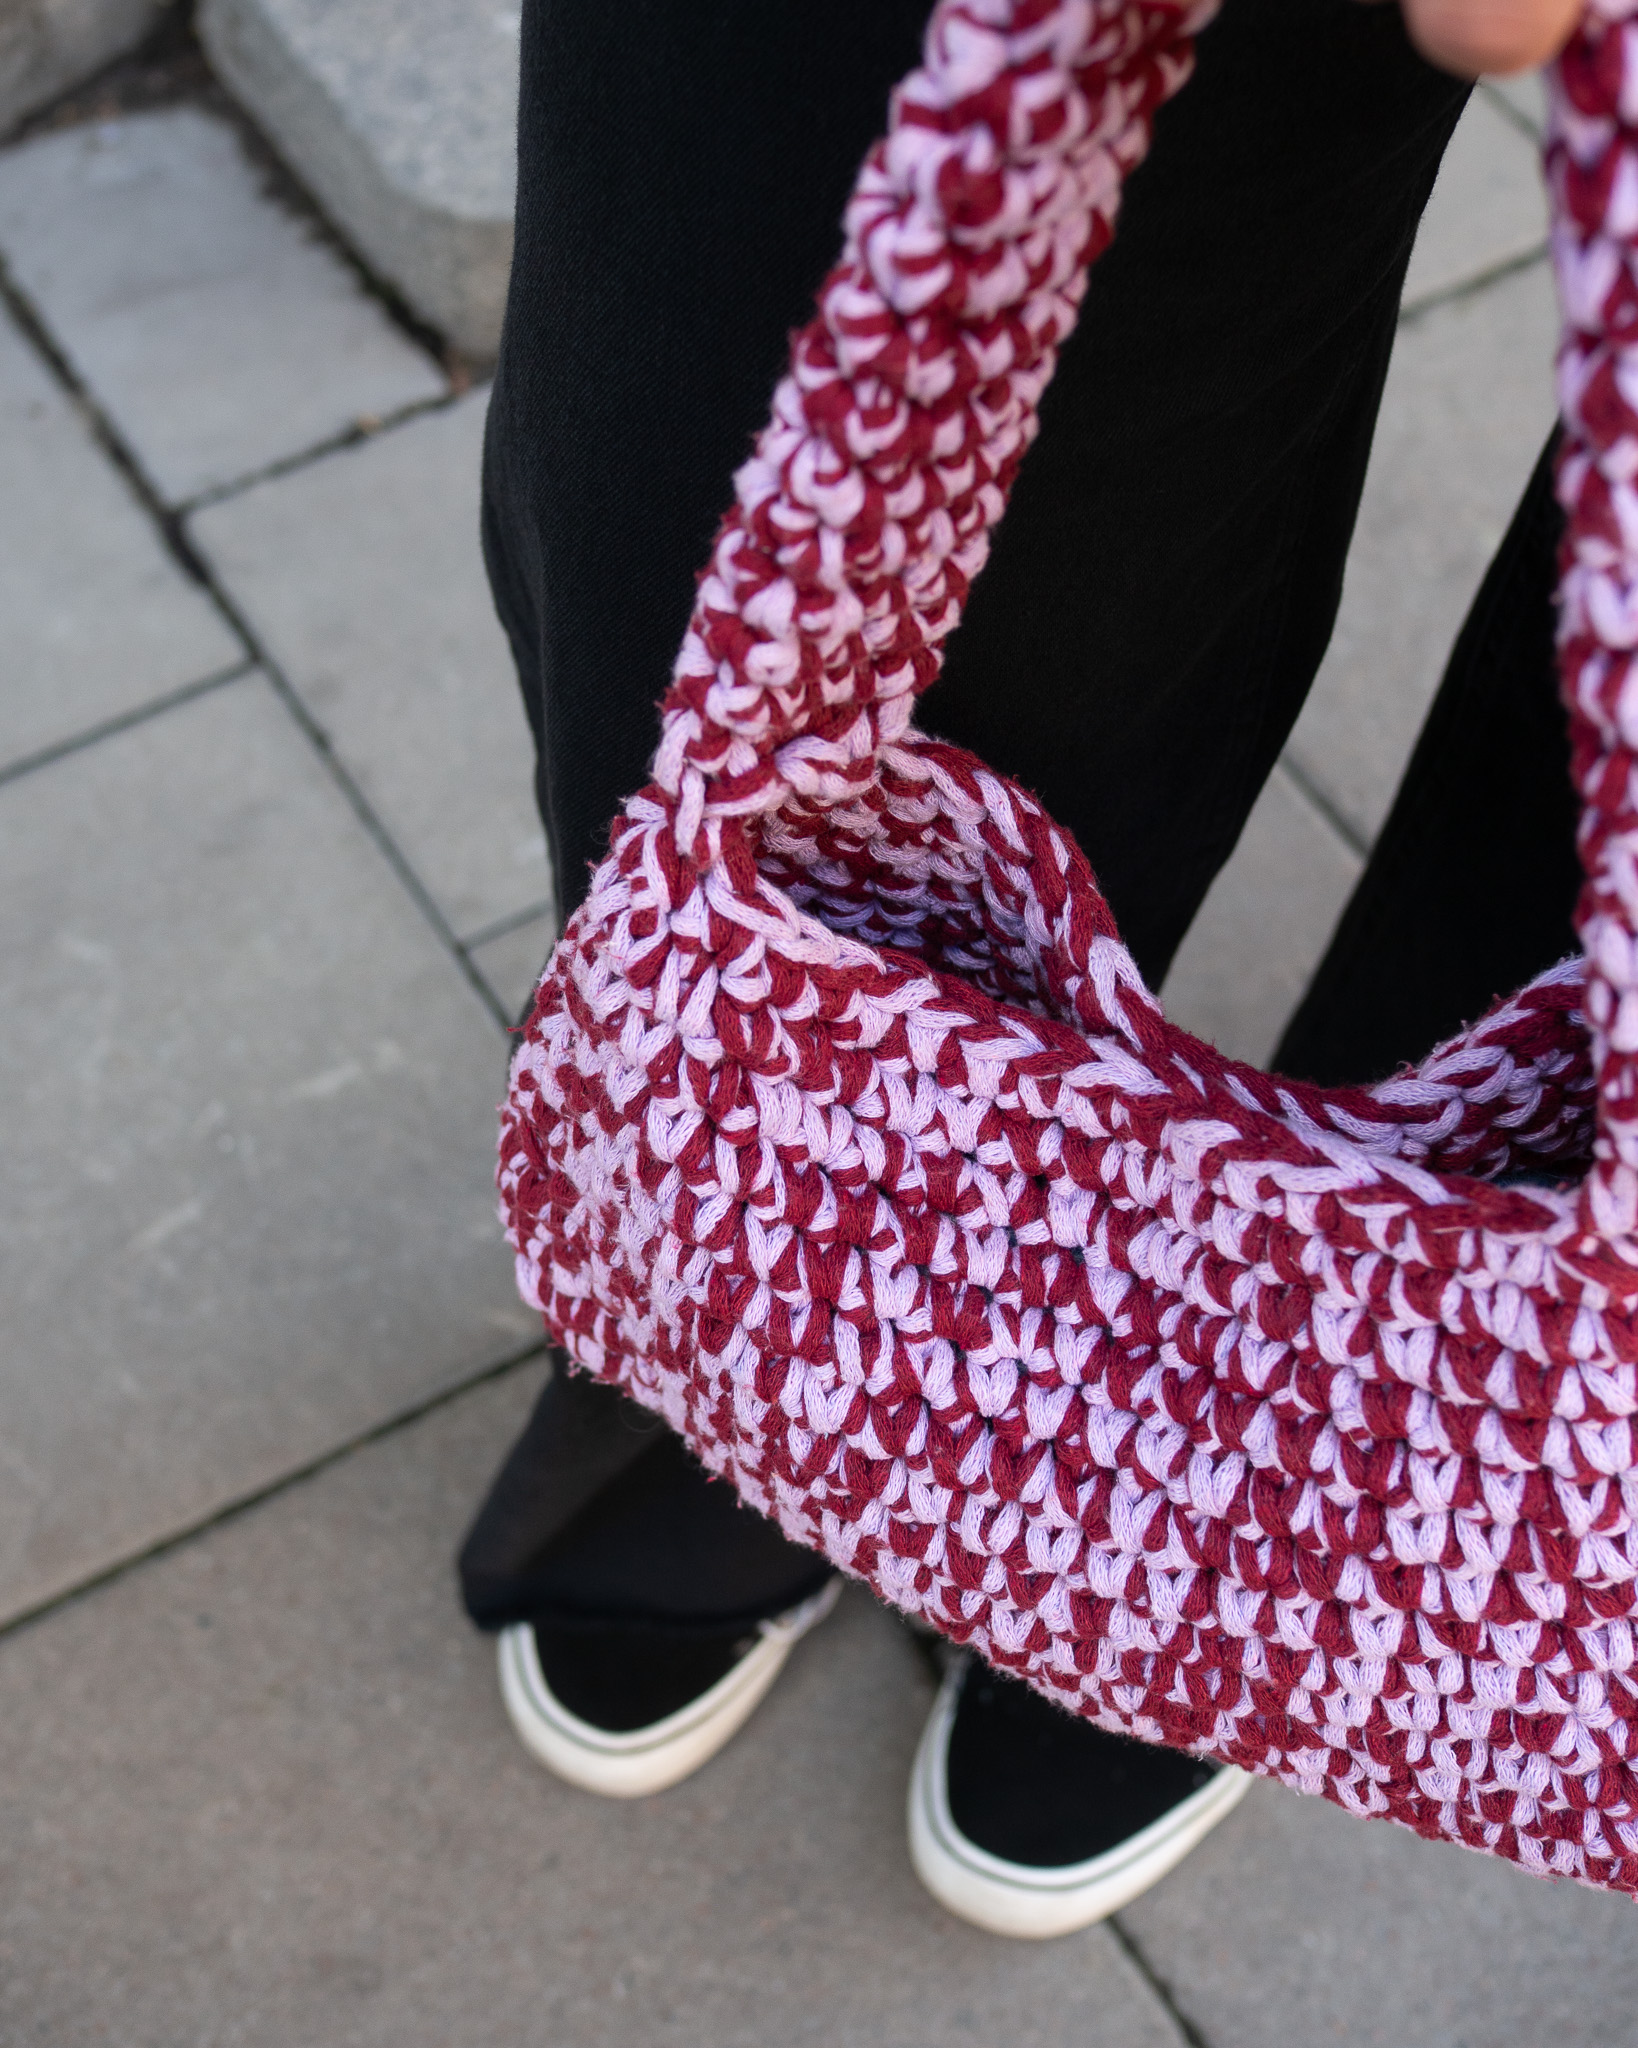
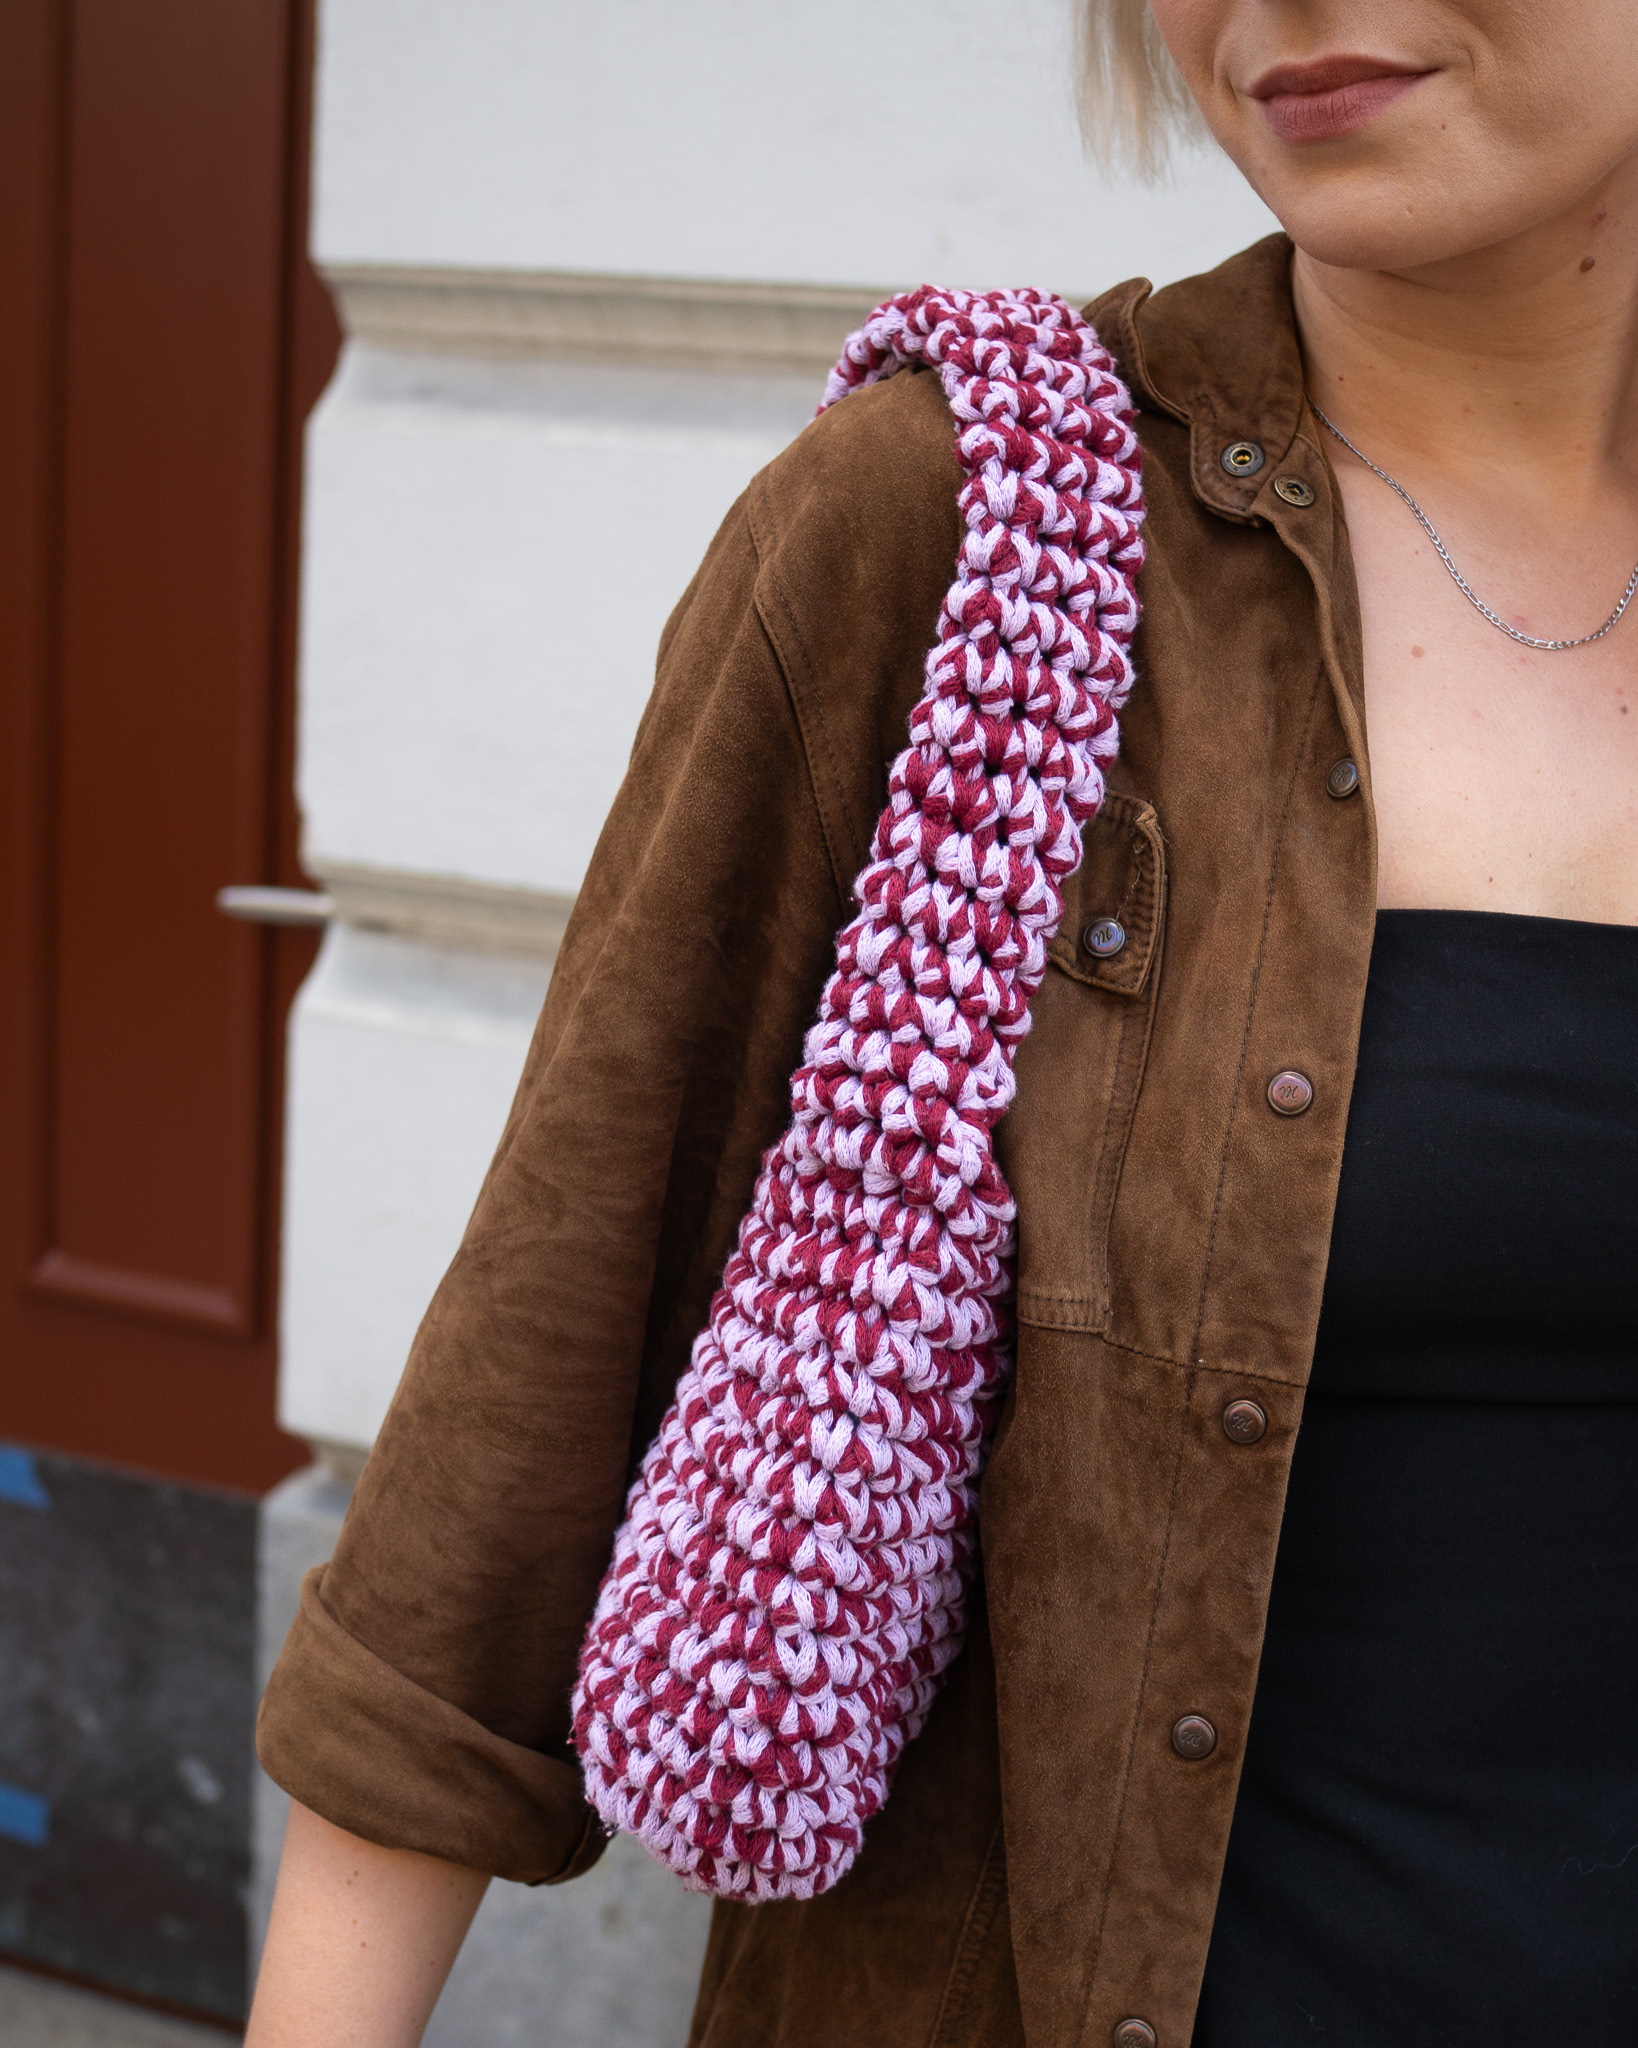
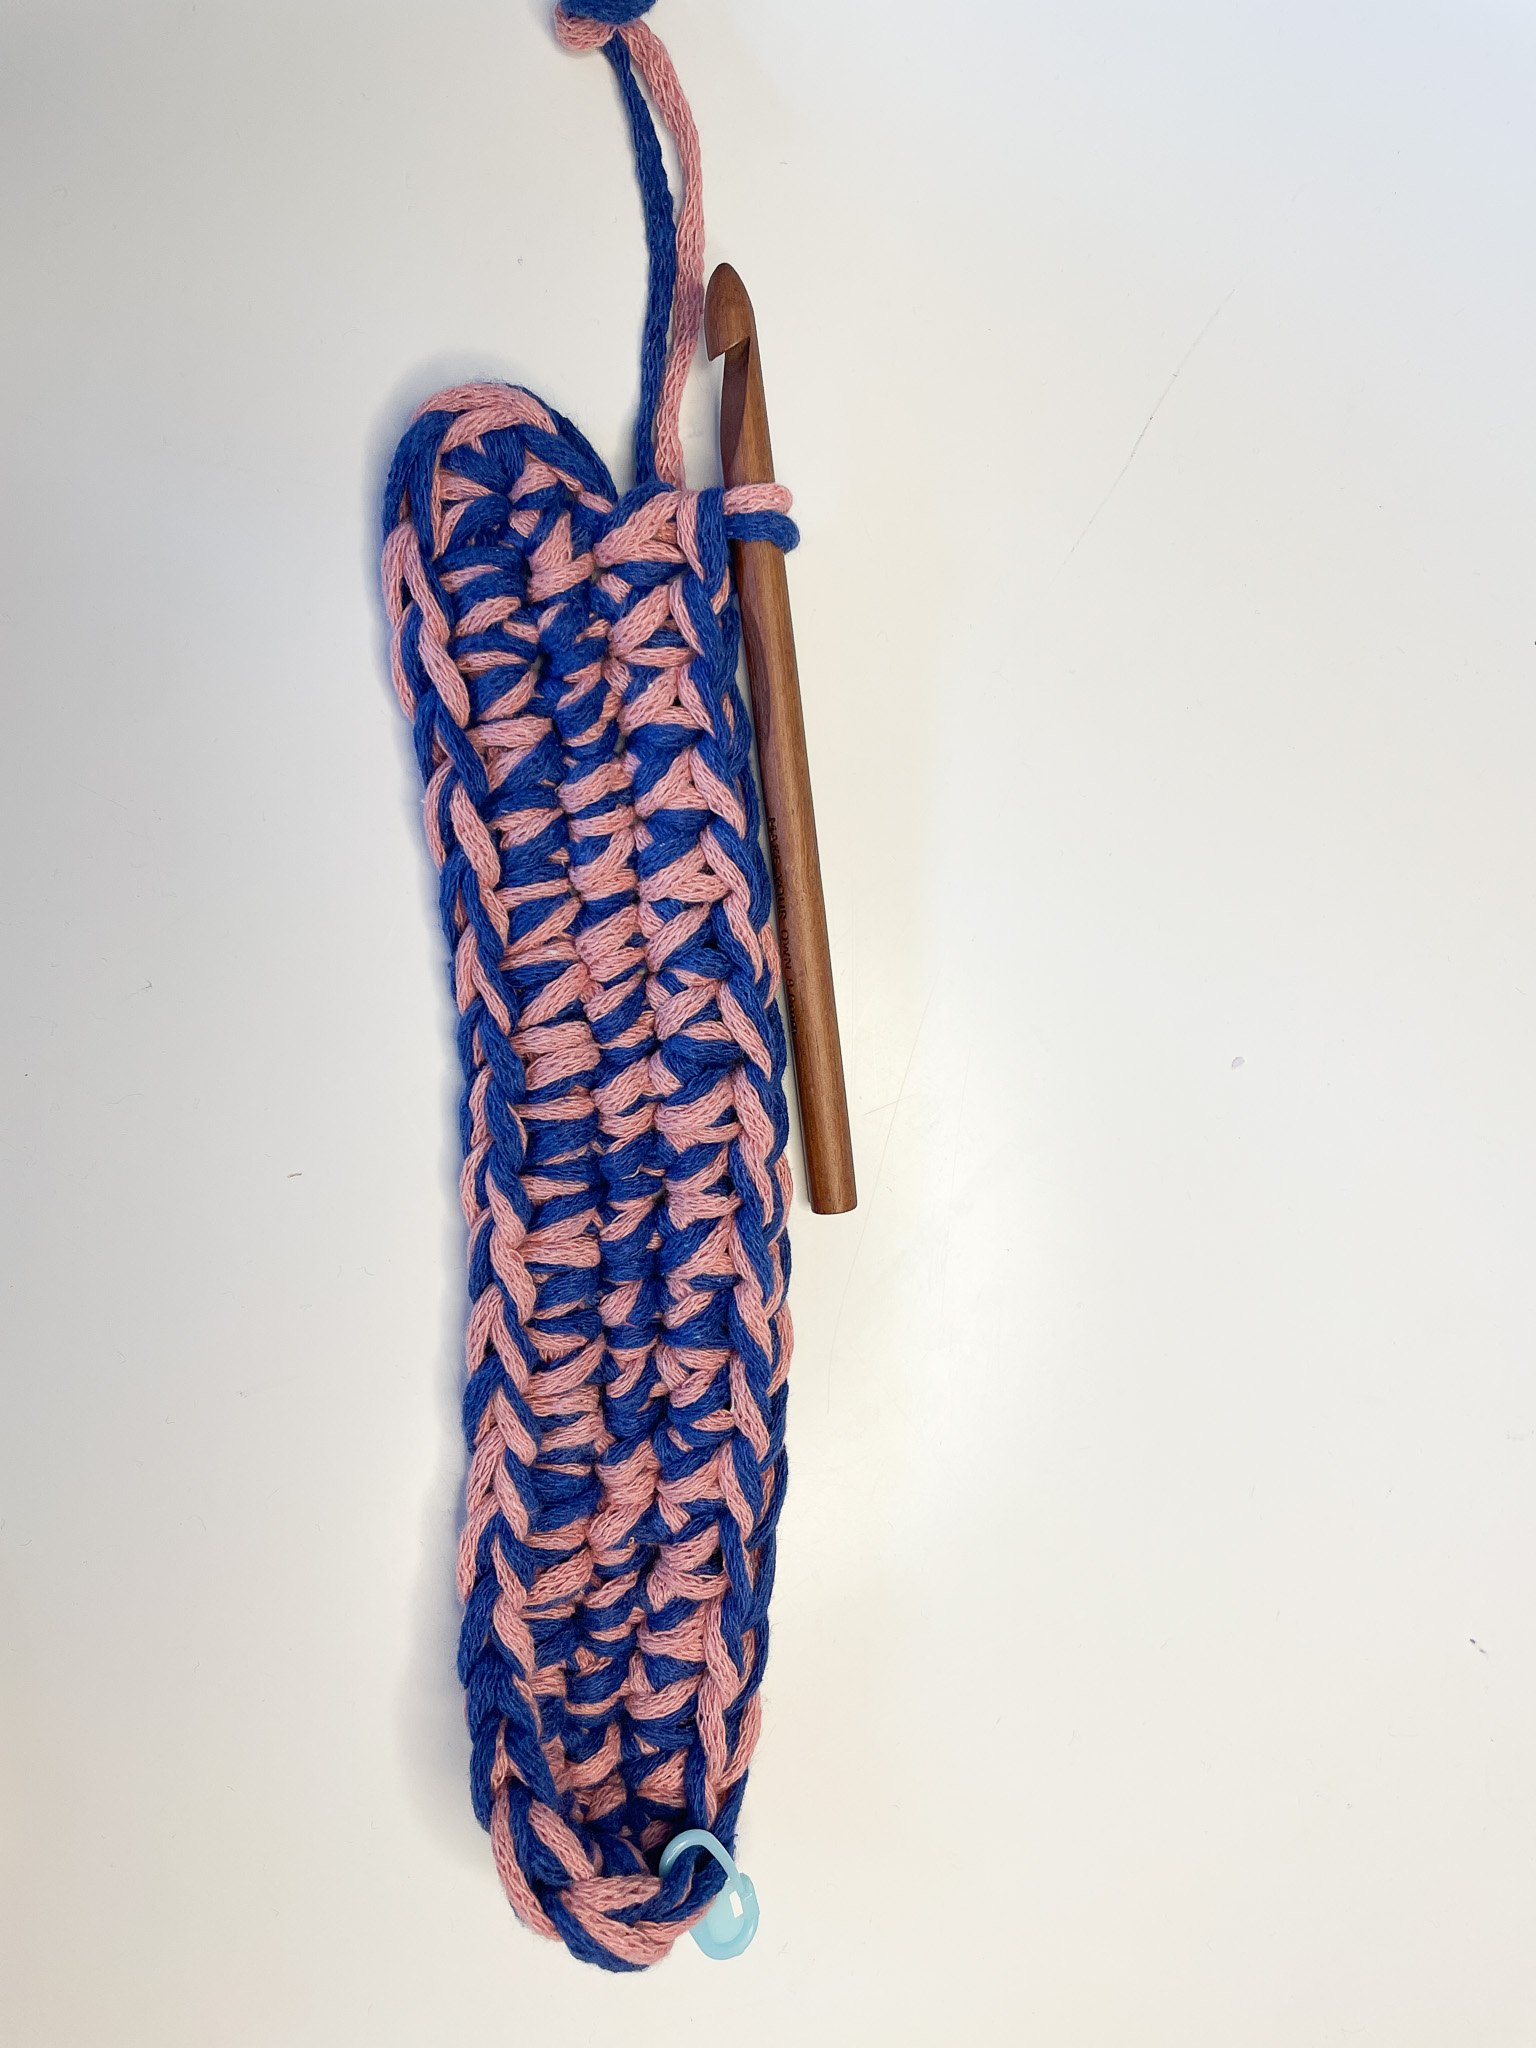
STEP 3 – The Handle
Find the midpoint on both sides of the bag and place a stitch marker there. Crochet single crochets up to the marker and then into the next two stitches.
Now we’ll start working on the handle. The handle is made by picking up four single crochets on the inside of the bag. Grab the yarn from the front by inserting your hook through the “hole” between your single crochets, then go into the next hole, yarn over, and pull through.
See the pictures and video below for guidance.


There should be 8 single crochets in a ring, and you crochet around in a spiral without increasing or decreasing. Continue until the handle reaches the desired length (for example, 30 cm).
Attach the handle on the opposite side of the bag. Make sure it’s centered. Lay the “tube” flat and sew the handle to the edge of the bag.
You can also crochet the handle on by working through both layers of the handle and the stitches on the side of the bag, joining them together.
If you want to see a video on how we do this, see below.


Weave in the yarn ends. If you’re unsure how to do this, see the video below (Fasten Off).
You have now finished the Little Bag!
Abbreviations (US terms)
This part of the pattern consists only of crochet terms. If you need help along the way with explanations or more pictures, see our simple version of this pattern.
ch = chain
sl st = slip stitch
sc = single crochet
st(s) = stitch(es)
sk = skip
inc = increase (two single crochets in the same stitch)
dec = decrease (two stitches worked together as one)
(…) = indicates the number of stitches on the current round
*...* = repeat everything inside ... the number of times stated
[...] = work everything inside [...] into the same stitch
Base
Chain 20. You will now crochet around this chain to make the base. Place a stitch marker in the 20th chain. On the following rounds, always move the marker to the last stitch of the round.
Round 1: Ch 1 (does not count as a stitch), sc 18, inc, sc 17, inc (in the chain you skipped at the start), sc 1 (move marker).
.jpg)
Round 2: 17 sc, inc, 1 sc, inc, 17 sc, inc, 1 sc, inc.
Round 3: 17 sc, inc x2, 1 sc, inc x2, 17 sc, inc x2, 1 sc, inc x2.
Round 4: 18 sc, inc x2, 3 sc, inc x2, 20 sc, inc x2, 3 sc, inc x2.
Body:
Round 5: Place stitch markers at each corner (between the double increases). Sc until you have one stitch left before the marker. Work a decrease over that stitch and the stitch with the marker. Place a marker in the first decrease. Continue around the entire round in the same way.
The base has now turned “inward,” so make sure to turn it the other way. We will be crocheting from the “outside” toward the inside.

The decrease round counts as row 1 on the body of the bag.
Round 6-8: 1 sc in each st.
Round 9: Repeat the decrease as you did in round 5.
Round 10-12: 1 sc in each st.
Round 13: Repeat the decrease as you did in round 5.
Round 14-16: 1 sc in each st.
Round 17: Repeat the decrease as you did in round 5.
The body is finished!
Handle:
Decide where the handle should start and end. Place a marker in the center of the bag’s opening on each side.
Crochet sc up to the marker plus two extra sc. After that, turn and pick up 4 sc on the inside of the bag so the handle becomes like a tube. Yarn over from the front by going through the "hole" where the sc should be, then go into the next hole, pull up a loop, and crochet a sc. Repeat this a total of 4 times. Then start crocheting sc two stitches before the center marker.
There should be a total of 8 sc on the handle. Continue until the handle reaches the desired length (e.g., 30 cm).
Attach the handle on the opposite side of the bag, at the center, by crocheting through both sides of the handle and the bag.
You have now finished the Lill Bag!
The rights to this pattern belong to MYO Make Your Own. The pattern or its pictures may not be copied, shared or resold either in parts or in its entirety, but you may sell items you have crocheted from this pattern. If you have questions about the pattern, contact MYO at hello@makeyourown.se.
Pattern
The bottom of the bag will be crocheted in an oval, and the rest of the pattern will be worked in a spiral.
Start by crocheting 20 chain stitches to make a foundation chain. Place a stitch marker in the last chain stitch. If you're unsure how to crochet a chain, see the video below.
Round 1: Skip the first chain and start in the second stitch. Then crochet 18 single crochets. You will now have one stitch left on the chain. If you're unsure how to crochet single crochet stitches, see the video below.
Crochet three single crochets into the last stitch. This creates a rounded turn. Then continue crocheting along the other side of the chain.
Crochet 17 single crochets. You should now have one stitch PLUS the skipped chain from the beginning left before the round is complete.
In the second-to-last stitch (the chain stitch you skipped), crochet two single crochets. In the last stitch (the one with the marker), crochet one single crochet. Place a stitch marker in your last stitch to keep track of where the round begins and ends.
Round 2: Crochet 17 single crochets. You are now at the edge/rounded corner.
In the three corner stitches (which you can see in the image above as the round part of the row), crochet 2 single crochets in the next stitch, 1 single crochet in the following stitch, and 2 single crochets in the last of the three stitches.
Then crochet 17 single crochets. You should now have three stitches left in the round. Work the same as in the previous corner, i.e.: 2 single crochets in the first stitch, 1 single crochet in the next stitch, and 2 single crochets in the last stitch. Move and place the stitch marker in the last stitch of round 2.
Round 3: Crochet 17 single crochets.
Crochet two single crochets in the same stitch in each of the next two stitches. Then crochet one single crochet in the following stitch. After that, crochet two single crochets in the same stitch in each of the next two stitches.
Crochet 17 single crochets.
In the last five stitches, crochet two single crochets in each of the first two stitches. Then crochet one single crochet in the next stitch. After that, crochet two single crochets in each of the following two stitches. Move your stitch marker to the last stitch of round 3.
Varv 4: Virka 18 fasta maskor.
Crochet two single crochets in the next two stitches. Crochet one stitch in the following three stitches. Crochet two single crochets in the next two stitches.
Crochet 20 single crochets.
Crochet two single crochets in the next two stitches. Then crochet one stitch in the following three stitches. Then crochet two single crochets in the next two stitches.
THE BOTTOM IS DONE!
If you want to make the bottom larger, continue increasing in the corners in the same way as before, but with 5 single crochets between the increases in each corner.
STEP 2 – The Body
Mark each corner (where you previously increased). Place two stitch markers in each corner, and there should be 8 stitches including the stitches where the markers are placed.
Round 5: Single crochet until you have one stitch left before the first marker. Here, make a decrease by yarn over and pulling through both that stitch and the stitch with the marker. Move the marker to the decrease. If you're unsure how to crochet a decrease, see the video below.
Now continue the same way on all four markers. That is, single crochet until you have one stitch left before the marker, then make a decrease in that stitch. You don’t need to place markers on the remaining decreases.
These decreases will give the bag a natural inward curve.
Now you need to flip the bag bottom so that you continue crocheting from the outside in.
Rounds 6-8: Crochet one single crochet in each stitch. Keep the marker in place so you can keep track of how many rounds you have crocheted.
Round 9: Now you will decrease in all 4 corners, just like before. Place markers in all 4 corners and decrease the same way as in round 5. After making your decreases, keep only the marker in the first decrease you made.
Round 10-12: Crochet one single crochet in each stitch. Keep the marker in place so you can keep track of how many rounds you have worked.
Round 13: Now decrease in all 4 corners again, the same way as in round 9. After your decreases, keep the marker in your first decrease.
Round 14-16: Crochet one single crochet in each stitch. Keep the markers in place so you can keep track of how many rounds you have worked.
Round 17: Decrease in all 4 corners again, the same way as in round 9. After your decreases, keep the marker in your first decrease.
STEP 3 – The Handle
Find the midpoint on both sides of the bag and place a stitch marker there. Crochet single crochets up to the marker and then into the next two stitches.
Now we’ll start working on the handle. The handle is made by picking up four single crochets on the inside of the bag. Grab the yarn from the front by inserting your hook through the “hole” between your single crochets, then go into the next hole, yarn over, and pull through.
See the pictures and video below for guidance.
There should be 8 single crochets in a ring, and you crochet around in a spiral without increasing or decreasing. Continue until the handle reaches the desired length (for example, 30 cm).
Attach the handle on the opposite side of the bag. Make sure it’s centered. Lay the “tube” flat and sew the handle to the edge of the bag.
You can also crochet the handle on by working through both layers of the handle and the stitches on the side of the bag, joining them together.
If you want to see a video on how we do this, see below.
Weave in the yarn ends. If you’re unsure how to do this, see the video below (Fasten Off).
You have now finished the Little Bag!
Abbreviations (US terms)
This part of the pattern consists only of crochet terms. If you need help along the way with explanations or more pictures, see our simple version of this pattern.
ch = chain
sl st = slip stitch
sc = single crochet
st(s) = stitch(es)
sk = skip
inc = increase (two single crochets in the same stitch)
dec = decrease (two stitches worked together as one)
(…) = indicates the number of stitches on the current round
*...* = repeat everything inside ... the number of times stated
[...] = work everything inside [...] into the same stitch
Base
Chain 20. You will now crochet around this chain to make the base. Place a stitch marker in the 20th chain. On the following rounds, always move the marker to the last stitch of the round.
Round 1: Ch 1 (does not count as a stitch), sc 18, inc, sc 17, inc (in the chain you skipped at the start), sc 1 (move marker).
Round 2: 17 sc, inc, 1 sc, inc, 17 sc, inc, 1 sc, inc.
Round 3: 17 sc, inc x2, 1 sc, inc x2, 17 sc, inc x2, 1 sc, inc x2.
Round 4: 18 sc, inc x2, 3 sc, inc x2, 20 sc, inc x2, 3 sc, inc x2.
Body:
Round 5: Place stitch markers at each corner (between the double increases). Sc until you have one stitch left before the marker. Work a decrease over that stitch and the stitch with the marker. Place a marker in the first decrease. Continue around the entire round in the same way.
The base has now turned “inward,” so make sure to turn it the other way. We will be crocheting from the “outside” toward the inside.
The decrease round counts as row 1 on the body of the bag.
Round 6-8: 1 sc in each st.
Round 9: Repeat the decrease as you did in round 5.
Round 10-12: 1 sc in each st.
Round 13: Repeat the decrease as you did in round 5.
Round 14-16: 1 sc in each st.
Round 17: Repeat the decrease as you did in round 5.
The body is finished!
Handle:
Decide where the handle should start and end. Place a marker in the center of the bag’s opening on each side.
Crochet sc up to the marker plus two extra sc. After that, turn and pick up 4 sc on the inside of the bag so the handle becomes like a tube. Yarn over from the front by going through the "hole" where the sc should be, then go into the next hole, pull up a loop, and crochet a sc. Repeat this a total of 4 times. Then start crocheting sc two stitches before the center marker.
There should be a total of 8 sc on the handle. Continue until the handle reaches the desired length (e.g., 30 cm).
Attach the handle on the opposite side of the bag, at the center, by crocheting through both sides of the handle and the bag.
You have now finished the Lill Bag!
The rights to this pattern belong to MYO Make Your Own. The pattern or its pictures may not be copied, shared or resold either in parts or in its entirety, but you may sell items you have crocheted from this pattern. If you have questions about the pattern, contact MYO at hello@makeyourown.se.

Share your creations with us
Thank you!
Your comment was sent!