
Crochet bag “Tara”
Crochet a beautiful bag with a bow
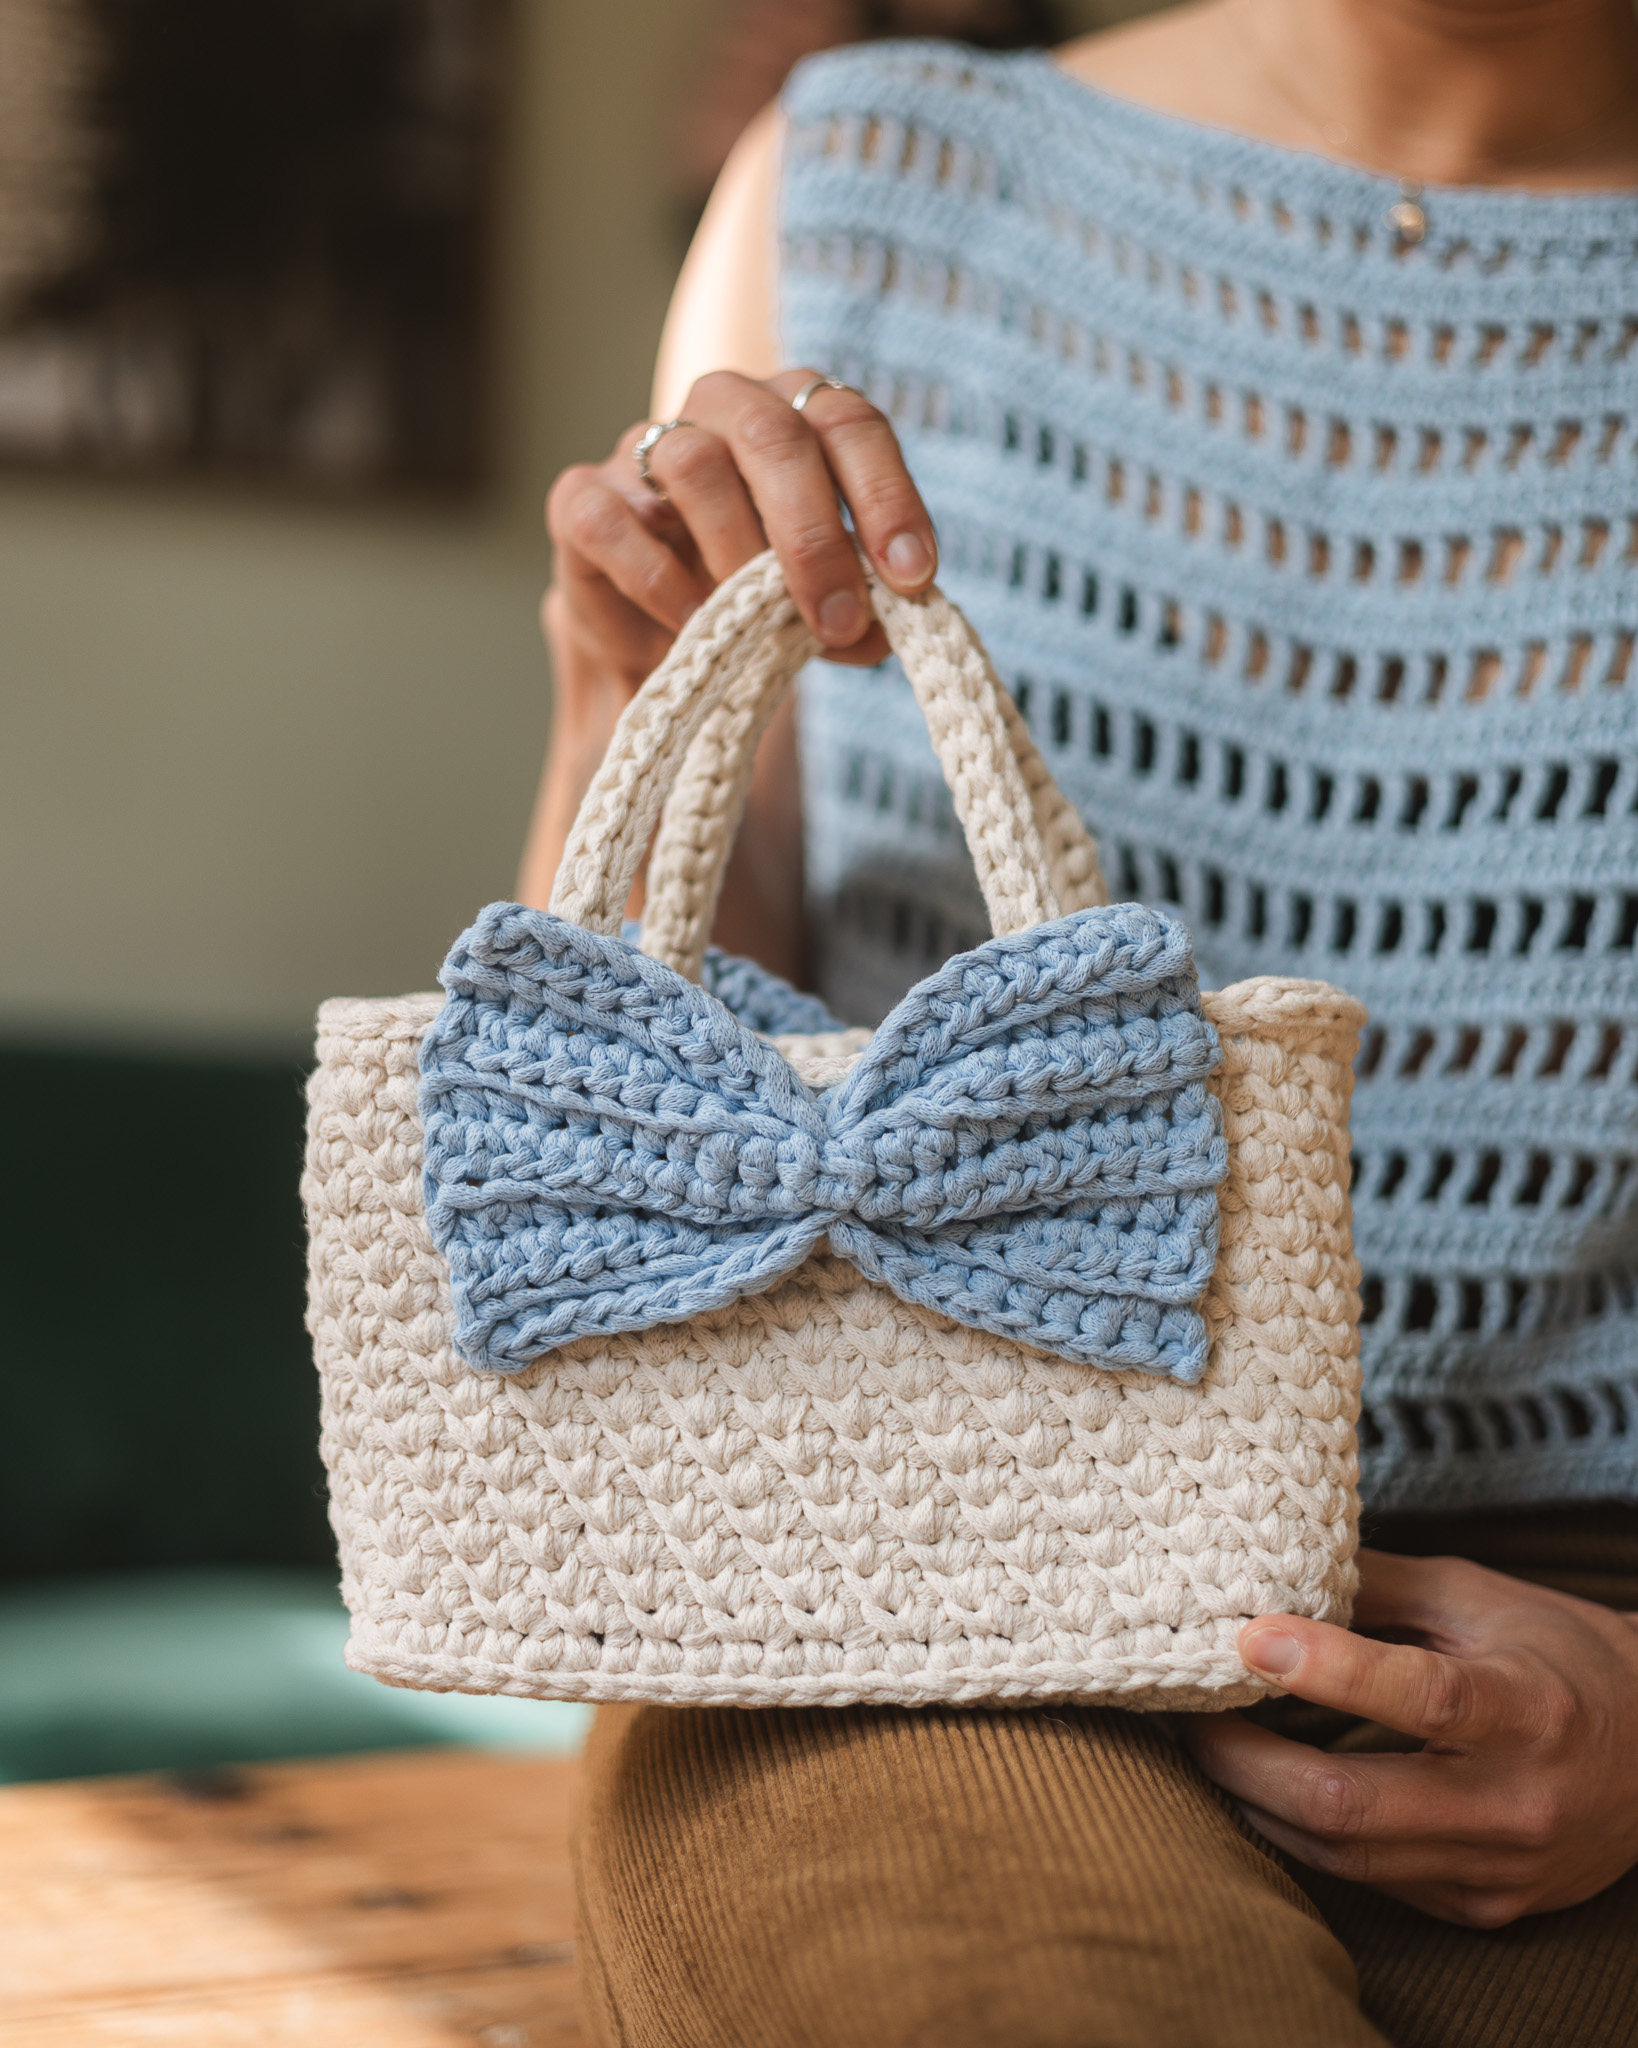
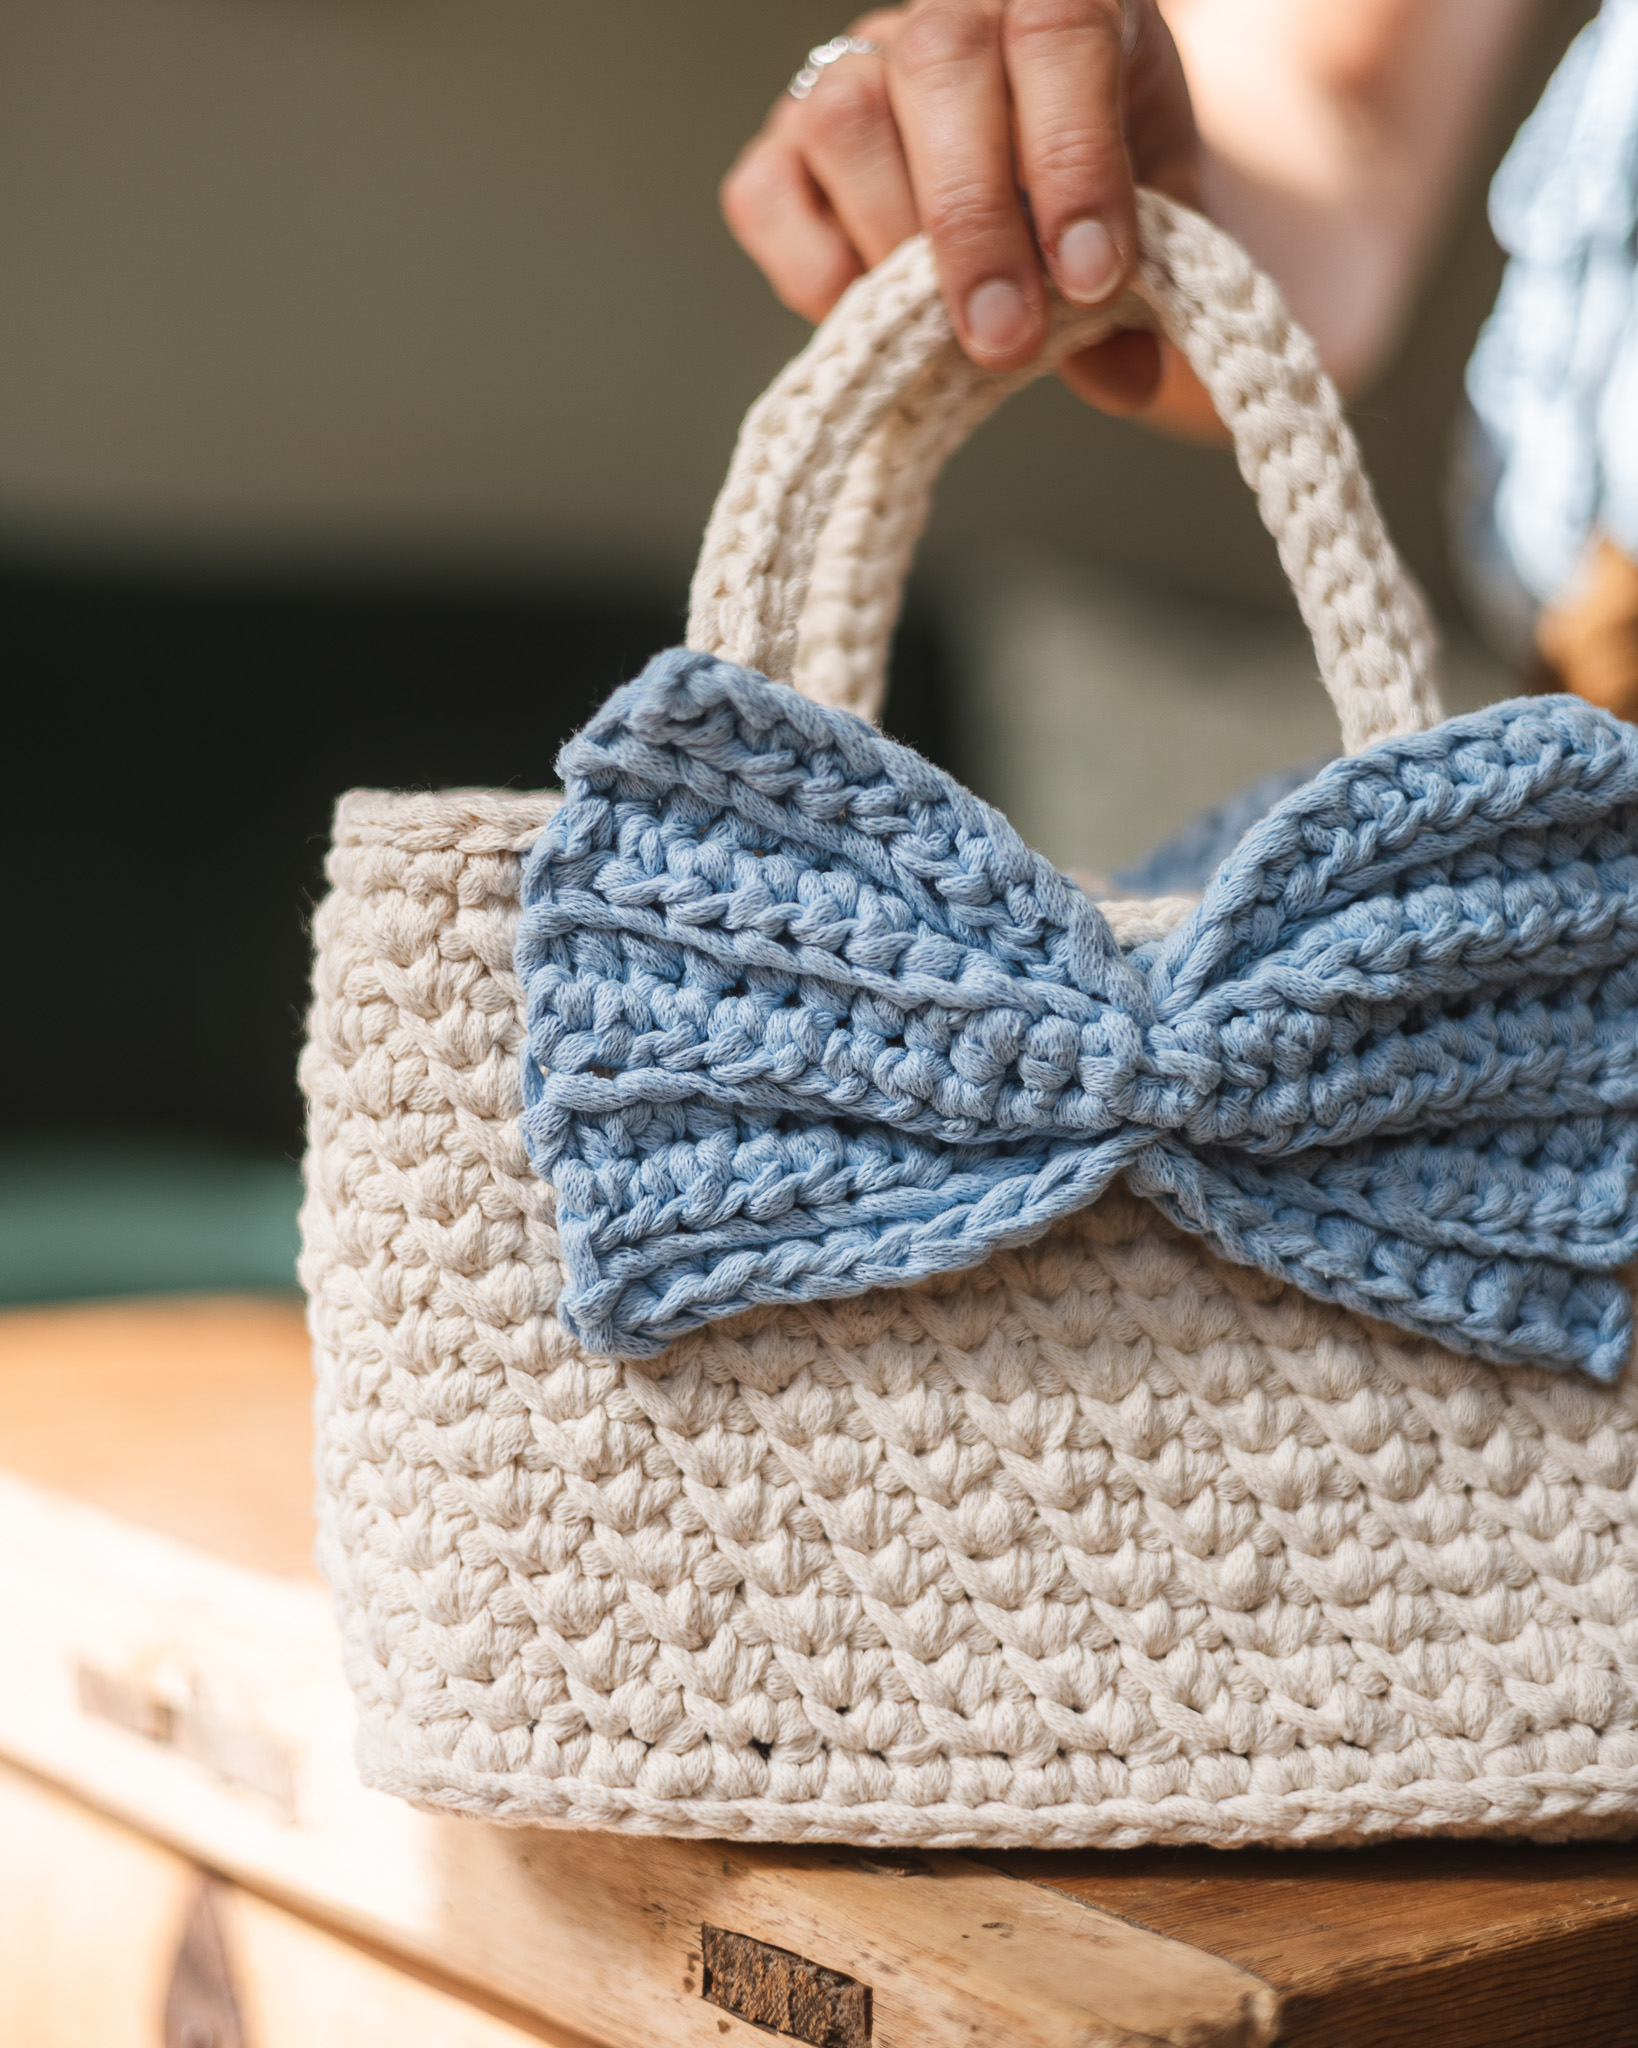
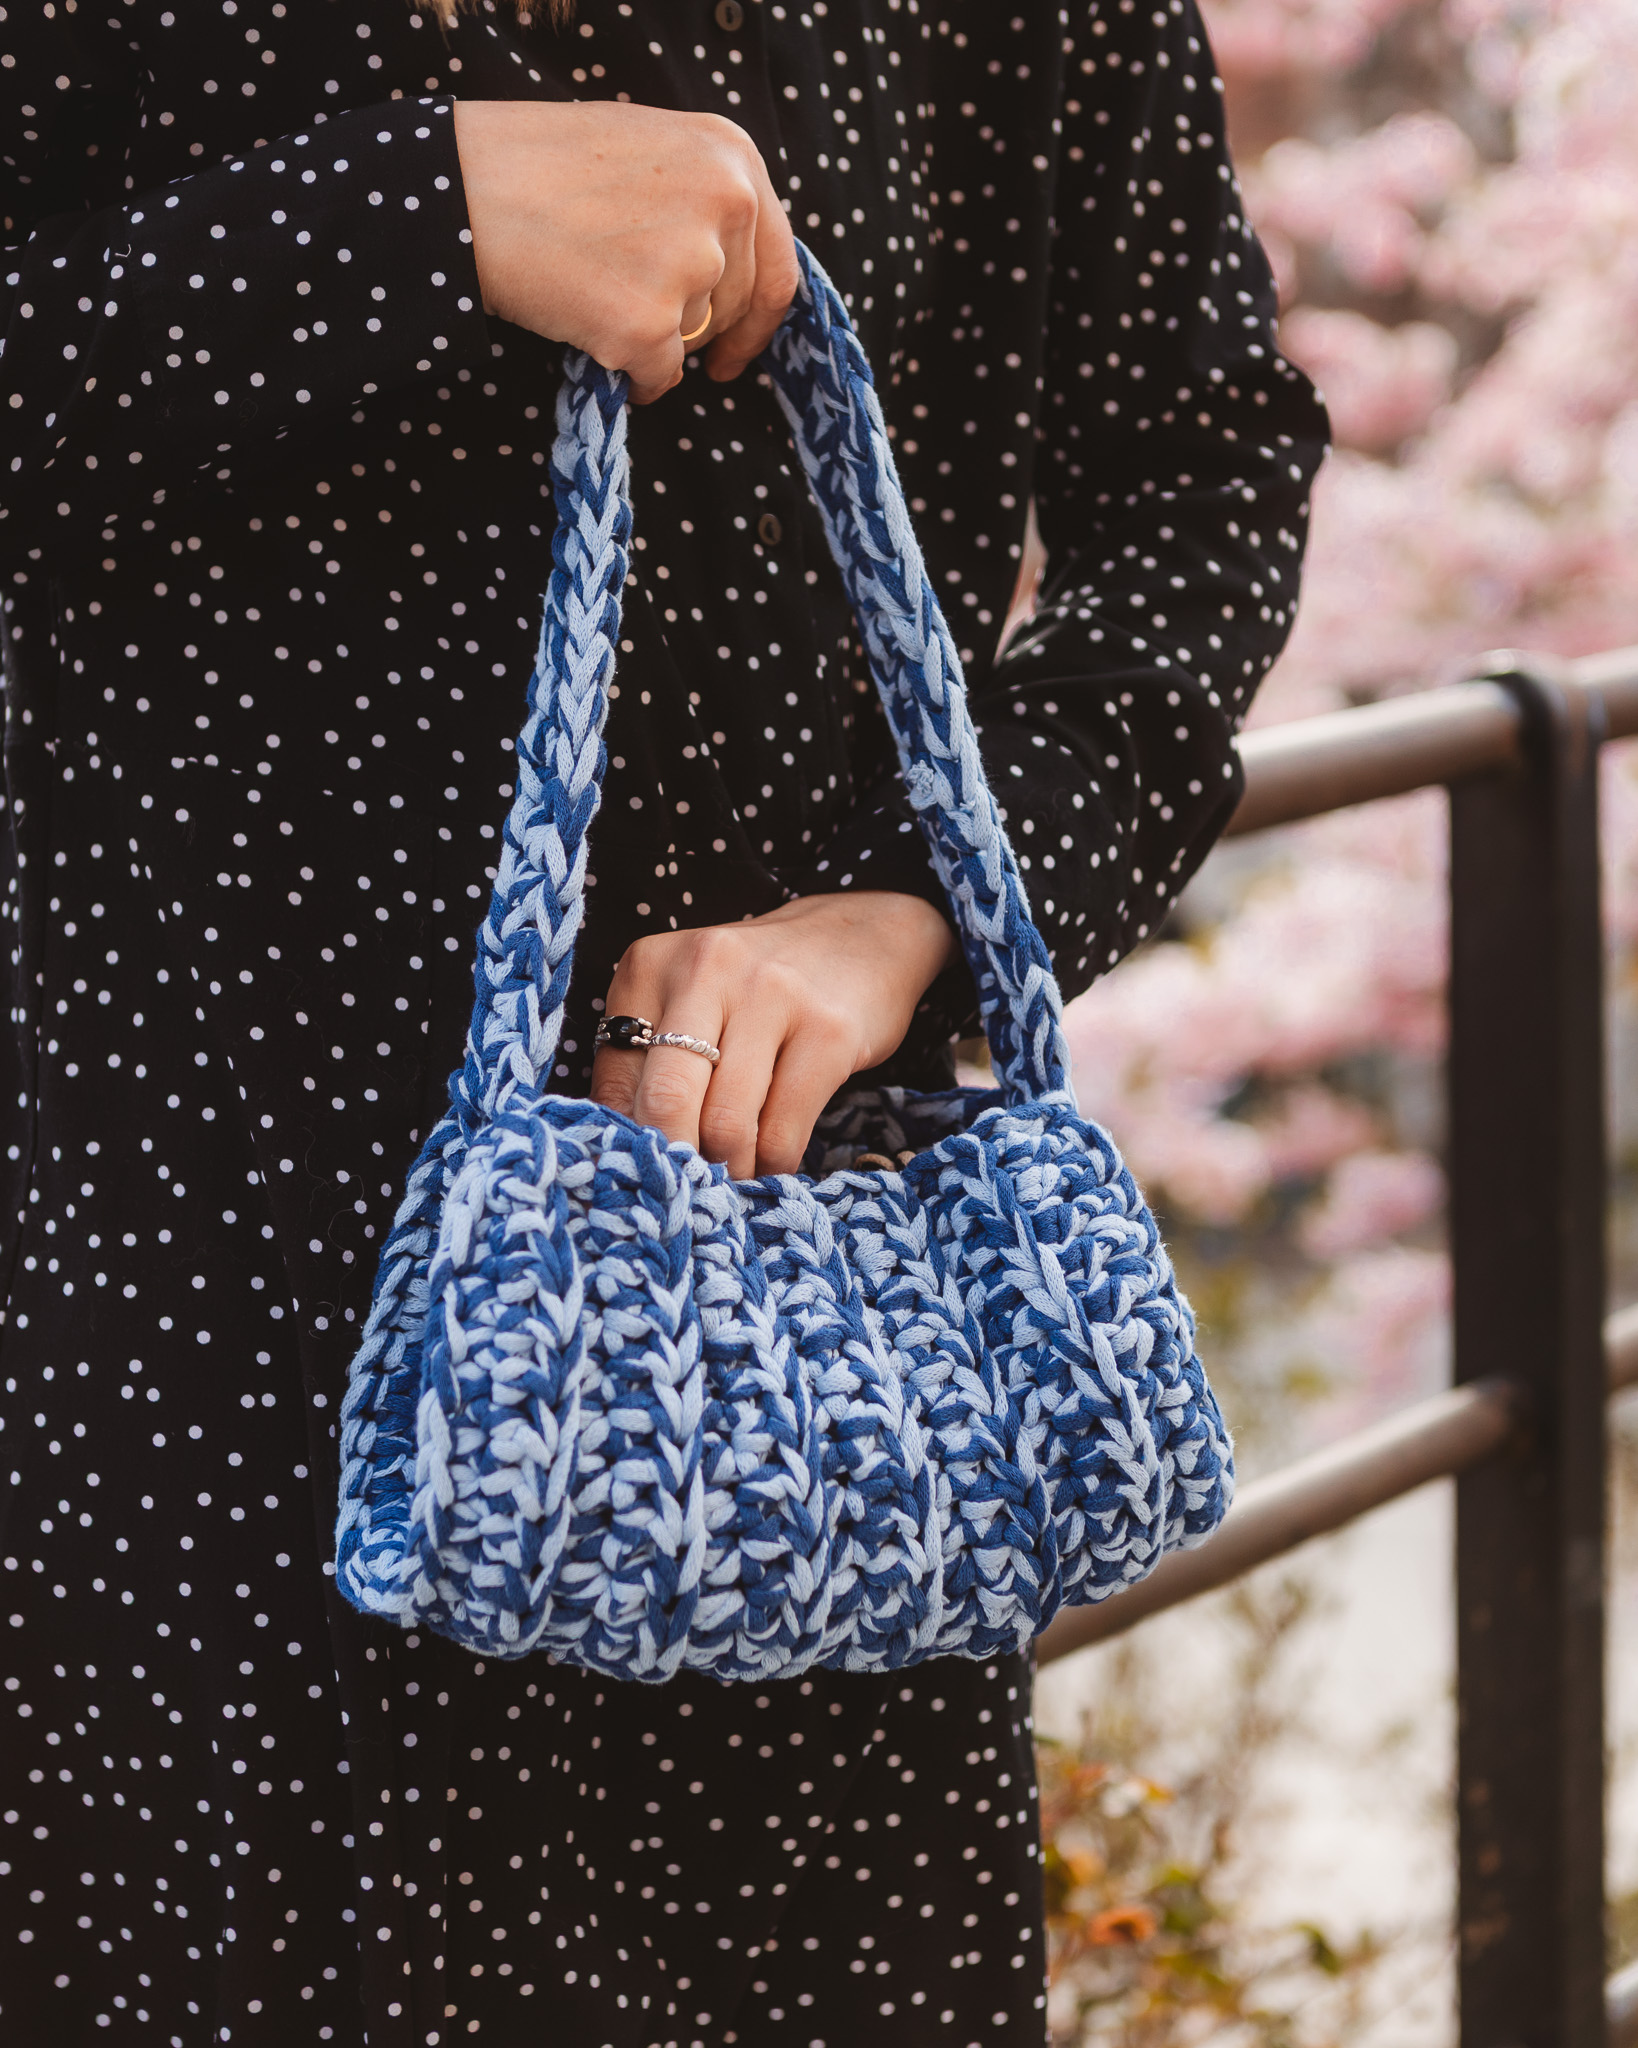
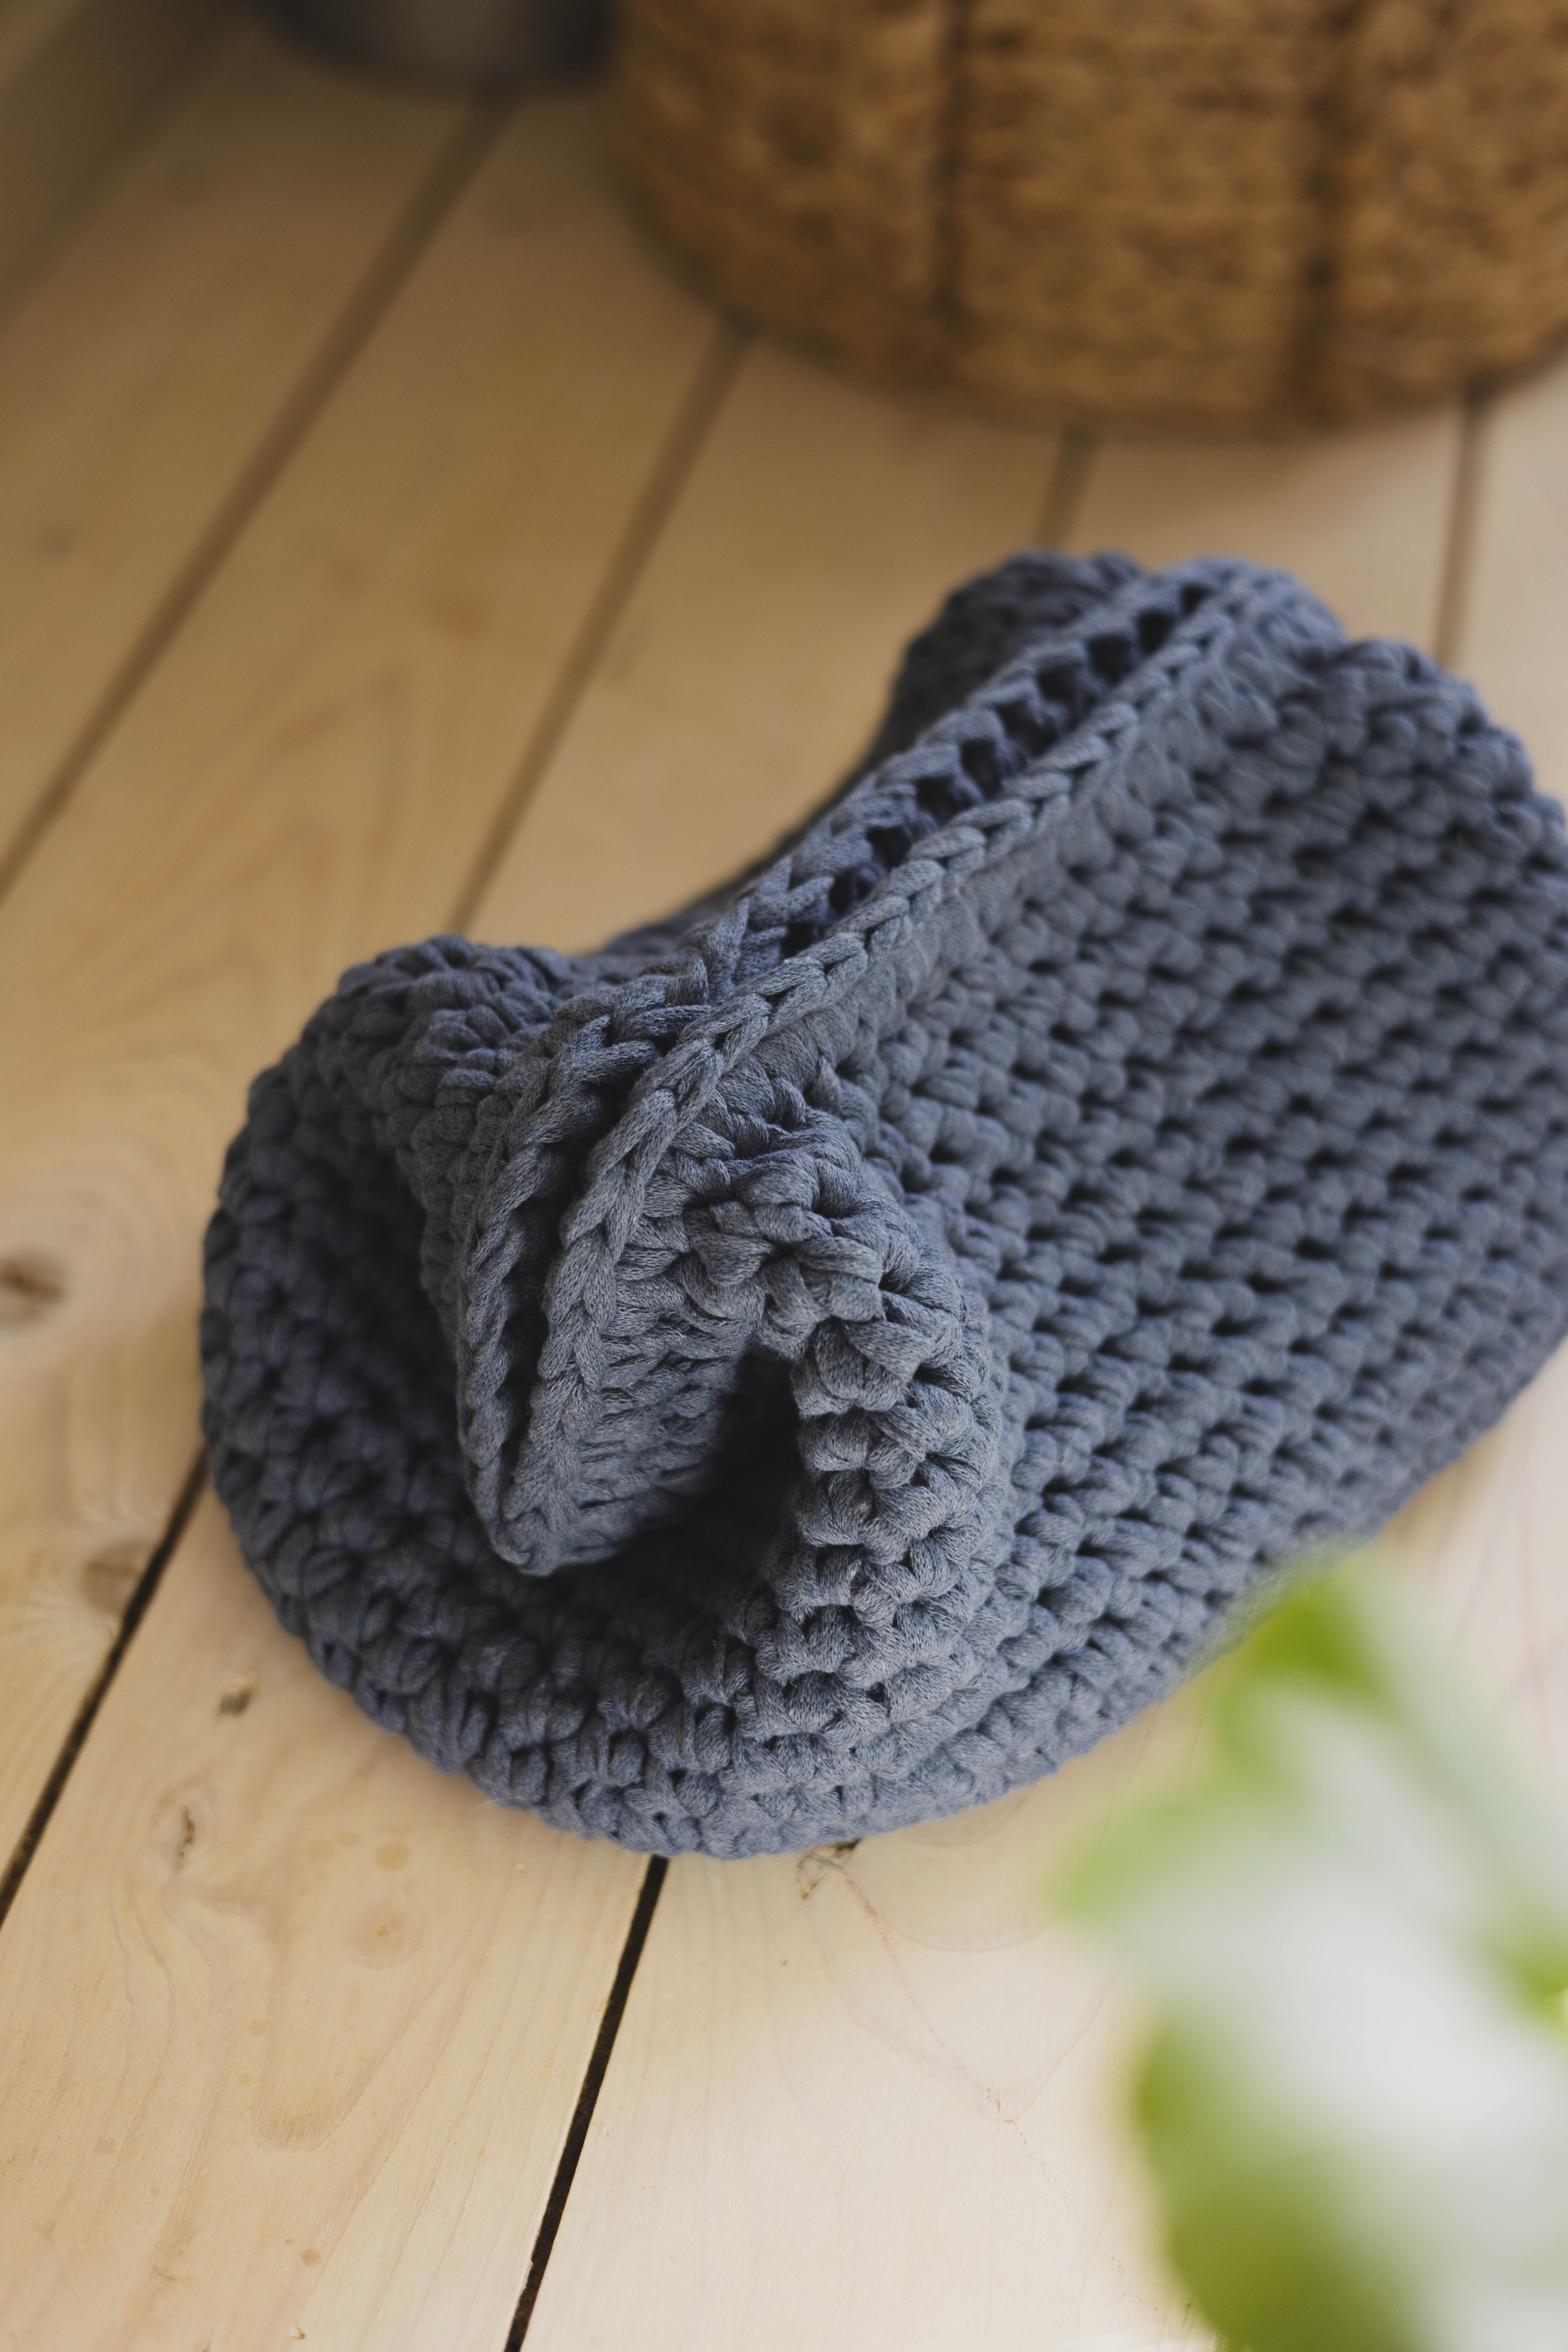
This is a charming yet elegant bag that can be customized with different colors and bow sizes! It’s suitable for beginners who have some basic crochet experience, as well as for more experienced crocheters. You will need EKO Mini tube yarn, a 6 mm (or 7 mm) crochet hook, stitch markers, scissors, and a large needle. If you want to be able to close the bag, you can sew on a magnetic clasp. We have used the colors “Nature white” and “Chalk blue”. The bag measures approximately 22–23 cm in length, 14 cm in height (without the handle), and 7 cm in width (using a 6 mm crochet hook). Including the handles, the bag is about 24 cm high.
Yarn consumption: Approximately 100 g of “Chalk Blue” and about 425 g of “Natural White”.
Note: In this pattern, we use videos from our technique library together with images.
Here's how to do it
The base of the bag is crocheted flat using regular single crochets before we move on to crocheting the sides of the bag in a spiral (without clearly finishing each round) using a stitch called the “Goose Feet Stitch.” We therefore recommend using stitch markers to keep track of where each round begins and ends. You can choose to use the “Goose Feet Stitch” for the bag itself, or regular single crochets if you prefer. /Michelle

This is what you need:
Here you can directly purchase the material for the product. Please note that the instruction is digital and appears here on the page (no written instruction).

EKO Mini tube yarn | 1000g
Narrow "Ribbon" yarn for crocheting, made of 80% recycled cotton
Buy product
.jpg)
Unleash your creativity
For only 85kr per month you get access to all our 300+ beginner-friendly instructions for crochet, knitting and macrame.
A perfect way to get started with your new hobby!

THE BASE OF THE BAG
Use white yarn. Worked flat.
Row 1: Crochet 23 chain stitches. Turn (23). If you are unsure how to crochet chain stitches (chain), see the video below.
Rows 2–8: Insert the hook into the second stitch from the hook, crochet 22 single crochets. Chain 1, turn. (23) If you are unsure how to crochet single crochets, see the video below.


Row 9: Prepare the base of the bag for the next step by crocheting one round around the base using single crochets.
Do as follows: Turn your work so you can crochet along one short side.
Crochet 8 single crochets. Turn to the long side.
Crochet 22 single crochets, placing the first single crochet in the same stitch as the last single crochet of the short side (in other words, the corners have 2 single crochets).
Turn to the other short side. Crochet 8 single crochets, again placing the first single crochet in the same stitch as the last single crochet of the long side.
Turn to the other long side. Crochet 22 single crochets starting in the corner.
Finish the round by removing the hook from the loop. Insert the hook from the back through the first single crochet of the round. Pick up the loop and pull it through. Insert the hook through the last single crochet of the round. (60)


Row 10: Crochet 60 slip stitches along the edge, all the way around. (60)
THE SIDES OF THE BAG
Use white yarn. The sides of the bag are worked in the round, directly onto the base of the bag. The first round is made with regular single crochets, followed by a technique called the “Goose Feet Stitch.” If you’re unsure how to work this stitch, see the video below. If you prefer, you can continue using single crochets instead. The sides won’t be as firm and sturdy, but the bag will still look great! Single crochet is also an easier technique.
The rounds are worked in a spiral, with no clear ending, so it can be helpful to mark the beginning or end of each round with a stitch marker.
Round 1: 60 single crochets. (60)

Round 2: Now you begin the “Goose Feet Stitch.” The first round is different from the rest. *Crochet 2 single crochets in the same stitch, skip 1 single crochet*. Repeat between *...* all the way around. (60)

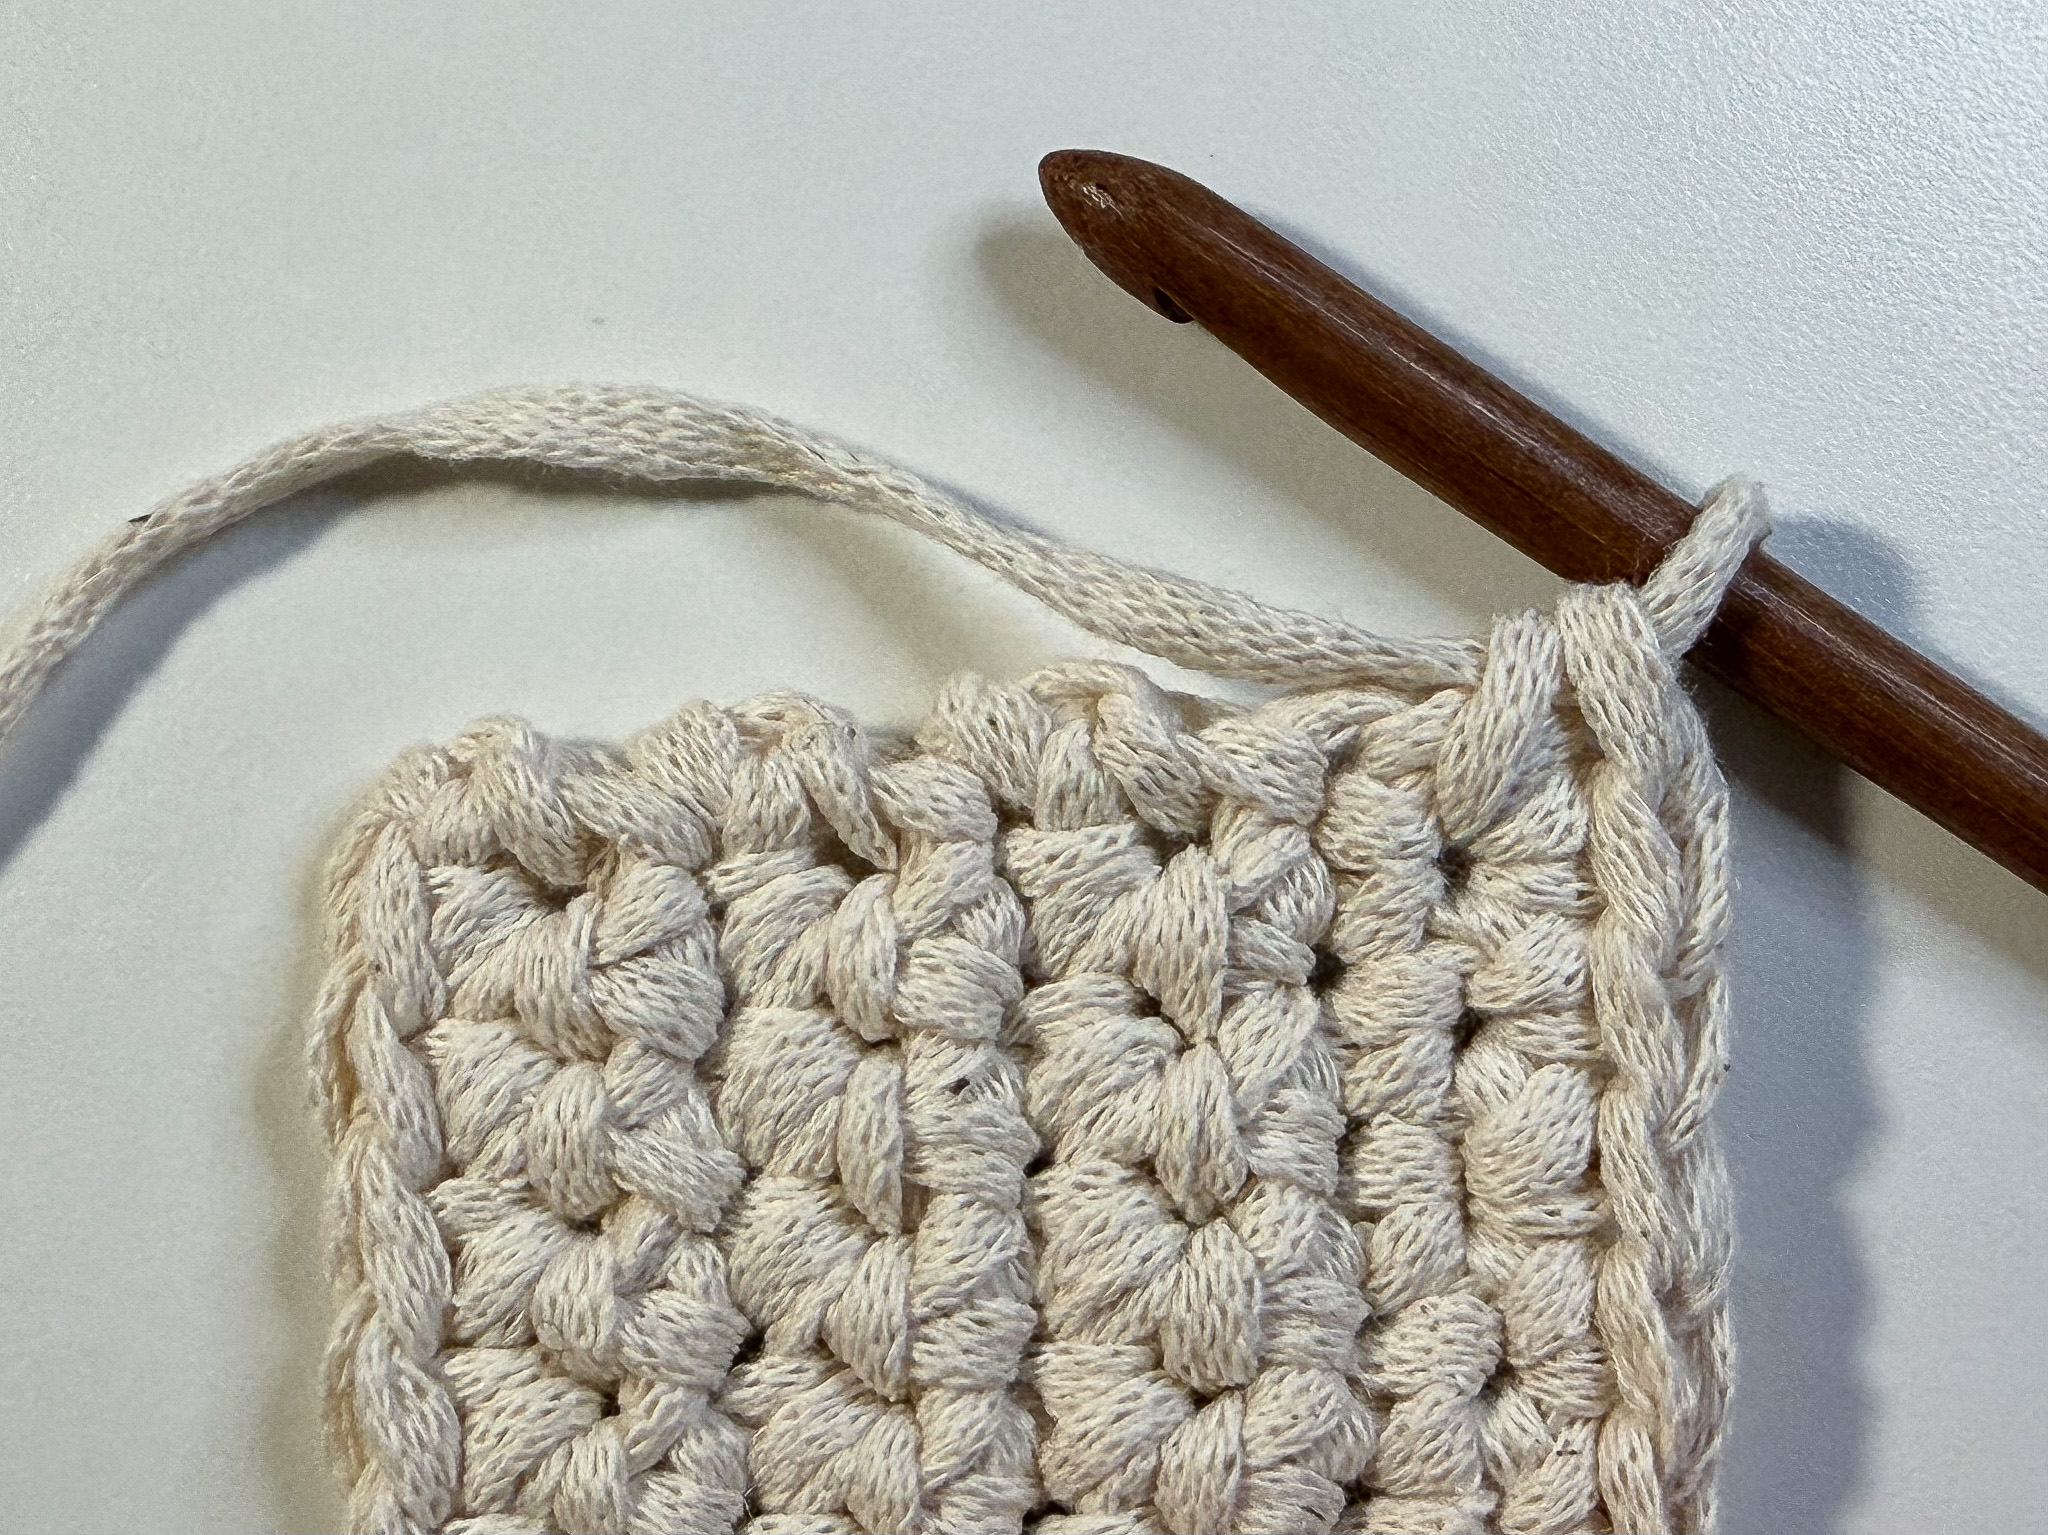
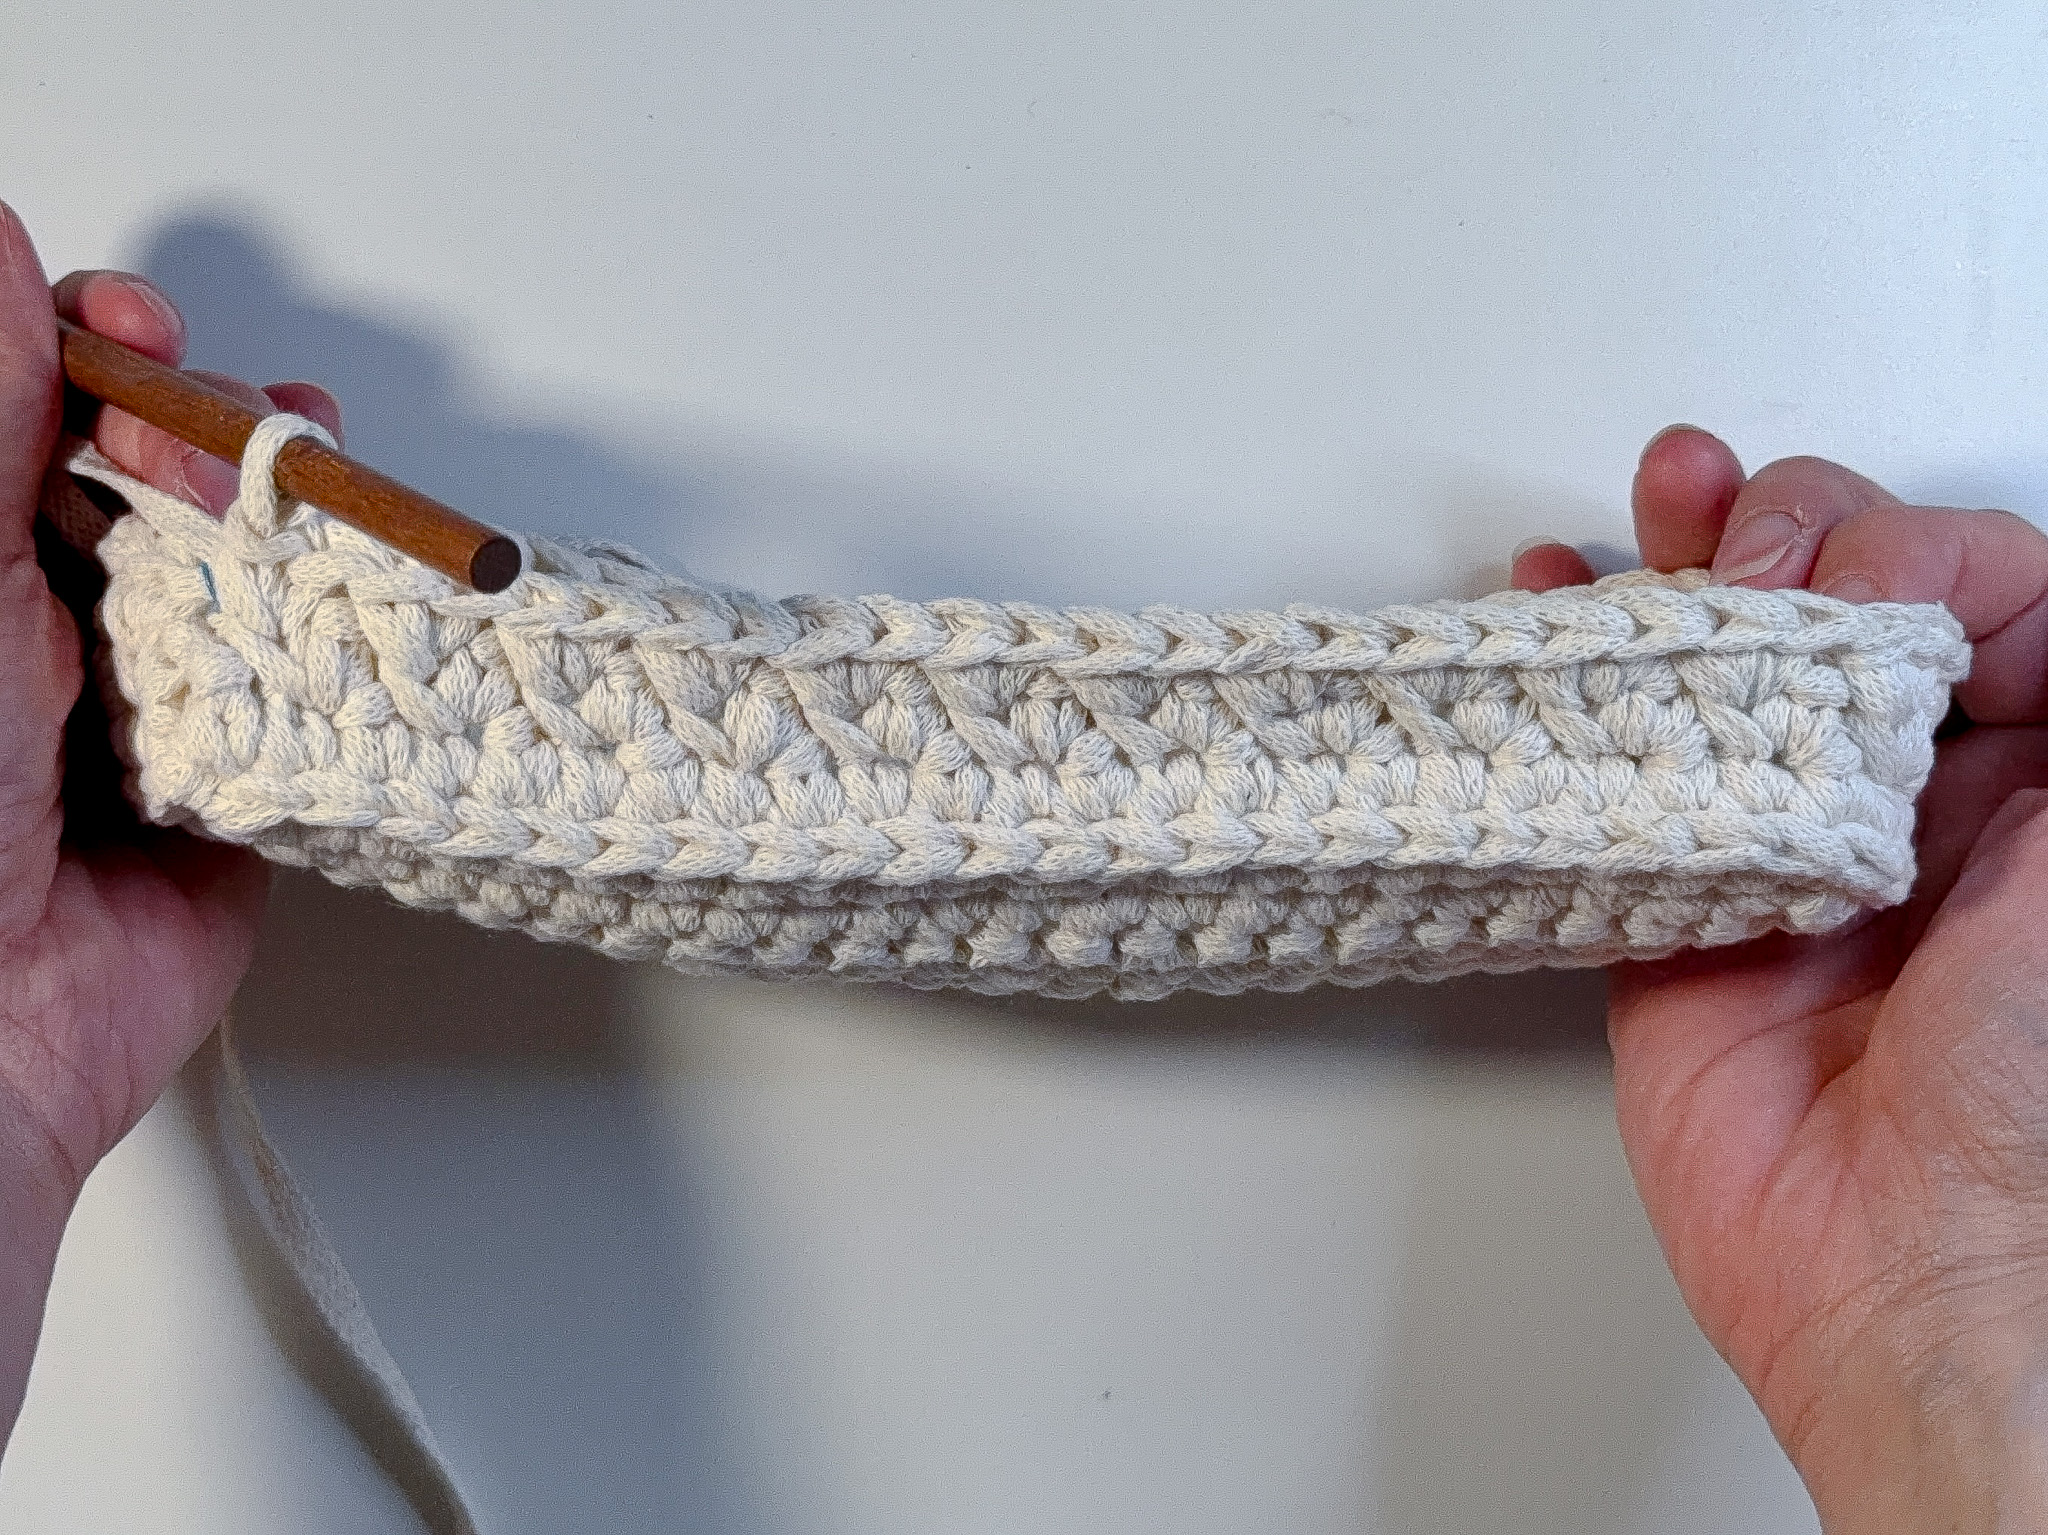
Rounds 3–17: Continue working the “Goose Feet Stitch” by making 2 single crochets through the second single crochet of the cluster below—see the video in the step above as well as the image example. (60)


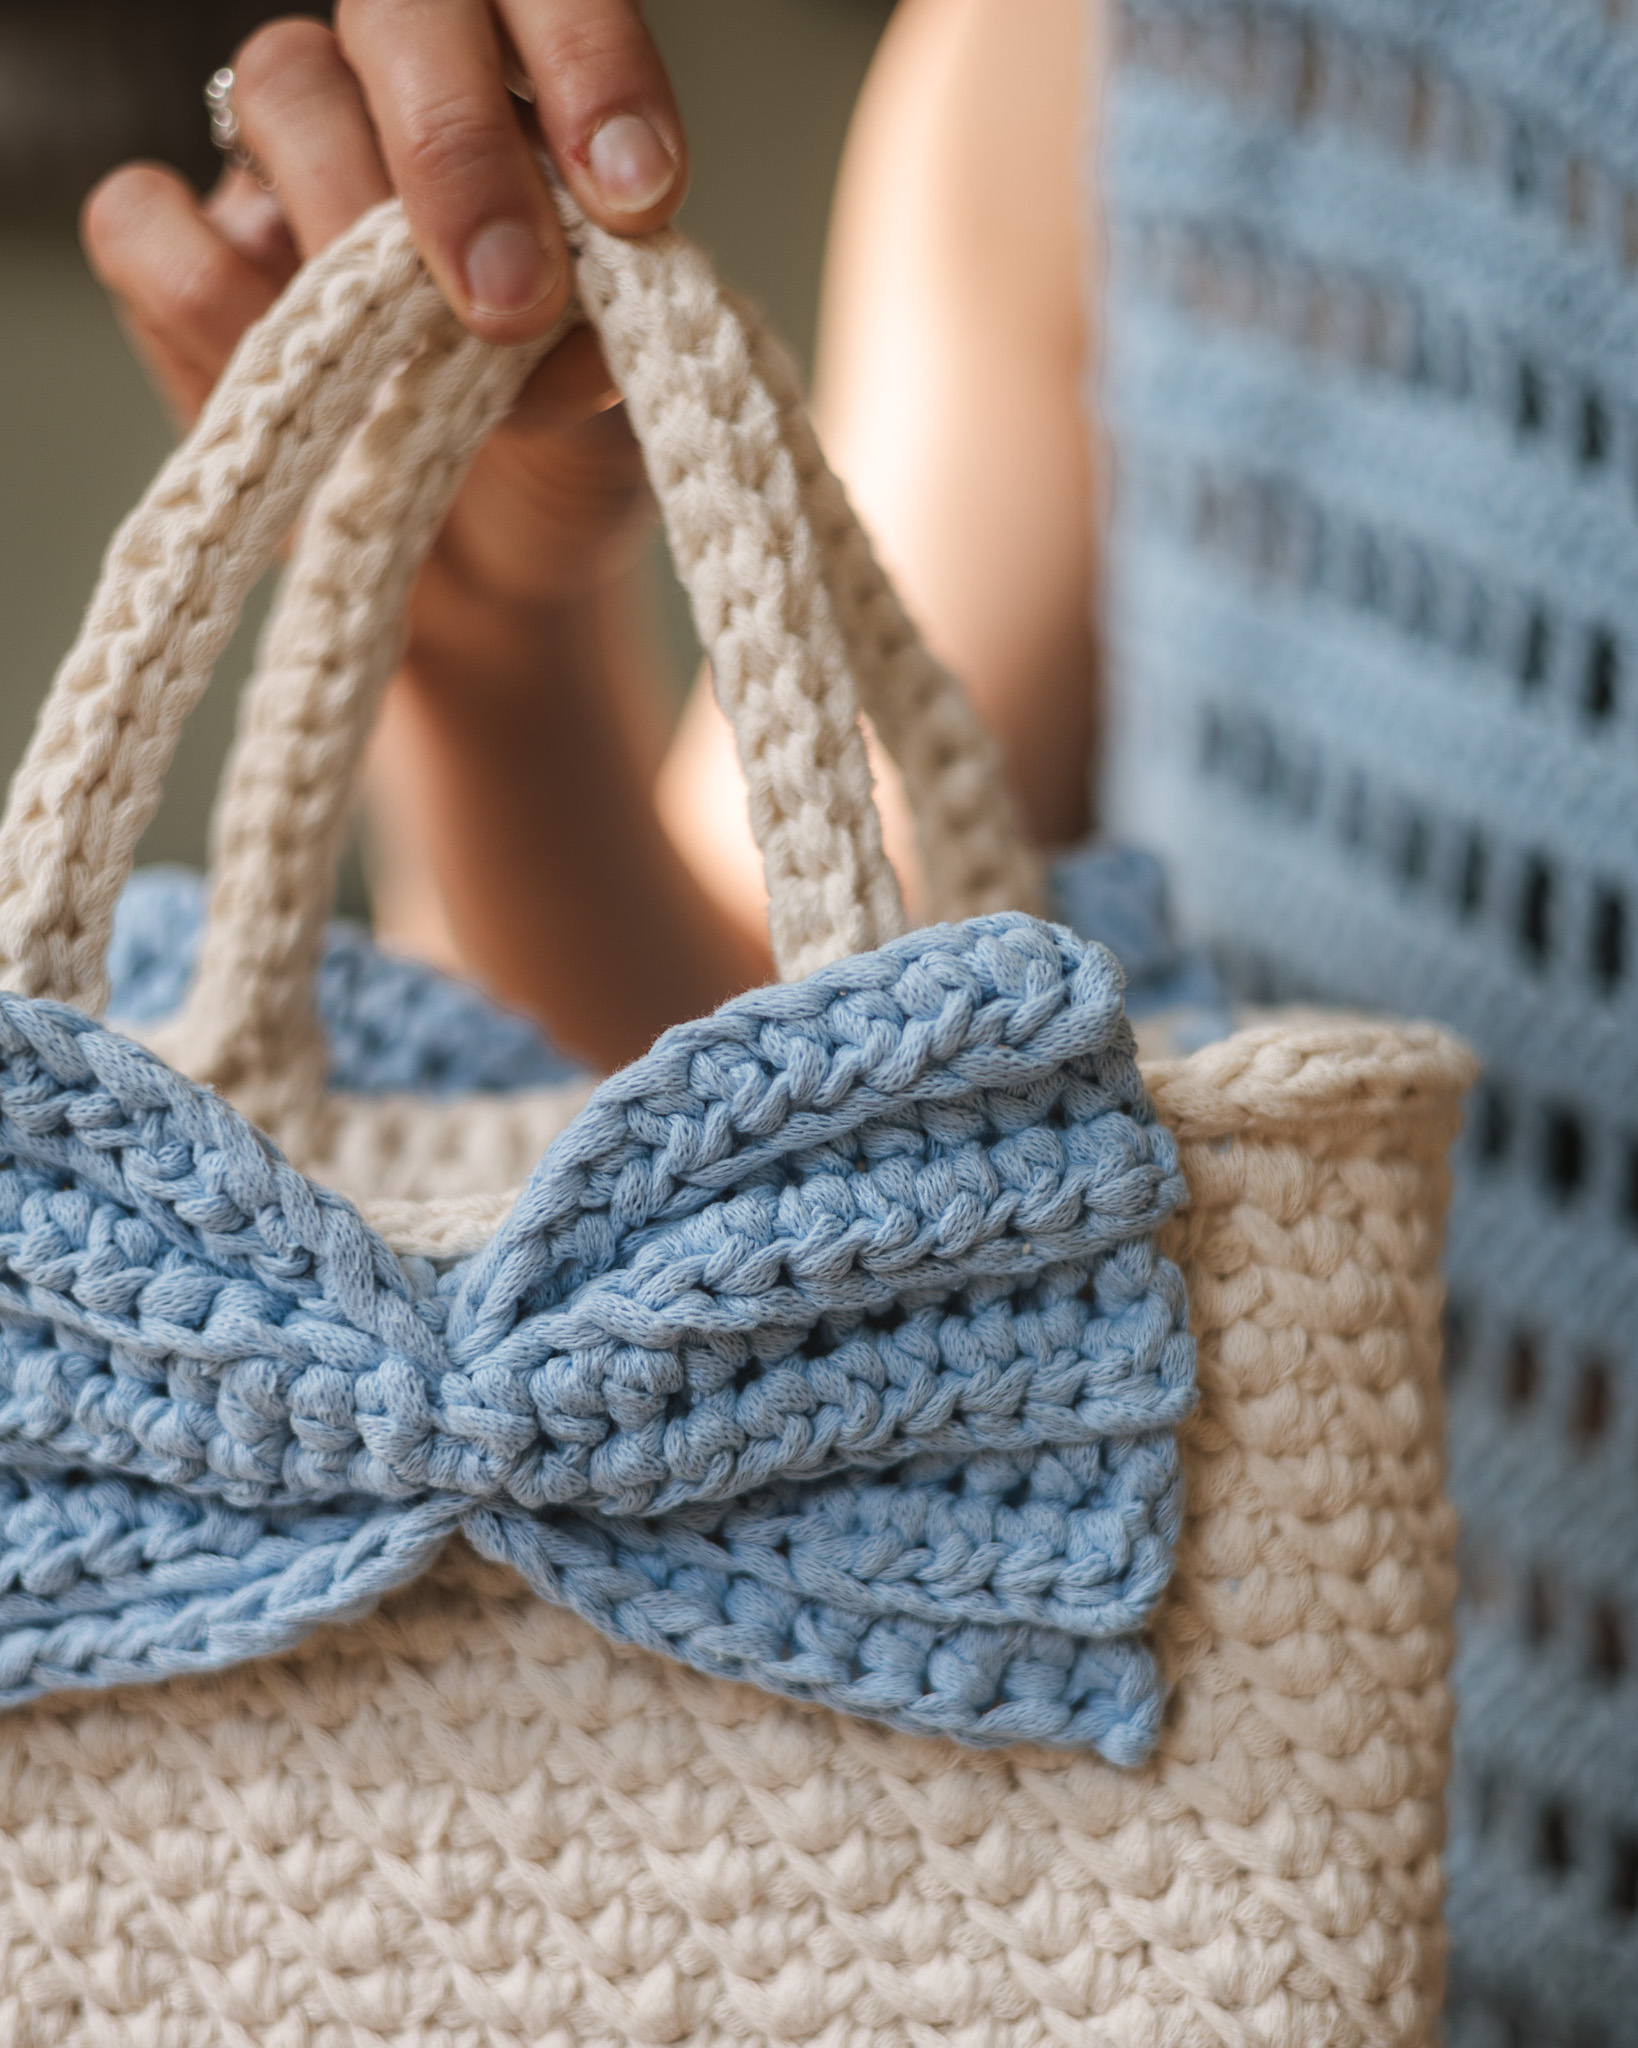
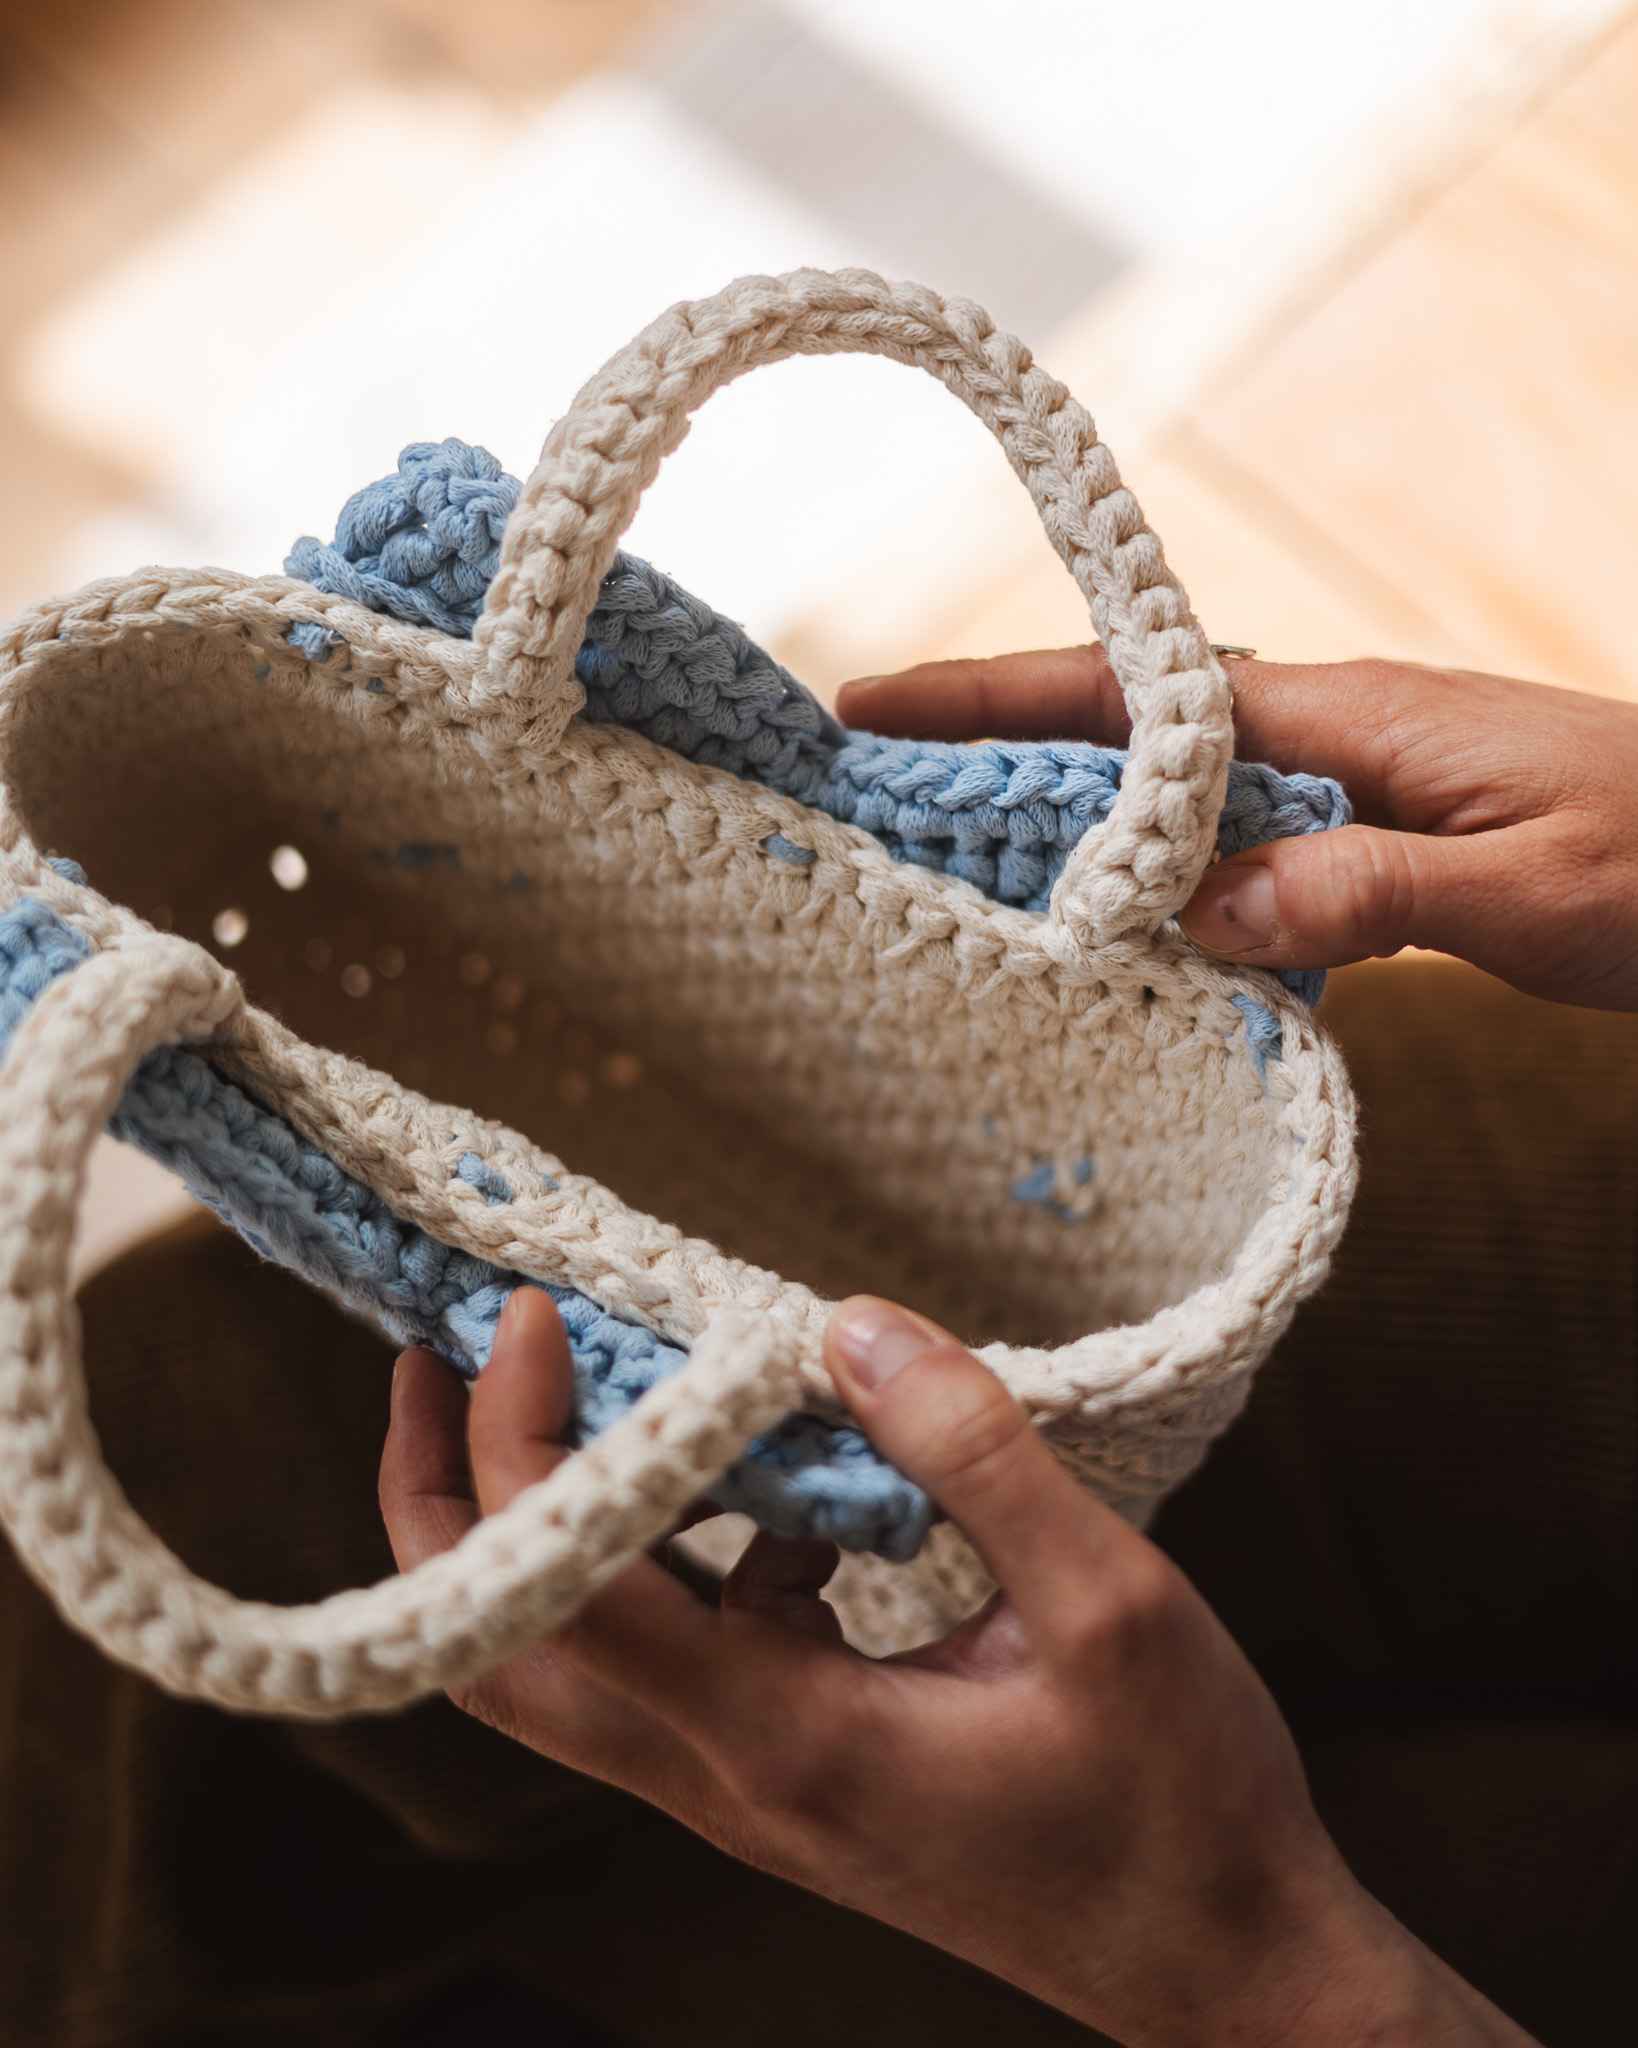
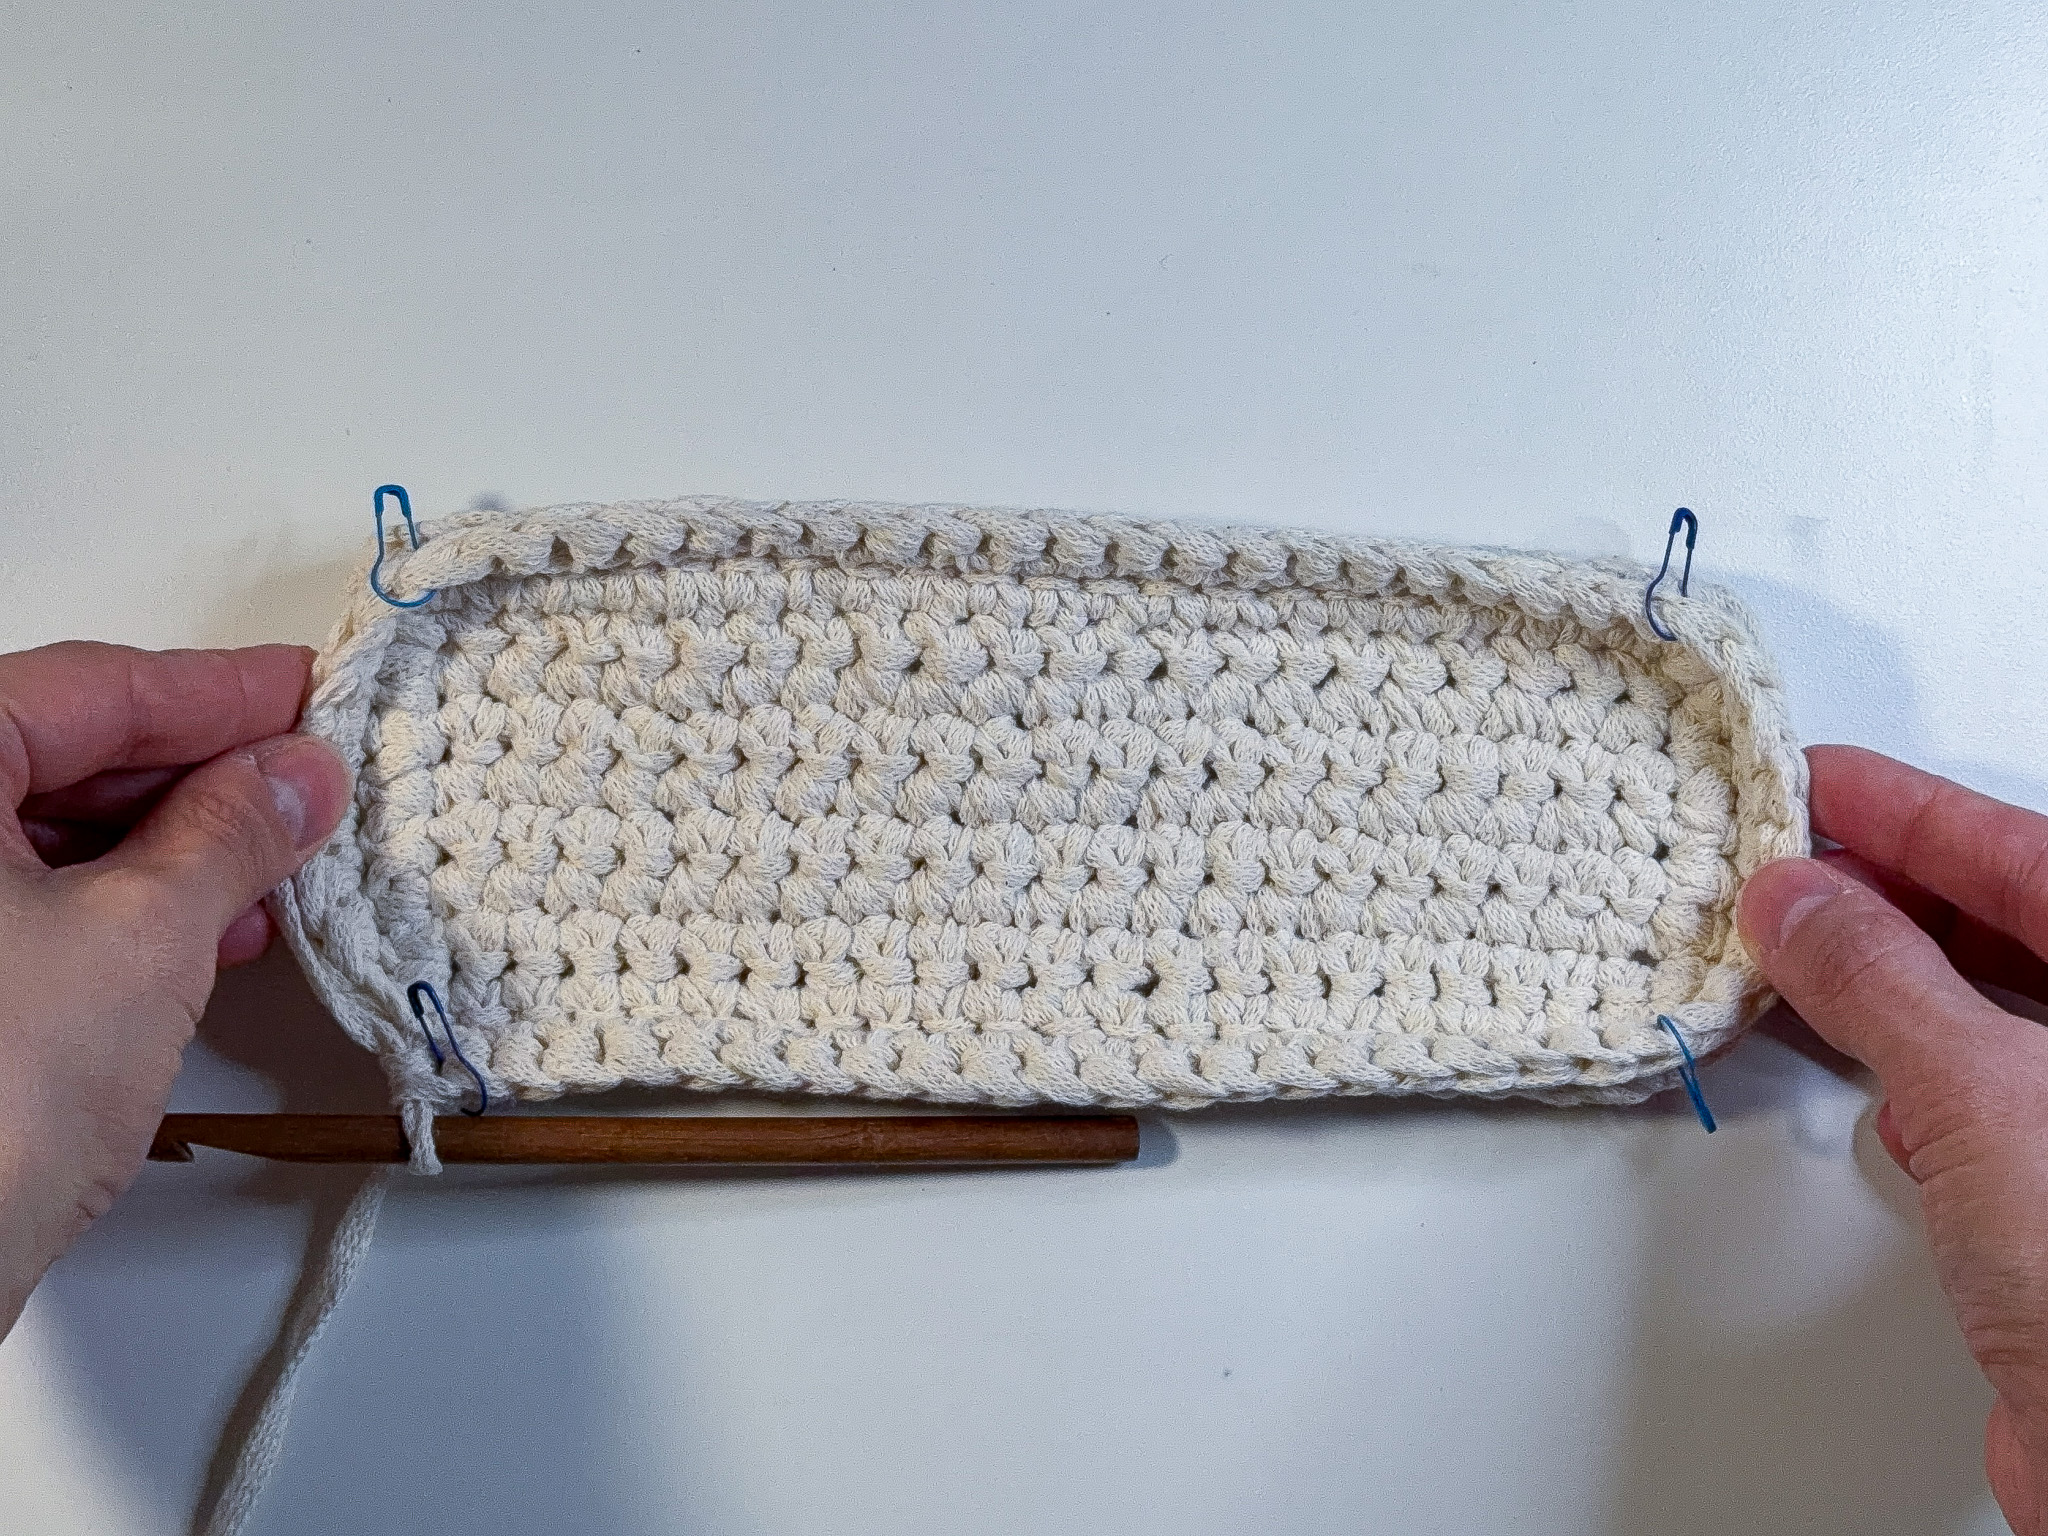
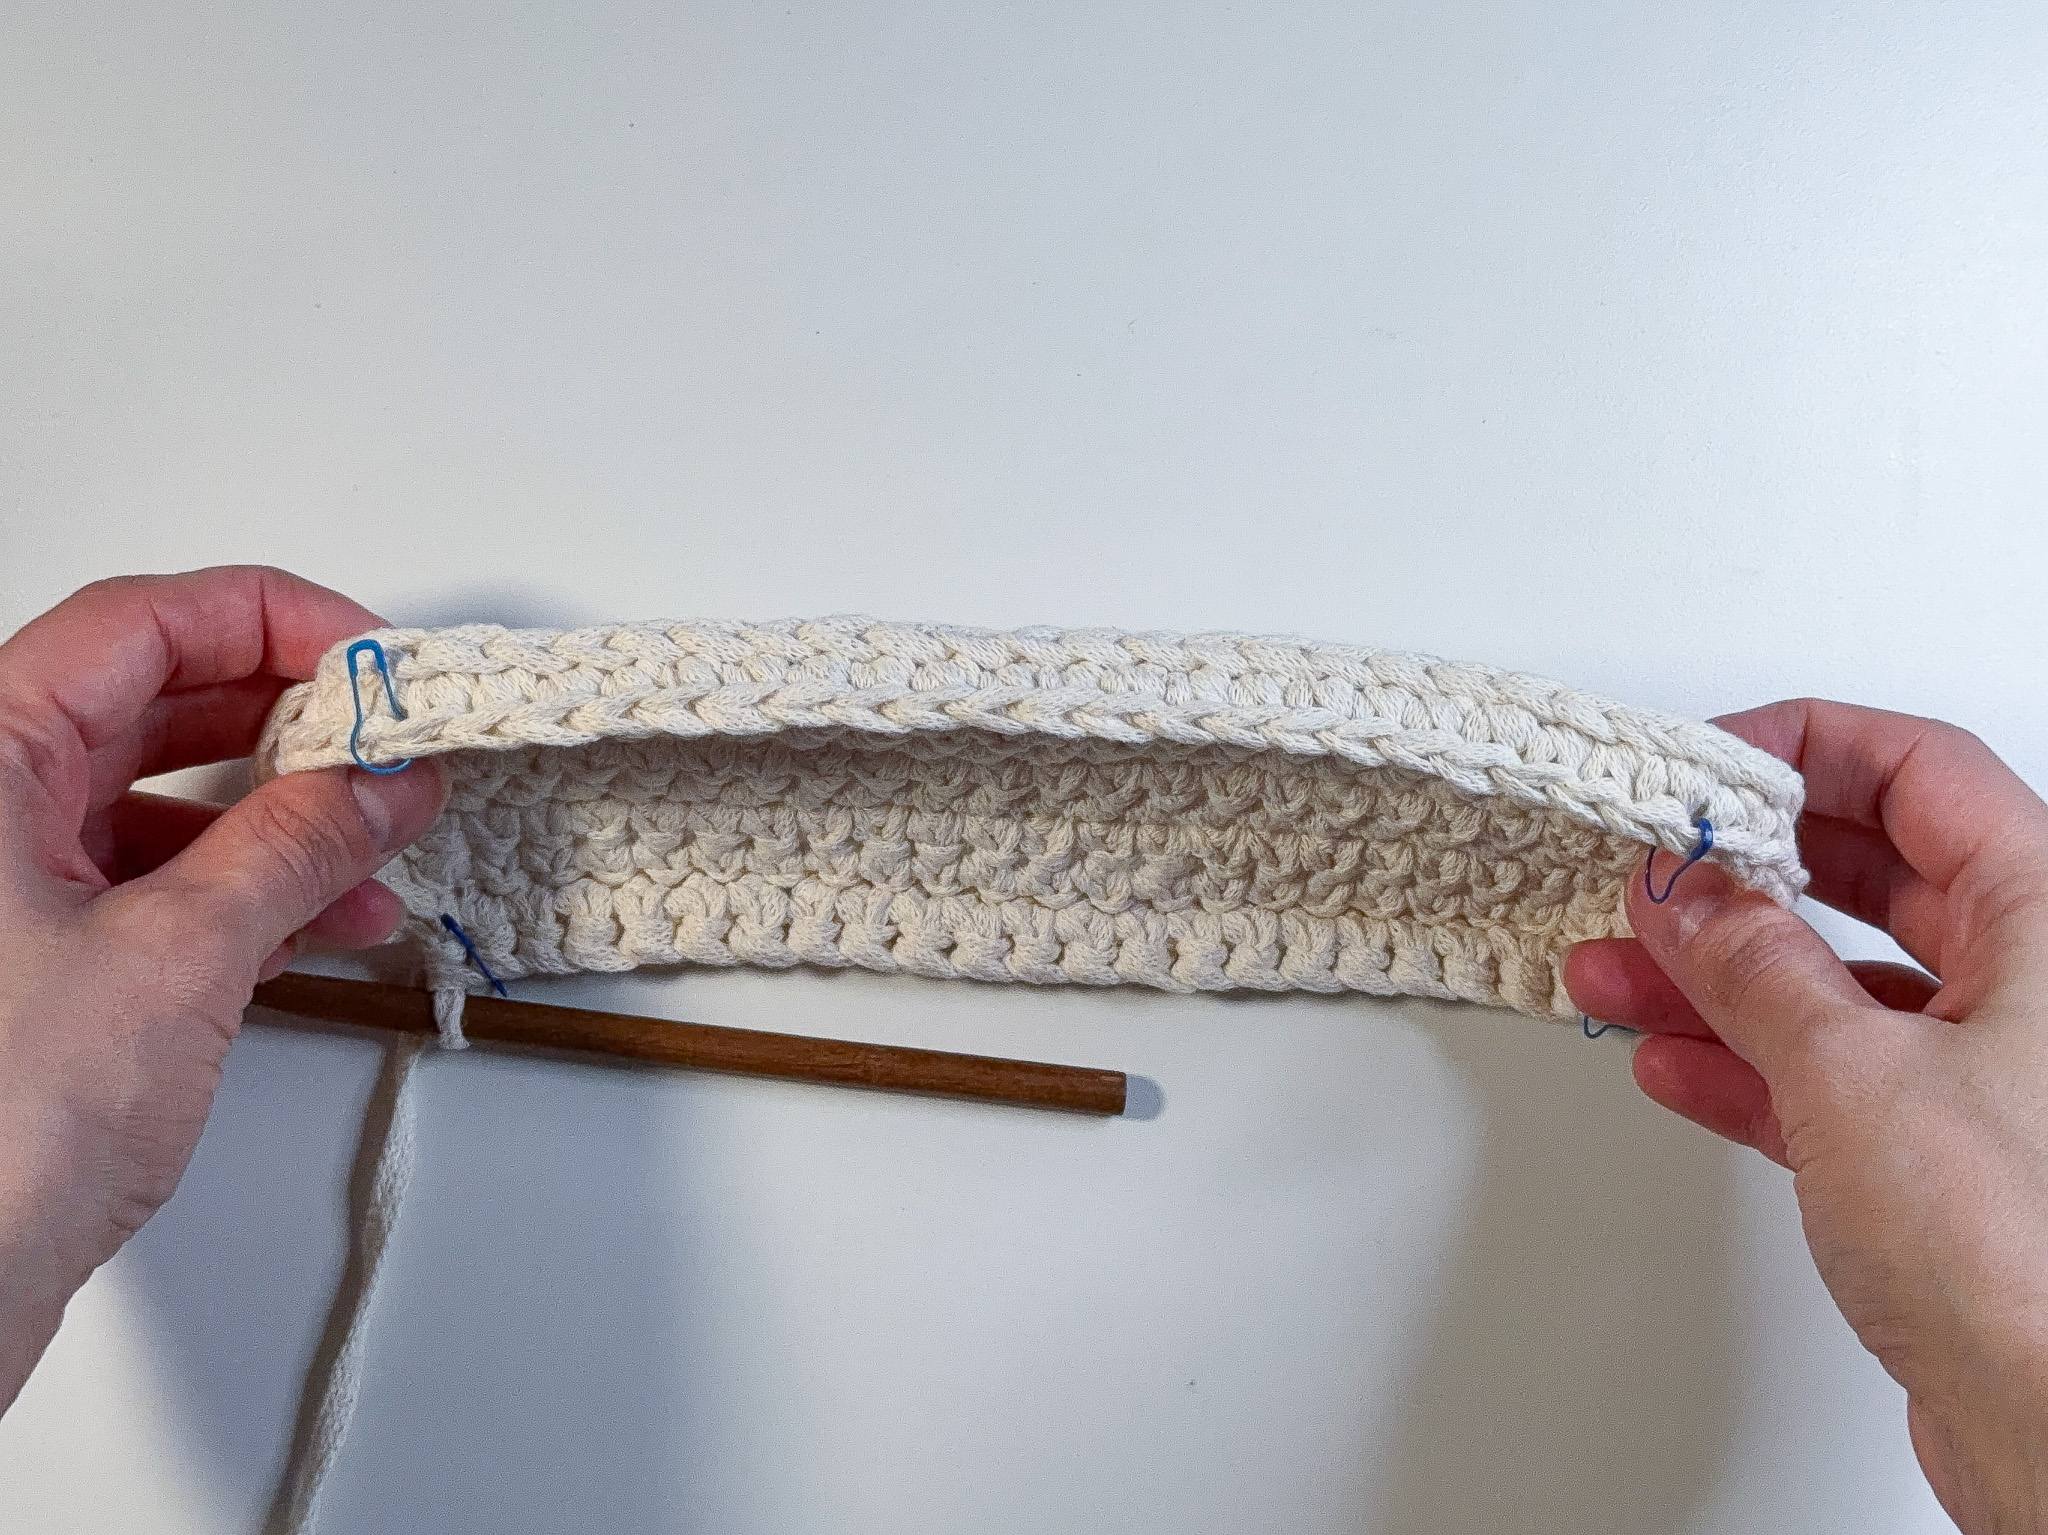
When you’ve reached the desired length, it’s time to make the handles. Mark them with stitch markers. In the picture, you can see that the blue marker is at the first corner. Then I used yellow markers to indicate where the handles should be placed.


Round 18 – With Handles:
- Crochet 5 single crochets.
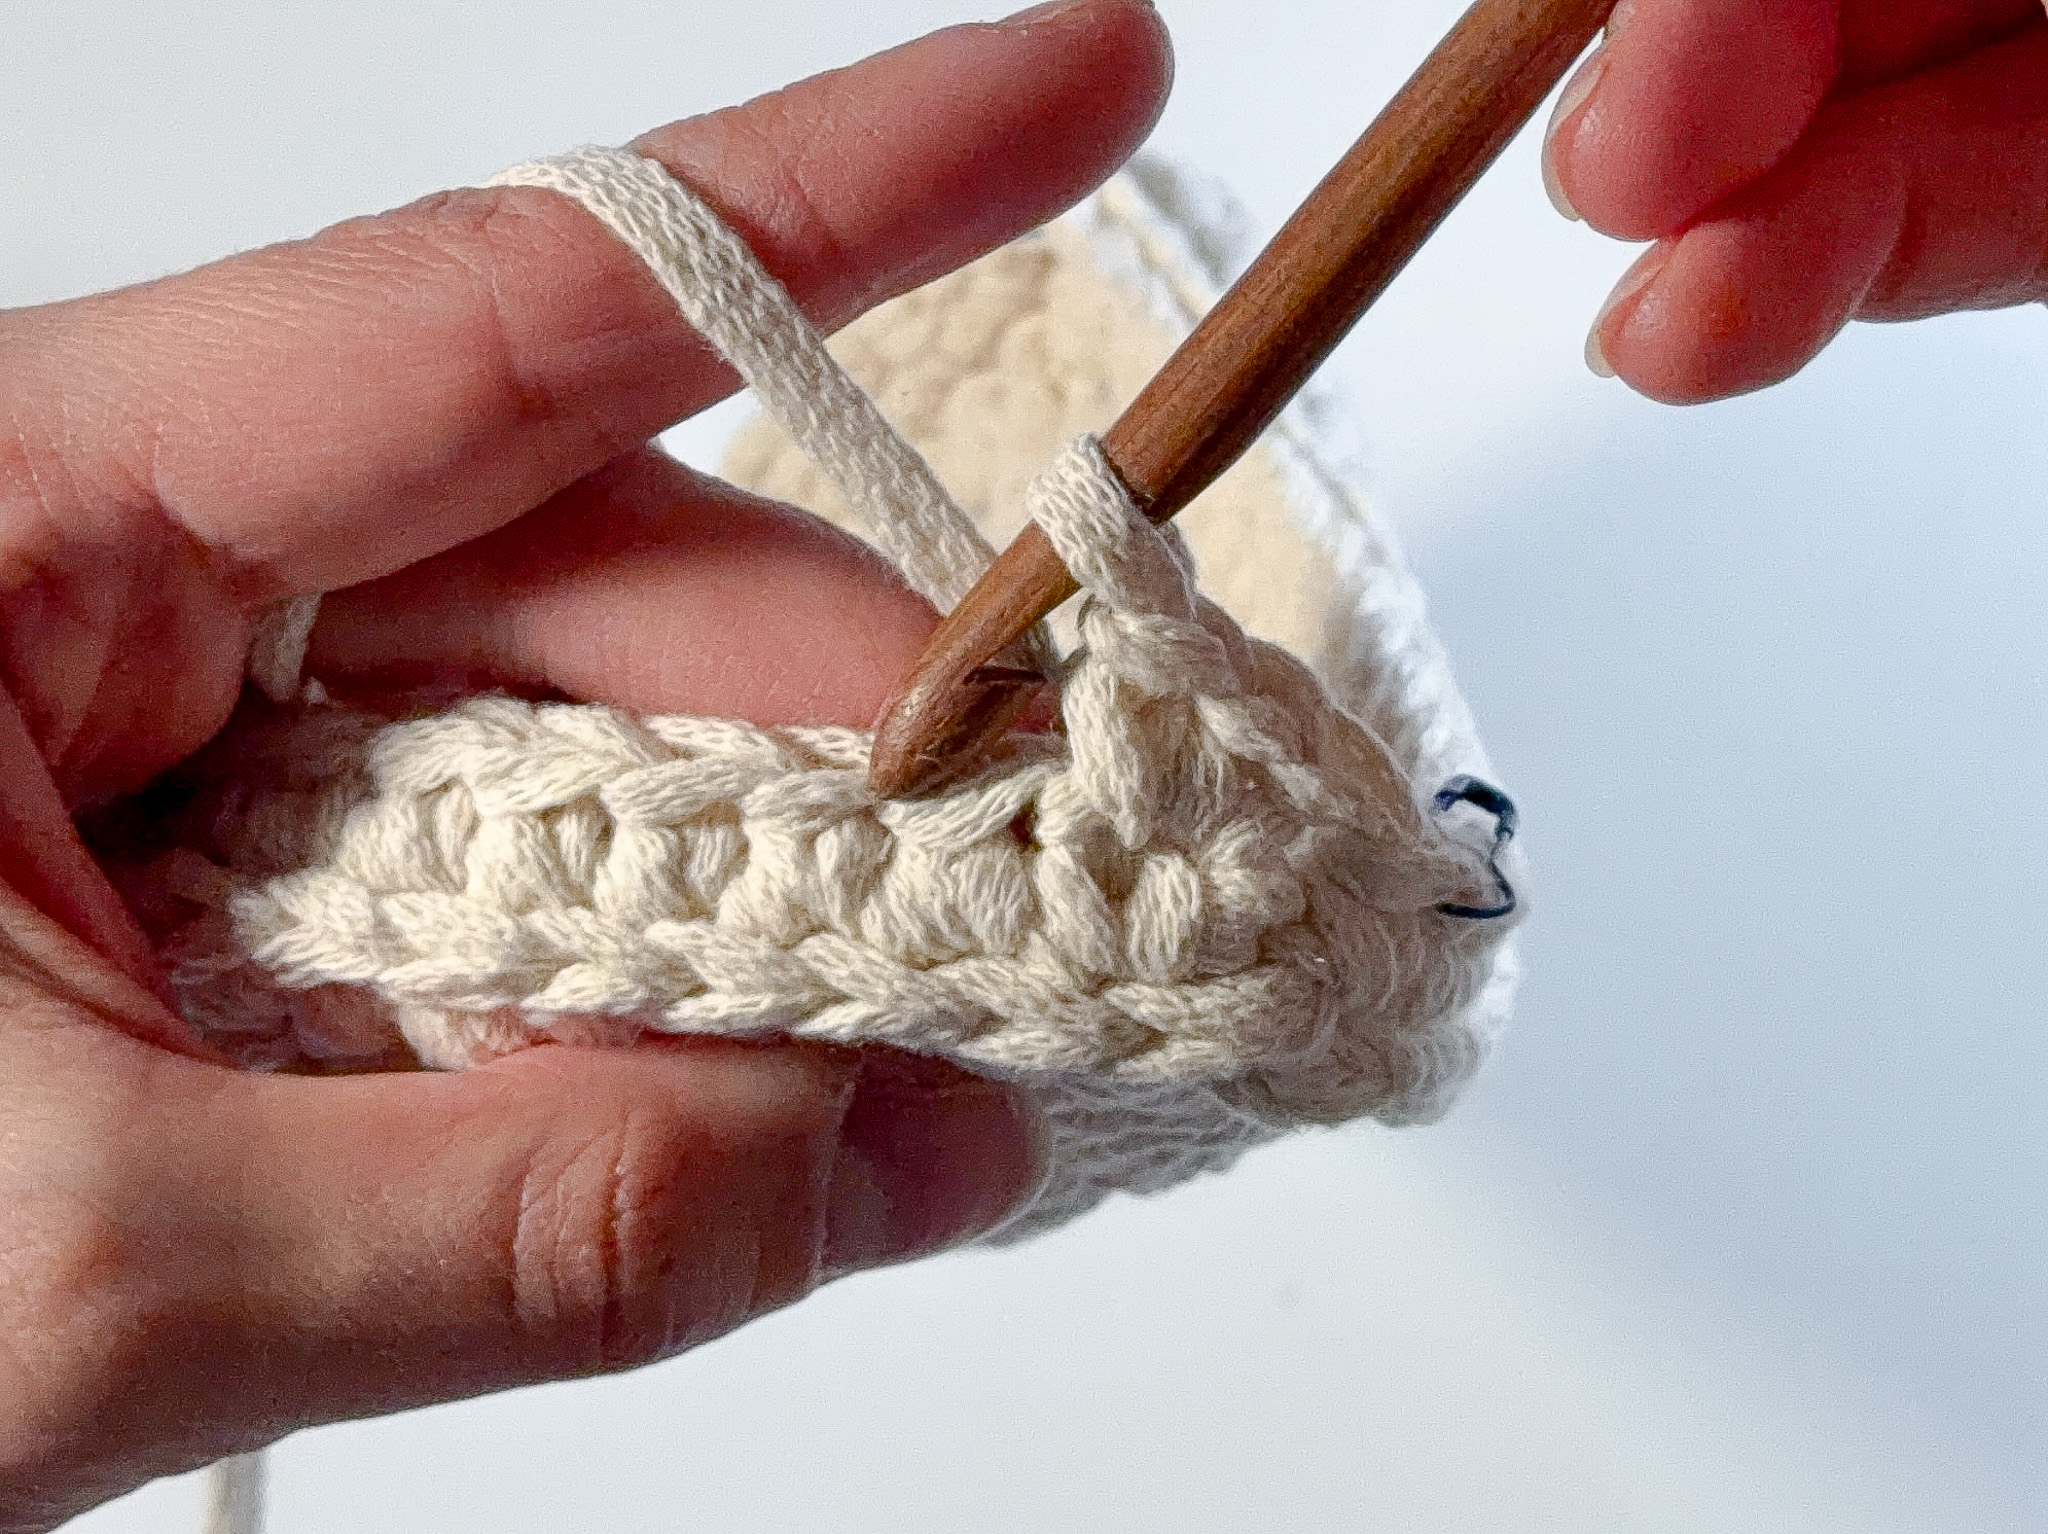
- Chain 30. Attach the chain for the handle to the edge of the bag with 1 slip stitch and turn.
- Crochet 30 single crochets into the chain. Attach to the edge of the bag with 1 slip stitch and turn.
- Join the handle with approximately 30 slip stitches. Attach to the bag’s edge with 1 slip stitch.
- Crochet 1 slip stitch to reach the other side of the handle. Then crochet 17 single crochets.
Second handle:
Chain 30. Attach to the bag’s edge with 1 slip stitch and turn.
Crochet 30 single crochets into the chain. Attach to the bag’s edge with 1 slip stitch and turn.
Join the handle with approximately 30 slip stitches by working into the visible stitch loops on the outside of the handle (see video). Attach to the bag’s edge with 1 slip stitch.
Chain 1 and then crochet 1 slip stitch on the inside of the bag to pass the handle (see video for the exact placement).
Crochet 12 single crochets.
Finish the round so it’s ready for slip stitches in Round 19 (see video if unsure).
The math works out as follows: One handle covers 14 single crochets, on each side there are 16 single crochets, and the handles themselves are 30 stitches long.
Round 19: Crochet 60 slip stitches along the opening of the bag. (60)
BOW (you can choose to make 1 or 2, depending on whether you want a bow on both sides of the bag)
Use blue yarn. Work flat.
Row 1: Crochet 22 chain stitches. Turn. (22)

Row 2: Insert the hook into the third chain from the hook. Crochet 20 half double crochets. Chain 2, turn. (22)
If you are unsure how to work half double crochets, see the video below.


Rows 3–9: Crochet 20 half double crochets. Chain 2, turn. (22)

Weave in loose ends. Cut a long strand of yarn from the skein. Pinch your crocheted piece in the middle and sew it together. Then attach the bow to the bag using a sewing needle and extra blue yarn.


TIP!
You can customize the bow by adding a border of single crochets before pinching it in the middle. You can also adjust the size of the bow by increasing or decreasing the number of chain stitches—it doesn’t matter if the number is even or odd.
For example: The brown/beige bow was made with 18 chain stitches but has the same number of rows as the blue bow. The brown/beige bow also has single crochets worked all the way around before the crocheted piece was pinched in the middle.

Magnetic Closure
If you want to be able to close the bag securely, I recommend trying magnetic snaps! Sew on one snap for a simple closure in the middle, or two snaps for extra fastening.
Keep in mind that you don’t need to sew all the way through the bag’s walls with the thin sewing thread. It’s enough to go through the nearest yarn strands of the bag.
It works even better—and may be easier—if you sew the snaps onto a lining/inner fabric first, and then attach the lining inside the bag.
Pattern with Crochet Terms
This part of the pattern uses standard crochet abbreviations. For more pictures or videos, see the simpler version.
Abbreviations:
- ch = chain
- sc = single crochet
- dc = double crochet
- R = round
- hdc = half double crochet
- sl st = slip stitch
- *…* = Repeat the sequence between … the number of times indicated
- (…) = number of stitches in the round
BAG BASE
Use white yarn. Work flat.
R1: Ch 23. Turn. (23)
R2–8: Insert hook into 2nd ch from hook, sc 22. Ch 1, turn. (23)
R9: Prepare the bag base for the next step by working around with sc.
- Sc 8 along the short side.
- Sc 22 along the long side, placing the first sc in the same stitch as the last sc of the short side (corners have 2 sc in the same stitch).
- Sc 8 along the other short side (first sc goes in last sc of previous side).
- Sc 22 along the final long side (first sc goes in last sc of previous side).
Finish the round by removing the hook from the loop. Insert the hook from the back through the first sc of the round. Pull up a loop. Pull it through. Insert the hook through the last sc of the round … (60)
R10: … then work 60 sl st around the edge, all the way around. (60)
BAG SIDES
Use white yarn. The sides are worked in the round, directly onto the bag base. The first round is worked with regular single crochets, then continue using a technique called the “Goose Feet Stitch.”
The rounds are worked in a spiral, with no obvious end, so it can be helpful to mark the beginning or end of each round. If you’re unsure about the technique, see the video in the simpler version.
R 1: 60 sc. (60)
R 2: Now begin the “Goose Feet Stitch.”
*Work 2 sc in the same st, skip 1 sc*. Repeat from * to * all the way around. (60)
R 3–17: Continue working the “Goose Feet Stitch” by working 2 sc into the second sc of the cluster below. (60)
When you’ve reached the desired length, it’s time to make the handles. Mark their placement with stitch markers. In the picture, the blue marker shows the first corner. Then I used yellow markers to indicate where the handles will go.
R 18 – With Handles
- Work 5 sc. Ch 30. Attach to the edge of the bag with 1 sl st and turn.
- Work 30 sc into the chain. Attach to the edge of the bag with 1 sl st and turn.
- Join the handle with approximately 30 sl st. Attach to the bag edge with 1 sl st.
- Ch 1. Work 1 sl st on the inside of the bag to reach the other side of the handle. Then work 17 sc.
Second handle:
5. Ch 30. Attach to the edge with 1 sl st and turn.
6. Work 30 sc into the chain. Attach to the edge with 1 sl st and turn.
7. Join the handle with approximately 30 sl st into the stitch loops visible on the front of the handles (see the video in the simpler version for guidance). Attach to the bag edge with 1 sl st.
8. Ch 1, then work 1 sl st to pass the handle on the inside of the bag (see video for exact placement). Work 12 sc.
Math: One handle covers 14 sc, each side has 16 sc, and the handles themselves are 30 stitches long.
R 19: Work 60 sl st around the bag opening. (60)
BOW (You can make 1 or 2 bows if you want one on each side of the bag)
Use blue yarn. Work flat.
Row 1: Ch 22. Turn. (22)
Row 2: Insert the hook into the 3rd ch from the hook. Work 20 hdc. Ch 2, turn. (22)
Rows 3–9: Work 20 hdc. Ch 2, turn. (22)
Weave in loose ends. Cut a long strand of yarn from the skein. Pinch your crocheted piece in the middle and sew it together. Then attach the bow to the bag using a tapestry needle and extra blue yarn.
TIP!
You can customize the bow by adding a border of sc before pinching it in the middle. You can also adjust the size of the bow by increasing or decreasing the number of chain stitches—it doesn’t matter if the number is even or odd.
For example: The brown/beige bow was made with 18 ch but has the same number of rows as the blue bow. The brown/beige bow also has sc worked all the way around before the crocheted piece was pinched in the middle.
If you want to close the bag securely, I recommend trying magnetic snaps! Sew on one snap for a simple closure in the middle, or two snaps for extra fastening.
Keep in mind that you don’t need to sew all the way through the bag’s walls with thin thread. It’s enough to go through the nearest yarn strands of the bag.
It works even better—and may be easier—if you sew the snaps onto a lining/inner fabric first, then attach the lining inside the bag.
You’re done!
The rights to this pattern belong to MYO Make Your Own. The pattern or its pictures may not be copied, shared or resold either in parts or in its entirety, but you may sell items you have crocheted from this pattern. If you have questions about the pattern, contact MYO at hello@makeyourown.se.
THE BASE OF THE BAG
Use white yarn. Worked flat.
Row 1: Crochet 23 chain stitches. Turn (23). If you are unsure how to crochet chain stitches (chain), see the video below.
Rows 2–8: Insert the hook into the second stitch from the hook, crochet 22 single crochets. Chain 1, turn. (23) If you are unsure how to crochet single crochets, see the video below.
Row 9: Prepare the base of the bag for the next step by crocheting one round around the base using single crochets.
Do as follows: Turn your work so you can crochet along one short side.
Crochet 8 single crochets. Turn to the long side.
Crochet 22 single crochets, placing the first single crochet in the same stitch as the last single crochet of the short side (in other words, the corners have 2 single crochets).
Turn to the other short side. Crochet 8 single crochets, again placing the first single crochet in the same stitch as the last single crochet of the long side.
Turn to the other long side. Crochet 22 single crochets starting in the corner.
Finish the round by removing the hook from the loop. Insert the hook from the back through the first single crochet of the round. Pick up the loop and pull it through. Insert the hook through the last single crochet of the round. (60)
Row 10: Crochet 60 slip stitches along the edge, all the way around. (60)
THE SIDES OF THE BAG
Use white yarn. The sides of the bag are worked in the round, directly onto the base of the bag. The first round is made with regular single crochets, followed by a technique called the “Goose Feet Stitch.” If you’re unsure how to work this stitch, see the video below. If you prefer, you can continue using single crochets instead. The sides won’t be as firm and sturdy, but the bag will still look great! Single crochet is also an easier technique.
The rounds are worked in a spiral, with no clear ending, so it can be helpful to mark the beginning or end of each round with a stitch marker.
Round 1: 60 single crochets. (60)
Round 2: Now you begin the “Goose Feet Stitch.” The first round is different from the rest. *Crochet 2 single crochets in the same stitch, skip 1 single crochet*. Repeat between *...* all the way around. (60)
Rounds 3–17: Continue working the “Goose Feet Stitch” by making 2 single crochets through the second single crochet of the cluster below—see the video in the step above as well as the image example. (60)
When you’ve reached the desired length, it’s time to make the handles. Mark them with stitch markers. In the picture, you can see that the blue marker is at the first corner. Then I used yellow markers to indicate where the handles should be placed.
Round 18 – With Handles:
- Crochet 5 single crochets.
- Chain 30. Attach the chain for the handle to the edge of the bag with 1 slip stitch and turn.
- Crochet 30 single crochets into the chain. Attach to the edge of the bag with 1 slip stitch and turn.
- Join the handle with approximately 30 slip stitches. Attach to the bag’s edge with 1 slip stitch.
- Crochet 1 slip stitch to reach the other side of the handle. Then crochet 17 single crochets.
Second handle:
Chain 30. Attach to the bag’s edge with 1 slip stitch and turn.
Crochet 30 single crochets into the chain. Attach to the bag’s edge with 1 slip stitch and turn.
Join the handle with approximately 30 slip stitches by working into the visible stitch loops on the outside of the handle (see video). Attach to the bag’s edge with 1 slip stitch.
Chain 1 and then crochet 1 slip stitch on the inside of the bag to pass the handle (see video for the exact placement).
Crochet 12 single crochets.
Finish the round so it’s ready for slip stitches in Round 19 (see video if unsure).
The math works out as follows: One handle covers 14 single crochets, on each side there are 16 single crochets, and the handles themselves are 30 stitches long.
Round 19: Crochet 60 slip stitches along the opening of the bag. (60)
BOW (you can choose to make 1 or 2, depending on whether you want a bow on both sides of the bag)
Use blue yarn. Work flat.
Row 1: Crochet 22 chain stitches. Turn. (22)
Row 2: Insert the hook into the third chain from the hook. Crochet 20 half double crochets. Chain 2, turn. (22)
If you are unsure how to work half double crochets, see the video below.
Rows 3–9: Crochet 20 half double crochets. Chain 2, turn. (22)
Weave in loose ends. Cut a long strand of yarn from the skein. Pinch your crocheted piece in the middle and sew it together. Then attach the bow to the bag using a sewing needle and extra blue yarn.
TIP!
You can customize the bow by adding a border of single crochets before pinching it in the middle. You can also adjust the size of the bow by increasing or decreasing the number of chain stitches—it doesn’t matter if the number is even or odd.
For example: The brown/beige bow was made with 18 chain stitches but has the same number of rows as the blue bow. The brown/beige bow also has single crochets worked all the way around before the crocheted piece was pinched in the middle.
Magnetic Closure
If you want to be able to close the bag securely, I recommend trying magnetic snaps! Sew on one snap for a simple closure in the middle, or two snaps for extra fastening.
Keep in mind that you don’t need to sew all the way through the bag’s walls with the thin sewing thread. It’s enough to go through the nearest yarn strands of the bag.
It works even better—and may be easier—if you sew the snaps onto a lining/inner fabric first, and then attach the lining inside the bag.
Pattern with Crochet Terms
This part of the pattern uses standard crochet abbreviations. For more pictures or videos, see the simpler version.
Abbreviations:
- ch = chain
- sc = single crochet
- dc = double crochet
- R = round
- hdc = half double crochet
- sl st = slip stitch
- *…* = Repeat the sequence between … the number of times indicated
- (…) = number of stitches in the round
BAG BASE
Use white yarn. Work flat.
R1: Ch 23. Turn. (23)
R2–8: Insert hook into 2nd ch from hook, sc 22. Ch 1, turn. (23)
R9: Prepare the bag base for the next step by working around with sc.
- Sc 8 along the short side.
- Sc 22 along the long side, placing the first sc in the same stitch as the last sc of the short side (corners have 2 sc in the same stitch).
- Sc 8 along the other short side (first sc goes in last sc of previous side).
- Sc 22 along the final long side (first sc goes in last sc of previous side).
Finish the round by removing the hook from the loop. Insert the hook from the back through the first sc of the round. Pull up a loop. Pull it through. Insert the hook through the last sc of the round … (60)
R10: … then work 60 sl st around the edge, all the way around. (60)
BAG SIDES
Use white yarn. The sides are worked in the round, directly onto the bag base. The first round is worked with regular single crochets, then continue using a technique called the “Goose Feet Stitch.”
The rounds are worked in a spiral, with no obvious end, so it can be helpful to mark the beginning or end of each round. If you’re unsure about the technique, see the video in the simpler version.
R 1: 60 sc. (60)
R 2: Now begin the “Goose Feet Stitch.”
*Work 2 sc in the same st, skip 1 sc*. Repeat from * to * all the way around. (60)
R 3–17: Continue working the “Goose Feet Stitch” by working 2 sc into the second sc of the cluster below. (60)
When you’ve reached the desired length, it’s time to make the handles. Mark their placement with stitch markers. In the picture, the blue marker shows the first corner. Then I used yellow markers to indicate where the handles will go.
R 18 – With Handles
- Work 5 sc. Ch 30. Attach to the edge of the bag with 1 sl st and turn.
- Work 30 sc into the chain. Attach to the edge of the bag with 1 sl st and turn.
- Join the handle with approximately 30 sl st. Attach to the bag edge with 1 sl st.
- Ch 1. Work 1 sl st on the inside of the bag to reach the other side of the handle. Then work 17 sc.
Second handle:
5. Ch 30. Attach to the edge with 1 sl st and turn.
6. Work 30 sc into the chain. Attach to the edge with 1 sl st and turn.
7. Join the handle with approximately 30 sl st into the stitch loops visible on the front of the handles (see the video in the simpler version for guidance). Attach to the bag edge with 1 sl st.
8. Ch 1, then work 1 sl st to pass the handle on the inside of the bag (see video for exact placement). Work 12 sc.
Math: One handle covers 14 sc, each side has 16 sc, and the handles themselves are 30 stitches long.
R 19: Work 60 sl st around the bag opening. (60)
BOW (You can make 1 or 2 bows if you want one on each side of the bag)
Use blue yarn. Work flat.
Row 1: Ch 22. Turn. (22)
Row 2: Insert the hook into the 3rd ch from the hook. Work 20 hdc. Ch 2, turn. (22)
Rows 3–9: Work 20 hdc. Ch 2, turn. (22)
Weave in loose ends. Cut a long strand of yarn from the skein. Pinch your crocheted piece in the middle and sew it together. Then attach the bow to the bag using a tapestry needle and extra blue yarn.
TIP!
You can customize the bow by adding a border of sc before pinching it in the middle. You can also adjust the size of the bow by increasing or decreasing the number of chain stitches—it doesn’t matter if the number is even or odd.
For example: The brown/beige bow was made with 18 ch but has the same number of rows as the blue bow. The brown/beige bow also has sc worked all the way around before the crocheted piece was pinched in the middle.
If you want to close the bag securely, I recommend trying magnetic snaps! Sew on one snap for a simple closure in the middle, or two snaps for extra fastening.
Keep in mind that you don’t need to sew all the way through the bag’s walls with thin thread. It’s enough to go through the nearest yarn strands of the bag.
It works even better—and may be easier—if you sew the snaps onto a lining/inner fabric first, then attach the lining inside the bag.
You’re done!
The rights to this pattern belong to MYO Make Your Own. The pattern or its pictures may not be copied, shared or resold either in parts or in its entirety, but you may sell items you have crocheted from this pattern. If you have questions about the pattern, contact MYO at hello@makeyourown.se.


Share your creations with us
Thank you!
Your comment was sent!