
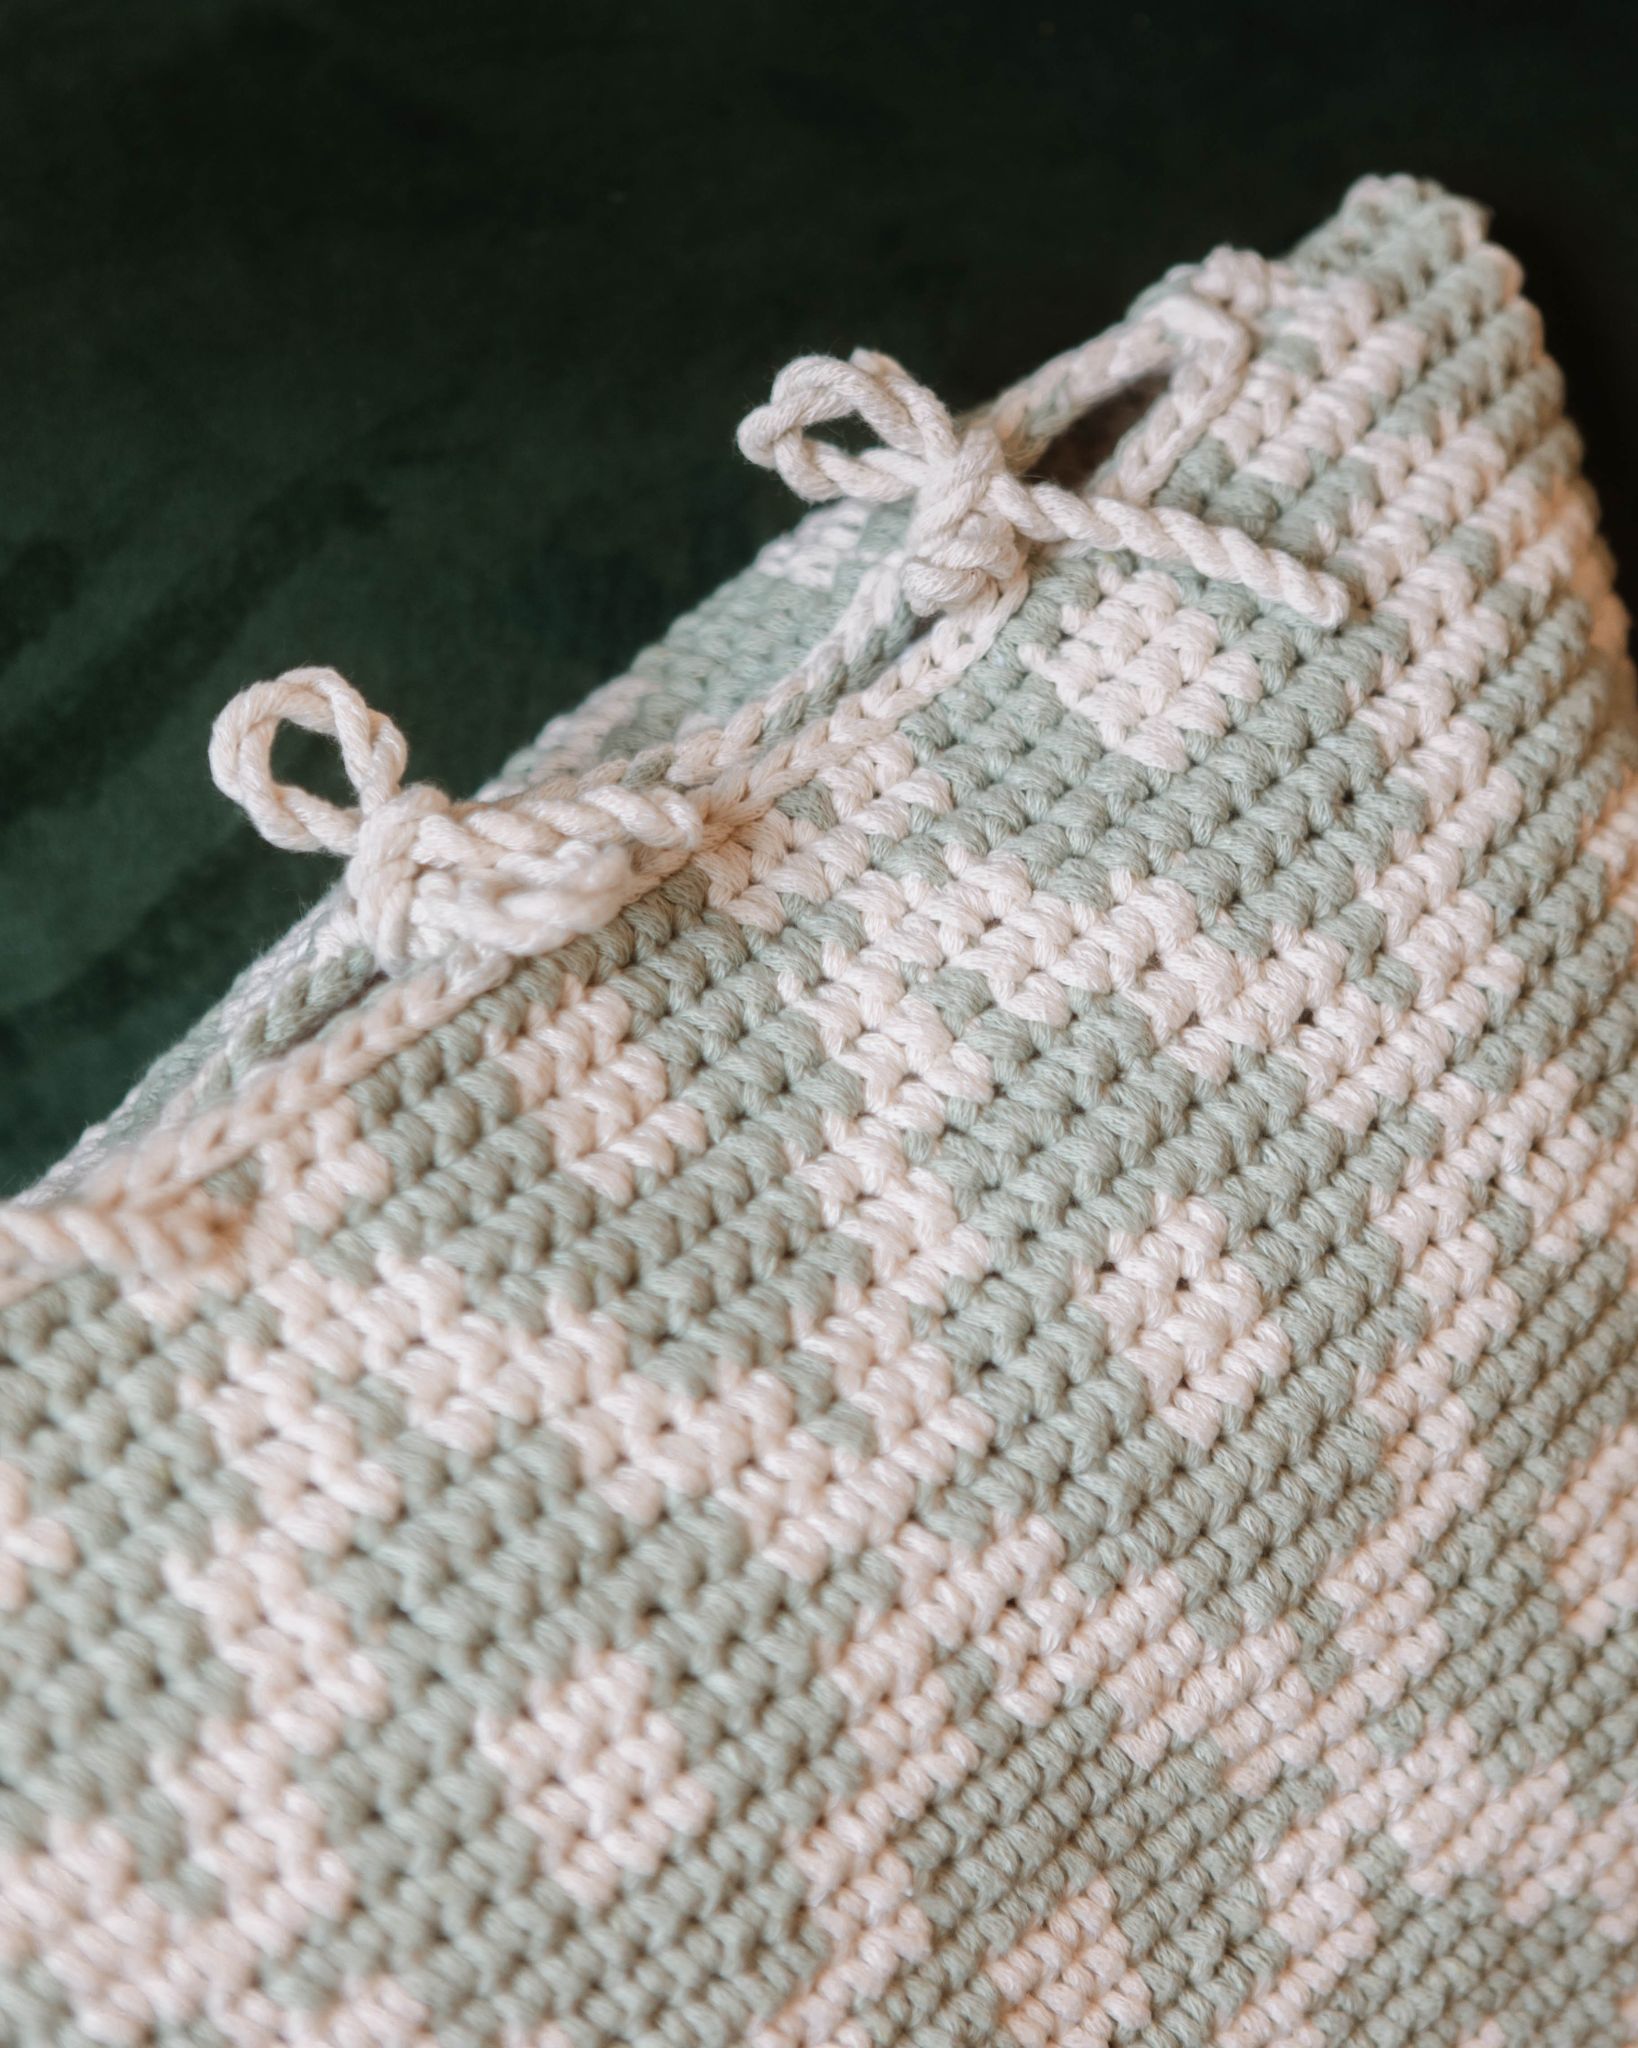
Crocheted Cushion Cover "Brisa"
Crochet a Beautiful Cushion Cover in Two Colors
You can create something really beautiful by combining different colors. This lovely cushion cover is crocheted using two colors. It's easier than you think — all you need to know is how to change colors, and we have a tutorial video for that. You will need two colors of EKO Nano Tube yarn and a 6 mm crochet hook. We've used "Chalk Green" and "Nature White." This pattern is designed for a 50x50 cm cushion insert. You will also need stitch markers, a needle, and a measuring tape.
Yarn Consumption: Approximately 450-500g per color. The total amount of yarn may vary depending on how tightly you crochet.
Please note that in this pattern, we use videos from our technique school along with images to guide you.


Here's how to do it
This cushion cover is perfect for both beginners and experienced crocheters. The pattern can be a great starting point for anyone looking to work with more than one color. If you know the basics of crochet, you already have all the skills needed to create your own cushion cover like this one! We’ll guide you through all the basic techniques. / Michelle

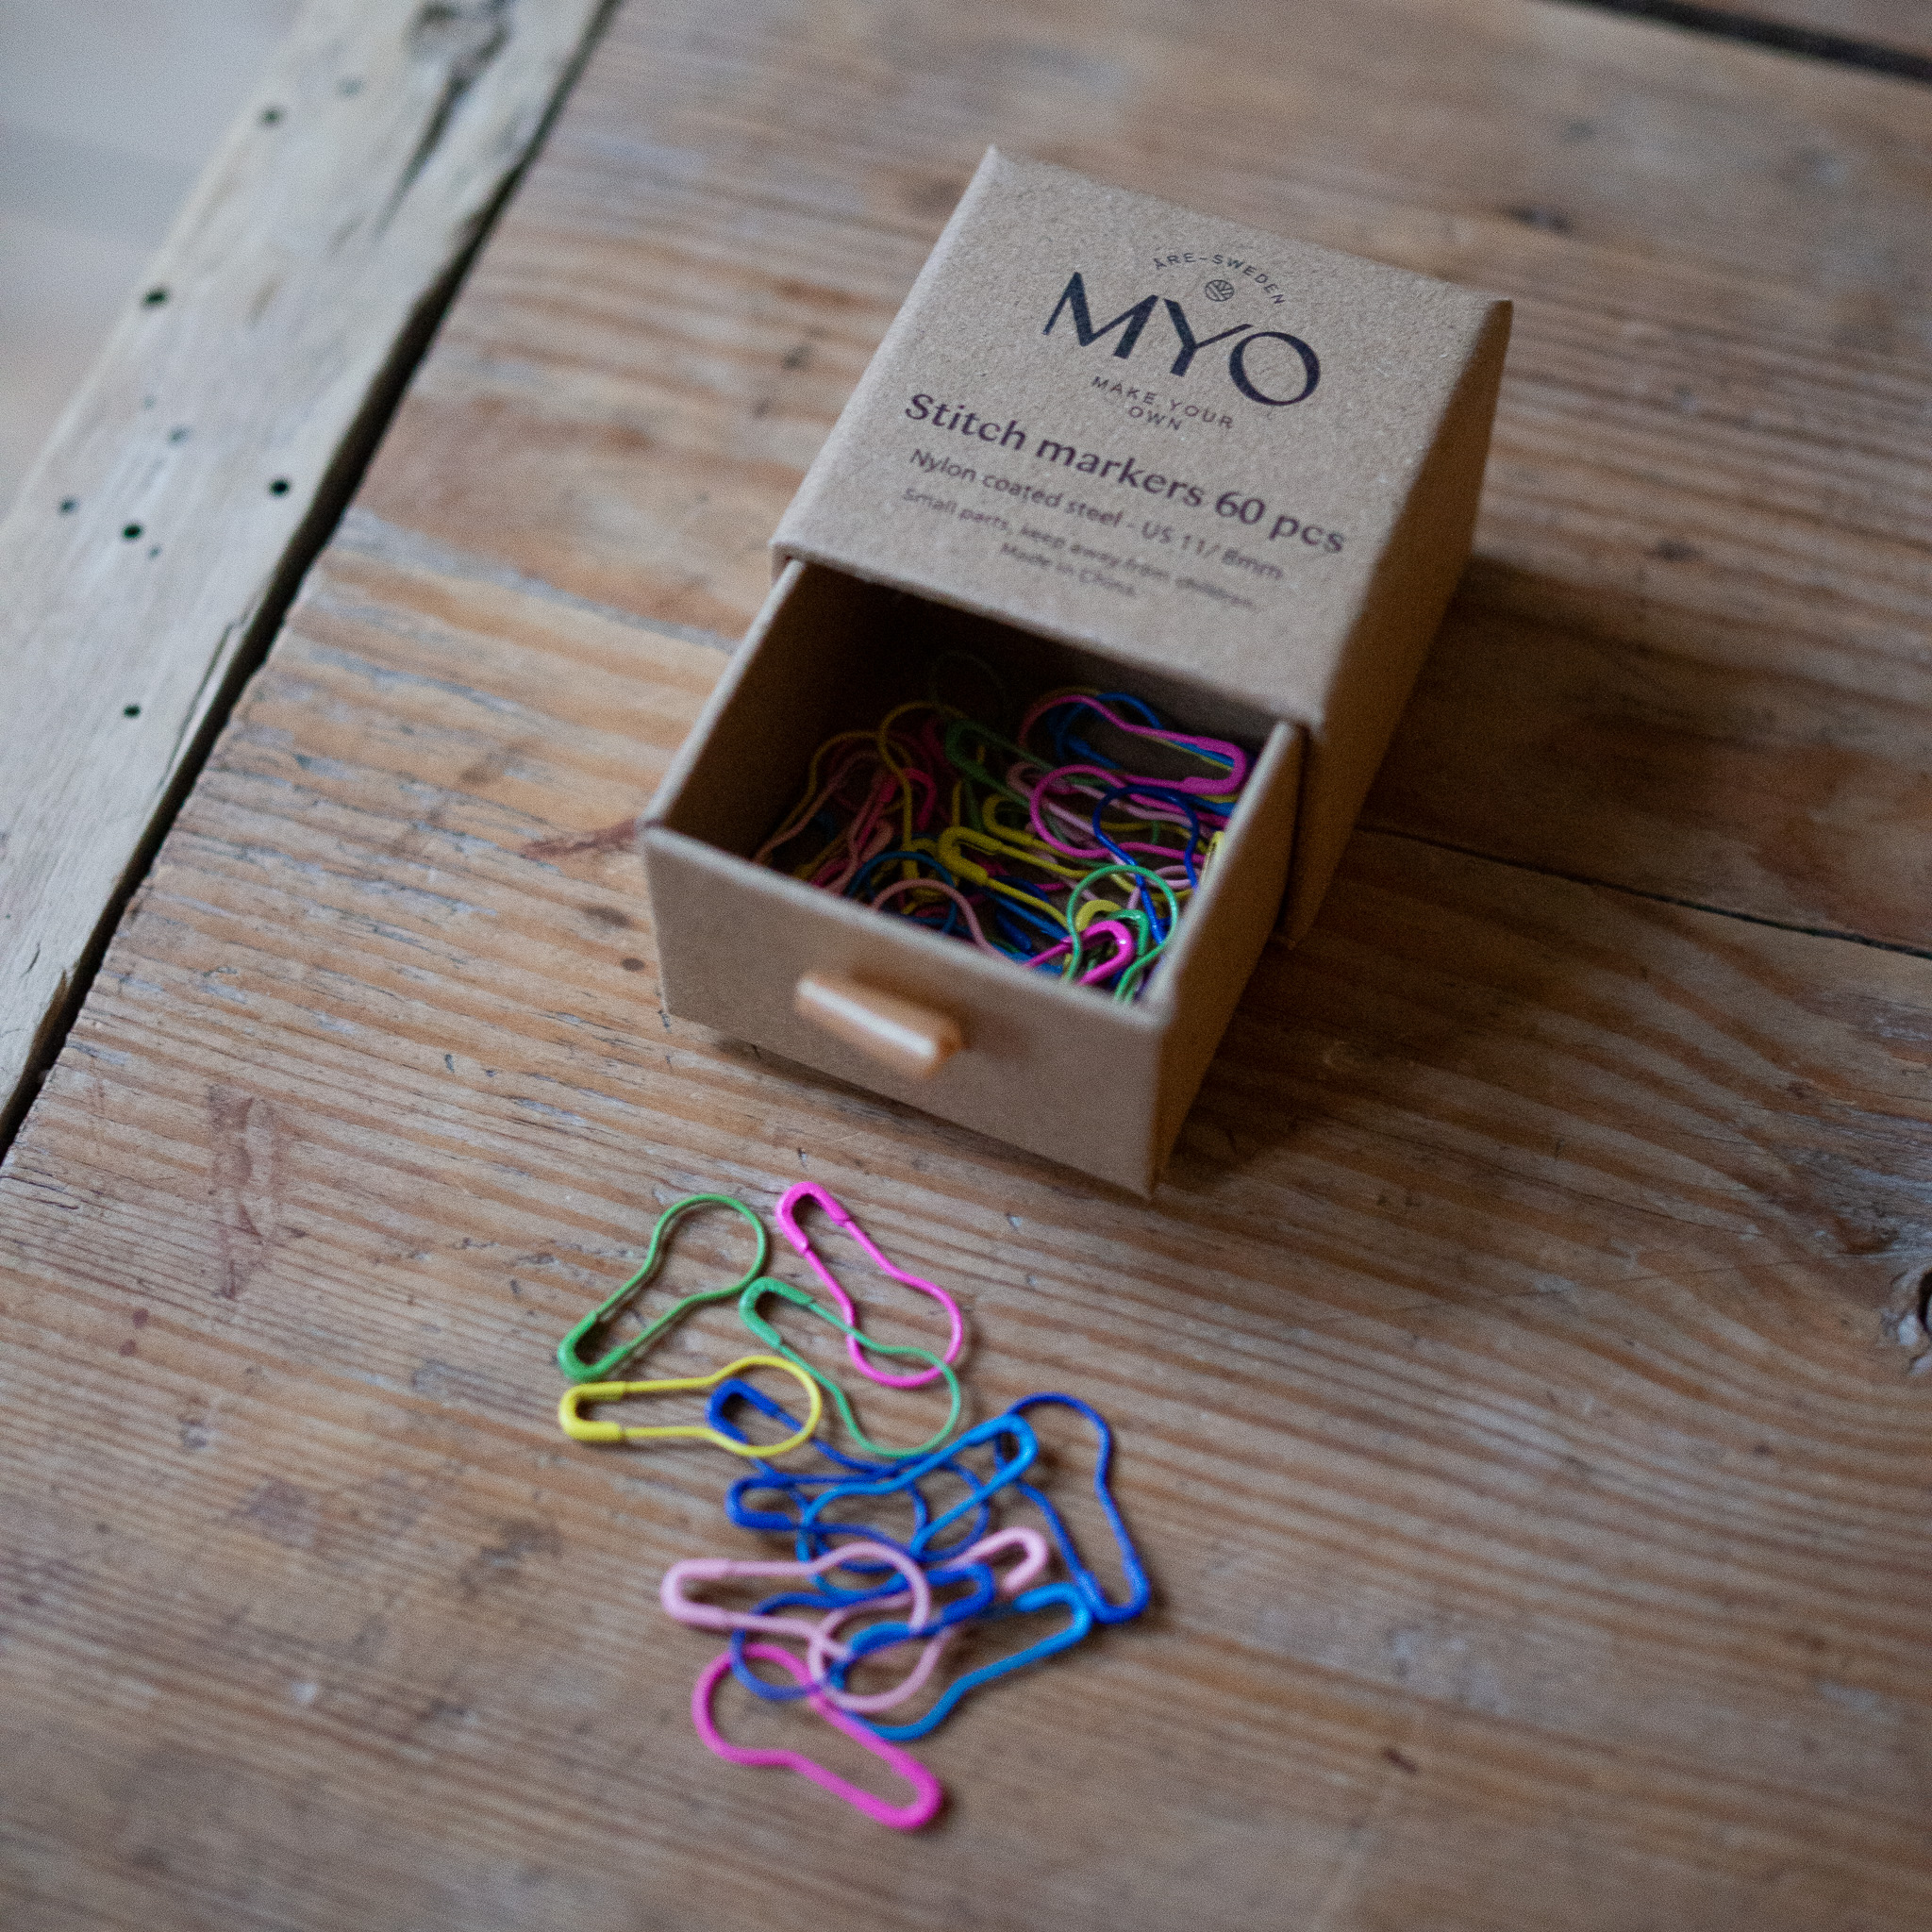
This is what you need:
Here you can directly purchase the material for the product. Please note that the instruction is digital and appears here on the page (no written instruction).


.jpg)
Unleash your creativity
For only 85kr per month you get access to all our 300+ beginner-friendly instructions for crochet, knitting and macrame.
A perfect way to get started with your new hobby!

Information
The cushion cover is crocheted as a tube, where one side (the bottom) is sewn together, and the other open side (the top) is closed with a fringe-like solution. All stitches are worked as regular single crochet stitches, except when a round is finished, in which case a form of slip stitch is worked from the wrong side.
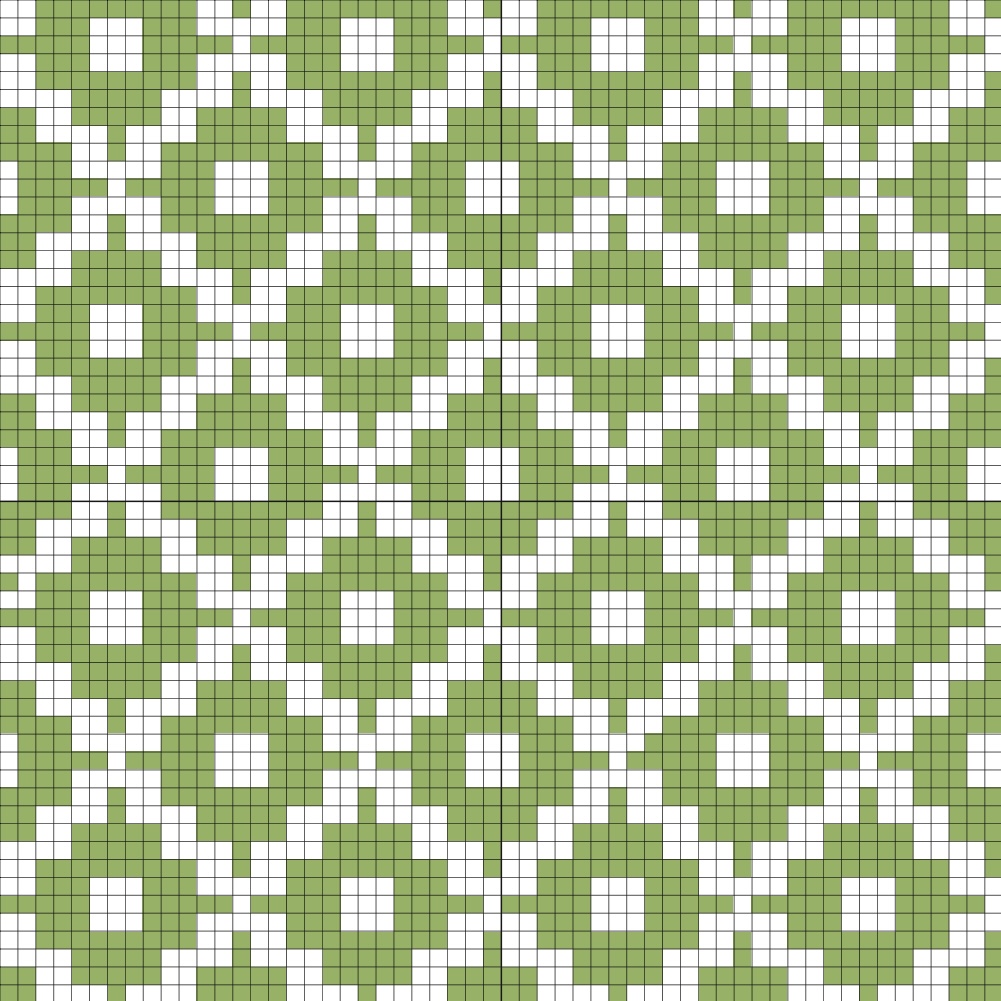
Diagram:
The challenges of this pattern are:
- Managing the two yarn balls as you crochet through the pattern, ensuring they don’t get tangled.
- Remembering to carry along the "inactive yarn" as you switch between colors.


- Changing yarn before finishing the last single crochet of the current color.


We will use "white" and "green" in the text, but of course, you can substitute these colors with any of your choice.
Start
Begin by crocheting a chain of 112 chain stitches with the white yarn. Finish by picking up the green yarn. So, you should have 112 white chain stitches and 1 green chain stitch at the end, total of 113.
If you're unsure how to crochet a chain, check out the video below for a detailed guide.

With this technique, you carry all the colors/threads through the rows/rounds, which results in the same pattern on both the front and back sides, or in this case, the inside and outside.
We join the ends of the tube after completing round 1, before starting round 2.
Round 1: Start by making 3 green single crochet stitches – don't forget to carry the white yarn along (meaning, crochet it in with the green yarn). Start crocheting in the last white chain stitch from the foundation chain.
If you're unsure how to crochet a single crochet, check out the video below for a step-by-step guide.

Gently pull on the yarn you’ve been carrying along (the “inactive yarn”) so that you’re always working with straight threads. Otherwise, these threads can become visible through the pattern.
Before you finish the third green single crochet stitch, pick up the white yarn. This will ensure a smooth color change.
If you'd like to see a video showing how to change colors mid-project, check out the video below.


Round 2: It’s now time to work with the white yarn and carry the green yarn underneath the stitches.
Start by making 4 white single crochet stitches. Change color before finishing the last white single crochet stitch. Remember to gently pull the carried green yarn to keep the threads neat before changing color.
Then, make 1 green single crochet stitch, and change color in this green stitch. Afterward, make 4 white single crochet stitches, and change color again.
Next, make 2 green single crochet stitches.
Repeat this sequence a total of eight times: 3 green single crochet stitches, 4 white single crochet stitches, 1 green single crochet stitch, 4 white single crochet stitches, and 2 green single crochet stitches.
Continue until the first round is finished. You should have a total of 112 stitches in the round.

Before starting the second round, we need to join the ends and shape the tube. Make sure that all the stitches are straight and align the sides/ends together.
This step ensures that your project forms a seamless tube, and the pattern continues evenly without any twisting.

Remove the crochet hook from the stitch. Insert the crochet hook through the first stitch of Round 1 from the wrong side (the back side).
This step helps to join the ends and make the transition between the rounds smoother, ensuring a clean, seamless look.

Next, pick up the stitch you just left. Pull the stitch to the wrong side (inside), making sure both the white and green yarns are on the inside of the tube.
This ensures the colorwork stays neat and consistent, with the wrong side facing inward while the right side (the patterned side) remains visible on the outside.

Make a green chain stitch. This will mark the beginning of the next round.


If you rather see a video on how to finihs a round and start a new ronud, see below video.
Round 2: Remember to make the first green stitch of the new round directly into the middle of the five green stitches from Round 1 (this means into the third green stitch).
Don’t forget to carry the white yarn along as you crochet, ensuring it stays on the inside of the tube.

Round 2 (continued)
Make 3 green single crochet stitches, then change color—don’t forget to carry the inactive thread when changing colors. Make 2 white single crochet stitches, then change color. Make 5 green single crochet stitches, then change color. Make 2 white single crochet stitches, then change color. Make 2 green single crochet stitches.
Repeat from the start to the end a total of eight times until you have completed the entire round. You should have 112 stitches in the round.
Ending each round (similar to how we closed the tube):
Remove the crochet hook from the stitch. Insert the crochet hook through the first stitch of the round from the wrong side (the back side). Pick up the stitch you just released and pull it to the wrong side. Make a chain stitch using the yarn color that begins the new round.
Now you're ready for the next round. Don't forget to always carry all the threads while crocheting. It’s also a good idea to count your stitches before closing the round to make sure everything is aligned correctly.
Round 3: *Make 1 green single crochet stitch in the middle of the five green single crochet stitches from the previous round, then switch to white yarn.

Make 4 white single crochet stitches, then change color. Make 5 green single crochet stitches, then change color. Make 4 white single crochet stitches, then change color.*
Repeat from * to * a total of eight times, until you've completed the full round. You should have 112 stitches in the round.
Finish the round as previously described.
Round 4: *Make 1 green single crochet stitch on top of the green single crochet stitch from the round below, then change color. Make 2 white single crochet stitches, then change color. Make 9 green single crochet stitches, then change color. Make 2 white single crochet stitches, then change color. On the last repeat, no color change is needed as the next round starts with the white yarn.* Repeat from * to * a total of eight times, until you've completed the full round. You should have 112 stitches in the round.
Finish the round as previously described.
Round 7: *Make 3 white single crochet stitches, change color. Make 3 green single crochet stitches, change color. Make 3 white single crochet stitches, change color. Make 3 green single crochet stitches, then change color. Make 2 white single crochet stitches.*
Repeat from * to * a total of eight times. Finish the round with green yarn. You should have 112 stitches in the round.
Round 8: *Make 1 green single crochet stitch, change color. Make 2 white single crochet stitches, change color. Make 9 green single crochet stitches, change color. Make 2 white single crochet stitches, change color.*
Repeat from * to * a total of eight times. Finish the round with green yarn. You should have 112 stitches in the round.
Round 9: *Make 1 green single crochet stitch, change color. Make 4 white single crochet stitches, change color. Make 5 green single crochet stitches, change color. Make 4 white single crochet stitches, change color.*
Repeat from * to * a total of eight times. Finish the round with green yarn. You should have 112 stitches in the round.
Round 10: *Make 3 green single crochet stitches, change color. Make 2 white single crochet stitches, change color. Make 5 green single crochet stitches, change color. Make 2 white single crochet stitches, change color. Make 2 green single crochet stitches.*
Repeat from * to * a total of eight times. Finish the round with green yarn.
Round 11: *Make 3 green single crochet stitches, change color. Make 4 white single crochet stitches, change color. Make 1 green single crochet stitch, change color. Make 4 white single crochet stitches, change color. Make 2 green single crochet stitches.*
Repeat from * to * a total of eight times. Finish the round with green yarn.
Round 12: *Make 5 green single crochet stitches, change color. Make 2 white single crochet stitches, change color. Make 1 green single crochet stitch, change color. Make 2 white single crochet stitches, change color. Make 4 green single crochet stitches.*
Repeat from * to * a total of eight times. Finish the round with white yarn.
Round 13: *Make 2 white single crochet stitches, change color. Make 3 green single crochet stitches, change color. Make 5 white single crochet stitches, change color. Make 3 green single crochet stitches, change color. Make 1 white single crochet stitch.*
Repeat from * to * a total of eight times. Finish the round with white yarn.
Round 14: *Make 2 white single crochet stitches, change color. Make 5 green single crochet stitches, change color. Make 1 white single crochet stitch, change color. Make 5 green single crochet stitches, change color. Make 1 white single crochet stitch.*
Repeat from * to * a total of eight times. Finish the round with white yarn.
Round 15: *Make 2 white single crochet stitches, change color. Make 3 green single crochet stitches, change color. Make 5 white single crochet stitches, change color. Make 3 green single crochet stitches, change color. Make 1 white single crochet stitch.*
Repeat from * to * a total of eight times. Finish the round with green yarn.
Round 16: *Make 5 green single crochet stitches, change color. Make 2 white single crochet stitches, change color. Make 1 green single crochet stitch, change color. Make 2 white single crochet stitches, change color. Make 4 green single crochet stitches.*
Repeat from * to * a total of eight times. Finish the round with green yarn.
The pattern now repeats from round 1-16 a total of 3 times. In total, there will be 48 rounds.
Assembly and Finishing:
If everything has gone according to the pattern, you should now have two openings – one at the top and one at the bottom. At this point, you can choose how to finish your pillowcase:
- A pillowcase with a zipper.
- A pillowcase with buttons.
- A pillowcase with a fringe solution.
- A closed pillow with no openings at all.
In this pattern, we will describe option 3.
The bottom side is sewn completely together using a sewing needle. Only go through the outermost loops of the matching stitches and gradually tighten the thread. This will also be done on the edges of the side referred to as the "top."
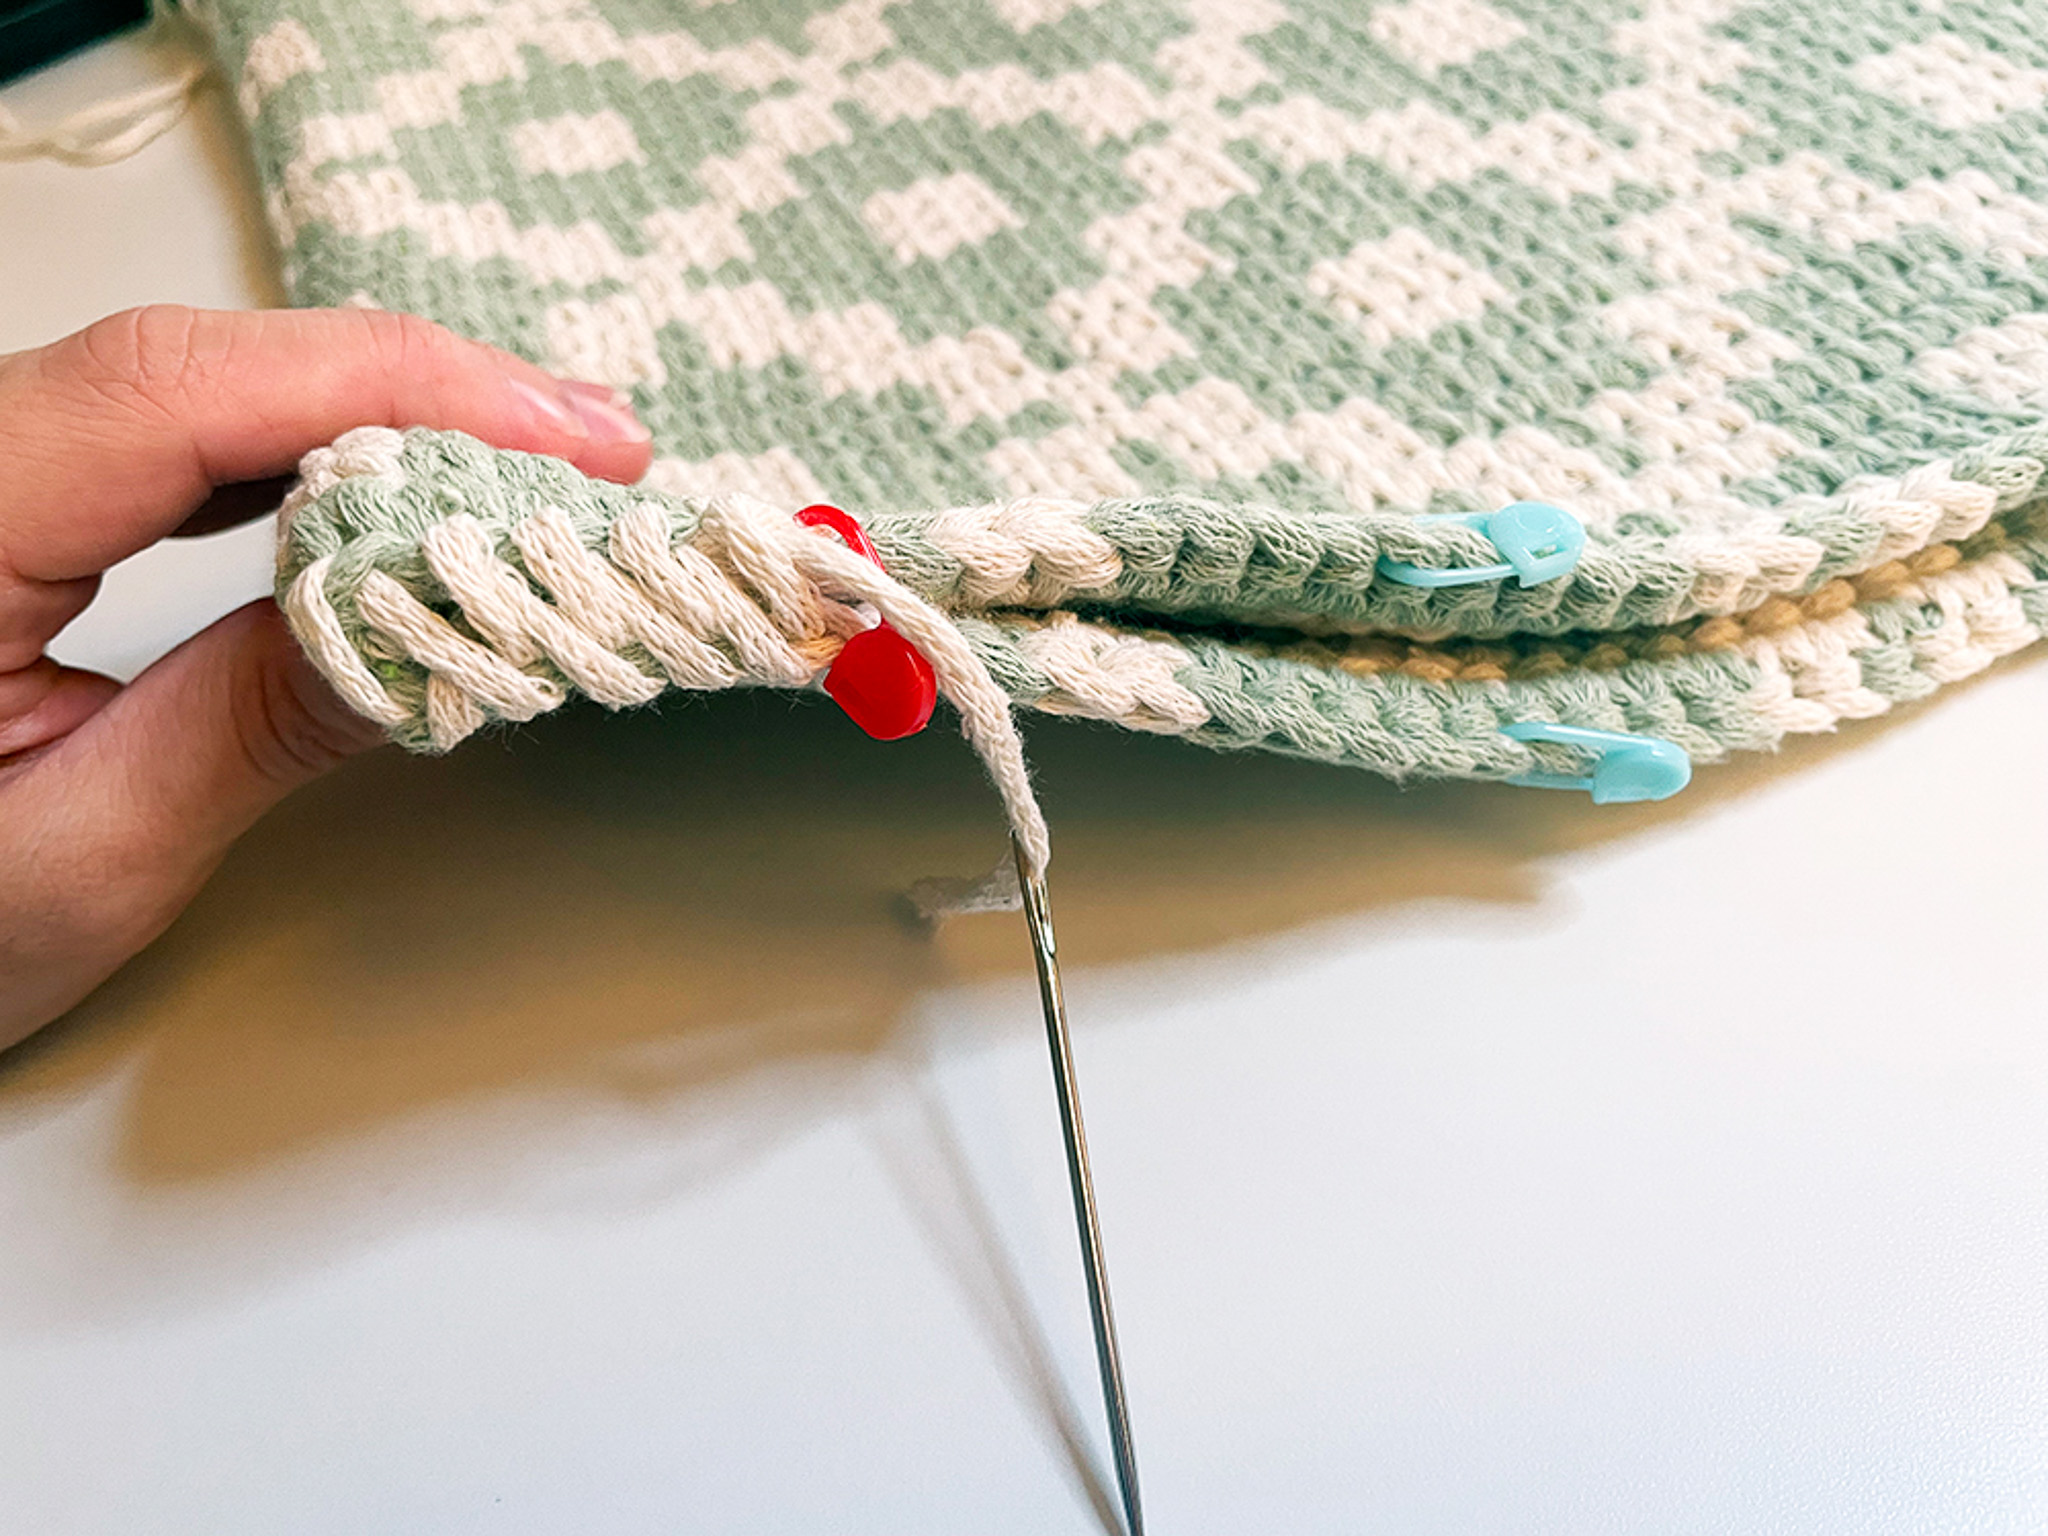
TOP / Step 1: Mark with stitch/crochet markers.


TOP / Step 2: Sew the edges together with a sewing needle, tightening the thread.

TOP / Step 3: Take your crochet hook and the white thread. Crochet 6 slip stitches along the edge of the opening (after the first stitch marker). If you're unsure how to crochet slip stitches, see the video below.


TOP / Step 4: Time to create a fringe; make a seventh slip stitch, but instead of continuing as before, pull the stitch/loop until the thread measures 44 cm – pull it longer if you prefer longer fringes. Twist the long stitch/loop so that it spirals, about 35 turns. It should resemble a tightly wound rope/thread.

TOP / Step 5: Fold the twisted thread in half. It should automatically form into a thick fringe. Make 1 single crochet.


TOP / Step 6: Release the crochet hook and insert it from the front, through the seventh slip stitch, and retrieve the stitch/loop you just released. Continue crocheting; make 13 slip stitches, then create a new fringe with the fourteenth slip stitch.


Finish by weaving in all loose ends. If you're unsure how to fasten off the yarn, see the video below.
The pillowcase is now finished!
Crochet Terms Abbreviations
sc = Single Crochet
ch = Chain Stitch
sl st = Slip Stitch
*...* = Everything within ... is repeated as many times as indicated
(...) = Indicates the number of stitches in the current round
Now let’s crochet a beautiful pillow cover! If you need help along the way, check out our simplified version of this pattern.
Information
The pillow cover is crocheted as a tube, with one side (the bottom) sewn together, and the other open side (the top) closed with a fringe solution. All stitches are made with sc, except for when finishing a round, where a type of sl st is made from the wrong side.
Diagram:
The challenges of this pattern are:
- Keeping track of the two yarn skeins you're juggling throughout
3. Change yarn before finishing the last single crochet of the current color.
Pattern:
Start with ch 112 with the white yarn. Finish by picking up the green yarn. These ch will form the base for the front and back of the pillowcase, as the entire project will be worked in the round like a tube. (112 white ch + 1 green ch). (113 total).
With this technique, you carry both yarns/threads through the rows/rounds, resulting in the same pattern on both the front and back, or in this case, the inside and outside. We will join the ends of the tube after round 1, before we begin round 2.
Now we will crochet each round with both colors. This means that you will change color on the last sc before finishing with the new color every time.
Round 1: *3 green sc, 4 white sc, 1 green sc, 4 white sc, 2 green sc* x 8 (112 total).
Don't forget to carry the white yarn with you (i.e., crochet it into the stitches). Gently pull on the yarn you are carrying to keep the threads straight throughout the work; otherwise, they will be visible through the pattern.
Before we start the second round, we need to join the ends and form the tube. Make sure all the stitches are aligned and that the sides/ends are properly matched.
Remove the hook from the loop. Insert the hook into the first stitch of Round 1 from the wrong side. Then, pick up the stitch/loop that you just dropped. Pull the stitch/loop to the wrong side, ensuring both the white and green yarn are on the inside of the tube. Make a green slip stitch.
Now, you are ready to begin the next round.
Round 2: Remember to make the first green stitch in the middle of the five green stitches from Round 1 (i.e., in the third green stitch) and don't forget to carry the white yarn along.
*Make 3 green sc, change color – remember to carry the "inactive thread" when changing colors. Make 2 white sc, change color. Make 5 green sc, change color. Make 2 white sc, change color. Make 2 green sc.*
Repeat from * to * eight times – until you complete the entire round. (112)
Ending of each round from now on: Every round will end as follows:
Remove the hook from the stitch/loop. Then insert the hook into the first stitch of the round through the back (wrong side). Pick up the recently released stitch/loop and pull it to the wrong side. Make a chain stitch with the color that starts the next round. You are now ready for the next round. Don't forget to always carry along all the threads as you crochet. It's a good idea to count the stitches before finishing the round.
Round 3: *1 green sc in the middle of the five green sc from the previous round, 4 white sc, 5 green sc, 4 white sc* x 8.
End the round as described above. (112)
Round 4: *1 green sc on top of the green sc from the previous round, 2 white sc, 9 green sc, 2 white sc* x 8. On the last repeat, no color change is needed at the end since the next round starts with the white thread. End the round as described above. (112)
Round 5: *3 white sc, 3 green sc, 3 white sc, 3 green sc, 2 white sc* x 8. End the round with white thread. (112)
Round 6: *1 white sc, 5 green sc, 3 white sc, 5 green sc* x 8. End the round with white thread. (112)
Round 7: *3 white sc, 3 green sc, 3 white sc, 3 green sc, 2 white sc* x 8. End the round with green thread. (112)
Round 8: *1 green sc, 2 white sc, 9 green sc, 2 white sc* x 8. End the round with green thread. (112)
Round 9: *1 green sc, 4 white sc, 5 green sc, 4 white sc* x 8. End the round with green thread. (112)
Round 10:* 3 green sc, 2 white sc, 5 green sc, 2 white sc, 2 green sc* x 8. End the round with green thread. (112)
Round 11: *3 green sc, 4 white sc, 1 green sc, 4 white sc, 2 green sc* x 8. End the round with green thread. (112)
Round 12: *5 green sc, 2 white sc, 1 green sc, 2 white sc, 4 green sc* x 8. End the round with white thread. (112)
Round 13: *2 white sc, 3 green sc, 5 white sc, 3 green sc, 1 white sc* x 8. End the round with white thread. (112)
Round 14: *2 white sc, 5 green sc, 1 white sc, 5 green sc, 1 white sc* x 8. End the round with white thread. (112)
Round 15: *2 white sc, 3 green sc, 5 white sc, 3 green sc, 1 white sc* x 8. End the round with green thread. (112)
Round 16: *5 green sc, 2 white sc, 1 green sc, 2 white sc, 4 green sc* x 8. End the round with green thread. (112)
Here, the pattern repeats again from round 1-16 a total of 3 times. In total, it will be 48 rounds.
Assembly and Finishing: If everything has gone according to the pattern, you should now have two openings – one at the top and one at the bottom. Here you can choose from the following options:
- A cushion cover with a zipper
- A cushion cover with buttons
- A cushion cover with a fringe solution
- A closed pillow with no openings
The pattern continues with option 3.
One side (the bottom) is sewn completely using a sewing needle. Only go through the outer loops of the opposing stitches and tighten the thread gradually. This will also be done on the edges of the side referred to as the “top.”
TOP / Step 1: Mark with stitch/ crochet markers.
TOP / Step 2: Sew the edges together with a sewing needle, tightening the thread.
TOP / Step 3: Take out the crochet hook and the white yarn. Crochet 6 sl st along the edge of the opening (after the first stitch marker).
TOP / Step 4: Time to create a tassel; Make a seventh sl st, but instead of continuing as before, pull out the loop until the yarn measures 44 cm – pull longer if you want longer tassels. Twist the long loop about 35 times so that it twists, resembling a tightly wound rope/thread.
TOP / Step 5: Fold the twisted yarn in half. It should automatically form into a thick tassel. Make 1 sc.
TOP / Step 6: Release the crochet hook and insert it from the front, through the seventh sl st, and grab the stitch/loop you just released. Continue crocheting; make 13 sl st, then create a new tassel with the fourteenth sl st.
Finish by weaving in all loose ends. Your pillow cover is now complete!
The rights to this pattern belong to MYO Make Your Own. The pattern or its pictures may not be copied, shared or resold either in parts or in its entirety, but you may sell items you have crocheted from this pattern. If you have questions about the pattern, contact MYO at hello@makeyourown.se.
Information
The cushion cover is crocheted as a tube, where one side (the bottom) is sewn together, and the other open side (the top) is closed with a fringe-like solution. All stitches are worked as regular single crochet stitches, except when a round is finished, in which case a form of slip stitch is worked from the wrong side.
Diagram:
The challenges of this pattern are:
- Managing the two yarn balls as you crochet through the pattern, ensuring they don’t get tangled.
- Remembering to carry along the "inactive yarn" as you switch between colors.
- Changing yarn before finishing the last single crochet of the current color.
We will use "white" and "green" in the text, but of course, you can substitute these colors with any of your choice.
Start
Begin by crocheting a chain of 112 chain stitches with the white yarn. Finish by picking up the green yarn. So, you should have 112 white chain stitches and 1 green chain stitch at the end, total of 113.
If you're unsure how to crochet a chain, check out the video below for a detailed guide.
With this technique, you carry all the colors/threads through the rows/rounds, which results in the same pattern on both the front and back sides, or in this case, the inside and outside.
We join the ends of the tube after completing round 1, before starting round 2.
Round 1: Start by making 3 green single crochet stitches – don't forget to carry the white yarn along (meaning, crochet it in with the green yarn). Start crocheting in the last white chain stitch from the foundation chain.
If you're unsure how to crochet a single crochet, check out the video below for a step-by-step guide.
Gently pull on the yarn you’ve been carrying along (the “inactive yarn”) so that you’re always working with straight threads. Otherwise, these threads can become visible through the pattern.
Before you finish the third green single crochet stitch, pick up the white yarn. This will ensure a smooth color change.
If you'd like to see a video showing how to change colors mid-project, check out the video below.
Round 2: It’s now time to work with the white yarn and carry the green yarn underneath the stitches.
Start by making 4 white single crochet stitches. Change color before finishing the last white single crochet stitch. Remember to gently pull the carried green yarn to keep the threads neat before changing color.
Then, make 1 green single crochet stitch, and change color in this green stitch. Afterward, make 4 white single crochet stitches, and change color again.
Next, make 2 green single crochet stitches.
Repeat this sequence a total of eight times: 3 green single crochet stitches, 4 white single crochet stitches, 1 green single crochet stitch, 4 white single crochet stitches, and 2 green single crochet stitches.
Continue until the first round is finished. You should have a total of 112 stitches in the round.
Before starting the second round, we need to join the ends and shape the tube. Make sure that all the stitches are straight and align the sides/ends together.
This step ensures that your project forms a seamless tube, and the pattern continues evenly without any twisting.
Remove the crochet hook from the stitch. Insert the crochet hook through the first stitch of Round 1 from the wrong side (the back side).
This step helps to join the ends and make the transition between the rounds smoother, ensuring a clean, seamless look.
Next, pick up the stitch you just left. Pull the stitch to the wrong side (inside), making sure both the white and green yarns are on the inside of the tube.
This ensures the colorwork stays neat and consistent, with the wrong side facing inward while the right side (the patterned side) remains visible on the outside.
Make a green chain stitch. This will mark the beginning of the next round.
If you rather see a video on how to finihs a round and start a new ronud, see below video.
Round 2: Remember to make the first green stitch of the new round directly into the middle of the five green stitches from Round 1 (this means into the third green stitch).
Don’t forget to carry the white yarn along as you crochet, ensuring it stays on the inside of the tube.
Round 2 (continued)
Make 3 green single crochet stitches, then change color—don’t forget to carry the inactive thread when changing colors. Make 2 white single crochet stitches, then change color. Make 5 green single crochet stitches, then change color. Make 2 white single crochet stitches, then change color. Make 2 green single crochet stitches.
Repeat from the start to the end a total of eight times until you have completed the entire round. You should have 112 stitches in the round.
Ending each round (similar to how we closed the tube):
Remove the crochet hook from the stitch. Insert the crochet hook through the first stitch of the round from the wrong side (the back side). Pick up the stitch you just released and pull it to the wrong side. Make a chain stitch using the yarn color that begins the new round.
Now you're ready for the next round. Don't forget to always carry all the threads while crocheting. It’s also a good idea to count your stitches before closing the round to make sure everything is aligned correctly.
Round 3: *Make 1 green single crochet stitch in the middle of the five green single crochet stitches from the previous round, then switch to white yarn.
Make 4 white single crochet stitches, then change color. Make 5 green single crochet stitches, then change color. Make 4 white single crochet stitches, then change color.*
Repeat from * to * a total of eight times, until you've completed the full round. You should have 112 stitches in the round.
Finish the round as previously described.
Round 4: *Make 1 green single crochet stitch on top of the green single crochet stitch from the round below, then change color. Make 2 white single crochet stitches, then change color. Make 9 green single crochet stitches, then change color. Make 2 white single crochet stitches, then change color. On the last repeat, no color change is needed as the next round starts with the white yarn.* Repeat from * to * a total of eight times, until you've completed the full round. You should have 112 stitches in the round.
Finish the round as previously described.
Round 7: *Make 3 white single crochet stitches, change color. Make 3 green single crochet stitches, change color. Make 3 white single crochet stitches, change color. Make 3 green single crochet stitches, then change color. Make 2 white single crochet stitches.*
Repeat from * to * a total of eight times. Finish the round with green yarn. You should have 112 stitches in the round.
Round 8: *Make 1 green single crochet stitch, change color. Make 2 white single crochet stitches, change color. Make 9 green single crochet stitches, change color. Make 2 white single crochet stitches, change color.*
Repeat from * to * a total of eight times. Finish the round with green yarn. You should have 112 stitches in the round.
Round 9: *Make 1 green single crochet stitch, change color. Make 4 white single crochet stitches, change color. Make 5 green single crochet stitches, change color. Make 4 white single crochet stitches, change color.*
Repeat from * to * a total of eight times. Finish the round with green yarn. You should have 112 stitches in the round.
Round 10: *Make 3 green single crochet stitches, change color. Make 2 white single crochet stitches, change color. Make 5 green single crochet stitches, change color. Make 2 white single crochet stitches, change color. Make 2 green single crochet stitches.*
Repeat from * to * a total of eight times. Finish the round with green yarn.
Round 11: *Make 3 green single crochet stitches, change color. Make 4 white single crochet stitches, change color. Make 1 green single crochet stitch, change color. Make 4 white single crochet stitches, change color. Make 2 green single crochet stitches.*
Repeat from * to * a total of eight times. Finish the round with green yarn.
Round 12: *Make 5 green single crochet stitches, change color. Make 2 white single crochet stitches, change color. Make 1 green single crochet stitch, change color. Make 2 white single crochet stitches, change color. Make 4 green single crochet stitches.*
Repeat from * to * a total of eight times. Finish the round with white yarn.
Round 13: *Make 2 white single crochet stitches, change color. Make 3 green single crochet stitches, change color. Make 5 white single crochet stitches, change color. Make 3 green single crochet stitches, change color. Make 1 white single crochet stitch.*
Repeat from * to * a total of eight times. Finish the round with white yarn.
Round 14: *Make 2 white single crochet stitches, change color. Make 5 green single crochet stitches, change color. Make 1 white single crochet stitch, change color. Make 5 green single crochet stitches, change color. Make 1 white single crochet stitch.*
Repeat from * to * a total of eight times. Finish the round with white yarn.
Round 15: *Make 2 white single crochet stitches, change color. Make 3 green single crochet stitches, change color. Make 5 white single crochet stitches, change color. Make 3 green single crochet stitches, change color. Make 1 white single crochet stitch.*
Repeat from * to * a total of eight times. Finish the round with green yarn.
Round 16: *Make 5 green single crochet stitches, change color. Make 2 white single crochet stitches, change color. Make 1 green single crochet stitch, change color. Make 2 white single crochet stitches, change color. Make 4 green single crochet stitches.*
Repeat from * to * a total of eight times. Finish the round with green yarn.
The pattern now repeats from round 1-16 a total of 3 times. In total, there will be 48 rounds.
Assembly and Finishing:
If everything has gone according to the pattern, you should now have two openings – one at the top and one at the bottom. At this point, you can choose how to finish your pillowcase:
- A pillowcase with a zipper.
- A pillowcase with buttons.
- A pillowcase with a fringe solution.
- A closed pillow with no openings at all.
In this pattern, we will describe option 3.
The bottom side is sewn completely together using a sewing needle. Only go through the outermost loops of the matching stitches and gradually tighten the thread. This will also be done on the edges of the side referred to as the "top."
TOP / Step 1: Mark with stitch/crochet markers.
TOP / Step 2: Sew the edges together with a sewing needle, tightening the thread.
TOP / Step 3: Take your crochet hook and the white thread. Crochet 6 slip stitches along the edge of the opening (after the first stitch marker). If you're unsure how to crochet slip stitches, see the video below.
TOP / Step 4: Time to create a fringe; make a seventh slip stitch, but instead of continuing as before, pull the stitch/loop until the thread measures 44 cm – pull it longer if you prefer longer fringes. Twist the long stitch/loop so that it spirals, about 35 turns. It should resemble a tightly wound rope/thread.
TOP / Step 5: Fold the twisted thread in half. It should automatically form into a thick fringe. Make 1 single crochet.
TOP / Step 6: Release the crochet hook and insert it from the front, through the seventh slip stitch, and retrieve the stitch/loop you just released. Continue crocheting; make 13 slip stitches, then create a new fringe with the fourteenth slip stitch.
Finish by weaving in all loose ends. If you're unsure how to fasten off the yarn, see the video below.
The pillowcase is now finished!
Crochet Terms Abbreviations
sc = Single Crochet
ch = Chain Stitch
sl st = Slip Stitch
*...* = Everything within ... is repeated as many times as indicated
(...) = Indicates the number of stitches in the current round
Now let’s crochet a beautiful pillow cover! If you need help along the way, check out our simplified version of this pattern.
Information
The pillow cover is crocheted as a tube, with one side (the bottom) sewn together, and the other open side (the top) closed with a fringe solution. All stitches are made with sc, except for when finishing a round, where a type of sl st is made from the wrong side.
Diagram:
The challenges of this pattern are:
- Keeping track of the two yarn skeins you're juggling throughout
3. Change yarn before finishing the last single crochet of the current color.
Pattern:
Start with ch 112 with the white yarn. Finish by picking up the green yarn. These ch will form the base for the front and back of the pillowcase, as the entire project will be worked in the round like a tube. (112 white ch + 1 green ch). (113 total).
With this technique, you carry both yarns/threads through the rows/rounds, resulting in the same pattern on both the front and back, or in this case, the inside and outside. We will join the ends of the tube after round 1, before we begin round 2.
Now we will crochet each round with both colors. This means that you will change color on the last sc before finishing with the new color every time.
Round 1: *3 green sc, 4 white sc, 1 green sc, 4 white sc, 2 green sc* x 8 (112 total).
Don't forget to carry the white yarn with you (i.e., crochet it into the stitches). Gently pull on the yarn you are carrying to keep the threads straight throughout the work; otherwise, they will be visible through the pattern.
Before we start the second round, we need to join the ends and form the tube. Make sure all the stitches are aligned and that the sides/ends are properly matched.
Remove the hook from the loop. Insert the hook into the first stitch of Round 1 from the wrong side. Then, pick up the stitch/loop that you just dropped. Pull the stitch/loop to the wrong side, ensuring both the white and green yarn are on the inside of the tube. Make a green slip stitch.
Now, you are ready to begin the next round.
Round 2: Remember to make the first green stitch in the middle of the five green stitches from Round 1 (i.e., in the third green stitch) and don't forget to carry the white yarn along.
*Make 3 green sc, change color – remember to carry the "inactive thread" when changing colors. Make 2 white sc, change color. Make 5 green sc, change color. Make 2 white sc, change color. Make 2 green sc.*
Repeat from * to * eight times – until you complete the entire round. (112)
Ending of each round from now on: Every round will end as follows:
Remove the hook from the stitch/loop. Then insert the hook into the first stitch of the round through the back (wrong side). Pick up the recently released stitch/loop and pull it to the wrong side. Make a chain stitch with the color that starts the next round. You are now ready for the next round. Don't forget to always carry along all the threads as you crochet. It's a good idea to count the stitches before finishing the round.
Round 3: *1 green sc in the middle of the five green sc from the previous round, 4 white sc, 5 green sc, 4 white sc* x 8.
End the round as described above. (112)
Round 4: *1 green sc on top of the green sc from the previous round, 2 white sc, 9 green sc, 2 white sc* x 8. On the last repeat, no color change is needed at the end since the next round starts with the white thread. End the round as described above. (112)
Round 5: *3 white sc, 3 green sc, 3 white sc, 3 green sc, 2 white sc* x 8. End the round with white thread. (112)
Round 6: *1 white sc, 5 green sc, 3 white sc, 5 green sc* x 8. End the round with white thread. (112)
Round 7: *3 white sc, 3 green sc, 3 white sc, 3 green sc, 2 white sc* x 8. End the round with green thread. (112)
Round 8: *1 green sc, 2 white sc, 9 green sc, 2 white sc* x 8. End the round with green thread. (112)
Round 9: *1 green sc, 4 white sc, 5 green sc, 4 white sc* x 8. End the round with green thread. (112)
Round 10:* 3 green sc, 2 white sc, 5 green sc, 2 white sc, 2 green sc* x 8. End the round with green thread. (112)
Round 11: *3 green sc, 4 white sc, 1 green sc, 4 white sc, 2 green sc* x 8. End the round with green thread. (112)
Round 12: *5 green sc, 2 white sc, 1 green sc, 2 white sc, 4 green sc* x 8. End the round with white thread. (112)
Round 13: *2 white sc, 3 green sc, 5 white sc, 3 green sc, 1 white sc* x 8. End the round with white thread. (112)
Round 14: *2 white sc, 5 green sc, 1 white sc, 5 green sc, 1 white sc* x 8. End the round with white thread. (112)
Round 15: *2 white sc, 3 green sc, 5 white sc, 3 green sc, 1 white sc* x 8. End the round with green thread. (112)
Round 16: *5 green sc, 2 white sc, 1 green sc, 2 white sc, 4 green sc* x 8. End the round with green thread. (112)
Here, the pattern repeats again from round 1-16 a total of 3 times. In total, it will be 48 rounds.
Assembly and Finishing: If everything has gone according to the pattern, you should now have two openings – one at the top and one at the bottom. Here you can choose from the following options:
- A cushion cover with a zipper
- A cushion cover with buttons
- A cushion cover with a fringe solution
- A closed pillow with no openings
The pattern continues with option 3.
One side (the bottom) is sewn completely using a sewing needle. Only go through the outer loops of the opposing stitches and tighten the thread gradually. This will also be done on the edges of the side referred to as the “top.”
TOP / Step 1: Mark with stitch/ crochet markers.
TOP / Step 2: Sew the edges together with a sewing needle, tightening the thread.
TOP / Step 3: Take out the crochet hook and the white yarn. Crochet 6 sl st along the edge of the opening (after the first stitch marker).
TOP / Step 4: Time to create a tassel; Make a seventh sl st, but instead of continuing as before, pull out the loop until the yarn measures 44 cm – pull longer if you want longer tassels. Twist the long loop about 35 times so that it twists, resembling a tightly wound rope/thread.
TOP / Step 5: Fold the twisted yarn in half. It should automatically form into a thick tassel. Make 1 sc.
TOP / Step 6: Release the crochet hook and insert it from the front, through the seventh sl st, and grab the stitch/loop you just released. Continue crocheting; make 13 sl st, then create a new tassel with the fourteenth sl st.
Finish by weaving in all loose ends. Your pillow cover is now complete!
The rights to this pattern belong to MYO Make Your Own. The pattern or its pictures may not be copied, shared or resold either in parts or in its entirety, but you may sell items you have crocheted from this pattern. If you have questions about the pattern, contact MYO at hello@makeyourown.se.


.jpg)


Share your creations with us
Thank you!
Your comment was sent!