
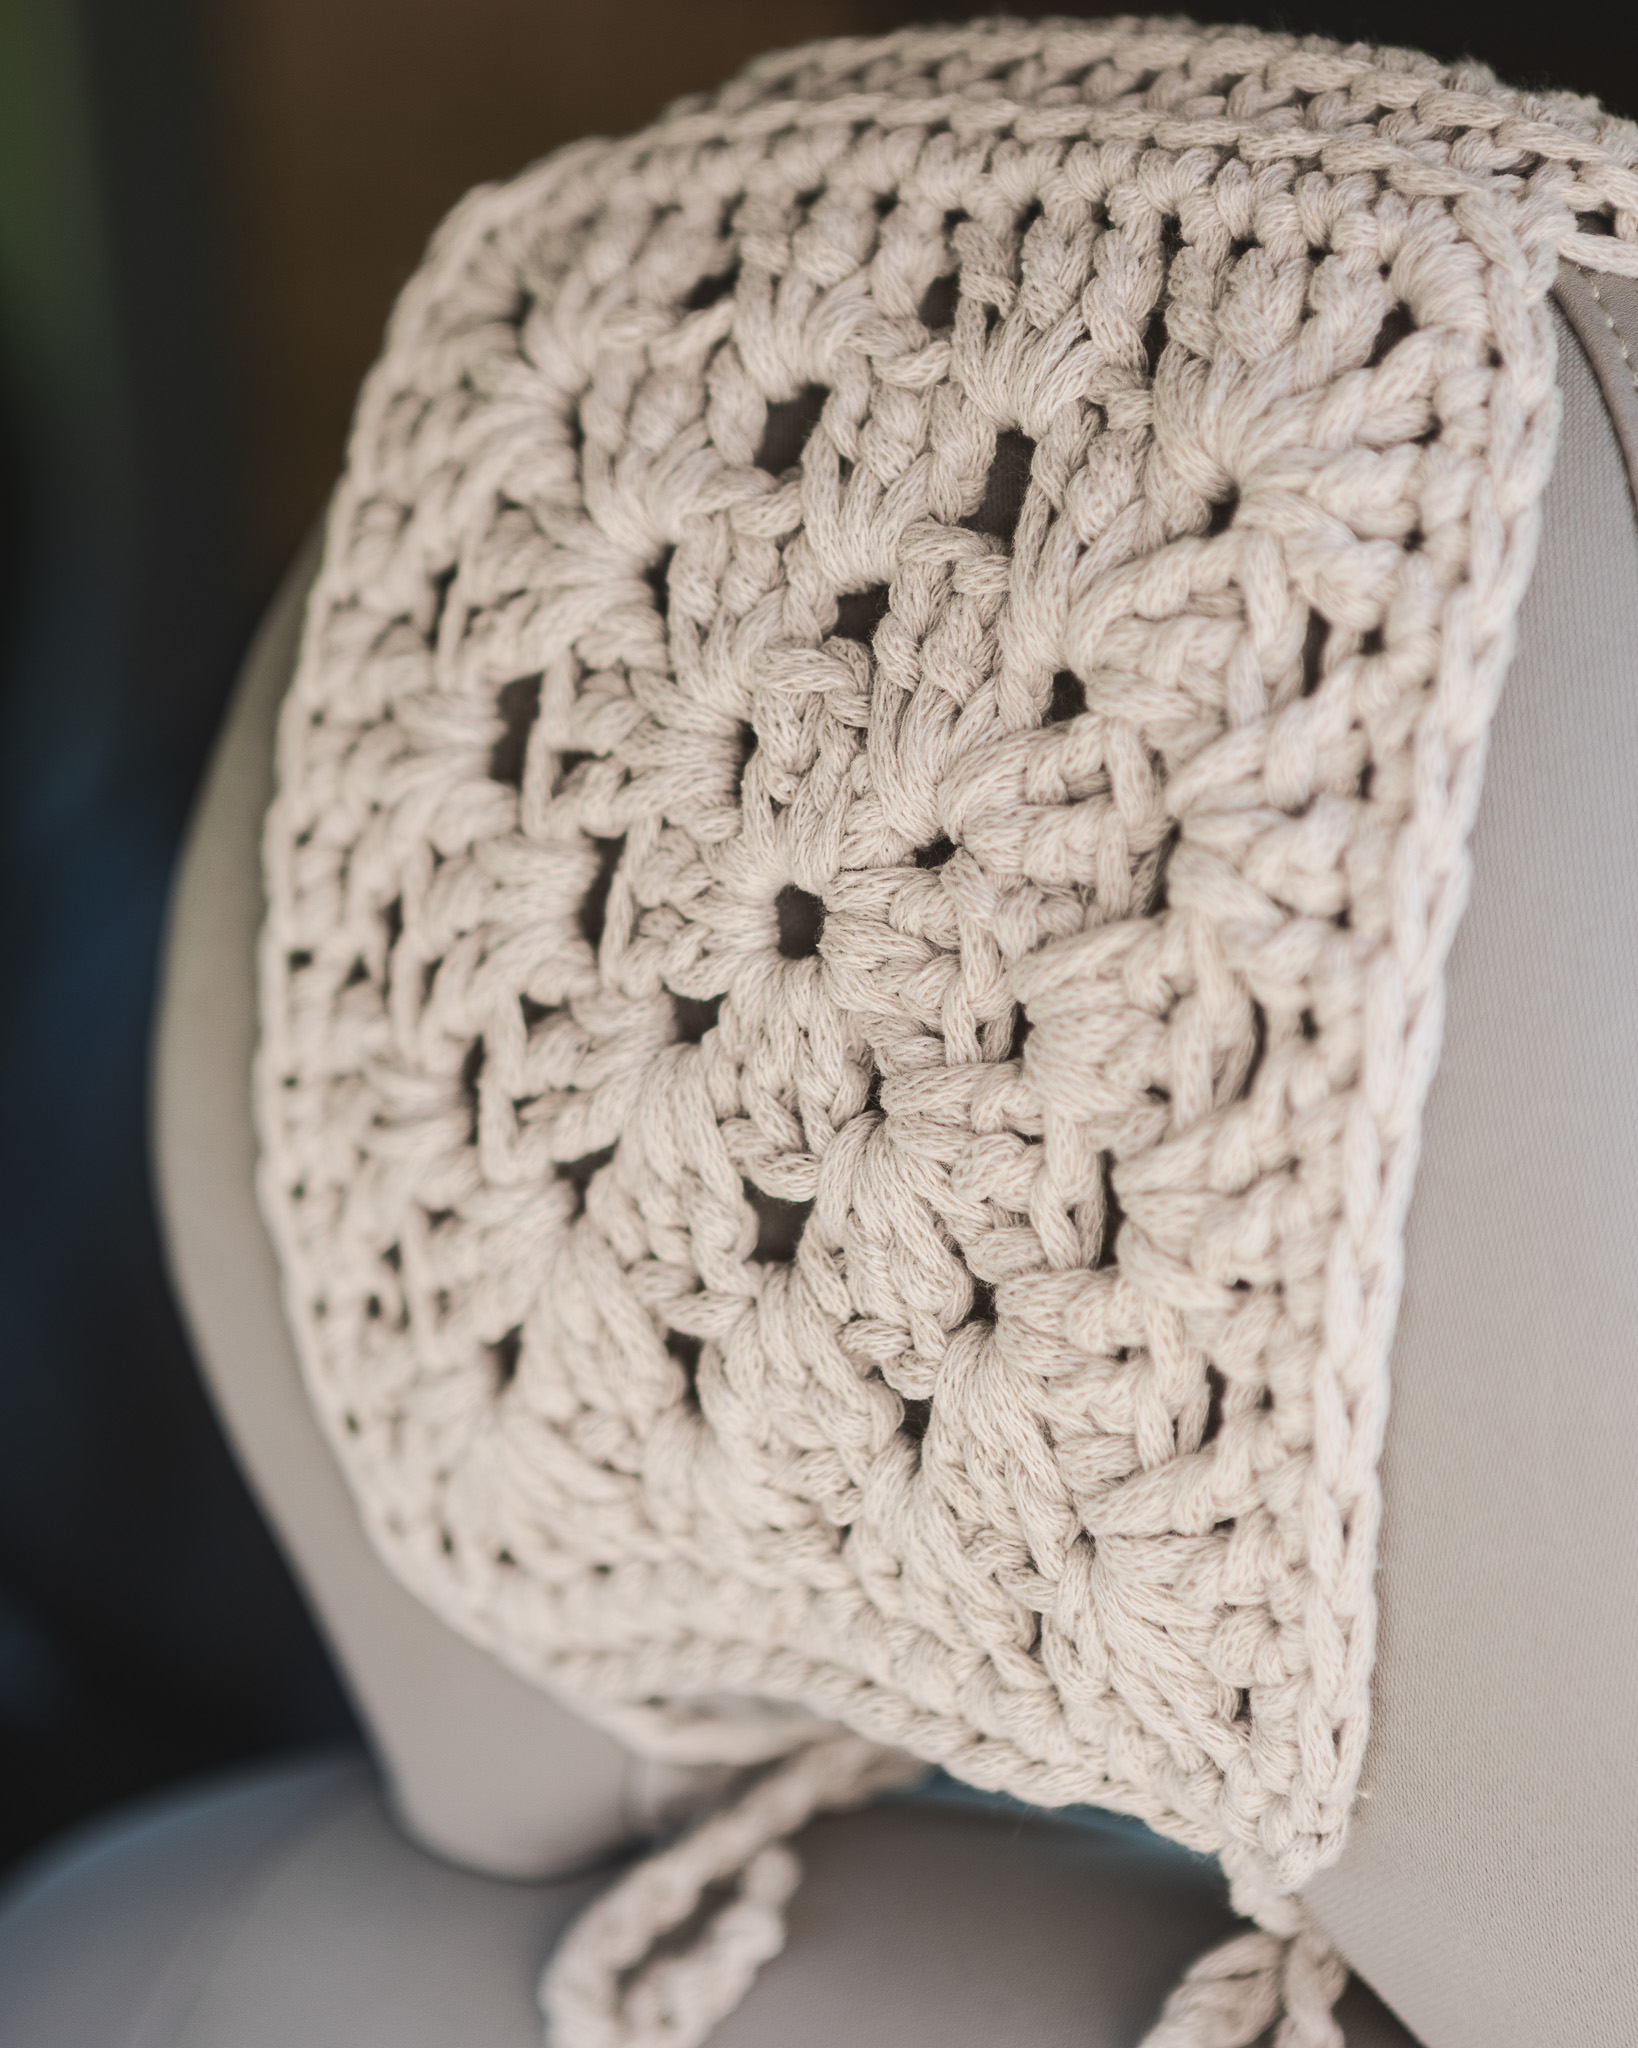
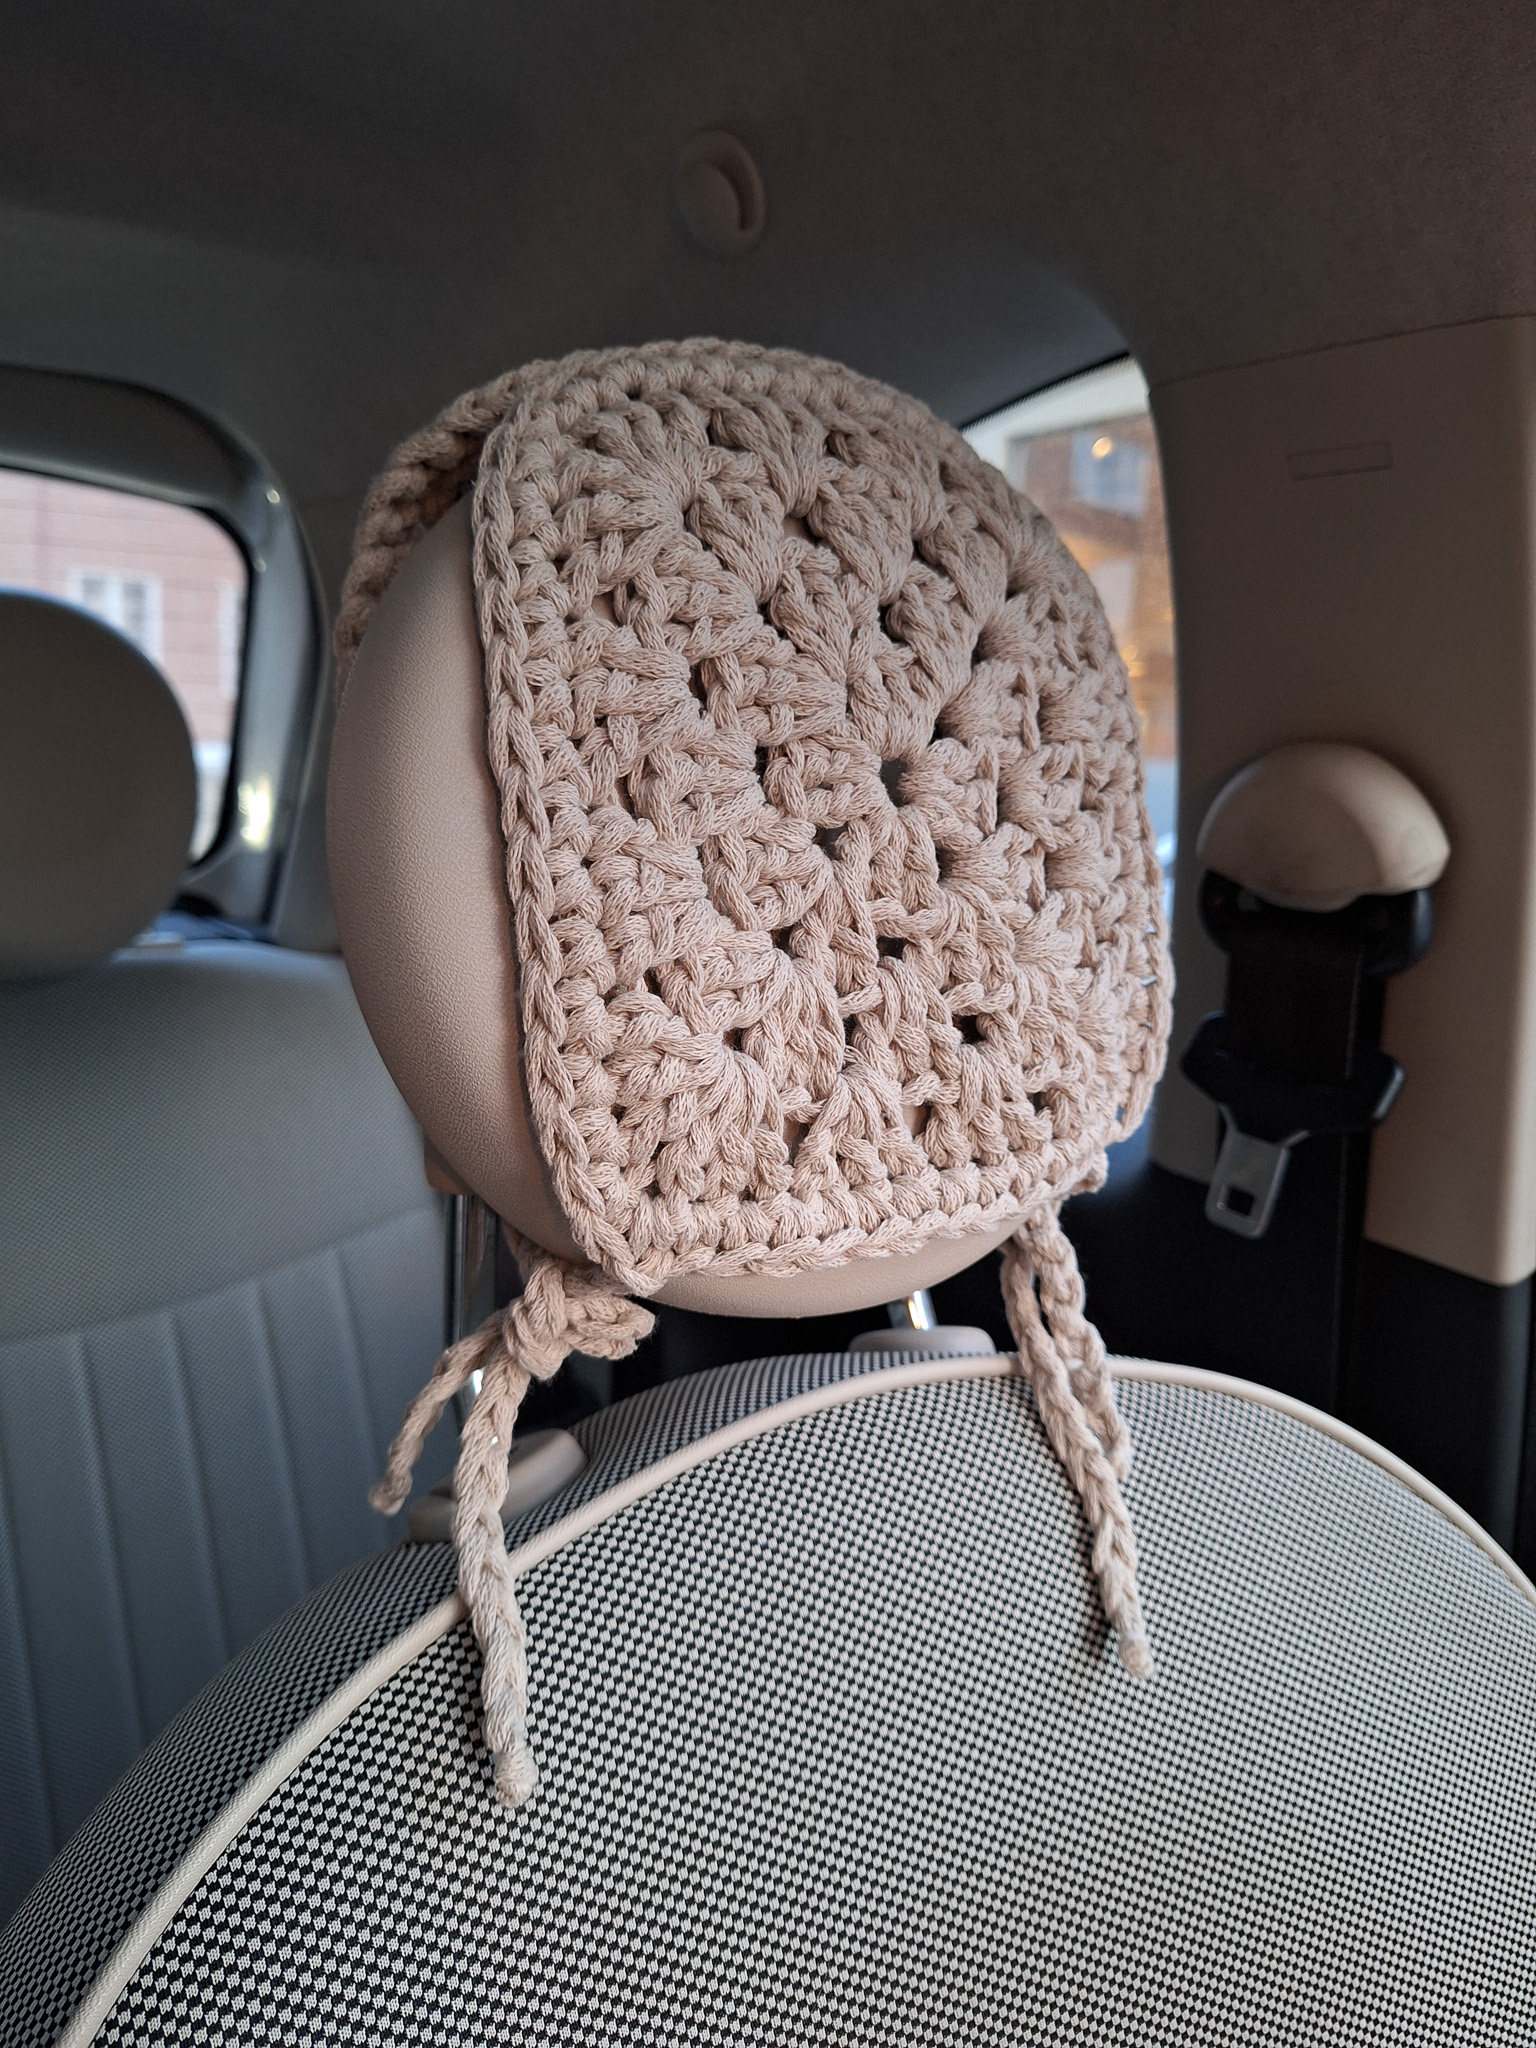
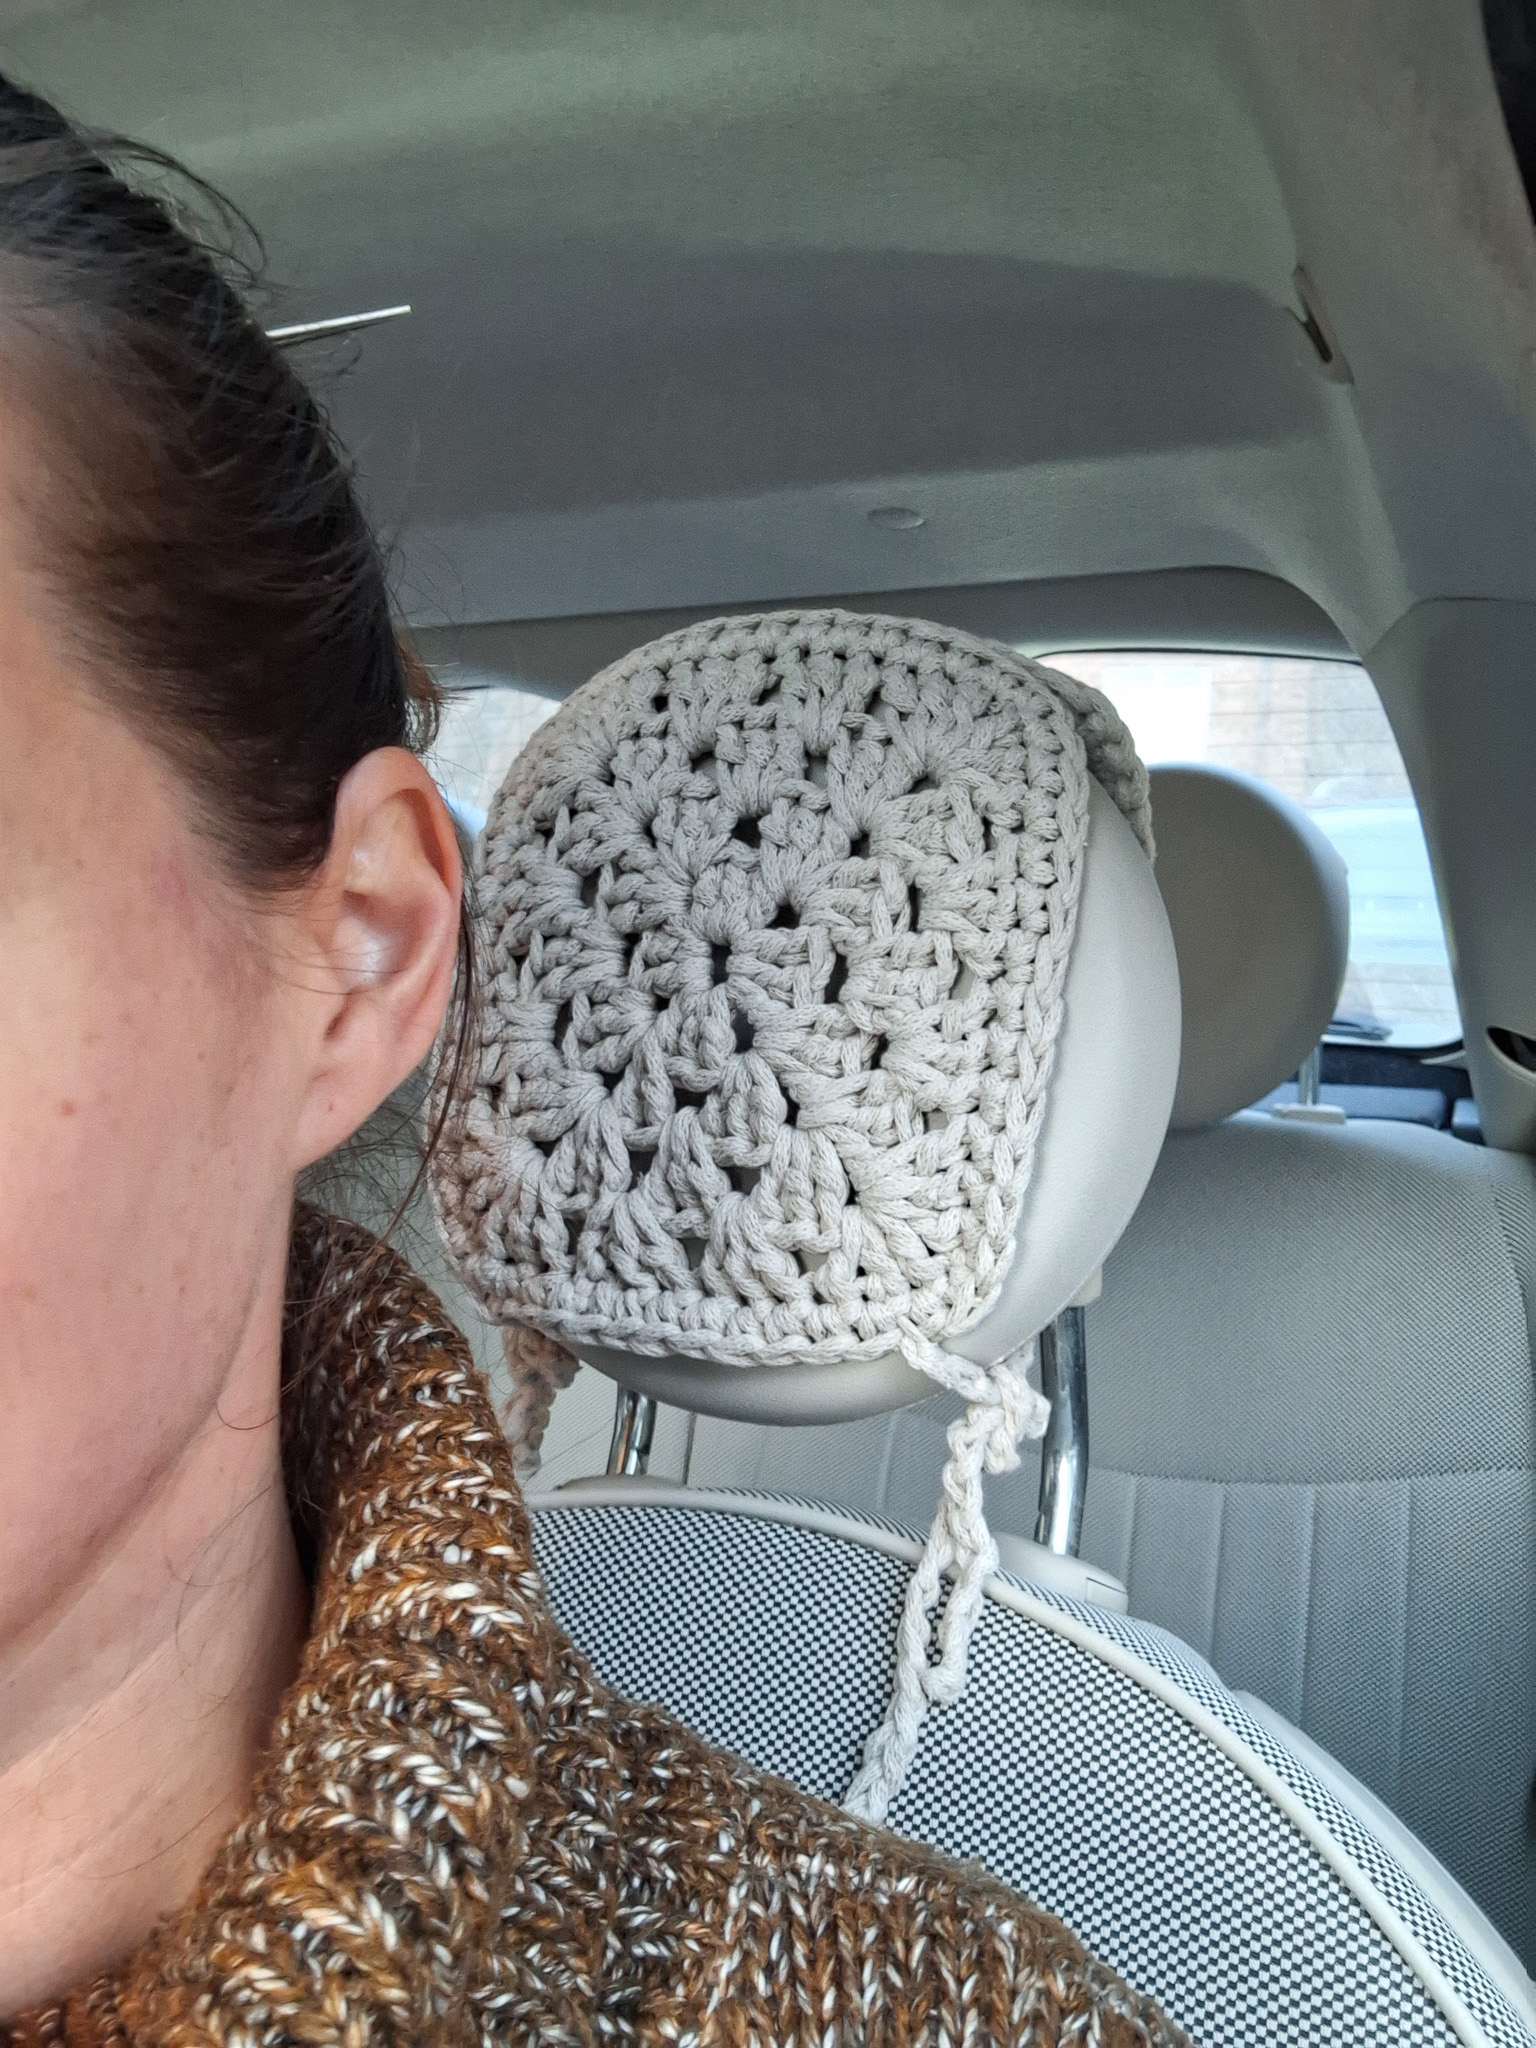
Headrest covers for car “Isolde”
Decorative Headrest Cover for Car
Style your car with crocheted interior pieces for the headrest! You will crochet beautiful granny squares and can mix and match colors to suit your style. Adjust the size depending on how large you make your squares so they fit your car’s headrest. The pattern is simple and suitable for beginners. Materials you need EKO Nano yarn (we used the color “greige”), 6 mm crochet hook, scissors. Finished size is approximately 18 × 18 cm (adjustable). You can customize the size of your cover by adding more squares, using larger or smaller squares, or adding extra rounds around the squares.
Yarn Consumption: Approximately 110 grams
Note: In this instruction, we use videos from our technique library along with images.

Here's how to do it
The size of the headrest cover can be adjusted depending on how large you crochet your squares. The pattern is based on the basic granny square motif. You can make the cover larger by using bigger squares, adding more squares, or crocheting extra rounds around each square.—Rebecca

This is what you need:
Here you can directly purchase the material for the product. Please note that the instruction is digital and appears here on the page (no written instruction).


.jpg)
Unleash your creativity
For only 85kr per month you get access to all our 300+ beginner-friendly instructions for crochet, knitting and macrame.
A perfect way to get started with your new hobby!

Crochet Granny Squares for Car Headrest Cover
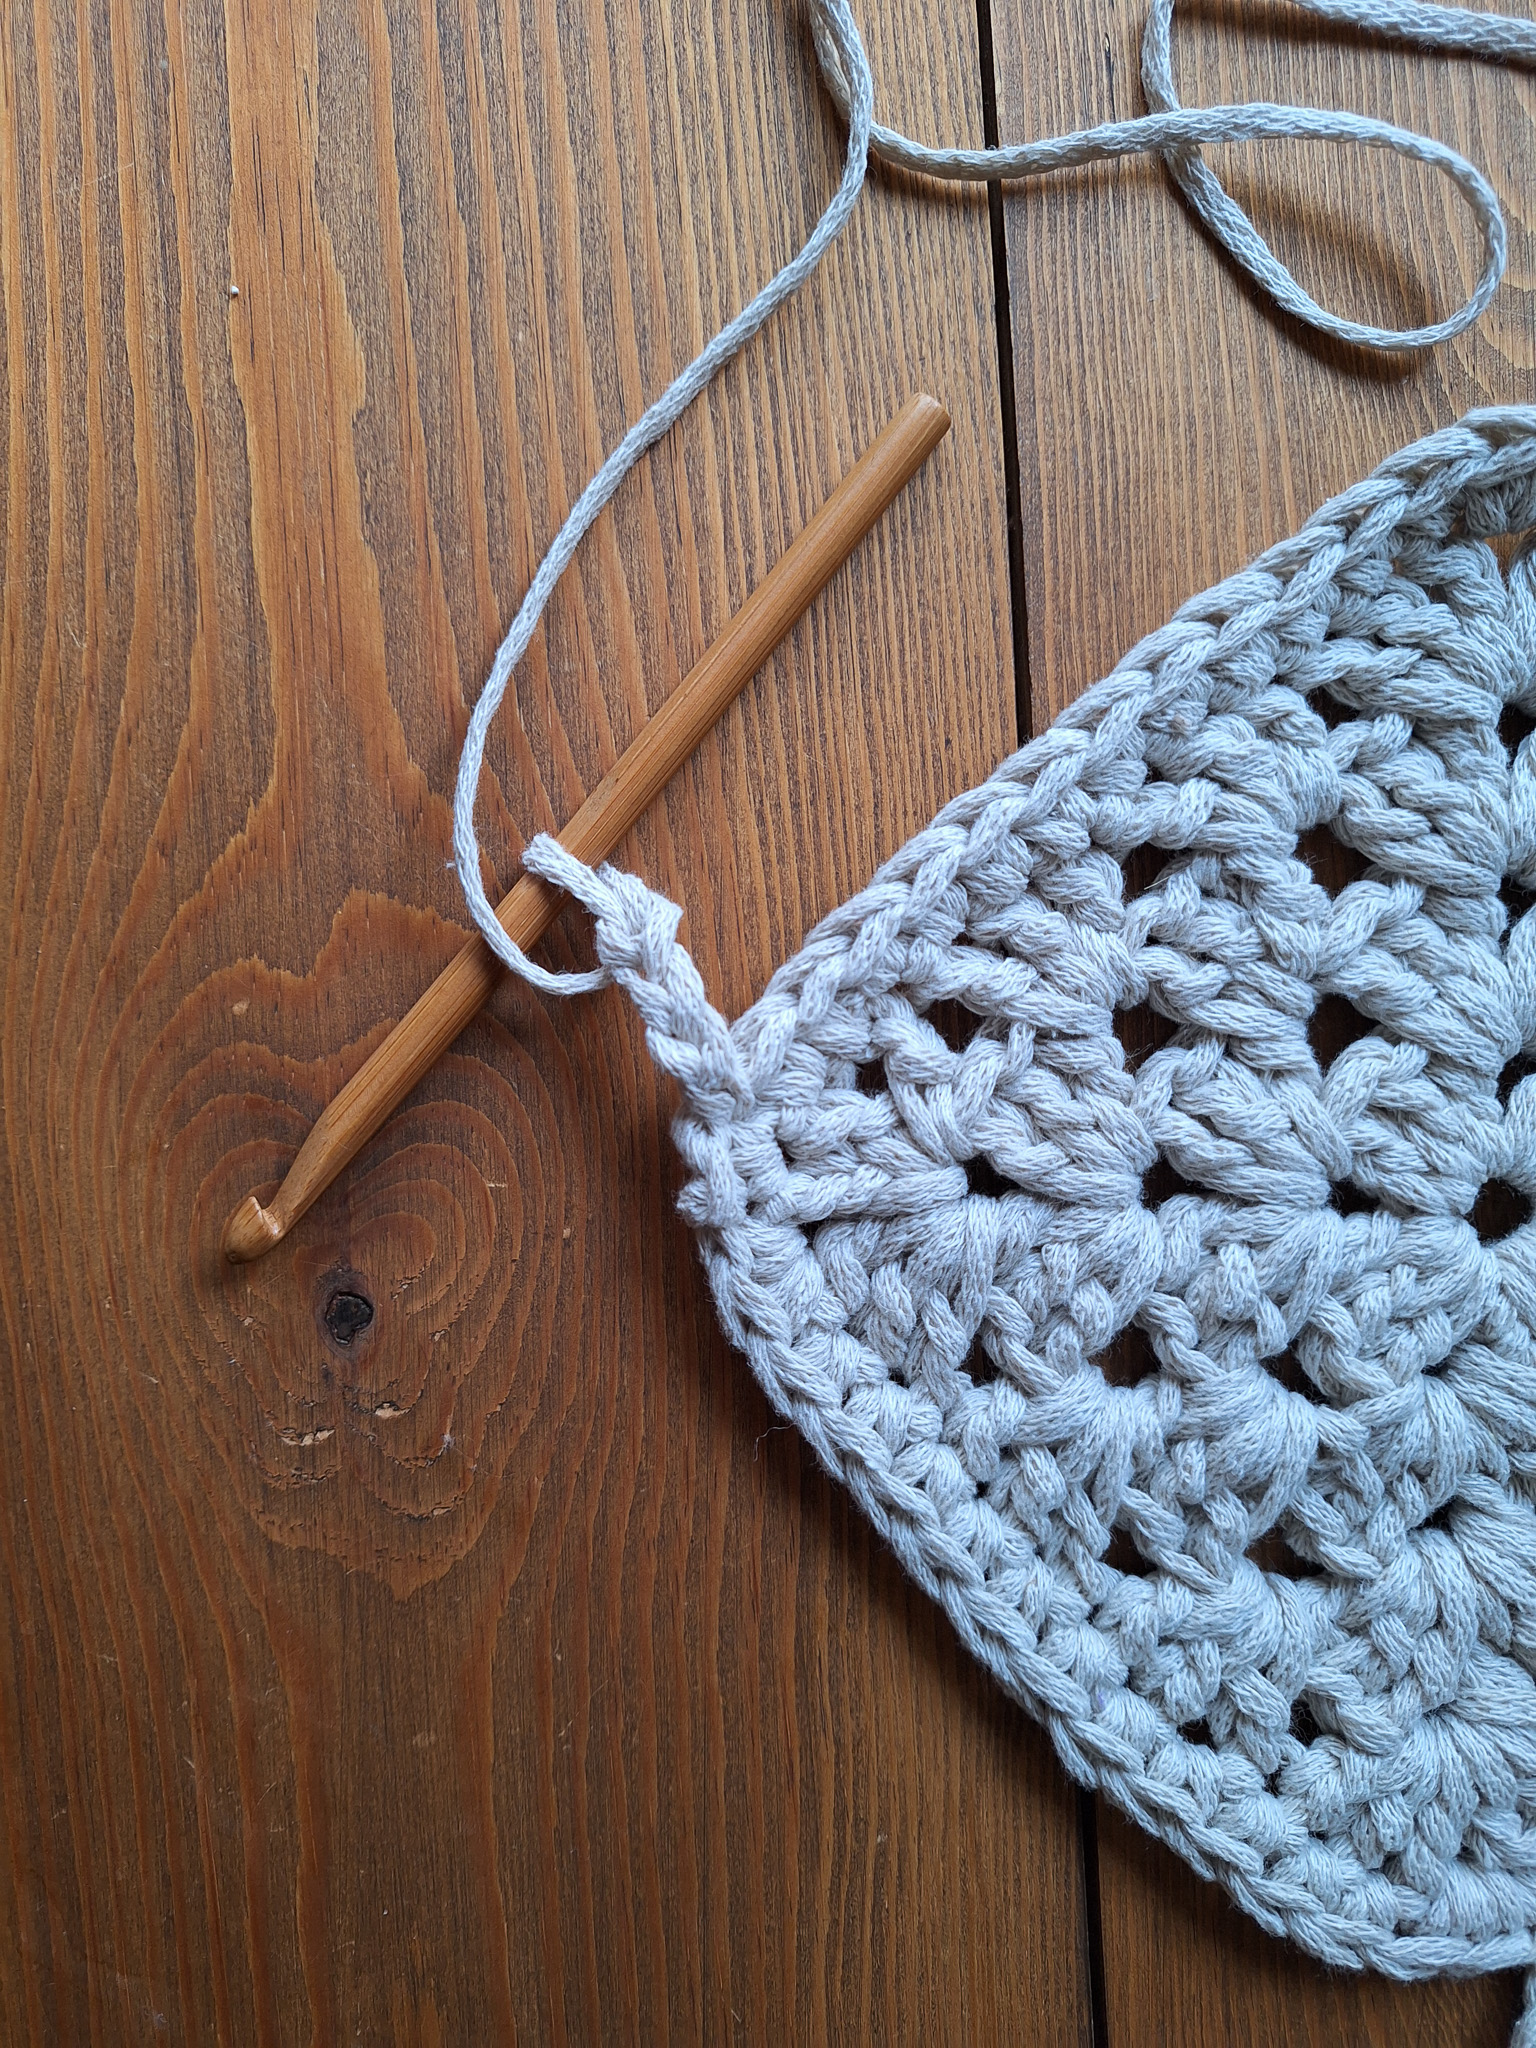
Start by crocheting one square the size of your headrest. Keep in mind that the squares will be joined at the top edge (one short side), so include this in your sizing. I recommend measuring as you go and adjusting the size while working the rounds.
Granny Square Instructions
Round 1:
- Make a magic ring. Chain 3 to count as your first double crochet.
- Work 2 more double crochets into the ring. Together with the initial chain, this forms your first double crochet group. Chain 1 between groups; this space forms a corner.
- Repeat 3 double crochets and 1 chain 3 more times, so you have 4 double crochet groups total, with 1 chain between each.
- Pull the short tail to close the center of the ring.
- Join with a slip stitch to the third chain of the starting chain 3.
Round 2:
Option 1: Change color
- Cut the old yarn and attach the new yarn in one of the corners (the chain space between two double crochet groups).
- Start the round with 3 chains (counts as first double crochet).
Option 2: Continue with same color
- Do not cut the yarn. Slip stitch to the top of the next 3 double crochets until you reach the corner. This moves the yarn neatly without cutting.
In the corner space:
- Chain 3 (counts as first double crochet), work 2 double crochets, chain 1, and then 3 more double crochets.
- Move to the next corner and repeat: 3 double crochets, chain 1, 3 double crochets.
- Continue this pattern for all four corners.
- Join with a slip stitch in the third chain of the starting chain three.
Round 3:
- Change color or continue with the same.
- Start in a corner space: chain 3 (first double crochet), then work 2 double crochets.
- In each corner: 3 double crochets, chain 1, 3 double crochets.
- In the sides between corners: 3 double crochets.
- Join with a slip stitch to the third chain of the starting chain 3.
Rounds 4–5:
- Continue as in Round 3. Each corner: 3 double crochets, chain 1, 3 double crochets.
- Between corners: 3 double crochets.
- Start and end as before.
Notes:
- You can crochet more rounds until the square matches the size of your headrest.
- We worked four rounds in our example, but measure your headrest and adjust accordingly.
- Fasten off all yarn ends when finished.
This will give you a neat and flexible granny square base to assemble the headrest cover.

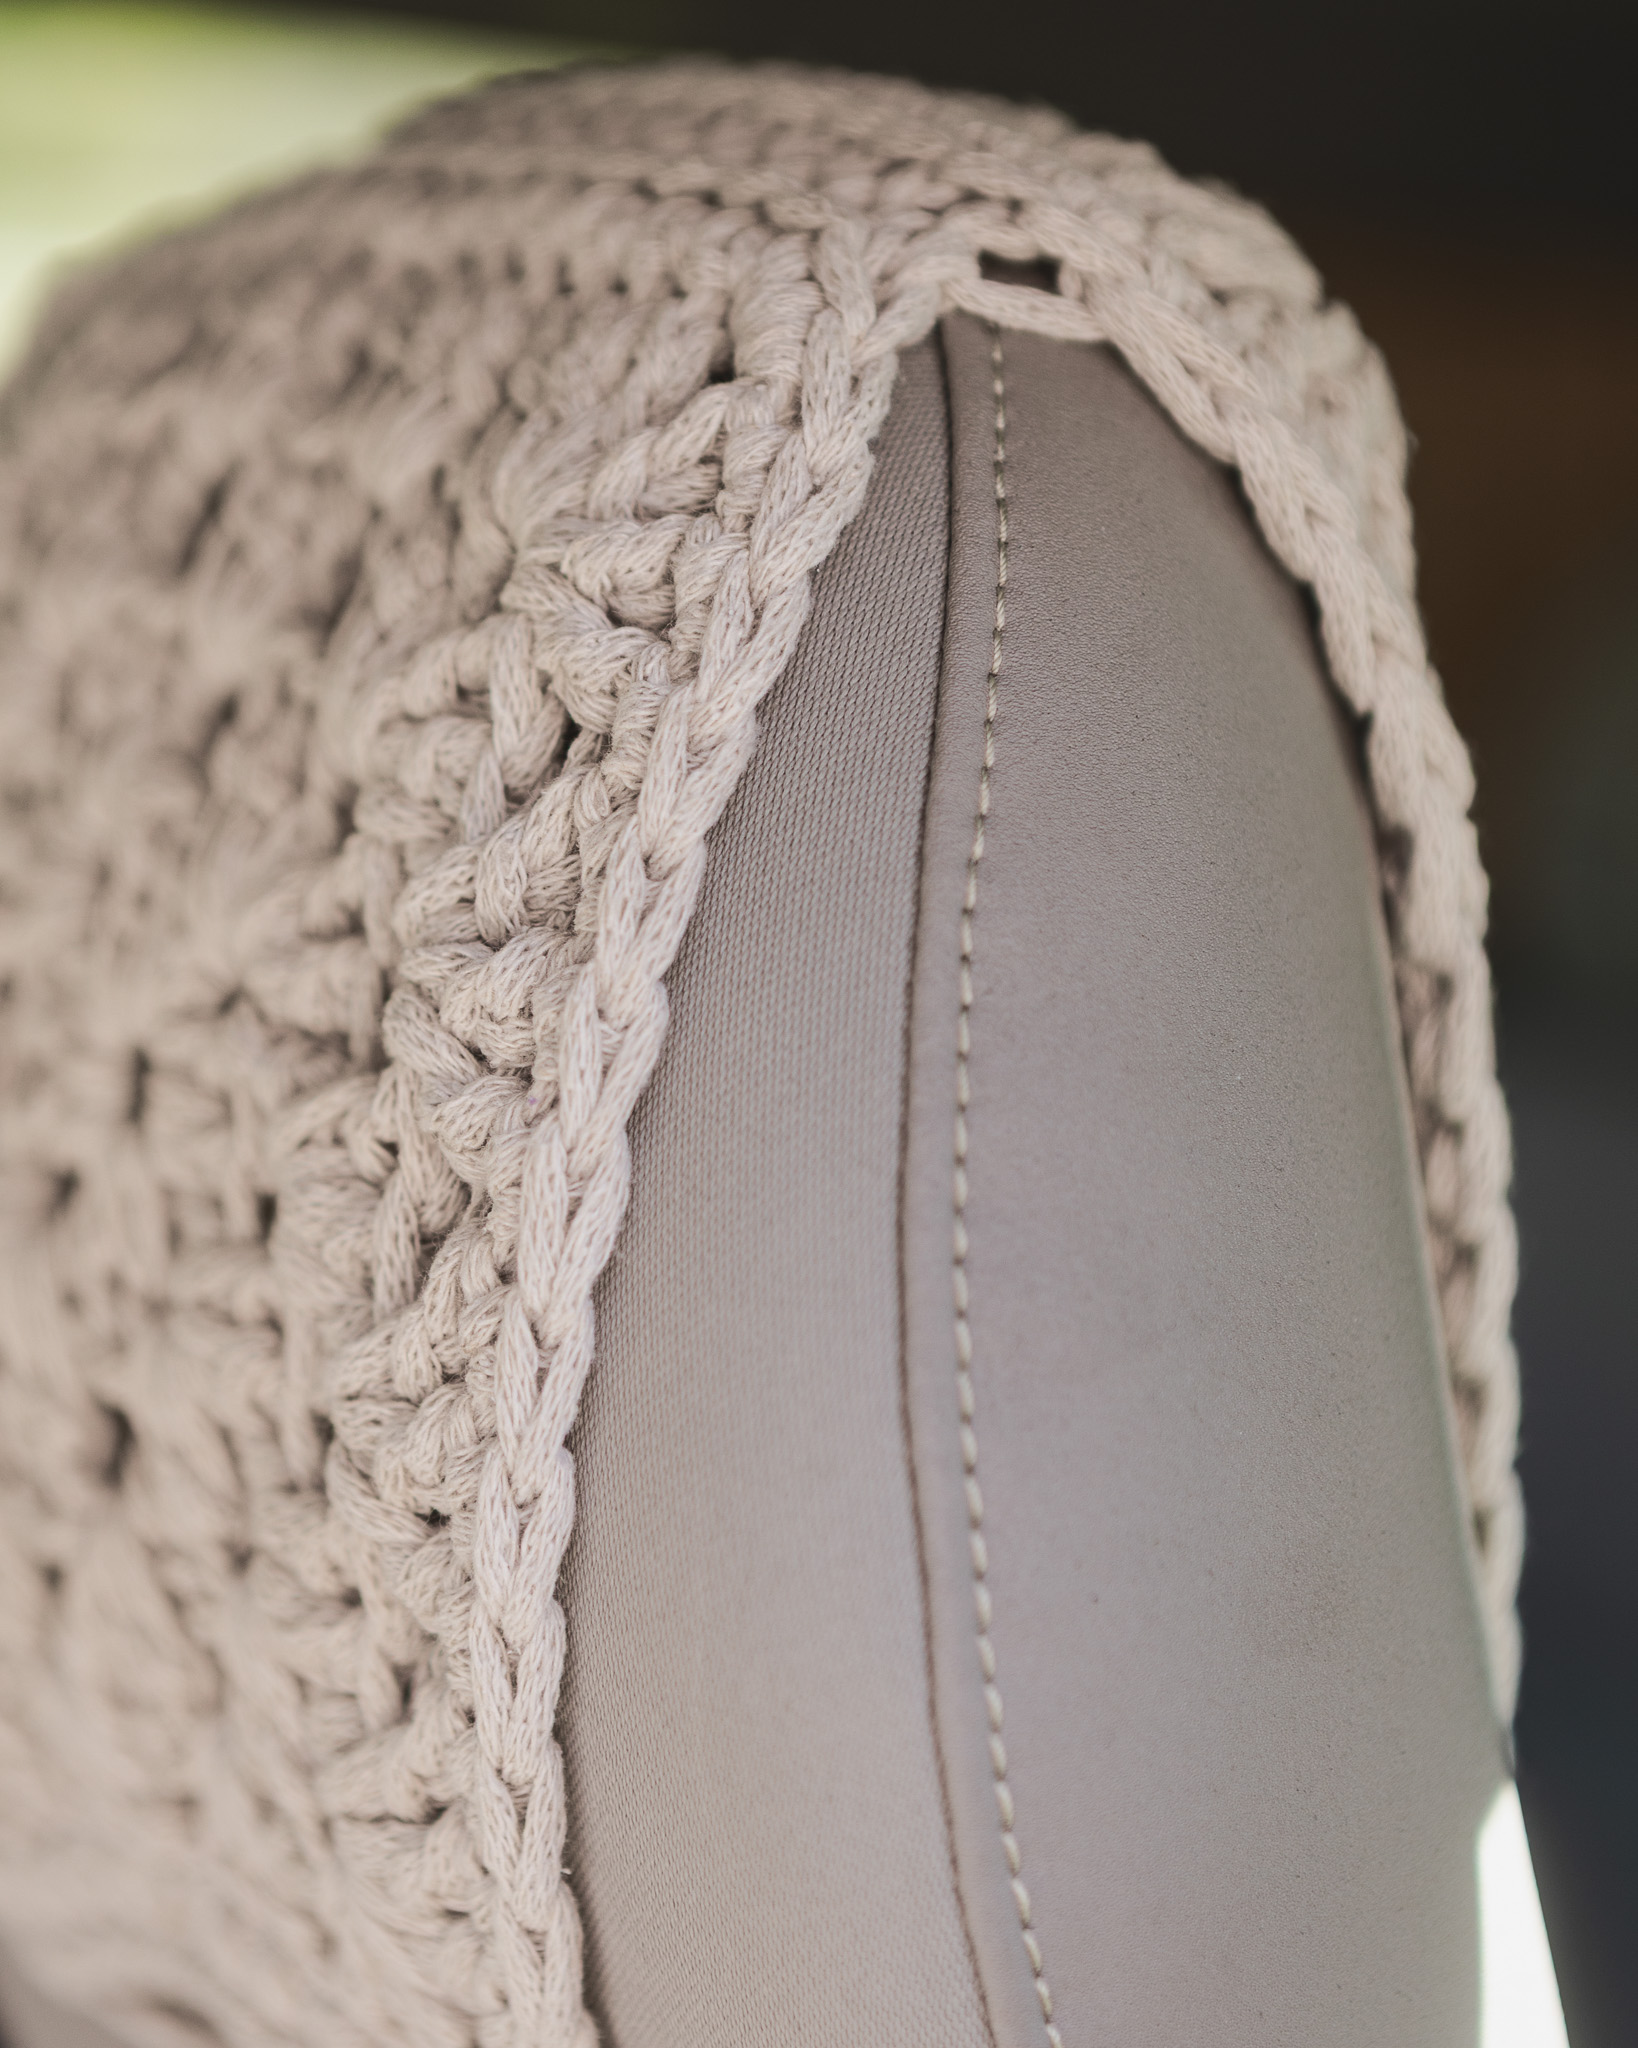
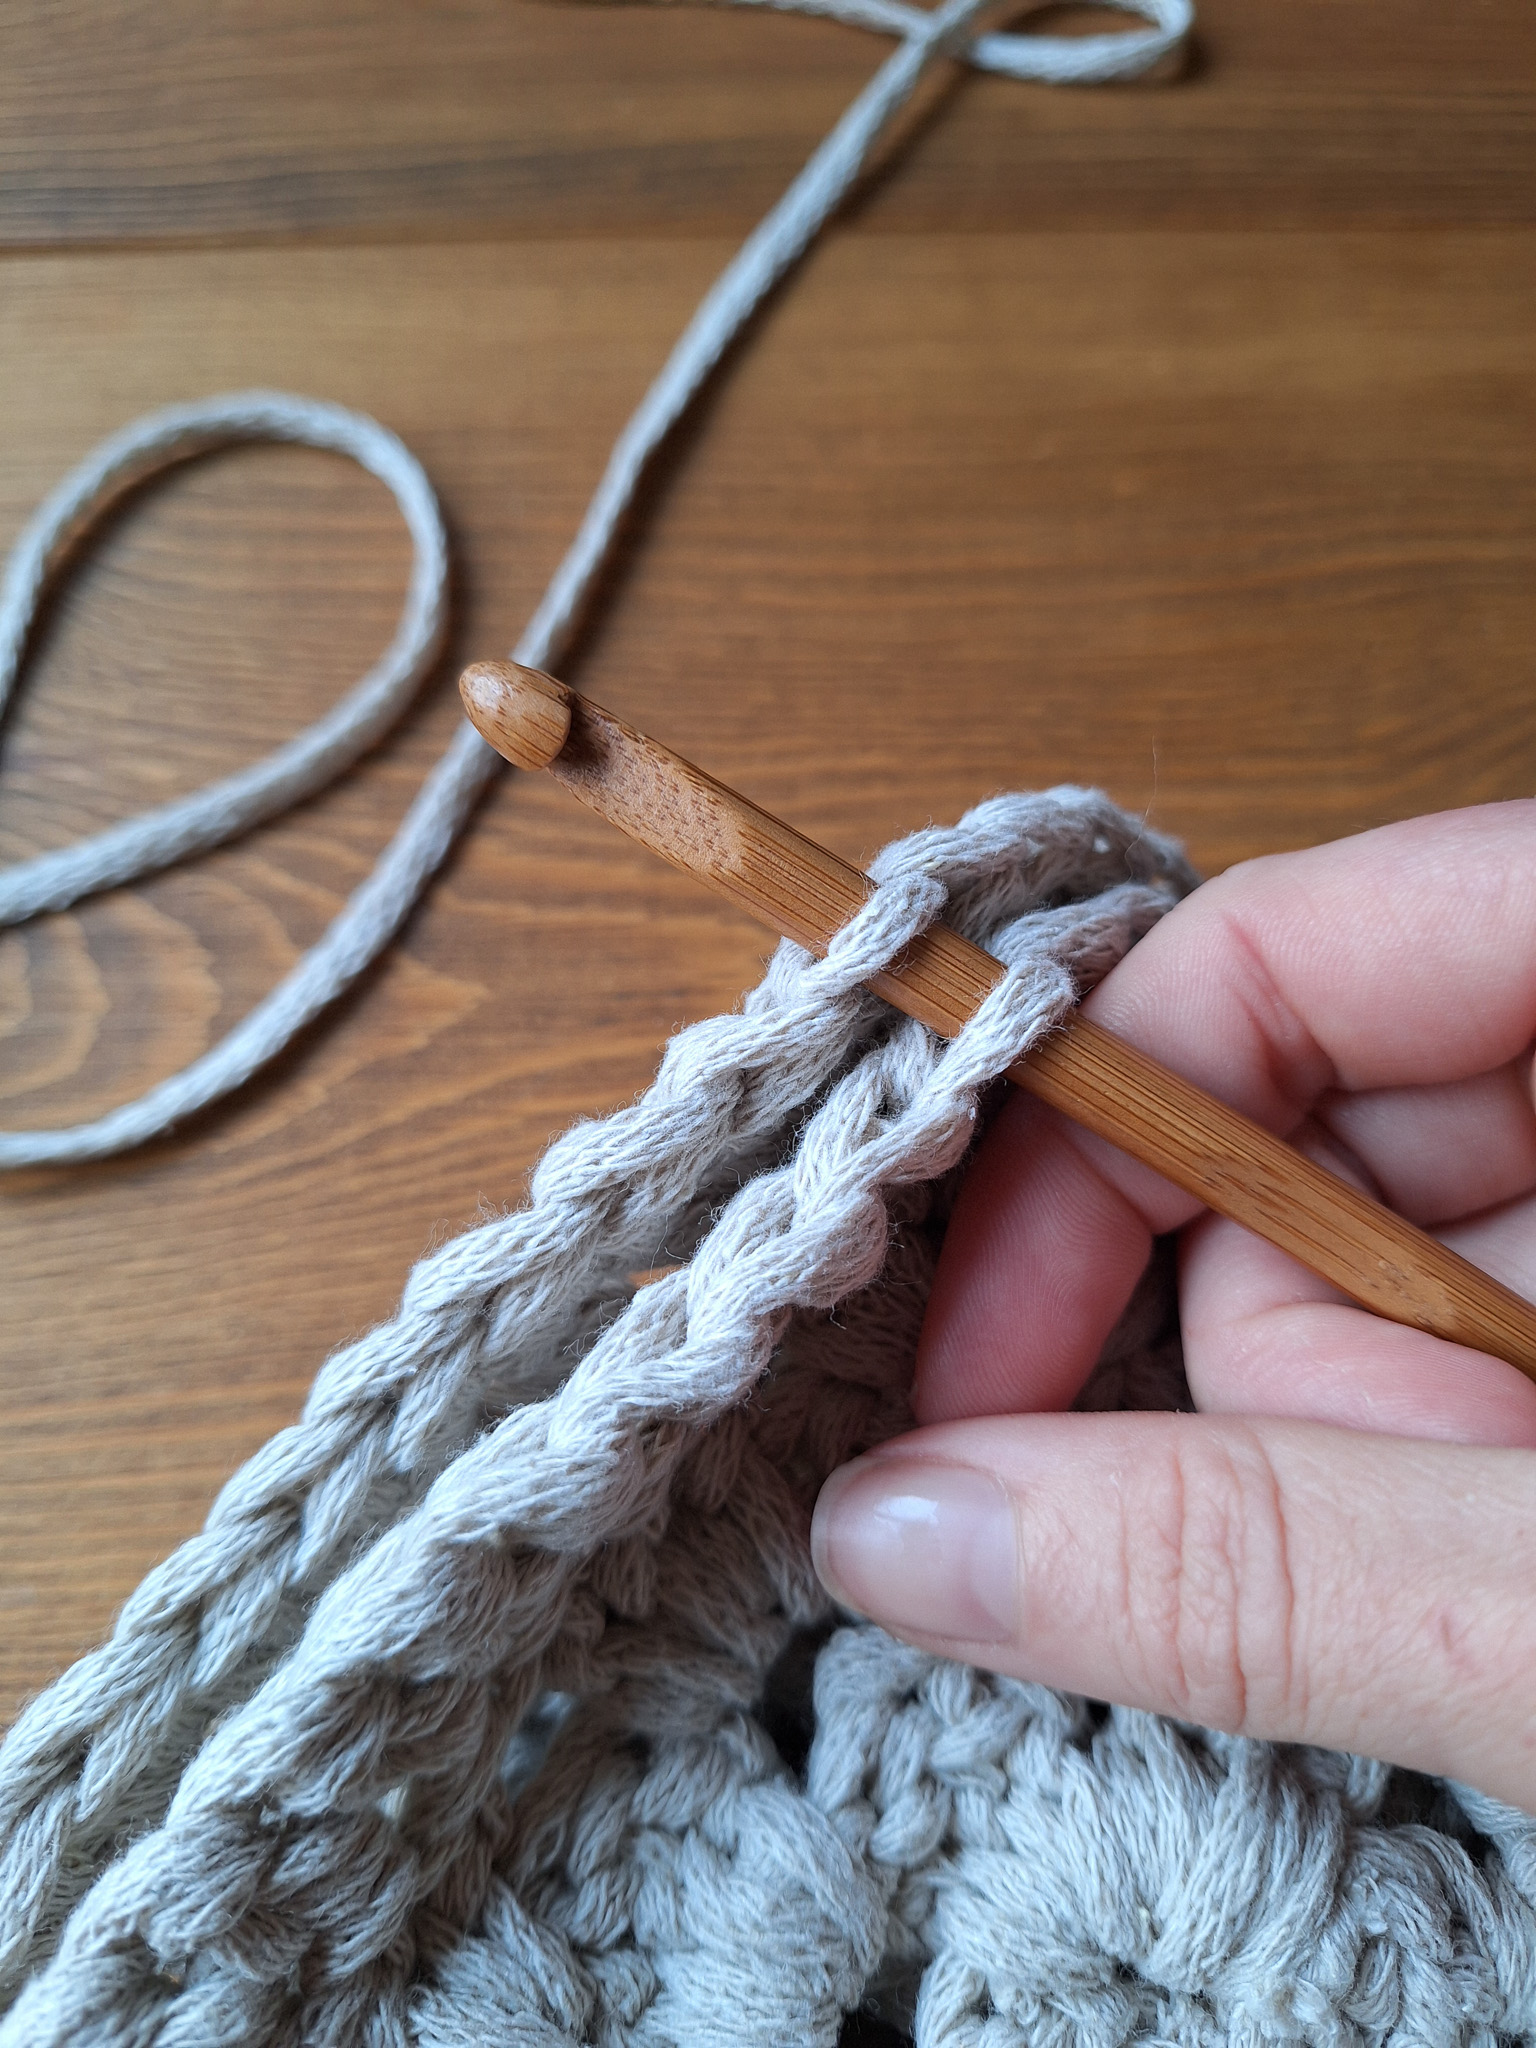
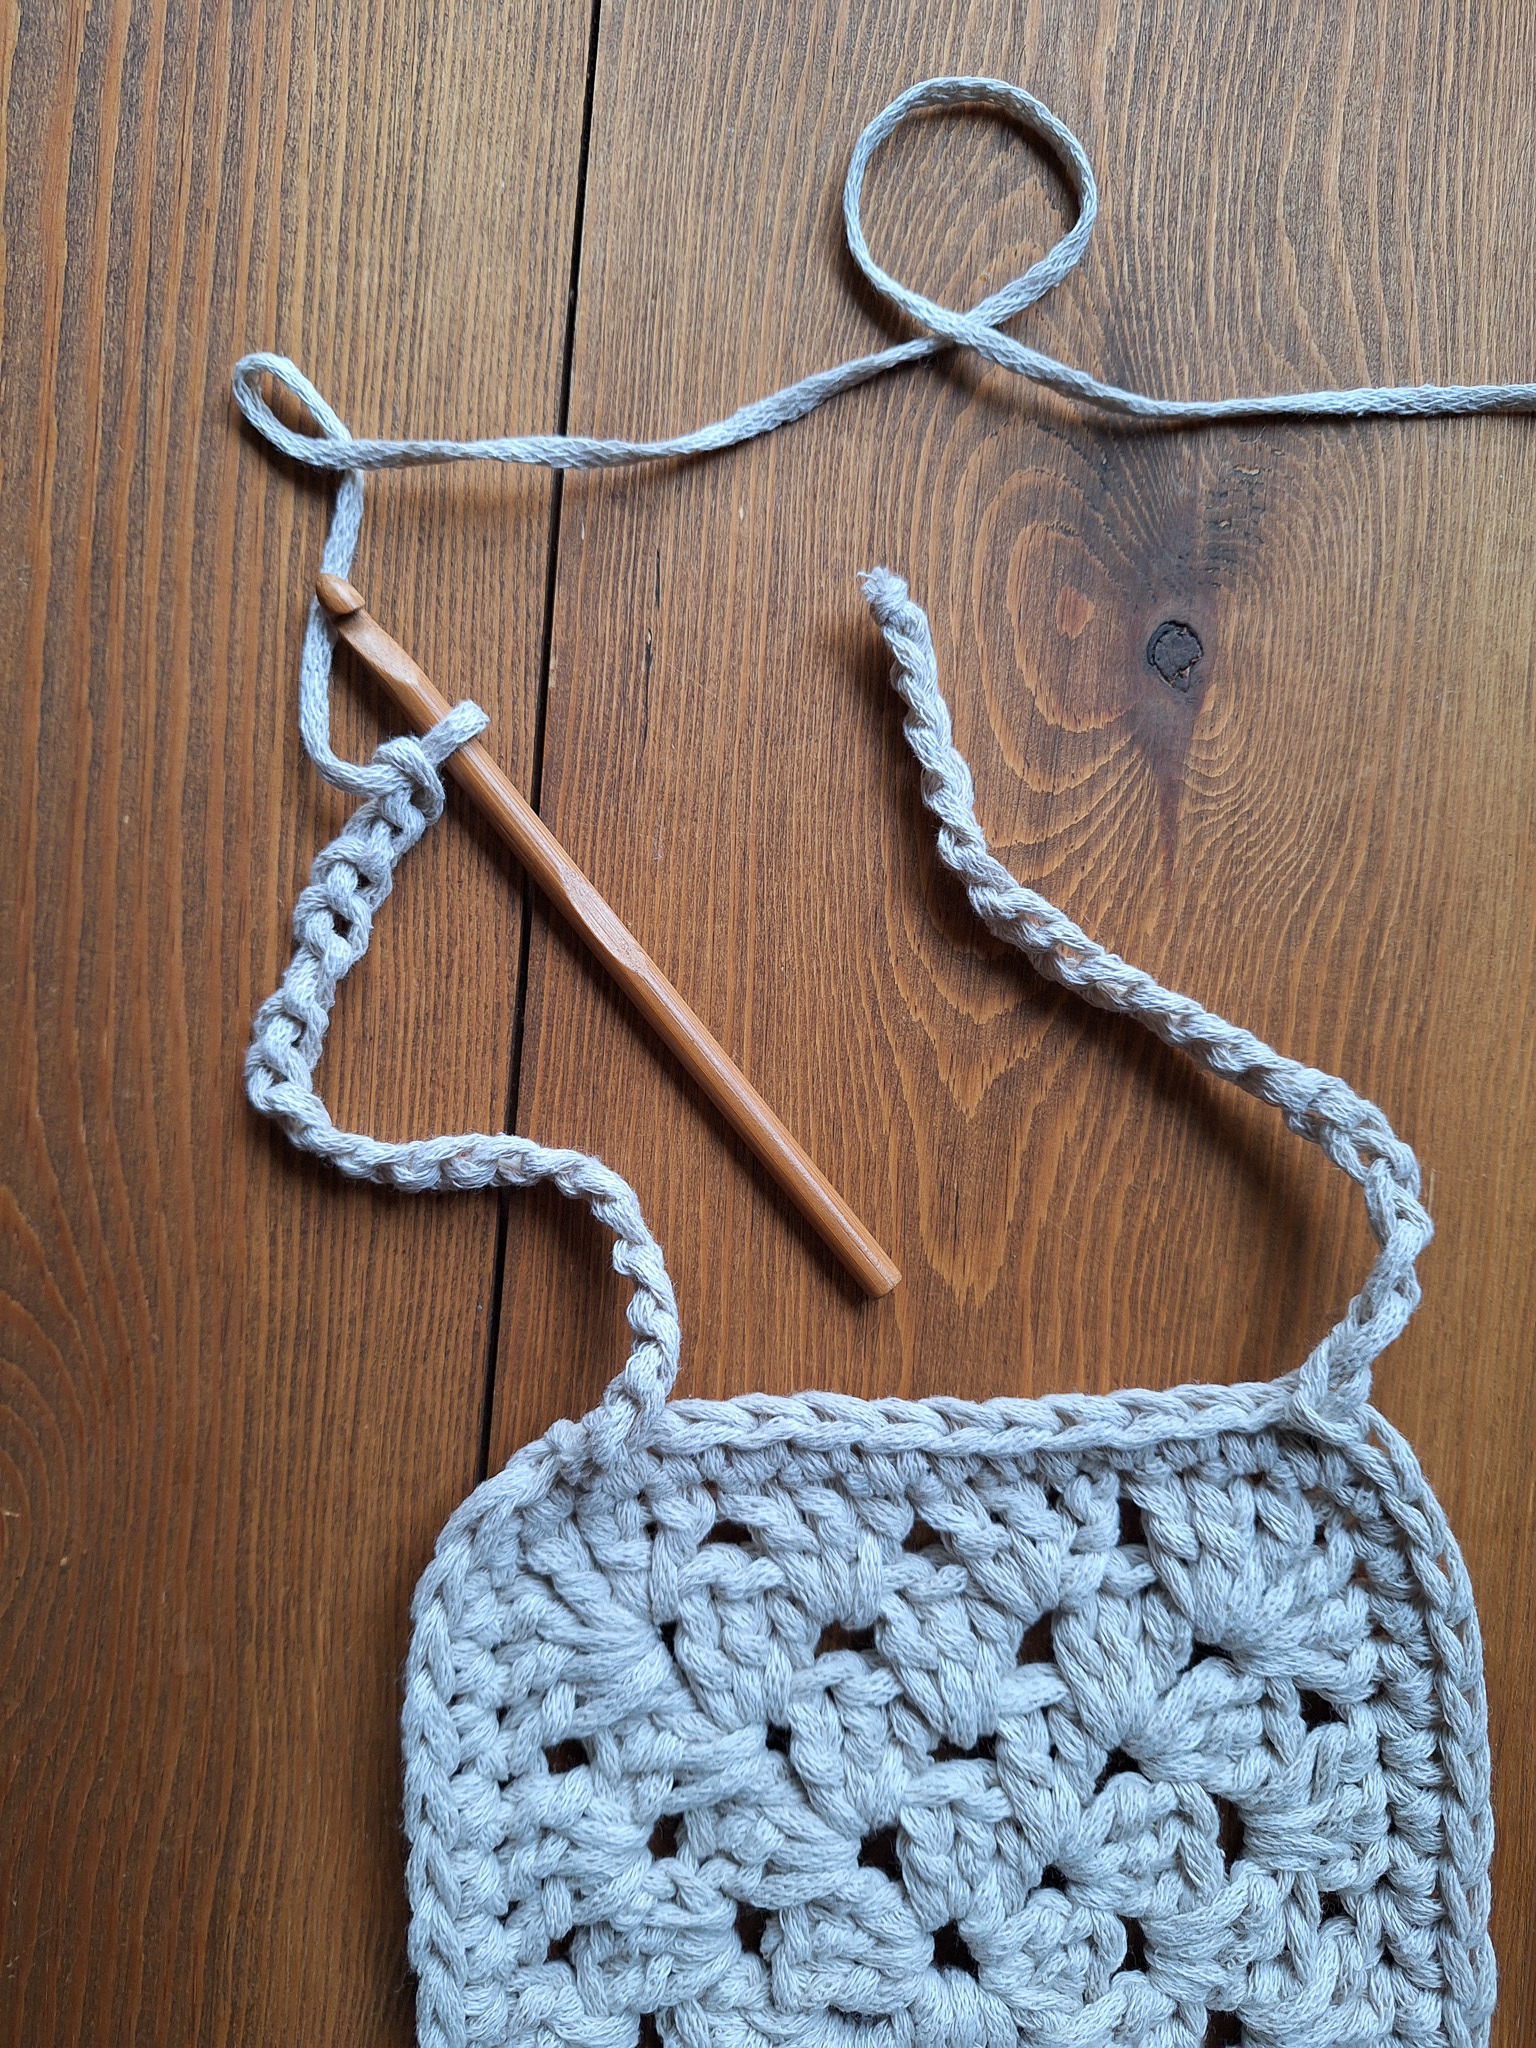
Joining Granny Squares at the Top Edge
You will join your squares only along the top edge (one short side). Work slip stitches (sl st) only through the outer loops (the loops farthest from each other).
Steps:
- Make a slip knot on your hook and attach your yarn to a corner of one square.
- Insert your hook through both squares at the corner and work a single crochet (sc) only in the outer loops.
- Continue working sl st along the row, pulling yarn through the outer loops of both squares.
Tips:
- Do not work all the way into the corners; leaving a small gap helps the cover fit the headrest better.


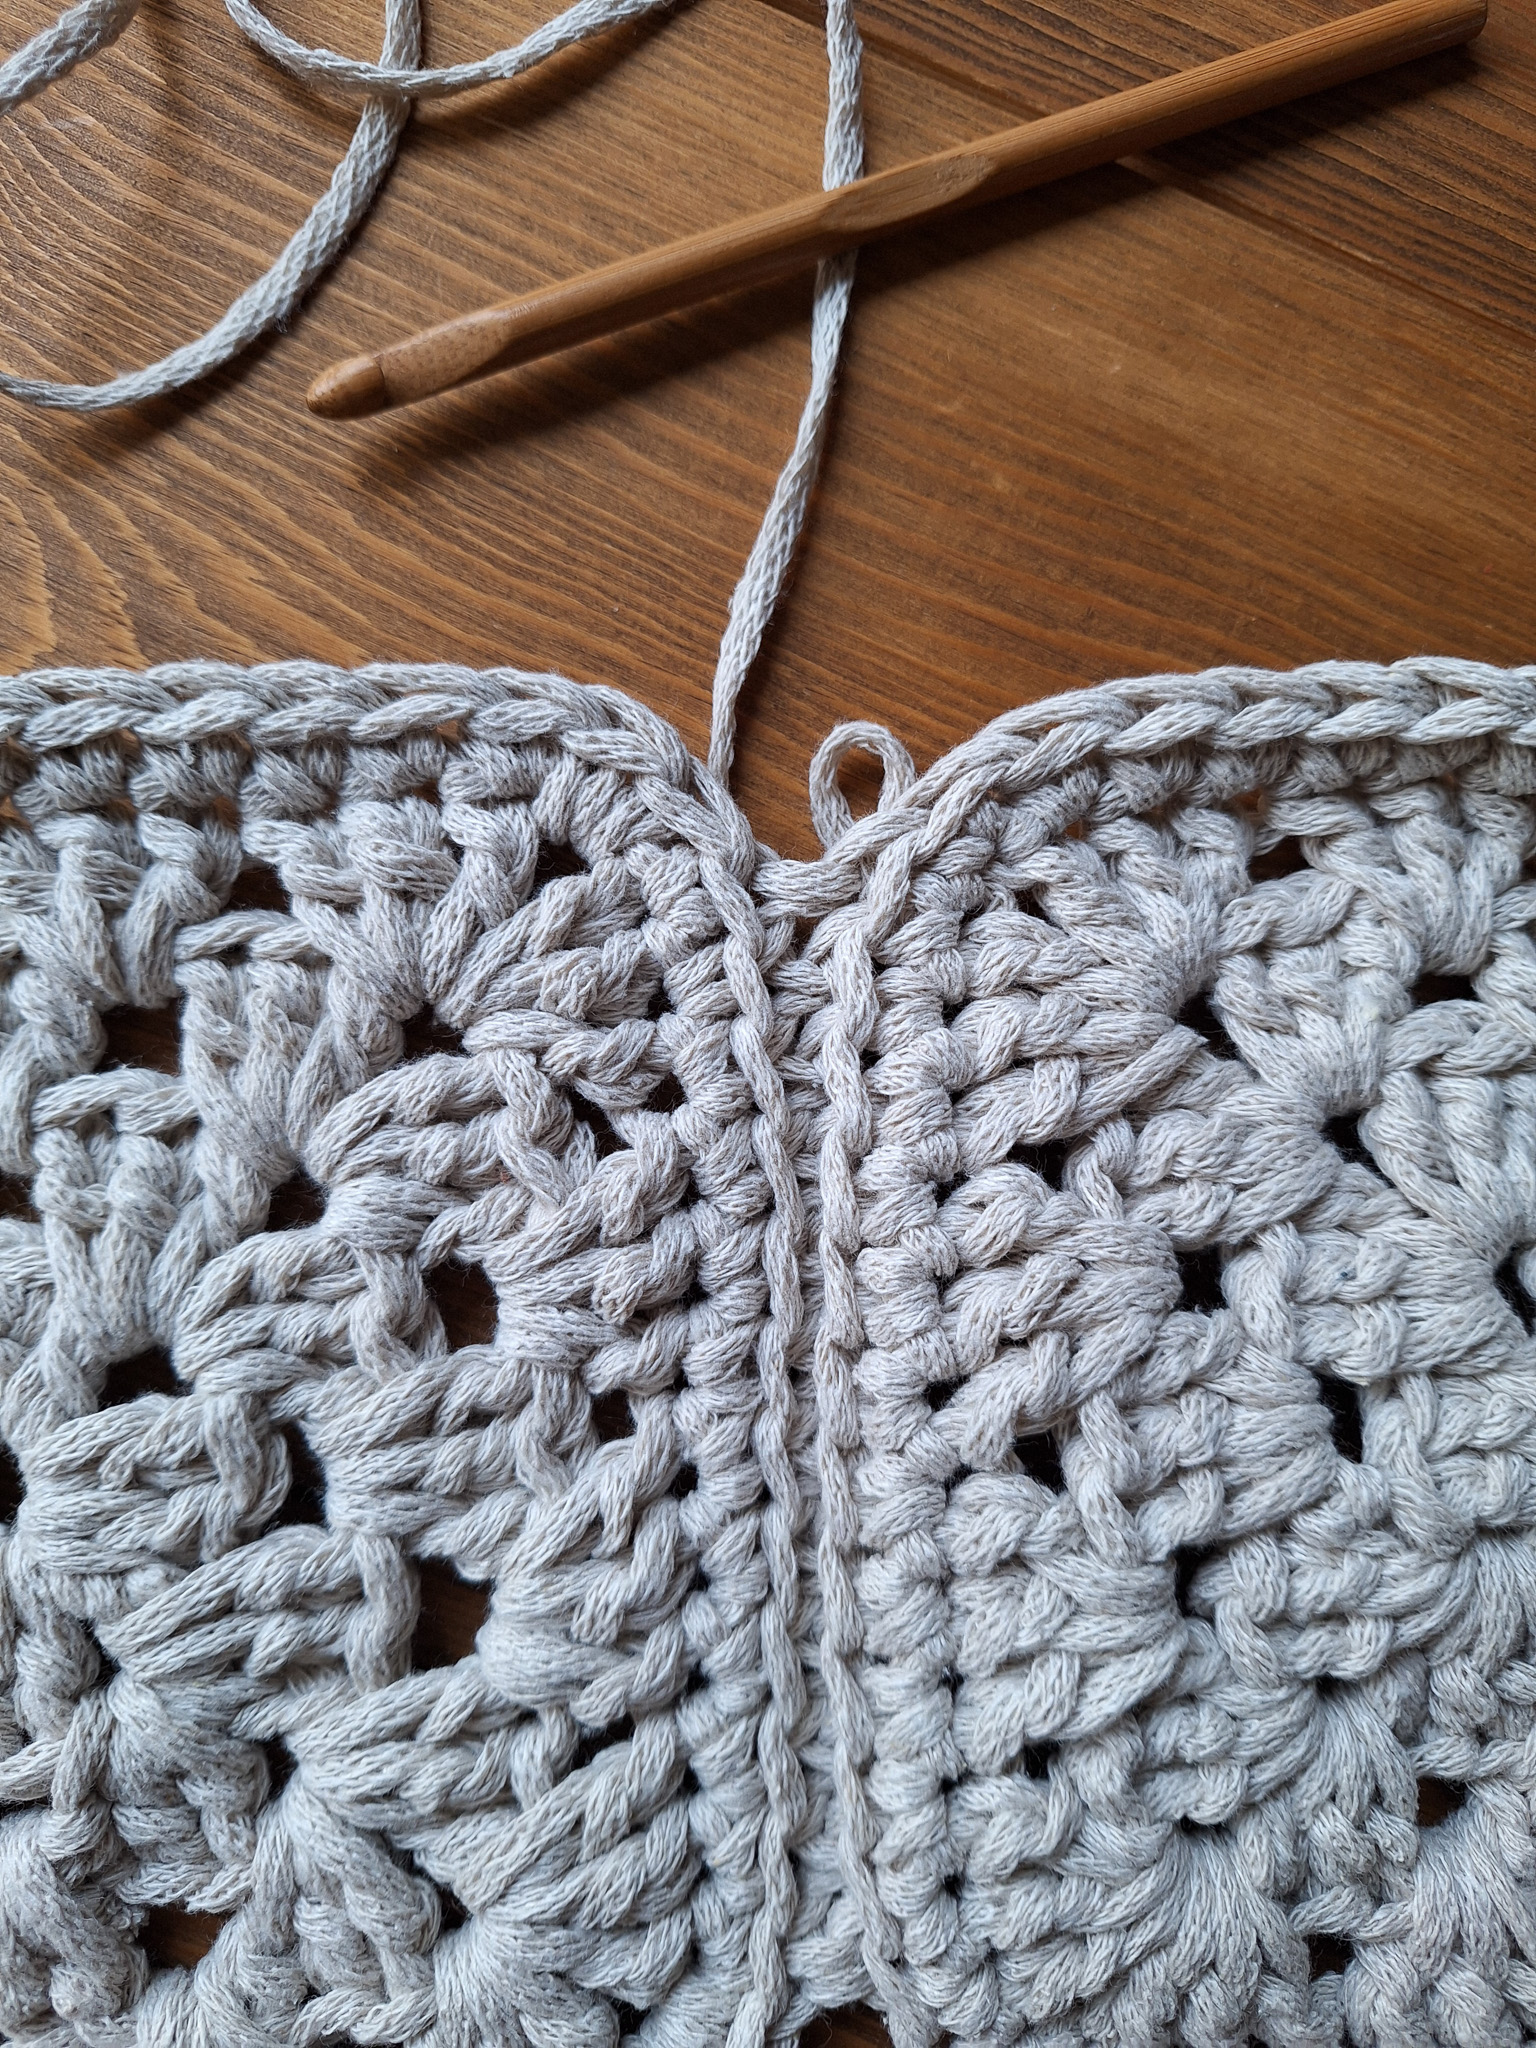
Ties
Now you need to add ties to the bottom edge of both the front and back pieces, one in each corner. You can either crochet them or just attach yarn ends. In this example, we crocheted them.
Steps:
- Attach your yarn to a corner using a single crochet (sc).
- From there, chain (ch) the length you want for your tie. Make sure the two ties will be long enough to secure around your headrest. In this example, we made each tie about 7 inches (18 cm) long.
- Repeat for each corner.
- Finish by weaving in and trimming all loose ends.
You’re done! Now you can finally decorate your car. Great job!
Crochet Terms (US)
- MR = Magic Ring
- ch = Chain
- sl st = Slip Stitch
- sc = Single Crochet
- dc = Double Crochet
- (…) = Number of stitches in the round
- *…* = Repeat everything between the asterisks as indicated
Granny Square for Car Headrest Cover
Note: Start by crocheting one square the size of your headrest. Keep in mind that the squares will be joined at the top edge (one short side). Measure as you go to adjust the size.
Round 1: Ch 3 (counts as first dc), 2 dc, ch 1, *3 dc, ch 1* ×3, join with sl st to top of starting ch 3. Stitches: 12 dc in total. Change color or continue with the same color.
Round 2: Join yarn in a corner (or sl st to next corner if continuing with same color). Ch 3 (counts as first dc), 2 dc, ch 1, 3 dc, move to next corner, *3 dc, ch 1, 3 dc* ×3, join with sl st to top of starting ch 3. Stitches: 24 dc in total. Change color or continue with same color.
Round 3: Join yarn in a side space (not a corner), ch 3 (counts as first dc), 2 dc, *move to next corner, 3 dc, ch 1, 3 dc, move to next side space, 3 dc* ×3, move to next corner, 3 dc, ch 1, 3 dc, join with sl st to top of starting ch 3. Stitches: 36 dc in total. Change color or continue with same color.
Round 4: Work as Round 3: 3 dc in each side space, 3 dc, ch 2, 3 dc in each corner, join with sl st. Stitches: 48 dc in total. Change color or continue with same color.
Round 5: Work as Round 4: 3 dc in each side space, 3 dc, ch 1, 3 dc in each corner, join with sl st. Stitches: 60 dc in total.
Notes:
- We worked 4 rounds in our example, but you can crochet as many rounds as needed to fit your car’s headrest.
- Fasten off and weave in all ends after finishing your squares.
Joining the Squares
You will join your granny squares only at the top edge, i.e., one short side. Use sl st only in the back loops of the stitches (the loops farthest from you).
Tip: Stop just before reaching the corner for a better fit.
How to do it:
- Make a slip knot on your hook and attach your yarn to one corner of the first square.
- Insert the hook through both squares at the same corner and work a sl st in the back loops only.
- Continue working sl st across the top edge, inserting your hook into the back loops of both squares.
- When you reach the end, fasten off and weave in the ends.
This method neatly joins the squares while keeping the edges flat and flexible for the headrest cover.
Tie Straps
You will add tie straps at the bottom edge of both the front and back pieces, one at each corner. You can either crochet the ties or simply attach yarn tails; here we will crochet the straps.
How to do it:
- Attach yarn to a corner using a sl st.
- Chain to the desired length for your tie strap (make sure the two straps will be long enough to secure around your headrest). For example, about 18 cm.
- Fasten off and pull through the last loop to secure.
- Repeat for the other corners as needed.
- Weave in all loose ends.
Now your granny square headrest cover is complete and ready to decorate your car!
The rights to this pattern belong to MYO Make Your Own. The pattern or its pictures may not be copied, shared or resold either in parts or in its entirety, but you may sell items you have crocheted from this pattern. If you have questions about the pattern, contact MYO at hello@makeyourown.se.
Crochet Granny Squares for Car Headrest Cover
Start by crocheting one square the size of your headrest. Keep in mind that the squares will be joined at the top edge (one short side), so include this in your sizing. I recommend measuring as you go and adjusting the size while working the rounds.
Granny Square Instructions
Round 1:
- Make a magic ring. Chain 3 to count as your first double crochet.
- Work 2 more double crochets into the ring. Together with the initial chain, this forms your first double crochet group. Chain 1 between groups; this space forms a corner.
- Repeat 3 double crochets and 1 chain 3 more times, so you have 4 double crochet groups total, with 1 chain between each.
- Pull the short tail to close the center of the ring.
- Join with a slip stitch to the third chain of the starting chain 3.
Round 2:
Option 1: Change color
- Cut the old yarn and attach the new yarn in one of the corners (the chain space between two double crochet groups).
- Start the round with 3 chains (counts as first double crochet).
Option 2: Continue with same color
- Do not cut the yarn. Slip stitch to the top of the next 3 double crochets until you reach the corner. This moves the yarn neatly without cutting.
In the corner space:
- Chain 3 (counts as first double crochet), work 2 double crochets, chain 1, and then 3 more double crochets.
- Move to the next corner and repeat: 3 double crochets, chain 1, 3 double crochets.
- Continue this pattern for all four corners.
- Join with a slip stitch in the third chain of the starting chain three.
Round 3:
- Change color or continue with the same.
- Start in a corner space: chain 3 (first double crochet), then work 2 double crochets.
- In each corner: 3 double crochets, chain 1, 3 double crochets.
- In the sides between corners: 3 double crochets.
- Join with a slip stitch to the third chain of the starting chain 3.
Rounds 4–5:
- Continue as in Round 3. Each corner: 3 double crochets, chain 1, 3 double crochets.
- Between corners: 3 double crochets.
- Start and end as before.
Notes:
- You can crochet more rounds until the square matches the size of your headrest.
- We worked four rounds in our example, but measure your headrest and adjust accordingly.
- Fasten off all yarn ends when finished.
This will give you a neat and flexible granny square base to assemble the headrest cover.
Joining Granny Squares at the Top Edge
You will join your squares only along the top edge (one short side). Work slip stitches (sl st) only through the outer loops (the loops farthest from each other).
Steps:
- Make a slip knot on your hook and attach your yarn to a corner of one square.
- Insert your hook through both squares at the corner and work a single crochet (sc) only in the outer loops.
- Continue working sl st along the row, pulling yarn through the outer loops of both squares.
Tips:
- Do not work all the way into the corners; leaving a small gap helps the cover fit the headrest better.
Ties
Now you need to add ties to the bottom edge of both the front and back pieces, one in each corner. You can either crochet them or just attach yarn ends. In this example, we crocheted them.
Steps:
- Attach your yarn to a corner using a single crochet (sc).
- From there, chain (ch) the length you want for your tie. Make sure the two ties will be long enough to secure around your headrest. In this example, we made each tie about 7 inches (18 cm) long.
- Repeat for each corner.
- Finish by weaving in and trimming all loose ends.
You’re done! Now you can finally decorate your car. Great job!
Crochet Terms (US)
- MR = Magic Ring
- ch = Chain
- sl st = Slip Stitch
- sc = Single Crochet
- dc = Double Crochet
- (…) = Number of stitches in the round
- *…* = Repeat everything between the asterisks as indicated
Granny Square for Car Headrest Cover
Note: Start by crocheting one square the size of your headrest. Keep in mind that the squares will be joined at the top edge (one short side). Measure as you go to adjust the size.
Round 1: Ch 3 (counts as first dc), 2 dc, ch 1, *3 dc, ch 1* ×3, join with sl st to top of starting ch 3. Stitches: 12 dc in total. Change color or continue with the same color.
Round 2: Join yarn in a corner (or sl st to next corner if continuing with same color). Ch 3 (counts as first dc), 2 dc, ch 1, 3 dc, move to next corner, *3 dc, ch 1, 3 dc* ×3, join with sl st to top of starting ch 3. Stitches: 24 dc in total. Change color or continue with same color.
Round 3: Join yarn in a side space (not a corner), ch 3 (counts as first dc), 2 dc, *move to next corner, 3 dc, ch 1, 3 dc, move to next side space, 3 dc* ×3, move to next corner, 3 dc, ch 1, 3 dc, join with sl st to top of starting ch 3. Stitches: 36 dc in total. Change color or continue with same color.
Round 4: Work as Round 3: 3 dc in each side space, 3 dc, ch 2, 3 dc in each corner, join with sl st. Stitches: 48 dc in total. Change color or continue with same color.
Round 5: Work as Round 4: 3 dc in each side space, 3 dc, ch 1, 3 dc in each corner, join with sl st. Stitches: 60 dc in total.
Notes:
- We worked 4 rounds in our example, but you can crochet as many rounds as needed to fit your car’s headrest.
- Fasten off and weave in all ends after finishing your squares.
Joining the Squares
You will join your granny squares only at the top edge, i.e., one short side. Use sl st only in the back loops of the stitches (the loops farthest from you).
Tip: Stop just before reaching the corner for a better fit.
How to do it:
- Make a slip knot on your hook and attach your yarn to one corner of the first square.
- Insert the hook through both squares at the same corner and work a sl st in the back loops only.
- Continue working sl st across the top edge, inserting your hook into the back loops of both squares.
- When you reach the end, fasten off and weave in the ends.
This method neatly joins the squares while keeping the edges flat and flexible for the headrest cover.
Tie Straps
You will add tie straps at the bottom edge of both the front and back pieces, one at each corner. You can either crochet the ties or simply attach yarn tails; here we will crochet the straps.
How to do it:
- Attach yarn to a corner using a sl st.
- Chain to the desired length for your tie strap (make sure the two straps will be long enough to secure around your headrest). For example, about 18 cm.
- Fasten off and pull through the last loop to secure.
- Repeat for the other corners as needed.
- Weave in all loose ends.
Now your granny square headrest cover is complete and ready to decorate your car!
The rights to this pattern belong to MYO Make Your Own. The pattern or its pictures may not be copied, shared or resold either in parts or in its entirety, but you may sell items you have crocheted from this pattern. If you have questions about the pattern, contact MYO at hello@makeyourown.se.


.jpg)


Share your creations with us
Thank you!
Your comment was sent!