
Crochet bag “Lola”
Crochet the “Lola” bag!
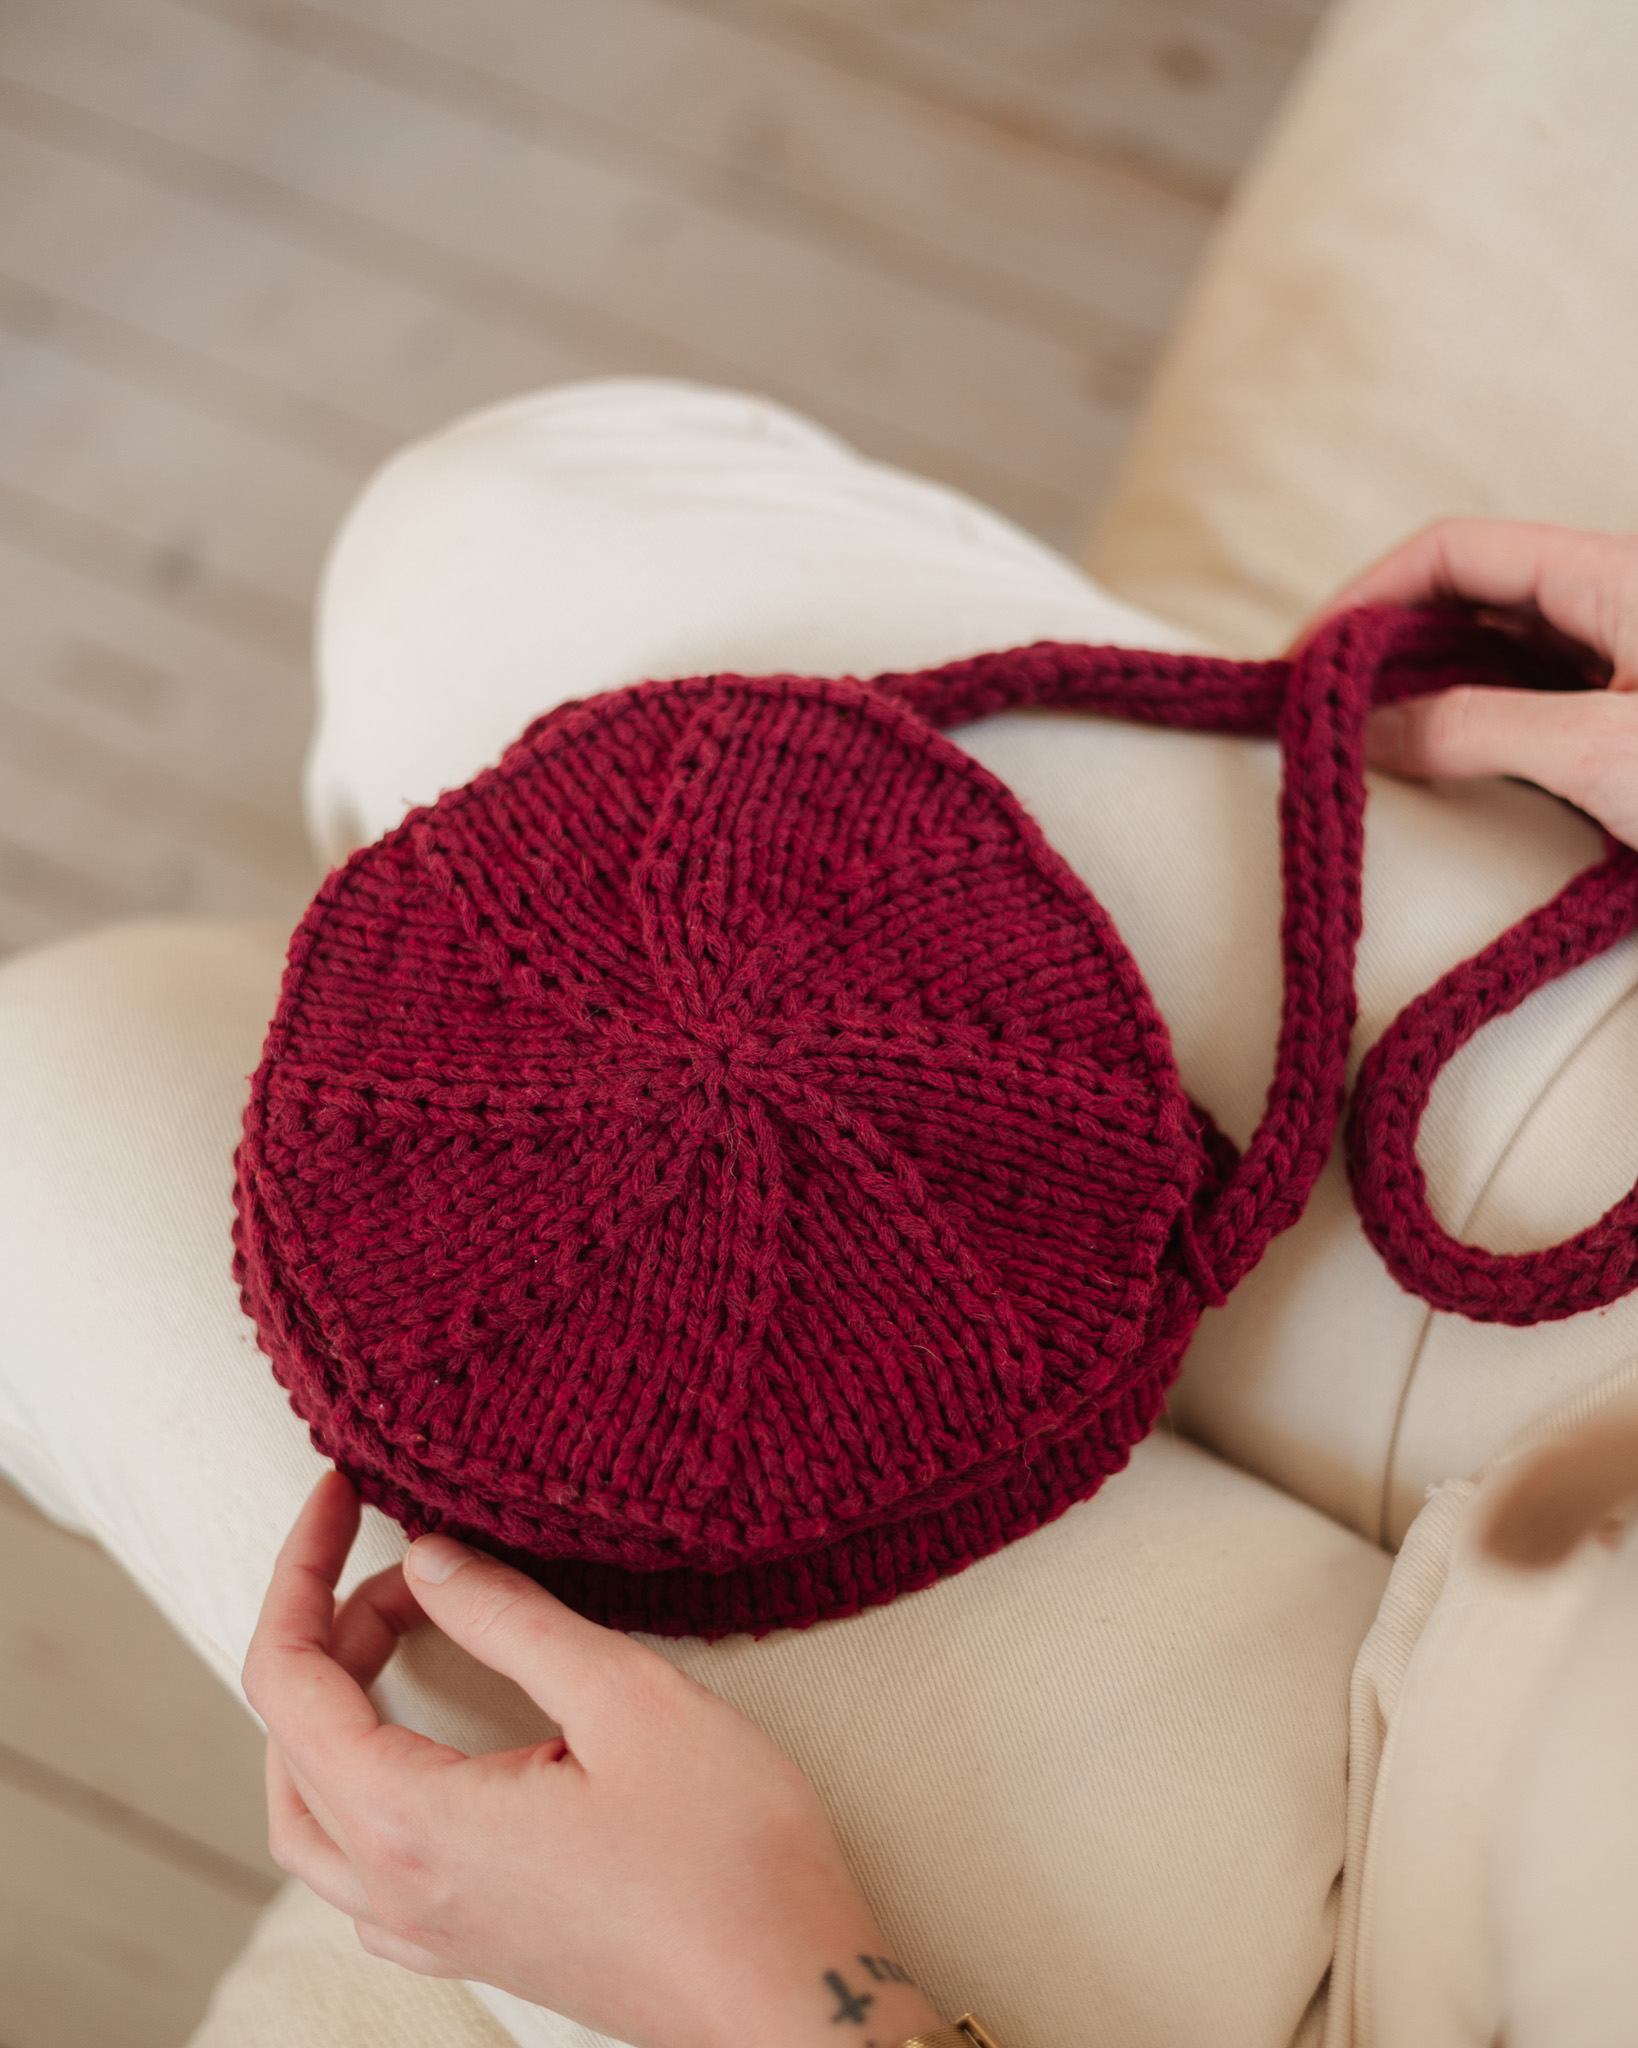
This bag truly becomes a unique accessory for any outfit—perfect for both everyday use and special occasions! The shape is round with a beautiful edge detail. The finished bag measures 35 cm in diameter and approximately 100 cm in circumference. A full-length video tutorial, recorded by our creator Rebecca Pedersen, is included so that anyone can crochet this stunning bag. In the images, we used the color “Rusty Yellow”, and in the video “Dark Green.”
To crochet this bag, you’ll need EKO Ribbon yarn and an 8 mm crochet hook.
Yarn Consumption: Approximately 500g. Keep in mind that the amount of yarn can vary depending on your tension, so you may need more than one roll.


Here's how to do it
The bag is made in two separate pieces that are then crocheted together, and finally, the handle is added. Since the sides of the bag are worked individually, it’s important to crochet with the same tension on both. A good tip is to work both sides at the same time—one round at a time, for example. /Emma
%20(1).jpg)
This is what you need:
Here you can directly purchase the material for the product. Please note that the instruction is digital and appears here on the page (no written instruction).


.jpg)
Unleash your creativity
For only 85kr per month you get access to all our 300+ beginner-friendly instructions for crochet, knitting and macrame.
A perfect way to get started with your new hobby!

The bag is crocheted back and forth to create two identical pieces, which are then crocheted together.
Row 1: Make a magic ring. Crochet 2 chain stitches (these count as the first half double crochet) into the magic ring. Then crochet 7 half double crochets into the ring. You now have a total of 8 half double crochets in the row. Place 1 stitch marker in the first half double crochet (that is, the 2nd chain stitch made at the beginning) so you know where the first/last stitch is. To tighten the hole in the magic ring, pull the loose yarn end.
Note that you are not working in the round here, but back and forth as in a semicircle. Turn your work.
If you are unsure how to crochet a magic ring with half double crochets (Magic ring with half double crochet), see the video below. Keep in mind that in the video we close the ring, but in this pattern we work in rows instead and do not close the ring.
Row 2: Now you will work increases. Begin by crocheting 2 chain stitches (these count as 1 half double crochet in the first stitch). Then crochet 1 half double crochet in the same stitch. The chain stitches and the half double crochet you just made count as 2 half double crochets in the same stitch. Continue by crocheting 2 half double crochets in each stitch across until you reach the end of the row.
The last 2 half double crochets should be worked into the stitch where you placed your first marker. Just like in Row 1, you can place a marker in the 2nd chain stitch you made so you know where the first/last stitch is.
You will now have a total of 16 stitches in the row. Turn your work.

From now through Row 7, always move your stitch markers to the 2nd of the 2 chain stitches made at the beginning of each row.
Row 3: Begin the row with 2 chain stitches. Then work 1 increase in the 2nd stitch (2 half double crochets in the same stitch). Continue by making 1 increase in every other stitch (crochet 1 half double crochet in the stitches in between) across the row. Turn your work.
(24 stitches in total.)
Row 4: Crochet 2 chain stitches, then work 3 half double crochets in the 2nd stitch.
*Skip 1 stitch. In the next stitch, crochet 1 single crochet, 2 chain stitches, 3 half double crochets*.
Repeat the sequence *...* across the entire row, but finish by making 3 half double crochets in the last stitch (the stitch that belongs to the chain from the previous row). Turn your work.
If you are unsure how to crochet a single crochet, see the video below.


Rows 5–7: Crochet 2 chain stitches, then work 3 half double crochets in the 2nd stitch (the chain stitches do not count).
*Into the chain space from the previous row: crochet 1 single crochet, 2 chain stitches, 3 half double crochets.*
Repeat the sequence *...* in every chain space from the previous row. Finish by making 3 half double crochets in the last stitch (the stitch that belongs to the chain from the previous row).
Row 8: Finish by crocheting along the opening edge: make 1 chain stitch, then 1 single crochet in each stitch across. The exact number is not crucial, but for a neat and even look, it is recommended to crochet the same number of stitches on each half.
Make a note of the number of single crochets and crochet the same number on the second piece. Crochet 1 chain stitch, cut the yarn, and fasten off.
Crochet another piece in the same way.
Note! Do not cut the yarn when you have finished your second piece.
If you are unsure how to fasten off, see the video below.


JOIN THE PIECES TOGETHER
Place the pieces against each other, choosing which sides you think look best and turning them outward.
Use the yarn end you saved (otherwise: make a slip knot) and begin crocheting the pieces together along one side, working through both layers. Crochet single crochets from one side of the opening to the other, working only in the outer loops.
Crochet 1 chain stitch, cut the yarn, and fasten off. See the instructional video if you are unsure how to do this.
Finish by cutting the yarn, tying a knot, and weaving in the yarn end. If you are unsure how to make a slip knot, see the video below.

HANDLE
Begin on one side of the bag, in the stitch just before the seam.
Row 1: Make a slip knot and attach it to the edge with 1 slip stitch. Crochet 3 single crochets: start to the right of the seam and finish to the left of the seam. Crochet 1 chain stitch and turn your work.
Row 2: *Crochet 3 single crochets, 1 chain stitch, and turn.*
Repeat the sequence *...* until you are satisfied with the length of the handle. For reference, the handle shown in the pictures consists of 21 rows.

ATTACH THE HANDLE
Attach the handle to the other seam of the bag by “sewing” it in place:
Measure out a long piece of yarn, approximately twice the length of your handle (this piece will be used in the next and final step), and cut it off. Make sure the handle is not twisted before you begin attaching it.
Pull the yarn up and down as if sewing, using your crochet hook or a large needle if you have one. The remaining yarn end will be used in the next step.
FINISHING THE HANDLE
Begin where you finished attaching the handle. Here as well, “sew” the outer edges together so that the handle forms a rounded shape. Use your crochet hook or a large needle, if you have one, and stitch the outer edges of the handle together.
Finish by crocheting 1 chain stitch, cutting the yarn, and fastening off. Weave in all yarn ends.

Cut and fasten off. Done!
Pattern Description – US Crochet Terms
Now we’re going to crochet a beautiful bag! If you need help along the way, see our simplified version of this pattern.
Abbreviations (US Terms)
- MR = Magic Ring
- st = stitch
- ch = chain
- sl st = slip stitch
- sc = single crochet
- sk = skip
- hdc = half double crochet
- hdc inc = half double crochet increase (2 hdc in the same stitch)
- blo = back loop only
- flo = front loop only
- ( … ) = indicates the number of stitches in the current row
- * … * = repeat everything within * … * the number of times stated
Crochet 2 identical pieces. Note that the circle is not joined — you will work back and forth in rows to create a semicircle.
Row 1: Make a MR. Ch 2 (counts as first hdc). Work 7 hdc into the ring.
Place 1 stitch marker in the first hdc (that is, the 2nd ch made at the beginning) so you know where the first/last st is. (8)
Row 2: Ch 2 (counts as 1 hdc). Work 1 hdc in the same st (together with the ch 2, this makes 2 hdc in the same st). Place 1 stitch marker in the 2nd of the 2 ch.
Work 2 hdc in each st across. The last 2 hdc should be worked in the st where you placed your first marker. (16)
From now through Row 7, always move your stitch markers to the 2nd of the 2 ch at the beginning of each row.
Row 3: Ch 2 (counts as 1 hdc). Begin in the 2nd st: *hdc inc, 1 hdc* × 7, hdc inc. (24)
Row 4: Ch 2 (counts as 1 hdc). Begin in the 2nd st: work 3 hdc. *Sk 1 st, in the next st work: 1 sc, ch 2, 3 hdc*.
Repeat *…* until you have 2 sts remaining. Sk 1 st, then work 3 hdc in the last st.
Rows 5–7: Ch 2 (counts as 1 hdc). Begin in the 2nd st and work 3 hdc. *In the chain space from the previous row: work 1 sc, ch 2, 3 hdc*. Repeat *…* across until 1 st remains. Finish with 3 hdc in the last st (the one belonging to the chain from the previous row).
Row 8: Ch 1, then work sc along the entire edge of the opening. The exact number of stitches is not critical, but for a uniform look, it is recommended to work the same number of stitches on each half. Note the number of sc and work the same number on the second piece. Crochet the second piece in the same way.
Important: Do not cut the yarn after finishing your second piece.
Ch 1, cut the yarn, and fasten off.
JOIN THE PIECES TOGETHER
Place your two pieces aginst each other, choosing which sides you want facing outward.
Crochet them together with 1 sc in each st all the way around, working only in the outer loops.
Finish with 1 ch, cut the yarn, tie a knot, and weave in the yarn end.

HANDLE
Row 1: Make a slip knot and attach it to the edge with 1 sl st. Start to the right of the seam and finish to the left of the seam. Work 3 sc, ch 1, turn.
Rows 2–21: Work 3 sc, ch 1, turn. Continue until you are satisfied with the length of the handle. For reference, the handle shown in the pictures consists of 21 rows.
ATTACH THE HANDLE
Attach the handle to the other seam of the bag by “sewing” it in place:
Measure a long piece of yarn, approximately twice the length of your handle (this piece will be used in the next and final step), cut it, and use it to sew the handle. Make sure the handle is not twisted before attaching it.
Pull the yarn back and forth as if sewing, using your crochet hook or a large needle for assistance. When finished, leave the remaining yarn end for the final step.
FINISHING THE HANDLE
Begin where you finished attaching the handle. Sew the outer edges together so the handle forms a rounded shape. Use your crochet hook or a large needle if needed.
Finish by tying a knot and weaving in all yarn ends.
Fasten off and you are done!
The rights to this pattern belong to MYO Make Your Own. The pattern or its pictures may not be copied, shared or resold either in parts or in its entirety, but you may sell items you have crocheted from this pattern. If you have questions about the pattern, contact MYO at hello@makeyourown.se.
The bag is crocheted back and forth to create two identical pieces, which are then crocheted together.
Row 1: Make a magic ring. Crochet 2 chain stitches (these count as the first half double crochet) into the magic ring. Then crochet 7 half double crochets into the ring. You now have a total of 8 half double crochets in the row. Place 1 stitch marker in the first half double crochet (that is, the 2nd chain stitch made at the beginning) so you know where the first/last stitch is. To tighten the hole in the magic ring, pull the loose yarn end.
Note that you are not working in the round here, but back and forth as in a semicircle. Turn your work.
If you are unsure how to crochet a magic ring with half double crochets (Magic ring with half double crochet), see the video below. Keep in mind that in the video we close the ring, but in this pattern we work in rows instead and do not close the ring.
Row 2: Now you will work increases. Begin by crocheting 2 chain stitches (these count as 1 half double crochet in the first stitch). Then crochet 1 half double crochet in the same stitch. The chain stitches and the half double crochet you just made count as 2 half double crochets in the same stitch. Continue by crocheting 2 half double crochets in each stitch across until you reach the end of the row.
The last 2 half double crochets should be worked into the stitch where you placed your first marker. Just like in Row 1, you can place a marker in the 2nd chain stitch you made so you know where the first/last stitch is.
You will now have a total of 16 stitches in the row. Turn your work.
From now through Row 7, always move your stitch markers to the 2nd of the 2 chain stitches made at the beginning of each row.
Row 3: Begin the row with 2 chain stitches. Then work 1 increase in the 2nd stitch (2 half double crochets in the same stitch). Continue by making 1 increase in every other stitch (crochet 1 half double crochet in the stitches in between) across the row. Turn your work.
(24 stitches in total.)
Row 4: Crochet 2 chain stitches, then work 3 half double crochets in the 2nd stitch.
*Skip 1 stitch. In the next stitch, crochet 1 single crochet, 2 chain stitches, 3 half double crochets*.
Repeat the sequence *...* across the entire row, but finish by making 3 half double crochets in the last stitch (the stitch that belongs to the chain from the previous row). Turn your work.
If you are unsure how to crochet a single crochet, see the video below.
Rows 5–7: Crochet 2 chain stitches, then work 3 half double crochets in the 2nd stitch (the chain stitches do not count).
*Into the chain space from the previous row: crochet 1 single crochet, 2 chain stitches, 3 half double crochets.*
Repeat the sequence *...* in every chain space from the previous row. Finish by making 3 half double crochets in the last stitch (the stitch that belongs to the chain from the previous row).
Row 8: Finish by crocheting along the opening edge: make 1 chain stitch, then 1 single crochet in each stitch across. The exact number is not crucial, but for a neat and even look, it is recommended to crochet the same number of stitches on each half.
Make a note of the number of single crochets and crochet the same number on the second piece. Crochet 1 chain stitch, cut the yarn, and fasten off.
Crochet another piece in the same way.
Note! Do not cut the yarn when you have finished your second piece.
If you are unsure how to fasten off, see the video below.
JOIN THE PIECES TOGETHER
Place the pieces against each other, choosing which sides you think look best and turning them outward.
Use the yarn end you saved (otherwise: make a slip knot) and begin crocheting the pieces together along one side, working through both layers. Crochet single crochets from one side of the opening to the other, working only in the outer loops.
Crochet 1 chain stitch, cut the yarn, and fasten off. See the instructional video if you are unsure how to do this.
Finish by cutting the yarn, tying a knot, and weaving in the yarn end. If you are unsure how to make a slip knot, see the video below.
HANDLE
Begin on one side of the bag, in the stitch just before the seam.
Row 1: Make a slip knot and attach it to the edge with 1 slip stitch. Crochet 3 single crochets: start to the right of the seam and finish to the left of the seam. Crochet 1 chain stitch and turn your work.
Row 2: *Crochet 3 single crochets, 1 chain stitch, and turn.*
Repeat the sequence *...* until you are satisfied with the length of the handle. For reference, the handle shown in the pictures consists of 21 rows.
ATTACH THE HANDLE
Attach the handle to the other seam of the bag by “sewing” it in place:
Measure out a long piece of yarn, approximately twice the length of your handle (this piece will be used in the next and final step), and cut it off. Make sure the handle is not twisted before you begin attaching it.
Pull the yarn up and down as if sewing, using your crochet hook or a large needle if you have one. The remaining yarn end will be used in the next step.
FINISHING THE HANDLE
Begin where you finished attaching the handle. Here as well, “sew” the outer edges together so that the handle forms a rounded shape. Use your crochet hook or a large needle, if you have one, and stitch the outer edges of the handle together.
Finish by crocheting 1 chain stitch, cutting the yarn, and fastening off. Weave in all yarn ends.
Cut and fasten off. Done!
Pattern Description – US Crochet Terms
Now we’re going to crochet a beautiful bag! If you need help along the way, see our simplified version of this pattern.
Abbreviations (US Terms)
- MR = Magic Ring
- st = stitch
- ch = chain
- sl st = slip stitch
- sc = single crochet
- sk = skip
- hdc = half double crochet
- hdc inc = half double crochet increase (2 hdc in the same stitch)
- blo = back loop only
- flo = front loop only
- ( … ) = indicates the number of stitches in the current row
- * … * = repeat everything within * … * the number of times stated
Crochet 2 identical pieces. Note that the circle is not joined — you will work back and forth in rows to create a semicircle.
Row 1: Make a MR. Ch 2 (counts as first hdc). Work 7 hdc into the ring.
Place 1 stitch marker in the first hdc (that is, the 2nd ch made at the beginning) so you know where the first/last st is. (8)
Row 2: Ch 2 (counts as 1 hdc). Work 1 hdc in the same st (together with the ch 2, this makes 2 hdc in the same st). Place 1 stitch marker in the 2nd of the 2 ch.
Work 2 hdc in each st across. The last 2 hdc should be worked in the st where you placed your first marker. (16)
From now through Row 7, always move your stitch markers to the 2nd of the 2 ch at the beginning of each row.
Row 3: Ch 2 (counts as 1 hdc). Begin in the 2nd st: *hdc inc, 1 hdc* × 7, hdc inc. (24)
Row 4: Ch 2 (counts as 1 hdc). Begin in the 2nd st: work 3 hdc. *Sk 1 st, in the next st work: 1 sc, ch 2, 3 hdc*.
Repeat *…* until you have 2 sts remaining. Sk 1 st, then work 3 hdc in the last st.
Rows 5–7: Ch 2 (counts as 1 hdc). Begin in the 2nd st and work 3 hdc. *In the chain space from the previous row: work 1 sc, ch 2, 3 hdc*. Repeat *…* across until 1 st remains. Finish with 3 hdc in the last st (the one belonging to the chain from the previous row).
Row 8: Ch 1, then work sc along the entire edge of the opening. The exact number of stitches is not critical, but for a uniform look, it is recommended to work the same number of stitches on each half. Note the number of sc and work the same number on the second piece. Crochet the second piece in the same way.
Important: Do not cut the yarn after finishing your second piece.
Ch 1, cut the yarn, and fasten off.
JOIN THE PIECES TOGETHER
Place your two pieces aginst each other, choosing which sides you want facing outward.
Crochet them together with 1 sc in each st all the way around, working only in the outer loops.
Finish with 1 ch, cut the yarn, tie a knot, and weave in the yarn end.
HANDLE
Row 1: Make a slip knot and attach it to the edge with 1 sl st. Start to the right of the seam and finish to the left of the seam. Work 3 sc, ch 1, turn.
Rows 2–21: Work 3 sc, ch 1, turn. Continue until you are satisfied with the length of the handle. For reference, the handle shown in the pictures consists of 21 rows.
ATTACH THE HANDLE
Attach the handle to the other seam of the bag by “sewing” it in place:
Measure a long piece of yarn, approximately twice the length of your handle (this piece will be used in the next and final step), cut it, and use it to sew the handle. Make sure the handle is not twisted before attaching it.
Pull the yarn back and forth as if sewing, using your crochet hook or a large needle for assistance. When finished, leave the remaining yarn end for the final step.
FINISHING THE HANDLE
Begin where you finished attaching the handle. Sew the outer edges together so the handle forms a rounded shape. Use your crochet hook or a large needle if needed.
Finish by tying a knot and weaving in all yarn ends.
Fasten off and you are done!
The rights to this pattern belong to MYO Make Your Own. The pattern or its pictures may not be copied, shared or resold either in parts or in its entirety, but you may sell items you have crocheted from this pattern. If you have questions about the pattern, contact MYO at hello@makeyourown.se.

Share your creations with us
Thank you!
Your comment was sent!