
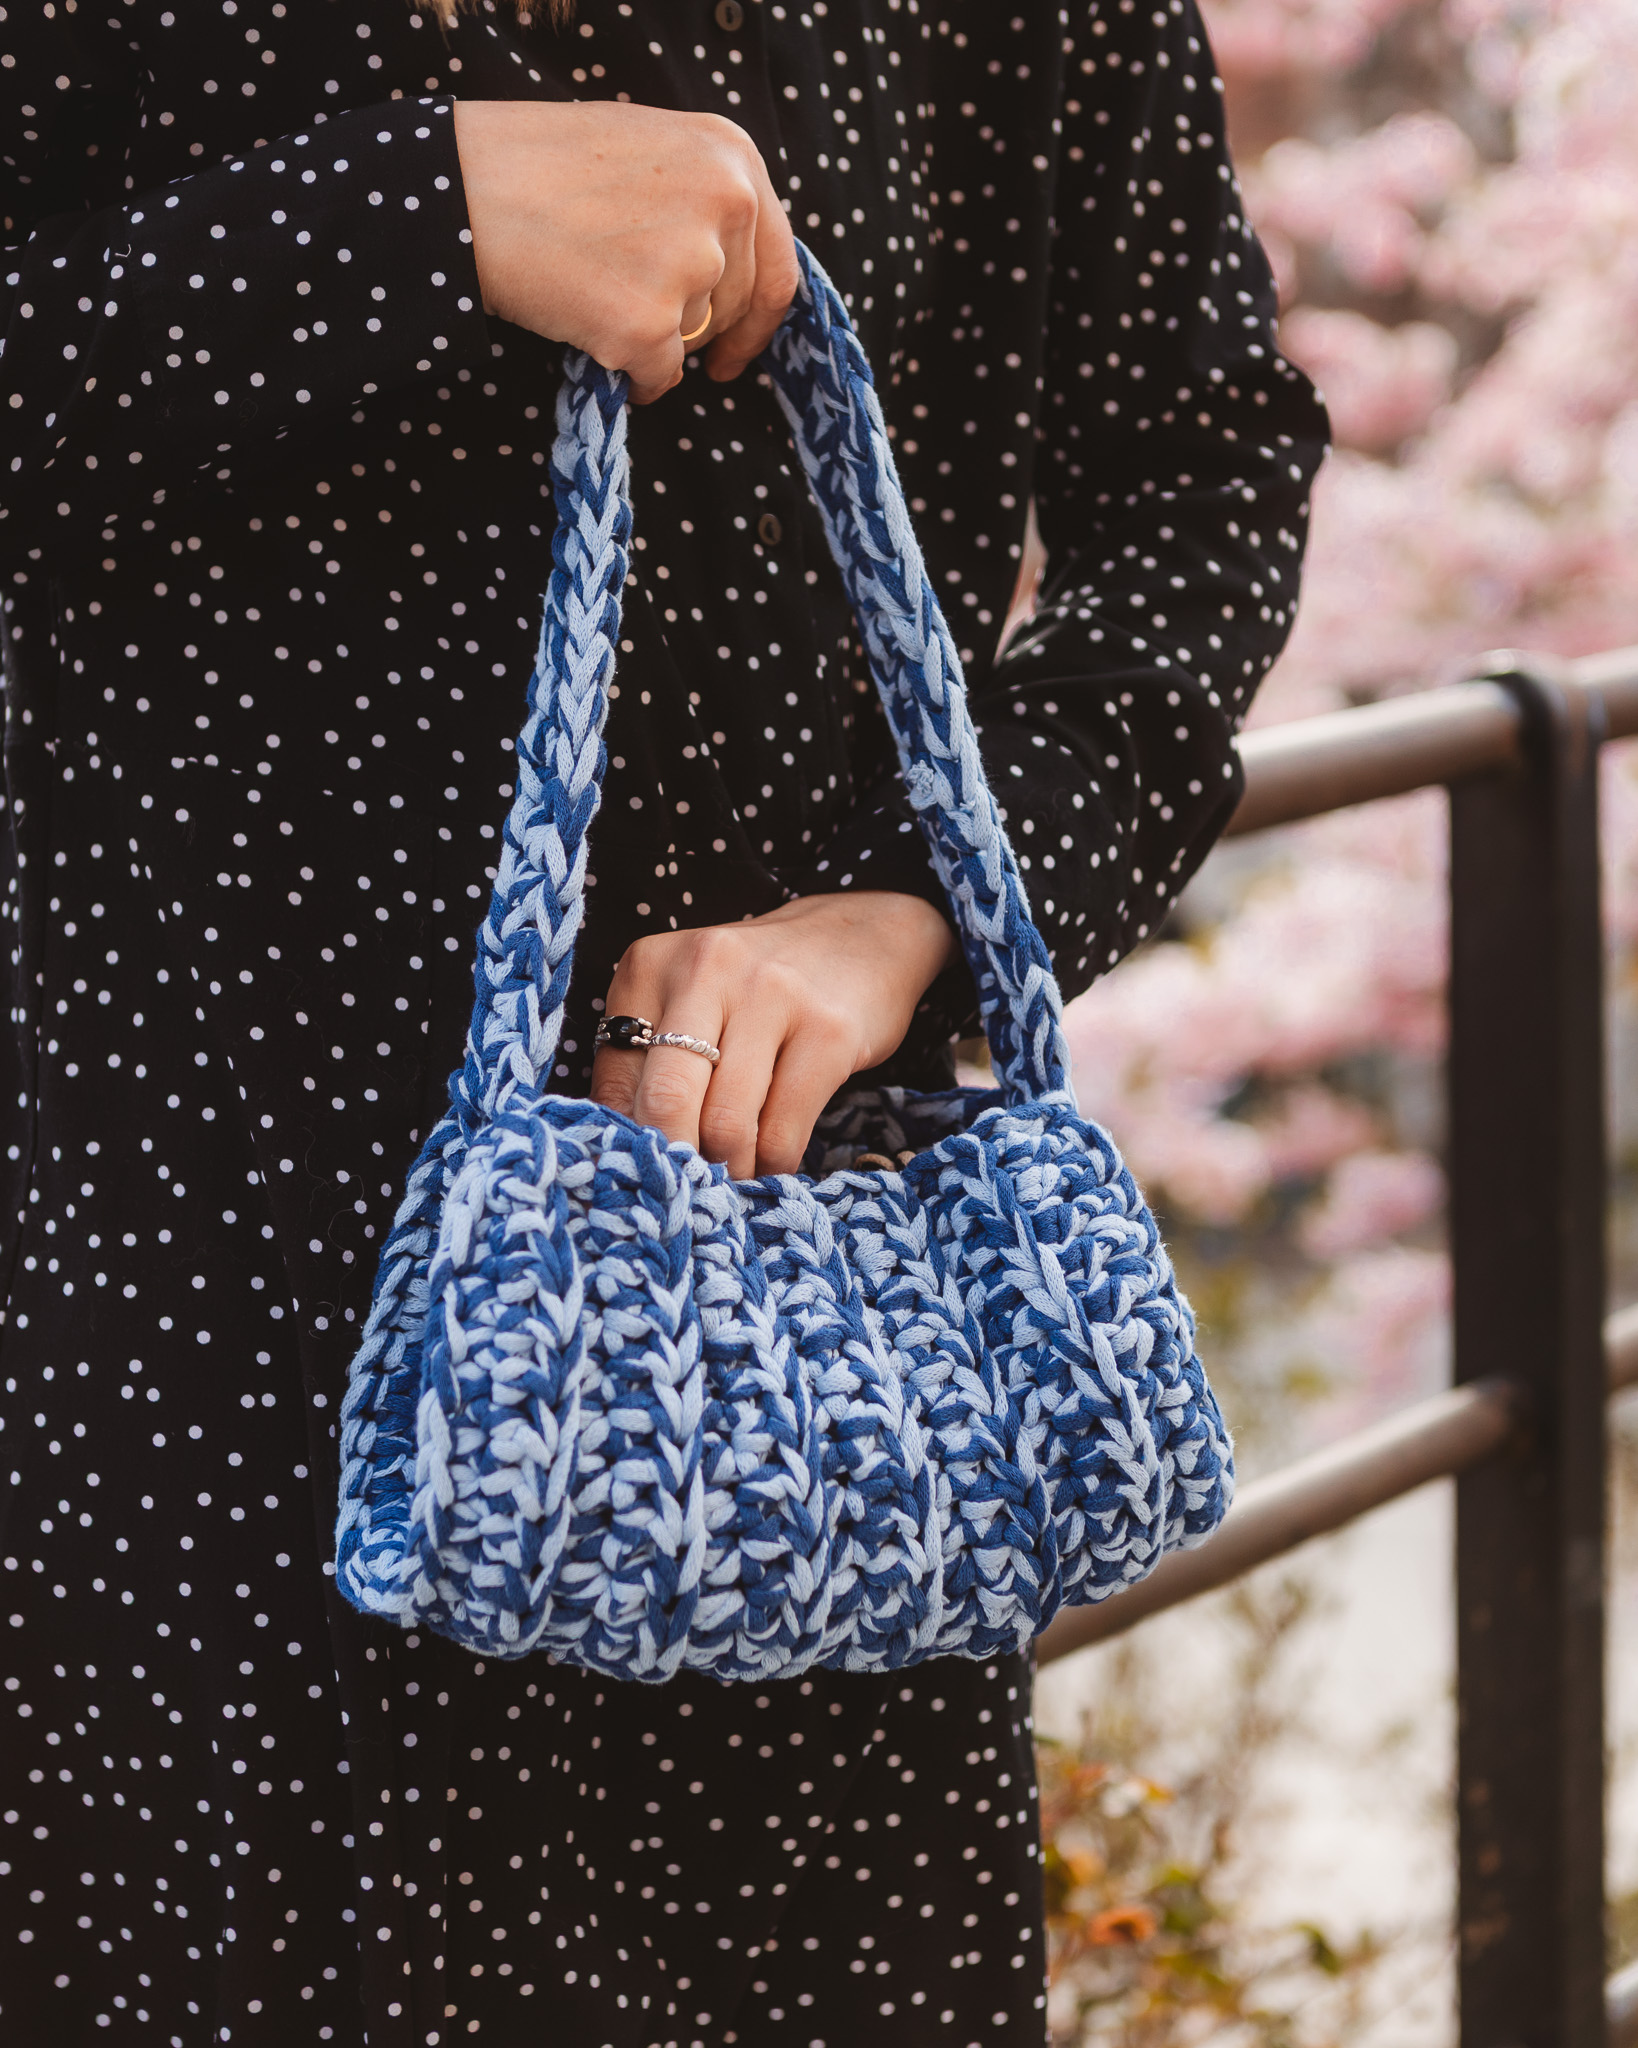
Crochet bag “Edith”
Crochet a stylish bag with the “African Flower” square
This bag is both unique, stylish and practical with space for your computer, favorite book or crochet projects. You will need EKO Nano tube yarn and 6 mm crochet hook for this bag. You choose how many colors you want to crochet the square with, in the example we have used three colors (dark green, nature white & chalk green) but everything between 1-5 colors fits well. You have the help of technique videos and pictures along the way.
Yarn Consumption: About 400-450g (each square weighs about 50g). It all depends on how long handles you choose to make and how hard/loose you crochet. See step 1 for more specific yarn consumption.
Note that we in this instruction uses videos from out technique library. If you are looking for a full instruction video for a crocheted vest, we suggest the bag Evelyn.

Here's how to do it
This bag is crocheted with 7 “African Flower” squares which are then assembled together. Last, the handles are crocheted. If you have leftover yarn at home that you want to use, you can see in step 1 how much yarn is needed for each round of the square. A stylish and practical bag! If you are not sure how to crochet it, you can take a look at our technique videos as a guide. /Lizette

This is what you need:
Here you can directly purchase the material for the product. Please note that the instruction is digital and appears here on the page (no written instruction).


.jpg)
Unleash your creativity
For only 85kr per month you get access to all our 300+ beginner-friendly instructions for crochet, knitting and macrame.
A perfect way to get started with your new hobby!

Weight
If you want to use leftover yarn that you have at home, you can see below what the weight is on each color:
Weight of one square: about 50g
Round 1: 4g (the white in the middle of the example square)
Round 2 & 3: 22g (the dark green in the example square)
Round 4: 9 g (the light green in the example square)
Round 5: 11g (the last white round on the example square)
Crochet 7 squares “African Flower”
If you feel unsure when crocheting the square, there is a video at the end showing all the steps in the "African Flower" square.
Round 1: Crochet a magic ring and in the magic ring start with chain two (this chain replaces the first double crochet). Then crochet 1 double crochet. Chain 1. Repeat: crochet 2 double crochet and then chain 1 a total of 6 times (so 5 more times). Finish with a slip stitch in the 2nd chain as you did at the beginning. If you want to change the color, cut the yarn here.
Round 2: Use color 2. Start by pulling through into a “hole”, that is, where you crocheted chained 1 between the double crochets. In this hole, chain 2 (replacing the first double crochet) a double crochet, chain 1, 2 double crochet and chain 1 in the same hole. Then crochet in the next hole: 2 double crochets, chain 1, 2 double crochets, chain 1. This sequence is repeated in all 6 holes.
In the pattern, the same color is used for round 3, if you want a different color for round 3, cut the yarn and start with your new color.
Round 3: If you use the same color, make a slip stitch in the “hole” between the two pairs of double crochets (the pairs of double crochets that were crocheted in the same hole in round 1). We do this to end up in the right place. If you have changed the color, you start here directly, so you do not need to do the slip stitch.
Chain 2, replacing the first double crochet. Then crochet 6 double crochets in the same hole. Chain 1. Go down into the next hole (which is between the post pairs) and crochet 7 double crochets and chain 1. Continue the whole round. Finish by going down the 2nd chain from the ones you did at the beginning. Cut the yarn.
Round 4: Tie the yarn in a hole on round 2, that is between the double crochets (between the 7 double crochet one round down). Tie the yarn and chain 2 so that they end up on the front. Crochet 7 single crochets in the 7 double crochets from the previous round. Between the 7 double crochets of the previous round, make 1 double crochet but go down on round 2 instead of round 3. This creates a longer double crochet marking the flower petals. Continue the round. Finish by going down the 2nd chain from the ones that you did at the beginning. Cut off.
Round 5: Start in a stitch. The important thing to keep in mind here is that we are going to make more stitches in the same stitch at the top of each petal i.e. in the stitch that is above the middle double crochet of the seven that were crocheted on round 3. We crochet 1 single crochet, chain 1, 1 single crochet in the middle stitch above the double crochet from round 3. It doesn't matter where you start as long as you make the increase on the top-stitch of each petal.
Crochet single crochets until you get to the topstitch of the flower petals. There you crochet 1 single crochet, chain 1, 1 single crochet in the same stitch. Continue the round. Finish by going down into the top chain as you did at the beginning. Cut off.
Attach all the yarn ends on the square.
Assemble the squares with each other
Now all the squares should be assembled with each other. When the squares are crocheted together, you can use different techniques, we have crocheted them together with slip stitches by putting the wrong side to each other and crochet in the stitch that is closes to you, on both squares. If you are unsure how to do this, you can see the video below. See step 4-5 how to assemble the squares.
Assemble the squares
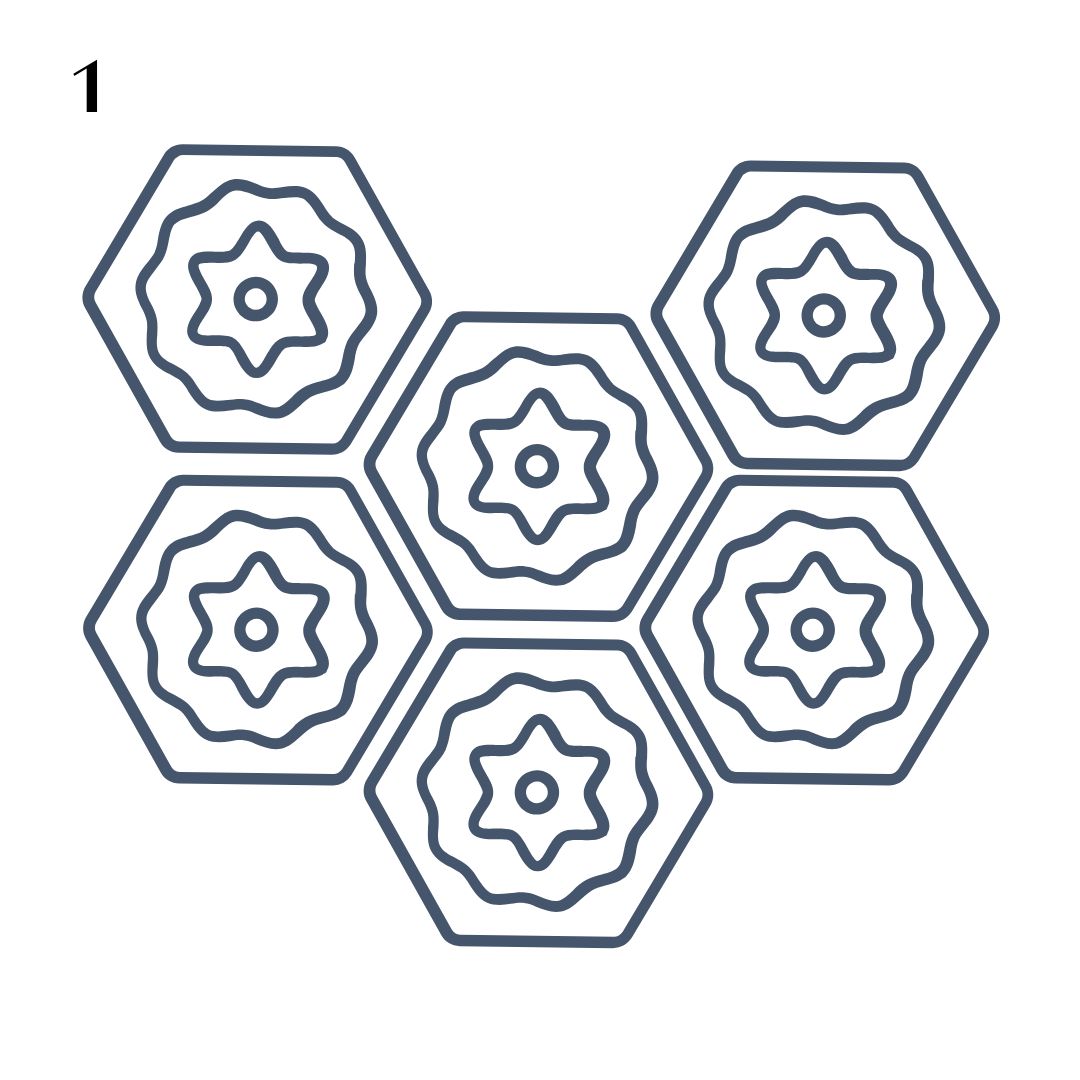
1) Put all squares according to below picture

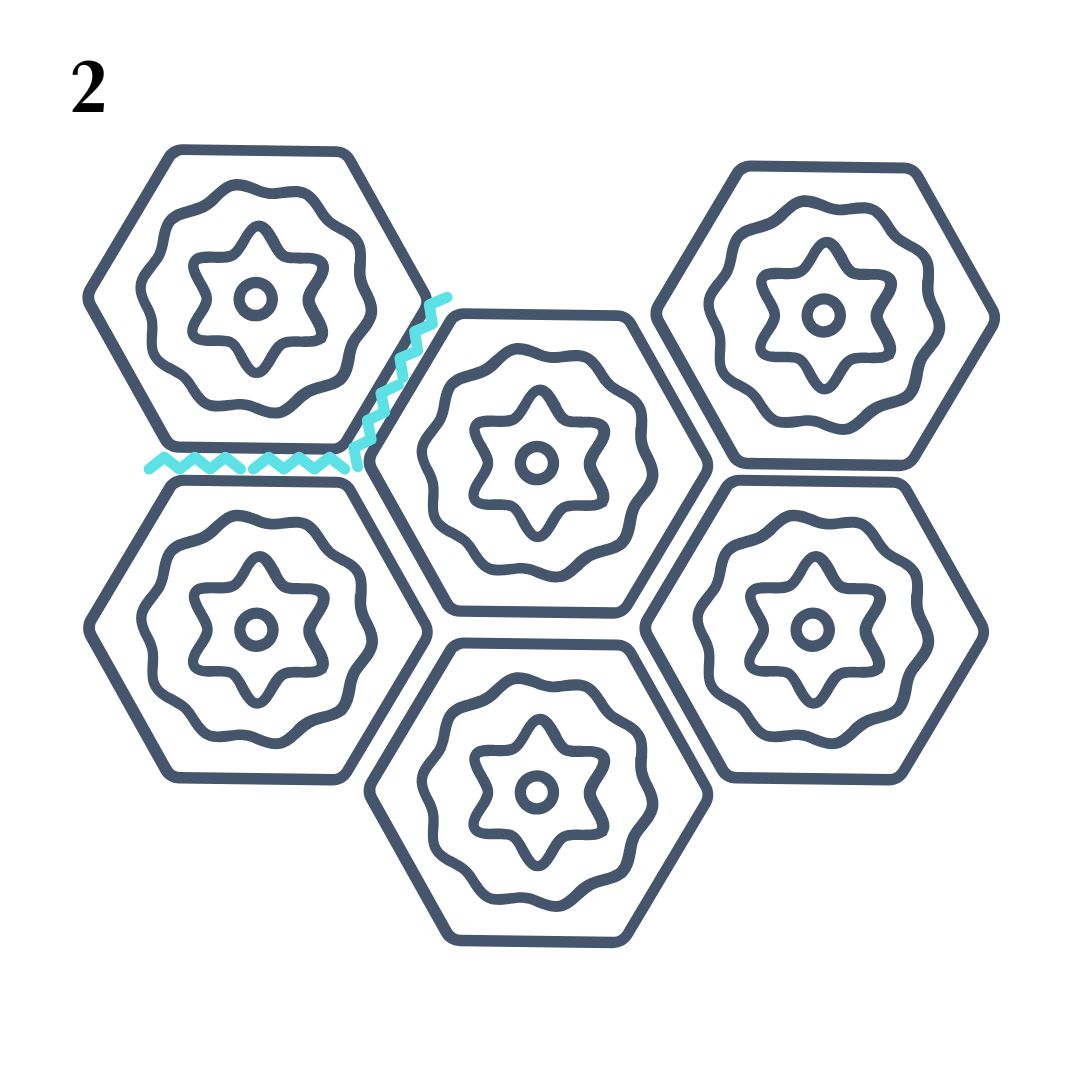
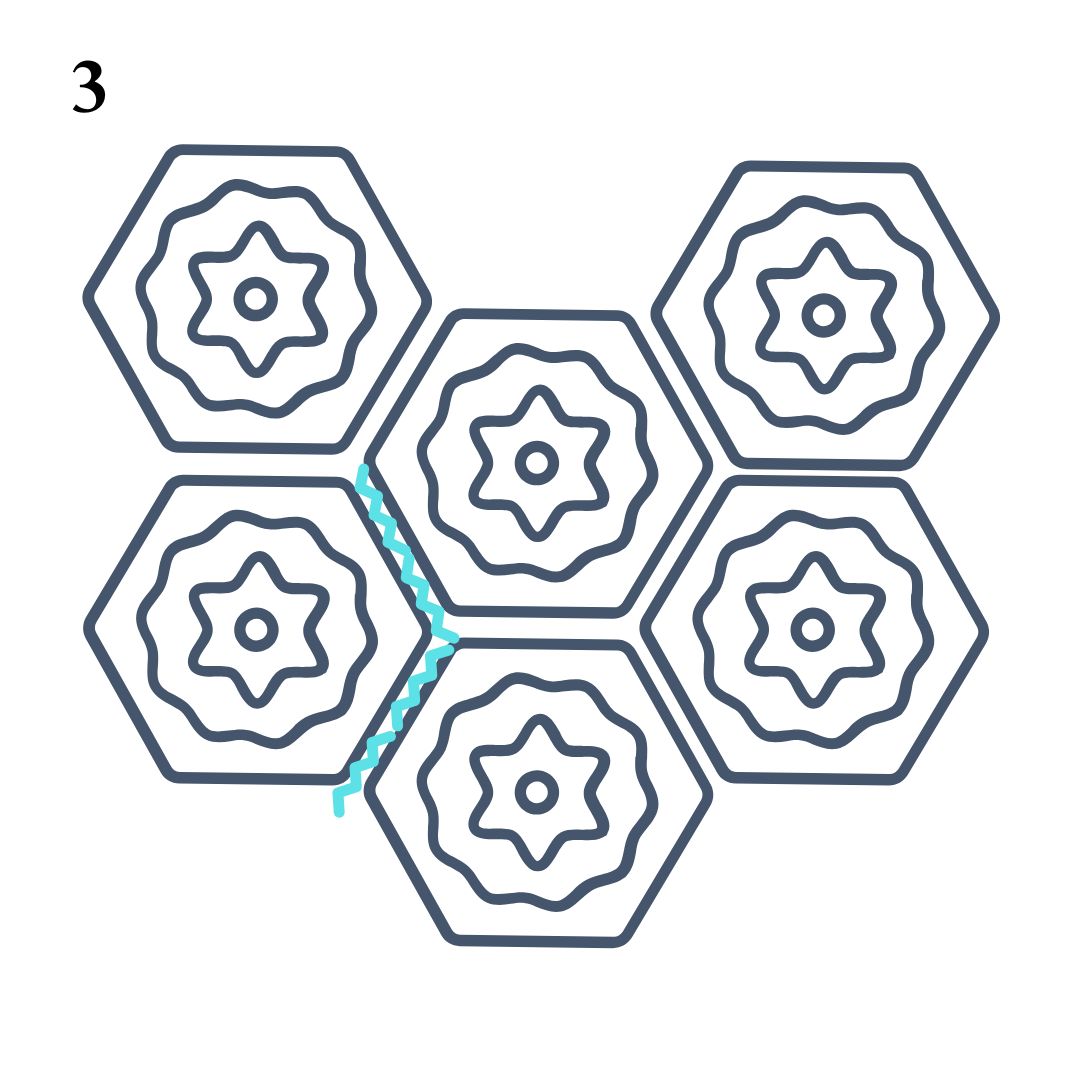
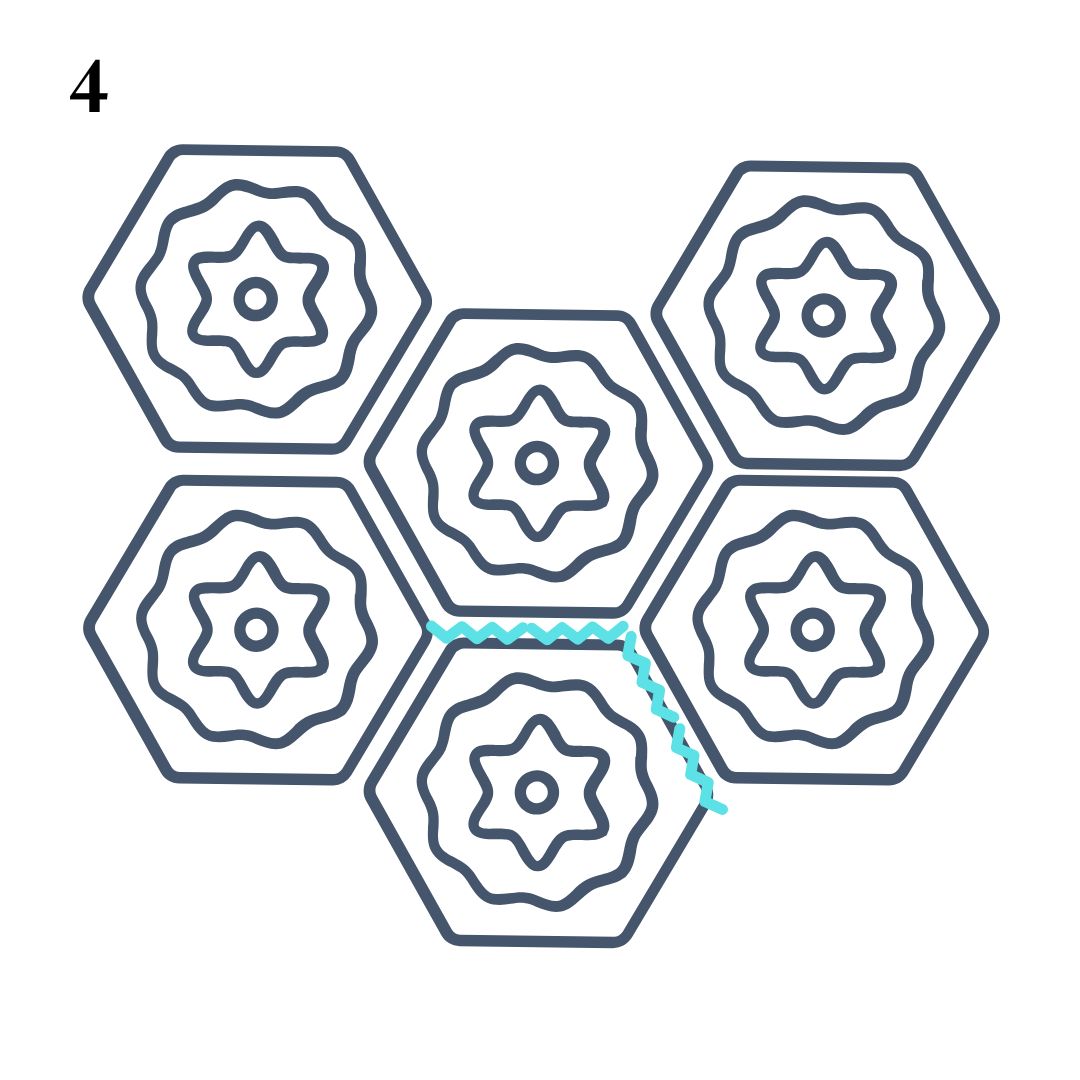
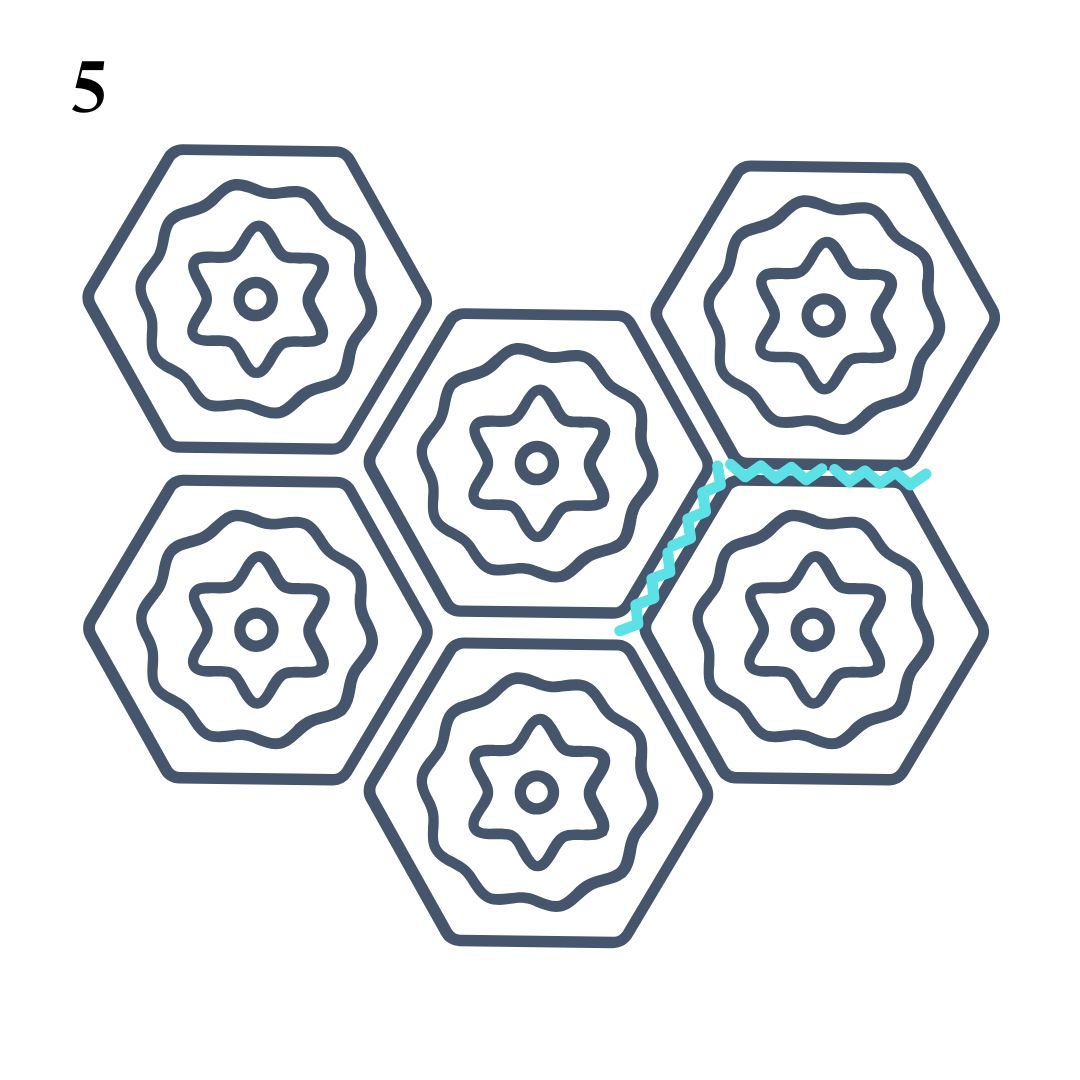
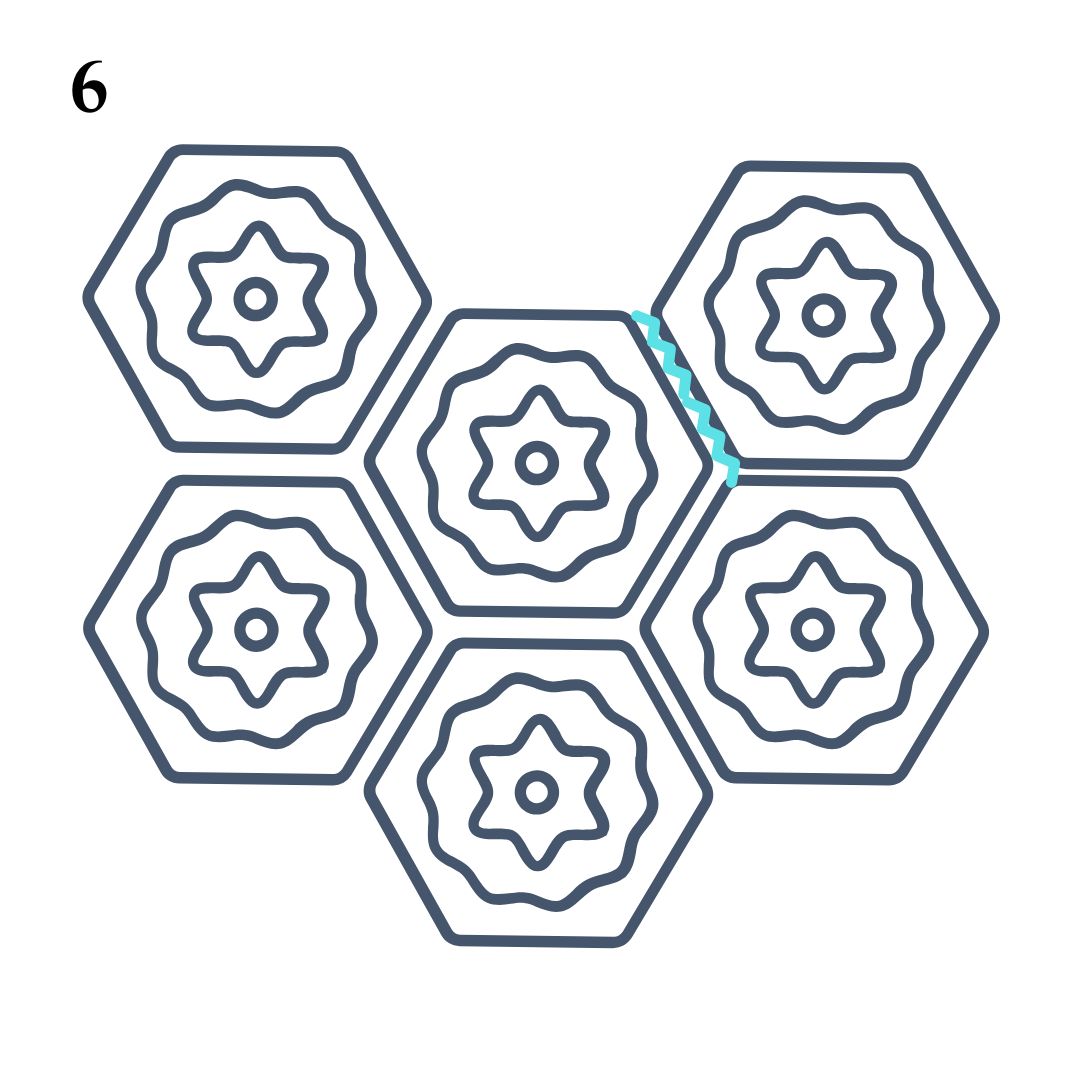
2) Crochet the squares together according to picture 2-6. Cut and attach the yarn ends after each piece you crochet together. Alternatively, crochet all the squares together and attach all the yarn ends at the same time in the end. Fasten off.


You have attached 6 squares together and have your 7th square left to attach. Turn the whole piece over so you have the wrong side facing you. Take your last square and put it in the middle with the nice side up (see picture 7).
Attach the other side of the bag. Fold all the squares according to the dashed lines of picture 7.

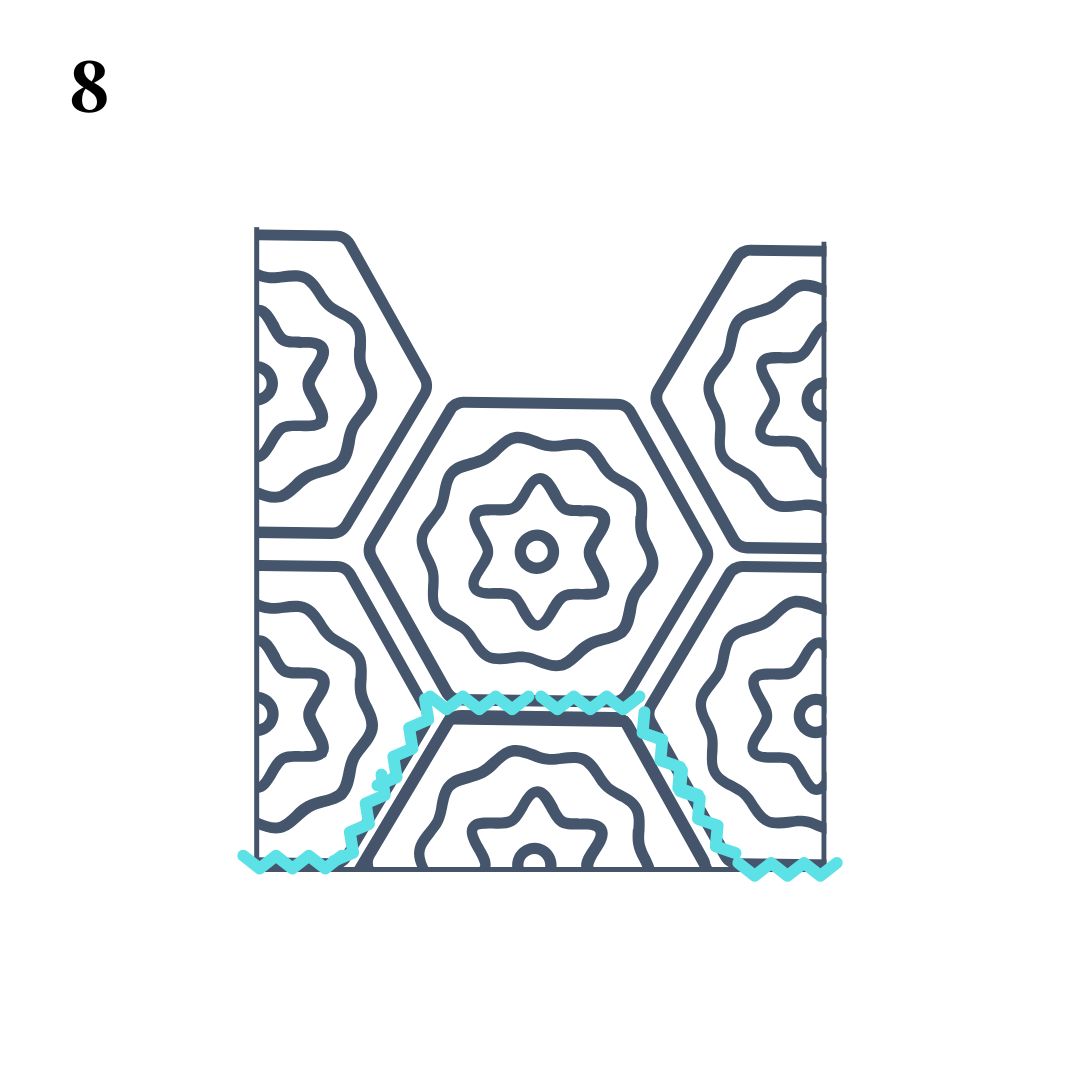
Attach the squares together according to picture 8.

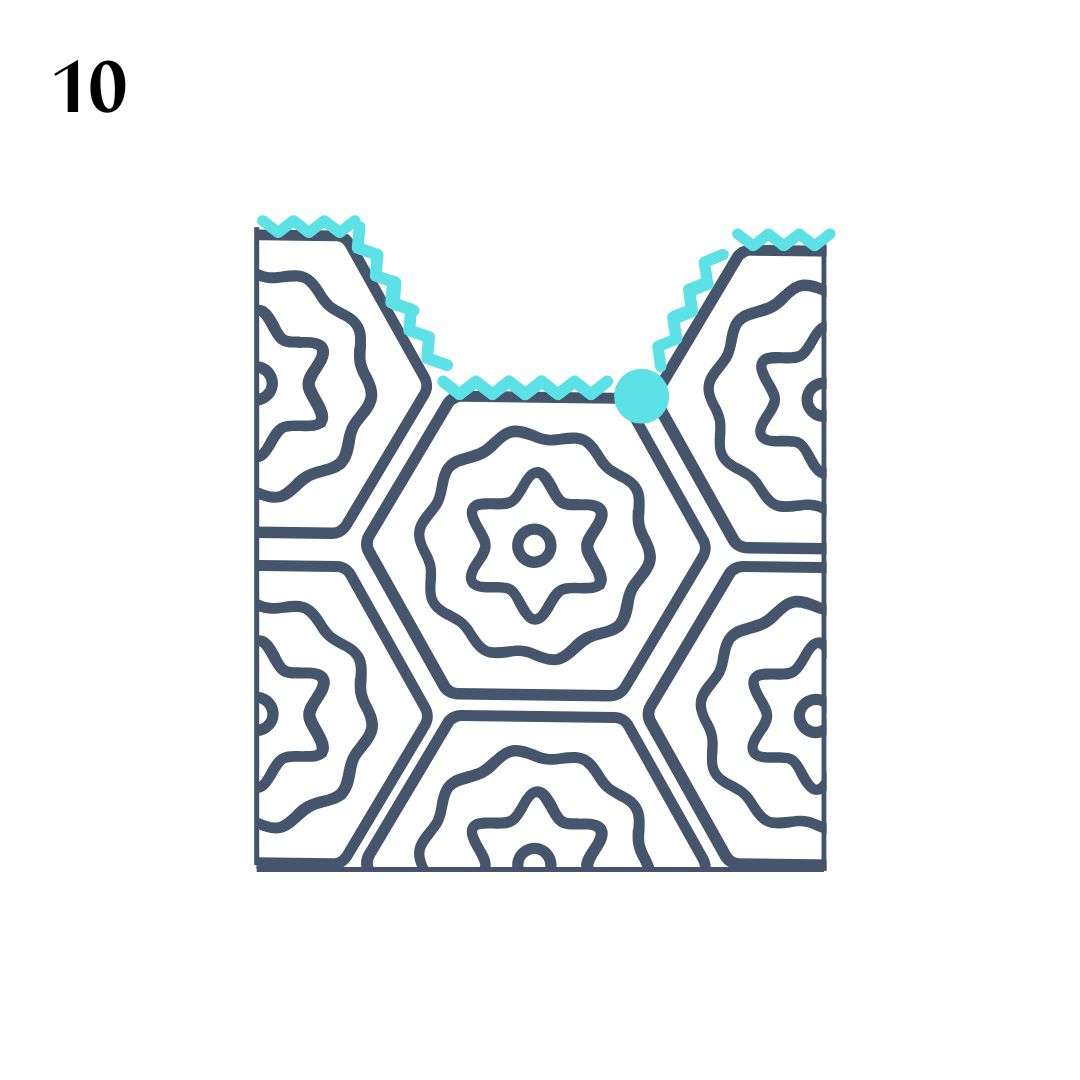
Attach the squares according to picture 9 but first crochet together according to the left marking. Cut off and fasten off. Then, when you crochet according to the right dashed lines, make sure to stop where the point is and continue on step 6, picture 10.

We are going to crochet one round around the top of the bag to get a nice finish. Start where you left off in picture 9 (see the point in picture 10) and crochet one round. Crochet with single crochets and finish where you started, cut the yarn and fasten. If you need a reminder on how to crochet a single crochets, see below video.

Crochet the handles
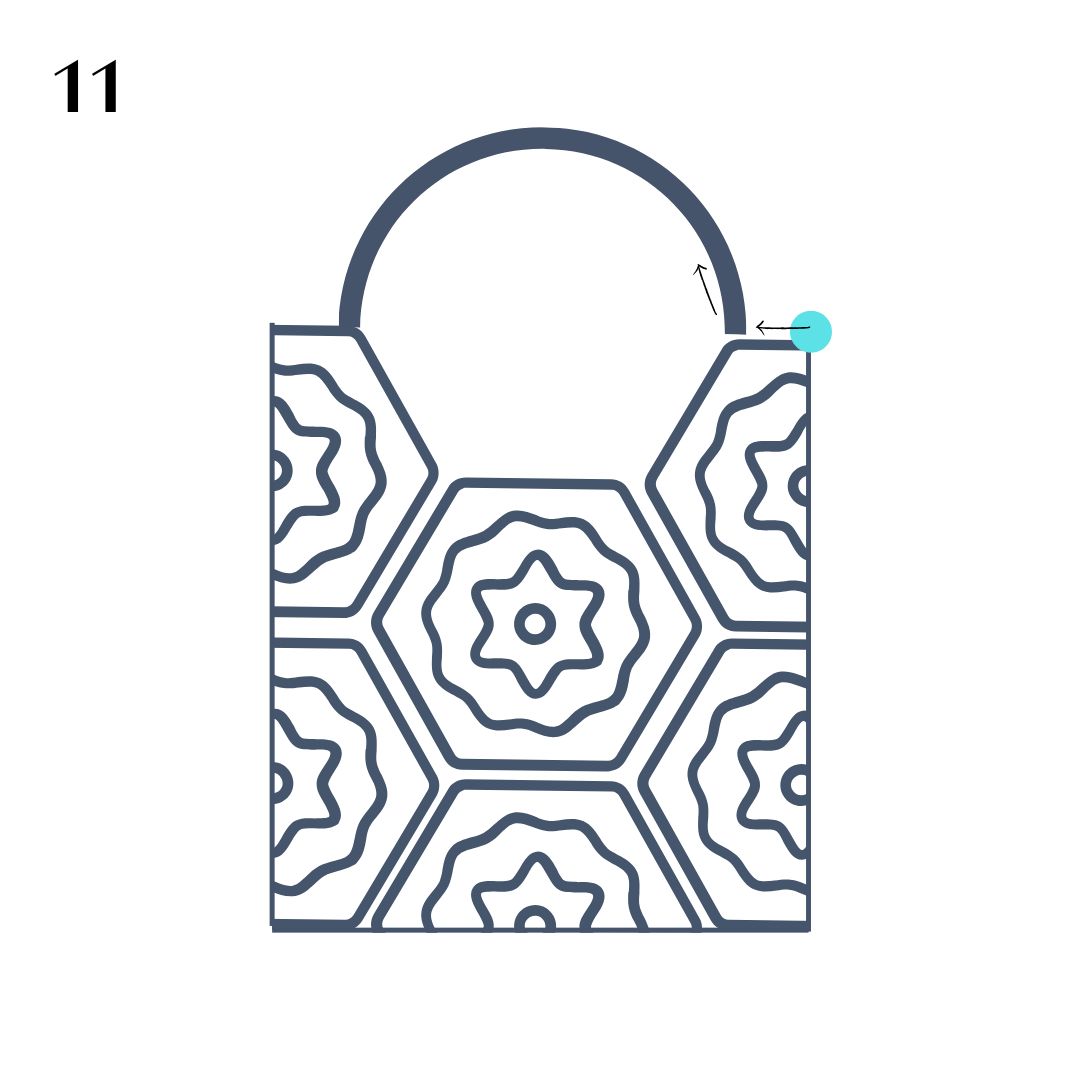
The last step is to crochet the handles. If you have the bag in front of you, start on the right, see where the dot shows in picture 11. Crochet single crochet until your are at the top on the side of the bag. There, crochet chain stitches until you are on the other side. Crochet as many chain stitches that you wish, this will be the length of the handle. Remember how many you crochet because you should make the same amount on the other side. If you need a reminder on how to crochet a chain, see technique video below.

Crochet single crochet until you are on the other side of the top. Chain as many as you did on the first handle. Crochet as many rounds of single crochet as you need to get the width that you want. When you are satisfied, stay where you started, cut the yarn and fasten off.
Now you're done with the bag, well done! Please share your results with us :)
Description (Using Crochet Terms)
This part of the pattern consists only of crochet terminology. If you need help along the way, refer to the simpler section.
Abbreviations (US Terms)
- sc = single crochet
- hdc = half double crochet
- dc = double crochet
- sl st = slip stitch
- ch = chain
- sk = skip
- (..) = total number of stitches in the round
- *…* = repeat instructions between asterisks
If you get stuck along the way, see the simpler description.
PATTERN
Make 2 "African Flower" Squares
Round 1: Create a MR (magic ring). Ch 2 (counts as first dc), 1 dc, ch 1. *2 dc, ch 1* x6. Join with 1 sl st in 2nd ch from beginning.
If changing color for the next round, fasten off here.
Round 2: Using Color 2. Start in a ch-1 space. Ch 2 (counts as first dc), 1 dc, ch 1, 2 dc, ch 1 in same space.
*In next ch-1 space: 2 dc, ch 1, 2 dc, ch 1* x6.
In the pattern, the same color is used for Round 3. If changing color, fasten off and join new color for Round 3.
Round 3: If using same color: sl st into the ch-1 space between the two dc groups. If you changed color, join here directly (no sl st needed). Ch 2 (counts as first dc). Work 6 dc in same space, ch 1. *In next ch-1 space: 7 dc, ch 1* repeat around.
Join with sl st in 2nd ch from beginning. Fasten off.
Round 4: Attach yarn in a ch-1 space from Round 2 that is between dc groups (between the 7 dc groups but one round below). Join yarn and ch 2 so the chains sit on the right side. Work 7 sc over the 7 dc from previous round. Between each group of 7 dc from previous round, work 1 dc inserting hook into Round 2 instead of Round 3. This creates a longer dc that marks the flower petals.
Continue around. Join with sl st in 2nd ch from beginning. Fasten off.
Round 5: Start in any stitch.
Important: You will increase in the stitch at the top of each petal (the stitch above the center dc of the 7 dc made in Round 3).
Work 1 sc, ch 1, 1 sc in the stitch above the center dc from Round 3. It does not matter where you start, as long as you make the increase in the top stitch of each petal. 1 sc in each st until you reach the top st of the next petal.
There work: 1 sc, ch 1, 1 sc in same stitch.
Continue around. Join with sl st in the ch made at the beginning. Fasten off.
Weave in all ends on the square.
Join the Squares
Now all squares should be joined together.
There are different techniques you can use to join the squares. In this pattern, they are joined using slip stitches (sl st) by placing the wrong sides together and working through the loop closest to you on both squares.
If you are unsure how to do this, refer to the video at the bottom.
See below for instructions on how to assemble the bag.
You have now joined 6 squares and have your 7th square left to attach.
Turn the entire piece so the wrong side is facing you. Take your last square and place it with the right side facing up (see image 7, blue square). You are placing it on top of the other square to form the back of the bag.
Now we will join the other side of the bag.
Fold all squares along the dashed lines shown in image 7. Be especially careful with the two bottom squares, as they are easy to assemble incorrectly.
If they are attached incorrectly, the shape of the bag will be different.

In image 9, first join along the left marked line. Fasten off and weave in the yarn.
Then join along the right marked line. Make sure to stop where the dot indicates, and then continue as shown in image 10.
Do not fasten off when you reach the point marked by the dot.

Now we will crochet one round around the top of the bag to give it a neat finish. Start where you finished in image 9 (see the dot in image 10) and work one round all the way around the top.
Work 1 sc in each stitch around. Join where you began, fasten off, and weave in the ends.
Crochet the Handles
Now you will crochet the handles.
With the bag facing you, start on the right side where the dot indicates in image 11. Work sc until you reach the top of the side (where the bag ends and the strap will begin).
Chain (ch) as many stitches as you want for your strap length. This will determine the length of the handle. Make sure to remember how many chains you make, since you will need to make the same number on the other side.
When you are satisfied with the length, insert your hook down into the other side of the bag (see image). Work sc across until you reach the other side of the bag.
There, chain again the same number of stitches as for the first handle. Now work as many rows as needed with 1 sc in each stitch to make the handles as wide as you like. When you are satisfied, stop where you originally began, fasten off, and weave in the ends.
Your bag is now finished — great job! Feel free to share your result with us :)
The rights to this pattern belong to MYO Make Your Own. The pattern or its pictures may not be copied, shared or resold either in parts or in its entirety, but you may sell items you have crocheted from this pattern. If you have questions about the pattern, contact MYO at hello@makeyourown.se.
Weight
If you want to use leftover yarn that you have at home, you can see below what the weight is on each color:
Weight of one square: about 50g
Round 1: 4g (the white in the middle of the example square)
Round 2 & 3: 22g (the dark green in the example square)
Round 4: 9 g (the light green in the example square)
Round 5: 11g (the last white round on the example square)
Crochet 7 squares “African Flower”
If you feel unsure when crocheting the square, there is a video at the end showing all the steps in the "African Flower" square.
Round 1: Crochet a magic ring and in the magic ring start with chain two (this chain replaces the first double crochet). Then crochet 1 double crochet. Chain 1. Repeat: crochet 2 double crochet and then chain 1 a total of 6 times (so 5 more times). Finish with a slip stitch in the 2nd chain as you did at the beginning. If you want to change the color, cut the yarn here.
Round 2: Use color 2. Start by pulling through into a “hole”, that is, where you crocheted chained 1 between the double crochets. In this hole, chain 2 (replacing the first double crochet) a double crochet, chain 1, 2 double crochet and chain 1 in the same hole. Then crochet in the next hole: 2 double crochets, chain 1, 2 double crochets, chain 1. This sequence is repeated in all 6 holes.
In the pattern, the same color is used for round 3, if you want a different color for round 3, cut the yarn and start with your new color.
Round 3: If you use the same color, make a slip stitch in the “hole” between the two pairs of double crochets (the pairs of double crochets that were crocheted in the same hole in round 1). We do this to end up in the right place. If you have changed the color, you start here directly, so you do not need to do the slip stitch.
Chain 2, replacing the first double crochet. Then crochet 6 double crochets in the same hole. Chain 1. Go down into the next hole (which is between the post pairs) and crochet 7 double crochets and chain 1. Continue the whole round. Finish by going down the 2nd chain from the ones you did at the beginning. Cut the yarn.
Round 4: Tie the yarn in a hole on round 2, that is between the double crochets (between the 7 double crochet one round down). Tie the yarn and chain 2 so that they end up on the front. Crochet 7 single crochets in the 7 double crochets from the previous round. Between the 7 double crochets of the previous round, make 1 double crochet but go down on round 2 instead of round 3. This creates a longer double crochet marking the flower petals. Continue the round. Finish by going down the 2nd chain from the ones that you did at the beginning. Cut off.
Round 5: Start in a stitch. The important thing to keep in mind here is that we are going to make more stitches in the same stitch at the top of each petal i.e. in the stitch that is above the middle double crochet of the seven that were crocheted on round 3. We crochet 1 single crochet, chain 1, 1 single crochet in the middle stitch above the double crochet from round 3. It doesn't matter where you start as long as you make the increase on the top-stitch of each petal.
Crochet single crochets until you get to the topstitch of the flower petals. There you crochet 1 single crochet, chain 1, 1 single crochet in the same stitch. Continue the round. Finish by going down into the top chain as you did at the beginning. Cut off.
Attach all the yarn ends on the square.
Assemble the squares with each other
Now all the squares should be assembled with each other. When the squares are crocheted together, you can use different techniques, we have crocheted them together with slip stitches by putting the wrong side to each other and crochet in the stitch that is closes to you, on both squares. If you are unsure how to do this, you can see the video below. See step 4-5 how to assemble the squares.
Assemble the squares
1) Put all squares according to below picture
2) Crochet the squares together according to picture 2-6. Cut and attach the yarn ends after each piece you crochet together. Alternatively, crochet all the squares together and attach all the yarn ends at the same time in the end. Fasten off.
You have attached 6 squares together and have your 7th square left to attach. Turn the whole piece over so you have the wrong side facing you. Take your last square and put it in the middle with the nice side up (see picture 7).
Attach the other side of the bag. Fold all the squares according to the dashed lines of picture 7.
Attach the squares together according to picture 8.
Attach the squares according to picture 9 but first crochet together according to the left marking. Cut off and fasten off. Then, when you crochet according to the right dashed lines, make sure to stop where the point is and continue on step 6, picture 10.
We are going to crochet one round around the top of the bag to get a nice finish. Start where you left off in picture 9 (see the point in picture 10) and crochet one round. Crochet with single crochets and finish where you started, cut the yarn and fasten. If you need a reminder on how to crochet a single crochets, see below video.
Crochet the handles
The last step is to crochet the handles. If you have the bag in front of you, start on the right, see where the dot shows in picture 11. Crochet single crochet until your are at the top on the side of the bag. There, crochet chain stitches until you are on the other side. Crochet as many chain stitches that you wish, this will be the length of the handle. Remember how many you crochet because you should make the same amount on the other side. If you need a reminder on how to crochet a chain, see technique video below.
Crochet single crochet until you are on the other side of the top. Chain as many as you did on the first handle. Crochet as many rounds of single crochet as you need to get the width that you want. When you are satisfied, stay where you started, cut the yarn and fasten off.
Now you're done with the bag, well done! Please share your results with us :)
Description (Using Crochet Terms)
This part of the pattern consists only of crochet terminology. If you need help along the way, refer to the simpler section.
Abbreviations (US Terms)
- sc = single crochet
- hdc = half double crochet
- dc = double crochet
- sl st = slip stitch
- ch = chain
- sk = skip
- (..) = total number of stitches in the round
- *…* = repeat instructions between asterisks
If you get stuck along the way, see the simpler description.
PATTERN
Make 2 "African Flower" Squares
Round 1: Create a MR (magic ring). Ch 2 (counts as first dc), 1 dc, ch 1. *2 dc, ch 1* x6. Join with 1 sl st in 2nd ch from beginning.
If changing color for the next round, fasten off here.
Round 2: Using Color 2. Start in a ch-1 space. Ch 2 (counts as first dc), 1 dc, ch 1, 2 dc, ch 1 in same space.
*In next ch-1 space: 2 dc, ch 1, 2 dc, ch 1* x6.
In the pattern, the same color is used for Round 3. If changing color, fasten off and join new color for Round 3.
Round 3: If using same color: sl st into the ch-1 space between the two dc groups. If you changed color, join here directly (no sl st needed). Ch 2 (counts as first dc). Work 6 dc in same space, ch 1. *In next ch-1 space: 7 dc, ch 1* repeat around.
Join with sl st in 2nd ch from beginning. Fasten off.
Round 4: Attach yarn in a ch-1 space from Round 2 that is between dc groups (between the 7 dc groups but one round below). Join yarn and ch 2 so the chains sit on the right side. Work 7 sc over the 7 dc from previous round. Between each group of 7 dc from previous round, work 1 dc inserting hook into Round 2 instead of Round 3. This creates a longer dc that marks the flower petals.
Continue around. Join with sl st in 2nd ch from beginning. Fasten off.
Round 5: Start in any stitch.
Important: You will increase in the stitch at the top of each petal (the stitch above the center dc of the 7 dc made in Round 3).
Work 1 sc, ch 1, 1 sc in the stitch above the center dc from Round 3. It does not matter where you start, as long as you make the increase in the top stitch of each petal. 1 sc in each st until you reach the top st of the next petal.
There work: 1 sc, ch 1, 1 sc in same stitch.
Continue around. Join with sl st in the ch made at the beginning. Fasten off.
Weave in all ends on the square.
Join the Squares
Now all squares should be joined together.
There are different techniques you can use to join the squares. In this pattern, they are joined using slip stitches (sl st) by placing the wrong sides together and working through the loop closest to you on both squares.
If you are unsure how to do this, refer to the video at the bottom.
See below for instructions on how to assemble the bag.
You have now joined 6 squares and have your 7th square left to attach.
Turn the entire piece so the wrong side is facing you. Take your last square and place it with the right side facing up (see image 7, blue square). You are placing it on top of the other square to form the back of the bag.
Now we will join the other side of the bag.
Fold all squares along the dashed lines shown in image 7. Be especially careful with the two bottom squares, as they are easy to assemble incorrectly.
If they are attached incorrectly, the shape of the bag will be different.
In image 9, first join along the left marked line. Fasten off and weave in the yarn.
Then join along the right marked line. Make sure to stop where the dot indicates, and then continue as shown in image 10.
Do not fasten off when you reach the point marked by the dot.
Now we will crochet one round around the top of the bag to give it a neat finish. Start where you finished in image 9 (see the dot in image 10) and work one round all the way around the top.
Work 1 sc in each stitch around. Join where you began, fasten off, and weave in the ends.
Crochet the Handles
Now you will crochet the handles.
With the bag facing you, start on the right side where the dot indicates in image 11. Work sc until you reach the top of the side (where the bag ends and the strap will begin).
Chain (ch) as many stitches as you want for your strap length. This will determine the length of the handle. Make sure to remember how many chains you make, since you will need to make the same number on the other side.
When you are satisfied with the length, insert your hook down into the other side of the bag (see image). Work sc across until you reach the other side of the bag.
There, chain again the same number of stitches as for the first handle. Now work as many rows as needed with 1 sc in each stitch to make the handles as wide as you like. When you are satisfied, stop where you originally began, fasten off, and weave in the ends.
Your bag is now finished — great job! Feel free to share your result with us :)
The rights to this pattern belong to MYO Make Your Own. The pattern or its pictures may not be copied, shared or resold either in parts or in its entirety, but you may sell items you have crocheted from this pattern. If you have questions about the pattern, contact MYO at hello@makeyourown.se.

Share your creations with us
Thank you!
Your comment was sent!