
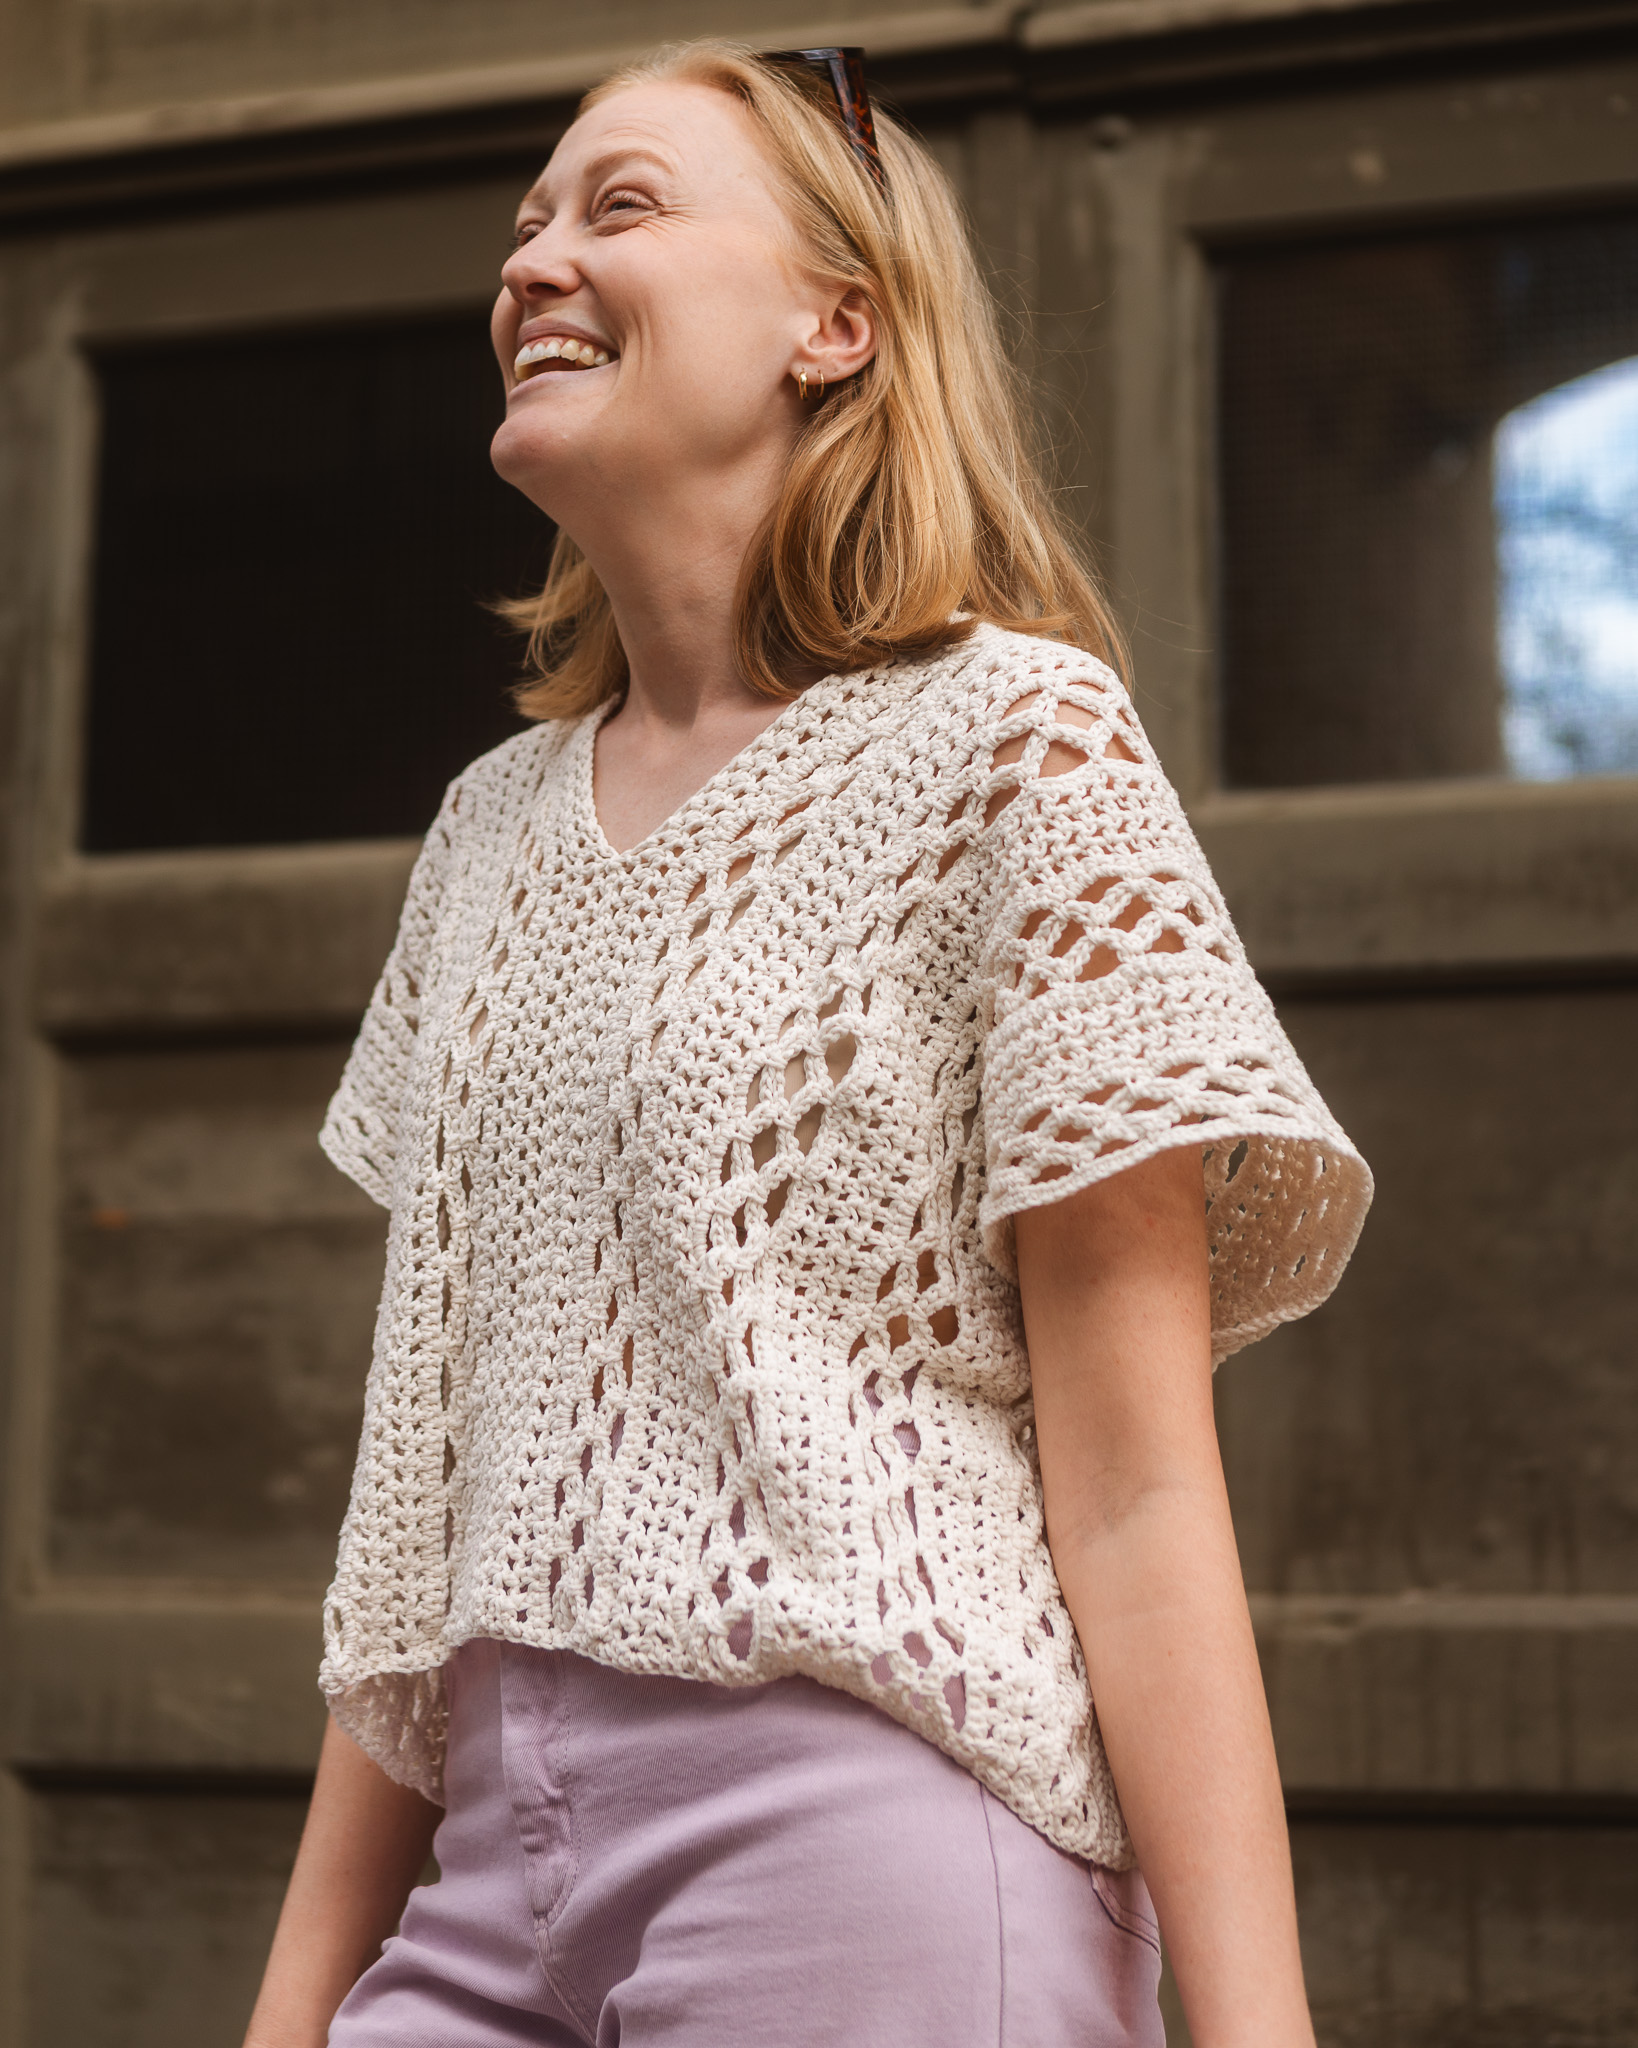
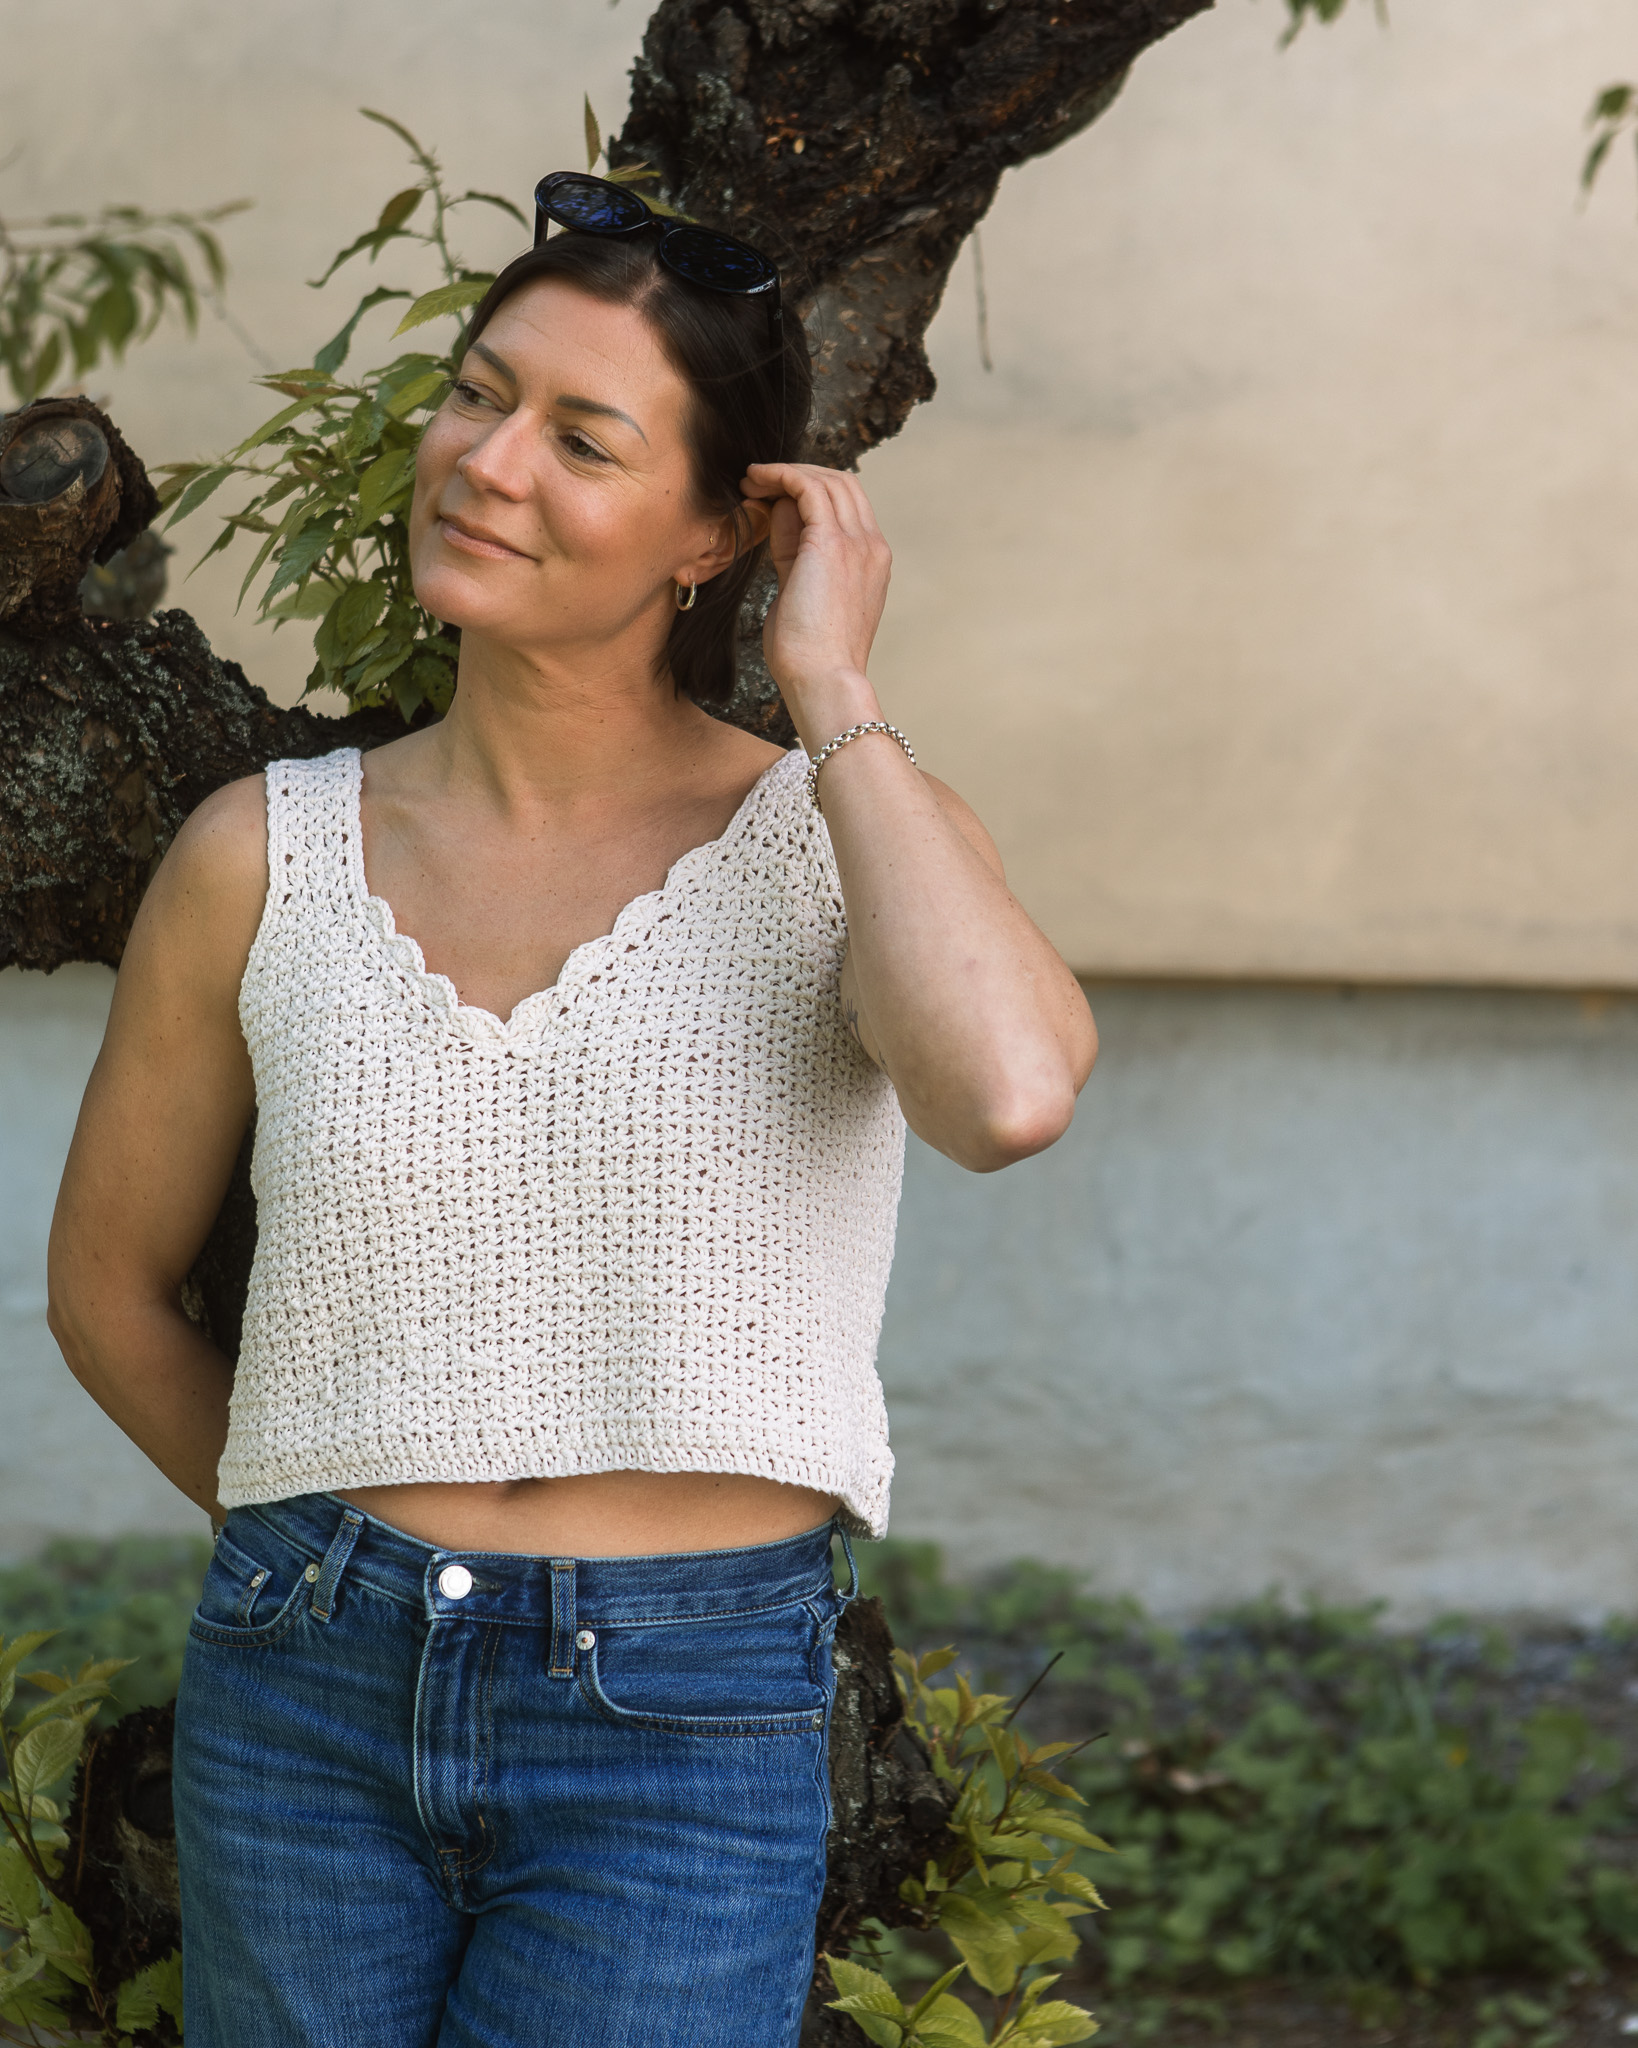
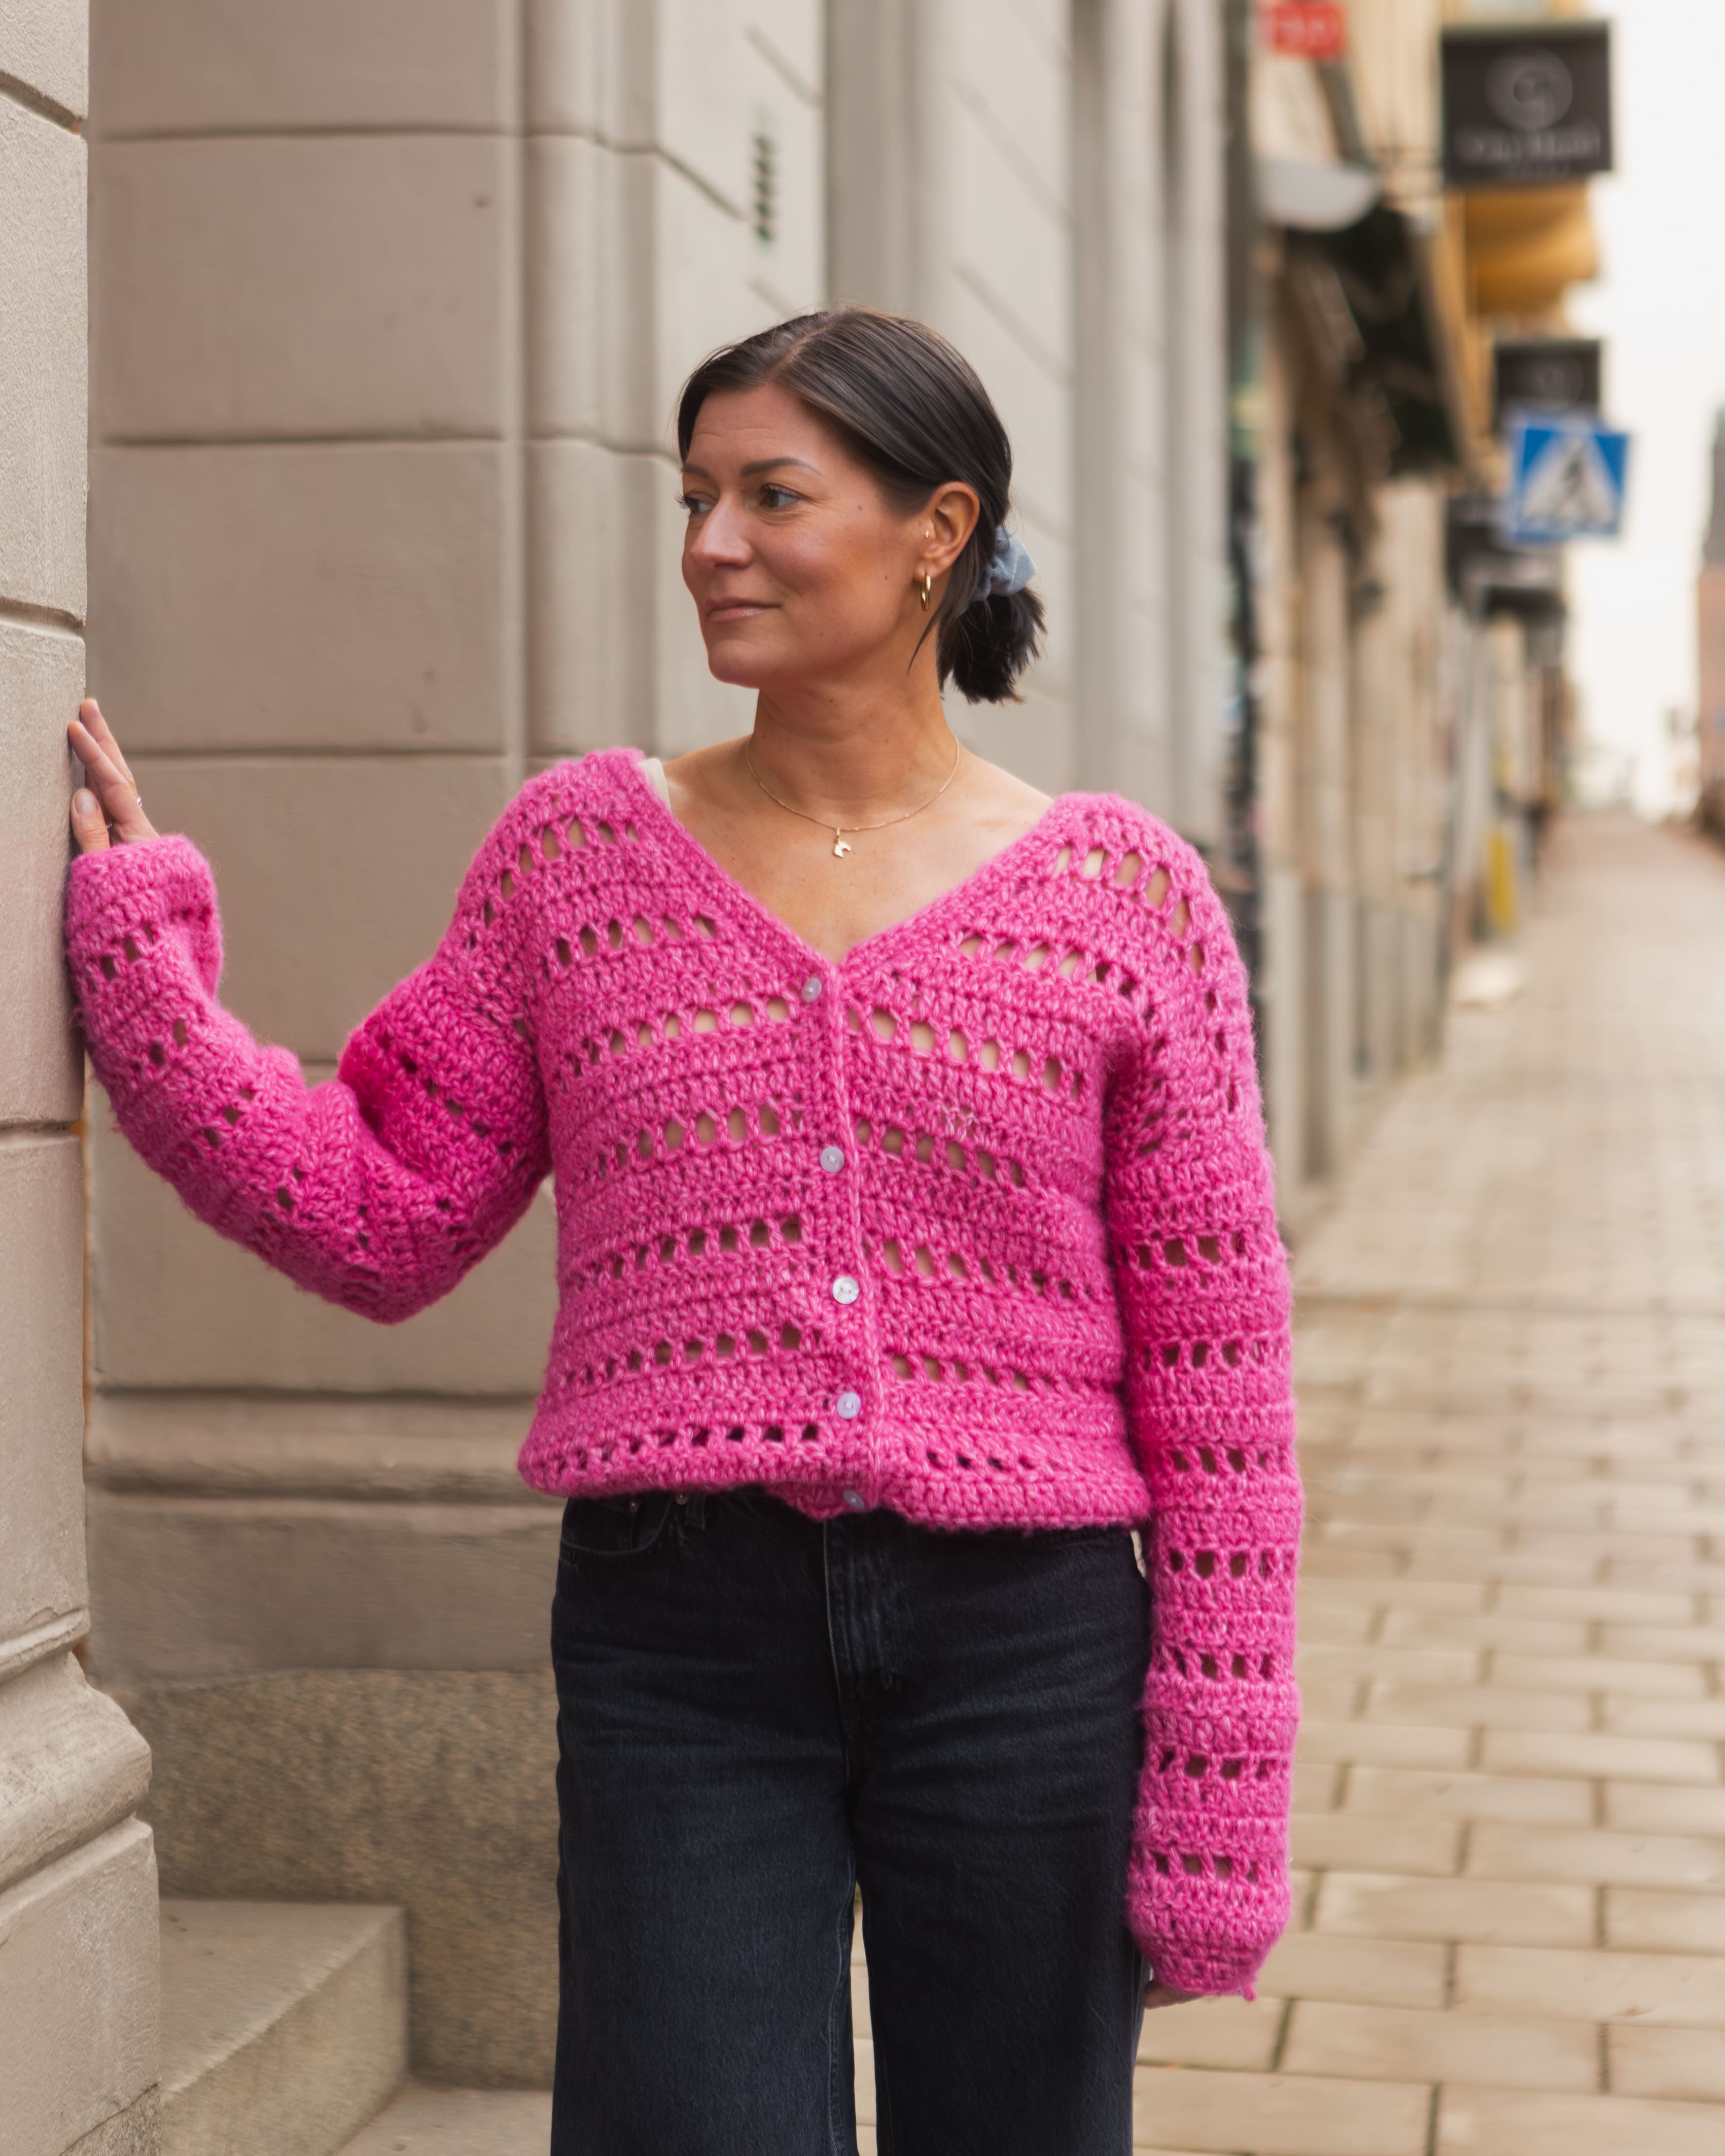
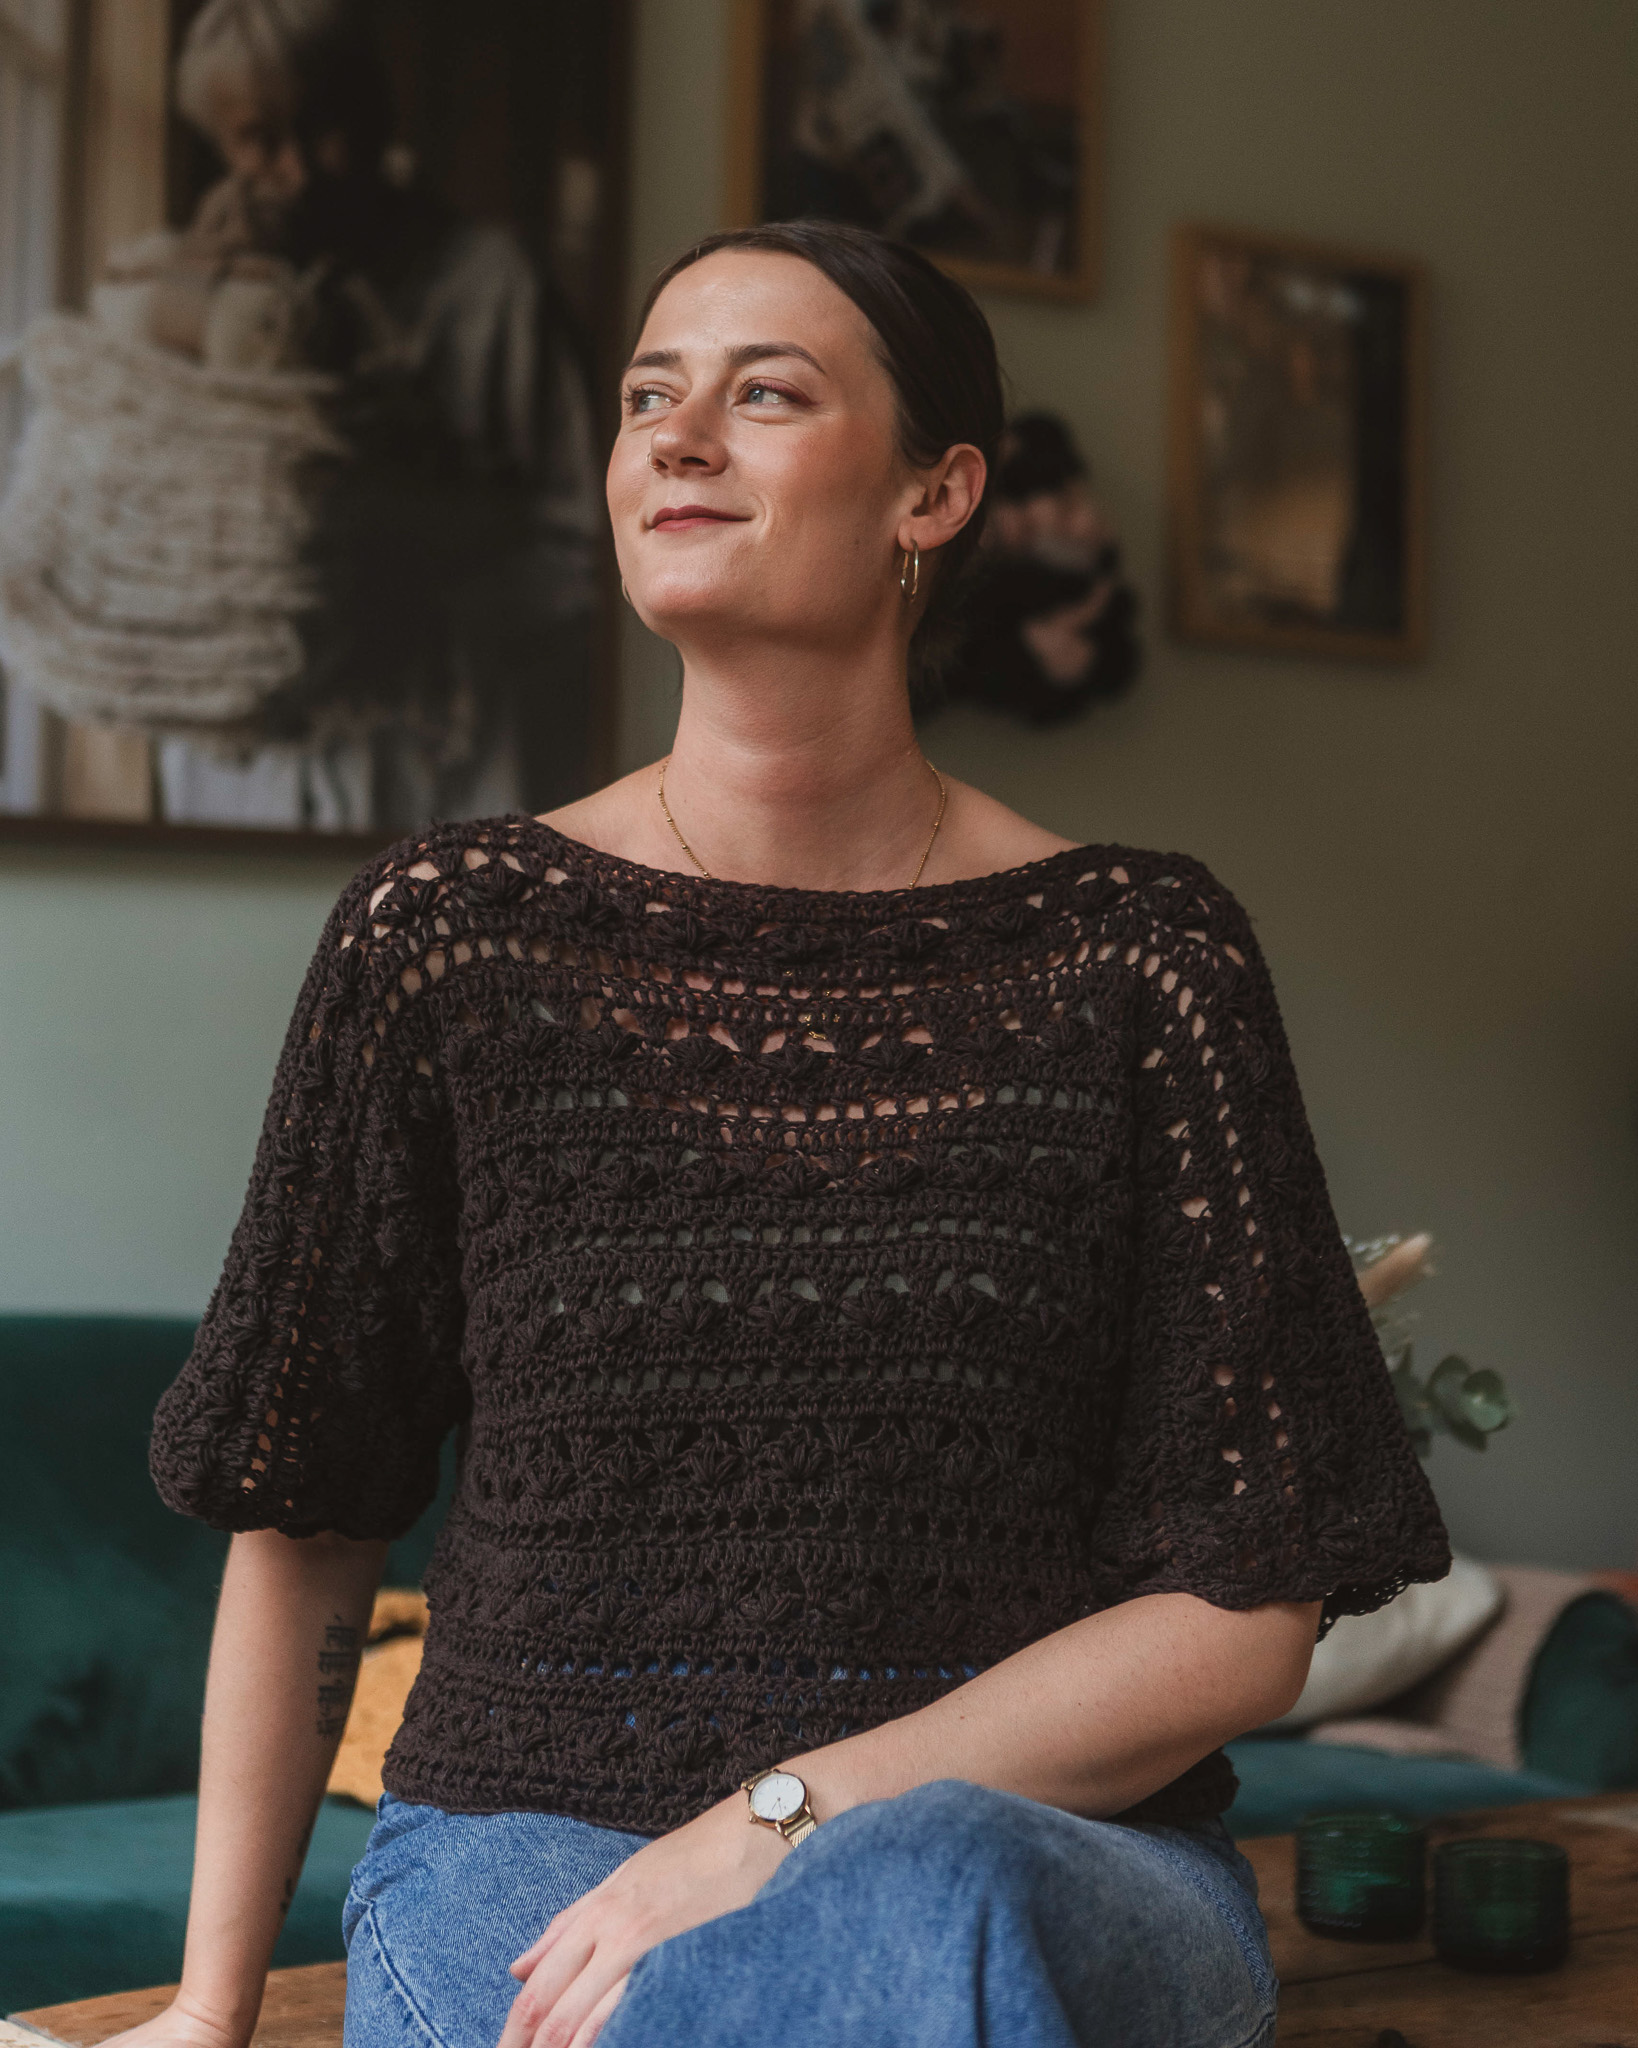
Crochet top “Elvira”
Crochet this simple and beautiful top "Elvira"
This is a pattern for a top with the simplest possible construction—perfect for those who want to try different techniques using basic stitches. There is no full-length video, but there are videos showing how to crochet the different techniques required. This is a made-to-measure project, which means you measure yourself to determine the length and width of the top. It’s easy to make it shorter or longer, and also more oversized if you prefer. You will need Cotton Cloud (we use the color “Cloud”), a 4 mm crochet hook, scissors, a tapestry needle, and a measuring tape.
Yarn requirement: approx. 400 g. The finished top shown in the image weighs 380 g (approx. size M/L). Keep in mind that yarn usage may vary depending on how tightly or loosely you crochet, as well as how wide and long you want the top to be.
Please note that in this pattern, we use videos from our technique library together with images.


Here's how to do it
The pattern consists of two equally sized rectangles that are crocheted together at the center front and back, as well as along the sides. The rectangles are made using two patterns (panels) that alternate to create a striped effect. The top can easily be customized to your size by adjusting the length and width of the rectangles to your measurements. Hope you’d like to try making your own top! Good luck! /Johanna
%20(4).jpg)
This is what you need:
Here you can directly purchase the material for the product. Please note that the instruction is digital and appears here on the page (no written instruction).

Cotton Cloud | 100 g
A slightly thinner cotton yarn that works perfectly for clothes, accessories and amigurumi.
Buy product
.jpg)
Unleash your creativity
For only 85kr per month you get access to all our 300+ beginner-friendly instructions for crochet, knitting and macrame.
A perfect way to get started with your new hobby!

TIP: How to get the right size for your garment
1. Make a Gauge Swatch and Measure Your Gauge
Crochet a gauge swatch using the stitch pattern specified in the pattern and measure how many stitches fit within 10 cm (4 inches). Once you know your gauge, you can calculate how many stitches you need to achieve the desired width of your garment.
How to do it: Chain enough stitches to make a swatch approximately 12–15 cm (5–6 inches) wide, then crochet at least three rows. Measure a section that is 10 cm (4 inches) wide and count the number of stitches within that section.
Once you know the number of stitches per 10 cm (4 inches), divide that number by 10 to find the number of stitches per centimeter. Then multiply this number by the desired width of your garment in centimeters. The result tells you how many stitches you need to start with to achieve the desired width.
Note: Be sure to adjust the stitch count according to the pattern instructions. Some patterns, for example, require an even number of stitches or a stitch count that is a multiple of a specific number.
2. Keep Your Crochet Tension in Mind
The size and drape of a garment—especially one made with double crochet stitches or other taller stitches—are greatly affected by your crochet tension and hook size. If you tend to crochet tightly, consider using a larger hook. This will help you achieve the correct measurements and create a fabric with a softer, more fluid drape.
Size
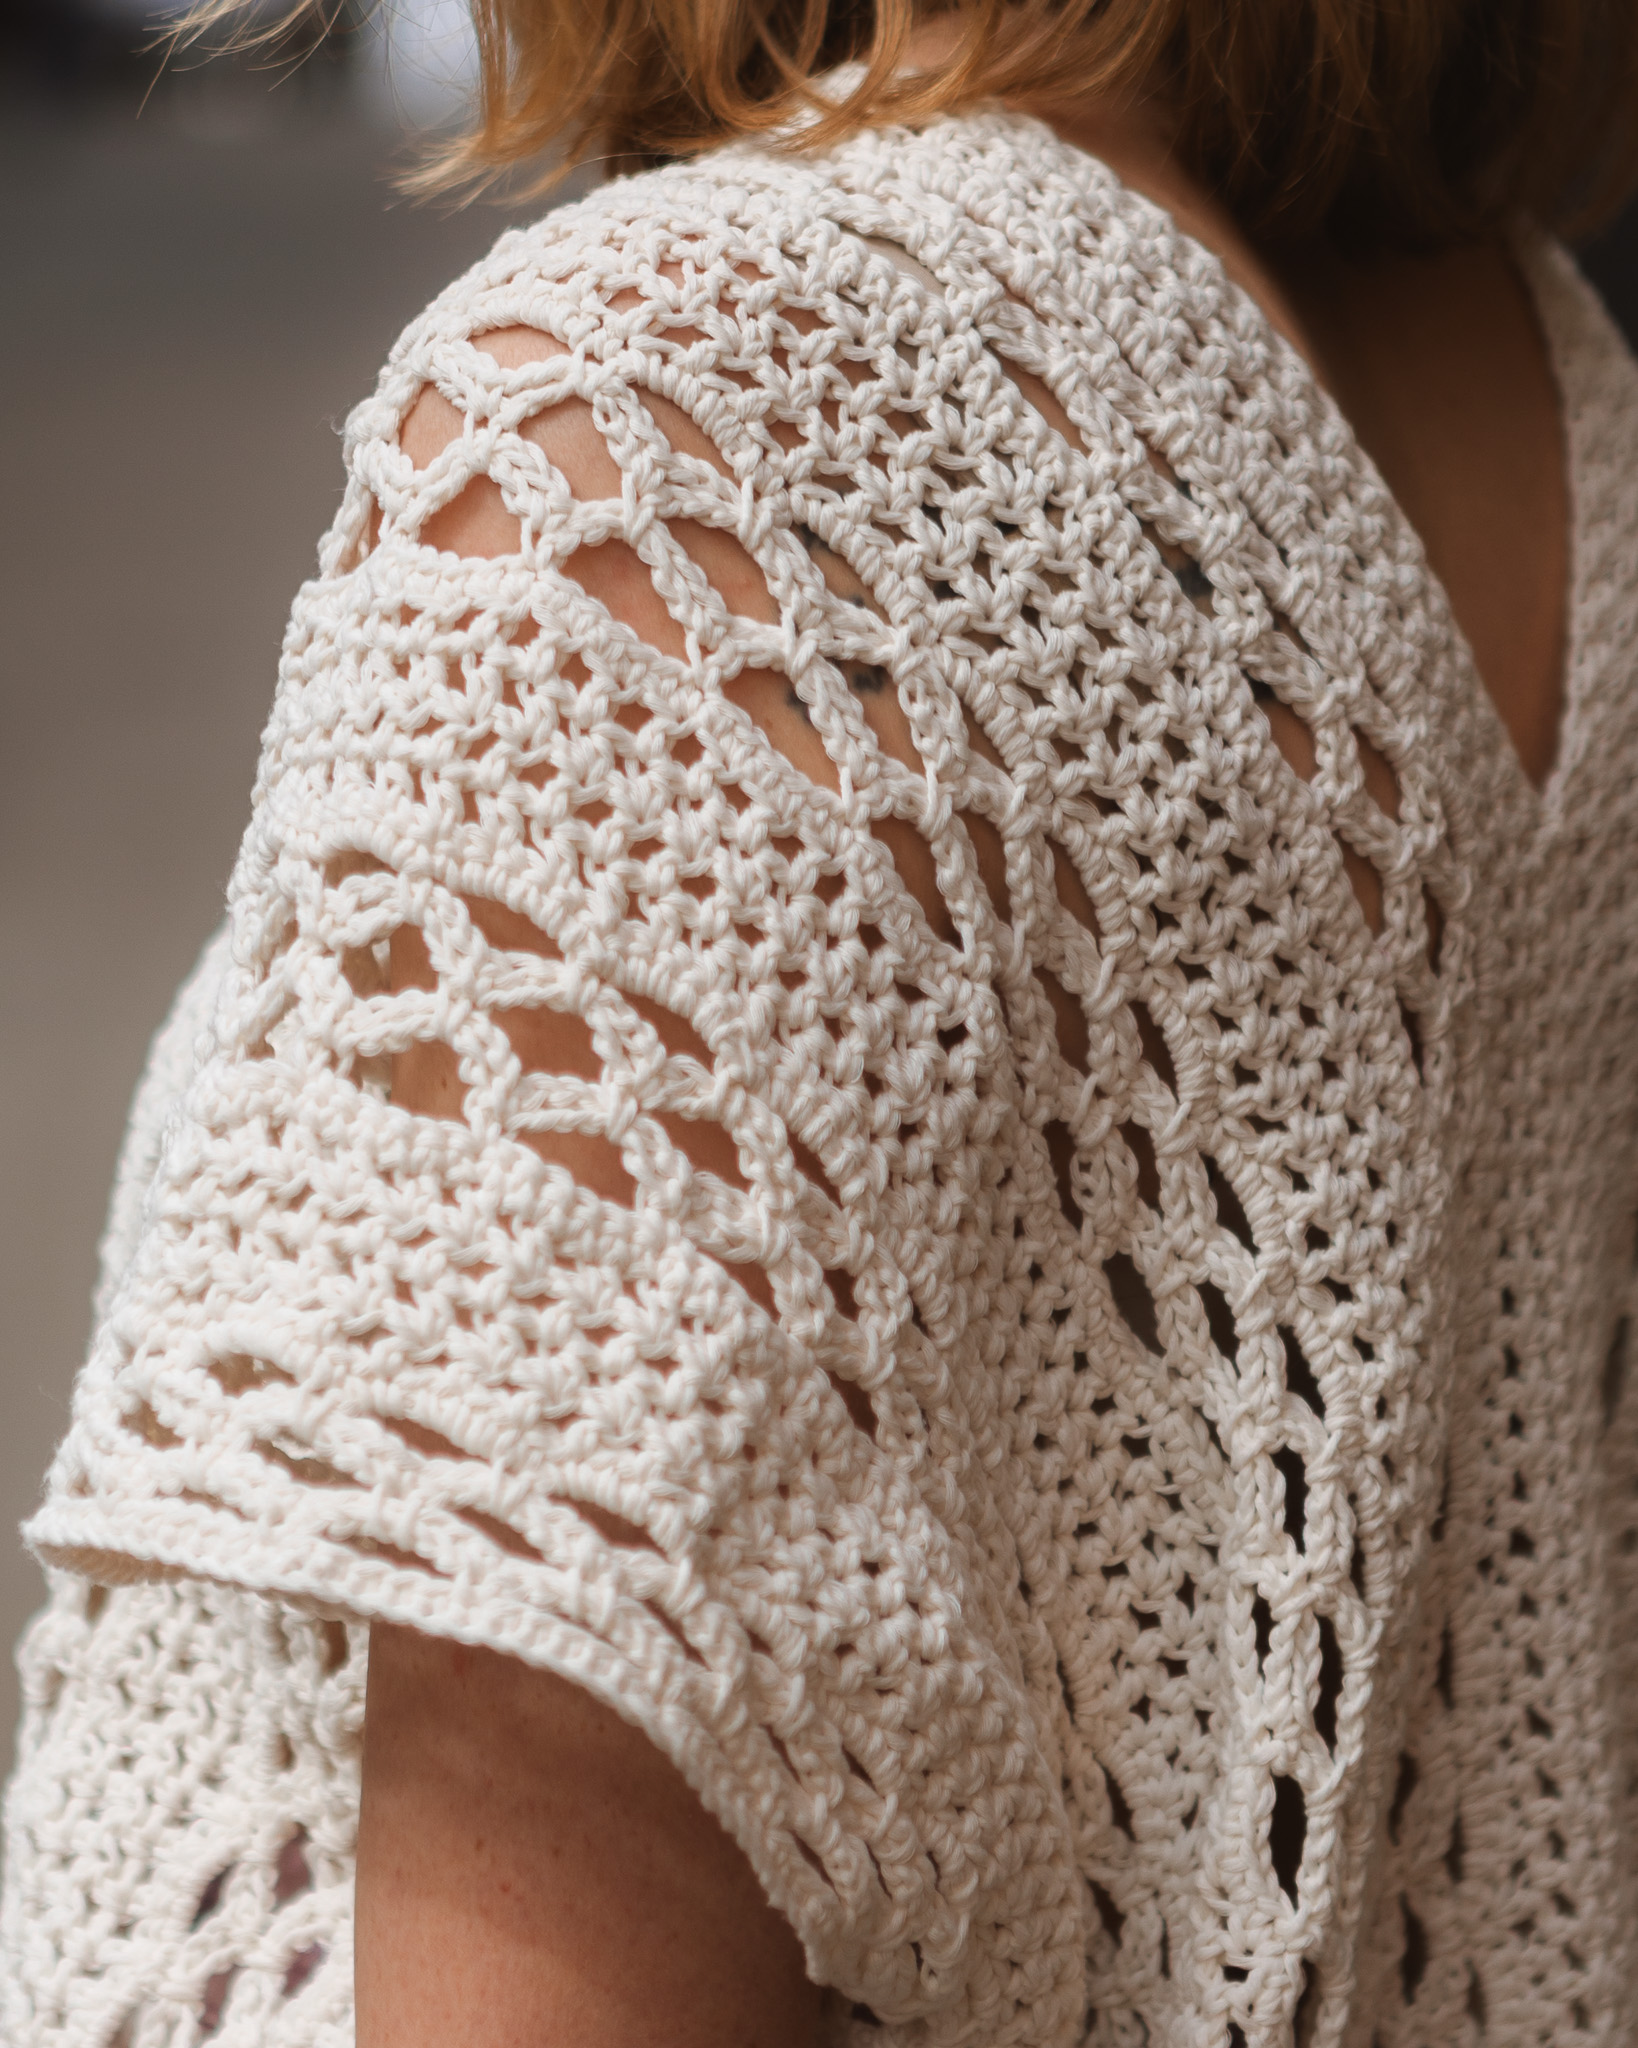
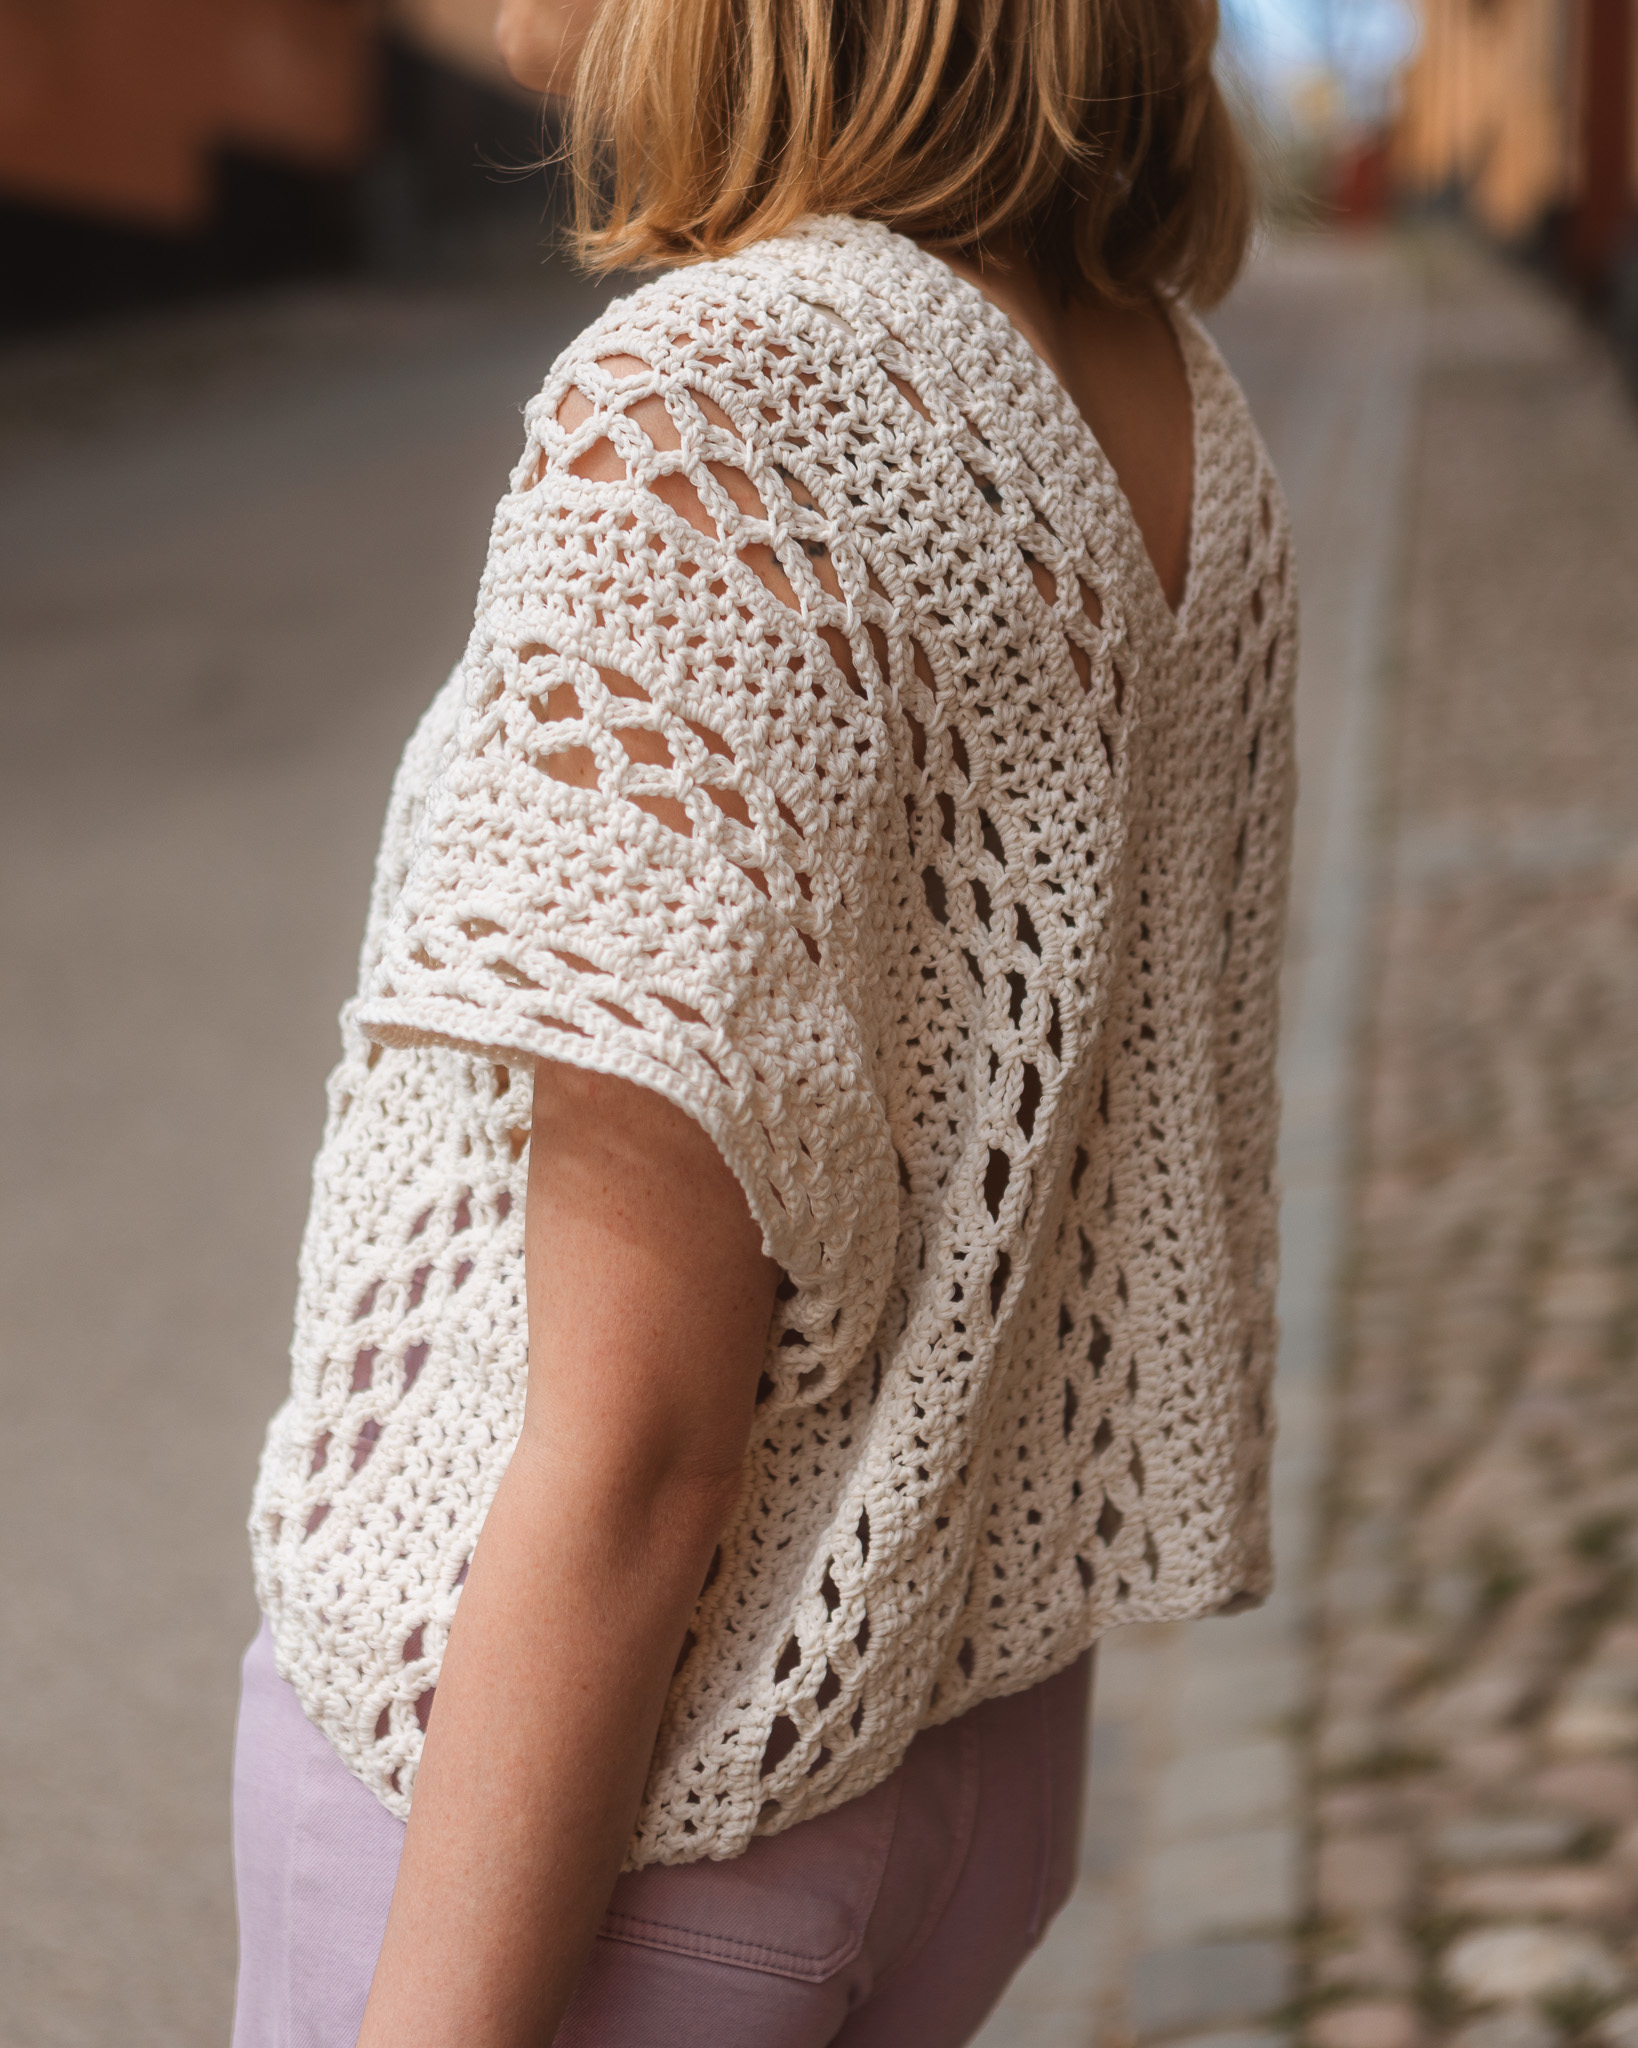
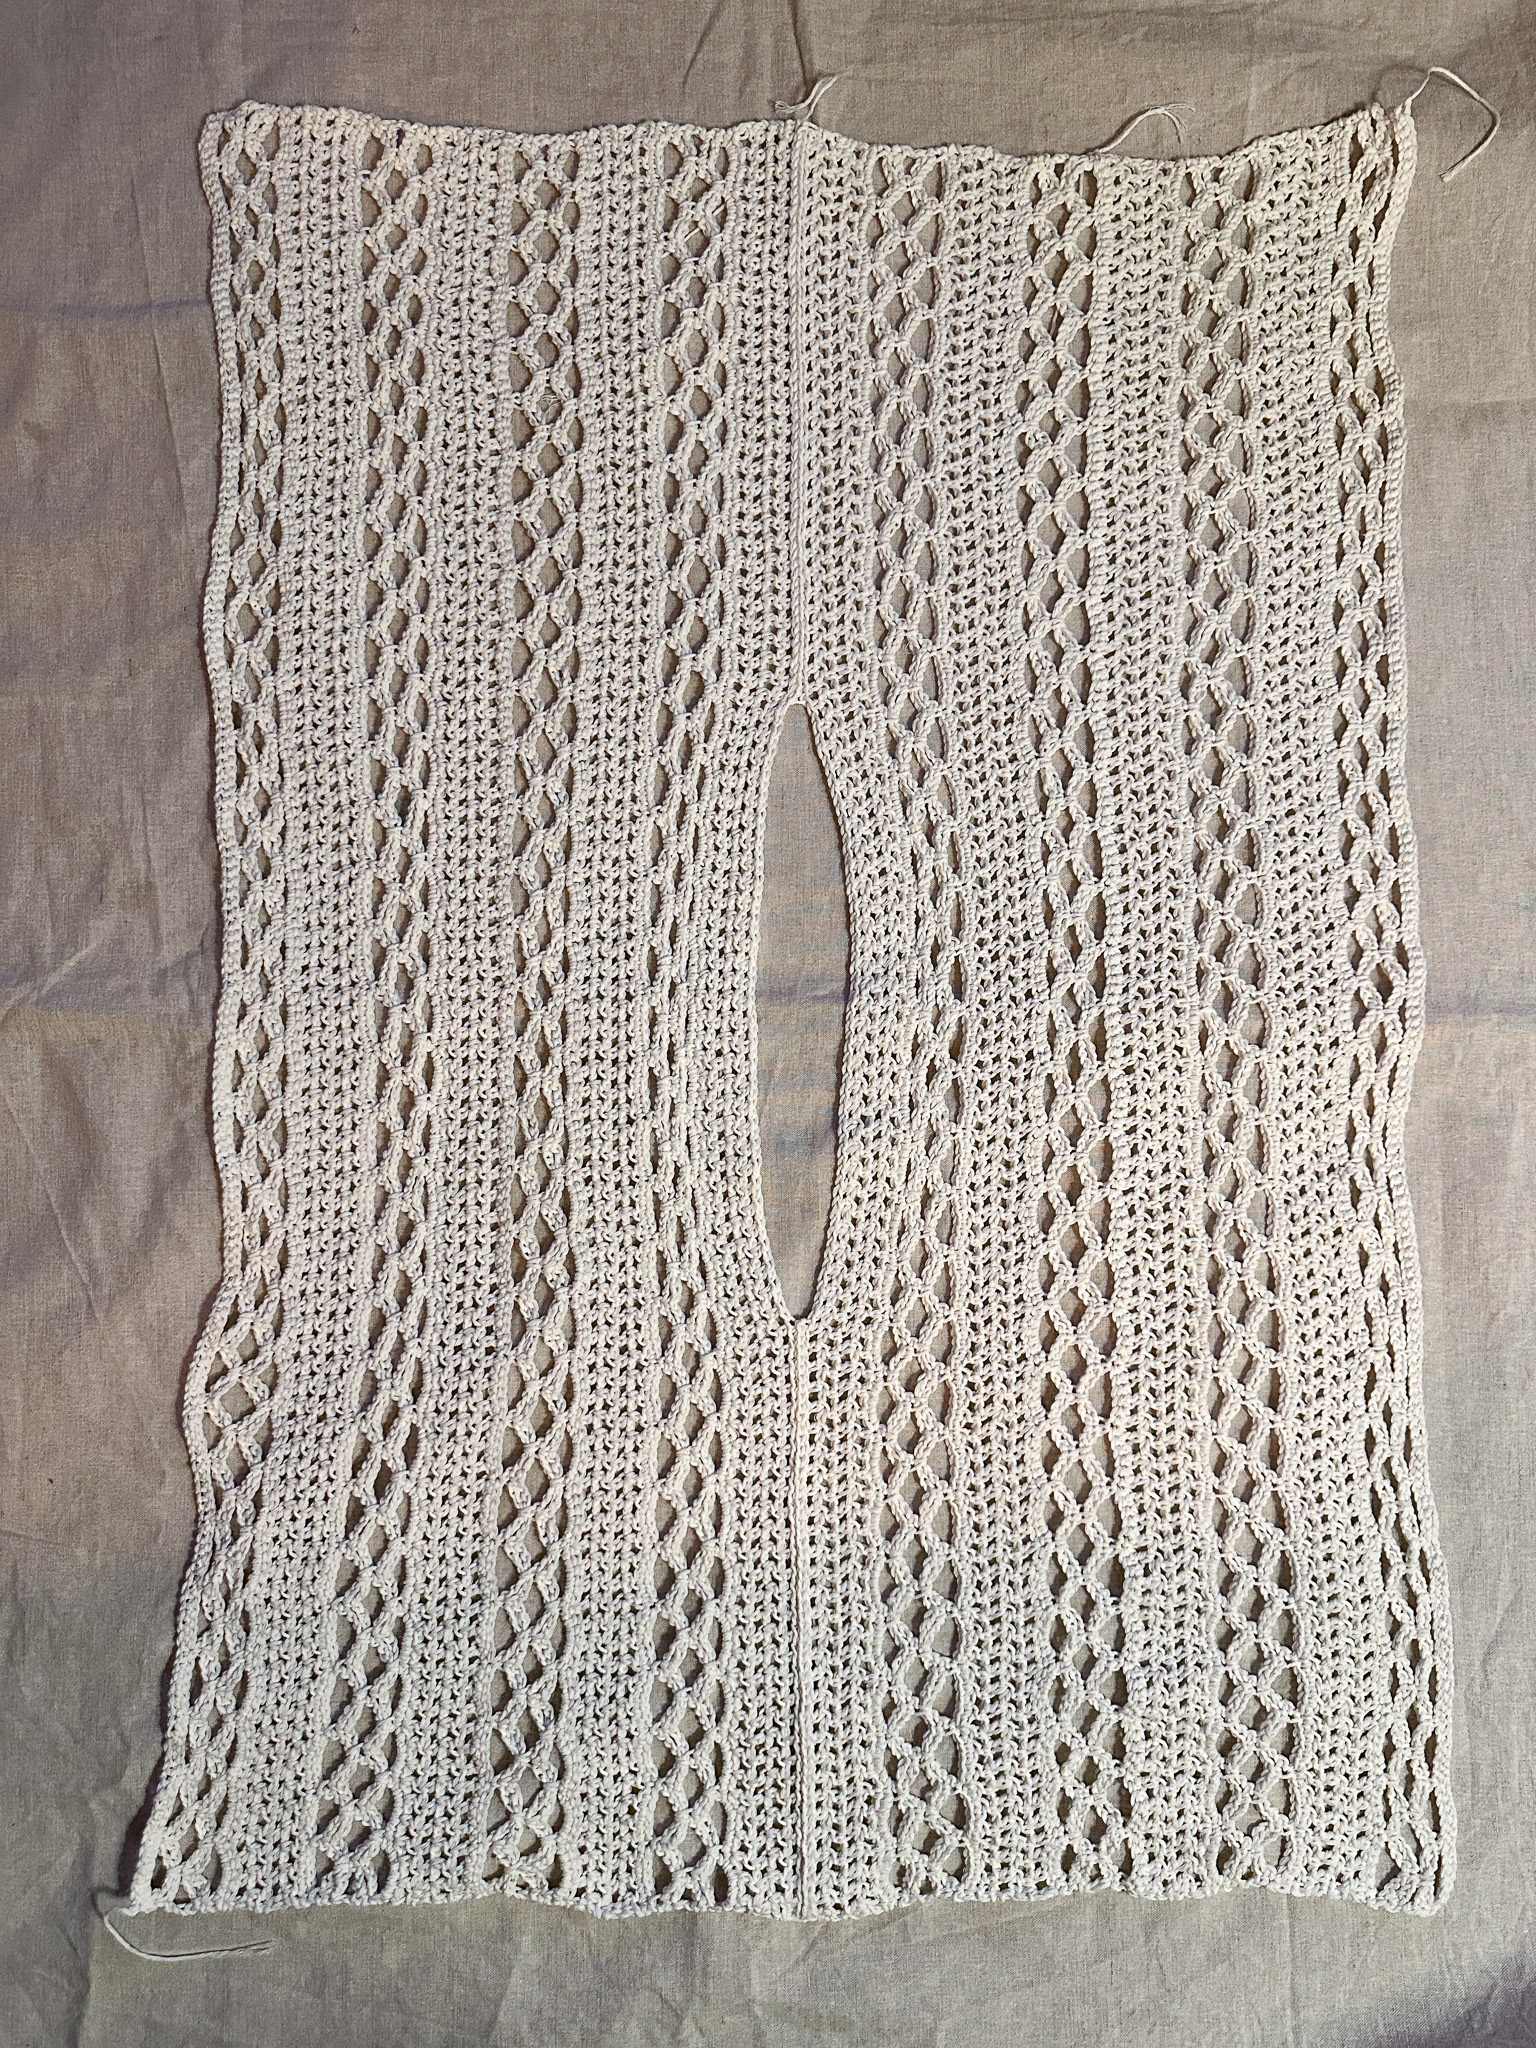
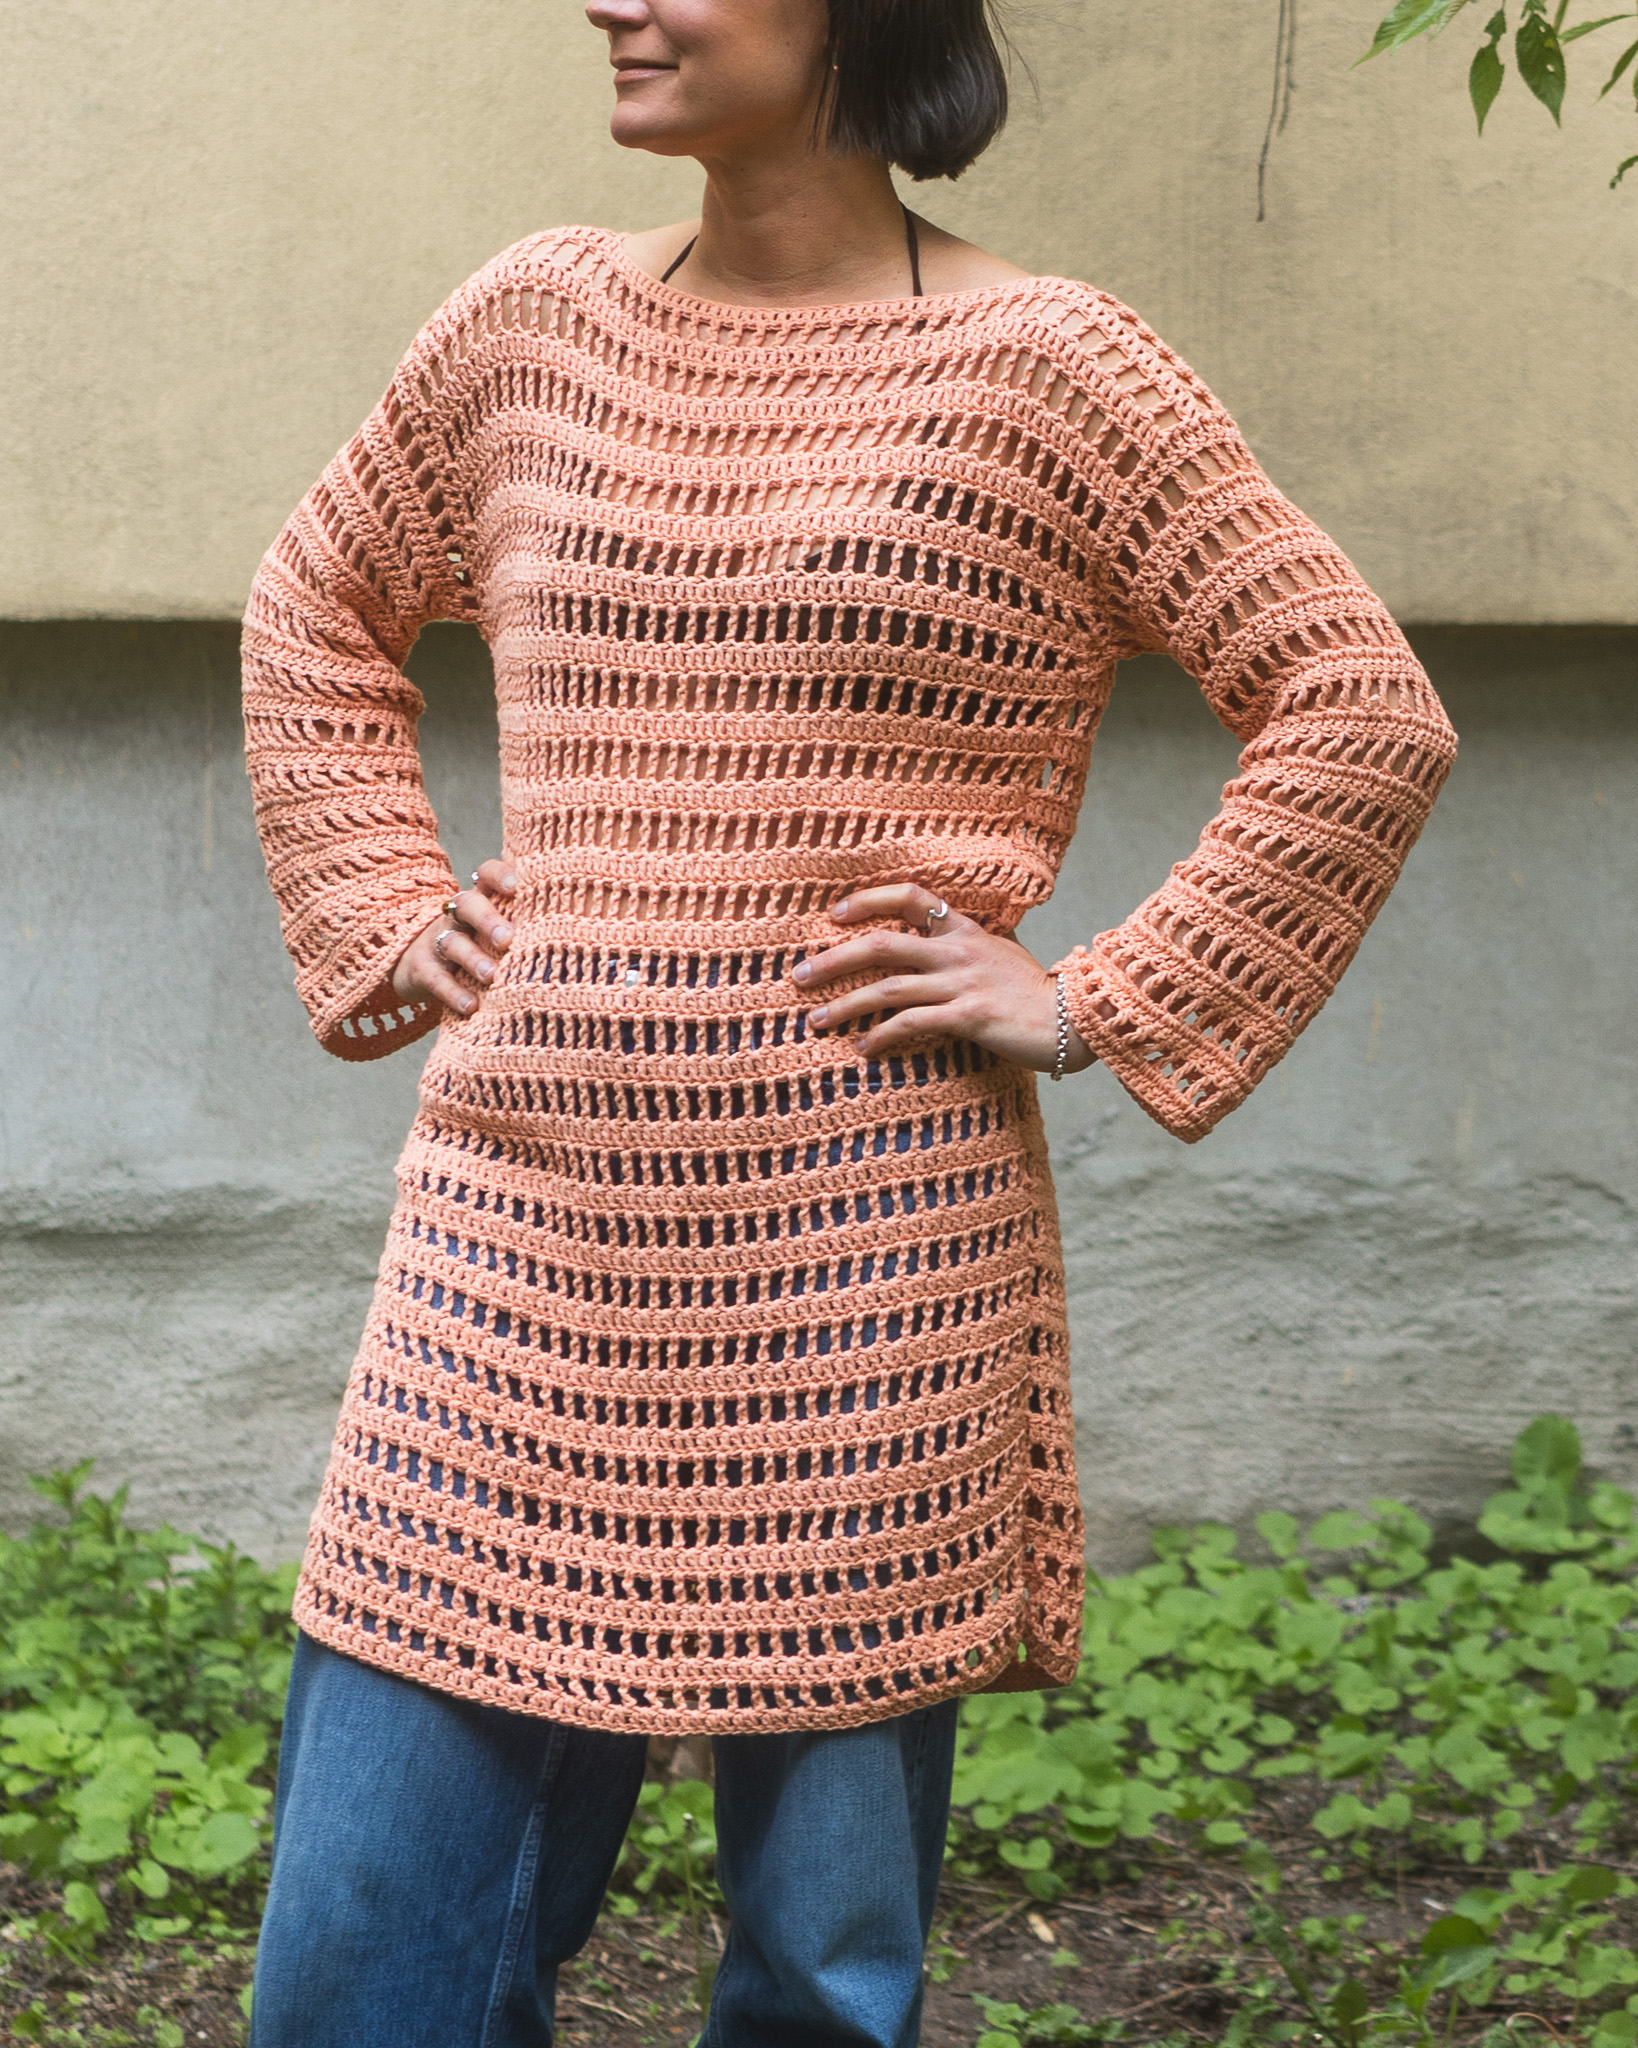
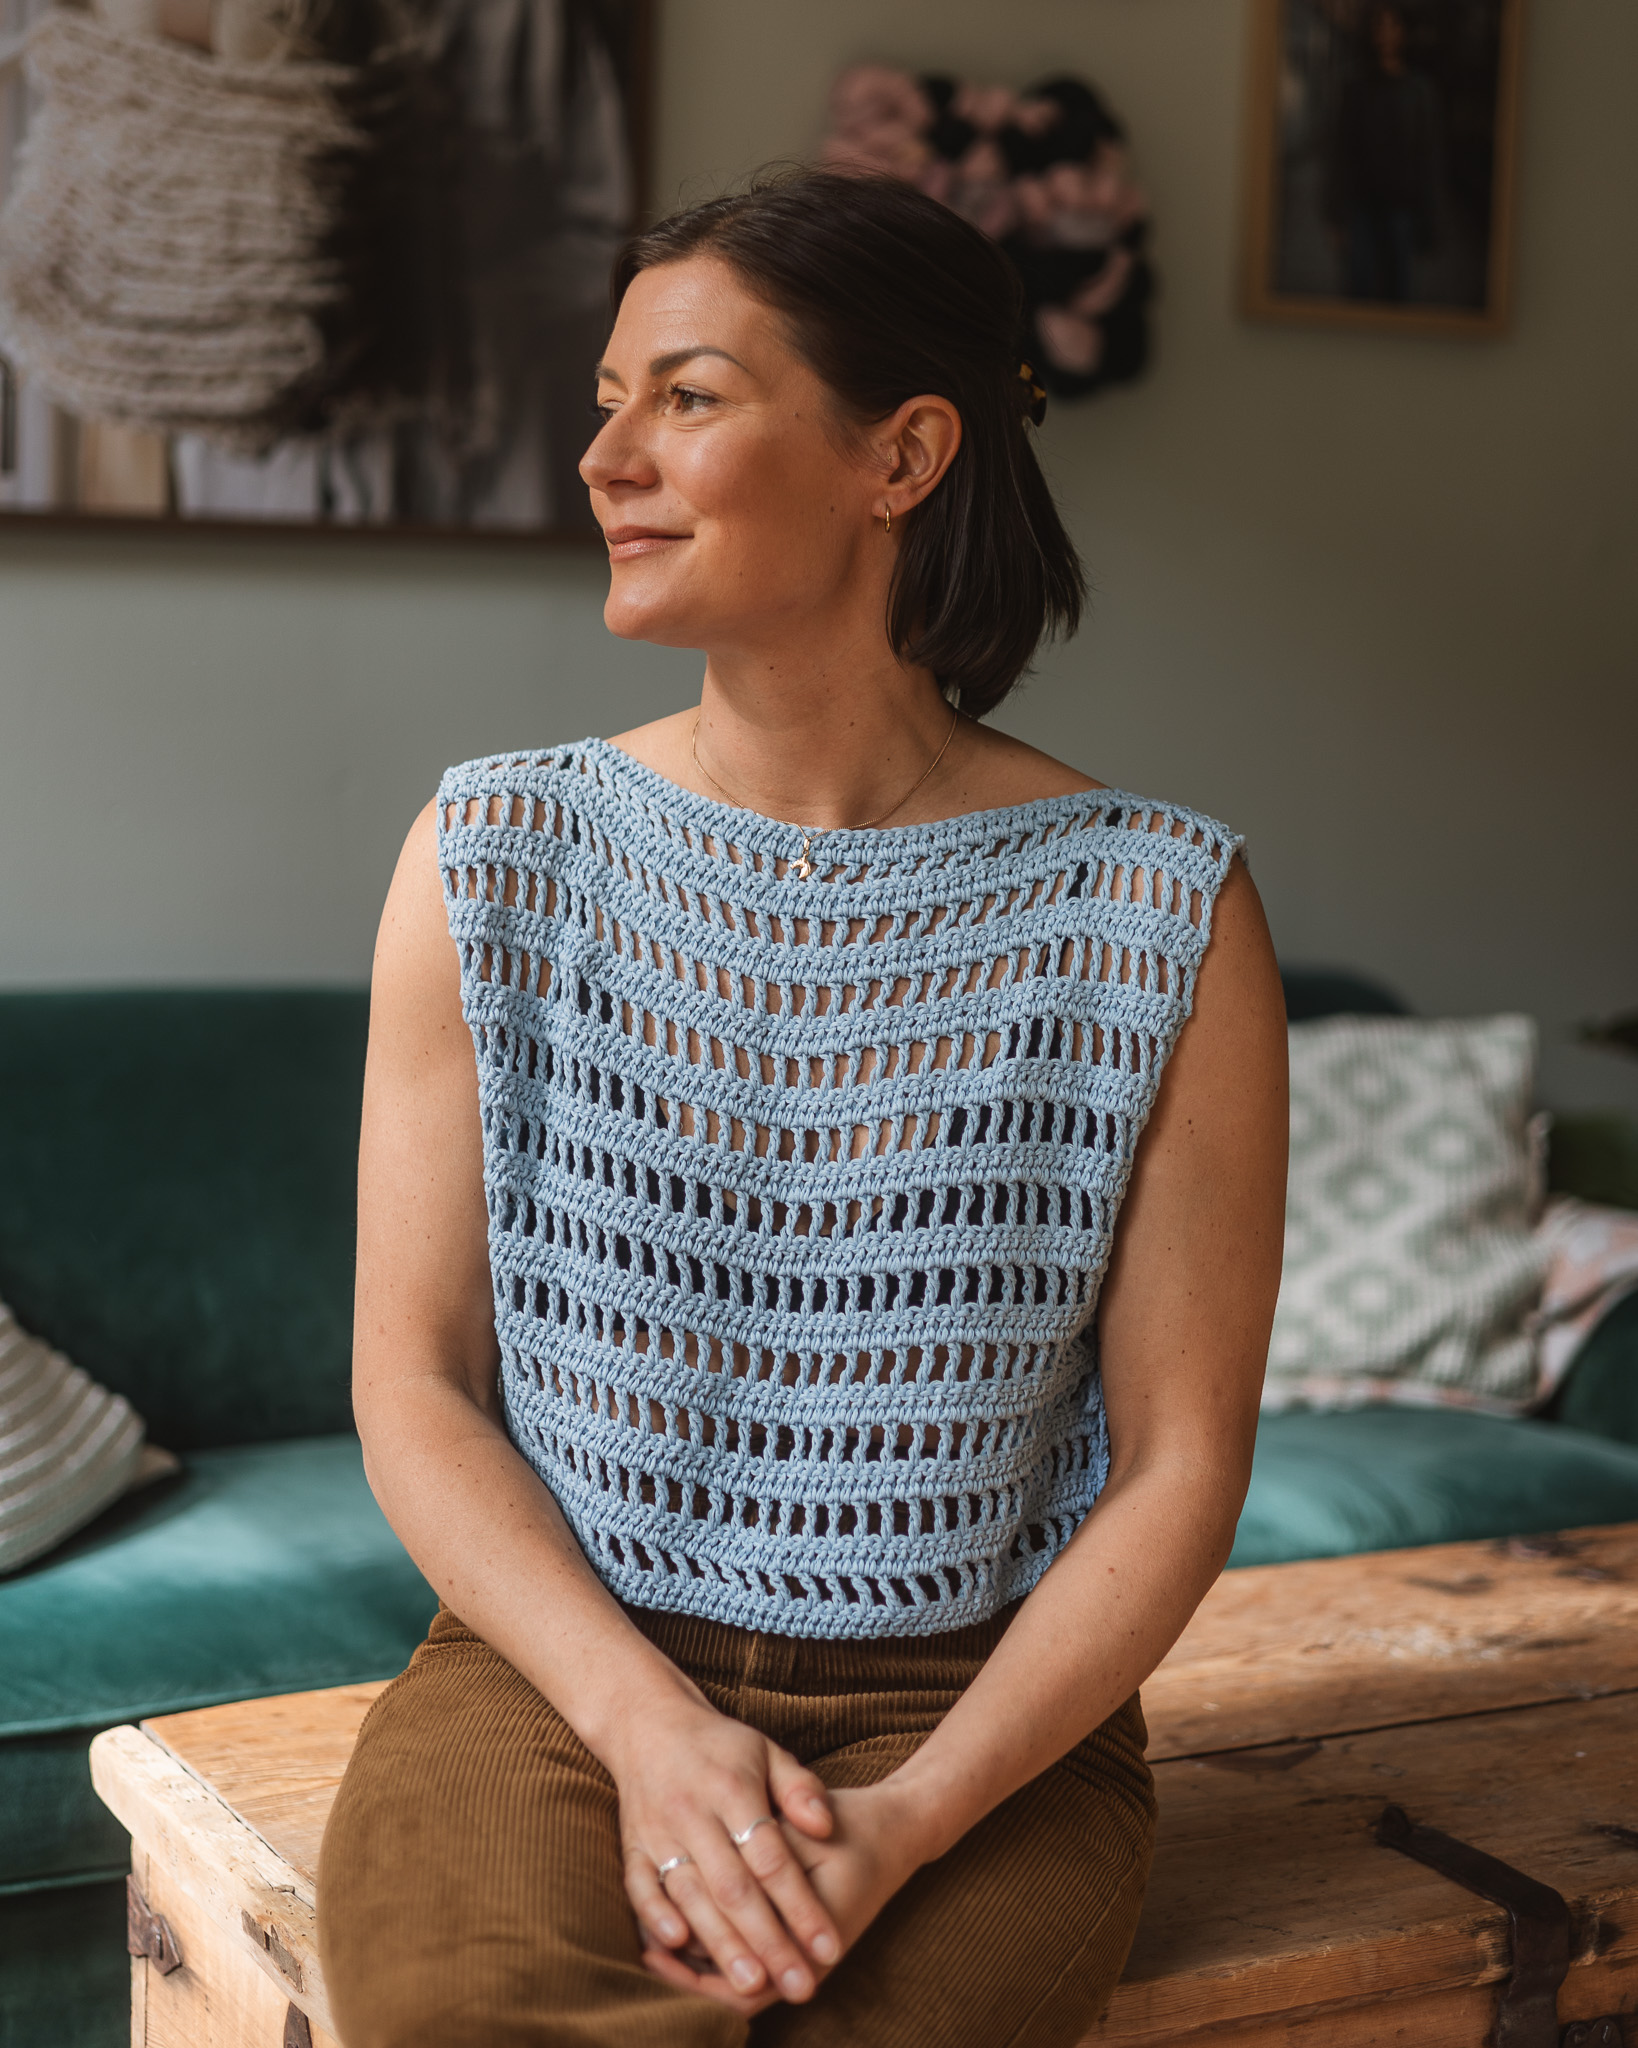
This top consists of two equally sized rectangles with two different panels that alternate to create the pattern.
Start by placing a measuring tape over your shoulder and measure how long the rectangle should be for your desired fit. The length of the rectangles/top shown in the picture is 100 cm. Measuring points are approximately at the waistband level in the front and back of the hips.
To achieve a length of 100 cm, we crocheted 181 stitches. If you want to make it longer or shorter, adjust the number of stitches per row.
NOTE! Do not measure until after approximately 3 rows, not directly after the foundation chain, as the measurement will not be accurate until the pattern has developed. This is our recommendation both if you made a swatch and if you did not.
To work the pattern in panel 1, the total number of stitches must be divisible by 6 + 1 (for example, 180 (6 × 30) + 1 = 181). Each row of the rectangle should have a total of 181 stitches to keep the edges straight. When making the foundation chain, add 1 extra stitch to serve as a turning chain (181 + 1).
Important – Read before you begin!
NOTE! After some rows, you will make a chain stitch when turning, but not after all rows. Pay close attention to the instructions for each row.
If a turning chain is made, always skip it at the beginning of the next row.
Below you will find a video showing the techniques used in Rows 2–9 if you need guidance.
Rectangle (make 2)
Foundation: Chain 182 (181 + 1). If you are unsure how to crochet a chain, see the video below.
Panel 1
Row 1: Skip the first stitch. Work 1 single crochet in each stitch across the row. You should have a total of 181 stitches. Chain 1, turn.
There is a video for Rows 2–9 in Step 1.
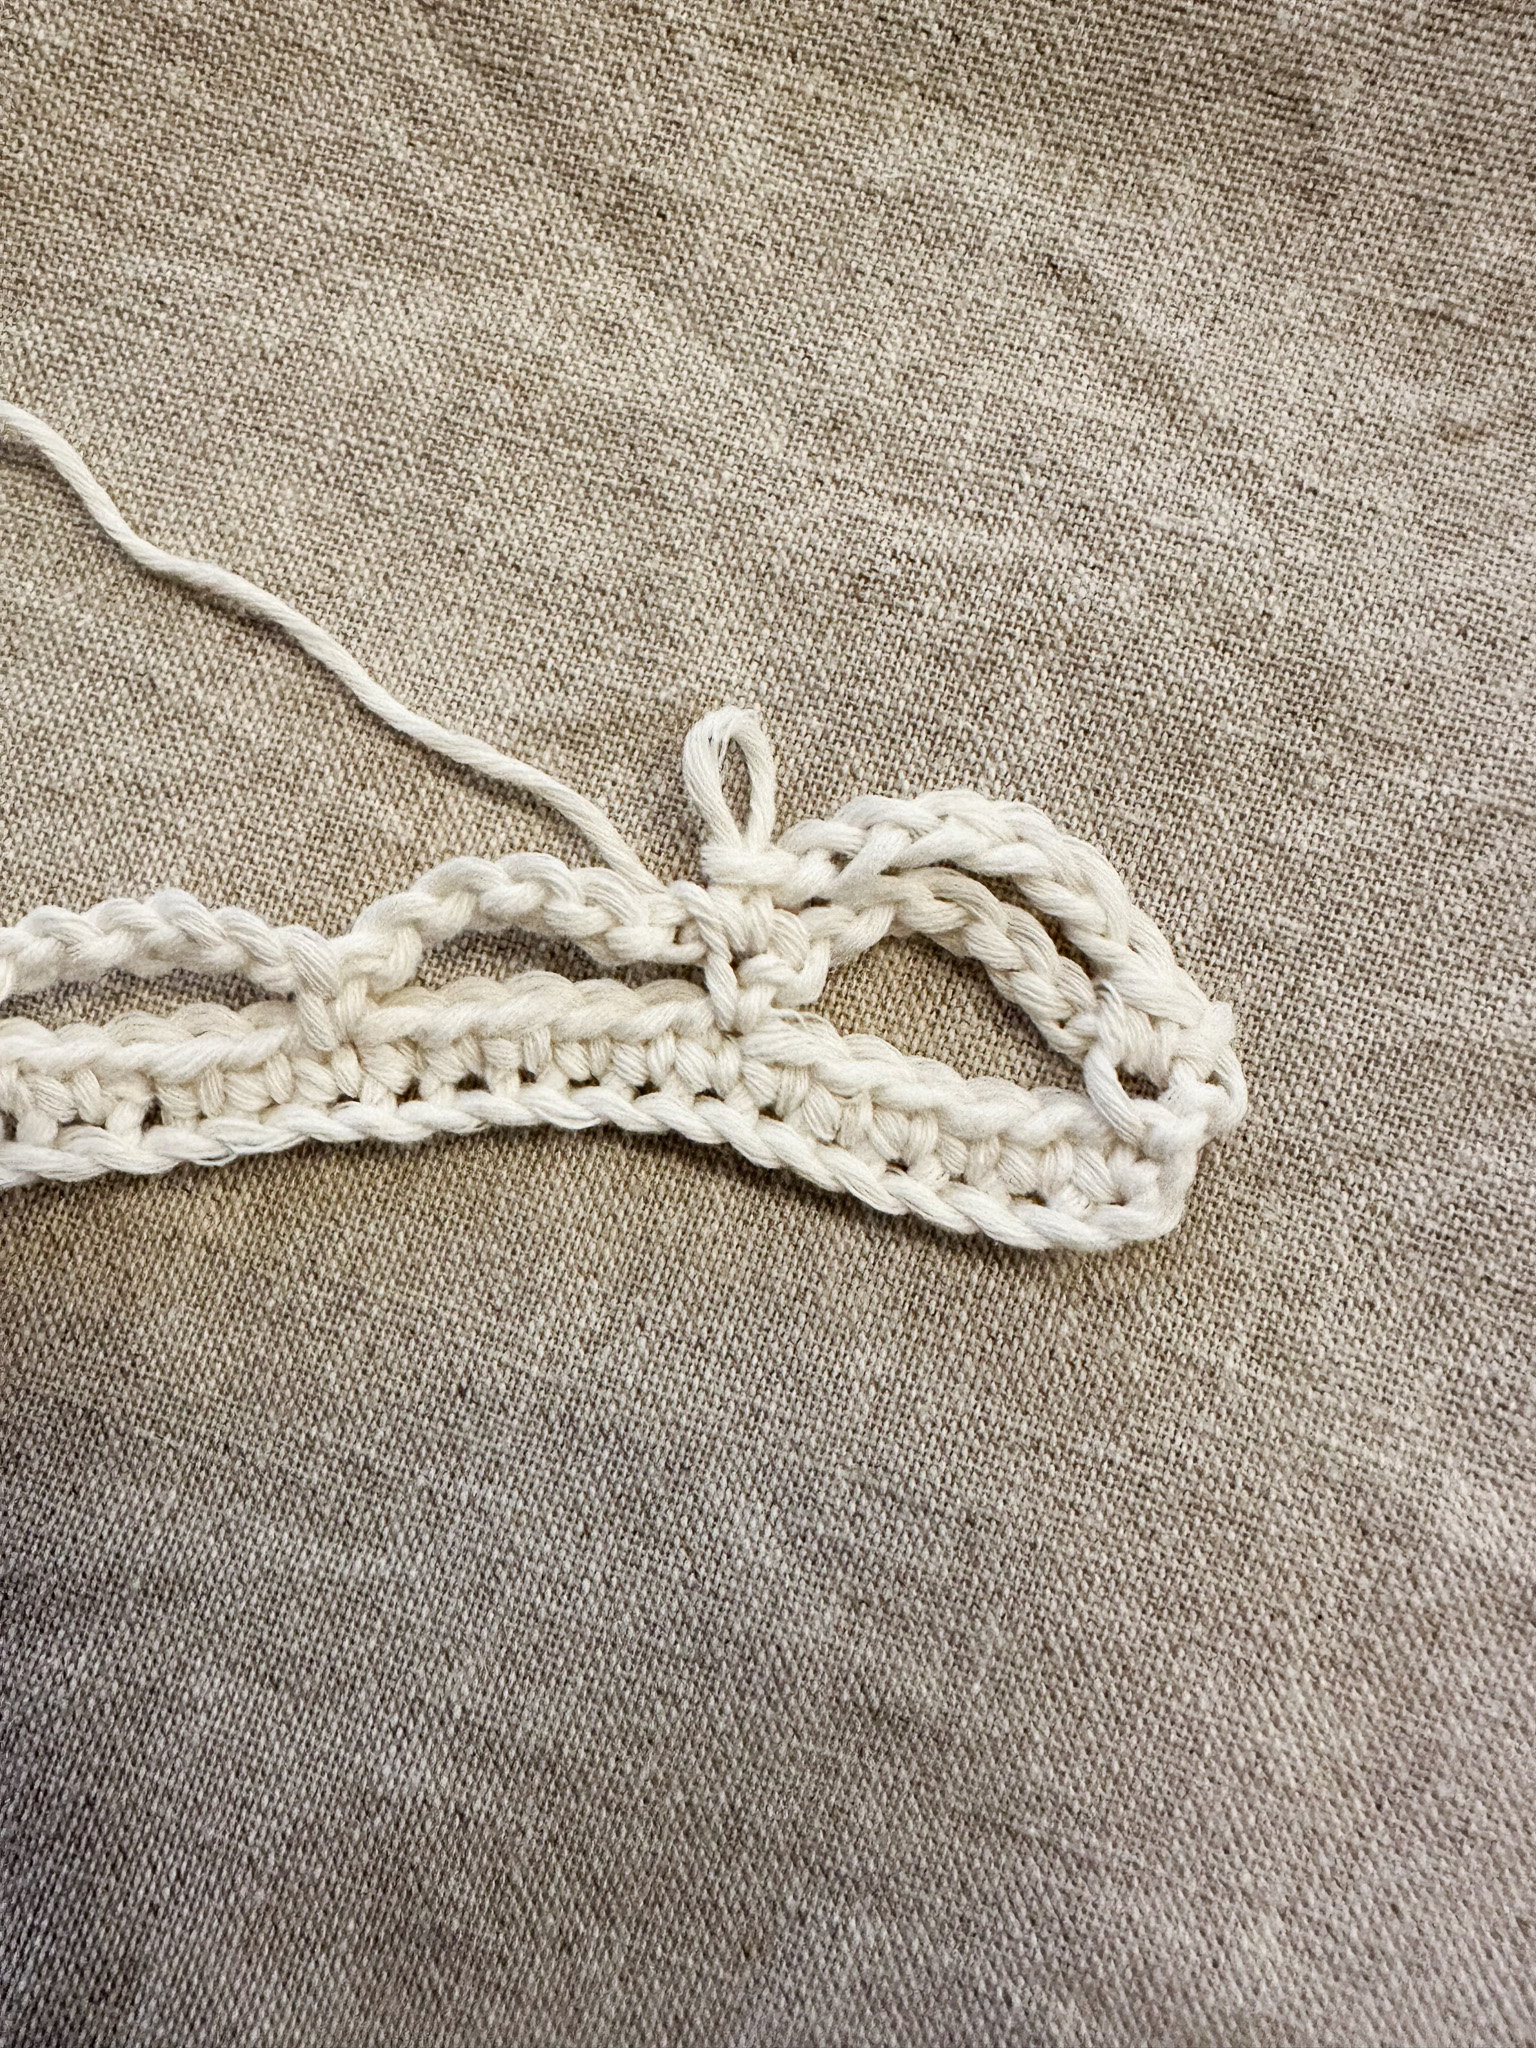
Row 2: Skip the turning chain, make one single crochet in the first stitch. Then make 6 chain stitches. Skip 5 stitches and make one single crochet. You have now created a chain loop.
Make 29 more chain loops in the same way, with single crochets in between, so that you have a total of 30 chain loops across the row.
NOTE! If you started with a different number of chain stitches in the foundation, the number of loops will be different.
Make 1 chain stitch and turn.

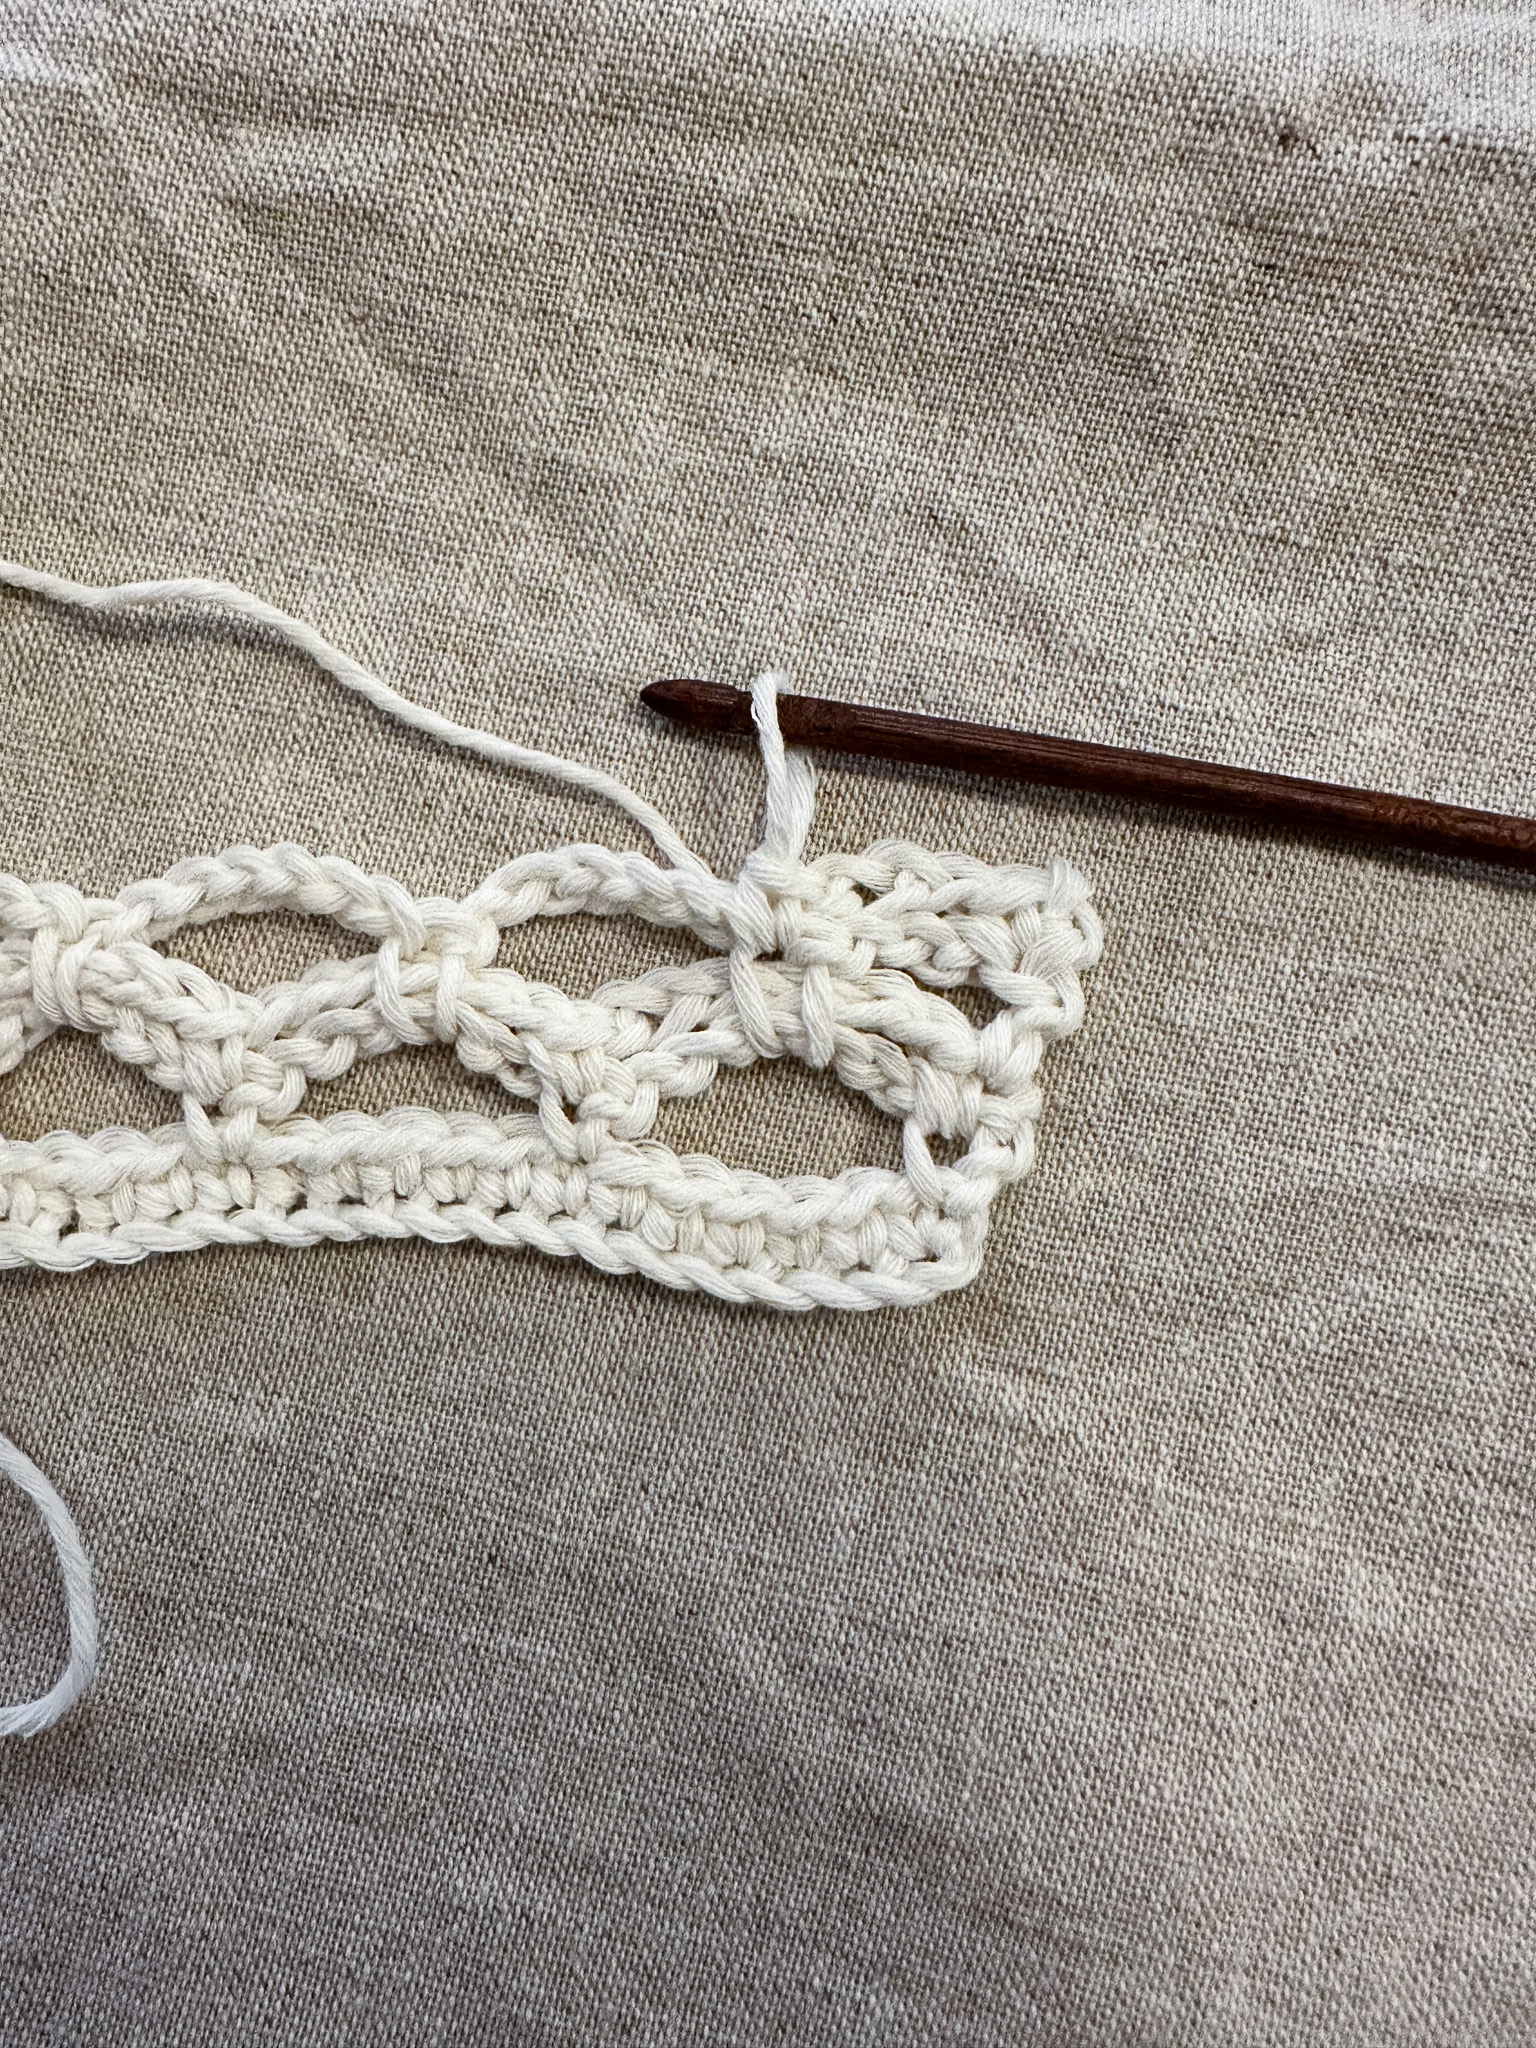
Row 3: Skip the chain stitch, work one single crochet in the first stitch. Then make 6 chain stitches. Skip the chain space and work one single crochet between the chain spaces from the previous row. Repeat across the row. Do not make a chain stitch before turning!
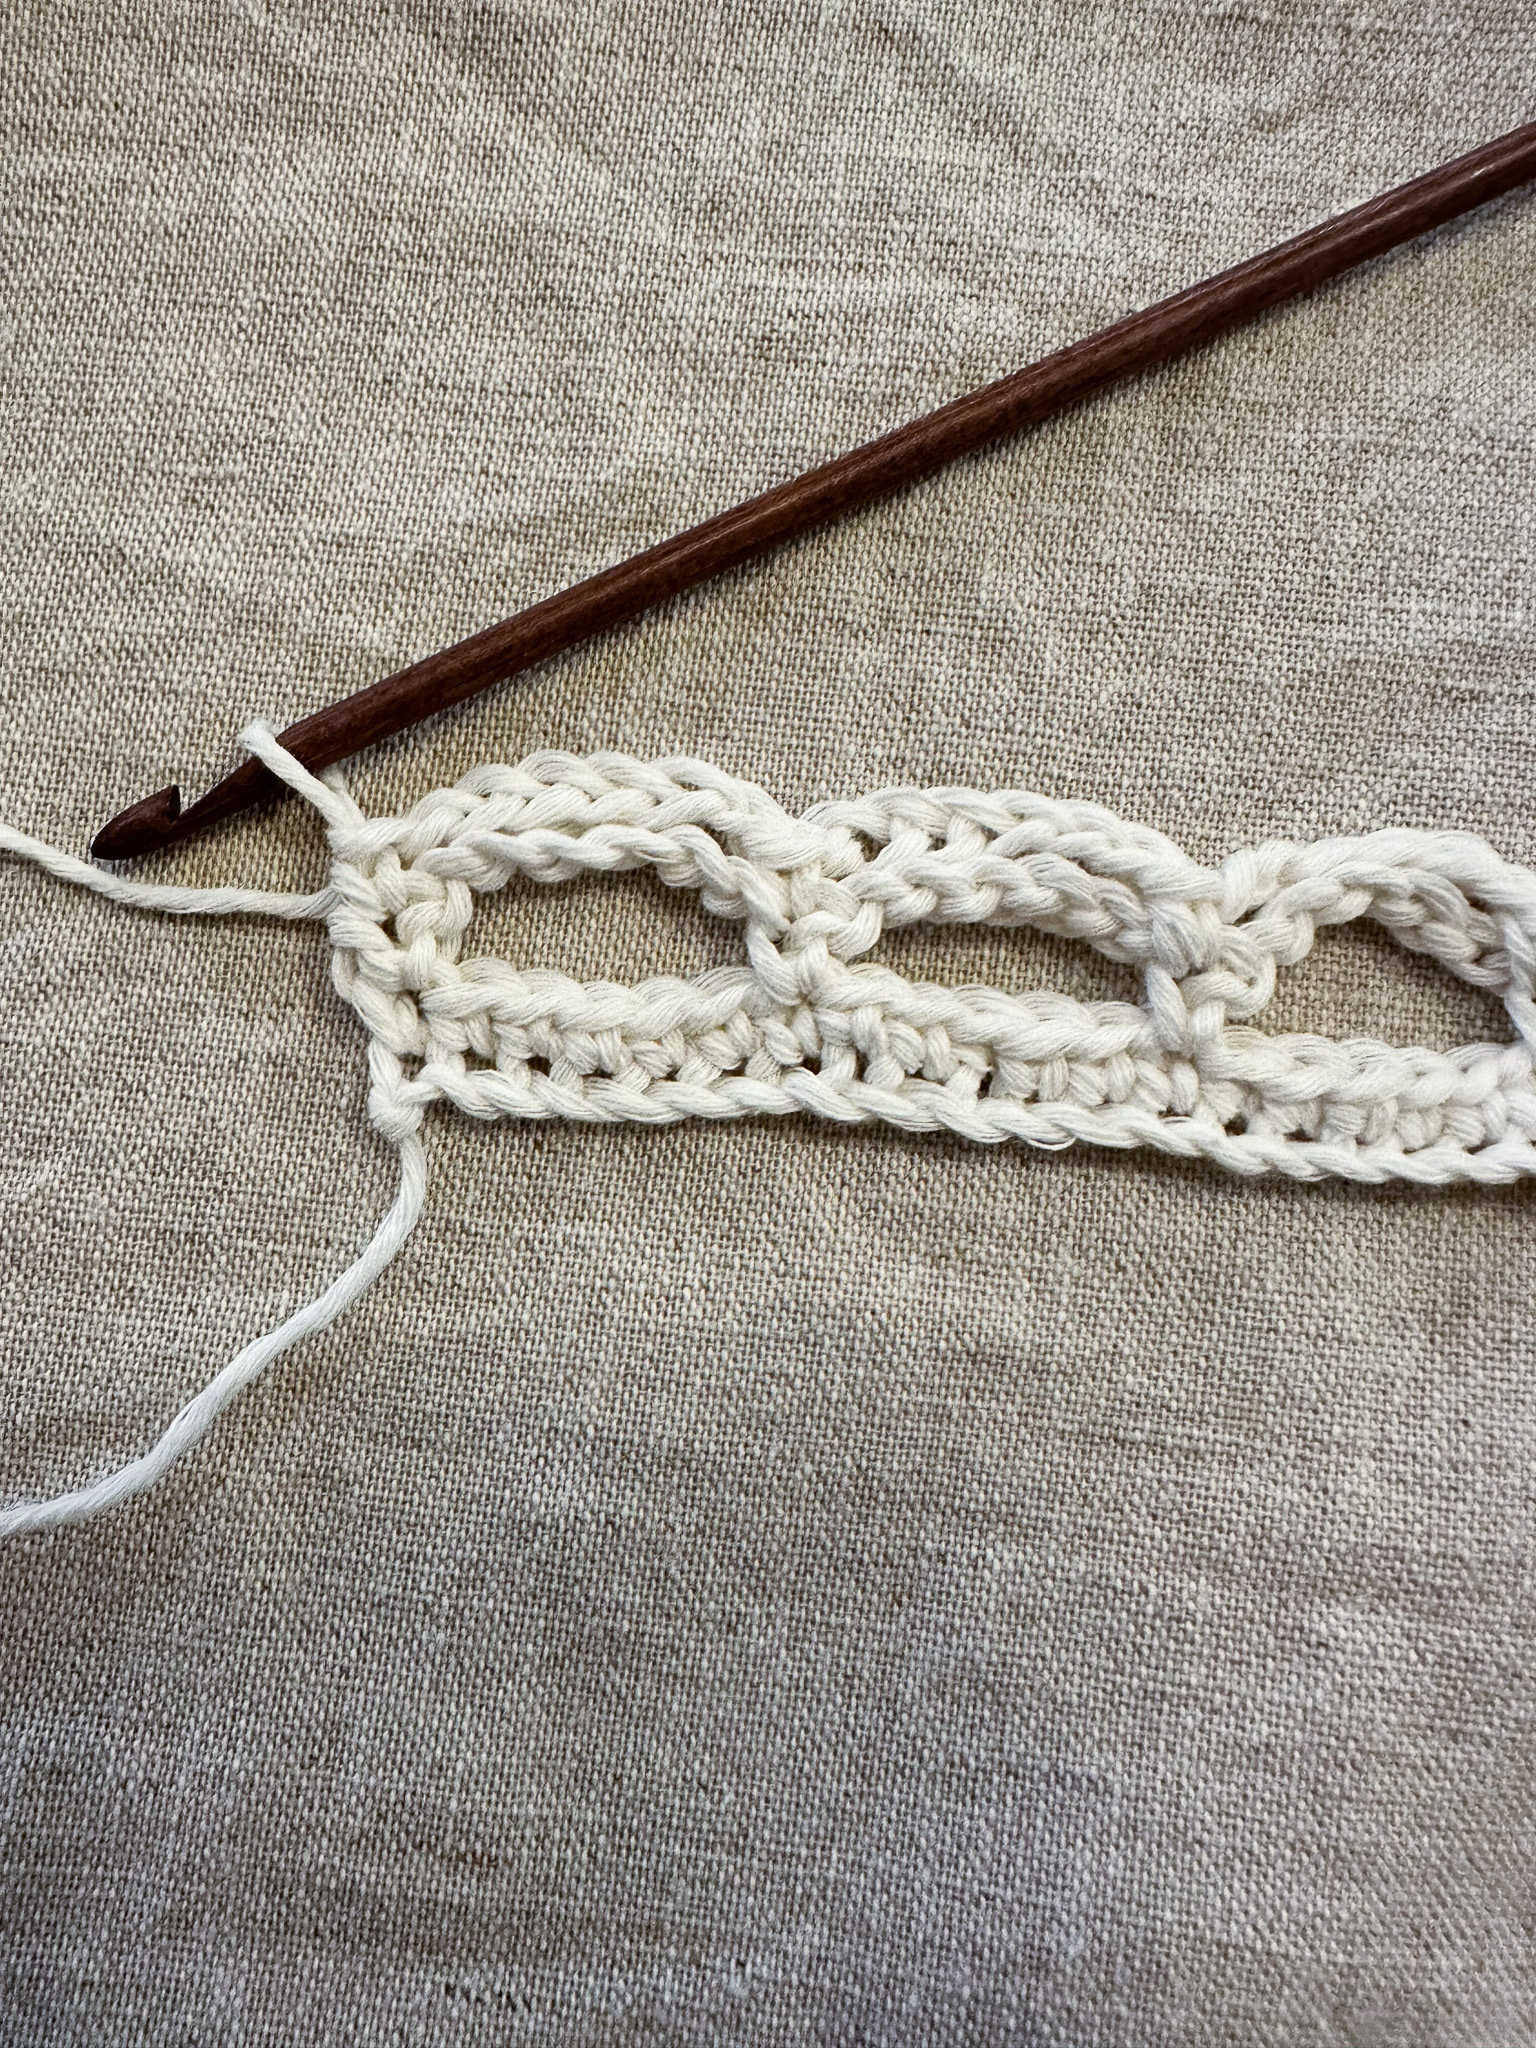
Row 4: Make 6 chain stitches. Work one single crochet around the chain loops from Row 2 and Row 3 so that they are held together by the single crochet.
Make 6 chain stitches and work one single crochet around loop number 2 from Rows 2 and 3. Continue in the same way across the row.
After the last loop, make 3 chain stitches and finish the row with one double crochet in the last stitch.
This row starts with a half loop, followed by 29 full loops, and ends with another half loop.
Make 1 chain stitch and turn.

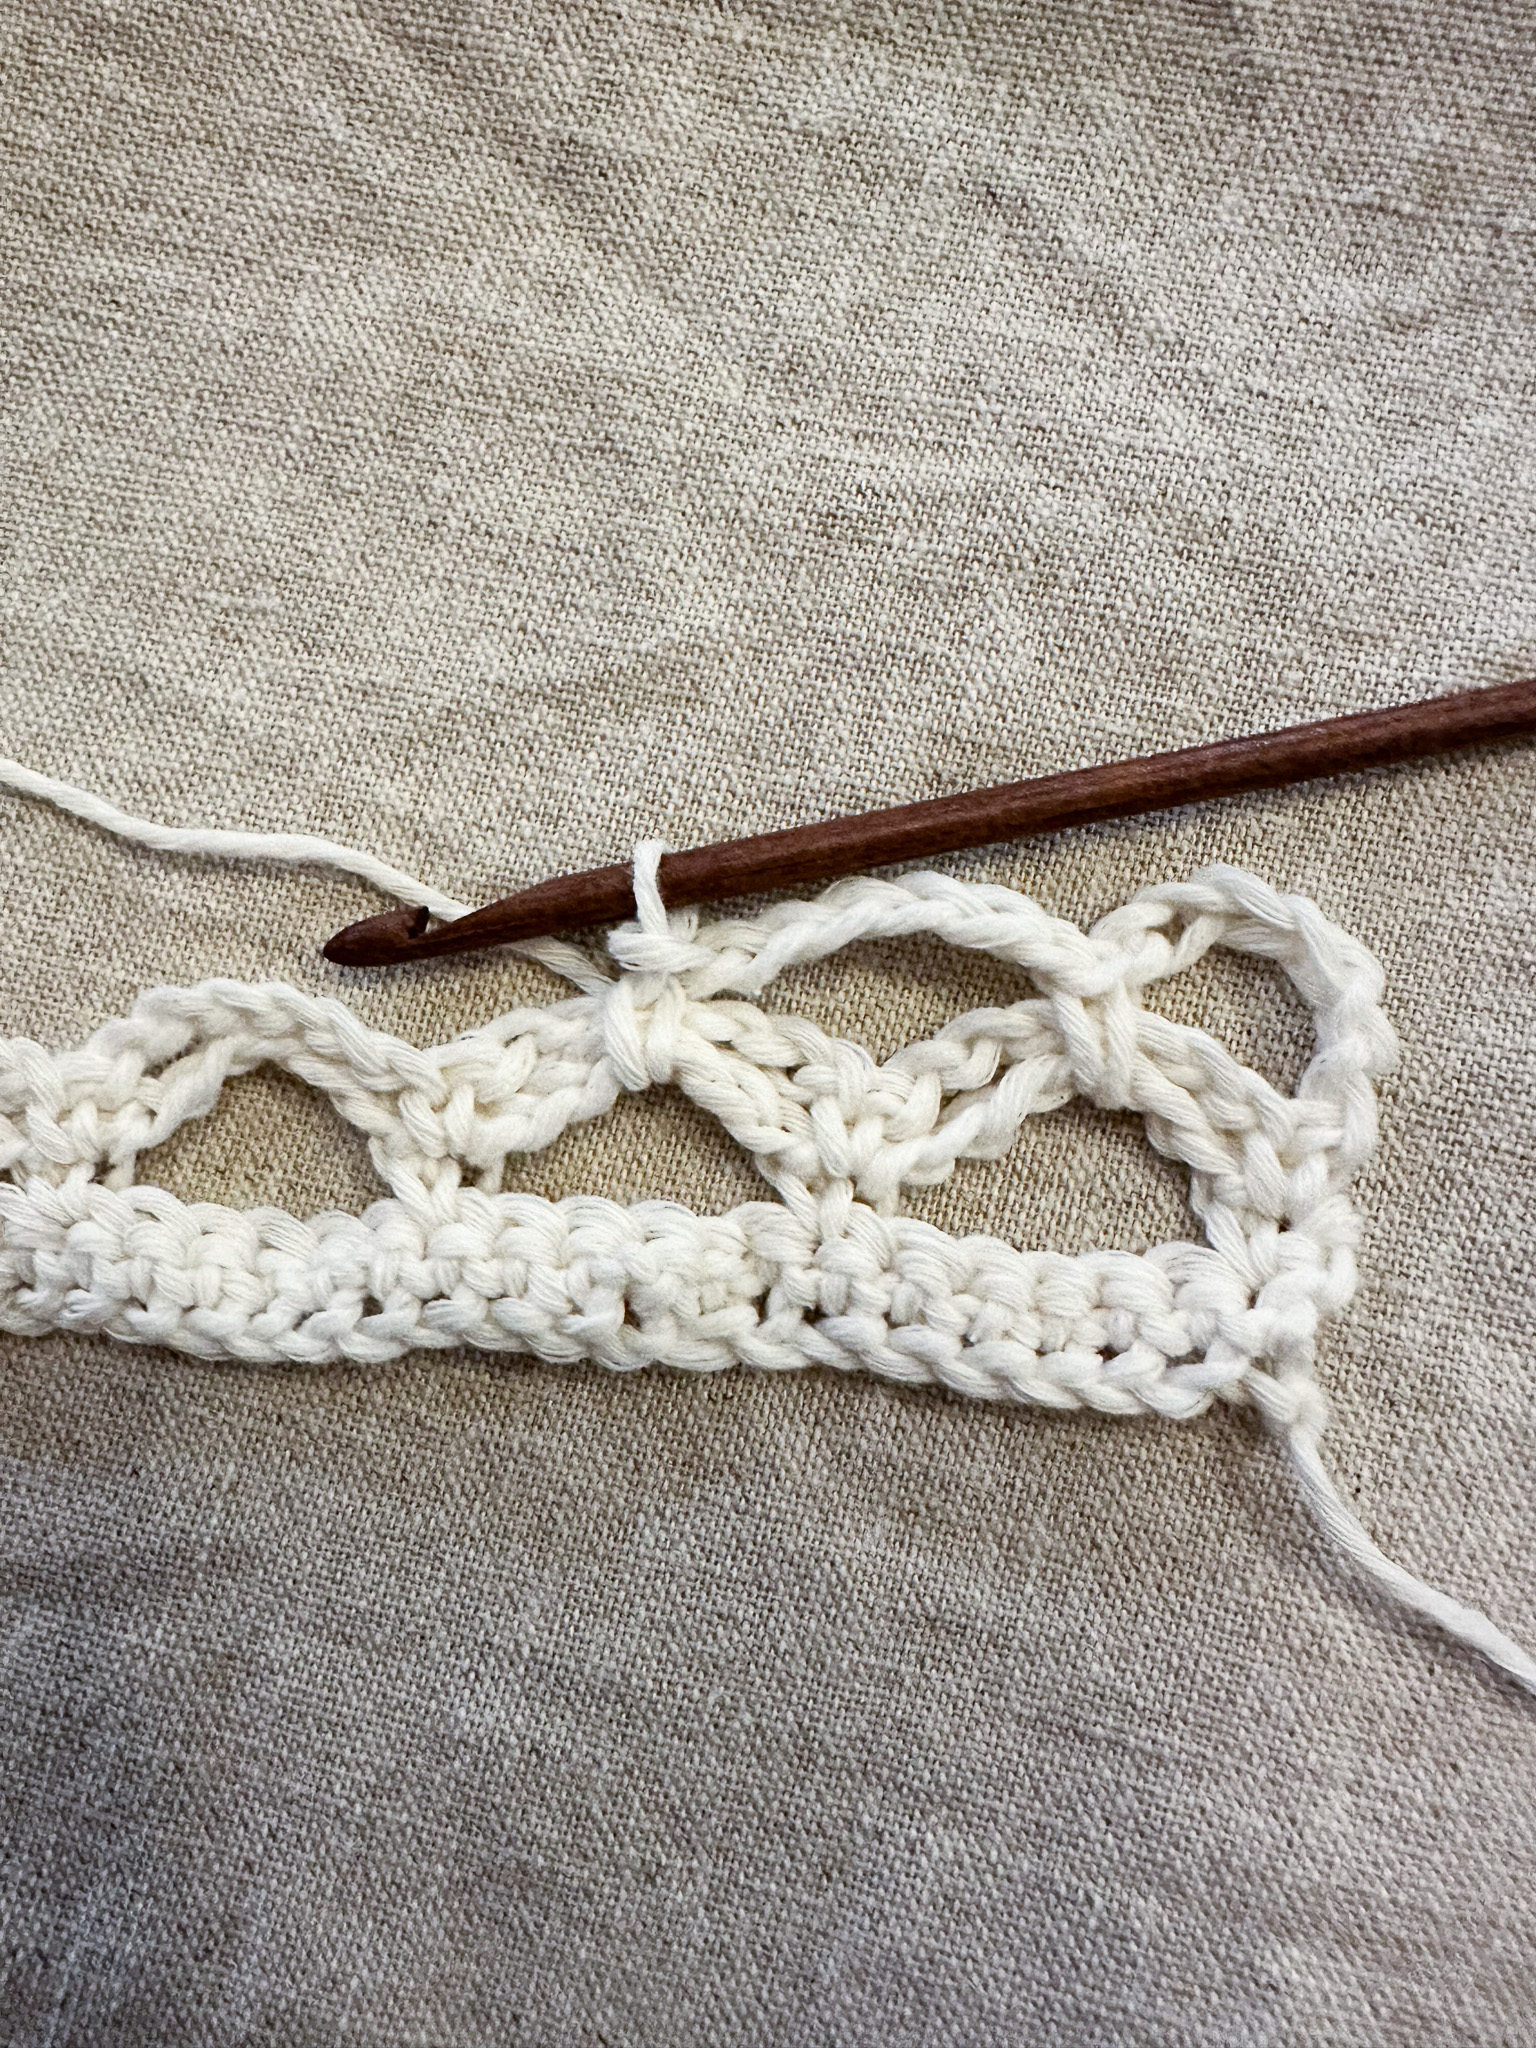
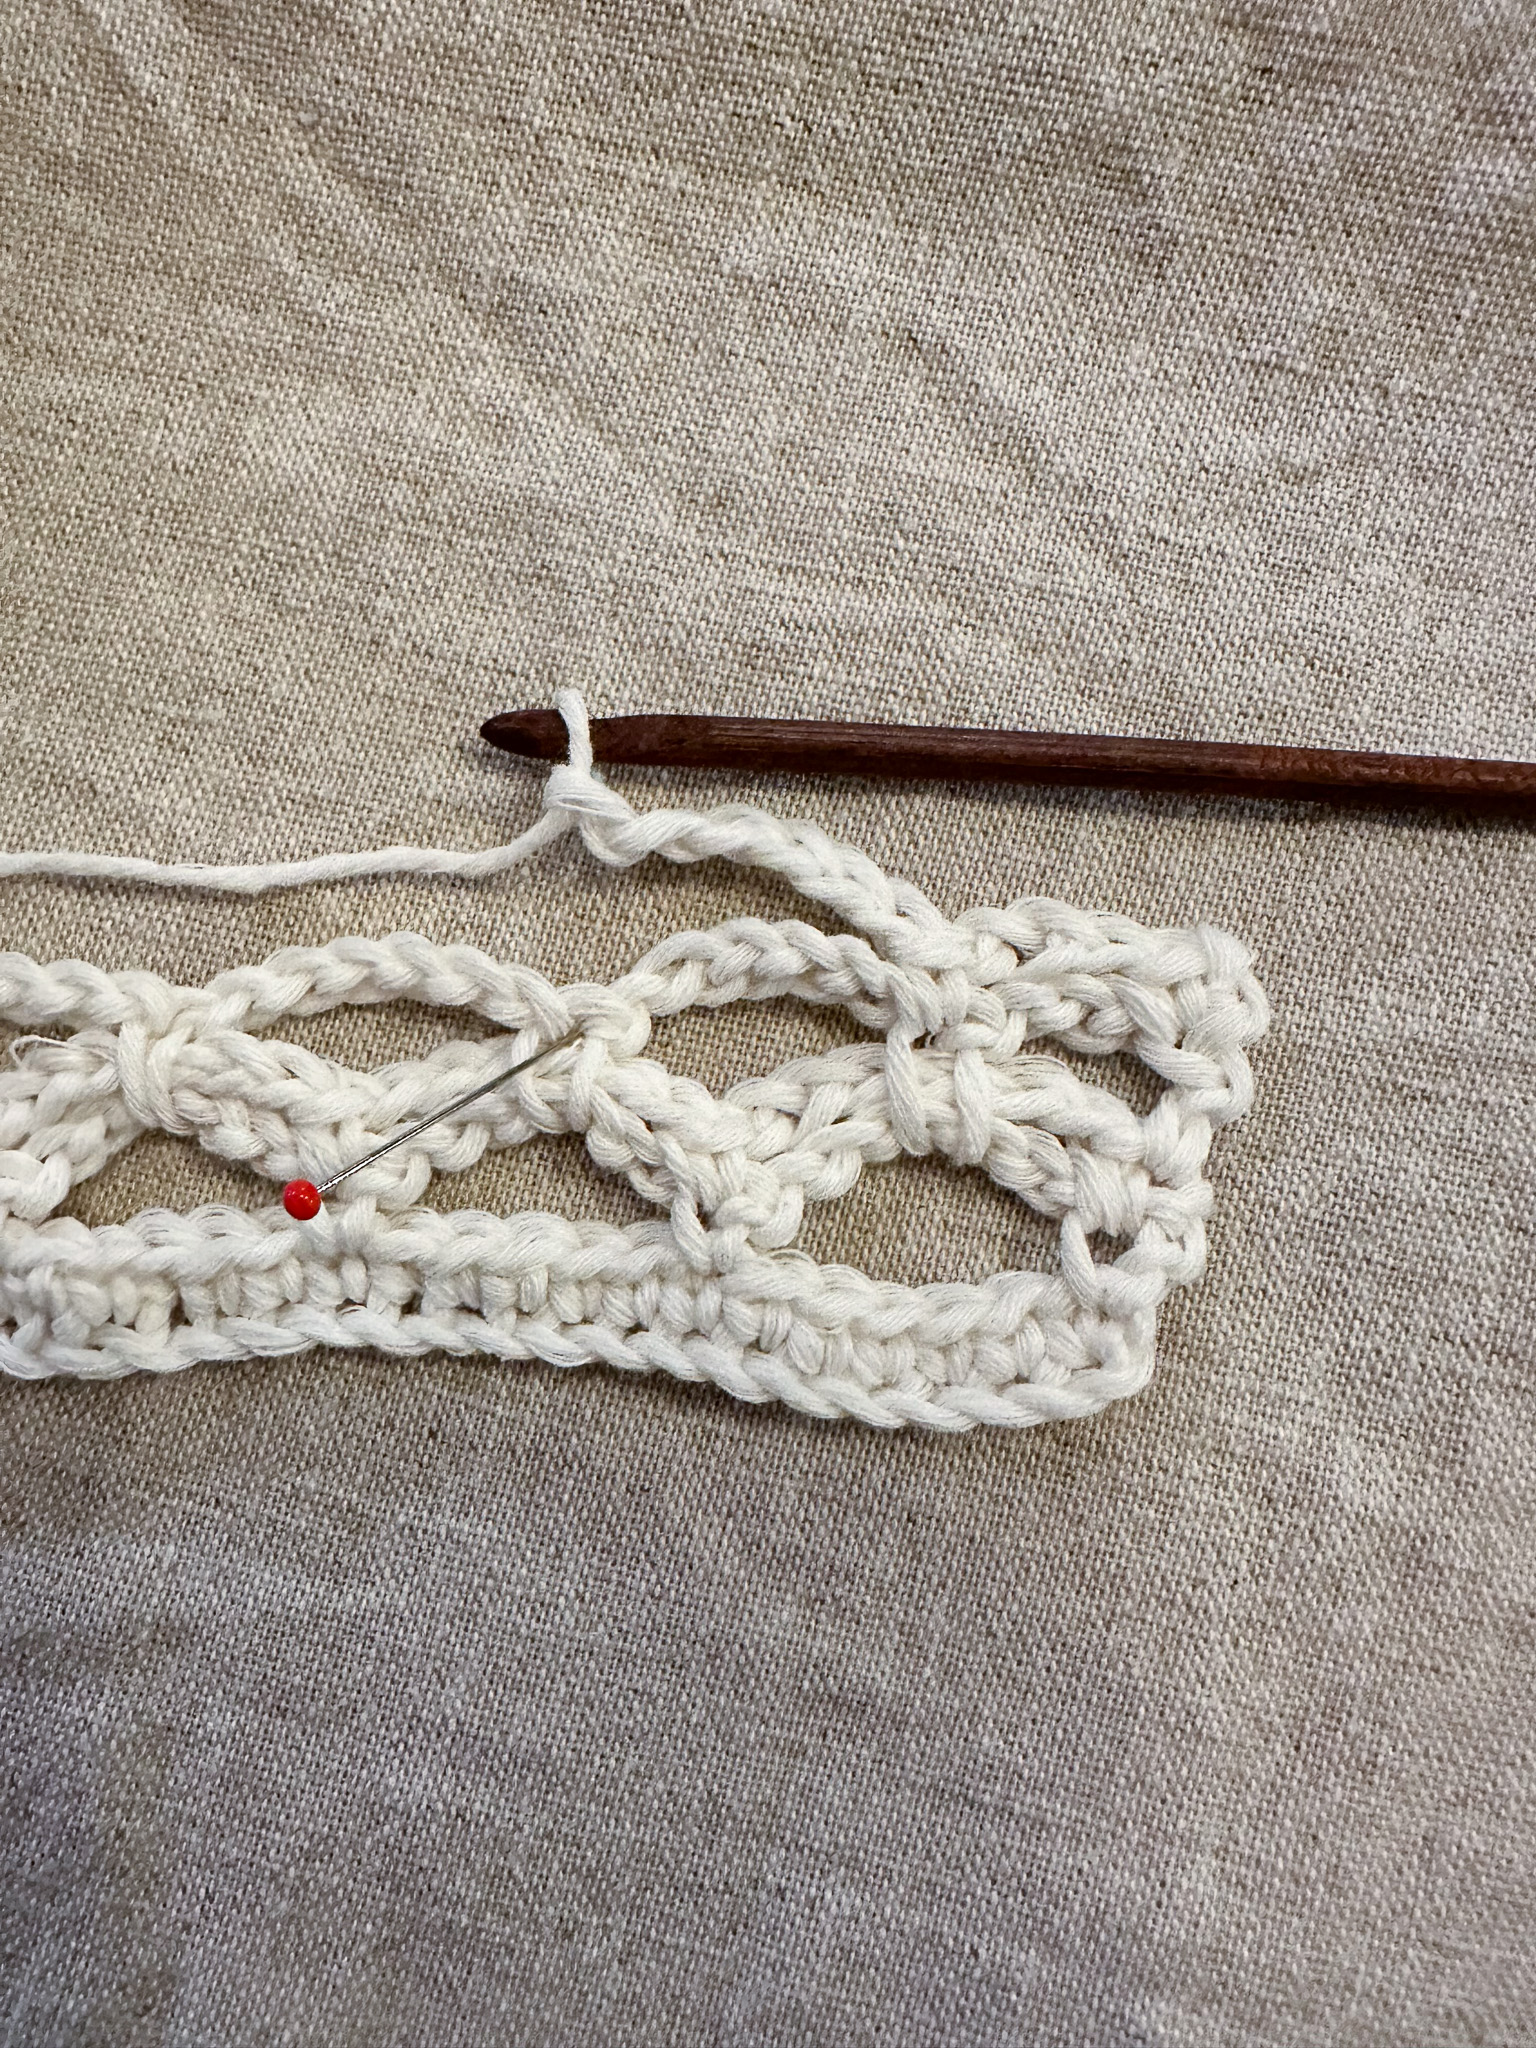
Row 5: Skip the chain stitch and work one single crochet in the first stitch. Make 3 chain stitches and then work one single crochet into the single crochet that was worked around the loops from Row 4.
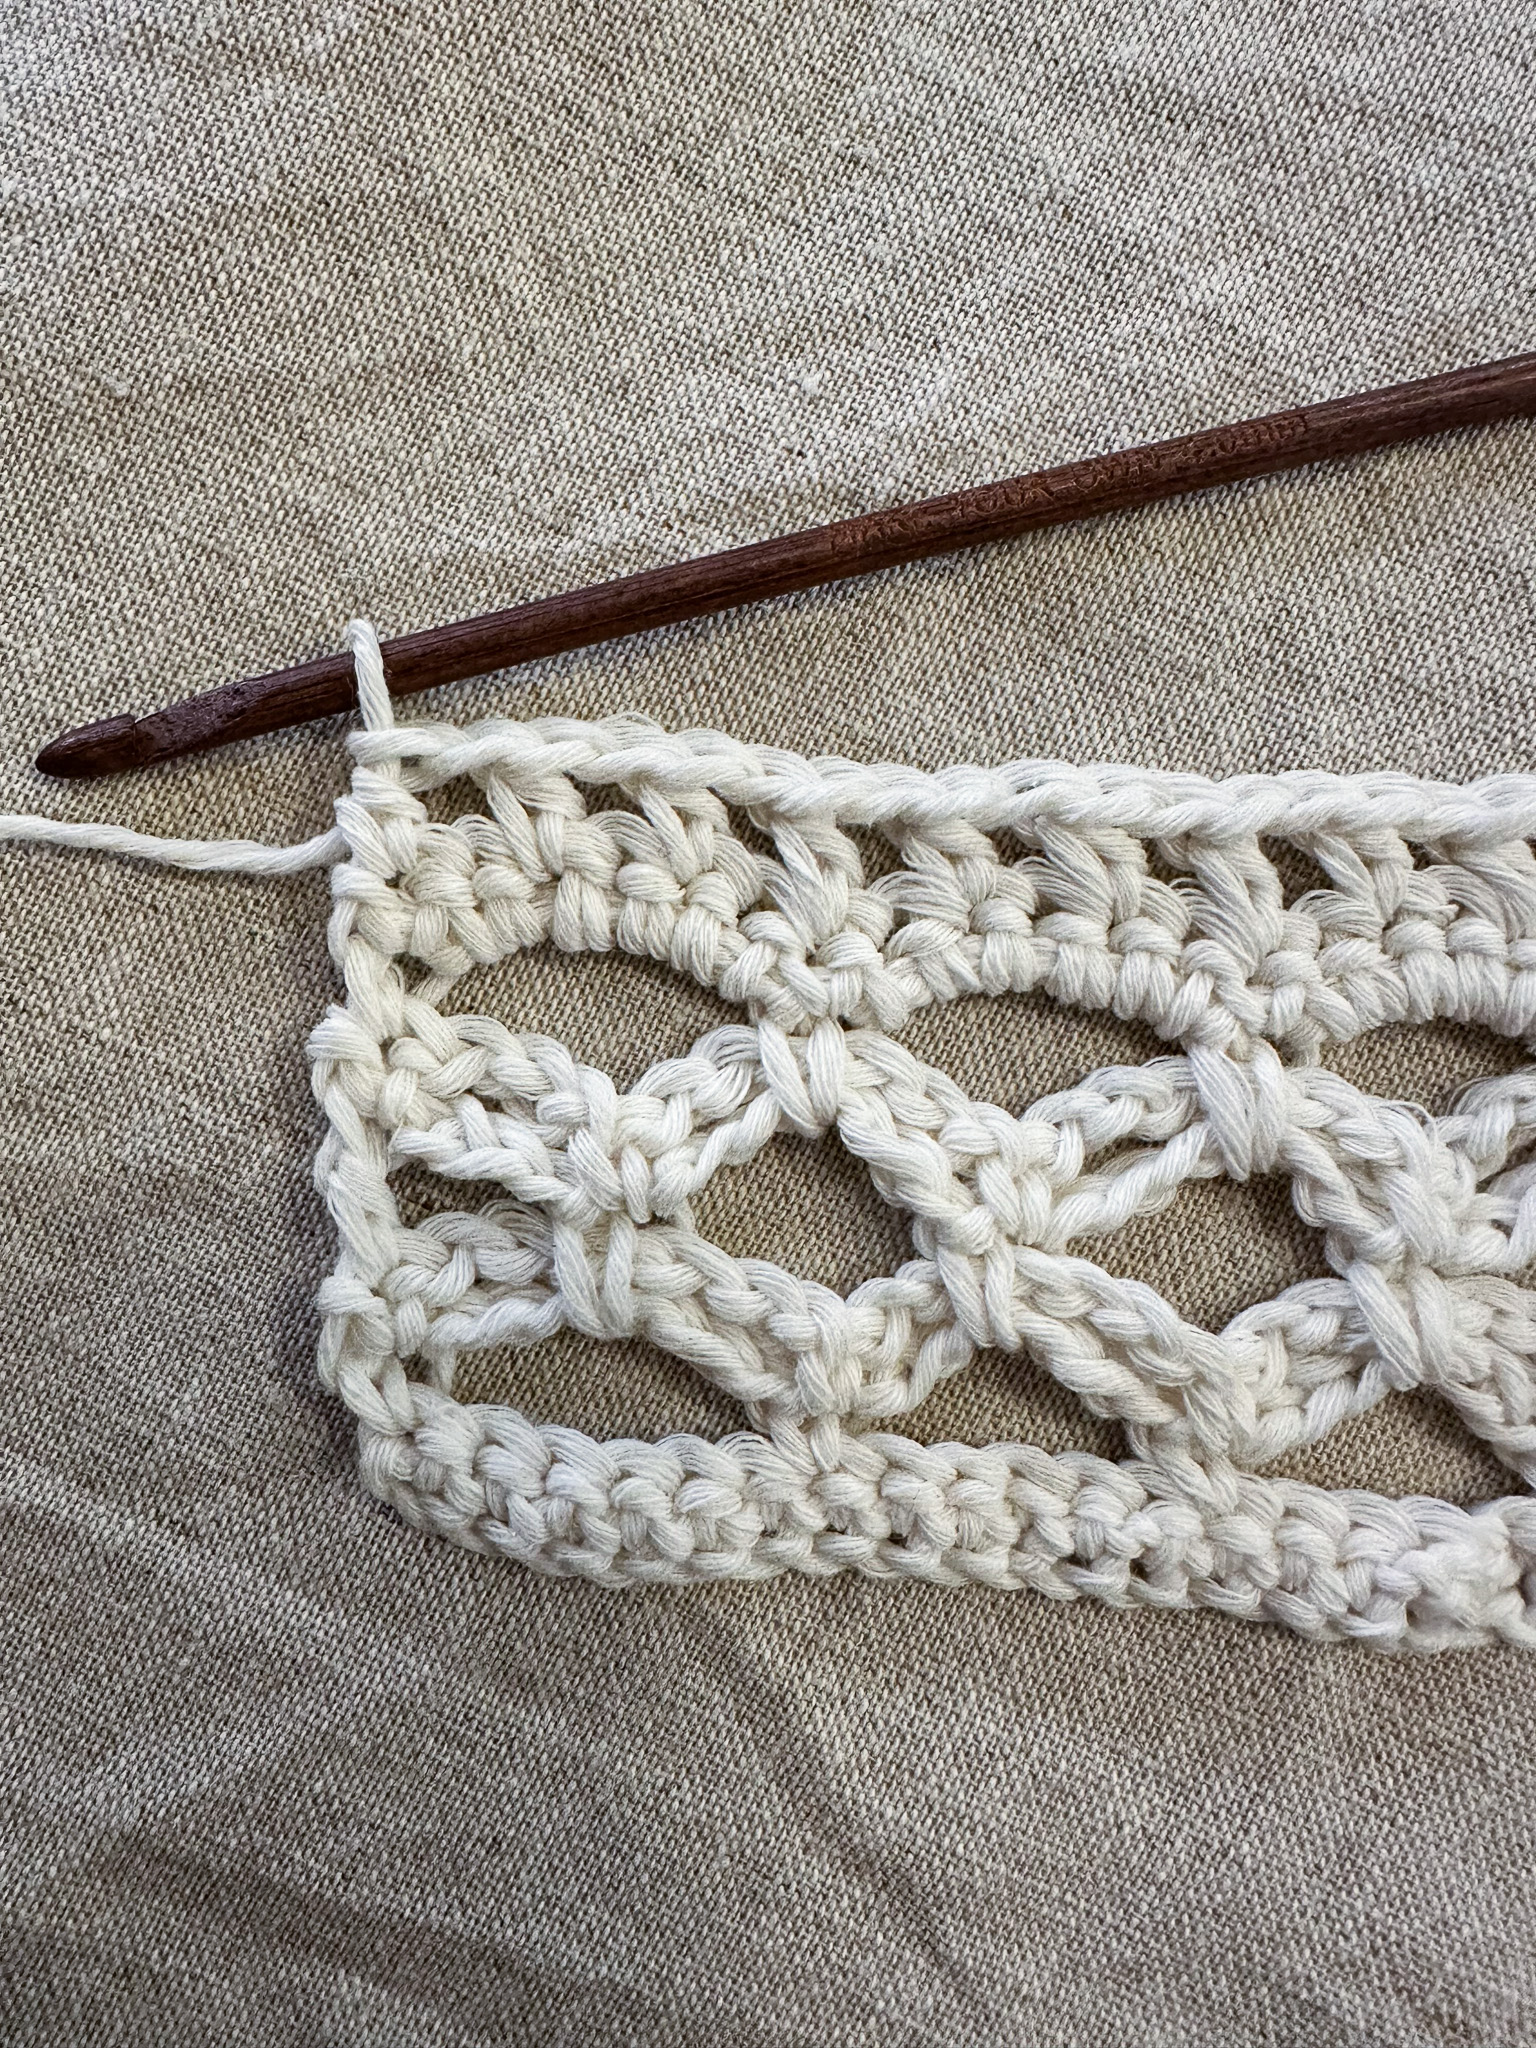
Make 6 chain stitches and then work one single crochet into the single crochet that was worked around the loops from Row 5 (see red needle). Continue in this way until the last half loop.
You are now at the last loop. Make 3 chain stitches in a chain. Skip 3 chain stitches in the loop from Row 4 and work a final single crochet into the 4th chain stitch of the chain. You should have the same number of loops as in Row 4.
Make 1 chain stitch and turn.
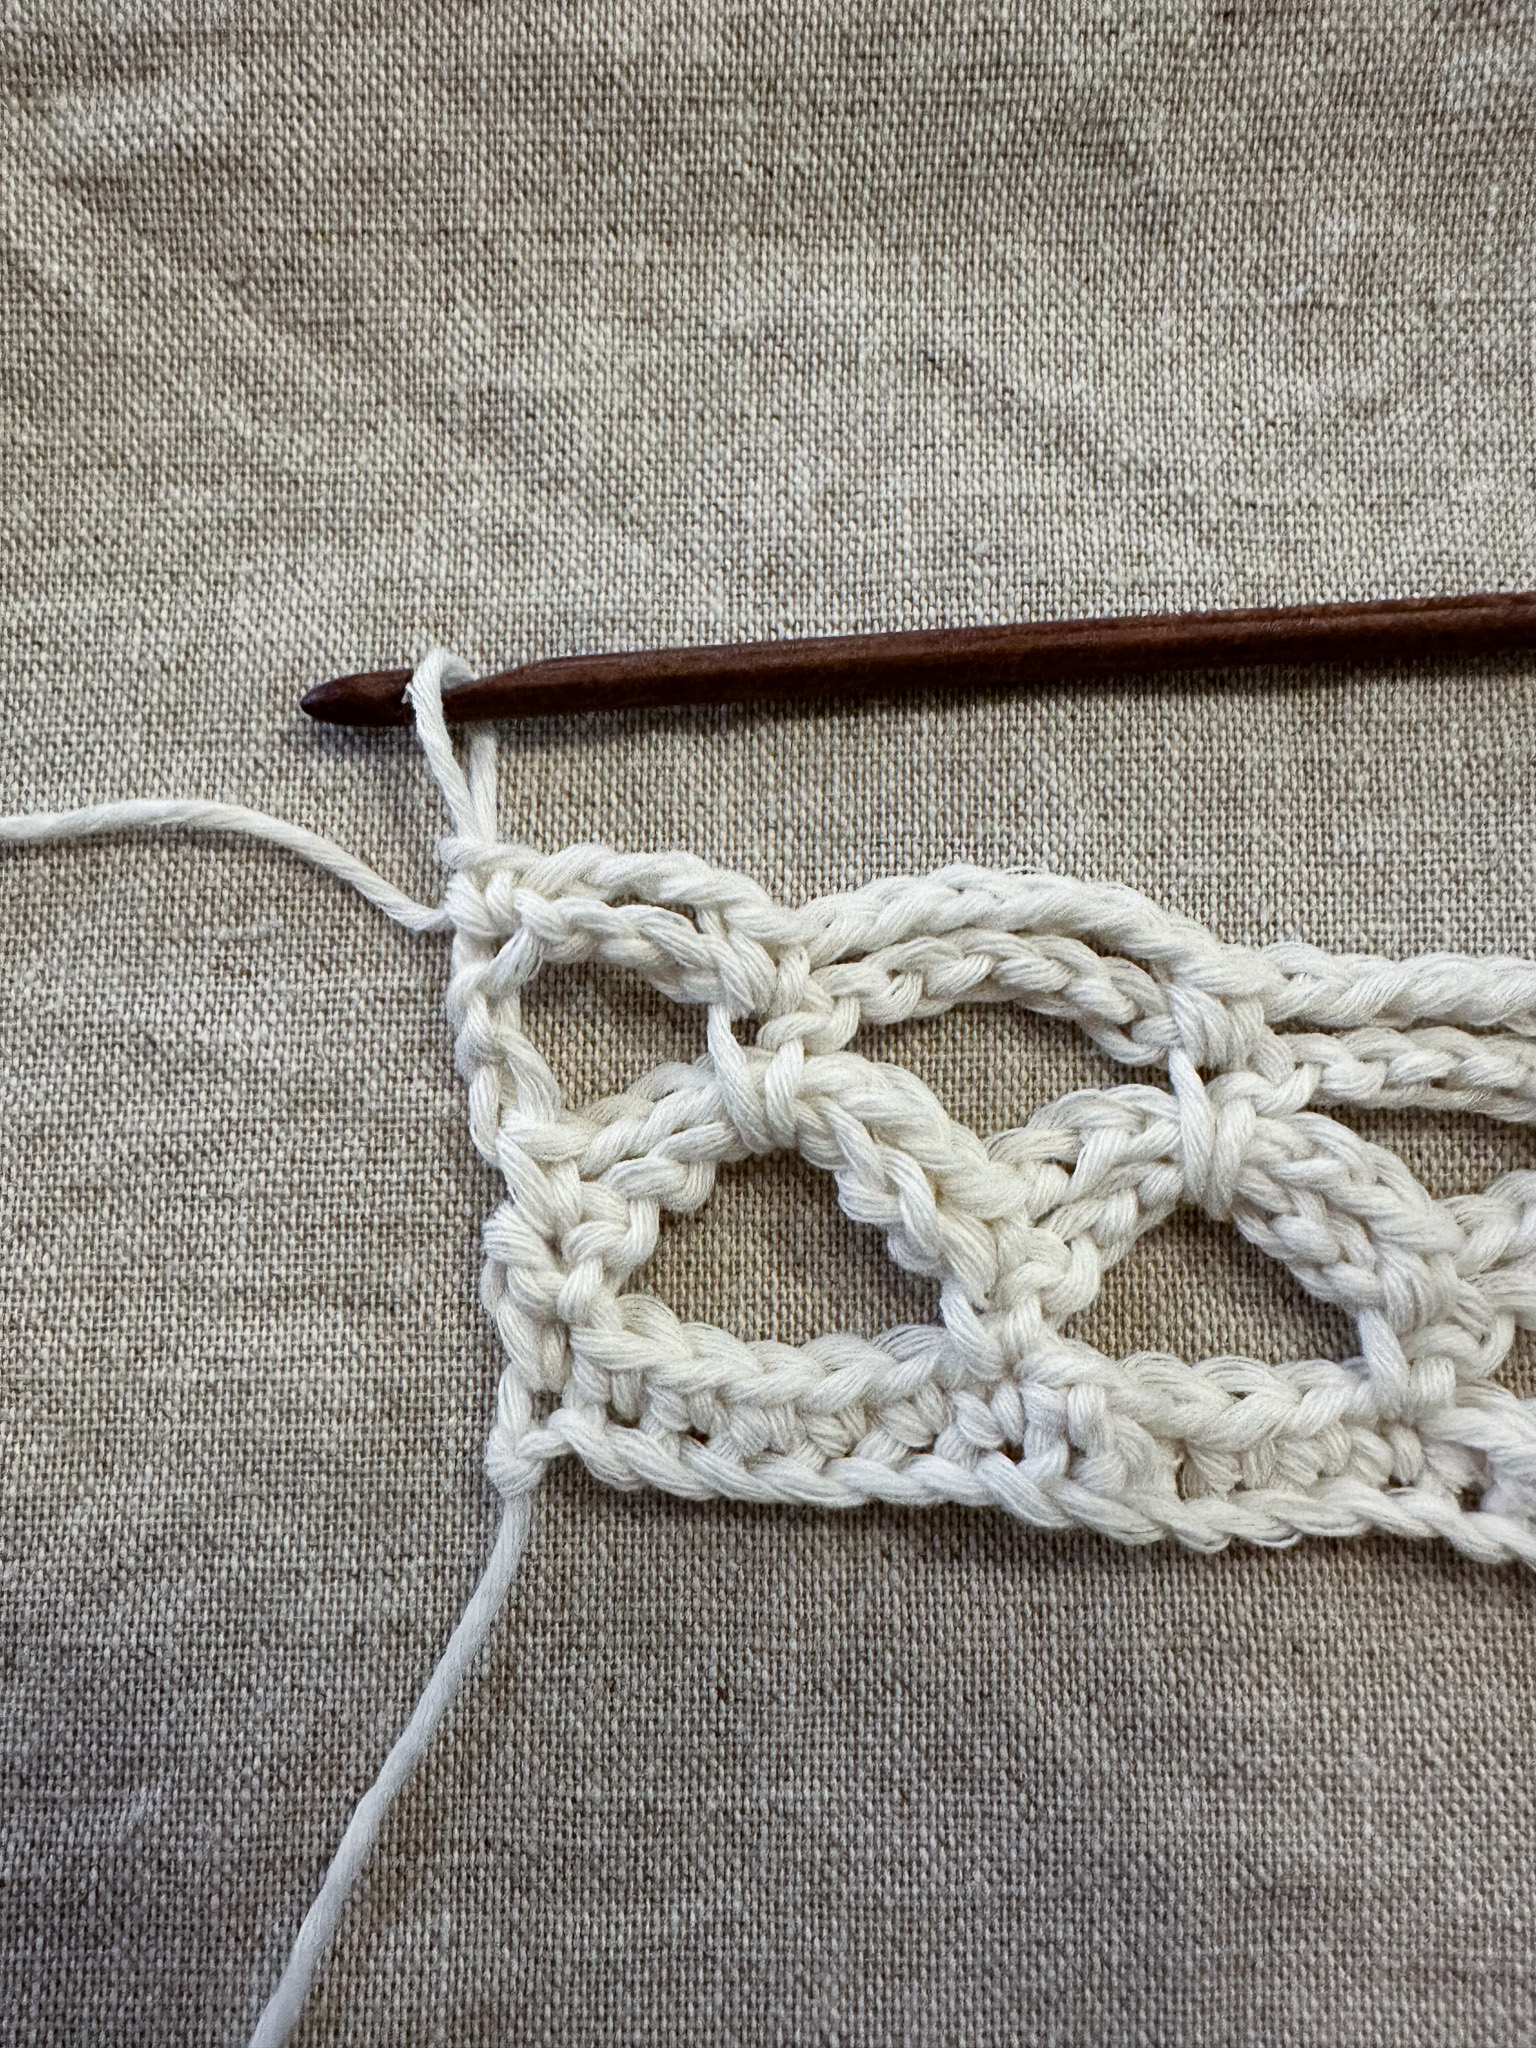
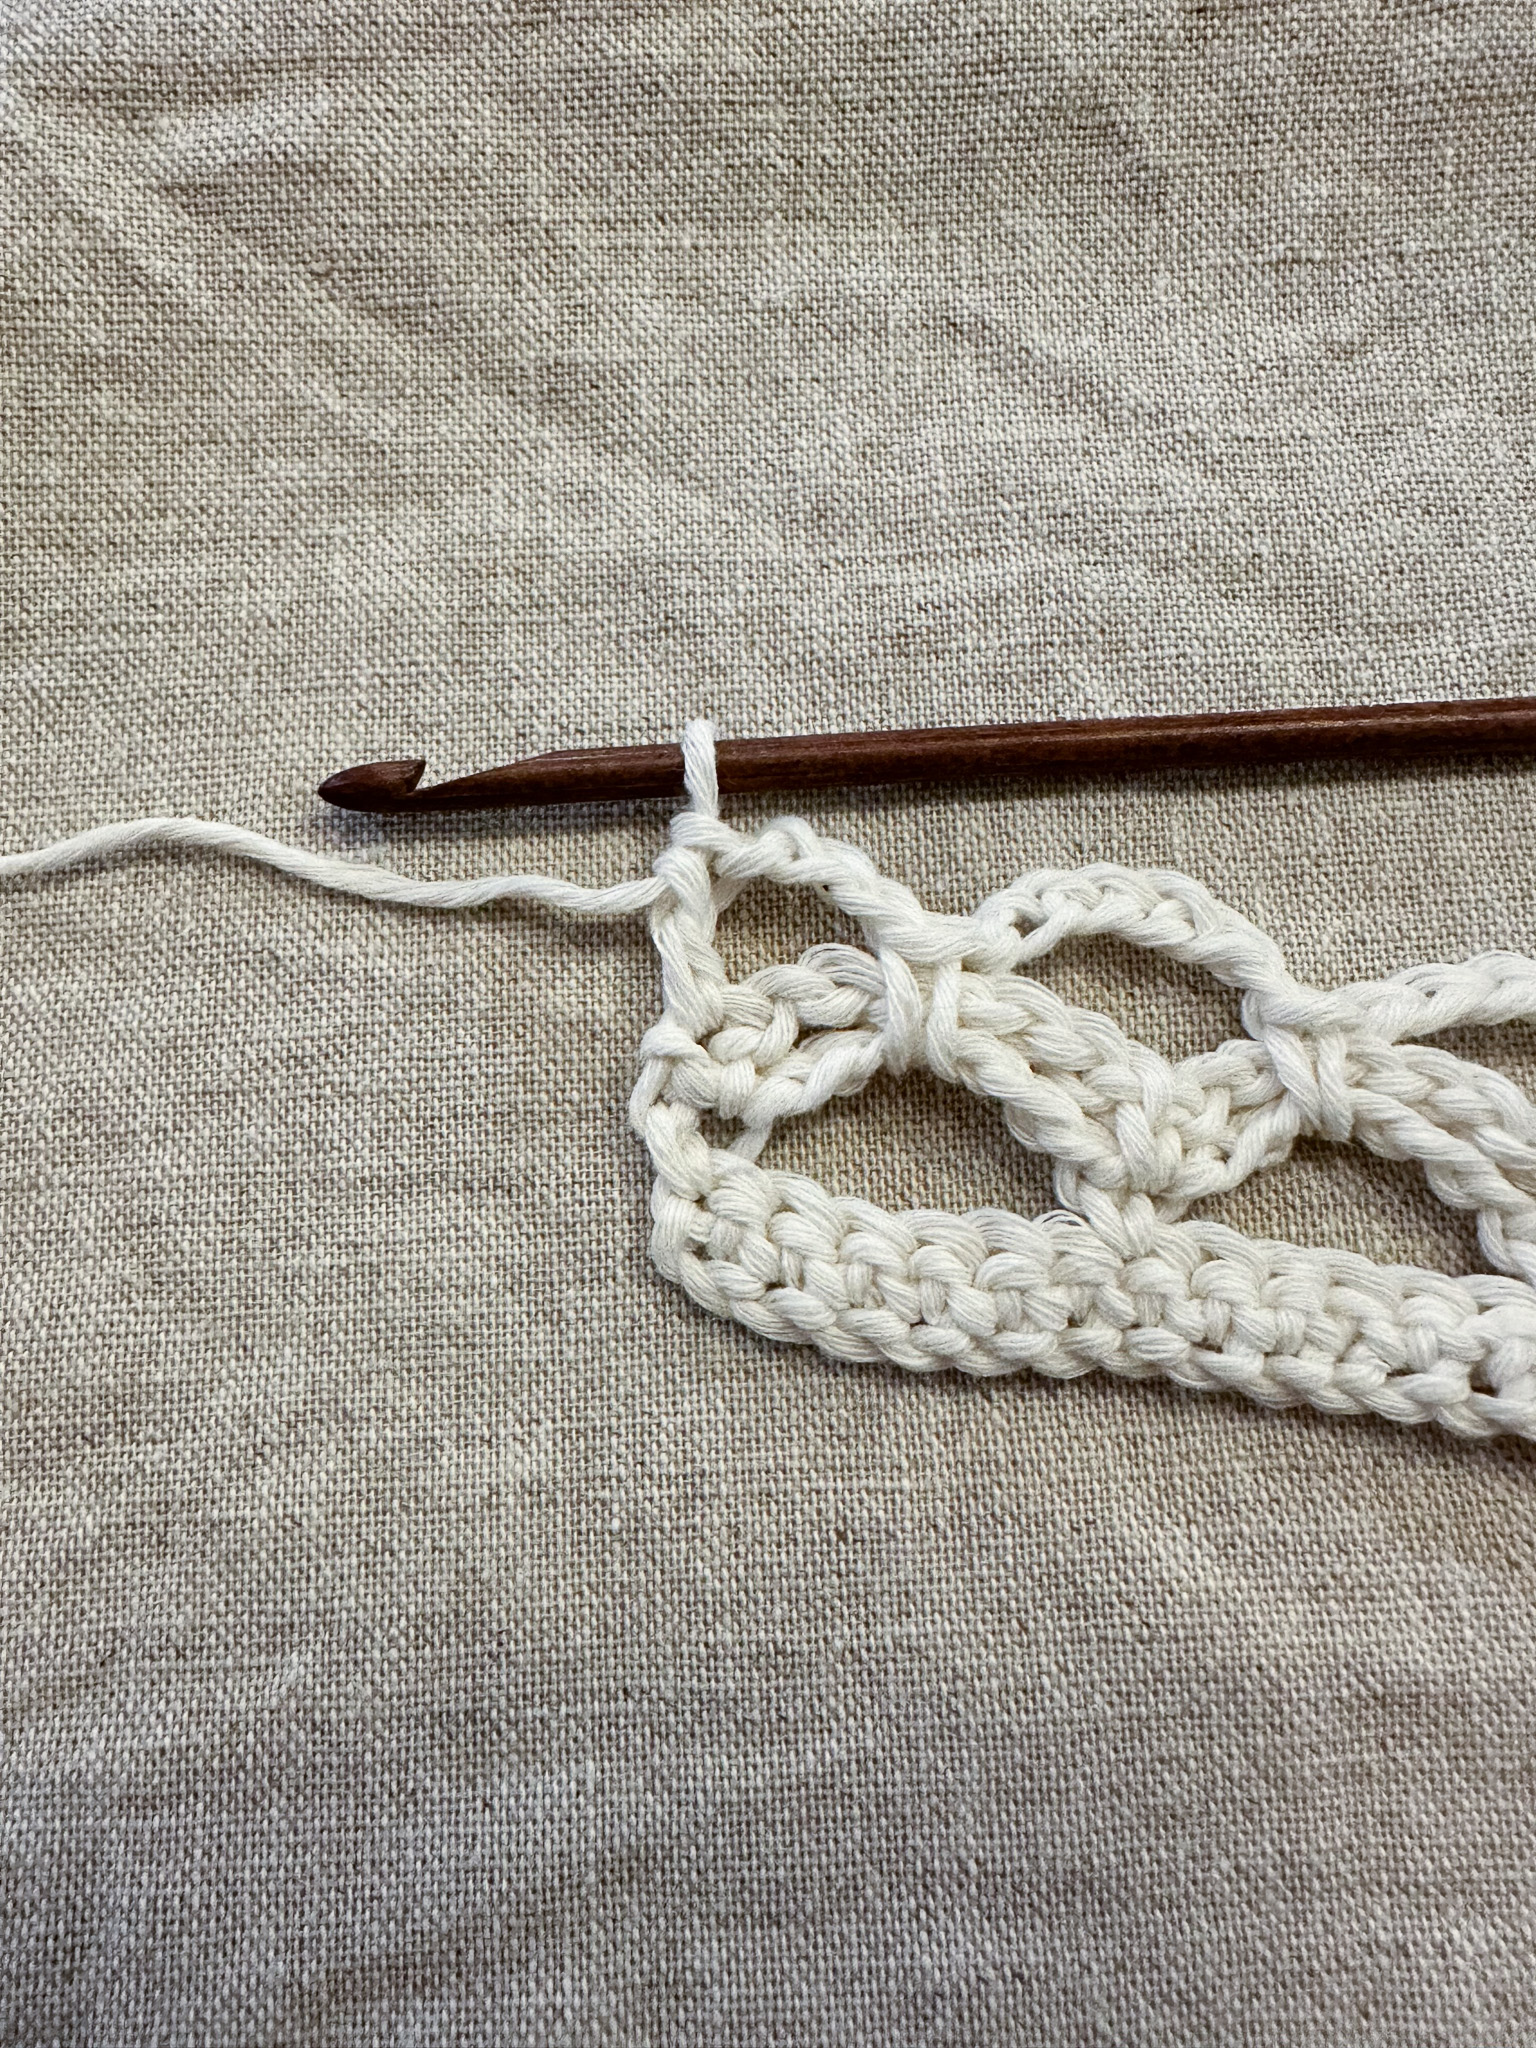
Row 6: Skip the chain stitch and work one single crochet in the first stitch. Make 5 chain stitches, skip the first half loop. Work one single crochet around the chain loops from Row 4 and Row 5.
Repeat: make 5 chain stitches and one single crochet around the chain loops across the row, and place the final single crochet in the last stitch of the row.
You should now have a total of 30 chain loops.
Make 1 chain stitch and turn.
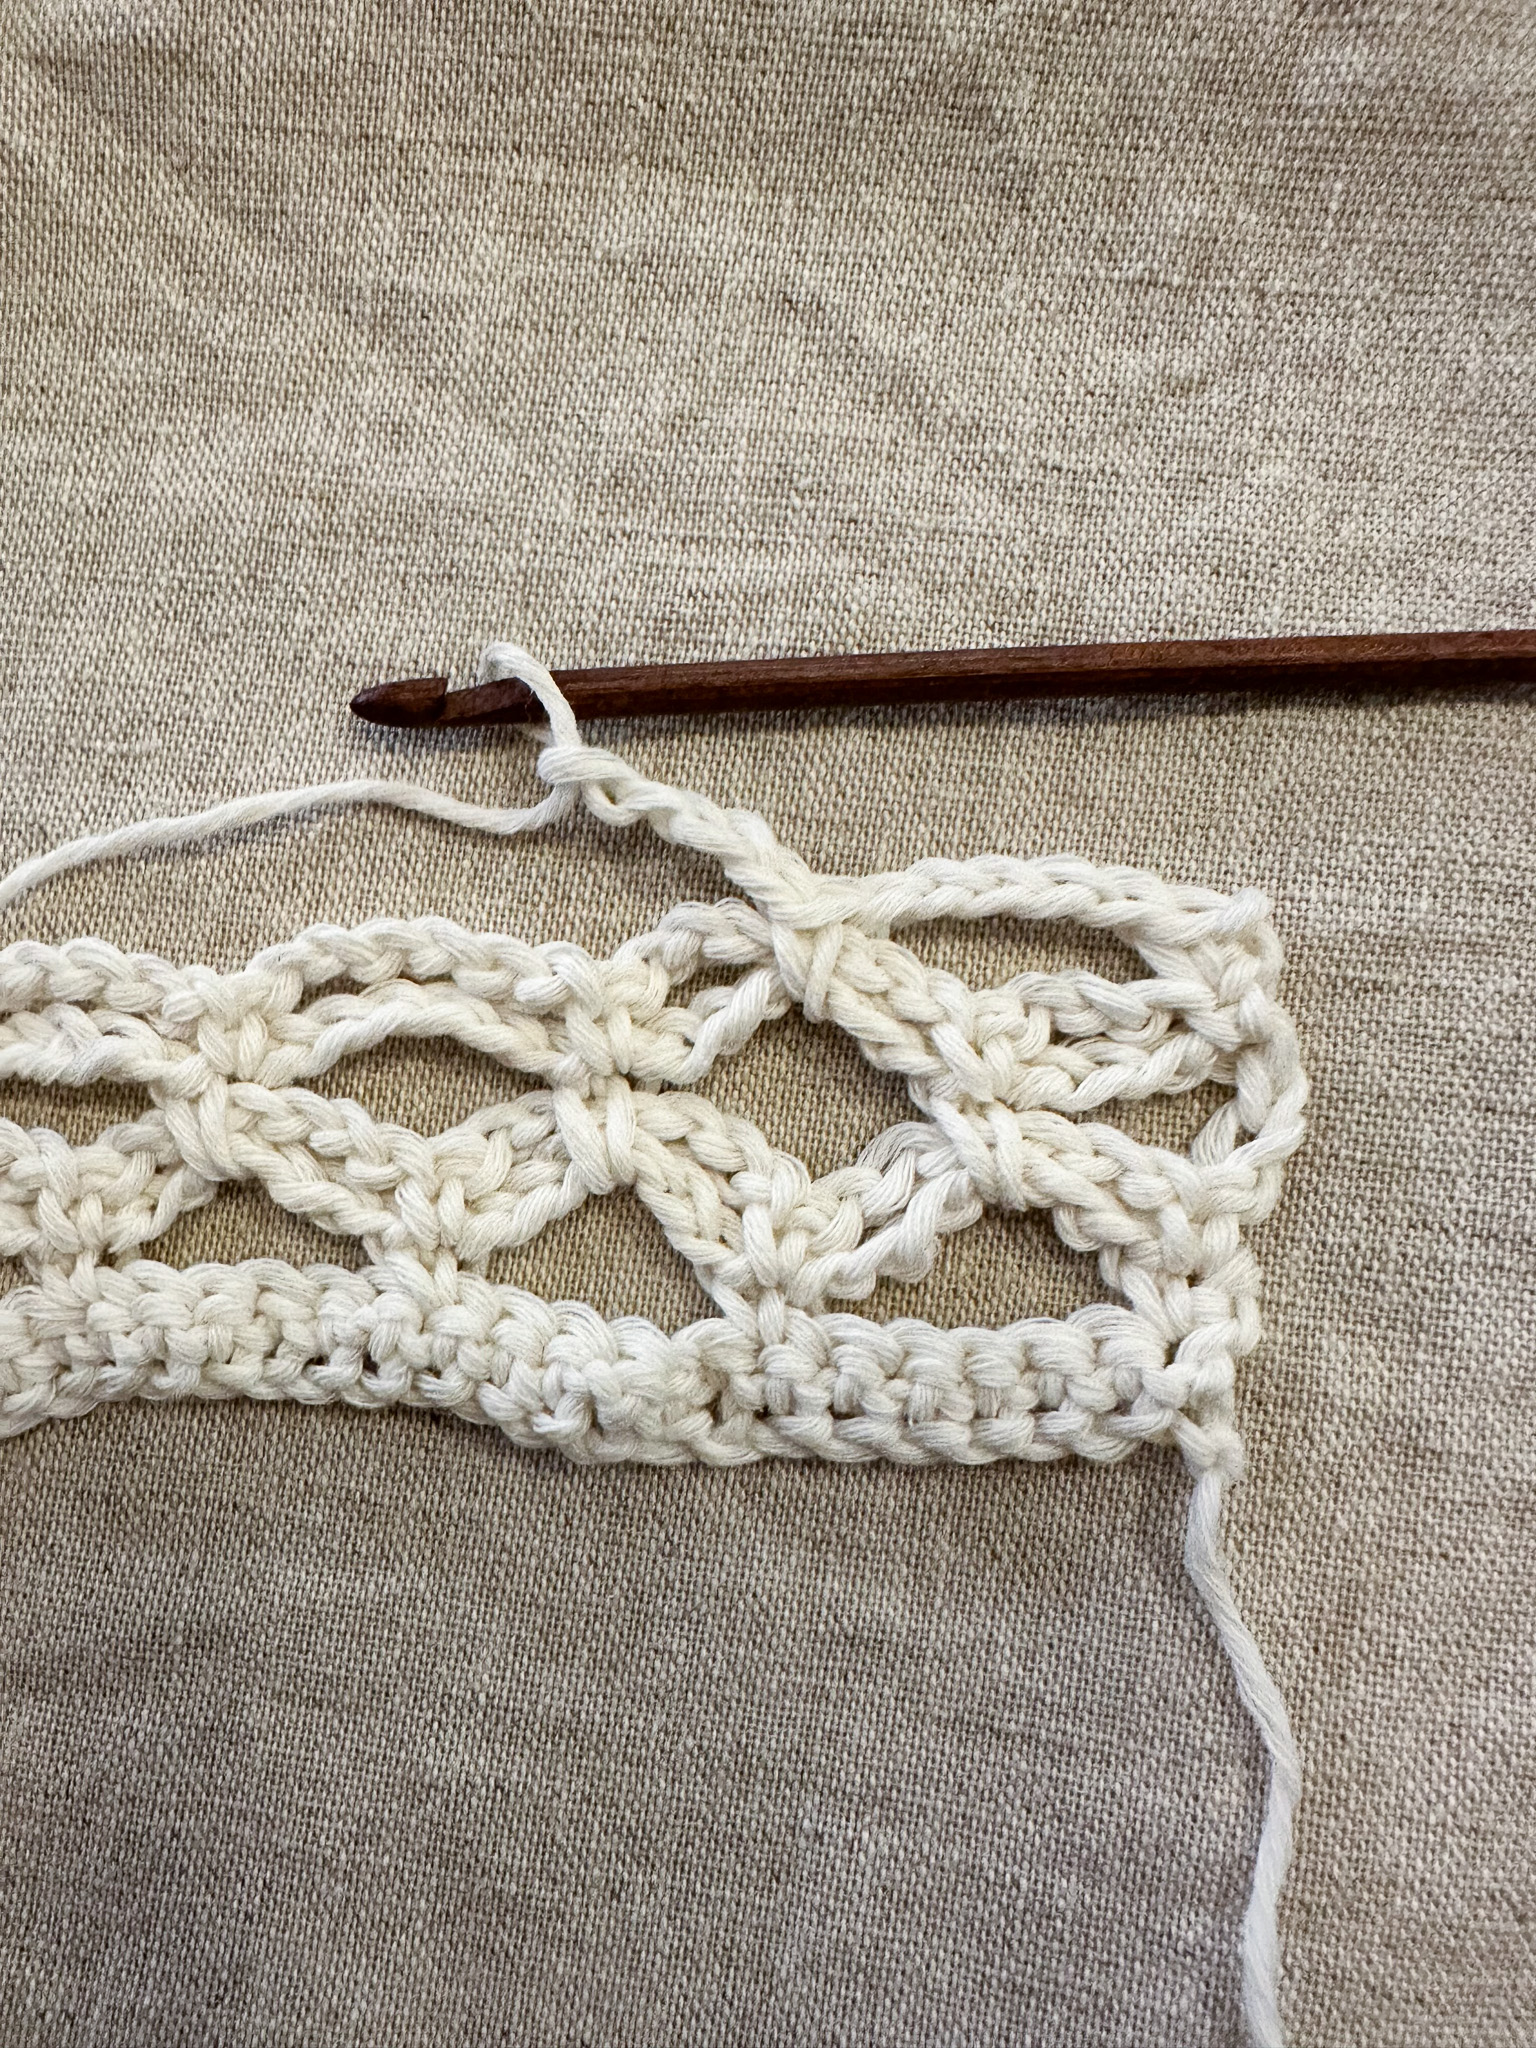
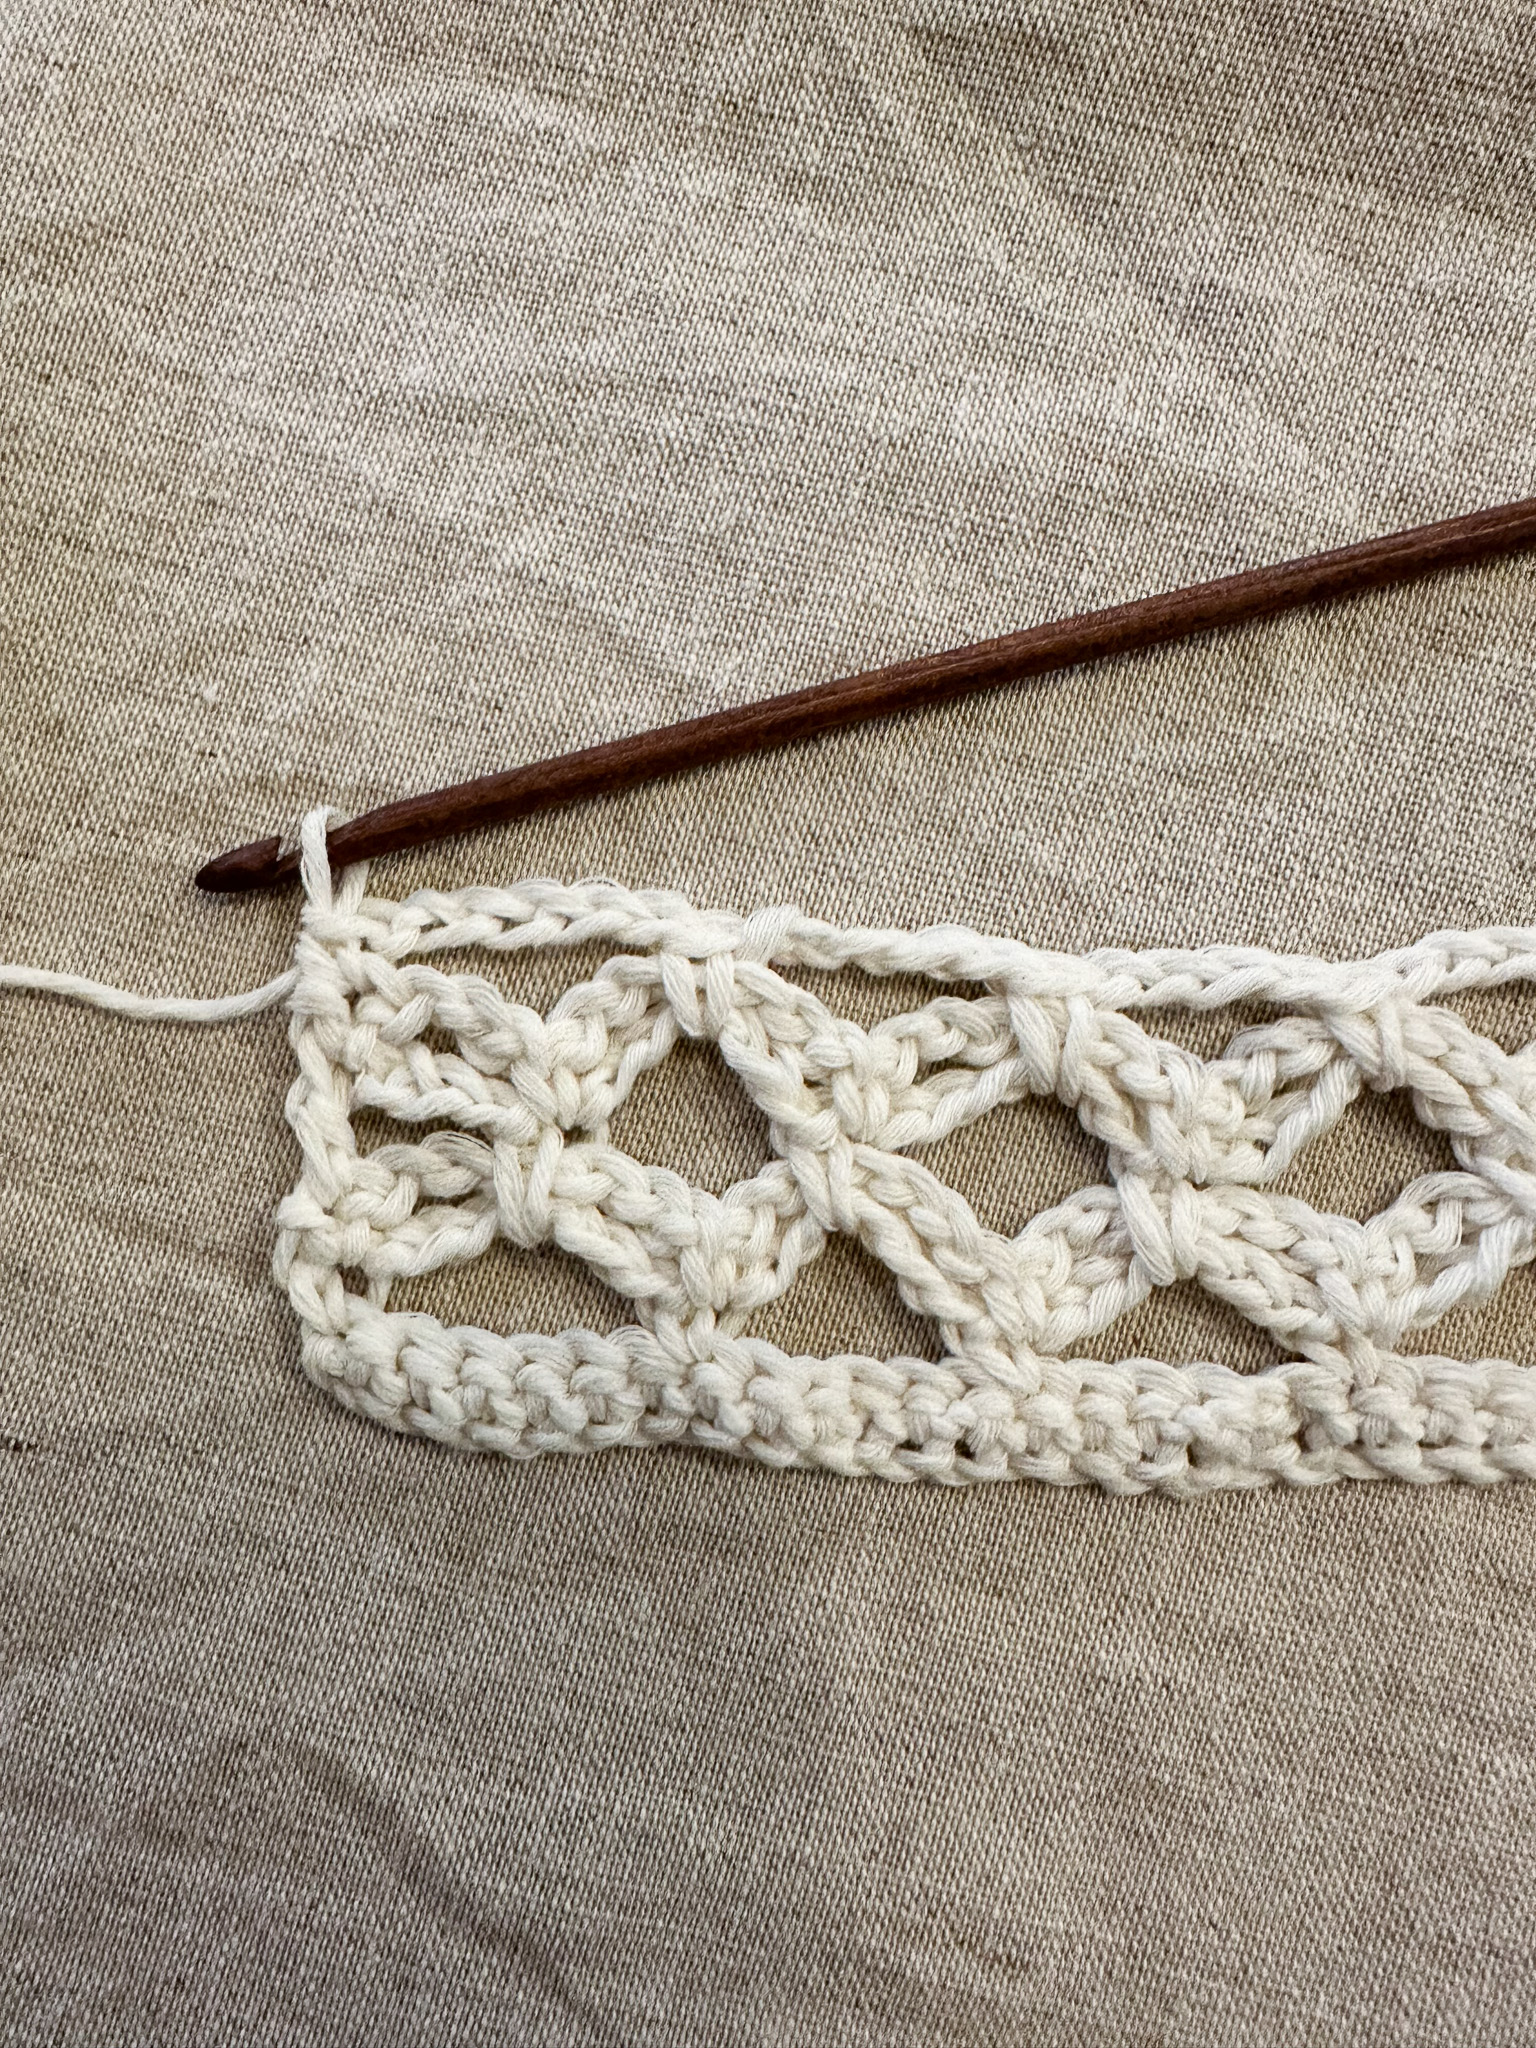
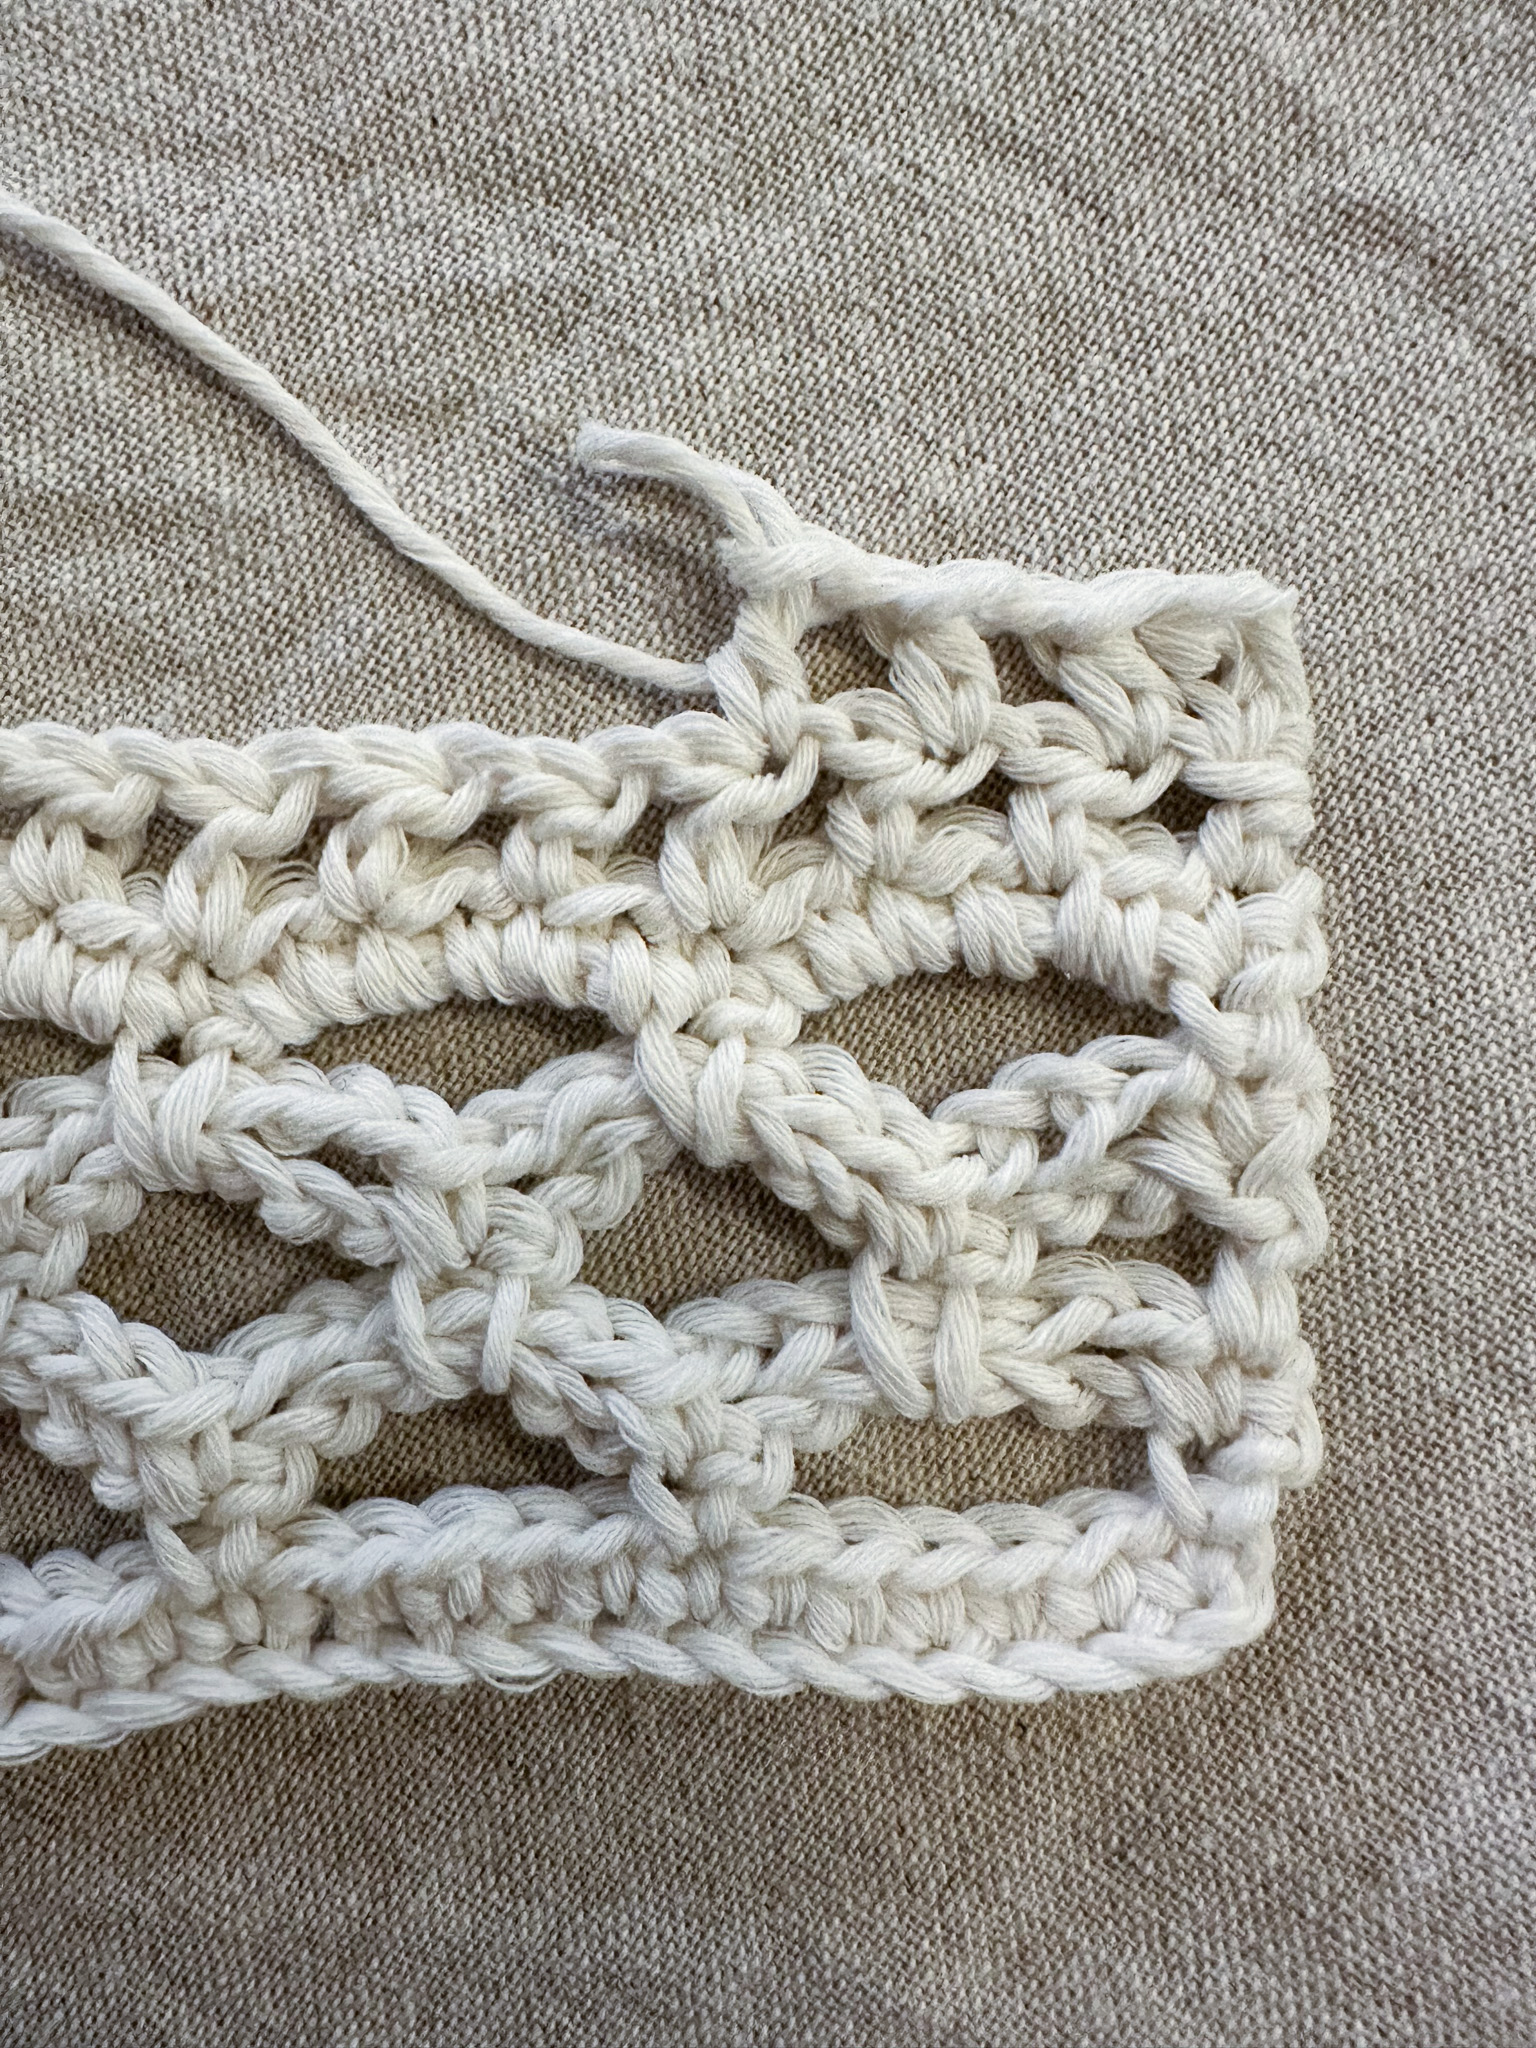
Row 7: Skip the chain stitch and work one single crochet in the first stitch. Work 5 single crochets around the chain loop. Work one single crochet in the stitch between the loops (see green needle). Continue in the same way across the row. (181 single crochets in total).
Panel 2
NOTE: In Panel 2, no chain stitches are made when turning!
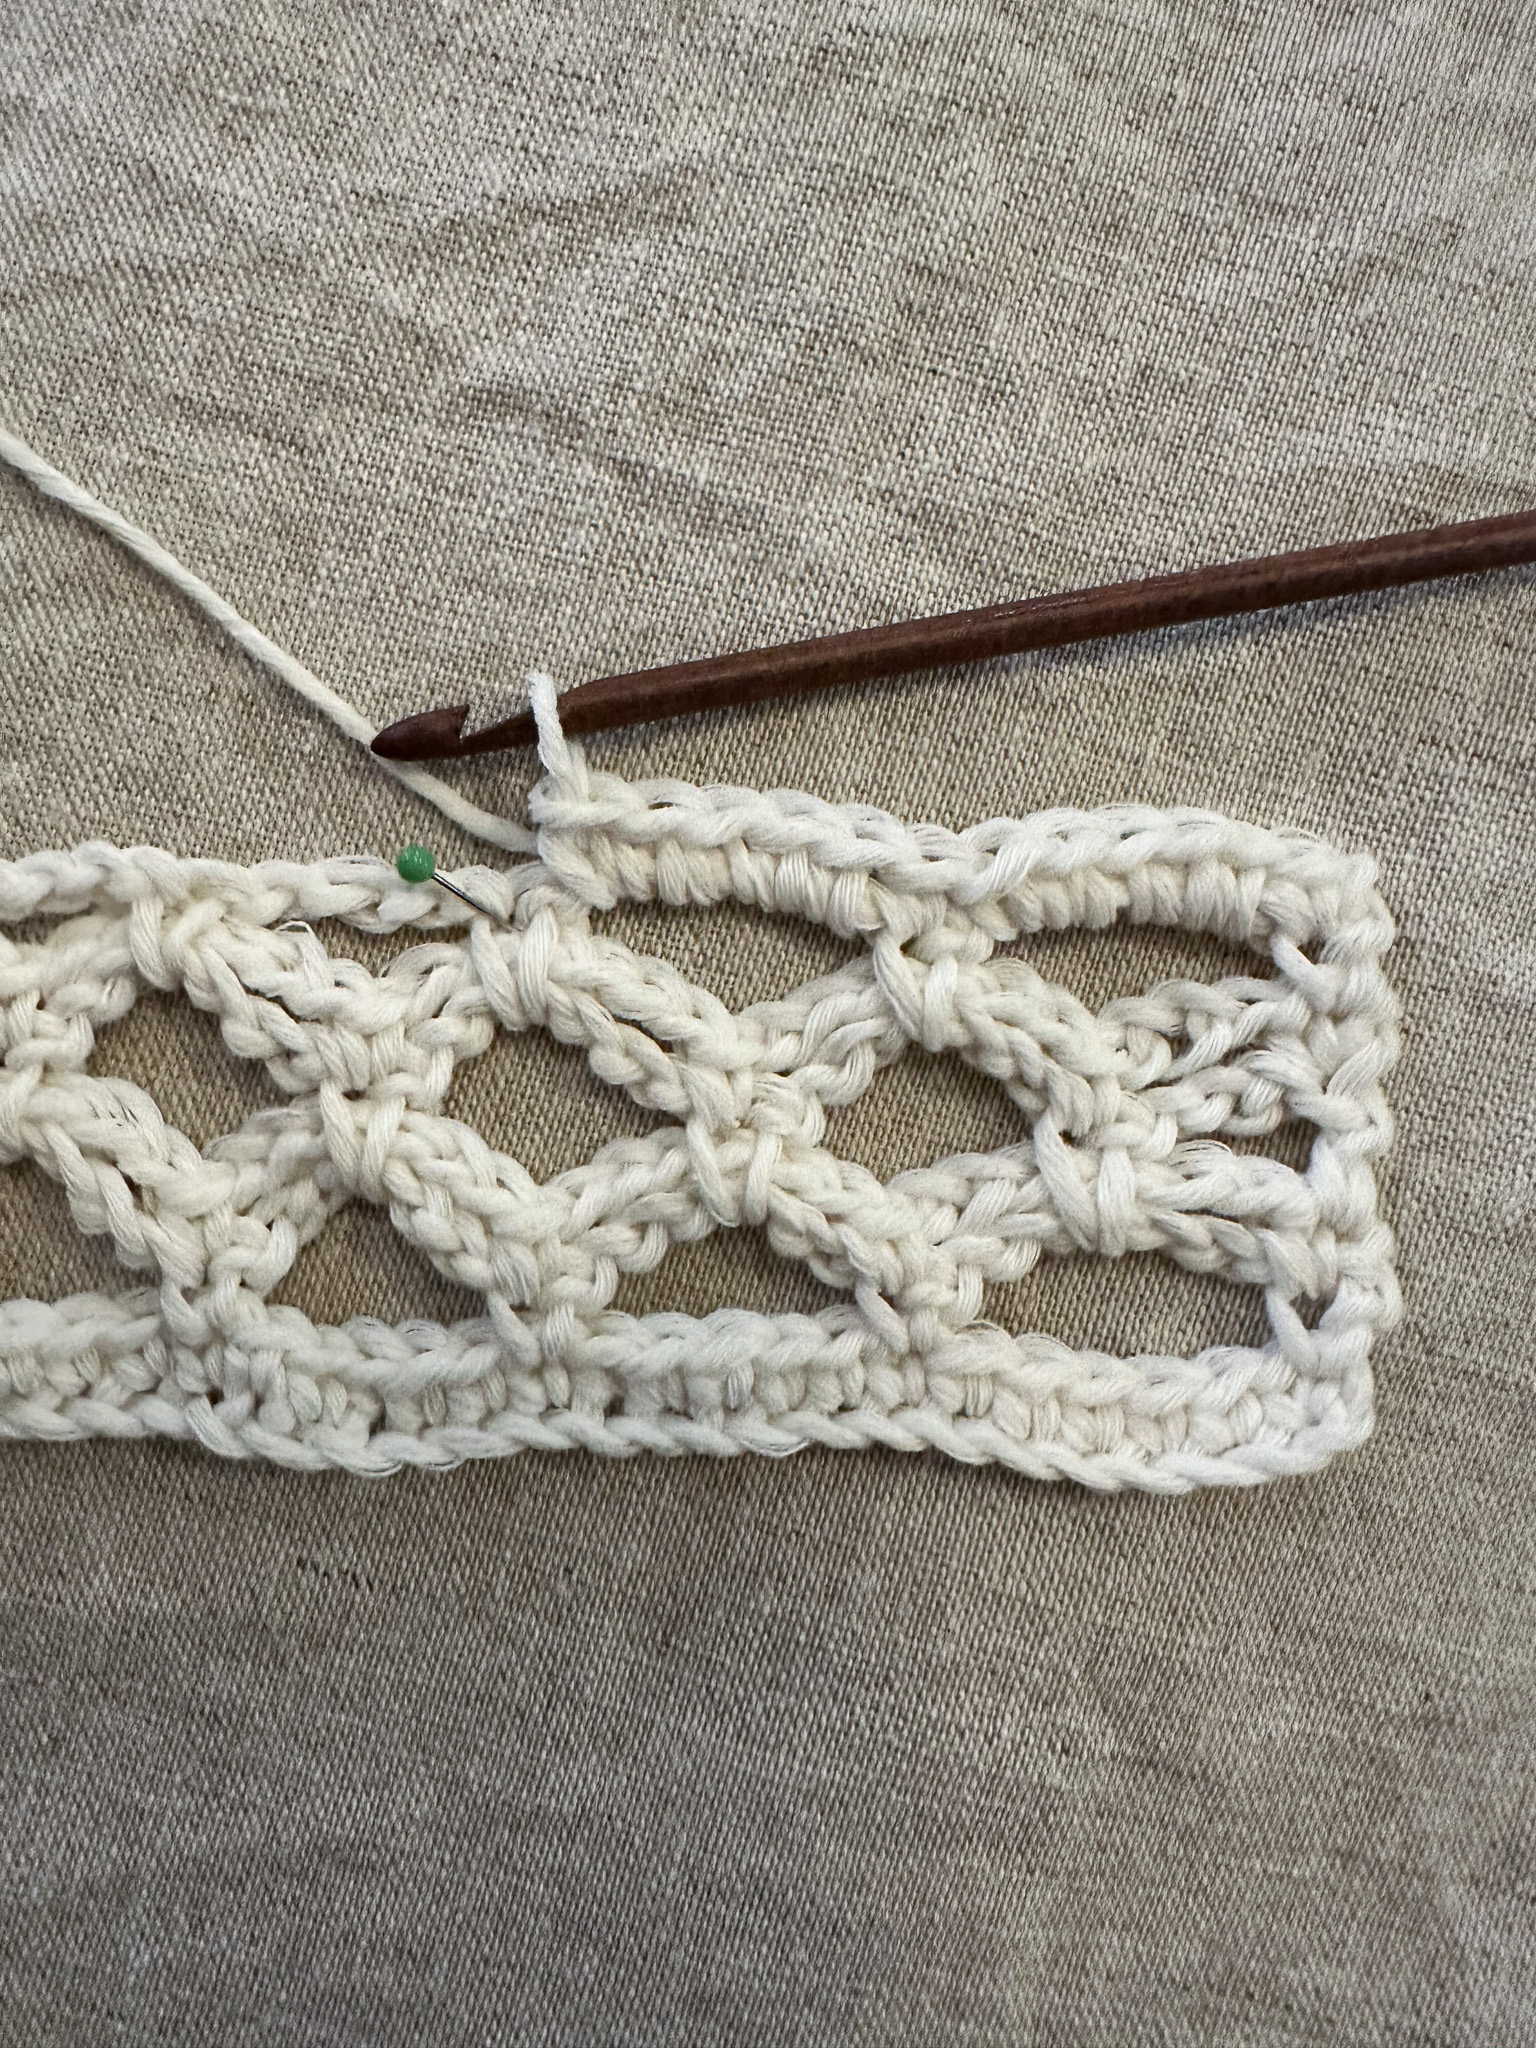
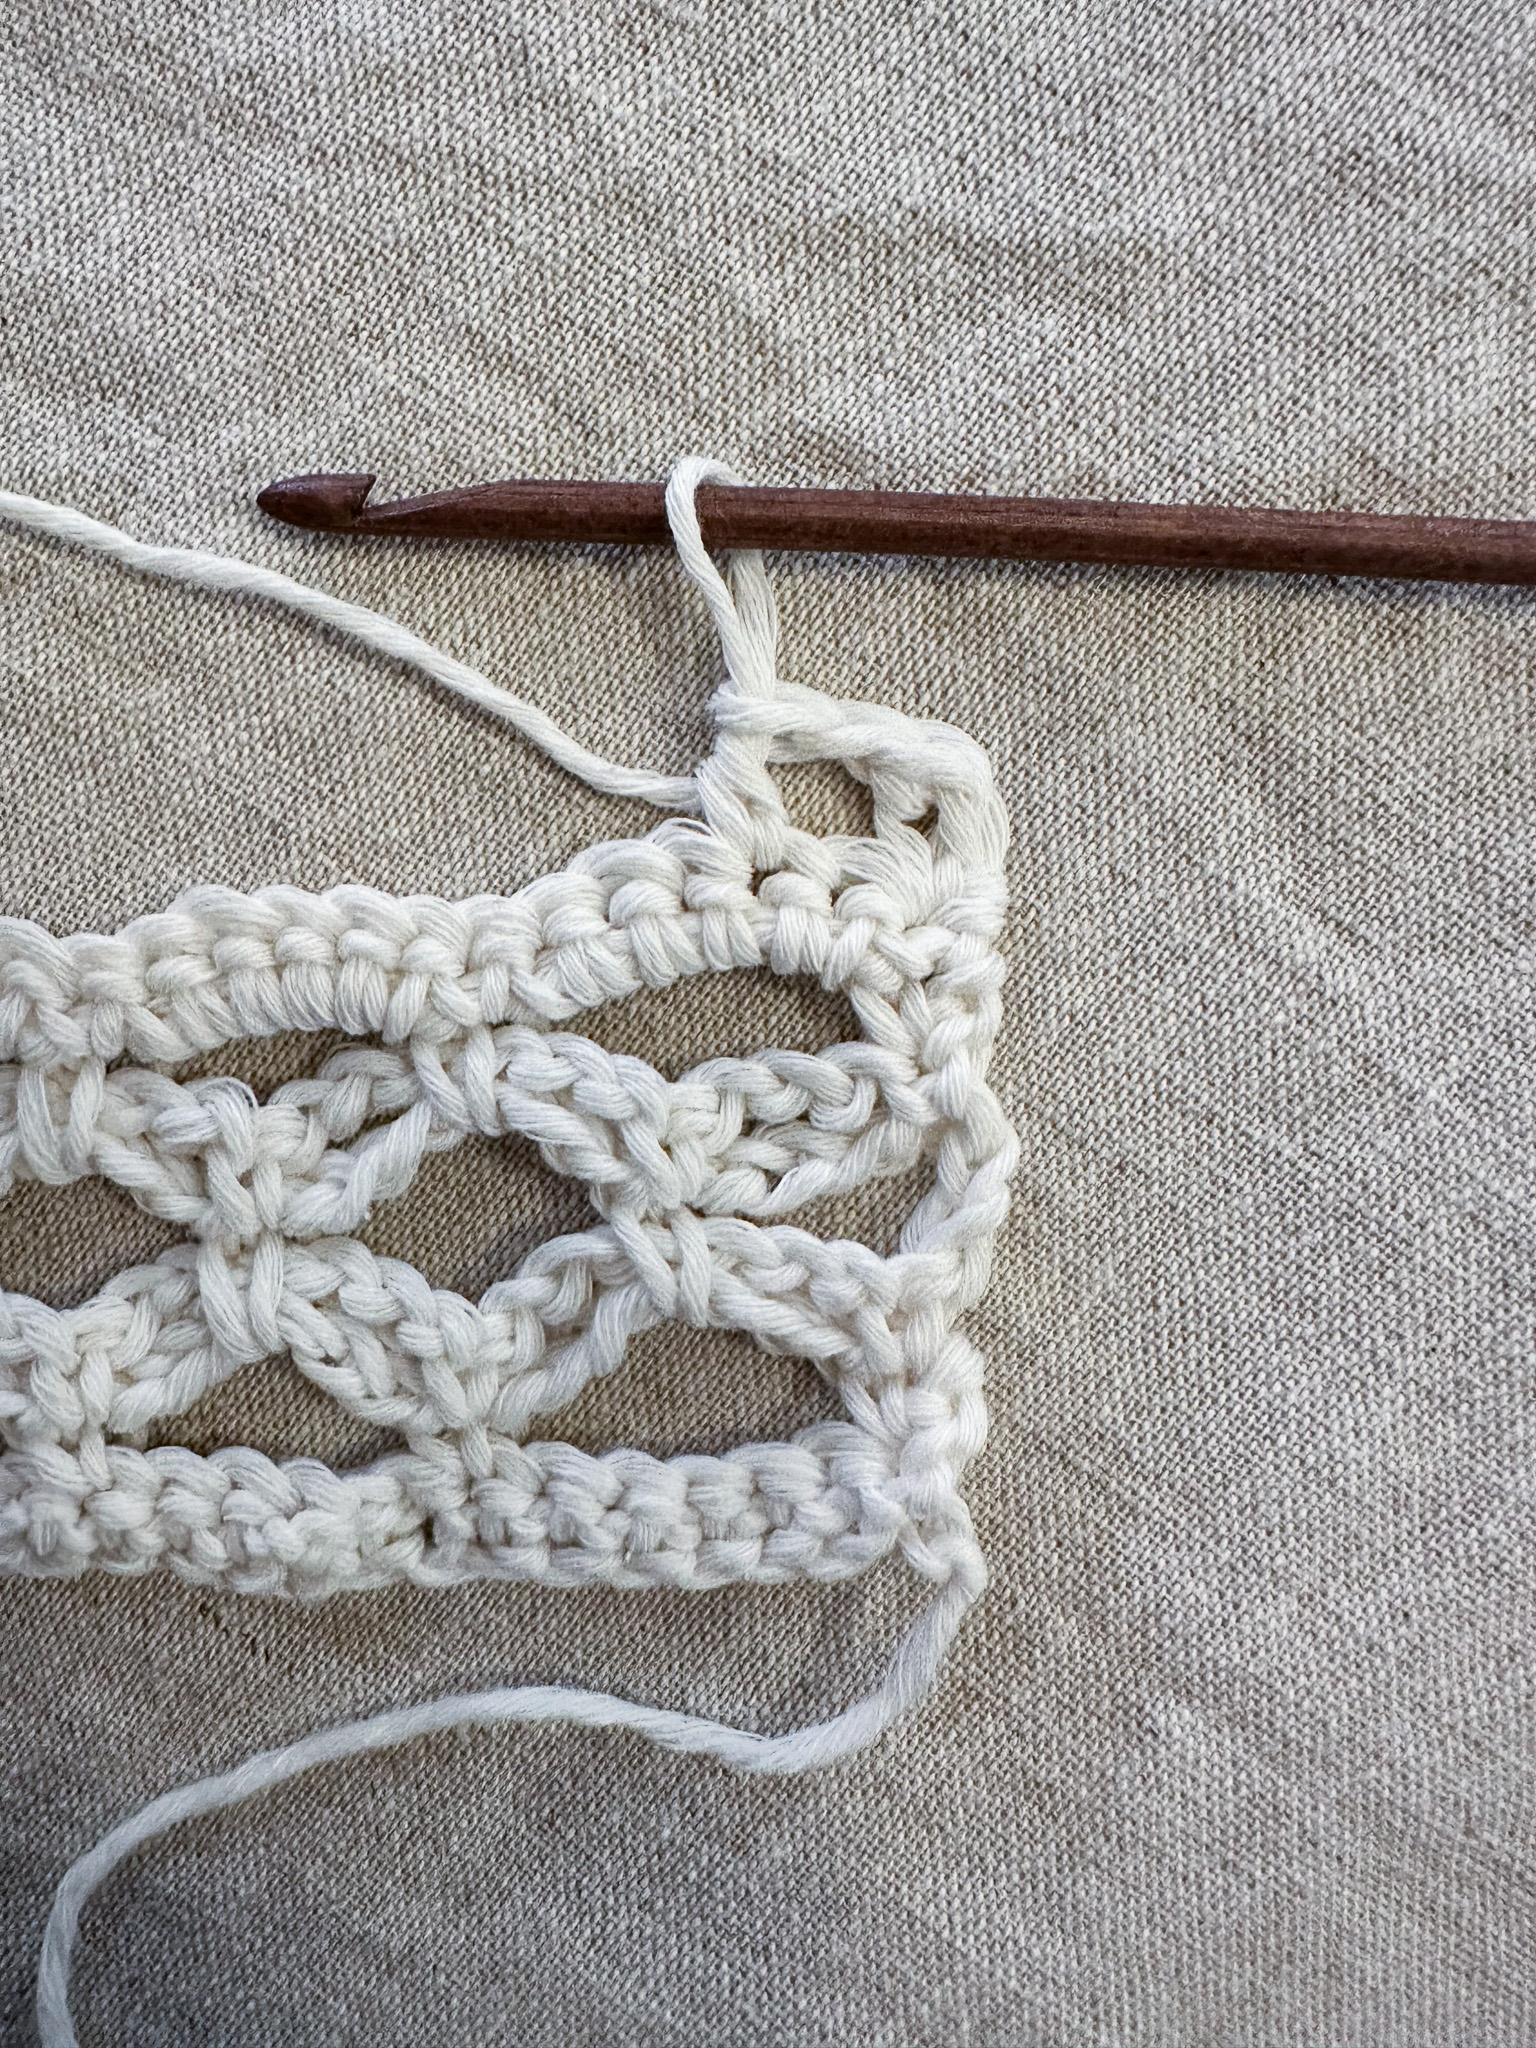
Row 8: Start the row with a stacked single crochet. Then make 1 chain stitch, skip 1 stitch, and work 1 half double crochet. Repeat this (1 chain stitch, then 1 half double crochet) a total of 90 times. Turn.

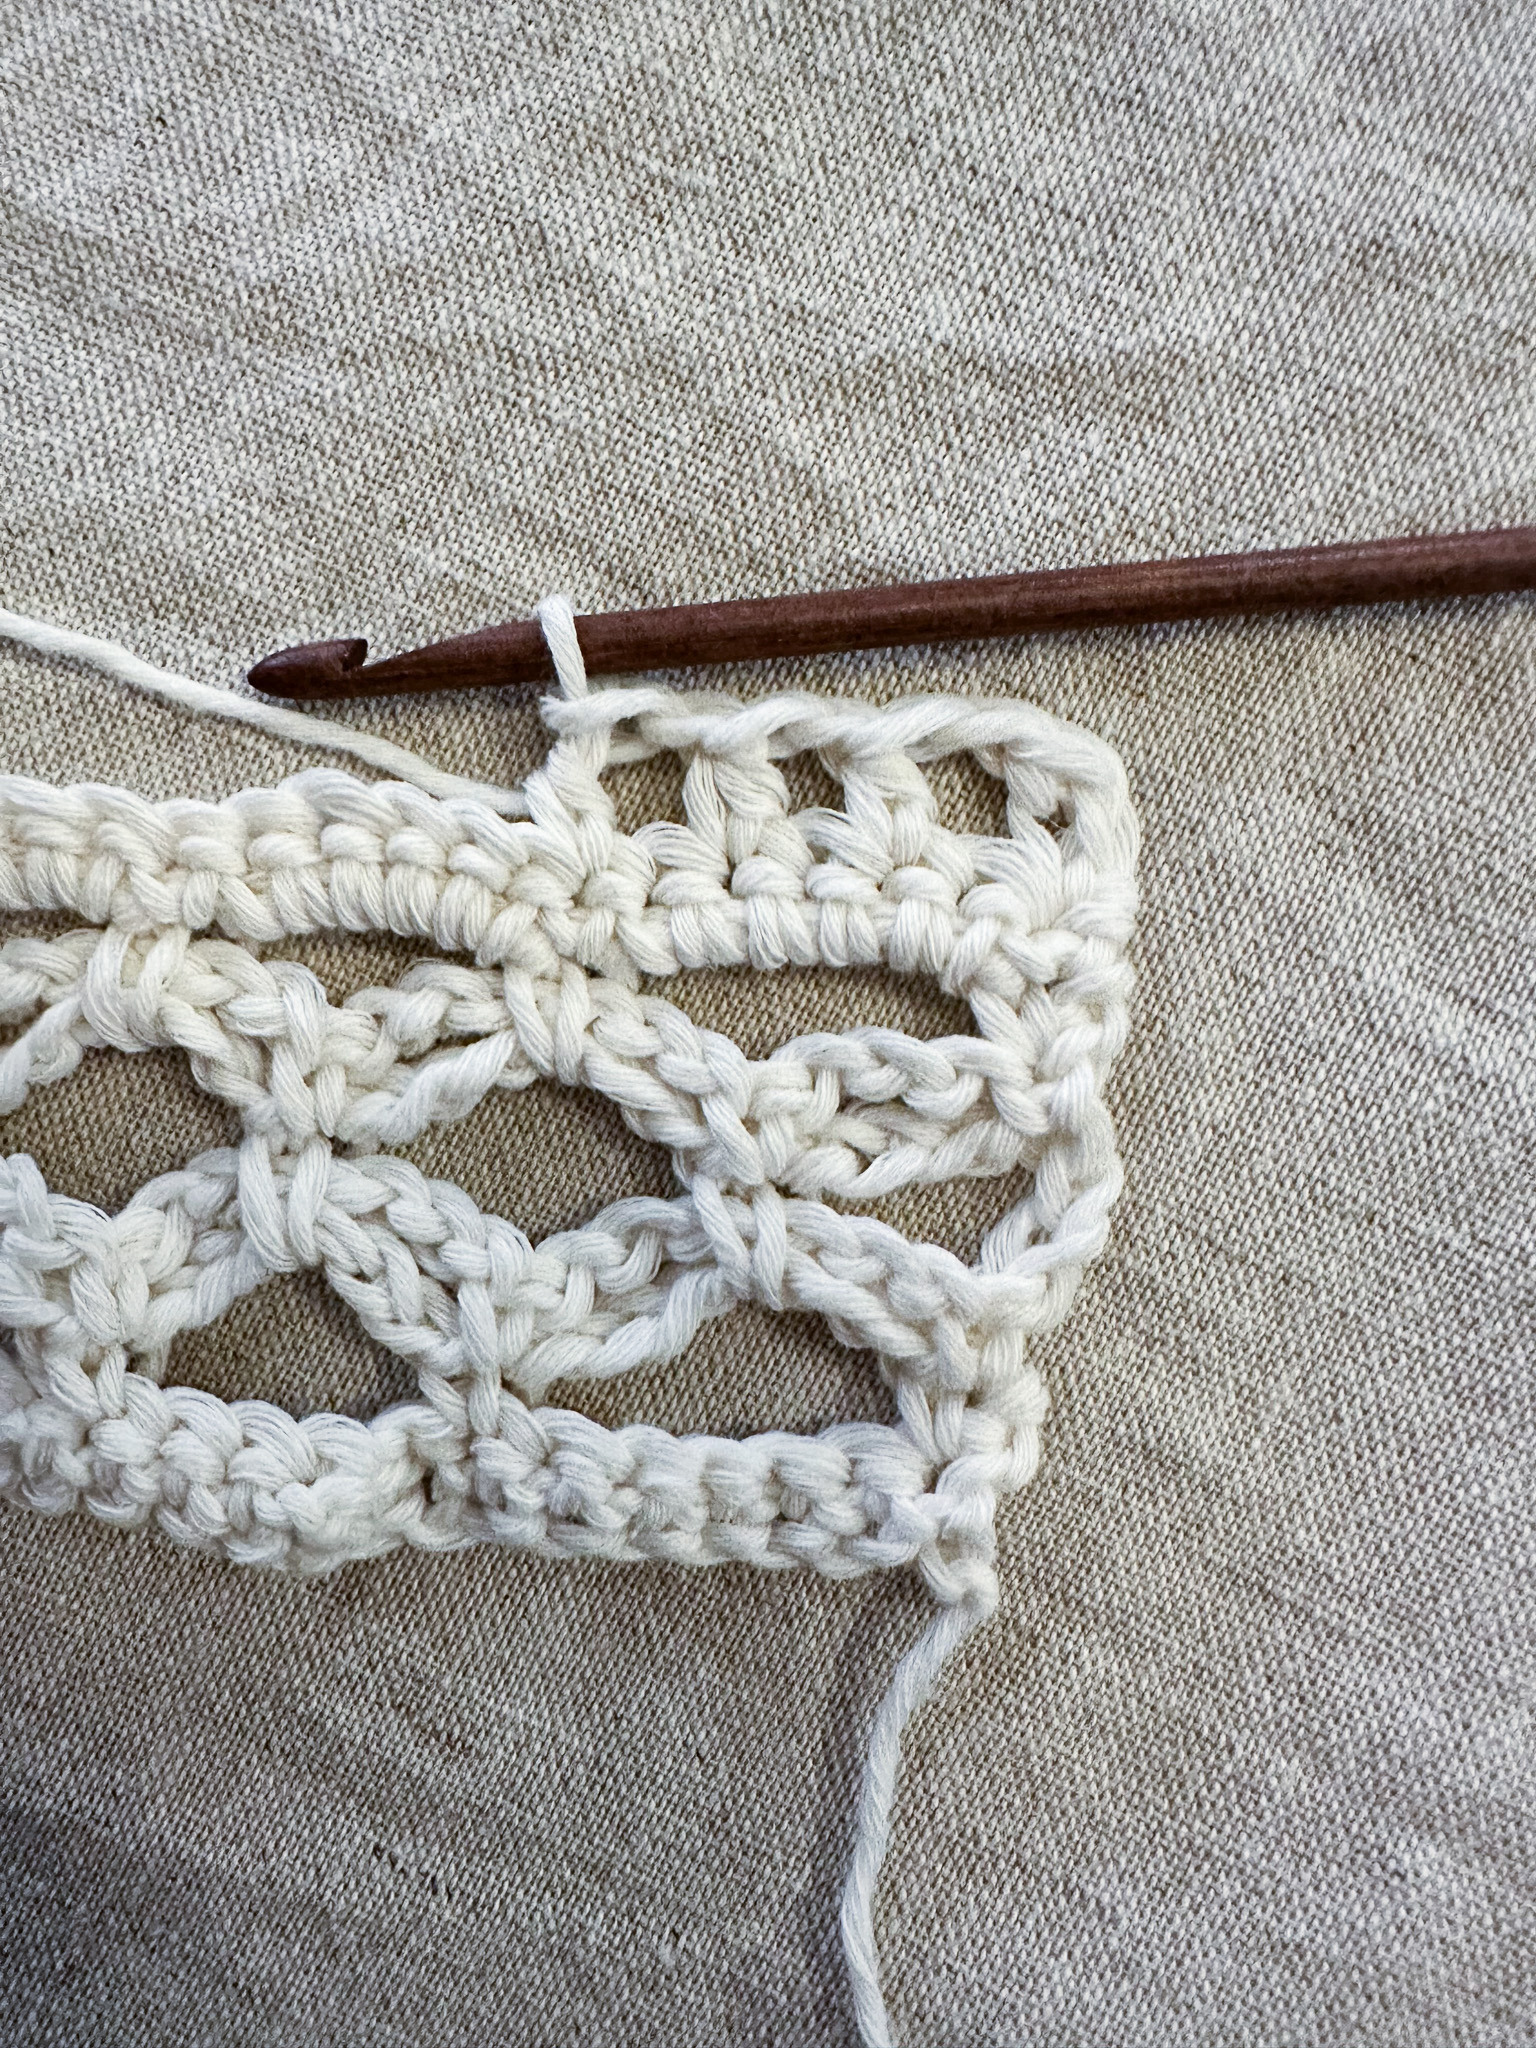
Row 9: Start the row with a stacked single crochet. Then work one half double crochet in the next stitch. Make 1 chain stitch, skip 1 stitch, and work 1 half double crochet. Repeat this (1 chain stitch and then 1 half double crochet) a total of 89 times. Finish the row with one half double crochet in the last stitch.
Row 10: Repeat Row 8.
Row 11: Repeat Row 9.
You have now completed the two different panels once. Repeat Rows 1–11 a total of 4 times (8 panels in total), or as many times as needed to achieve your desired width for one half of the top.
8 panels correspond to approximately 35 cm.
Make one more rectangle.
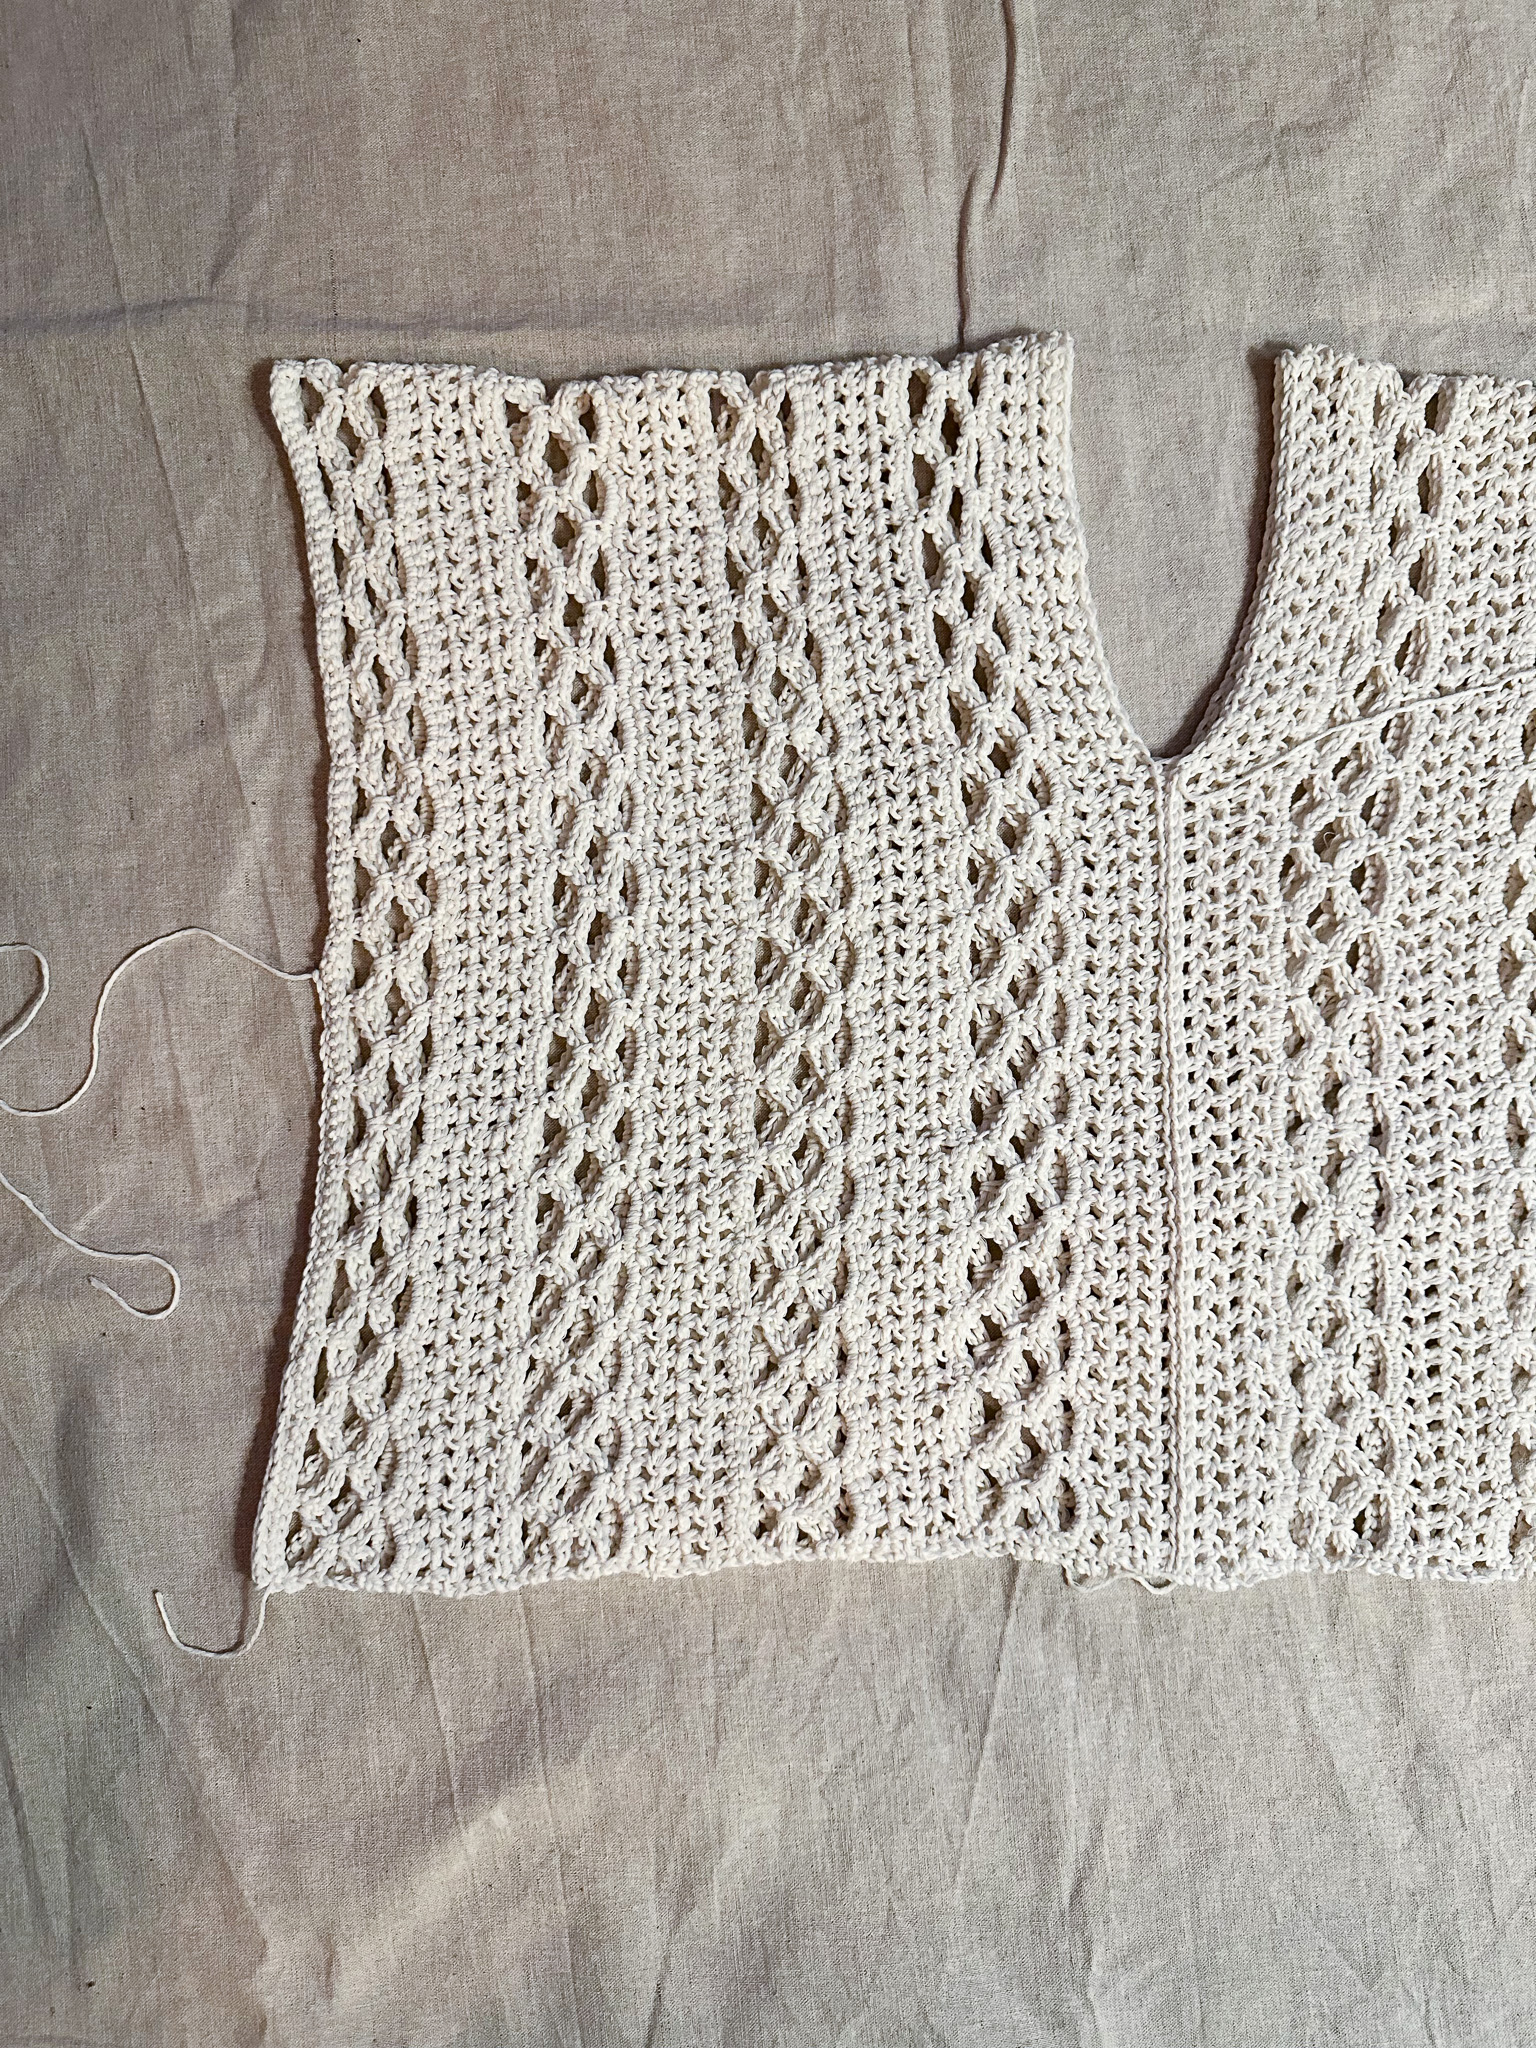
Lay out the first rectangle with the right side of the last row facing up. Place the rectangles with Panel 2 (the one with half double crochets) facing each other. This panel will be closest to the V-neck of the top.

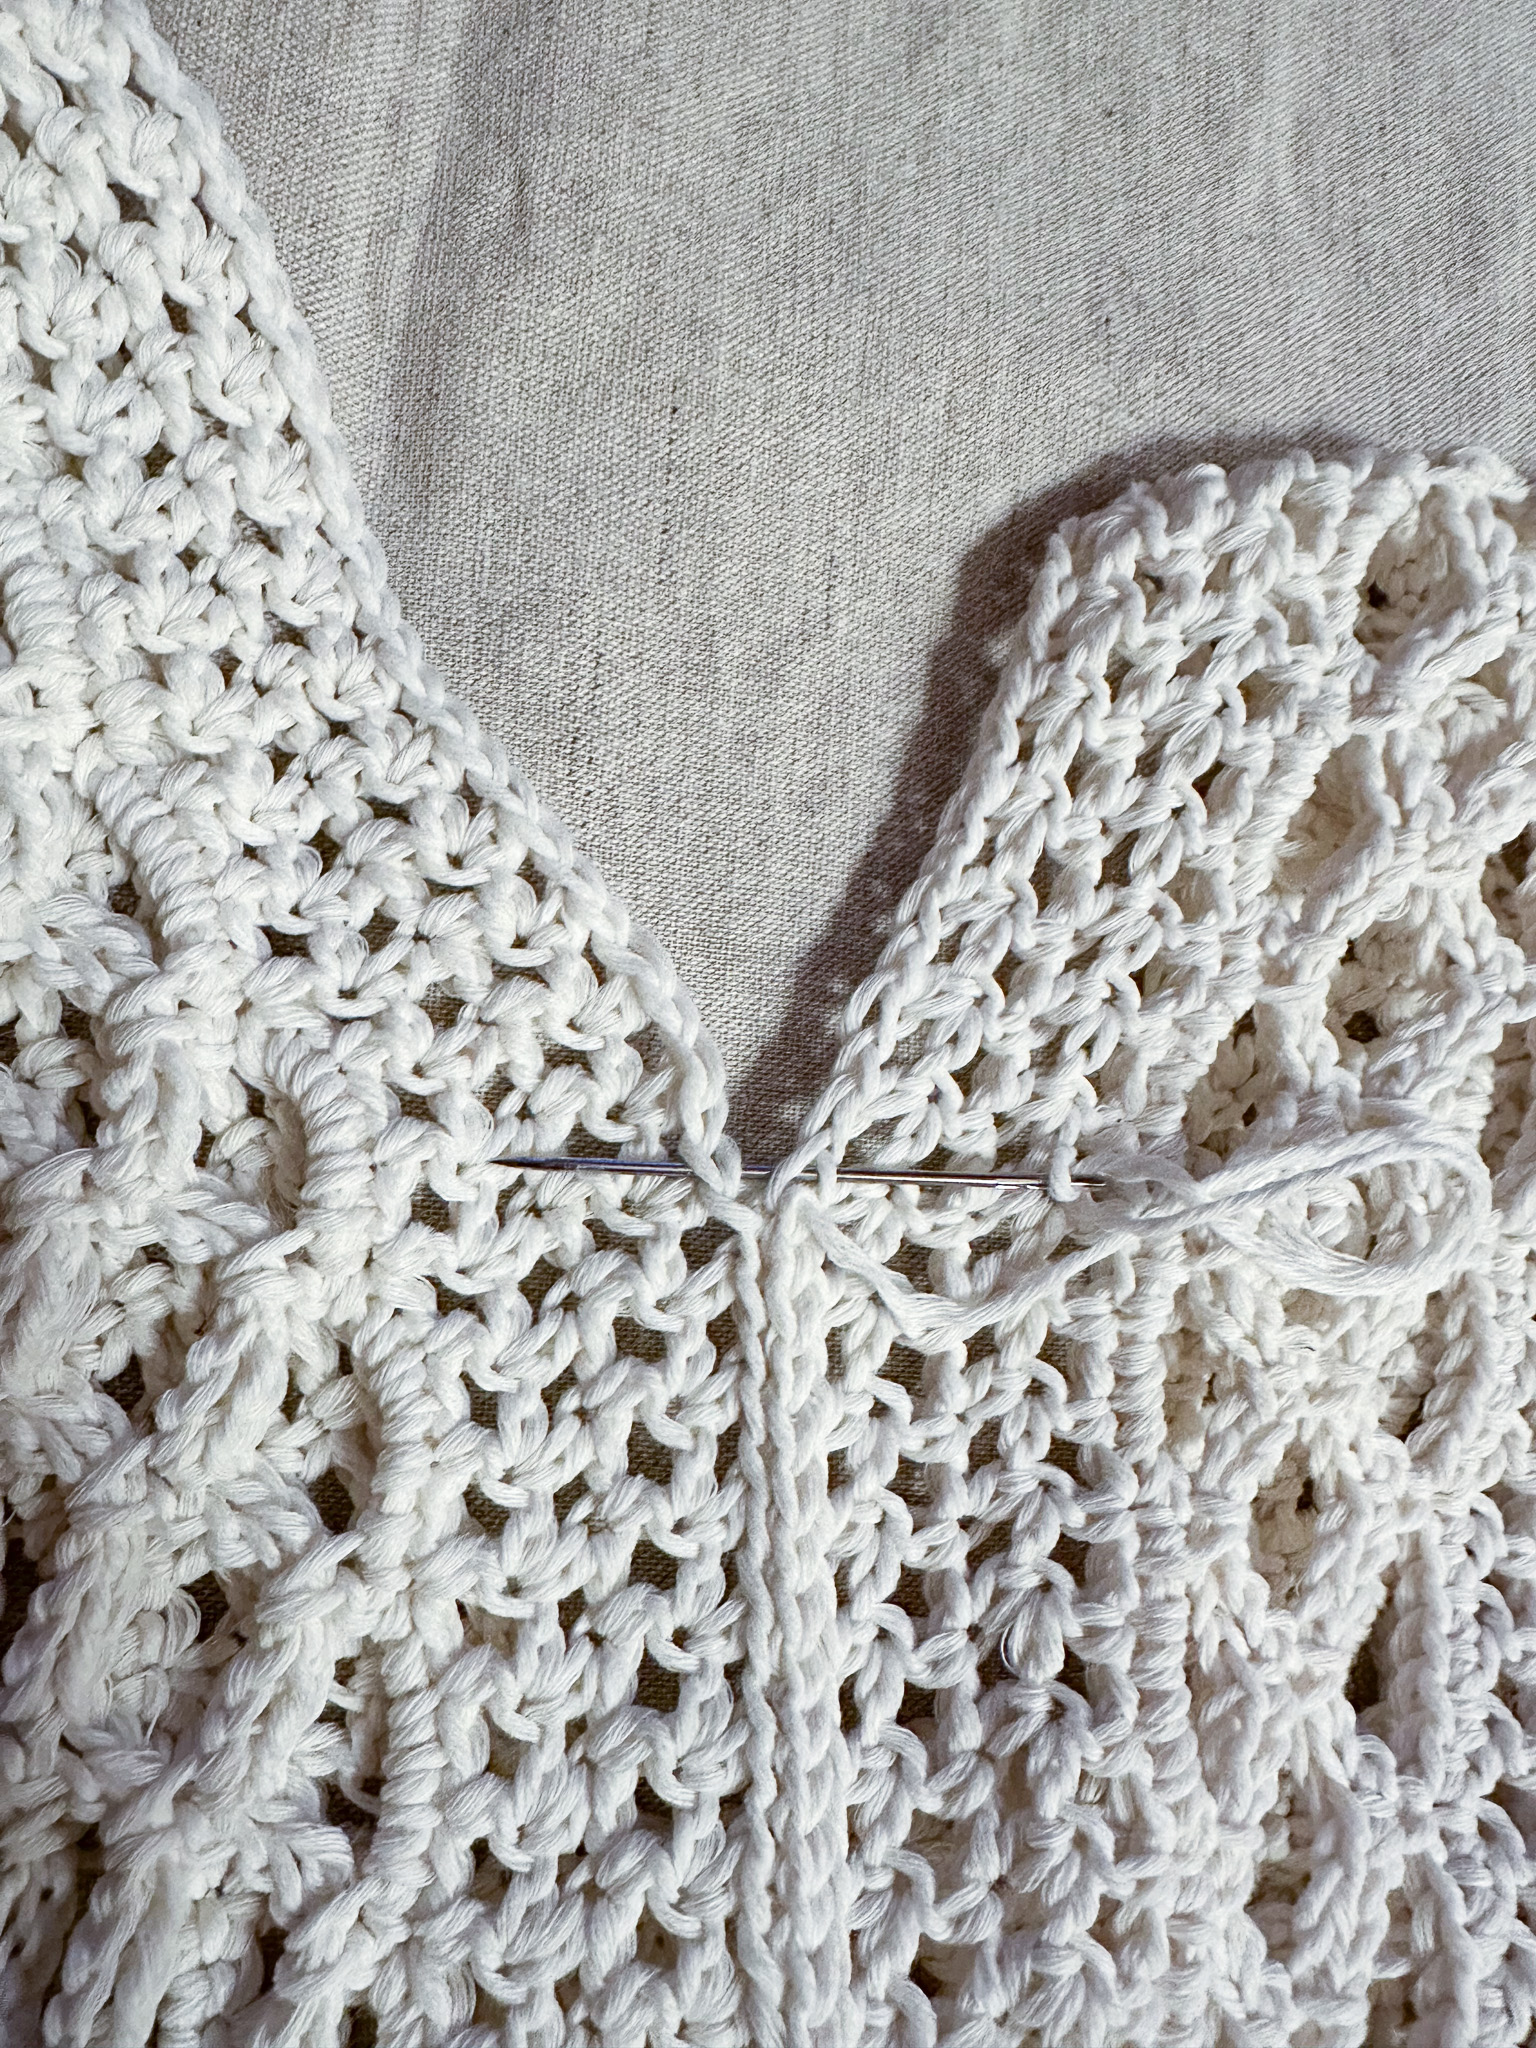
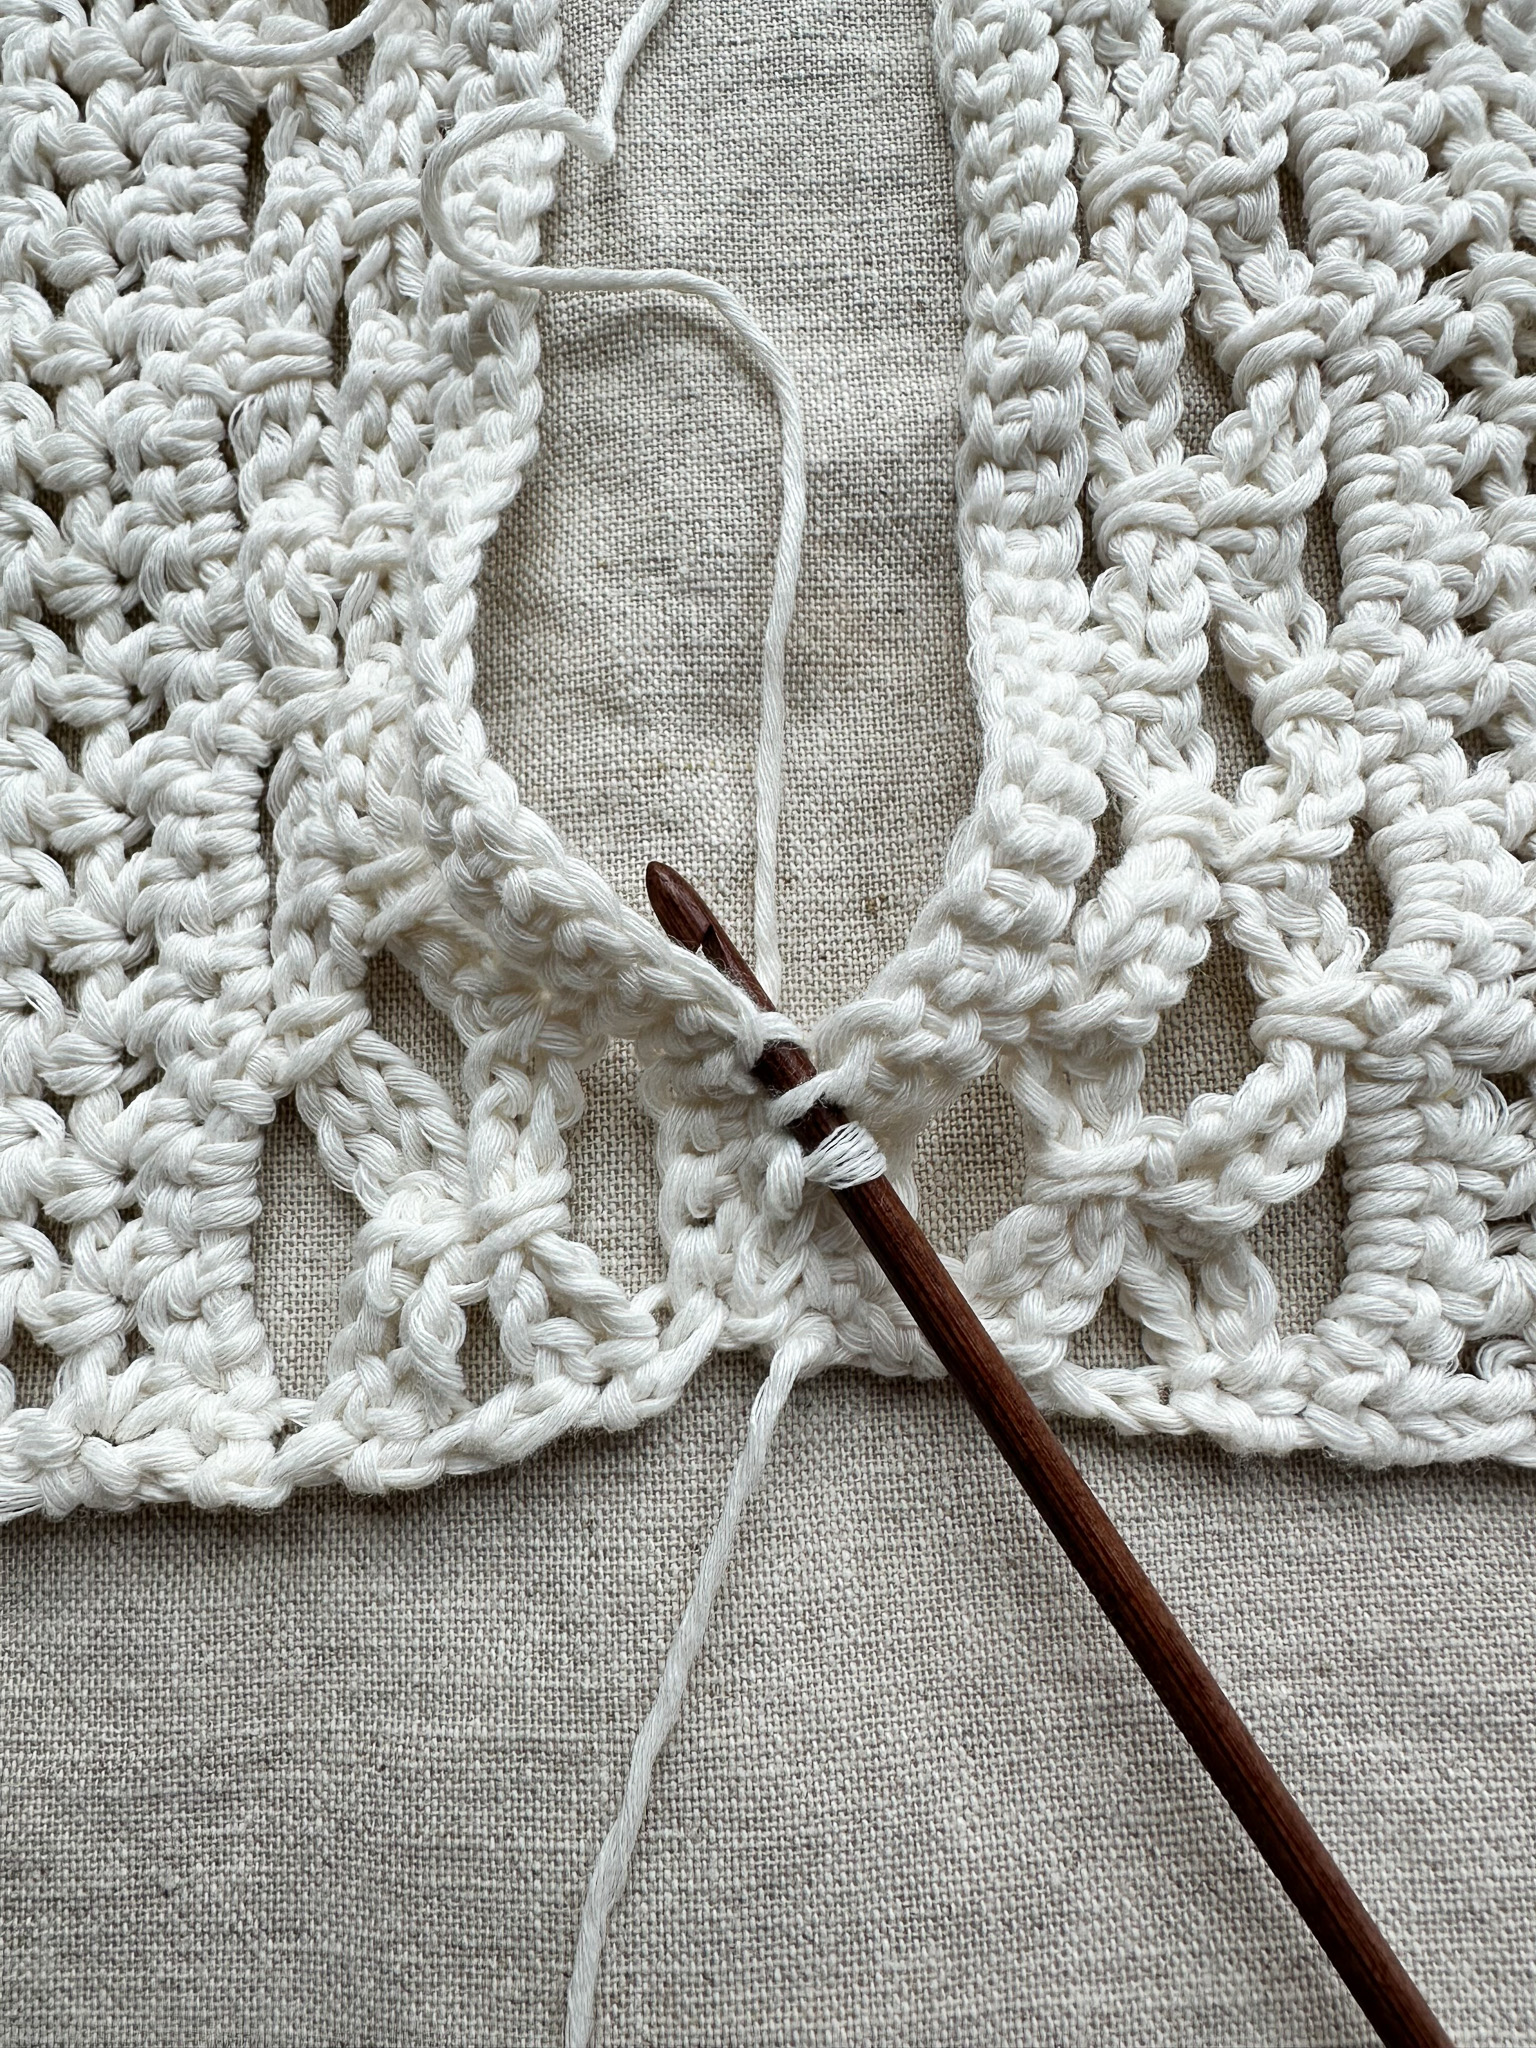
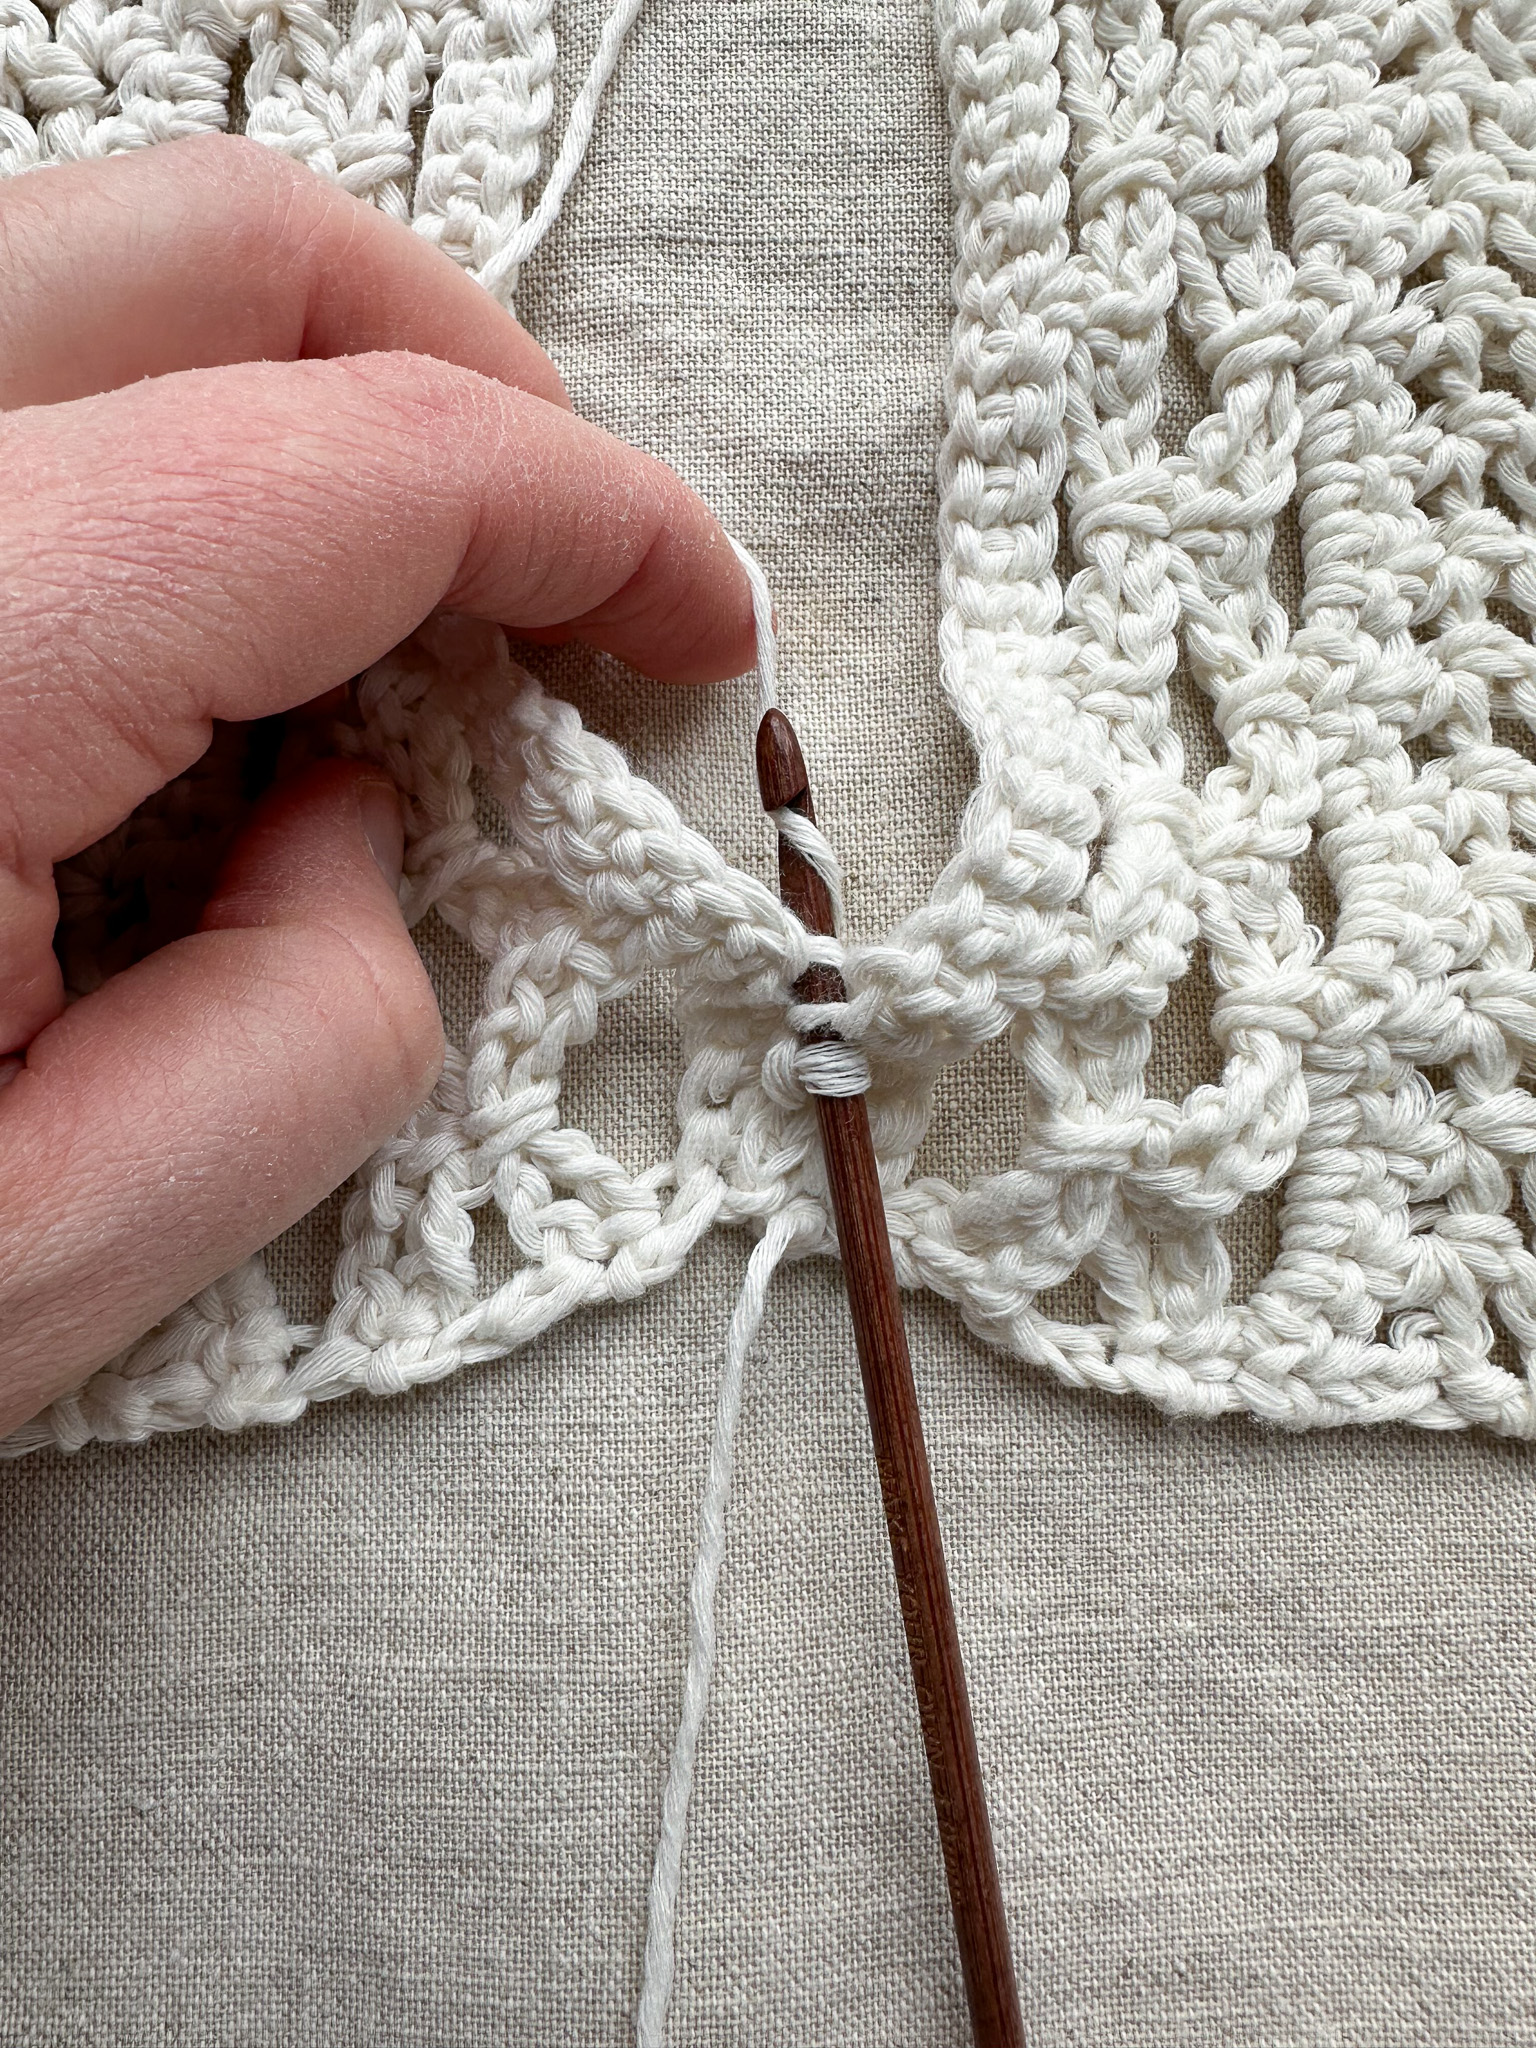
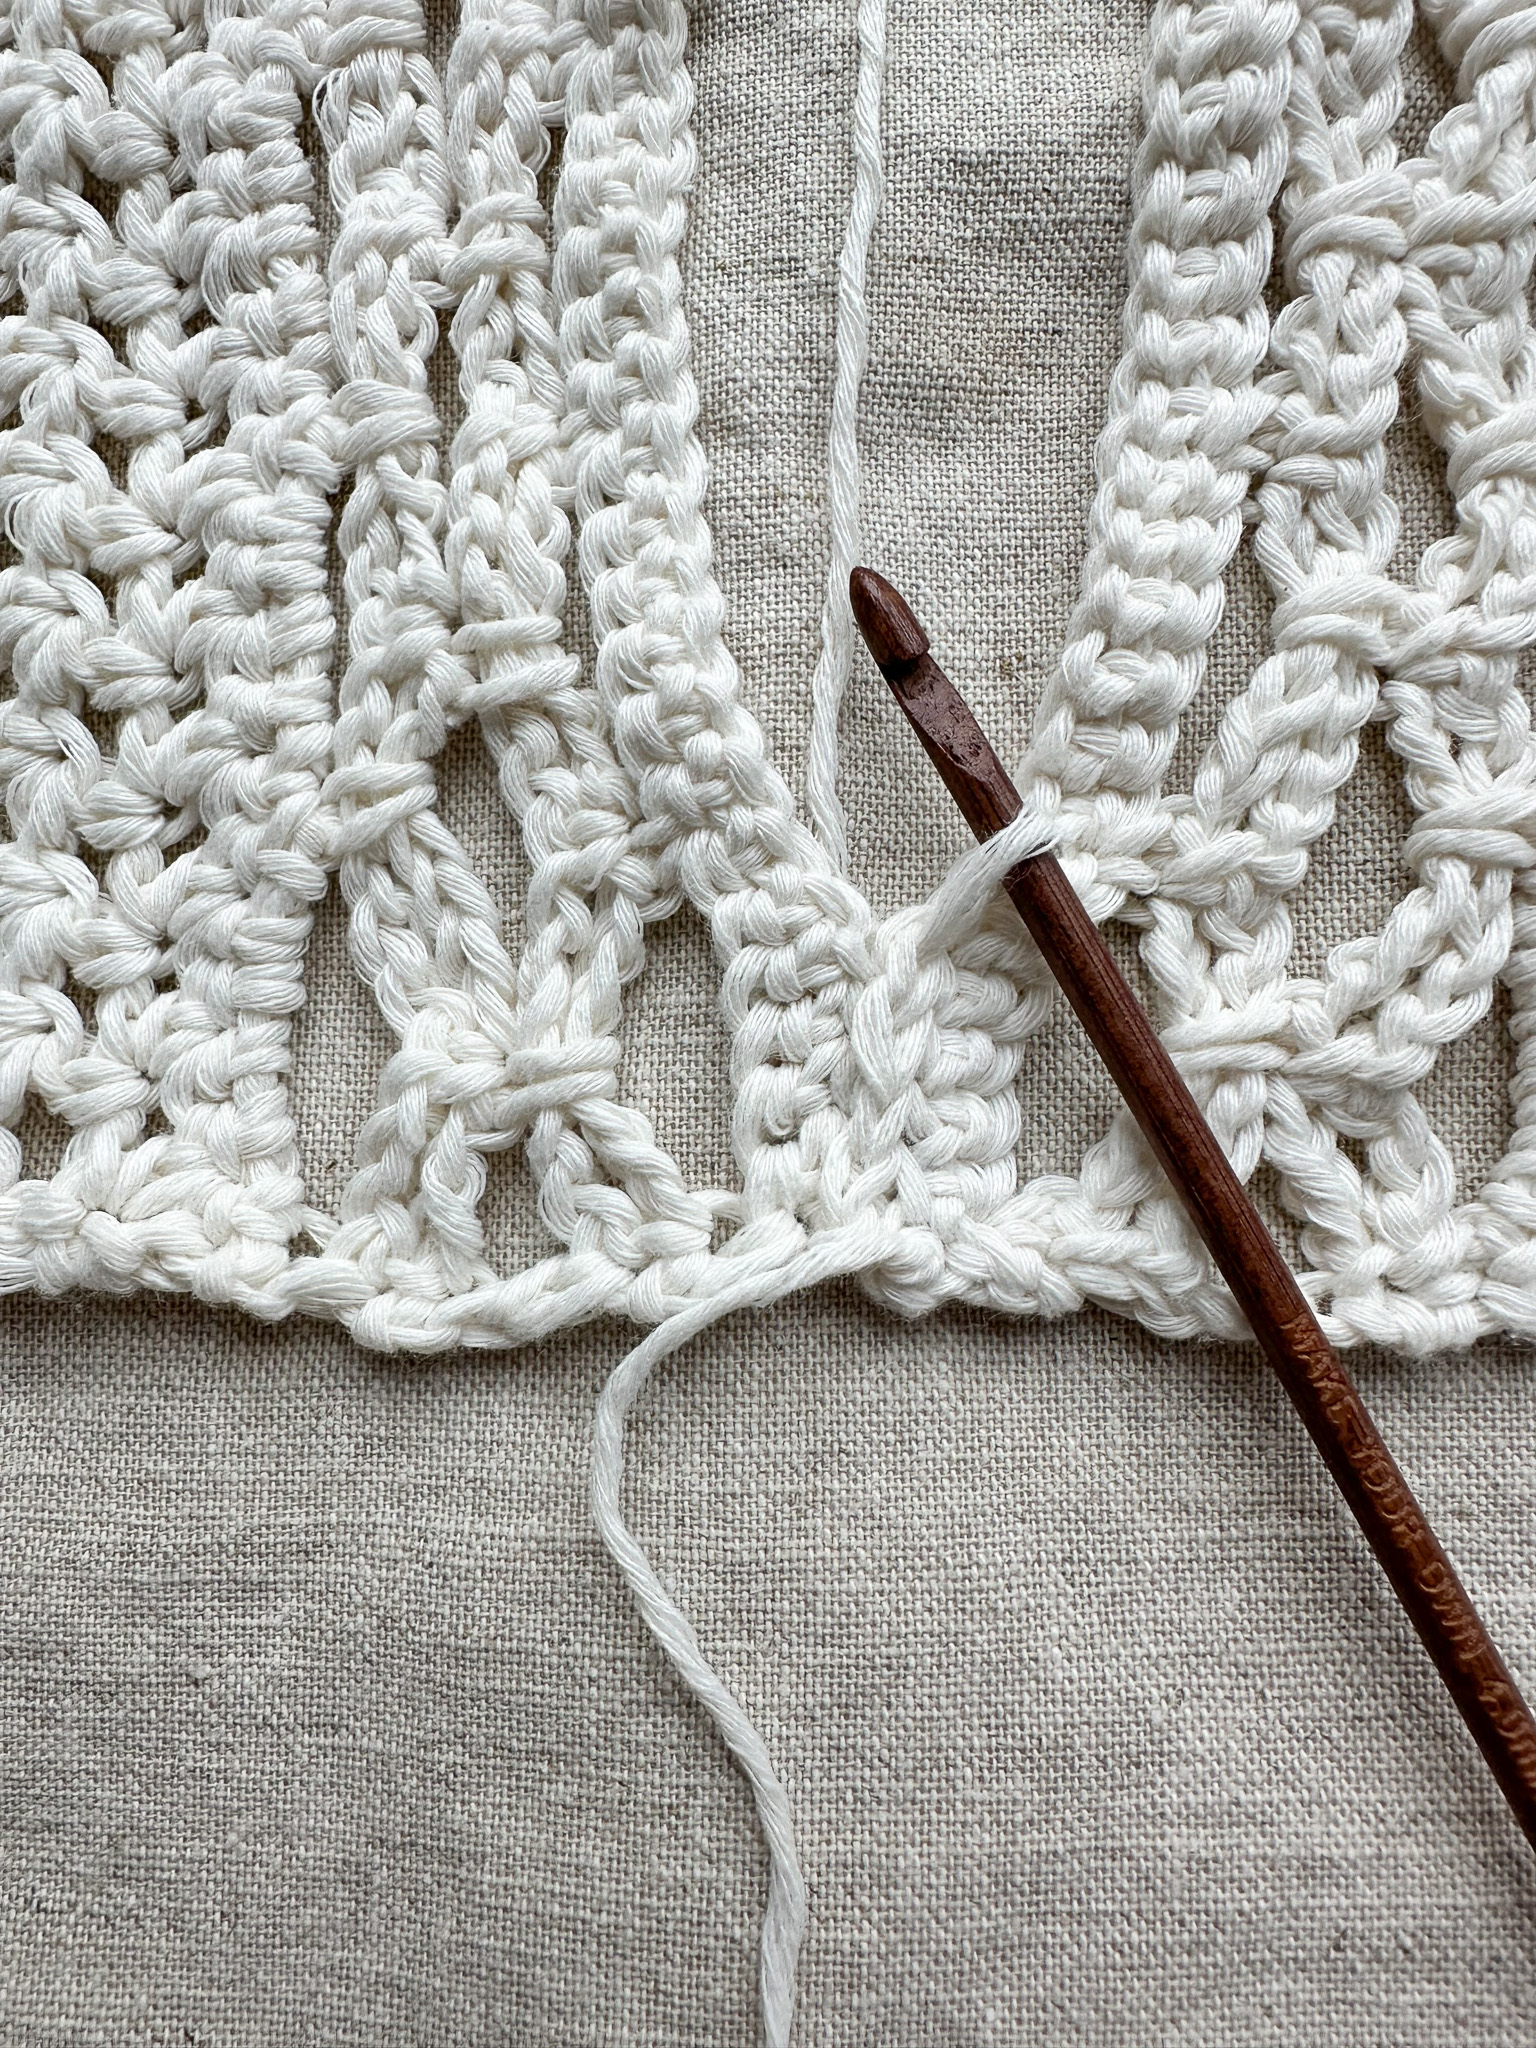
Crochet the center of the top together one third in from each side (towards the middle), leaving the middle third open for the neck opening. If you want a smaller V-neck, crochet more than one third together and leave a smaller opening for the top.
Secure the yarn with a few extra stitches at the top to create a sturdy finish and to hold the two halves together properly.
Fold the top in half and crochet the sides together along the long edges, approximately half the length. Leave the upper half unworked, which will form the arm openings. Fasten off the yarn.
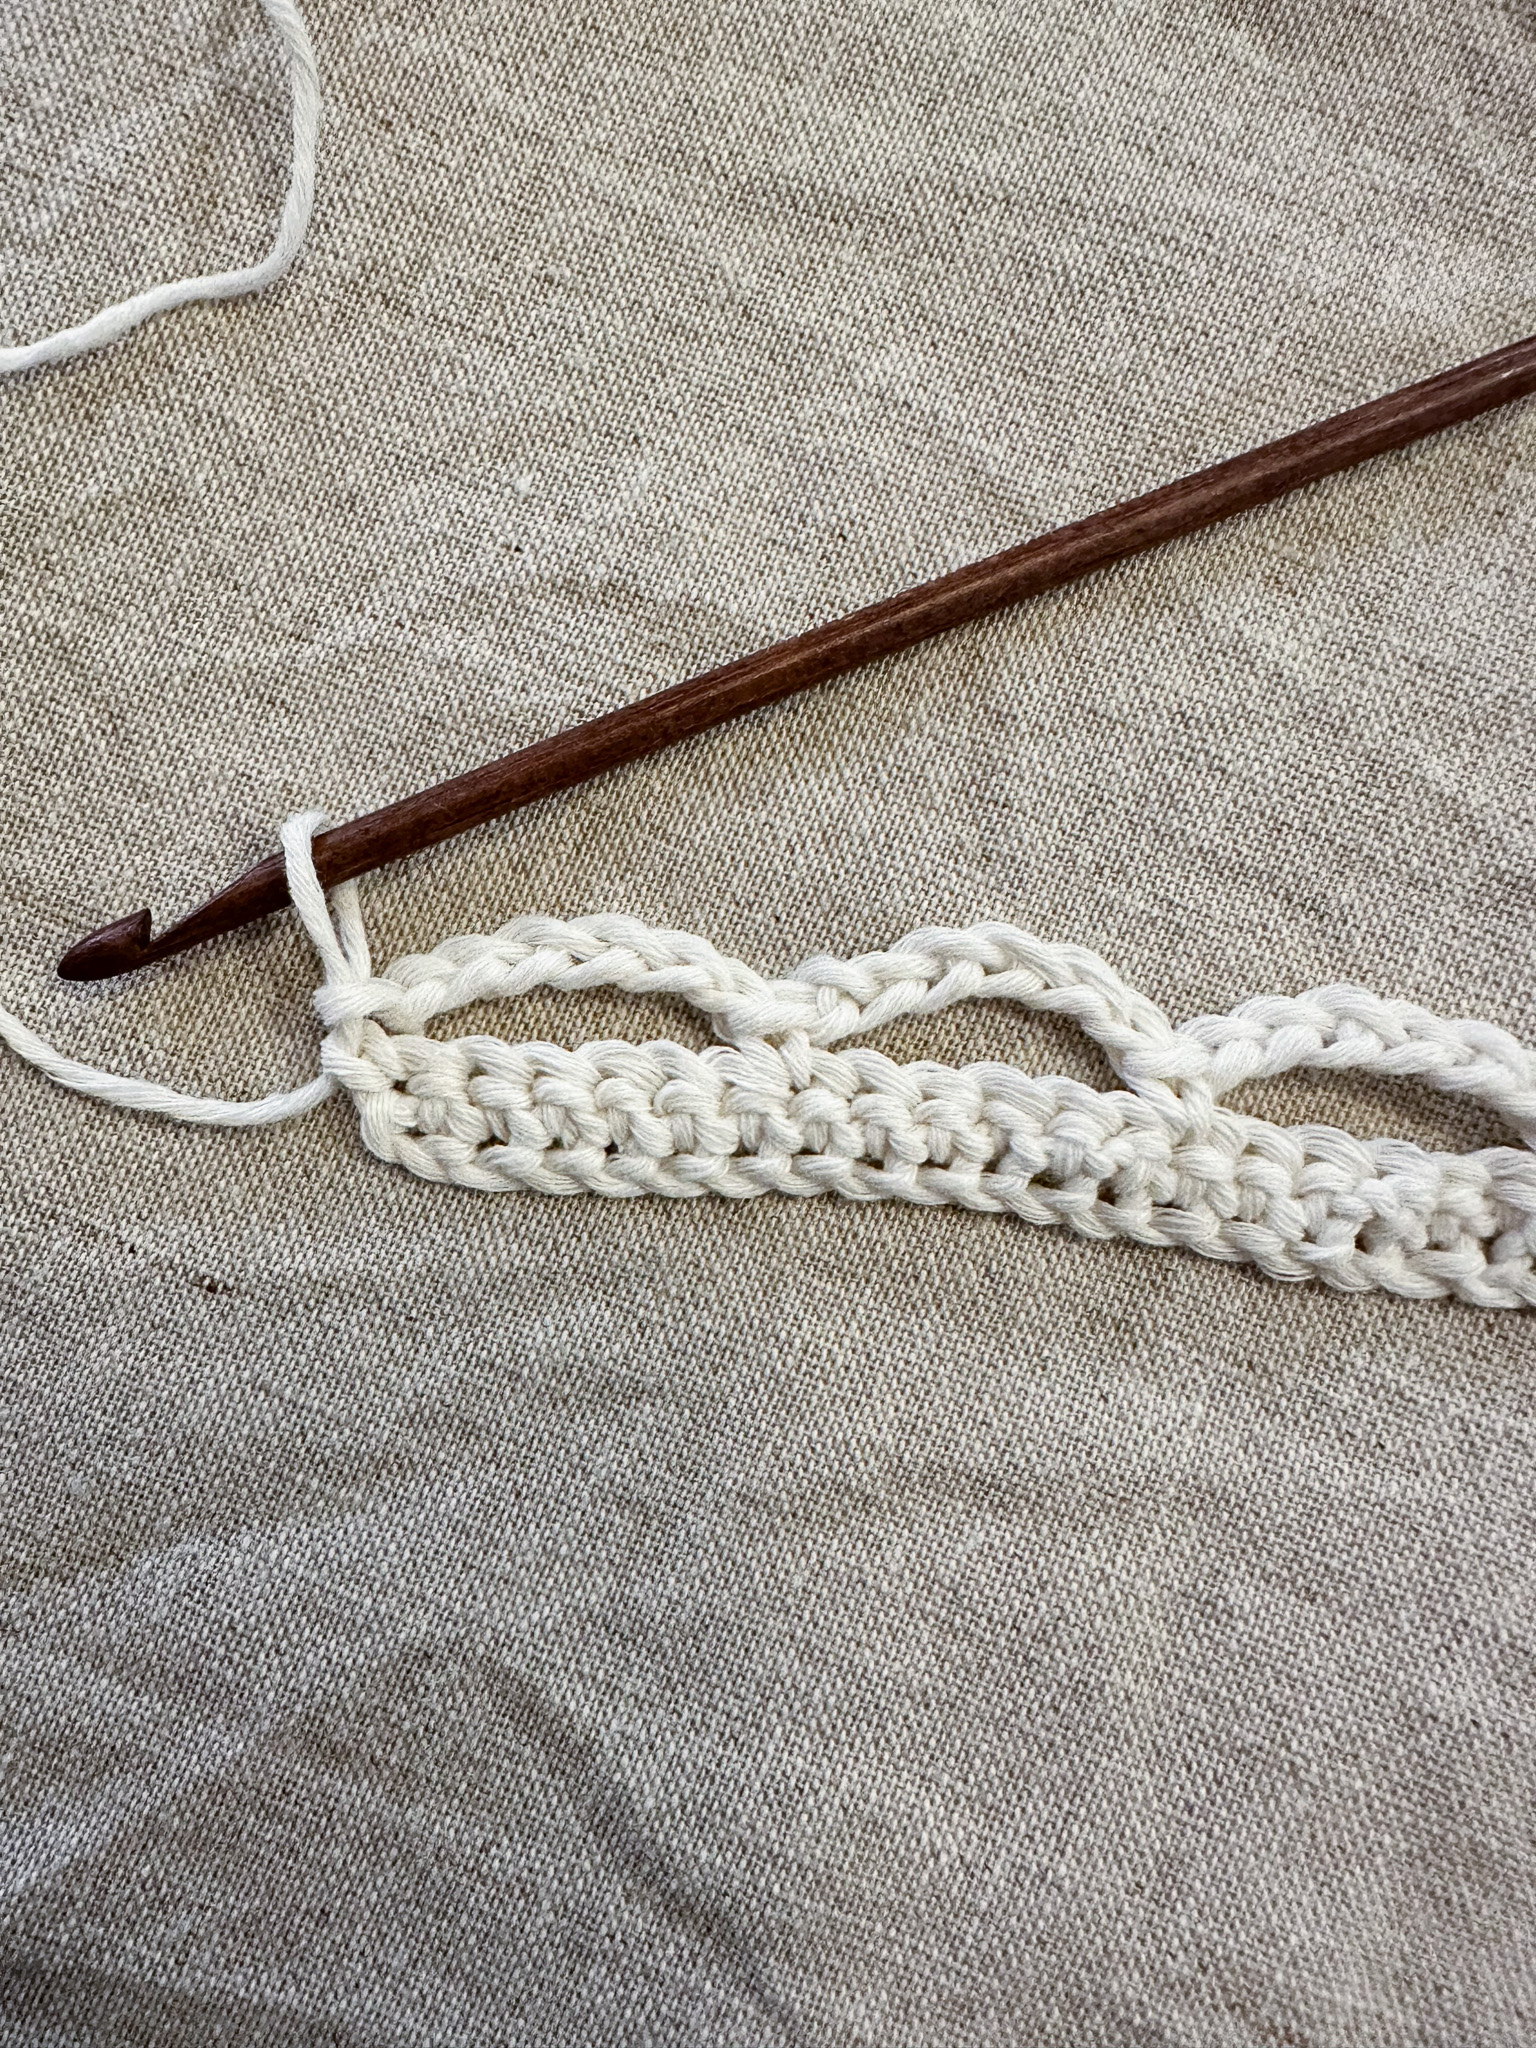
Joining technique:
To make the seam as invisible as possible, slip stitches are used here with the yarn worked “from underneath” rather than on top of the pieces.
Start by making a slip knot in any stitch where you want to begin. Make one slip stitch to create a secure start. Then place the yarn between your pieces in the direction you are going to work.
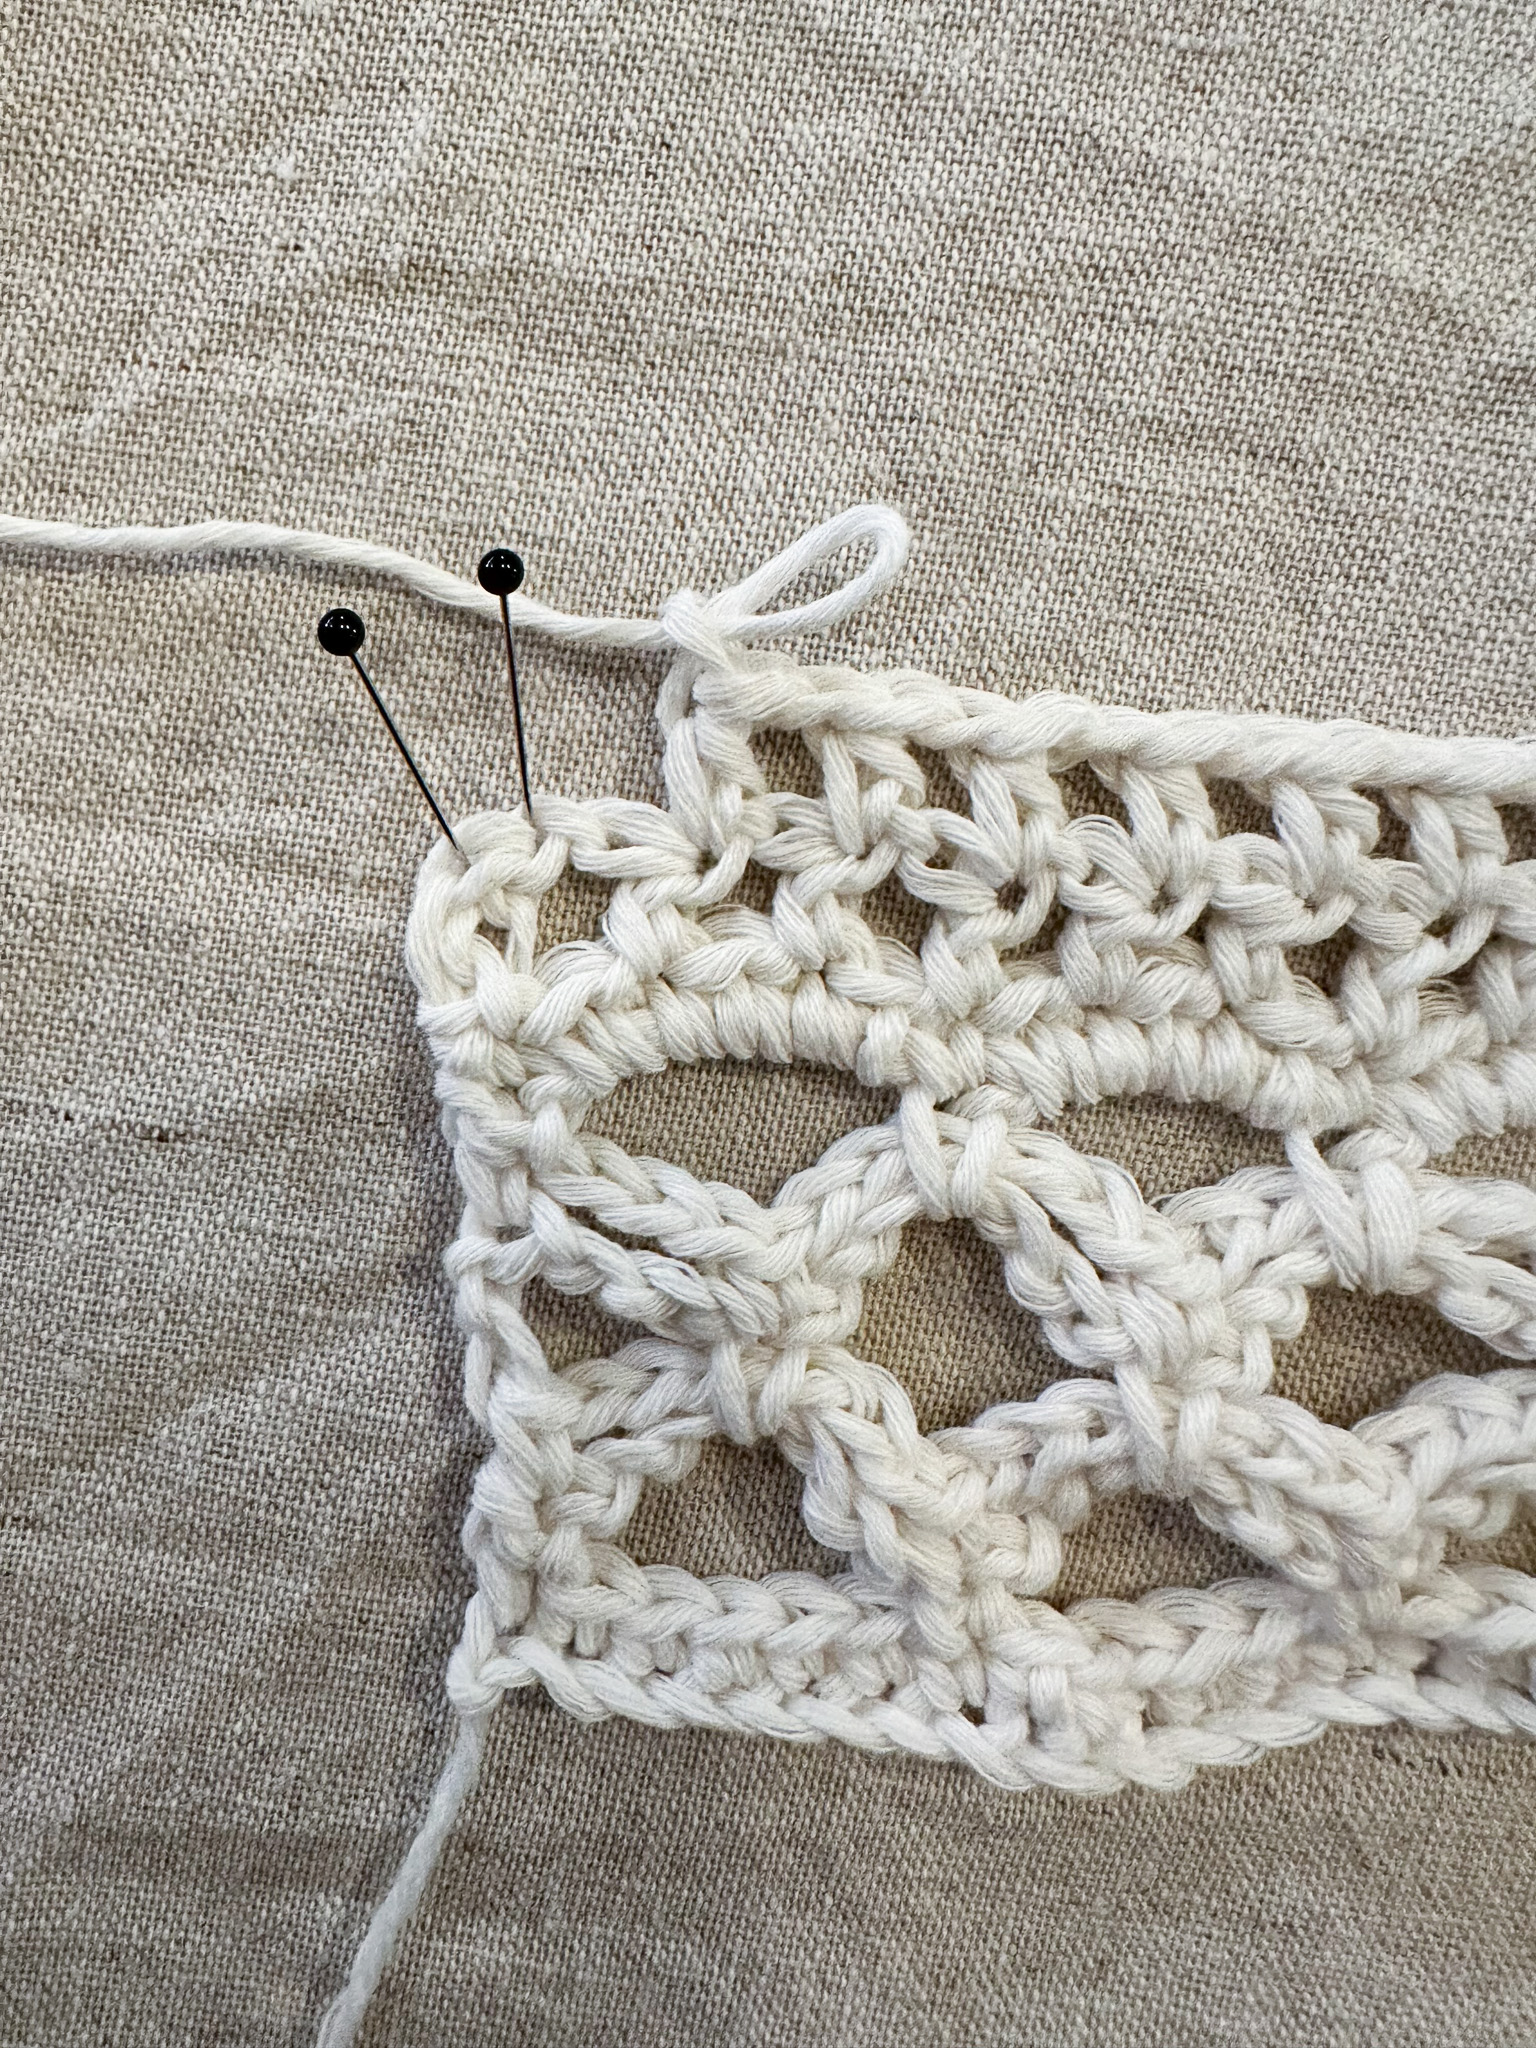
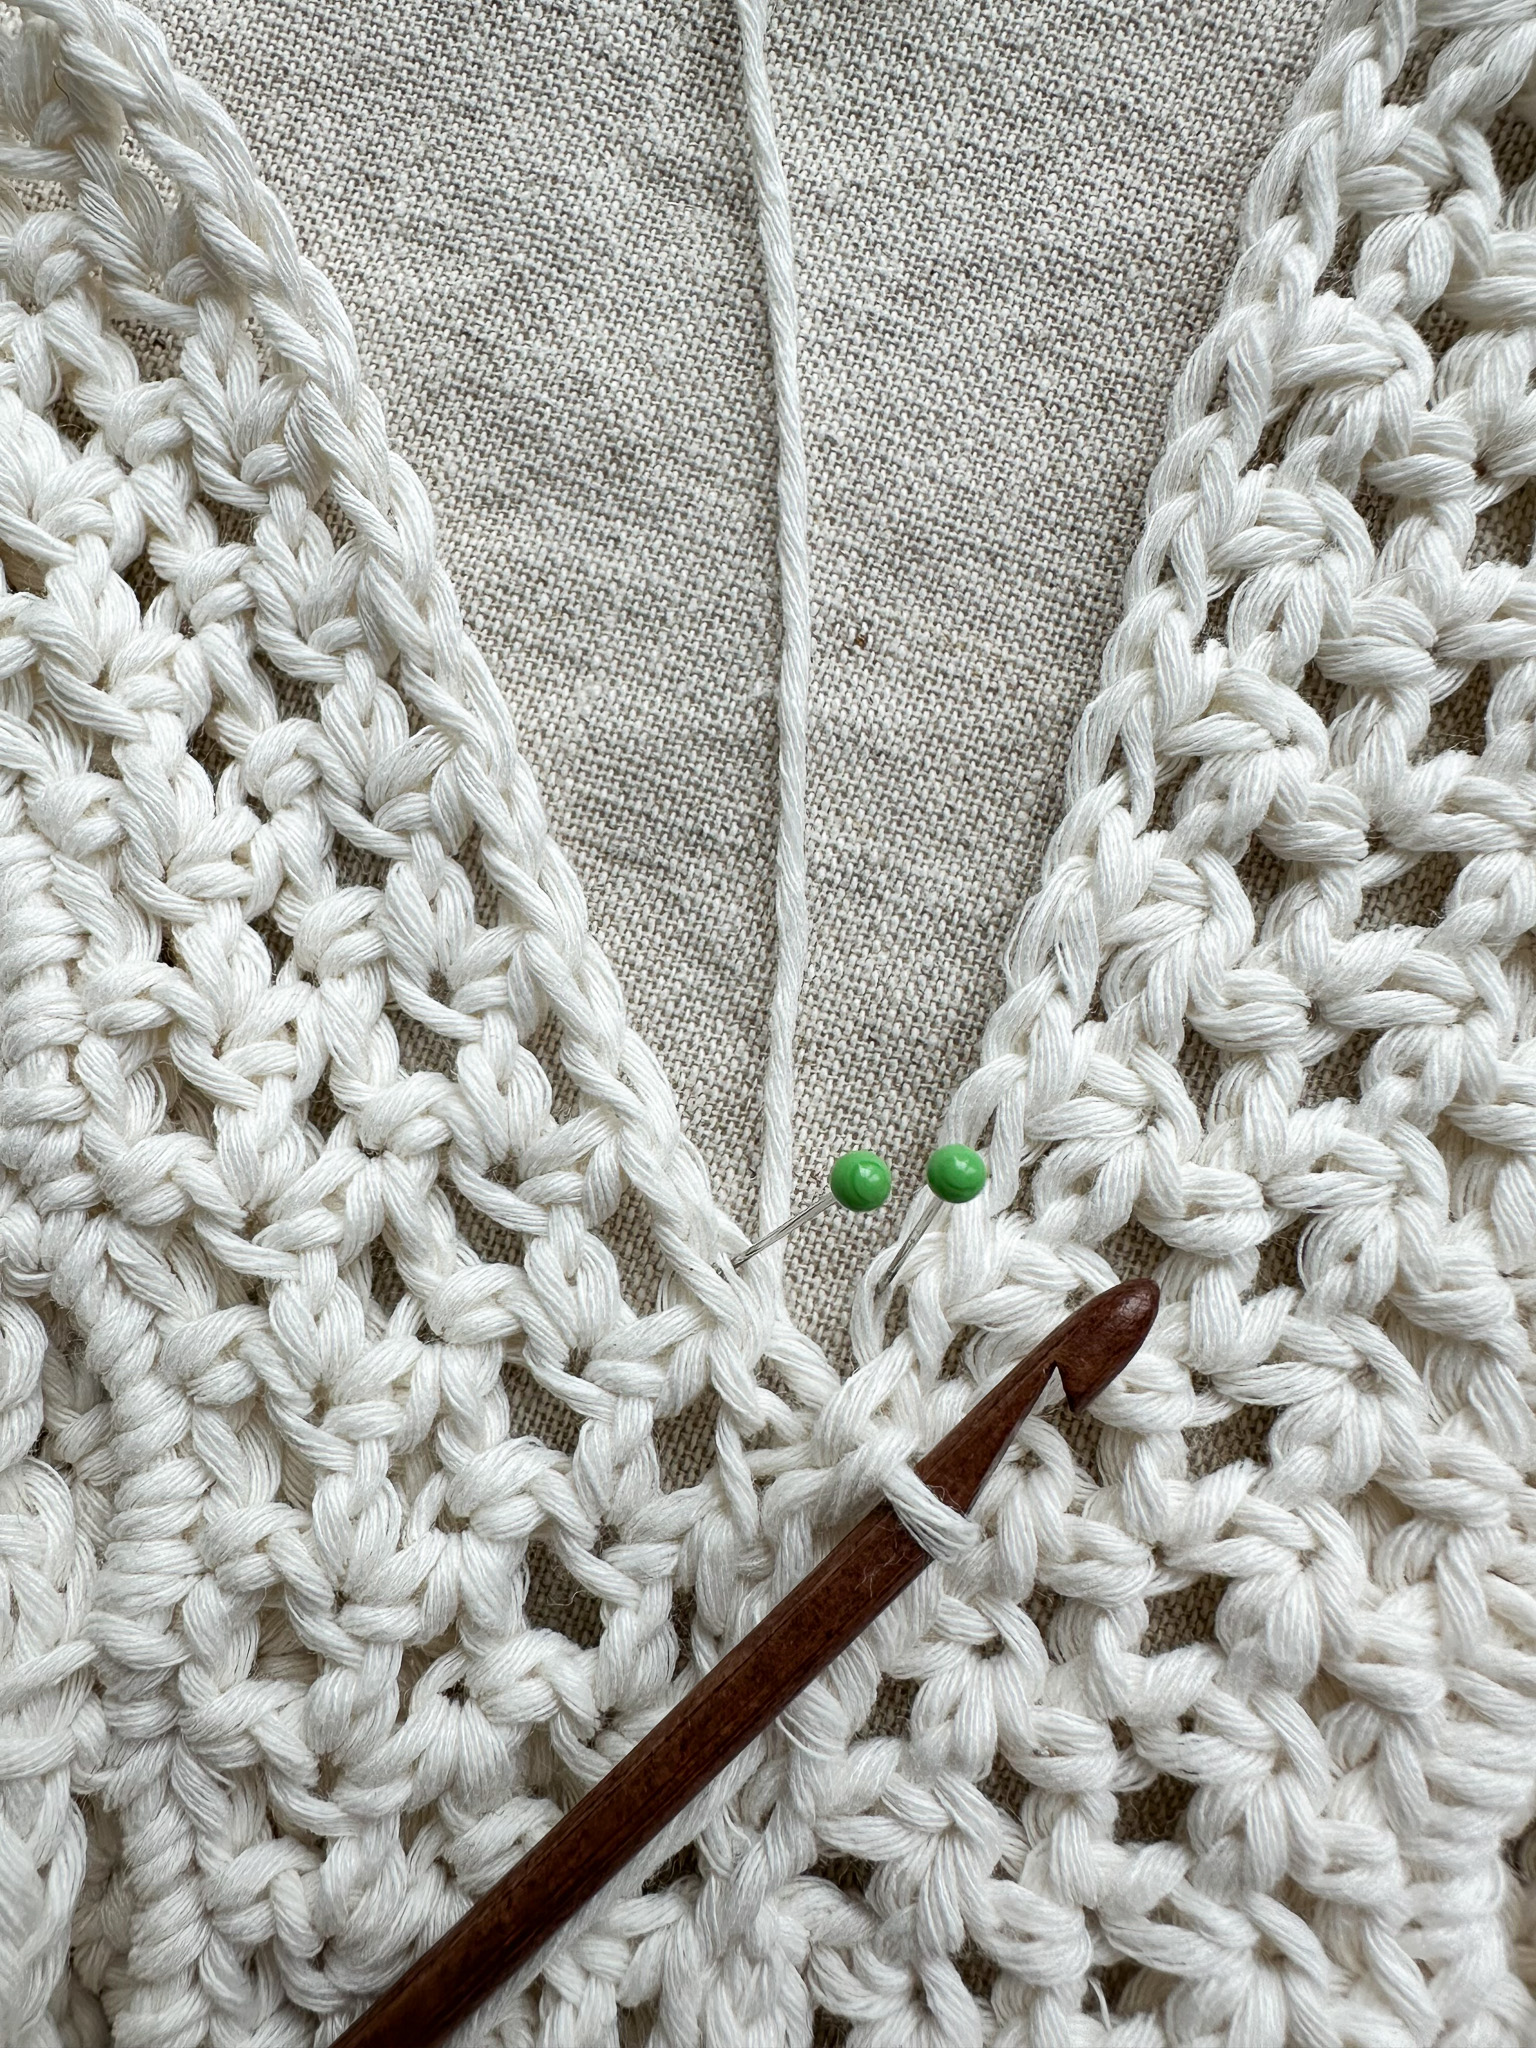
Hold the pieces in front of you, one on the right and one on the left. Insert the hook into the middle stitch loop of the first stitch on the right piece, then into the middle stitch loop of the first stitch on the left piece (see green needles in the picture).
Yarn over and pull through all loops on the hook at once (one slip stitch).
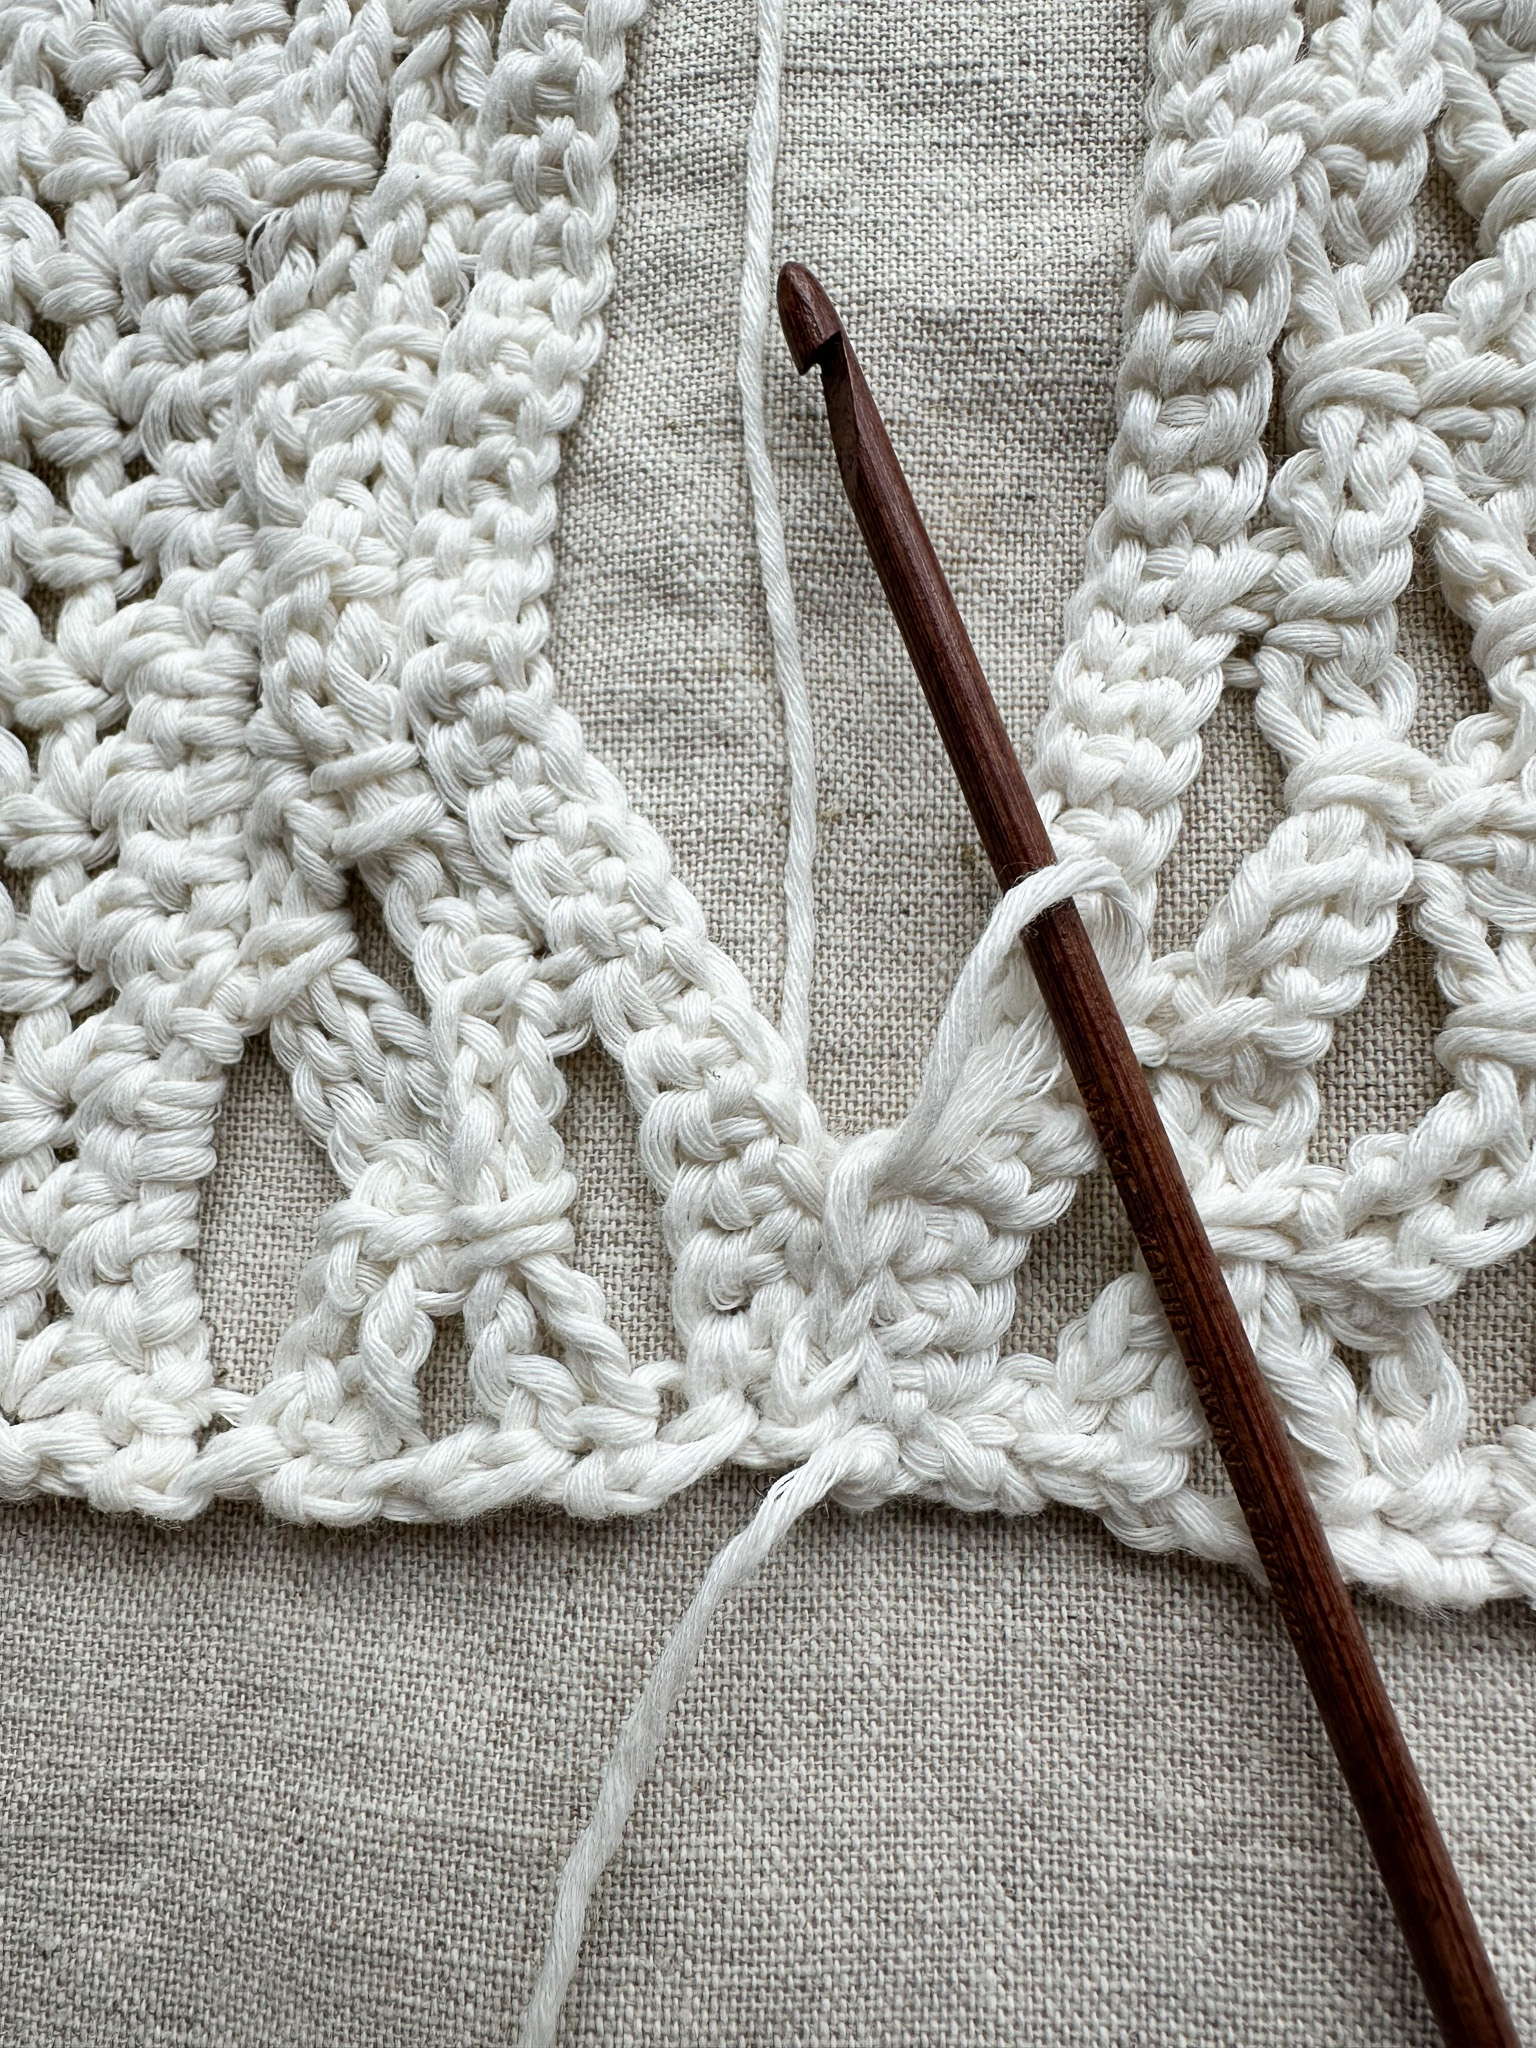

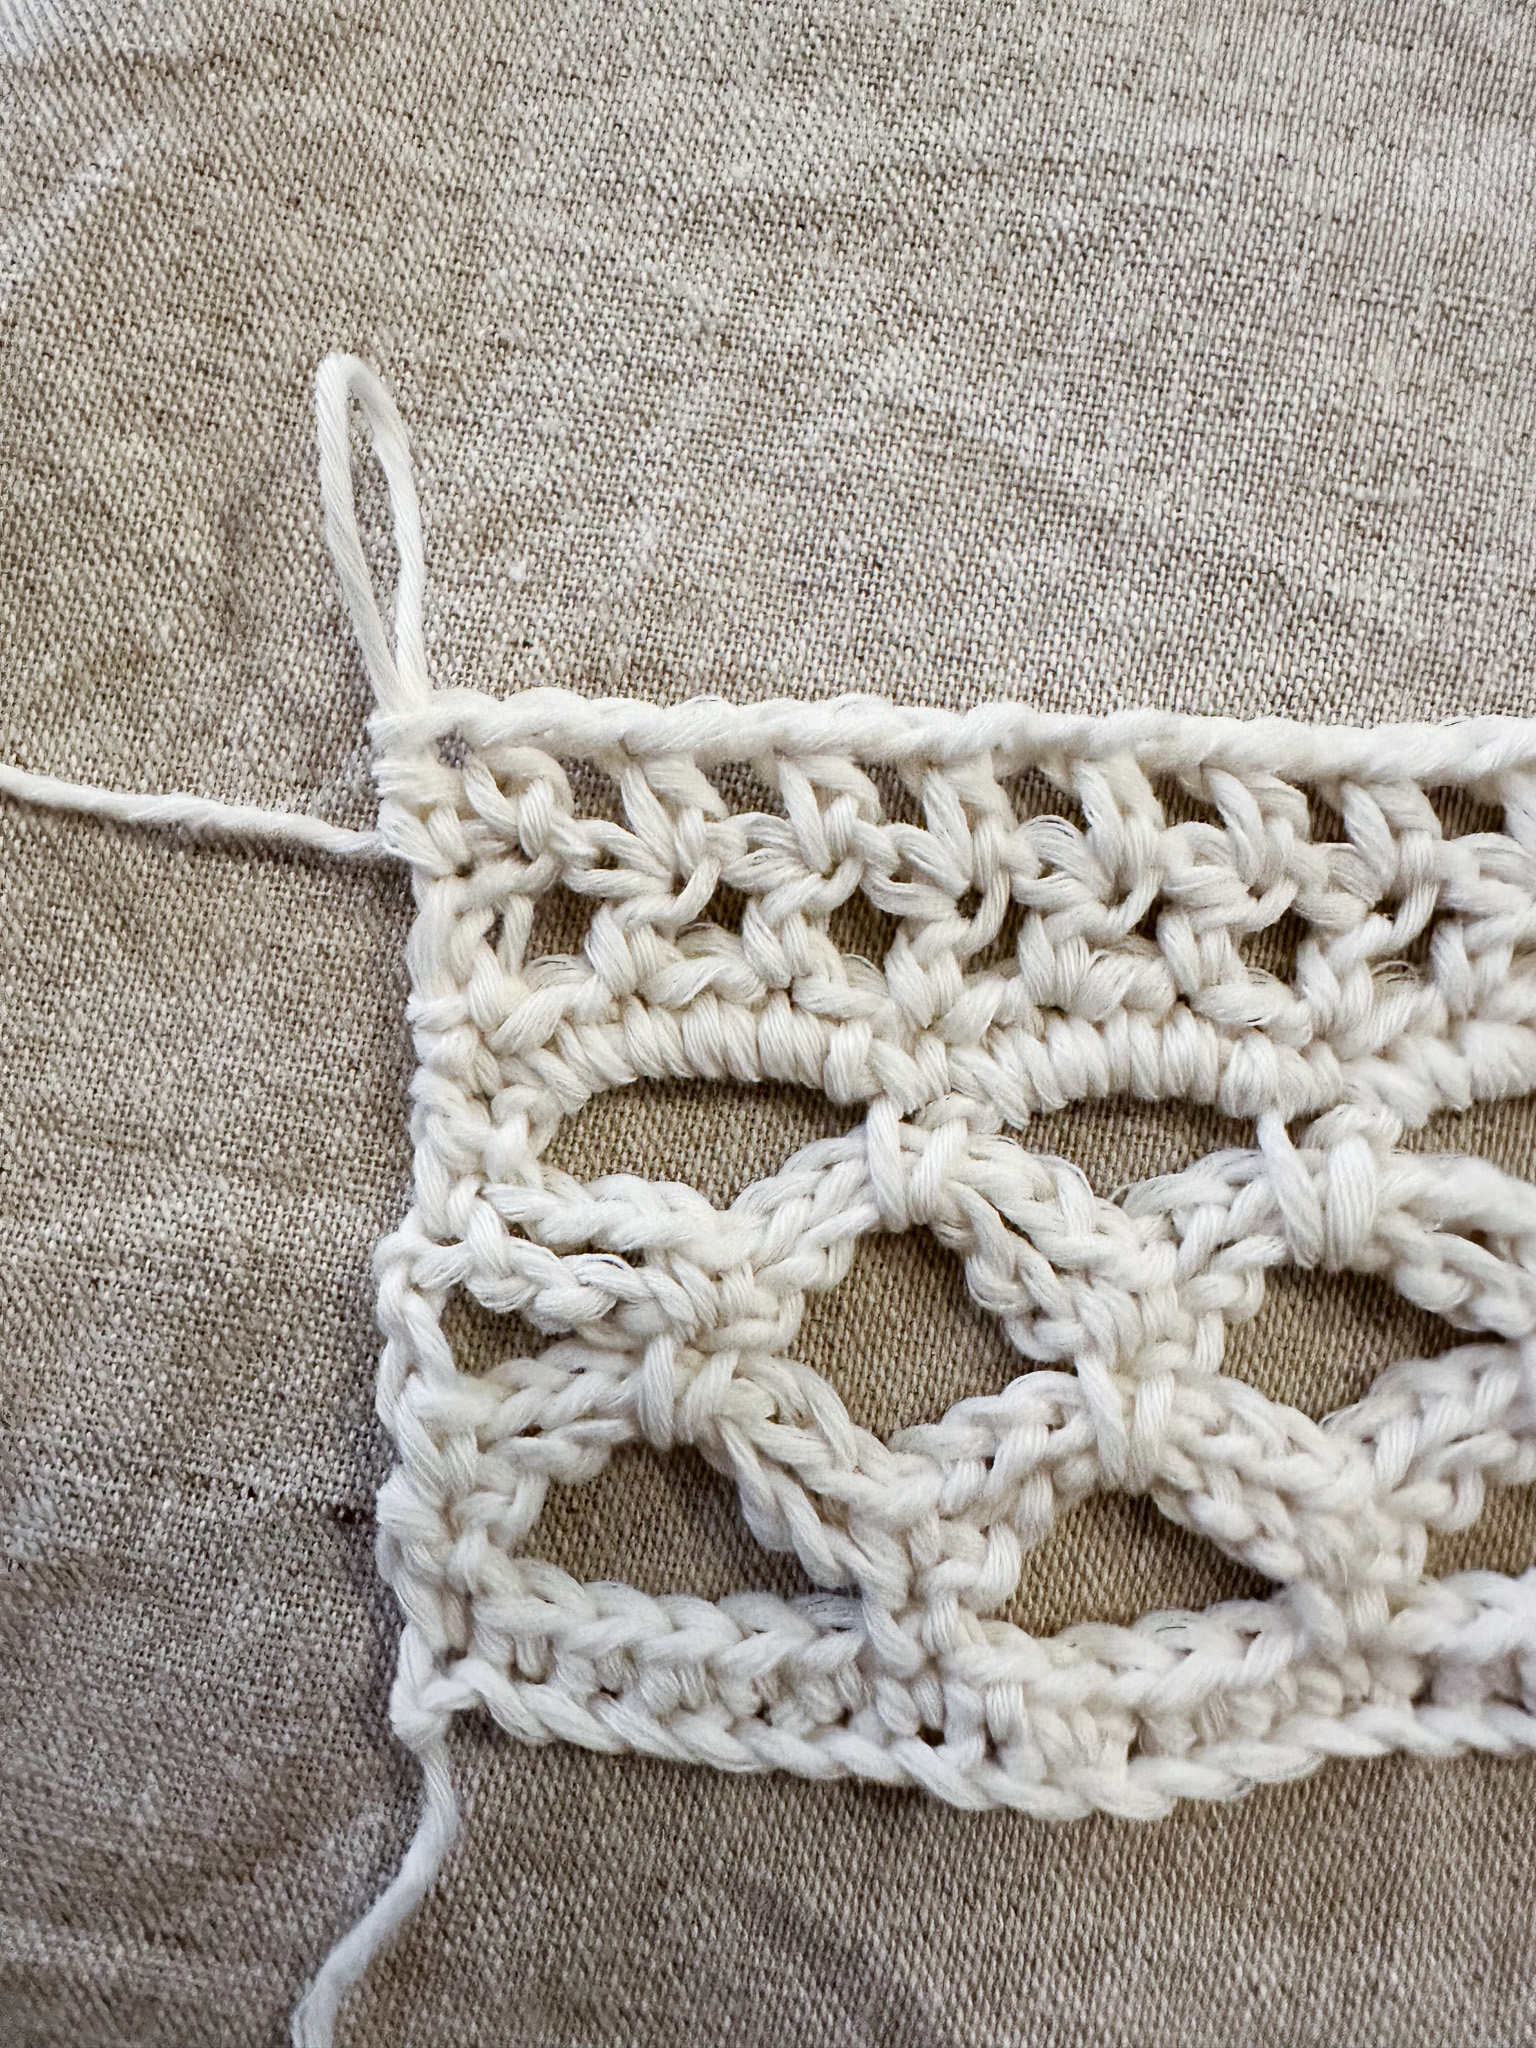
Finish by working one round of single crochets along the bottom edge of the top to create an even finish. Keep in mind that it is better to place the stitches slightly loosely rather than making too many tight single crochets, as this will cause the edge to become wavy like a ruffle. If it does become wavy, try working fewer single crochets.
Fasten off the yarn, and the top is now completely finished!
Well done ☺
Pattern with Crochet Terms
This section uses crochet terminology. For additional pictures or help, refer to the simpler version.
Abbreviations:
sc = single crochet
hdc = half double crochet
dc = double crochet
ch = chain
ch-sp = chain space
sk = skip
(...) = total number of stitches in the row
*…* = repeat instructions within *...*
TIP: How to get the right size for your garment
1. Make a Gauge Swatch and Measure Your Gauge
Crochet a gauge swatch using the stitch pattern specified in the pattern and measure how many stitches fit within 10 cm (4 inches). Once you know your gauge, you can calculate how many stitches you need to achieve the desired width of your garment.
How to do it: Chain enough stitches to make a swatch approximately 12–15 cm (5–6 inches) wide, then crochet at least three rows. Measure a section that is 10 cm (4 inches) wide and count the number of stitches within that section.
Once you know the number of stitches per 10 cm (4 inches), divide that number by 10 to find the number of stitches per centimeter. Then multiply this number by the desired width of your garment in centimeters. The result tells you how many stitches you need to start with to achieve the desired width.
Note: Be sure to adjust the stitch count according to the pattern instructions. Some patterns, for example, require an even number of stitches or a stitch count that is a multiple of a specific number.
2. Keep Your Crochet Tension in Mind
The size and drape of a garment—especially one made with double crochet stitches or other taller stitches—are greatly affected by your crochet tension and hook size. If you tend to crochet tightly, consider using a larger hook. This will help you achieve the correct measurements and create a fabric with a softer, more fluid drape.
Size
This top consists of two equally sized rectangles with two different panels that alternate to create the pattern.
Start by placing a measuring tape over your shoulder and measure how long the rectangle should be for your desired fit. The length of the rectangles/top shown in the picture is 100 cm. Measuring points are approximately at the waistband level in the front and back of the hips.
To achieve a length of 100 cm, we crocheted 181 stitches. If you want to make it longer or shorter, adjust the number of stitches per row.
NOTE! Do not measure until after approximately 3 rows, not directly after the foundation chain, as the measurement will not be accurate until the pattern has developed. This is our recommendation both if you made a swatch and if you did not.
To work Panel 1 correctly, the total stitch count must be divisible by 6 + 1 (for example, 180 (6 × 30) + 1 = 181). Each row must have 181 stitches to keep straight edges. One extra stitch is added in the foundation chain as a turning chain (181 + 1).
Important – Read before you start!
NOTE! Some rows use a turning ch, but not all. Pay attention to each row. If a turning ch is made, always sk it at the beginning of the next row.
Rectangle (make 2)
Foundation: ch 182 (181 + 1)
Panel 1
Row 1: sk 1, sc in each st across (181). ch 1, turn.
Row 2: sc in first st, ch 6, sk 5, sc x 30. (181, 30 ch-sps). ch 1, turn.
If you want, I can continue converting the rest (Rows 3–end + Panel 2) into the same clean US-pattern format so it becomes a fully professional crochet pattern.
Row 3: sc in first st, *ch 6, sk 5, sc* x 30. (181, 30 ch-sps).
Row 4: *ch 6, sc around both ch-spaces from Row 2 and Row 3* x 30, ch 3, dc in the last st of the row. (181, 29 full ch-sps and 2 half ch-sps at the beginning and end of the row). ch 1, turn.
Row 5: sc in first st, ch 3, sc in the sc worked around the ch-spaces, *ch 6, sc in the sc worked around the ch-spaces* x 29, ch 3, sk 3 ch, sc in the 4th ch of the ch-6 space. (181, 29 full ch-sps and 2 half ch-sps at the beginning and end of the row). ch 1, turn.
Row 6: sc in first st, ch 5, sk first half ch-space, sc around both ch-spaces from Row 4 and Row 5. *Ch 5, sc around both ch-spaces from Row 4 and Row 5* x 29. ch 5, sc in last st of the row. (181, 30 ch-spaces) ch 1, turn.
Row 7: sc in first st, *5 sc around ch-space, 1 sc* x 30. (181)
Panel 2
Row 8: stacked sc, *ch 1, sk 1, hdc* x 90. (181)
Row 9: stacked sc, hdc, *ch 1, sk 1, hdc* x 89, hdc. (181)
Row 10: repeat Row 8
Row 11: repeat Row 9
You have now completed the two different panels once. Repeat Rows 1–11 a total of 4 times (8 panels total), or as many times as needed to achieve your desired width for one half of the top. 8 panels correspond to approximately 35 cm.
Lay out the panels with the right side of the last row facing up. Place them with Panel 2 (the one with half double crochet) facing each other. This panel will be closest to the V-neck of the top.
Crochet the center of the top together, one third in from each side (towards the middle), and leave the middle third open for the head opening. If you want a smaller V-neck, crochet together more than one third and leave a smaller opening for the top.
Secure the yarn with a few extra stitches at the top to create a sturdy finish and to hold the two halves together properly.
Fold the top in half and crochet the sides together along the long edges, approximately half the length. Leave the upper half unworked, which will form the arm openings. Fasten off the yarn.
Joining technique:
To make the seam as invisible as possible, slip stitches are used here with the yarn worked “from underneath” rather than above the pieces.
Start by making a slip knot in any stitch where you want your starting point. Make one slip stitch to create a secure start. Then place the yarn between your pieces in the direction you are going to work.
Hold the pieces in front of you, one on the right and one on the left. Insert the hook into the middle loop of the first stitch on the right piece, then into the middle loop of the first stitch on the left piece (see green needles in the picture).
Yarn over and pull through all loops on the hook at once (one slip stitch).
Finish by working one round of single crochet along the bottom edge of the top to create an even finish. Keep in mind that it is better to space the stitches slightly rather than working too many single crochets close together, as this will cause the edge to become wavy like a ruffle. If it becomes wavy, try working fewer single crochets.
Fasten off the yarn, and the top is now completely finished!
Well done ☺
The rights to this pattern belong to MYO Make Your Own. The pattern or its pictures may not be copied, shared or resold either in parts or in its entirety, but you may sell items you have crocheted from this pattern. If you have questions about the pattern, contact MYO at hello@makeyourown.se.
TIP: How to get the right size for your garment
1. Make a Gauge Swatch and Measure Your Gauge
Crochet a gauge swatch using the stitch pattern specified in the pattern and measure how many stitches fit within 10 cm (4 inches). Once you know your gauge, you can calculate how many stitches you need to achieve the desired width of your garment.
How to do it: Chain enough stitches to make a swatch approximately 12–15 cm (5–6 inches) wide, then crochet at least three rows. Measure a section that is 10 cm (4 inches) wide and count the number of stitches within that section.
Once you know the number of stitches per 10 cm (4 inches), divide that number by 10 to find the number of stitches per centimeter. Then multiply this number by the desired width of your garment in centimeters. The result tells you how many stitches you need to start with to achieve the desired width.
Note: Be sure to adjust the stitch count according to the pattern instructions. Some patterns, for example, require an even number of stitches or a stitch count that is a multiple of a specific number.
2. Keep Your Crochet Tension in Mind
The size and drape of a garment—especially one made with double crochet stitches or other taller stitches—are greatly affected by your crochet tension and hook size. If you tend to crochet tightly, consider using a larger hook. This will help you achieve the correct measurements and create a fabric with a softer, more fluid drape.
Size
This top consists of two equally sized rectangles with two different panels that alternate to create the pattern.
Start by placing a measuring tape over your shoulder and measure how long the rectangle should be for your desired fit. The length of the rectangles/top shown in the picture is 100 cm. Measuring points are approximately at the waistband level in the front and back of the hips.
To achieve a length of 100 cm, we crocheted 181 stitches. If you want to make it longer or shorter, adjust the number of stitches per row.
NOTE! Do not measure until after approximately 3 rows, not directly after the foundation chain, as the measurement will not be accurate until the pattern has developed. This is our recommendation both if you made a swatch and if you did not.
To work the pattern in panel 1, the total number of stitches must be divisible by 6 + 1 (for example, 180 (6 × 30) + 1 = 181). Each row of the rectangle should have a total of 181 stitches to keep the edges straight. When making the foundation chain, add 1 extra stitch to serve as a turning chain (181 + 1).
Important – Read before you begin!
NOTE! After some rows, you will make a chain stitch when turning, but not after all rows. Pay close attention to the instructions for each row.
If a turning chain is made, always skip it at the beginning of the next row.
Below you will find a video showing the techniques used in Rows 2–9 if you need guidance.
Rectangle (make 2)
Foundation: Chain 182 (181 + 1). If you are unsure how to crochet a chain, see the video below.
Panel 1
Row 1: Skip the first stitch. Work 1 single crochet in each stitch across the row. You should have a total of 181 stitches. Chain 1, turn.
There is a video for Rows 2–9 in Step 1.
Row 2: Skip the turning chain, make one single crochet in the first stitch. Then make 6 chain stitches. Skip 5 stitches and make one single crochet. You have now created a chain loop.
Make 29 more chain loops in the same way, with single crochets in between, so that you have a total of 30 chain loops across the row.
NOTE! If you started with a different number of chain stitches in the foundation, the number of loops will be different.
Make 1 chain stitch and turn.
Row 3: Skip the chain stitch, work one single crochet in the first stitch. Then make 6 chain stitches. Skip the chain space and work one single crochet between the chain spaces from the previous row. Repeat across the row. Do not make a chain stitch before turning!
Row 4: Make 6 chain stitches. Work one single crochet around the chain loops from Row 2 and Row 3 so that they are held together by the single crochet.
Make 6 chain stitches and work one single crochet around loop number 2 from Rows 2 and 3. Continue in the same way across the row.
After the last loop, make 3 chain stitches and finish the row with one double crochet in the last stitch.
This row starts with a half loop, followed by 29 full loops, and ends with another half loop.
Make 1 chain stitch and turn.
Row 5: Skip the chain stitch and work one single crochet in the first stitch. Make 3 chain stitches and then work one single crochet into the single crochet that was worked around the loops from Row 4.
Make 6 chain stitches and then work one single crochet into the single crochet that was worked around the loops from Row 5 (see red needle). Continue in this way until the last half loop.
You are now at the last loop. Make 3 chain stitches in a chain. Skip 3 chain stitches in the loop from Row 4 and work a final single crochet into the 4th chain stitch of the chain. You should have the same number of loops as in Row 4.
Make 1 chain stitch and turn.
Row 6: Skip the chain stitch and work one single crochet in the first stitch. Make 5 chain stitches, skip the first half loop. Work one single crochet around the chain loops from Row 4 and Row 5.
Repeat: make 5 chain stitches and one single crochet around the chain loops across the row, and place the final single crochet in the last stitch of the row.
You should now have a total of 30 chain loops.
Make 1 chain stitch and turn.
Row 7: Skip the chain stitch and work one single crochet in the first stitch. Work 5 single crochets around the chain loop. Work one single crochet in the stitch between the loops (see green needle). Continue in the same way across the row. (181 single crochets in total).
Panel 2
NOTE: In Panel 2, no chain stitches are made when turning!
Row 8: Start the row with a stacked single crochet. Then make 1 chain stitch, skip 1 stitch, and work 1 half double crochet. Repeat this (1 chain stitch, then 1 half double crochet) a total of 90 times. Turn.
Row 9: Start the row with a stacked single crochet. Then work one half double crochet in the next stitch. Make 1 chain stitch, skip 1 stitch, and work 1 half double crochet. Repeat this (1 chain stitch and then 1 half double crochet) a total of 89 times. Finish the row with one half double crochet in the last stitch.
Row 10: Repeat Row 8.
Row 11: Repeat Row 9.
You have now completed the two different panels once. Repeat Rows 1–11 a total of 4 times (8 panels in total), or as many times as needed to achieve your desired width for one half of the top.
8 panels correspond to approximately 35 cm.
Make one more rectangle.
Lay out the first rectangle with the right side of the last row facing up. Place the rectangles with Panel 2 (the one with half double crochets) facing each other. This panel will be closest to the V-neck of the top.
Crochet the center of the top together one third in from each side (towards the middle), leaving the middle third open for the neck opening. If you want a smaller V-neck, crochet more than one third together and leave a smaller opening for the top.
Secure the yarn with a few extra stitches at the top to create a sturdy finish and to hold the two halves together properly.
Fold the top in half and crochet the sides together along the long edges, approximately half the length. Leave the upper half unworked, which will form the arm openings. Fasten off the yarn.
Joining technique:
To make the seam as invisible as possible, slip stitches are used here with the yarn worked “from underneath” rather than on top of the pieces.
Start by making a slip knot in any stitch where you want to begin. Make one slip stitch to create a secure start. Then place the yarn between your pieces in the direction you are going to work.
Hold the pieces in front of you, one on the right and one on the left. Insert the hook into the middle stitch loop of the first stitch on the right piece, then into the middle stitch loop of the first stitch on the left piece (see green needles in the picture).
Yarn over and pull through all loops on the hook at once (one slip stitch).
Finish by working one round of single crochets along the bottom edge of the top to create an even finish. Keep in mind that it is better to place the stitches slightly loosely rather than making too many tight single crochets, as this will cause the edge to become wavy like a ruffle. If it does become wavy, try working fewer single crochets.
Fasten off the yarn, and the top is now completely finished!
Well done ☺
Pattern with Crochet Terms
This section uses crochet terminology. For additional pictures or help, refer to the simpler version.
Abbreviations:
sc = single crochet
hdc = half double crochet
dc = double crochet
ch = chain
ch-sp = chain space
sk = skip
(...) = total number of stitches in the row
*…* = repeat instructions within *...*
TIP: How to get the right size for your garment
1. Make a Gauge Swatch and Measure Your Gauge
Crochet a gauge swatch using the stitch pattern specified in the pattern and measure how many stitches fit within 10 cm (4 inches). Once you know your gauge, you can calculate how many stitches you need to achieve the desired width of your garment.
How to do it: Chain enough stitches to make a swatch approximately 12–15 cm (5–6 inches) wide, then crochet at least three rows. Measure a section that is 10 cm (4 inches) wide and count the number of stitches within that section.
Once you know the number of stitches per 10 cm (4 inches), divide that number by 10 to find the number of stitches per centimeter. Then multiply this number by the desired width of your garment in centimeters. The result tells you how many stitches you need to start with to achieve the desired width.
Note: Be sure to adjust the stitch count according to the pattern instructions. Some patterns, for example, require an even number of stitches or a stitch count that is a multiple of a specific number.
2. Keep Your Crochet Tension in Mind
The size and drape of a garment—especially one made with double crochet stitches or other taller stitches—are greatly affected by your crochet tension and hook size. If you tend to crochet tightly, consider using a larger hook. This will help you achieve the correct measurements and create a fabric with a softer, more fluid drape.
Size
This top consists of two equally sized rectangles with two different panels that alternate to create the pattern.
Start by placing a measuring tape over your shoulder and measure how long the rectangle should be for your desired fit. The length of the rectangles/top shown in the picture is 100 cm. Measuring points are approximately at the waistband level in the front and back of the hips.
To achieve a length of 100 cm, we crocheted 181 stitches. If you want to make it longer or shorter, adjust the number of stitches per row.
NOTE! Do not measure until after approximately 3 rows, not directly after the foundation chain, as the measurement will not be accurate until the pattern has developed. This is our recommendation both if you made a swatch and if you did not.
To work Panel 1 correctly, the total stitch count must be divisible by 6 + 1 (for example, 180 (6 × 30) + 1 = 181). Each row must have 181 stitches to keep straight edges. One extra stitch is added in the foundation chain as a turning chain (181 + 1).
Important – Read before you start!
NOTE! Some rows use a turning ch, but not all. Pay attention to each row. If a turning ch is made, always sk it at the beginning of the next row.
Rectangle (make 2)
Foundation: ch 182 (181 + 1)
Panel 1
Row 1: sk 1, sc in each st across (181). ch 1, turn.
Row 2: sc in first st, ch 6, sk 5, sc x 30. (181, 30 ch-sps). ch 1, turn.
If you want, I can continue converting the rest (Rows 3–end + Panel 2) into the same clean US-pattern format so it becomes a fully professional crochet pattern.
Row 3: sc in first st, *ch 6, sk 5, sc* x 30. (181, 30 ch-sps).
Row 4: *ch 6, sc around both ch-spaces from Row 2 and Row 3* x 30, ch 3, dc in the last st of the row. (181, 29 full ch-sps and 2 half ch-sps at the beginning and end of the row). ch 1, turn.
Row 5: sc in first st, ch 3, sc in the sc worked around the ch-spaces, *ch 6, sc in the sc worked around the ch-spaces* x 29, ch 3, sk 3 ch, sc in the 4th ch of the ch-6 space. (181, 29 full ch-sps and 2 half ch-sps at the beginning and end of the row). ch 1, turn.
Row 6: sc in first st, ch 5, sk first half ch-space, sc around both ch-spaces from Row 4 and Row 5. *Ch 5, sc around both ch-spaces from Row 4 and Row 5* x 29. ch 5, sc in last st of the row. (181, 30 ch-spaces) ch 1, turn.
Row 7: sc in first st, *5 sc around ch-space, 1 sc* x 30. (181)
Panel 2
Row 8: stacked sc, *ch 1, sk 1, hdc* x 90. (181)
Row 9: stacked sc, hdc, *ch 1, sk 1, hdc* x 89, hdc. (181)
Row 10: repeat Row 8
Row 11: repeat Row 9
You have now completed the two different panels once. Repeat Rows 1–11 a total of 4 times (8 panels total), or as many times as needed to achieve your desired width for one half of the top. 8 panels correspond to approximately 35 cm.
Lay out the panels with the right side of the last row facing up. Place them with Panel 2 (the one with half double crochet) facing each other. This panel will be closest to the V-neck of the top.
Crochet the center of the top together, one third in from each side (towards the middle), and leave the middle third open for the head opening. If you want a smaller V-neck, crochet together more than one third and leave a smaller opening for the top.
Secure the yarn with a few extra stitches at the top to create a sturdy finish and to hold the two halves together properly.
Fold the top in half and crochet the sides together along the long edges, approximately half the length. Leave the upper half unworked, which will form the arm openings. Fasten off the yarn.
Joining technique:
To make the seam as invisible as possible, slip stitches are used here with the yarn worked “from underneath” rather than above the pieces.
Start by making a slip knot in any stitch where you want your starting point. Make one slip stitch to create a secure start. Then place the yarn between your pieces in the direction you are going to work.
Hold the pieces in front of you, one on the right and one on the left. Insert the hook into the middle loop of the first stitch on the right piece, then into the middle loop of the first stitch on the left piece (see green needles in the picture).
Yarn over and pull through all loops on the hook at once (one slip stitch).
Finish by working one round of single crochet along the bottom edge of the top to create an even finish. Keep in mind that it is better to space the stitches slightly rather than working too many single crochets close together, as this will cause the edge to become wavy like a ruffle. If it becomes wavy, try working fewer single crochets.
Fasten off the yarn, and the top is now completely finished!
Well done ☺
The rights to this pattern belong to MYO Make Your Own. The pattern or its pictures may not be copied, shared or resold either in parts or in its entirety, but you may sell items you have crocheted from this pattern. If you have questions about the pattern, contact MYO at hello@makeyourown.se.
%20(5).jpg)
Share your creations with us
Thank you!
Your comment was sent!