
Square pouf “Max”
Crochet a Square Pouf
This floor cushion has a simple design, but the textured sides make it visually interesting. The blue color adds a sense of calm to your interior, and the square shape is timeless. The pouf is easy to place and fits well anywhere in your home. You’ll need a 10 mm crochet hook, EKO Ribbon yarn, scissors, and a needle to weave in the ends and sew the pouf together. You’ll also need filling for the pouf—this could be blankets, towels, or similar items. The dimensions of the pouf are 40 x 40 x 20 cm.
Yarn Consumption: 5 rolls of EKO Ribbon yarn (500g). We used Graphite Blue. The amount of yarn may vary depending on how tightly you crochet and whether you make a larger or smaller pouf than the one we made.
Please note that in this instruction, we use videos from our technique school along with images.


Here's how to do it
You crochet the floor cushion in six separate pieces, which you then sew together. The two larger pieces make up the top and bottom, while the four smaller ones form the sides. All pieces are crocheted in rows, back and forth. Before assembling the parts, it’s a good idea to block them to ensure the pouf has the correct size and a nice, square shape. This is especially important for the top and bottom pieces, which likely won’t measure exactly 40x40 cm when you’ve finished crocheting them. The side panels should measure 40x20 cm before assembly. / Johan

This is what you need:
Here you can directly purchase the material for the product. Please note that the instruction is digital and appears here on the page (no written instruction).


.jpg)
Unleash your creativity
For only 85kr per month you get access to all our 300+ beginner-friendly instructions for crochet, knitting and macrame.
A perfect way to get started with your new hobby!

Top and Bottom Panels – 2 pieces in total
Make a slip knot with your crochet hook. Chain 30. If you’re unsure how to crochet a chain, see the video below.
Row 1: Crochet one single crochet in the second chain from the hook. Then, continue by crocheting one single crochet in each chain across the entire row. Turn your work. (From now on, you will turn your work at the end of every row, even if it’s not specifically stated.)You should have a total of 29 stitches in the row. If you’re unsure how to crochet a single crochet, see the video below.
Row 2–30: Crochet one single crochet into the first stitch from the hook (do not make a chain stitch before the first single crochet). Continue with one single crochet in each stitch across the row. Turn your work at the end of each row.

Continue crocheting one single crochet in each stitch across the row. You should have a total of 29 stitches in each row.
When you’ve finished Row 30, pull the yarn through the last stitch and fasten off. Now crochet a second piece in the same way.
Sides – 4 pieces
Make a slip knot with your crochet hook. Crochet 30 chain stitches.
Row 1:
You are now working on the right side. Crochet one single crochet in the second chain from the hook. Continue with one single crochet in each chain across the row. Turn your work. (From now on, you’ll turn your work at the end of every row, even if it’s not explicitly mentioned.) You should have a total of 29 stitches in the row.
Row 2:
Crochet one single crochet in the first stitch from the hook (just like you did with the larger pieces). Continue crocheting one single crochet in each stitch across the row. You should have 29 stitches in total.
Row 3:
Crochet one single crochet in the first stitch from the hook. Then crochet a double crochet around the second stitch two rows below as described below:
Yarn over.

Insert the hook behind the second stitch two rows below.

Yarn over.

Pull through.

Yarn over.

Pull through two stitches.

Yarn over.

Pull through two stitches.

Skip the stitch hidden behind the double crochet and crochet a single crochet into the next stitch.

*Now crochet a double crochet around the fourth stitch two rows below. Skip the stitch hidden behind the double crochet and crochet a single crochet into the next stitch*. Continue crocheting in the same way as described between * * across the entire row (the row ends with a single crochet in the last stitch). You should have a total of 29 stitches in the row.
Row 4:
Crochet one single crochet into the first stitch from the hook. Continue crocheting one single crochet in each stitch across the entire row. You should have a total of 29 stitches in the row.
Row 5:
Crochet one single crochet into the first stitch from the hook, then crochet another single crochet into the next stitch. *Crochet a double crochet around the third stitch two rows below. Skip the stitch hidden behind the double crochet and crochet a single crochet into the next stitch. Now crochet a double crochet around the fifth stitch two rows below. Skip the stitch hidden behind the double crochet and crochet a single crochet into the next stitch.*

Continue crocheting in the same way as described between * * across the entire row (the row ends with one single crochet in each of the last two stitches).
You should have a total of 29 stitches in the row.
Repeat Rows 2–5 until you've crocheted 16 rows in total. You should have 29 stitches in each row.
When you’ve finished the last row, pull the yarn through the last stitch and fasten off. Now crochet three more pieces in the same way.
Assembly
Now it’s time to sew the cushion together. Cut a 4-meter long yarn piece (if you want to avoid fastening off more than once) and thread it onto an appropriate needle.
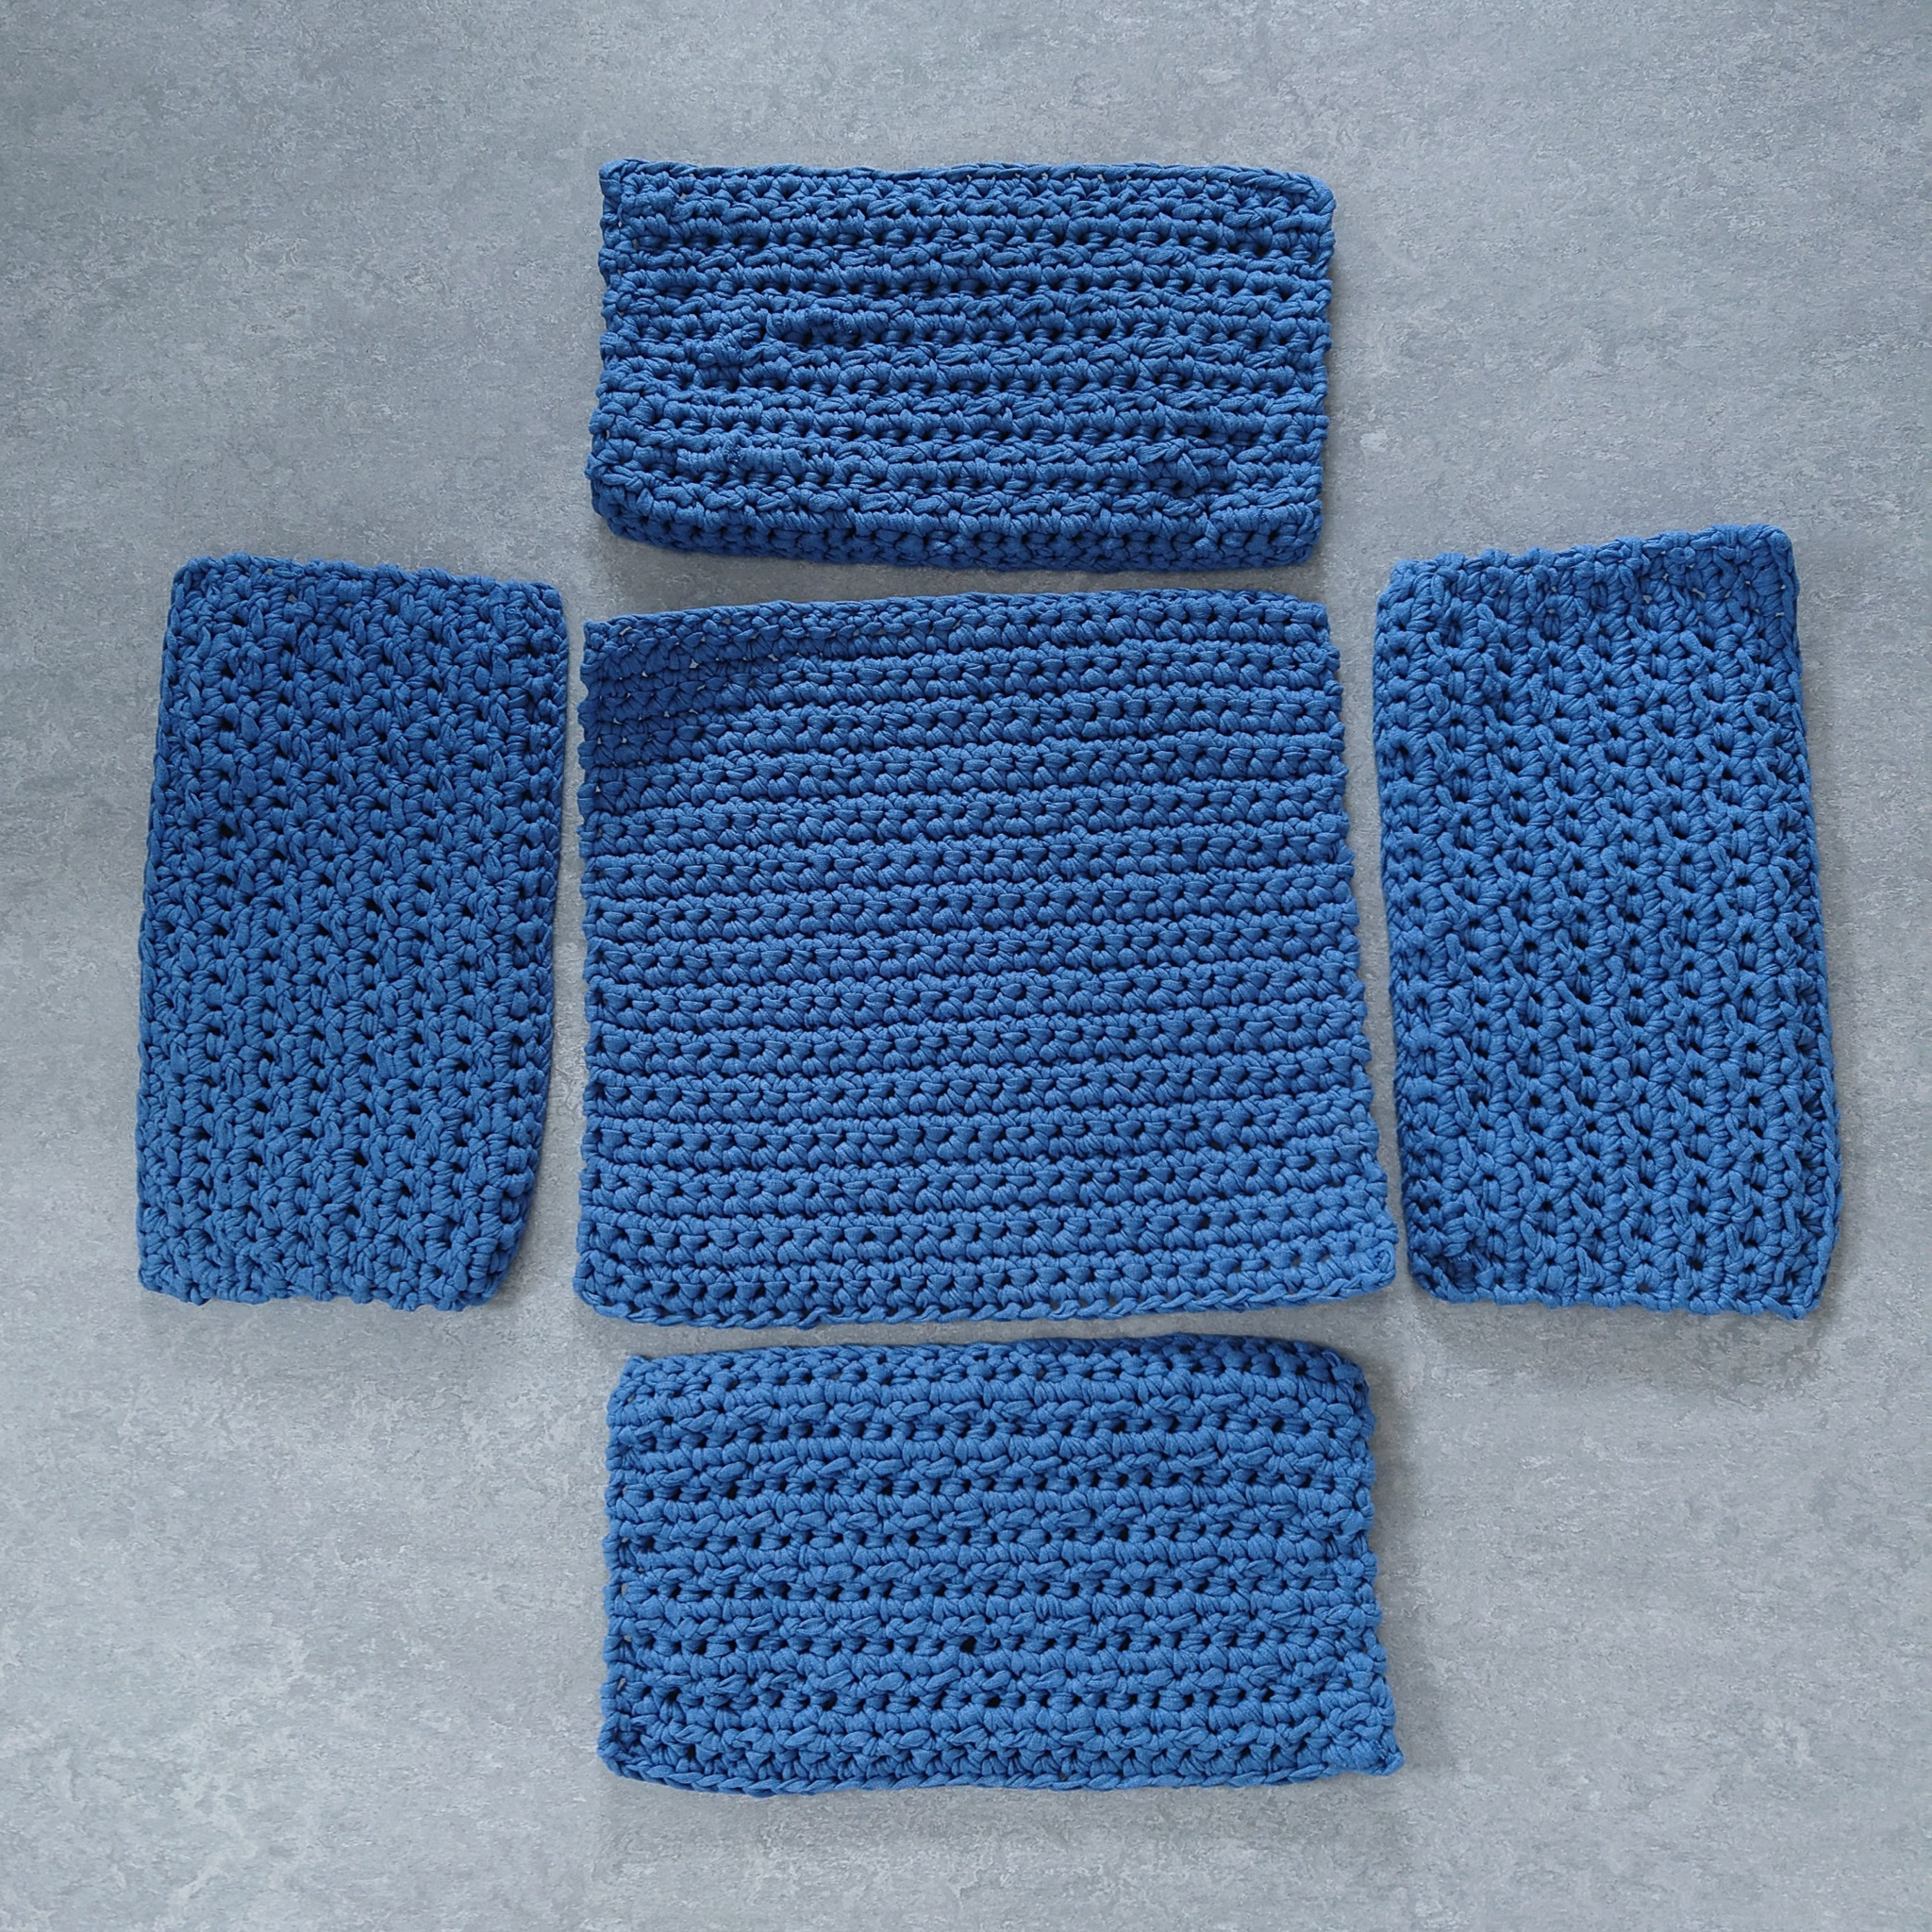
Place the pieces according to the image below. Place Row 1 of the side panels facing in toward the large piece, with the right side facing down. Lay the large piece with the rows horizontal, with Row 1 facing the side panel at the bottom.
Start at the bottom left corner of the large piece. Using the needle, sew inside the outermost single crochet of the large piece and through the first chain stitch (the foundation chain below Row 1) of the side panel. Then, make a double knot so that you don’t accidentally pull the thread through in the future.


Continue sewing through the next chain stitch on the side panel and inside the outermost stitch of the next row on the large piece.

Sew back and forth in this way until you reach the next corner. Since the large piece has 30 rows and the side panel has only 29 stitches, you will need to sew through the last chain stitch of the side panel twice (you will need to keep this in mind when sewing the third side panel onto the third side of the large piece). You should also be aware that the spot you sew through on the large piece before changing sides is the same spot you will sew through when starting to attach the next side panel (this needs to be considered at each corner).
Then, continue sewing in the same way as before through the stitches on the next side of the large piece and through the chain stitches of the second side panel.

Next, sew the third side panel onto the third side of the large piece in the same way as you did with the first side panel.
Finally, sew the fourth side panel onto the fourth side of the large piece. When doing this, keep in mind that you should not sew through the chain stitches (foundation chain below Row 1) of the large piece. Instead, sew through the single crochets on Row 1 of the large piece.


Start by cutting a 50 cm long piece of yarn and threading it onto the needle. Sew inside the outermost stitch of Row 1 on one side panel and inside the outermost stitch of Row 1 on the other side panel. Then, make a double knot so that you don’t accidentally pull the thread through in the future.
Now it’s time to sew the side panels together.


Continue sewing back and forth in the same way as you did when you attached the side panels to the large piece.

When you’ve sewn all the way up, fasten off the thread.
Sew the side panels together in the remaining three corners around the cushion in the same way.

Finally, it’s time to sew the second large piece onto the cushion. Cut a 4-meter long piece of yarn (if you want to avoid fastening off more than once) and thread it onto an appropriate needle. Keep in mind to position the second large piece so that the rows align with the rows of the first large piece.
Start at the bottom left corner, tie the yarn, and sew in the same way as you did with the first large piece, all the way around. However, instead of sewing through the chain stitches (foundation chains) on the side panels, sew through the top row's single crochets. On the fourth side of the large piece, sew through the single crochets on Row 1, just like you did on the first large piece, and not through the chain stitches.
Don't forget to fill the cushion before sewing it together.


Finish by fastening off the thread. If you’re unsure how to do this, see the video below (Fasten Off).
The floor cushion is now complete.
Abbreviations
ch = chain stitch
sl st = slip stitch
sc = single crochet
dc = double crochet
blo = back loop only
(...) = indicates the number of stitches in the current round
*...* = Everything within ... is repeated the number of times specified
Now let's crochet a practical floor cushion! If you need help along the way, check out our simple version of this pattern.
Top and Bottom Panels – 2 pieces in total
Make a slip knot with your crochet hook. Crochet 30 ch.
Row 1: 1 sc in the 2nd ch from the hook, 28 sc, turn your work (from now on, turn your work at the end of each row, even if not explicitly mentioned). (29)
Rows 2–30: 1 sc in the first st from the hook (do not make a ch before the first sc), 28 sc. (29)
When you've finished Row 30, pull the yarn through the last stitch and fasten off.
Crochet one more piece in the same way.
Sides – 4 pieces
Make a slip knot with your crochet hook. Crochet 30 ch.
Row 1: Now you have the right side facing you. 1 sc in the second ch from the hook, 28 sc, turn your work (from now on, turn your work at the end of each row, even if not explicitly mentioned). (29)
Row 2: 1 sc in the first st from the hook (just like you did with the large pieces), 28 sc. (29)
Row 3: 1 sc in the first st from the hook, 1 dc around the second st two rows below as follows:
1. Yarn over.
2. Insert the hook behind the second stitch two rows below.
- Yarn over.
- Pull through.
- Yarn over.
- Pull through two stitches.
- Yarn over.
- Pull through two stitches.
- Skip the stitch hidden behind the dc and crochet 1 sc into the next stitch.
*1 dc around the fourth st two rows below. Skip the stitch hidden behind the dc and crochet 1 sc into the next stitch.*
Continue crocheting in the same way as described between * * across the entire row (the row ends with 1 sc in the last st). (29)
Row 4: 1 sc in the first st from the hook, 28 sc. (29)
Row 5: 1 sc in the first st from the hook, 1 sc, *1 dc around the third st two rows below. Skip the stitch hidden behind the dc and crochet 1 sc into the next stitch. 1 dc around the fifth st two rows below. Skip the stitch hidden behind the dc and crochet 1 sc into the next stitch.*
Continue crocheting in the same way as described between * * across the entire row (the row ends with 1 sc in each of the last two stitches). (29)
Now, repeat Rows 2–5 until you've crocheted 16 rows. (29 stitches in each row). When you’ve finished the last row, pull the yarn through the last stitch and fasten off.
Crochet three more pieces in the same way.
Assembly
Now it’s time to sew the cushion together. Cut a 4-meter long piece of yarn (if you want to avoid fastening off more than once) and thread it onto an appropriate needle.
Place the pieces according to the image below. Place Row 1 of the side panels facing in toward the large piece, with the right side facing down. Lay the large piece with the rows horizontal, with Row 1 facing the side panel at the bottom.
Start at the bottom left corner of the large piece. Sew with the needle inside the outermost sc of the large piece and through the first ch (foundation chain stitch below Row 1) of the side panel. Then, make a double knot so that you don’t accidentally pull the thread through in the future.
Continue sewing through the next ch on the side panel and inside the outermost sc of the next row of the large piece. Sew back and forth like this until you reach the next corner.
Since the large piece has 30 rows and the side panel only has 29 sts, you need to sew twice through the last ch on the side panel (keep this in mind when sewing the third side panel onto the third side of the large piece).
Also, be aware that the spot you sew through on the large piece before changing sides is the same spot you sew through when you start attaching the next side panel (this should be considered at every corner).
Then, continue sewing in the same way through the sts of the large piece and the chs of the second side panel.
Next, sew the third side panel onto the third side of the large piece in the same way you did with the first side panel.
Finally, sew the fourth side panel onto the fourth side of the large piece. When doing this, remember that you should not sew through the large piece’s ch (foundation chain stitches below Row 1). Instead, sew through the sc on Row 1 of the large piece.
Now it's time to sew the side panels together. Start by cutting a 50 cm piece of yarn and threading it onto the needle. Sew inside the outermost st of Row 1 on one side panel and inside the outermost st of Row 1 on the other side panel. Then, make a double knot so that you don’t accidentally pull the thread through in the future.
Continue sewing back and forth in the same way you did when attaching the side panels to the large piece.
When you’ve sewn all the way up, fasten off the thread.
Sew the remaining three corners of the cushion in the same way.
Finally, it's time to sew on the second large piece. Cut a 4-meter long piece of yarn (if you want to avoid fastening off more than once) and thread it onto an appropriate needle.
Make sure to place the second large piece so that the rows align with the rows of the first large piece. Start at the bottom left corner, knot the thread, and sew in the same way you did with the first large piece, all the way around.
However, instead of sewing through the chs (foundation chain stitches) on the side panels, sew through the scs on the top rows. On the fourth side of the large piece, sew through the scs on Row 1, just like you did with the first large piece, and not through the chs.
Don’t forget to stuff the cushion before sewing it together.
Finish by fastening off the thread.The floor cushion is now complete!
The rights to this pattern belong to MYO Make Your Own. The pattern or its pictures may not be copied, shared or resold either in parts or in its entirety, but you may sell items you have crocheted from this pattern. If you have questions about the pattern, contact MYO at hello@makeyourown.se.
Top and Bottom Panels – 2 pieces in total
Make a slip knot with your crochet hook. Chain 30. If you’re unsure how to crochet a chain, see the video below.
Row 1: Crochet one single crochet in the second chain from the hook. Then, continue by crocheting one single crochet in each chain across the entire row. Turn your work. (From now on, you will turn your work at the end of every row, even if it’s not specifically stated.)You should have a total of 29 stitches in the row. If you’re unsure how to crochet a single crochet, see the video below.
Row 2–30: Crochet one single crochet into the first stitch from the hook (do not make a chain stitch before the first single crochet). Continue with one single crochet in each stitch across the row. Turn your work at the end of each row.
Continue crocheting one single crochet in each stitch across the row. You should have a total of 29 stitches in each row.
When you’ve finished Row 30, pull the yarn through the last stitch and fasten off. Now crochet a second piece in the same way.
Sides – 4 pieces
Make a slip knot with your crochet hook. Crochet 30 chain stitches.
Row 1:
You are now working on the right side. Crochet one single crochet in the second chain from the hook. Continue with one single crochet in each chain across the row. Turn your work. (From now on, you’ll turn your work at the end of every row, even if it’s not explicitly mentioned.) You should have a total of 29 stitches in the row.
Row 2:
Crochet one single crochet in the first stitch from the hook (just like you did with the larger pieces). Continue crocheting one single crochet in each stitch across the row. You should have 29 stitches in total.
Row 3:
Crochet one single crochet in the first stitch from the hook. Then crochet a double crochet around the second stitch two rows below as described below:
Yarn over.
Insert the hook behind the second stitch two rows below.
Yarn over.
Pull through.
Yarn over.
Pull through two stitches.
Yarn over.
Pull through two stitches.
Skip the stitch hidden behind the double crochet and crochet a single crochet into the next stitch.
*Now crochet a double crochet around the fourth stitch two rows below. Skip the stitch hidden behind the double crochet and crochet a single crochet into the next stitch*. Continue crocheting in the same way as described between * * across the entire row (the row ends with a single crochet in the last stitch). You should have a total of 29 stitches in the row.
Row 4:
Crochet one single crochet into the first stitch from the hook. Continue crocheting one single crochet in each stitch across the entire row. You should have a total of 29 stitches in the row.
Row 5:
Crochet one single crochet into the first stitch from the hook, then crochet another single crochet into the next stitch. *Crochet a double crochet around the third stitch two rows below. Skip the stitch hidden behind the double crochet and crochet a single crochet into the next stitch. Now crochet a double crochet around the fifth stitch two rows below. Skip the stitch hidden behind the double crochet and crochet a single crochet into the next stitch.*
Continue crocheting in the same way as described between * * across the entire row (the row ends with one single crochet in each of the last two stitches).
You should have a total of 29 stitches in the row.
Repeat Rows 2–5 until you've crocheted 16 rows in total. You should have 29 stitches in each row.
When you’ve finished the last row, pull the yarn through the last stitch and fasten off. Now crochet three more pieces in the same way.
Assembly
Now it’s time to sew the cushion together. Cut a 4-meter long yarn piece (if you want to avoid fastening off more than once) and thread it onto an appropriate needle.
Place the pieces according to the image below. Place Row 1 of the side panels facing in toward the large piece, with the right side facing down. Lay the large piece with the rows horizontal, with Row 1 facing the side panel at the bottom.
Start at the bottom left corner of the large piece. Using the needle, sew inside the outermost single crochet of the large piece and through the first chain stitch (the foundation chain below Row 1) of the side panel. Then, make a double knot so that you don’t accidentally pull the thread through in the future.
Continue sewing through the next chain stitch on the side panel and inside the outermost stitch of the next row on the large piece.
Sew back and forth in this way until you reach the next corner. Since the large piece has 30 rows and the side panel has only 29 stitches, you will need to sew through the last chain stitch of the side panel twice (you will need to keep this in mind when sewing the third side panel onto the third side of the large piece). You should also be aware that the spot you sew through on the large piece before changing sides is the same spot you will sew through when starting to attach the next side panel (this needs to be considered at each corner).
Then, continue sewing in the same way as before through the stitches on the next side of the large piece and through the chain stitches of the second side panel.
Next, sew the third side panel onto the third side of the large piece in the same way as you did with the first side panel.
Finally, sew the fourth side panel onto the fourth side of the large piece. When doing this, keep in mind that you should not sew through the chain stitches (foundation chain below Row 1) of the large piece. Instead, sew through the single crochets on Row 1 of the large piece.
Start by cutting a 50 cm long piece of yarn and threading it onto the needle. Sew inside the outermost stitch of Row 1 on one side panel and inside the outermost stitch of Row 1 on the other side panel. Then, make a double knot so that you don’t accidentally pull the thread through in the future.
Now it’s time to sew the side panels together.
Continue sewing back and forth in the same way as you did when you attached the side panels to the large piece.
When you’ve sewn all the way up, fasten off the thread.
Sew the side panels together in the remaining three corners around the cushion in the same way.
Finally, it’s time to sew the second large piece onto the cushion. Cut a 4-meter long piece of yarn (if you want to avoid fastening off more than once) and thread it onto an appropriate needle. Keep in mind to position the second large piece so that the rows align with the rows of the first large piece.
Start at the bottom left corner, tie the yarn, and sew in the same way as you did with the first large piece, all the way around. However, instead of sewing through the chain stitches (foundation chains) on the side panels, sew through the top row's single crochets. On the fourth side of the large piece, sew through the single crochets on Row 1, just like you did on the first large piece, and not through the chain stitches.
Don't forget to fill the cushion before sewing it together.
Finish by fastening off the thread. If you’re unsure how to do this, see the video below (Fasten Off).
The floor cushion is now complete.
Abbreviations
ch = chain stitch
sl st = slip stitch
sc = single crochet
dc = double crochet
blo = back loop only
(...) = indicates the number of stitches in the current round
*...* = Everything within ... is repeated the number of times specified
Now let's crochet a practical floor cushion! If you need help along the way, check out our simple version of this pattern.
Top and Bottom Panels – 2 pieces in total
Make a slip knot with your crochet hook. Crochet 30 ch.
Row 1: 1 sc in the 2nd ch from the hook, 28 sc, turn your work (from now on, turn your work at the end of each row, even if not explicitly mentioned). (29)
Rows 2–30: 1 sc in the first st from the hook (do not make a ch before the first sc), 28 sc. (29)
When you've finished Row 30, pull the yarn through the last stitch and fasten off.
Crochet one more piece in the same way.
Sides – 4 pieces
Make a slip knot with your crochet hook. Crochet 30 ch.
Row 1: Now you have the right side facing you. 1 sc in the second ch from the hook, 28 sc, turn your work (from now on, turn your work at the end of each row, even if not explicitly mentioned). (29)
Row 2: 1 sc in the first st from the hook (just like you did with the large pieces), 28 sc. (29)
Row 3: 1 sc in the first st from the hook, 1 dc around the second st two rows below as follows:
1. Yarn over.
2. Insert the hook behind the second stitch two rows below.
- Yarn over.
- Pull through.
- Yarn over.
- Pull through two stitches.
- Yarn over.
- Pull through two stitches.
- Skip the stitch hidden behind the dc and crochet 1 sc into the next stitch.
*1 dc around the fourth st two rows below. Skip the stitch hidden behind the dc and crochet 1 sc into the next stitch.*
Continue crocheting in the same way as described between * * across the entire row (the row ends with 1 sc in the last st). (29)
Row 4: 1 sc in the first st from the hook, 28 sc. (29)
Row 5: 1 sc in the first st from the hook, 1 sc, *1 dc around the third st two rows below. Skip the stitch hidden behind the dc and crochet 1 sc into the next stitch. 1 dc around the fifth st two rows below. Skip the stitch hidden behind the dc and crochet 1 sc into the next stitch.*
Continue crocheting in the same way as described between * * across the entire row (the row ends with 1 sc in each of the last two stitches). (29)
Now, repeat Rows 2–5 until you've crocheted 16 rows. (29 stitches in each row). When you’ve finished the last row, pull the yarn through the last stitch and fasten off.
Crochet three more pieces in the same way.
Assembly
Now it’s time to sew the cushion together. Cut a 4-meter long piece of yarn (if you want to avoid fastening off more than once) and thread it onto an appropriate needle.
Place the pieces according to the image below. Place Row 1 of the side panels facing in toward the large piece, with the right side facing down. Lay the large piece with the rows horizontal, with Row 1 facing the side panel at the bottom.
Start at the bottom left corner of the large piece. Sew with the needle inside the outermost sc of the large piece and through the first ch (foundation chain stitch below Row 1) of the side panel. Then, make a double knot so that you don’t accidentally pull the thread through in the future.
Continue sewing through the next ch on the side panel and inside the outermost sc of the next row of the large piece. Sew back and forth like this until you reach the next corner.
Since the large piece has 30 rows and the side panel only has 29 sts, you need to sew twice through the last ch on the side panel (keep this in mind when sewing the third side panel onto the third side of the large piece).
Also, be aware that the spot you sew through on the large piece before changing sides is the same spot you sew through when you start attaching the next side panel (this should be considered at every corner).
Then, continue sewing in the same way through the sts of the large piece and the chs of the second side panel.
Next, sew the third side panel onto the third side of the large piece in the same way you did with the first side panel.
Finally, sew the fourth side panel onto the fourth side of the large piece. When doing this, remember that you should not sew through the large piece’s ch (foundation chain stitches below Row 1). Instead, sew through the sc on Row 1 of the large piece.
Now it's time to sew the side panels together. Start by cutting a 50 cm piece of yarn and threading it onto the needle. Sew inside the outermost st of Row 1 on one side panel and inside the outermost st of Row 1 on the other side panel. Then, make a double knot so that you don’t accidentally pull the thread through in the future.
Continue sewing back and forth in the same way you did when attaching the side panels to the large piece.
When you’ve sewn all the way up, fasten off the thread.
Sew the remaining three corners of the cushion in the same way.
Finally, it's time to sew on the second large piece. Cut a 4-meter long piece of yarn (if you want to avoid fastening off more than once) and thread it onto an appropriate needle.
Make sure to place the second large piece so that the rows align with the rows of the first large piece. Start at the bottom left corner, knot the thread, and sew in the same way you did with the first large piece, all the way around.
However, instead of sewing through the chs (foundation chain stitches) on the side panels, sew through the scs on the top rows. On the fourth side of the large piece, sew through the scs on Row 1, just like you did with the first large piece, and not through the chs.
Don’t forget to stuff the cushion before sewing it together.
Finish by fastening off the thread.The floor cushion is now complete!
The rights to this pattern belong to MYO Make Your Own. The pattern or its pictures may not be copied, shared or resold either in parts or in its entirety, but you may sell items you have crocheted from this pattern. If you have questions about the pattern, contact MYO at hello@makeyourown.se.


.jpg)


Share your creations with us
Thank you!
Your comment was sent!