Crochet clutch “Kira”
Crochet a beautiful clutch bag with our paper yarn!
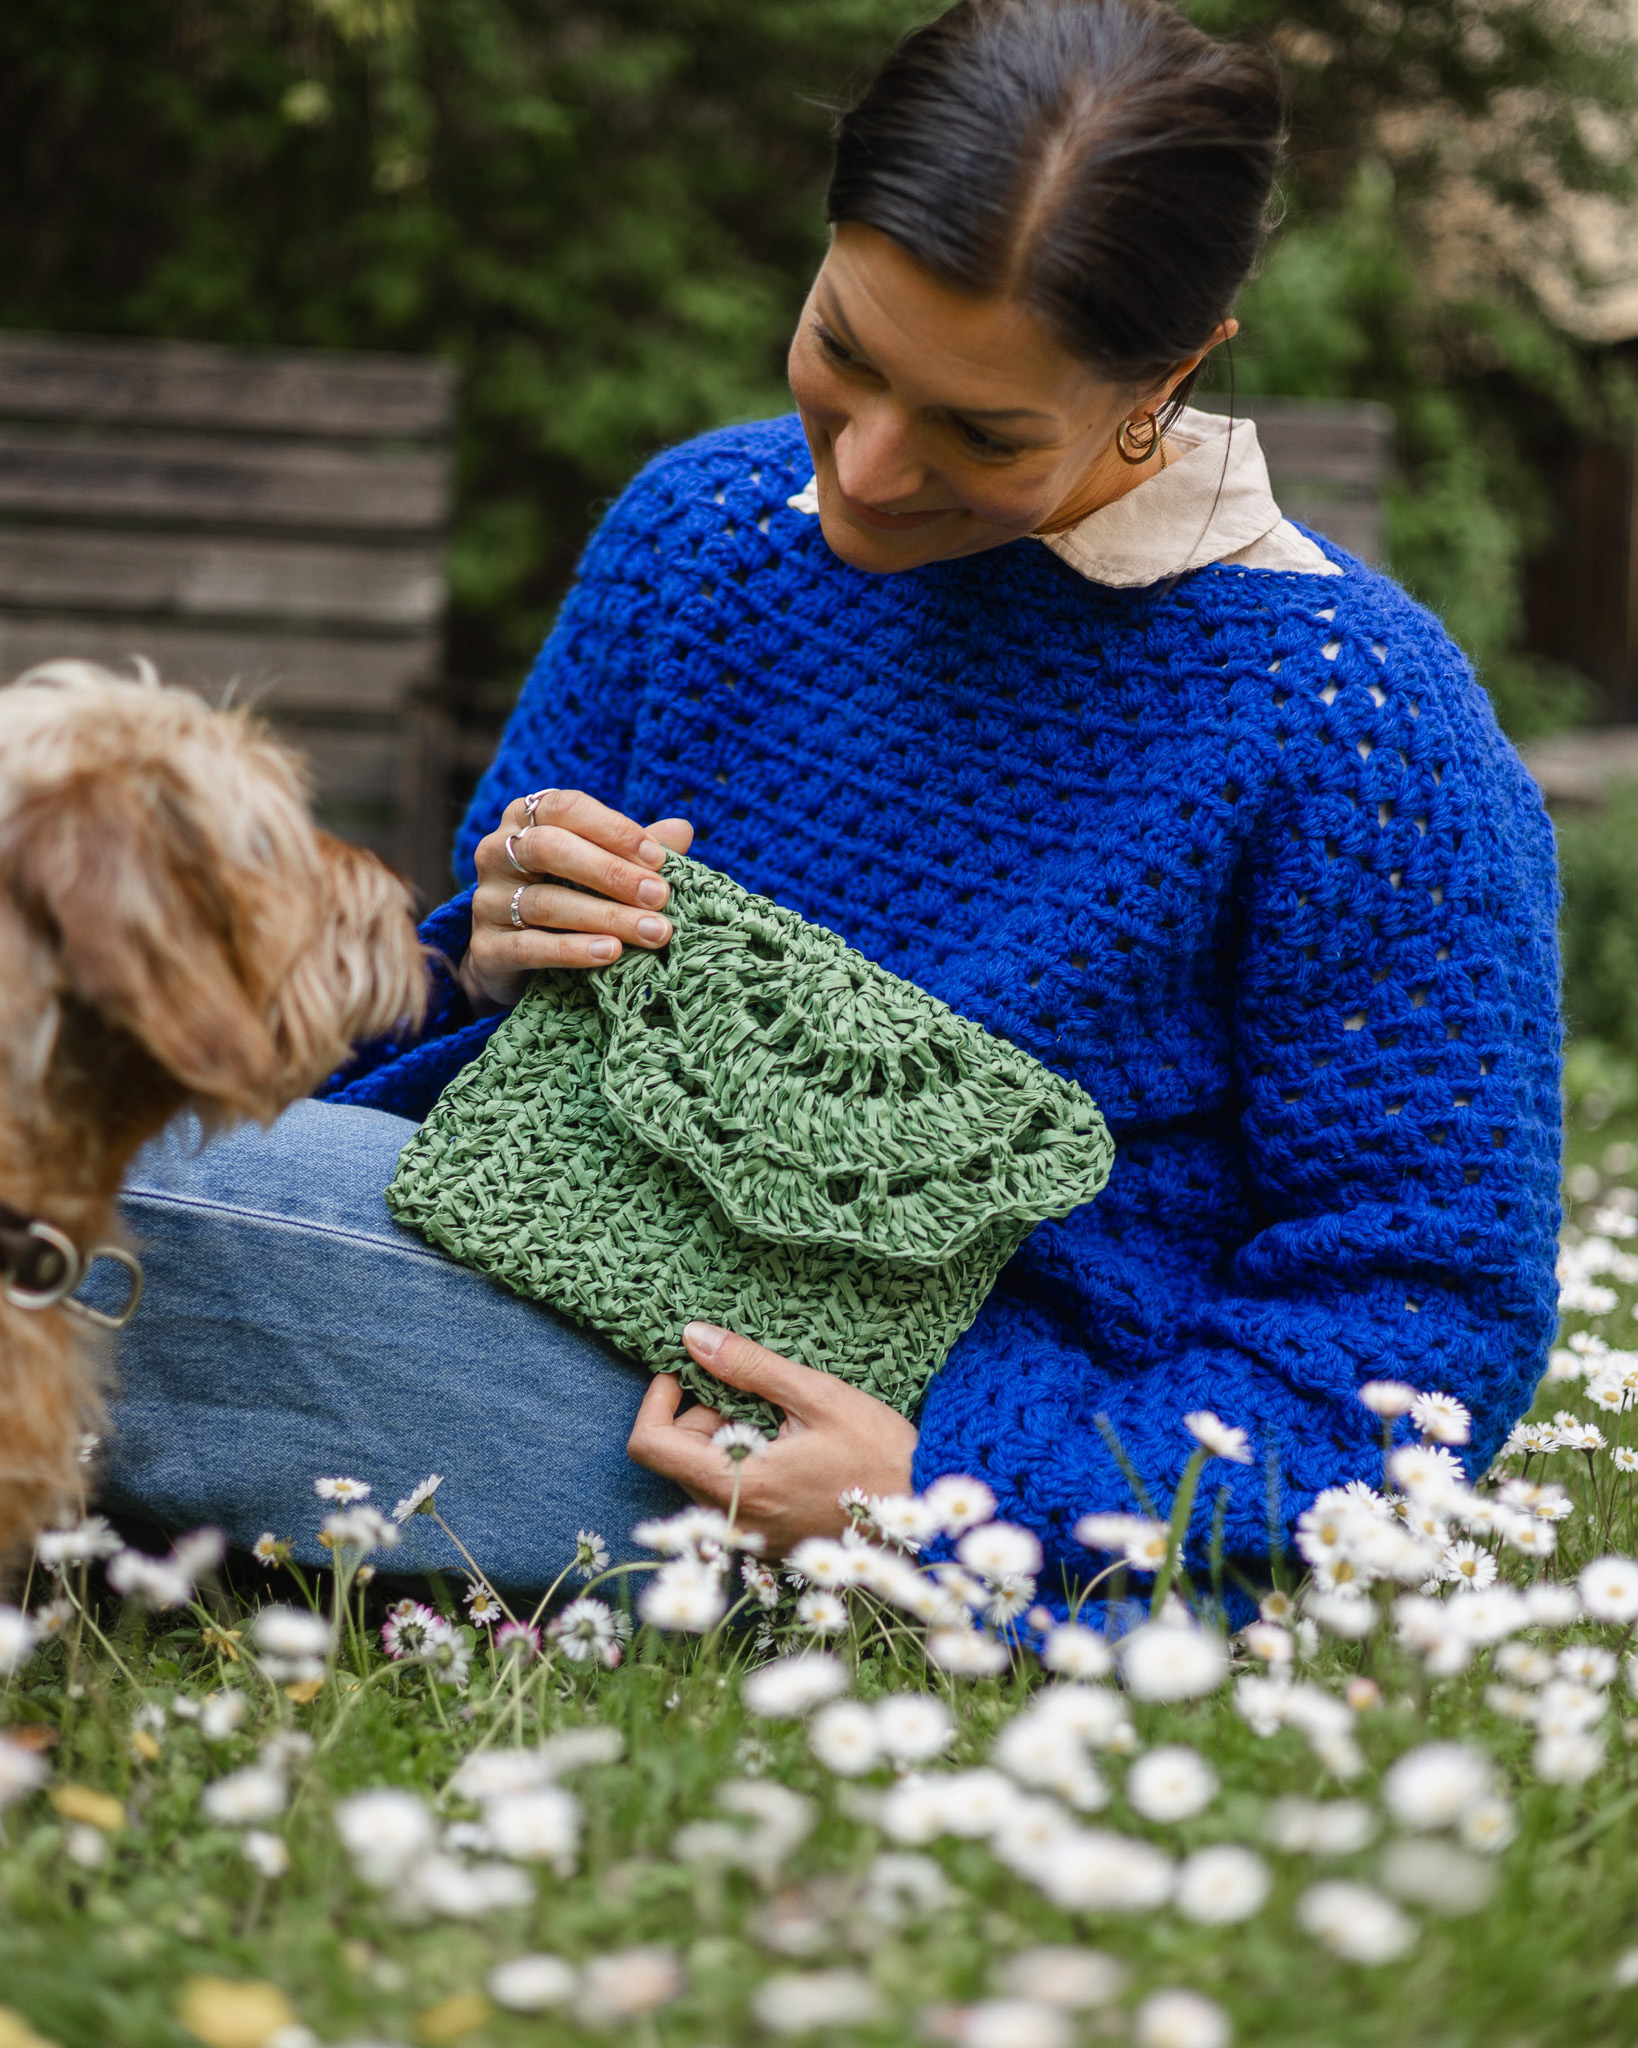
This lovely clutch bag is a fun and quick project using our paper yarn. It works up relatively fast and incorporates several techniques that create a beautiful texture. We used the color "Green."You’ll need one skein of our paper yarn and a 5 mm crochet hook.
Yarn Consumption: 100 g of our paper yarn.
Please note that this pattern includes videos from our technique library alongside images for guidance.

This is what you need:
Here you can directly purchase the material for the product. Please note that the instruction is digital and appears here on the page (no written instruction).


Here's how to do it
The clutch bag consists of two separate parts. The main body of the bag is crocheted as one piece, which is then folded and sewn or crocheted together along the sides. The second part is the flap, which is sewn or crocheted onto the back of the bag. / Johanna K

Bag Body / Compartment
Chain 36 stitches. If you’re unsure how to crochet a chain, watch the video below.
Row 1: Crochet 1 herringbone half double crochet (herringbone hdc) in each stitch, starting in the third chain from the hook. You should have a total of 34 herringbone half double crochets. Turn your work.

Row 2: Chain 2. Crochet 1 herringbone half double crochet (herringbone hdc) in the same stitch. Then crochet 1 herringbone hdc in each stitch across the row. Turn your work.
Rows 3–14: Repeat Row 2.Finishing: Cut the yarn and weave in the ends. If you’re unsure how to weave in ends, see the video below.
Crochet or sew the sides of the body together
Start by folding the body or rectangle you have crocheted. Make a slip knot to start at the bottom of the body. Crochet the sides together through both layers using single crochet stitches. Continue crocheting up the side all the way to the top edge of the body. Repeat on the other side.
If you prefer not to crochet the sides together, you can sew them instead.
If you’re unsure how to make a slip knot or crochet single crochet stitches, see the videos below.


Crochet single crochet stitches along the top edge of the body
Attach the yarn to the edge on one side of the body. Crochet single crochet stitches along the edge. Crochet a total of 24 single crochet stitches along one side of the edge.Then crochet 1 single crochet stitch in the corner stitch. Continue with 24 single crochet stitches along the other side, and finish with 1 single crochet stitch in the corner stitch on the opposite side (where the sides are joined).Cut the yarn, fasten off, and weave in the ends. You can place the single crochet stitches as shown in the image below.


The flap
Start with a magic ring.

Row 1: Chain 3 (counts as the first double crochet). Then work 9 more double crochets into the magic ring (a total of 10 double crochets).
If you're unsure how to crochet a double crochet stitch, see the video below.

Row 2: Chain 4 (counts as 1 double crochet + 1 chain stitch). Crochet 1 double crochet in the same stitch. Crochet 1 double crochet in the next stitch. Chain 1. Repeat this pattern all the way to the last stitch.
After the last stitch, chain 1 and finish with 1 double crochet in the 3rd chain from the beginning of the previous row. Total: 11 double crochets, 10 chain stitches.

Row 3: Chain 3 (counts as 1 double crochet). Crochet 2 double crochets in the next chain space. Crochet 1 double crochet in the next stitch (the double crochet from the previous row) (see image).
Repeat the pattern: 2 double crochets in the chain space, 1 double crochet in the next stitch, all the way around the row.Finish with 1 double crochet in the 3rd chain from the beginning of the previous row. Total: 29 double crochets.


Row 4: Chain 1. Crochet 1 single crochet in the same stitch. Chain 3. Skip 2 stitches. Crochet 1 single crochet in the next stitch.Repeat this pattern around the row.At the end of the row, skip 3 stitches and crochet 1 single crochet in the last stitch. Total: 9 single crochets and 9 chain spaces (chain-3 loops).

Row 5: Chain 1. Slip stitch into the chain space (the chain-3 loop). Chain 3 (counts as 1 double crochet). Crochet 5 more double crochets into the same chain space (total 6 double crochets).
Crochet 1 single crochet in the next chain space.
Crochet 6 double crochets in the next chain space.
Repeat this pattern all the way around.
In the last chain space, crochet 6 double crochets. Finish with 1 single crochet in the first single crochet from the previous row. Total: 30 double crochets and 5 single crochets.
If you’re unsure how to do a slip stitch, check the instructional video linked below.


Kanten på locket
Row 1: Chain 1. Crochet 1 single crochet in the single crochet stitch where you finished Row 5.

Crochet 1 single crochet in the single crochet stitch from Row 4 (see picture). Then crochet 3 single crochets into the chain space made of 3 chains from Row 3.

Crochet 3 single crochets into the chain space with 3 chains from Row 2. Then crochet 3 single crochets into the chain space with 3 chains from Row 1. Finish by crocheting 1 single crochet into the magic ring.

Repeat the same pattern on the other part of the front piece. At the end of the row, crochet 1 single crochet into the chain from the beginning of Row 5. Then crochet 1 single crochet into the chain space with 3 chains from Row 5. You should have a total of 24 stitches.

Row 2: Chain 1. Single crochet in the same stitch. Single crochet across the entire row (total 24 stitches).
Row 3: Repeat Row 2. Fasten off and cut the yarn.
Note: Leave a longer yarn tail to sew the front piece onto the body of the bag.

Sew the front piece onto the body:
The back edge of the body has the same number of stitches as the edge of the front piece — 24 stitches. Sew the back edge of the body’s stitches together with the front piece.
See the pictures below for guidance.


Cut the yarn and fasten off.
Strap:
If you want, you can crochet a strap for the bag. Use the leftover paper yarn. Crochet with a double strand of yarn. Attach the yarn to one end of any side of the bag. Chain 20 stitches (or as many as you want for the length of the strap). Slip stitch into the same stitch where you attached the yarn. Cut the yarn and fasten off.

You are done!
Crochet Terms
Now we’re going to crochet a beautiful clutch with our paper yarn! This is the version using crochet terms. You can always switch back to the simple version if you need help along the way.
MR = Magic Ring
ch = Chain
sl st = Slip Stitch
sc = Single Crochet
dc = Double Crochet
hbst = Herringbone Double Crochet (Herringbone Stitch)
(...) = indicates the number of stitches in the current row
*...* = repeat everything inside the asterisks the indicated number of times
Clutch Body
In this pattern, turning chains at the beginning/end of a row do not count as stitches. You always turn your work after each row.
Chain 34 + 2 turning chains (36 chains total).
Row 1: Starting in the 3rd chain from the hook, work 1 hbst in each ch across (34 stitches).
Row 2: Chain 2. Work 1 hbst in each st across (34 stitches).
Rows 3–14: Repeat Row 2 (34 stitches).
Fasten off.

Crochet or Sew the Sides of the Body
Fold your work in half and crochet the sides together. Crochet together from the bottom up to the top edge of the body. Do the same on the other side.
If you prefer not to crochet the sides together, you can sew them instead.

Crochet Single Crochets Along the Top Edge of the Body
Crochet sc along the edge. Work a total of 24 sc along one side. Crochet 1 sc in the corner stitch. Then work 24 sc along the other side and finish with 1 sc in the corner stitch on the opposite side (where you joined the sides). Fasten off your yarn.
You can place the sc as shown in the picture description below.


Clutch Flap
Start with 1 Magic Ring (MR).
Round 1: Chain 3 (counts as first dc). Crochet 9 more dc into the MR. (Total 10 dc)

Round 2: Chain 4 (counts as 1 dc + 1 chain). *Dc in the same st, dc in the next st, ch 1*. Repeat from * to * around until the last st. After the last st, ch 1 and sl st into the 3rd ch of the starting ch from the previous round to join. Total: 11 dc and 10 chs.

Round 3: Chain 3 (counts as 1 dc). *Work 2 dc in the next ch space. Work 1 dc in the next st (from the previous round)*. Repeat from * to * around. End with 1 dc in the 3rd ch of the starting ch from the previous round to join.Total: 29 dc.

Round 4: Ch 1, sc in the same st, ch 3. *Skip 2 st, sc in the next st.* Repeat from * to * around.
At the end, skip 3 sts and sc in the last st.
Total: 9 sc and 9 chain-3 spaces.

Round 5:Chain 1, sl st into the ch space. Ch 3 (counts as first dc), then work 5 more dc into the same ch space (6 dc total). Sc in the next ch space. Work 6 dc in the next ch space. Repeat this pattern around. Work 6 dc in the last ch space. Finish with 1 sc in the first sc from the previous round. Total: 30 dc and 5 sc.


Edge of the flap
Round 1: Ch 1. Sc around the sc where you ended Row 5. Sc in the sc from Row 4 (see image). Work 3 sc in the 3- ch space from Row 3 (see image). Work 3 sc in the 3-ch space from Row 2. Work 3 sc in the 3-ch space from Row 1. Sc in the MR (see image). Repeat the same pattern on the other side of the flap. Sc in the ch from the beginning of Row 5. Sc in the 3-ch space from Row 5 (see image). Total: 24 sc.


Round 2: Ch 1. Sc around (24 sc).
Round 3: Repeat Round 2. Fasten off.
Note: Leave a longer yarn tail for sewing the flap to the body.
Sew front piece to body
The back of the body has the same number of stitches as the edge of the flap, i.e., 24 stitches. Sew the back edge of the body stitches to the front piece. See pictures below. Fasten off.


Strap
If you want, you can crochet a strap for the clutch. Use the leftover paper yarn. Crochet with double strands. Attach the yarn at one end of any side of the clutch. Chain 20 (or as many as you want for the strap length). Slip stitch in the same stitch where you attached the yarn. Fasten off.

You are done!
Bag Body / Compartment
Chain 36 stitches. If you’re unsure how to crochet a chain, watch the video below.
Row 1: Crochet 1 herringbone half double crochet (herringbone hdc) in each stitch, starting in the third chain from the hook. You should have a total of 34 herringbone half double crochets. Turn your work.

Row 2: Chain 2. Crochet 1 herringbone half double crochet (herringbone hdc) in the same stitch. Then crochet 1 herringbone hdc in each stitch across the row. Turn your work.
Rows 3–14: Repeat Row 2.Finishing: Cut the yarn and weave in the ends. If you’re unsure how to weave in ends, see the video below.
Crochet or sew the sides of the body together
Start by folding the body or rectangle you have crocheted. Make a slip knot to start at the bottom of the body. Crochet the sides together through both layers using single crochet stitches. Continue crocheting up the side all the way to the top edge of the body. Repeat on the other side.
If you prefer not to crochet the sides together, you can sew them instead.
If you’re unsure how to make a slip knot or crochet single crochet stitches, see the videos below.


Crochet single crochet stitches along the top edge of the body
Attach the yarn to the edge on one side of the body. Crochet single crochet stitches along the edge. Crochet a total of 24 single crochet stitches along one side of the edge.Then crochet 1 single crochet stitch in the corner stitch. Continue with 24 single crochet stitches along the other side, and finish with 1 single crochet stitch in the corner stitch on the opposite side (where the sides are joined).Cut the yarn, fasten off, and weave in the ends. You can place the single crochet stitches as shown in the image below.


The flap
Start with a magic ring.

Row 1: Chain 3 (counts as the first double crochet). Then work 9 more double crochets into the magic ring (a total of 10 double crochets).
If you're unsure how to crochet a double crochet stitch, see the video below.

Row 2: Chain 4 (counts as 1 double crochet + 1 chain stitch). Crochet 1 double crochet in the same stitch. Crochet 1 double crochet in the next stitch. Chain 1. Repeat this pattern all the way to the last stitch.
After the last stitch, chain 1 and finish with 1 double crochet in the 3rd chain from the beginning of the previous row. Total: 11 double crochets, 10 chain stitches.

Row 3: Chain 3 (counts as 1 double crochet). Crochet 2 double crochets in the next chain space. Crochet 1 double crochet in the next stitch (the double crochet from the previous row) (see image).
Repeat the pattern: 2 double crochets in the chain space, 1 double crochet in the next stitch, all the way around the row.Finish with 1 double crochet in the 3rd chain from the beginning of the previous row. Total: 29 double crochets.


Row 4: Chain 1. Crochet 1 single crochet in the same stitch. Chain 3. Skip 2 stitches. Crochet 1 single crochet in the next stitch.Repeat this pattern around the row.At the end of the row, skip 3 stitches and crochet 1 single crochet in the last stitch. Total: 9 single crochets and 9 chain spaces (chain-3 loops).

Row 5: Chain 1. Slip stitch into the chain space (the chain-3 loop). Chain 3 (counts as 1 double crochet). Crochet 5 more double crochets into the same chain space (total 6 double crochets).
Crochet 1 single crochet in the next chain space.
Crochet 6 double crochets in the next chain space.
Repeat this pattern all the way around.
In the last chain space, crochet 6 double crochets. Finish with 1 single crochet in the first single crochet from the previous row. Total: 30 double crochets and 5 single crochets.
If you’re unsure how to do a slip stitch, check the instructional video linked below.


Kanten på locket
Row 1: Chain 1. Crochet 1 single crochet in the single crochet stitch where you finished Row 5.

Crochet 1 single crochet in the single crochet stitch from Row 4 (see picture). Then crochet 3 single crochets into the chain space made of 3 chains from Row 3.

Crochet 3 single crochets into the chain space with 3 chains from Row 2. Then crochet 3 single crochets into the chain space with 3 chains from Row 1. Finish by crocheting 1 single crochet into the magic ring.

Repeat the same pattern on the other part of the front piece. At the end of the row, crochet 1 single crochet into the chain from the beginning of Row 5. Then crochet 1 single crochet into the chain space with 3 chains from Row 5. You should have a total of 24 stitches.

Row 2: Chain 1. Single crochet in the same stitch. Single crochet across the entire row (total 24 stitches).
Row 3: Repeat Row 2. Fasten off and cut the yarn.
Note: Leave a longer yarn tail to sew the front piece onto the body of the bag.

Sew the front piece onto the body:
The back edge of the body has the same number of stitches as the edge of the front piece — 24 stitches. Sew the back edge of the body’s stitches together with the front piece.
See the pictures below for guidance.


Cut the yarn and fasten off.
Strap:
If you want, you can crochet a strap for the bag. Use the leftover paper yarn. Crochet with a double strand of yarn. Attach the yarn to one end of any side of the bag. Chain 20 stitches (or as many as you want for the length of the strap). Slip stitch into the same stitch where you attached the yarn. Cut the yarn and fasten off.

You are done!
Crochet Terms
Now we’re going to crochet a beautiful clutch with our paper yarn! This is the version using crochet terms. You can always switch back to the simple version if you need help along the way.
MR = Magic Ring
ch = Chain
sl st = Slip Stitch
sc = Single Crochet
dc = Double Crochet
hbst = Herringbone Double Crochet (Herringbone Stitch)
(...) = indicates the number of stitches in the current row
*...* = repeat everything inside the asterisks the indicated number of times
Clutch Body
In this pattern, turning chains at the beginning/end of a row do not count as stitches. You always turn your work after each row.
Chain 34 + 2 turning chains (36 chains total).
Row 1: Starting in the 3rd chain from the hook, work 1 hbst in each ch across (34 stitches).
Row 2: Chain 2. Work 1 hbst in each st across (34 stitches).
Rows 3–14: Repeat Row 2 (34 stitches).
Fasten off.

Crochet or Sew the Sides of the Body
Fold your work in half and crochet the sides together. Crochet together from the bottom up to the top edge of the body. Do the same on the other side.
If you prefer not to crochet the sides together, you can sew them instead.

Crochet Single Crochets Along the Top Edge of the Body
Crochet sc along the edge. Work a total of 24 sc along one side. Crochet 1 sc in the corner stitch. Then work 24 sc along the other side and finish with 1 sc in the corner stitch on the opposite side (where you joined the sides). Fasten off your yarn.
You can place the sc as shown in the picture description below.


Clutch Flap
Start with 1 Magic Ring (MR).
Round 1: Chain 3 (counts as first dc). Crochet 9 more dc into the MR. (Total 10 dc)

Round 2: Chain 4 (counts as 1 dc + 1 chain). *Dc in the same st, dc in the next st, ch 1*. Repeat from * to * around until the last st. After the last st, ch 1 and sl st into the 3rd ch of the starting ch from the previous round to join. Total: 11 dc and 10 chs.

Round 3: Chain 3 (counts as 1 dc). *Work 2 dc in the next ch space. Work 1 dc in the next st (from the previous round)*. Repeat from * to * around. End with 1 dc in the 3rd ch of the starting ch from the previous round to join.Total: 29 dc.

Round 4: Ch 1, sc in the same st, ch 3. *Skip 2 st, sc in the next st.* Repeat from * to * around.
At the end, skip 3 sts and sc in the last st.
Total: 9 sc and 9 chain-3 spaces.

Round 5:Chain 1, sl st into the ch space. Ch 3 (counts as first dc), then work 5 more dc into the same ch space (6 dc total). Sc in the next ch space. Work 6 dc in the next ch space. Repeat this pattern around. Work 6 dc in the last ch space. Finish with 1 sc in the first sc from the previous round. Total: 30 dc and 5 sc.


Edge of the flap
Round 1: Ch 1. Sc around the sc where you ended Row 5. Sc in the sc from Row 4 (see image). Work 3 sc in the 3- ch space from Row 3 (see image). Work 3 sc in the 3-ch space from Row 2. Work 3 sc in the 3-ch space from Row 1. Sc in the MR (see image). Repeat the same pattern on the other side of the flap. Sc in the ch from the beginning of Row 5. Sc in the 3-ch space from Row 5 (see image). Total: 24 sc.


Round 2: Ch 1. Sc around (24 sc).
Round 3: Repeat Round 2. Fasten off.
Note: Leave a longer yarn tail for sewing the flap to the body.
Sew front piece to body
The back of the body has the same number of stitches as the edge of the flap, i.e., 24 stitches. Sew the back edge of the body stitches to the front piece. See pictures below. Fasten off.


Strap
If you want, you can crochet a strap for the clutch. Use the leftover paper yarn. Crochet with double strands. Attach the yarn at one end of any side of the clutch. Chain 20 (or as many as you want for the strap length). Slip stitch in the same stitch where you attached the yarn. Fasten off.

You are done!
The rights to this pattern belong to MYO Make Your Own. The pattern or its pictures may not be copied, shared or resold either in parts or in its entirety, but you may sell items you have crocheted from this pattern. If you have questions about the pattern, contact MYO at hello@makeyourown.se.


