
Crochet baby mobile “Luna”
Crochet a baby mobile with three different figures
In this instruction, we show you how to crochet three different figures; a star, a moon, and a rainbow. These can be used for many things and are, for example, beautiful in a baby mobile, in a stroller pendant, or as a garland. In the video, we will show an example of assembling a baby mobile and a simple stroller pendant.
For the instruction you will need EKO Nano Tube yarn in as many colors as desired (in the video it is shown with four colors), as well as crochet hook 6 mm. If you want to make a baby mobile, you need a bamboo ring 15 mm/20 mm, thin twine/thick wire and glue. If you want to make a stroller hanger, you need a stroller ring and thin twine/thick wire.
Yarn consumption: about 30g for a rainbow or a moon, about 25g for a star

Here's how to do it

This is what you need:
Here you can directly purchase the material for the product. Please note that the instruction is digital and appears here on the page (no written instruction).


.jpg)
Unleash your creativity
For only 85kr per month you get access to all our 300+ beginner-friendly instructions for crochet, knitting and macrame.
A perfect way to get started with your new hobby!

Before we start with the pattern; SAFETY! When making the stroller hangers and baby mobiles, safety is important! It is important that these products are for decoration only, they are not a toy and not for children to mouth/play with. It is you who crochet these products who are responsible for complying with the safety requirements and also passing on the information if they are given away as a gift.
MOON
Get started - the innermost ring
Hold the yarn in your left hand. Twist the yarn around your fingers (left hand) three times. Use your crochet hook to go under the first two loops and hook the third with your crochet hook. Pick up the yarn again and pull under the two finger loops, hook the yarn onto the hook and pull through. Now the loop on the crochet hook holds the double "inner ring" together and we can start on round 1.
First round
Now we will start crocheting the first row with stitches. Go down with the crochet in the ring and hook on the yarn and pull through, pick up the yarn again so you temporarily have two loops on the crochet hook, pick up the yarn and pull through both loops. Do this 7 more times so that you have a total of 8 stitches in the innermost ring. Now round 1 is done!
Second round
On this lap, we will make two stitches in each stitch from lap 1. Pass the crochet hook through the first stitch you made for the first lap and pull the yarn through. You now have two loops on the crochet hook. Grasp the yarn again and pull it through both loops. Now you have only one loop on the crochet and have crocheted the first stitch. On this lap we are going to make two stitches in each stitch so you go down in THE SAME stitch again and catches the yarn and pulls through so you temporarily get two loops on the crochet hook. Then pick up the yarn again and pull through.
You have now made two stitches in the same stitch. Continue in the same way round out, a total of 16 stitches on lap 2. Fasten the end of the yarn from the beginning. You fasten by threading the yarn under a stitch and tying a knot, then you hide the end of the yarn under neighboring stitches.
Third lap
Crochet two stitches in each stitch again, exactly the same as the previous round. You will have a total of 32 stitches on the round when you are finished.
Fourth round
This will be the last lap of the moon. Make two stitches in the same stitch in every other stitch, in between you make a stitch in each stitch. A total of 48 stitches on the round. If you want a small moon, skip this round.
Now you fold the moon with the yarn end at the top.
Now fold the moon with the end of the yarn at the top.
Fifth round
Now we will crochet through both layers and you will start at the top. We will crochet every second puff stitch and every other slip stitch, starting with a puff stitch. Crochet a puff stitch by taking the yarn over the crochet hook, go down the stitch and pick up yarn (you have three loops on the crochet hook). Take the yarn over the crochet hook and go down into the stitch and pick up yarn again. Do the same a third time, you now have 7 stitches on the crochet hook. Take the yarn over the crochet hook and pull through all the stitches.
In the stitch after, crochet a slip stitch. A slip stitch is crocheted by going down with the crochet needle in the stitch and picking up yarn and pulling through directly. Crochet every other puff and every other slip stitch until you are at the bottom. Attach the yarn. Note that you should not crochet the puff stitches too tightly but rather loosely, check the video if in doubt.
Attach the end of the yarn to the back.
STAR
Get started - the innermost ring
Hold the yarn in your left hand. Twist the yarn around your fingers (left hand) three times. Use your crochet hook to go under the first two loops and hook the third with your crochet hook. Pick up the yarn again and pull under the two finger loops, hook the yarn onto the hook and pull through. Now the loop on the crochet hook holds the double "inner ring" together and we can start on round 1.
Round 1
Now we will start crocheting the first round with single crochet. Go down into the ring and pick up the yarn (you have two loops on the hook), bring the yarn over the hook again, and pull through. Crochet a total of seven stitches.
Round 2
On this round we will make two regular double crochets in each stitch from round 1. Insert the crochet hook through the first stitch you made for the first round and pull the yarn through. You now have two loops on the hook. Grab the yarn again and pull it through both loops. Now you only have one loop on the hook and have crocheted the first stitch. On this round we will make two stitches in each stitch so you go down in the SAME stitch again and make another stitch. Continue in the same way round out but in the last stitch you make three stitches in the same stitch. A total of 15 stitches on round 2. It is important that there are 15 stitches here so that the star is even (total number of stitches must be divisible by five).
In round 3 we will crochet the five triangles on the star. Then follow below steps. Crochet a single crochet, and then three loops
b. Now we will crochet the chain with three loops that you just crocheted. Skip the nearest loop and start in loop two. Crochet a single crochet.
c. In the next loop of the chain, crochet a half double crochet. A half double crochet is crocheted by taking the yarn over the crochet hook, going down the stitch and picking up yarn (you have three loops on the crochet hook), picking up yarn and pulling through all the loops.
d. Skip a stitch on the roundabout and go down the third stitch and crochet a slip stitch (a slip stitch is crocheted by going down the stitch and picking up yarn and pulling through directly).
e. Repeat 4 more times, until you have a star. Cut the yarn and fasten.
f. Crochet the same one more time but do not cut the yarn at the end.
Now we will crochet the two parts together.
Lay them with the fine side out. Start crocheting together. Crochet a slip stitch into each stitch. In cases where there are two loop arches, select only the one closest to you, take a look in the video if in doubt. At the top of the corners of the tops, crochet a slip stitch, a loose loop and a slip stitch again, all in the same stitch. When you're done, attach the yarn.
RAINBOW
Use 1-5 colors.
Start with the first color.
Round 1: Start with a loop, one way you can start is to wrap the yarn around your index and middle finger and then pull the yarn up so that the loop locks when you tighten. The end of the yarn formed should preferably be about 20 cm, we will use it at the end. Crochet 7 loops.
Start in the second stitch, i.e. skip the first stitch. Crochet five single crochets. In the top stitch, you crochet four single stitches in the same stitch. Crochet four single crochets on the other side of the chain and in the last stitch you crochet three single crochets in the same stitch. In the last stitch, you make the last pass with your new color, see the video if you want guidance. The loose yarn end should preferably be about 20 cm, we will use it at the end. You have a total of 16 stitches on the round.
Round 2: In the first stitch, you crochet two single crochets in the same stitch, then you crochet four single crochets (one stitch in each stitch). After that, you crochet two double crochets in the same stitch in the next four stitches (the four stitches on top). Then crochet four single crochet, one in each. After that, you crochet two single crochets in the same stitch in the last three stitches. In the last stitch, you make the last pass with your new color, see the video if you want guidance. The loose yarn end should preferably be about 20 cm, we will use it at the end. In total you have 24 stitches on the row.
Round 3: In the first stitch, you crochet two single crochets in the same stitch, then you crochet six single crochets (one stitch in each stitch). After that, you crochet two single crochets in the same stitch in the next six stitches (the six stitches at the top). Crochet six single crochets, one in each. Then crochet two single crochets in the same stitch in the last five stitches. In the last stitch, you make the last pass with your new color, see the video if you want guidance. The loose yarn end should preferably be about 20 cm, we will use it at the end. A total of 36 stitches.
If you want a small rainbow, skip round 4 and go directly to the point after.
Round 4
Crochet 12 single stitches (one stitch in each stitch). After that, you crochet two single crochets in the same stitch in the next five single crochets (the five stitches at the top). Crochet 14 single crochets, one in each. Then crochet two single stitches and in the next five stitches. In the last stitch, you crochet a regular single crochet. Now crochet regular single crochets until you are in the middle of the long side (approx. 3-4 sts for a small and approx. 6-7 sts for a large one). In the last stitch, you make the last pass with your new color, see the video if you want guidance. The loose yarn end should preferably be about 20 cm, we will use it at the end.
Cut off all yarn ends and save approx. 20 cm of yarn end.
Fold the rainbow so that the yarn is where the arrow points in the picture below. Place all loose yarn ends on the left side (if you have more than 7, place the rest on the right side). They should not be hidden in the rainbow. Work a single crochet in each stitch around the entire hoop until you are at the bottom. Can be difficult at the very bottom where all the yarn ends are, but crochet as far as you can. Cut but keep the yarn end the same length as the other ends.
Now we will do the last step and create pendants on the rainbow. Count how many yarn ends there are on the sides where the yarn ends stick out. It is nice to have about 8 pcs. Then cut as many yarn ends as you need to fill in so you have equal numbers on both sides. Cut them about 30 cm long and thread them through the corner of the rainbow so that they hang equally on each side. Tie a knot with all yarn ends, pulling them tight so they are tight. Then cut them to the desired length.
.jpeg)

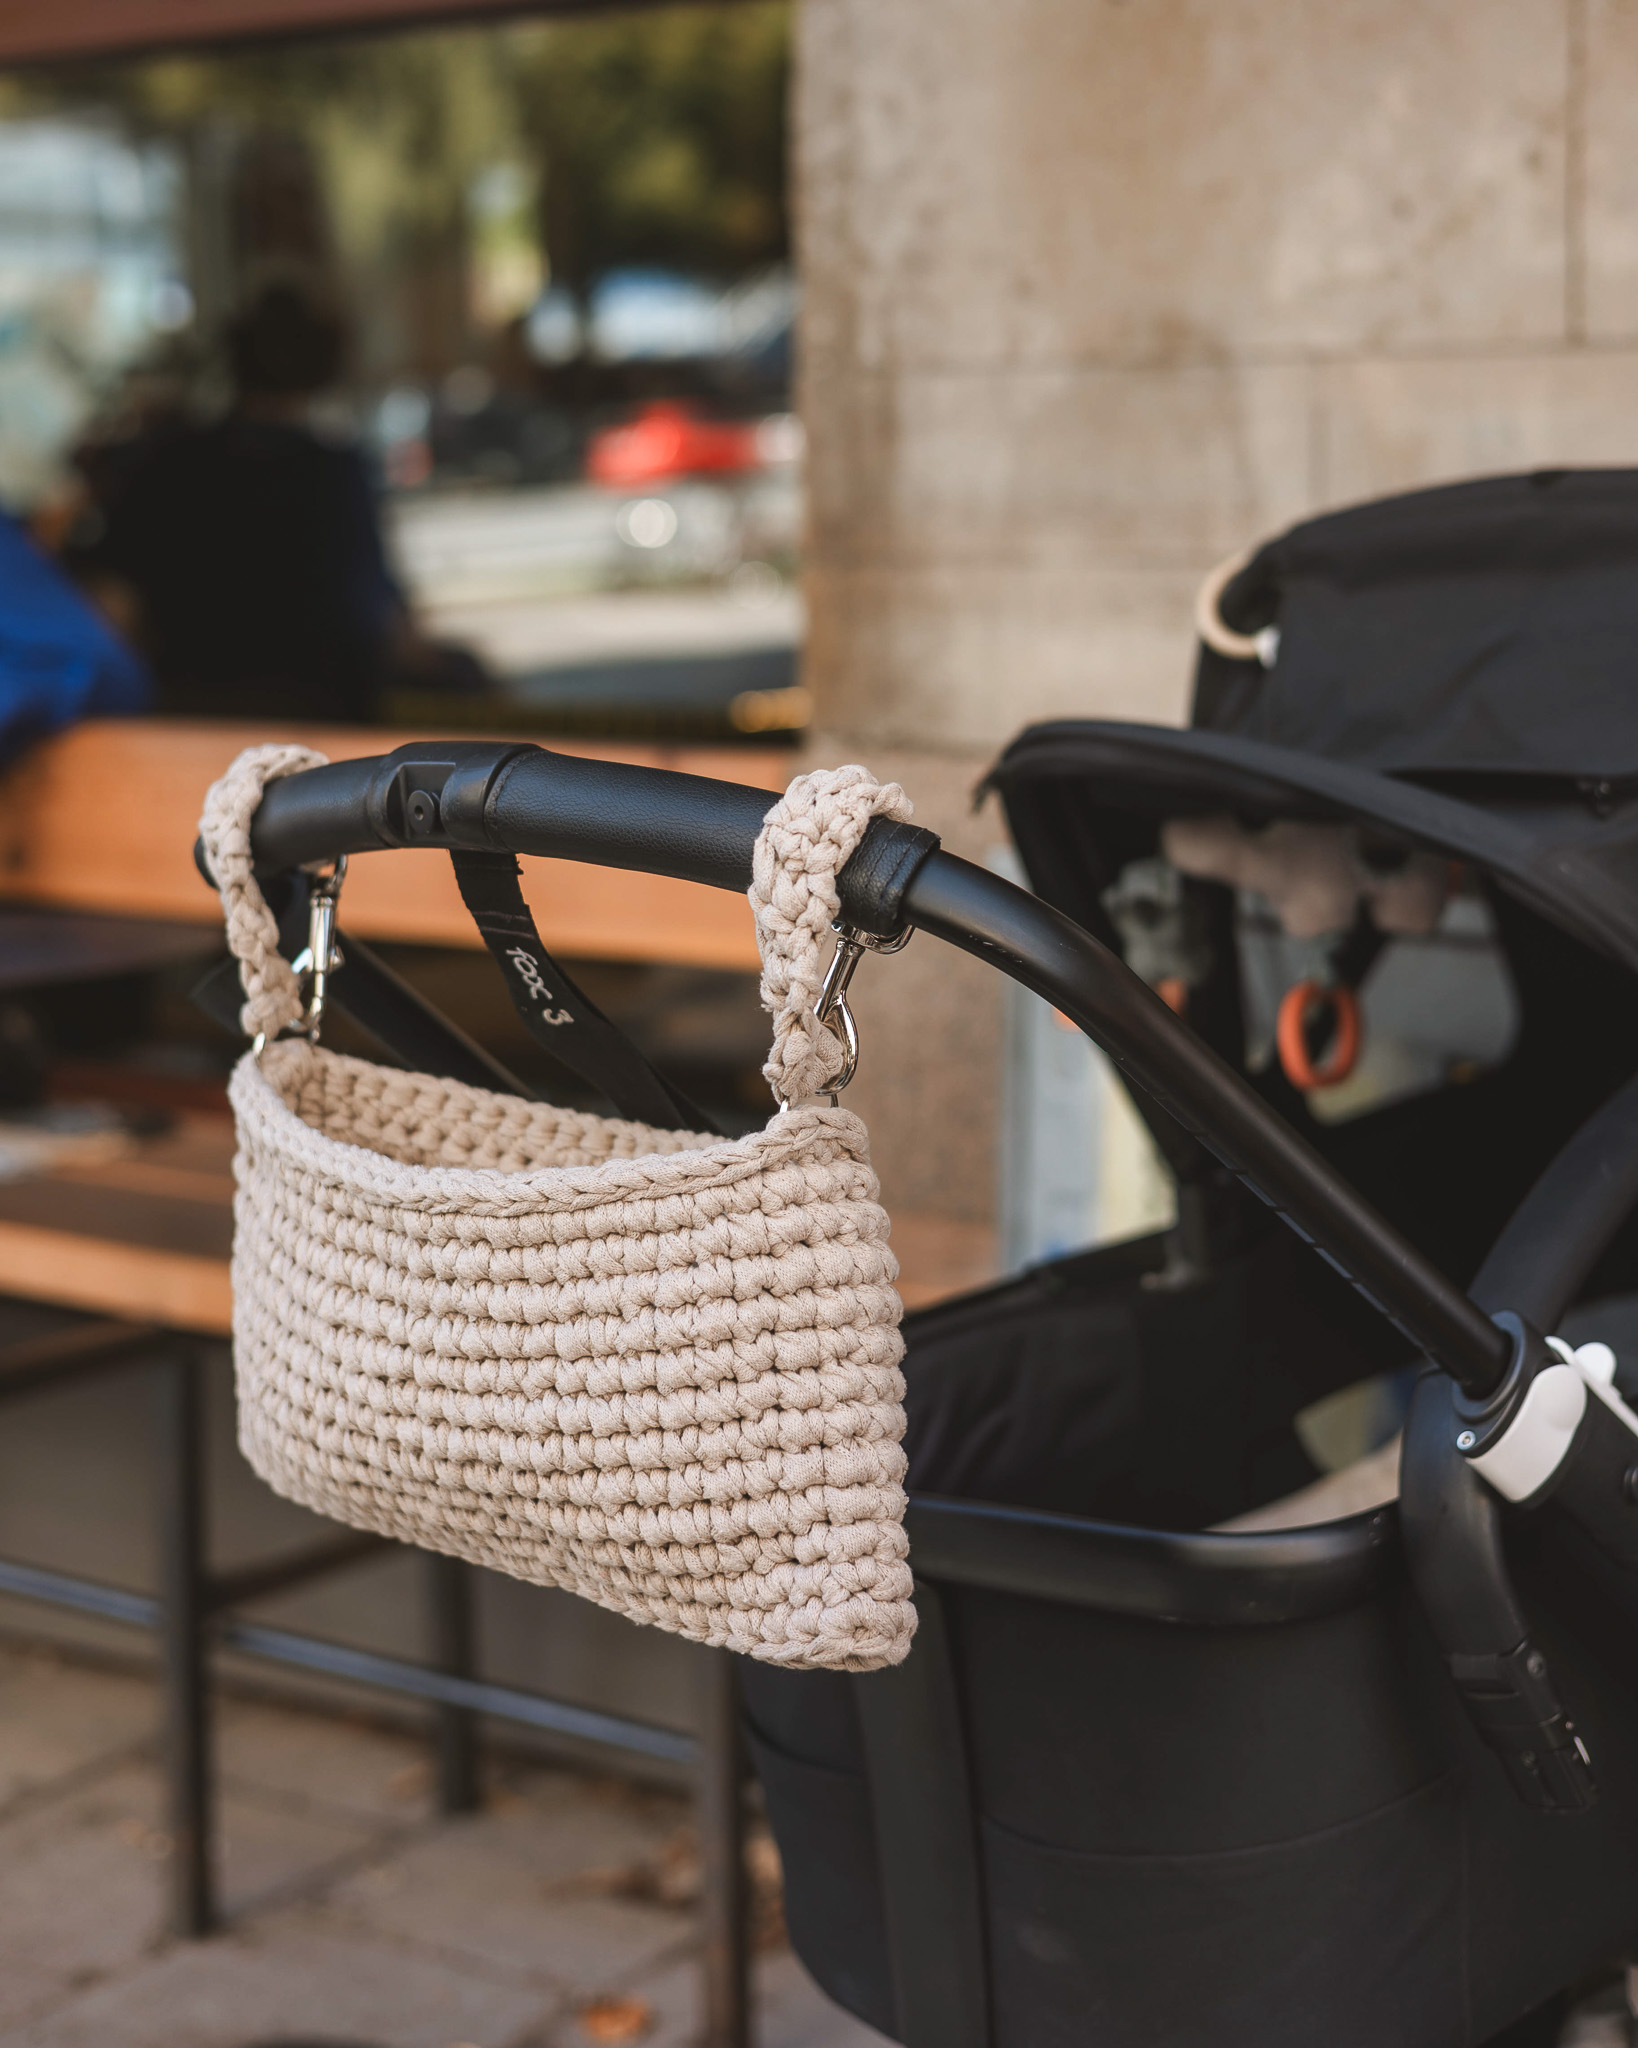
Stroller hanger
If you want to make a stroller hanger, you need a stroller ring and a thinner yarn/thicker wire. There are many ways to do this, but below
comes one way:
Cut 3 pieces of yarn of 80 cm. Thread them through the top of the moon/rainbow/star so that there are equal long ends on both sides. Braid the yarn ends until you are happy with the height. When you are satisfied with the height, divide the 6 yarn ends and make two braids (three and three). Take the pram ring and tie a bow (preferably two double knots first).
Stroller mobile.
For this you need a bamboo ring, there are two different sizes at makeyourown.se, 15 cm or 20 cm. You can choose for yourself how many moons/rainbows/stars you want in your mobile. My tip is to have about 3-4pcs around the ring, you can also have one in the middle.
Start by taking the thinner yarn (a tip is to take a yarn with glitter to bring some life to the mobile), cut a longer piece of yarn about 120 cm and thread it through the moon/rainbow/star so it is the same length on both sides. Tie a knot at the bottom and when you are satisfied with the length it should hang from the bamboo ring (before you tie it in the ring) then tie a double knot again. Let the yarn ends go on each side of the ring and tie a knot (so that the ring is fixed between the knots). Do the same with all parts. If you choose to have one in the middle, it will not be attached to the ring, but directly to the loop at the top.
When you attach all the parts of the ring plus any pendant you have in the middle, you take all the ends of the yarn and balance so that the ring is straight and make a double knot with all the ends. Then make a loop/bow from all the ends of the yarn and cut off to the desired length.
A tip is to glue the parts that hang from the bamboo ring so that they do not move. I glue a little on the bamboo ring so that the parts stay firmly in place.
Abbreviations:
m = stitch
sc = single crochet
ch = chain
sl st = slip stitch
dc = double crochet
hdc = half double crochet
puff = puff stitch
inc = increase (2 stitches in the same stitch)
*...* = Repeat the instructions within ... as many times as indicated
Now let's crochet a moon, rainbow, and star. You can use these in a baby mobile or as decoration, bunting, etc. If you need help along the way, refer to our easy version of this pattern. There are no pictures in this version, so we refer to the full video tutorial.
Safety:
When making stroller hangers and baby mobiles, safety is important! These products are meant for decoration only, they are not toys and should not be put in a child's mouth or played with. You, as the crafter, are responsible for adhering to safety requirements and also passing on this information if the items are given as gifts.
Moon
Round 1: Crochet 8 sc in a MR (8)
Round 2: Inc x8 (16)
Round 3: Inc x16 (32)
If you want a smaller moon, skip round 4.
Round 4: *1 sc, inc* x16 (48)
Fold the moon in half and crochet through both layers, starting at the top. We will crochet alternating puff stitches and slip stitches, starting with a puff stitch.
Puff stitch (puff):
To make a puff stitch, yarn over, insert your hook into the stitch, and pull up a loop (you will have 3 loops on your hook). Yarn over again, insert your hook into the stitch, and pull up another loop (you will have 5 loops on your hook). Yarn over again, insert your hook into the stitch, and pull up another loop (you will have 7 loops on your hook). Yarn over again and pull through all 7 loops.
Round 5: *1 puff, 1 sl st* repeat until you reach the bottom of the moon and finish with a sl st.
Cut off the yarn and weave in the ends. Your moon is complete.
Star
Round 1: Crochet 7 sc in a MR (7)
Round 2: Inc x6, crochet 3 sc in the last stitch (15)
The total number of stitches must be divisible by five.
Round 3: 1 sc, 3 ch. Start in the 2nd chain from the hook and crochet 1 sc, 1 hdc. Skip 1 stitch on the ring and crochet 1 sl st. Repeat 4 more times so you have 5 points.
Cut and fasten off the yarn for the first piece.
Crochet a second piece.
When you have two pieces, join them together. Place them with the right side facing out (wrong sides together). Crochet a sl st into each stitch. In places where there are two loops, only work into the one closest to you. At the top of each point, crochet 1 sl st, 1 ch, and 1 sl st all into the same stitch.
When you're finished, fasten off the yarn.
Your star is complete.
Rainbow
Round 1: Crochet 7 ch (leave a 20 cm long yarn tail from the start) (7)
Crochet around the chain: Start in the 2nd ch from the hook and crochet 5 sc. In the top stitch, crochet 4 sc in the same stitch. Crochet on the other side of the chain: 4 sc, 3 sc in the last stitch (16)
Change color, leaving both yarn ends around 20 cm, we will use them at the end.
Round 2: 1 inc, 4 sc, inc x4, 4 sc, inc x3 (24)
Change color, leave both yarn ends around 20 cm, we will use them at the end.
Round 3: 1 inc, 6 sc, inc x6, 6 sc, inc x5 (36)
Change color, leave both yarn ends around 20 cm, we will use them at the end.
If you want a smaller rainbow, skip round 4 and proceed to the next step.
Round 4: 12 sc, inc x5, 14 sc, inc x5 (46)
Now crochet sc until you reach the middle of the long side (around 3-4 stitches for a small rainbow and 6-7 stitches for a large one). In the last stitch, make the final pull-through with your new color. The loose yarn end should be about 20 cm, we will use it at the end. Cut all yarn ends and save around 20 cm yarn tail.
Fold the rainbow. Place all the loose yarn ends on the left side (if you have more than 7, place the remaining ones on the right side). Do not hide them in the rainbow. Crochet 1 sc in each stitch around the entire rainbow until you reach the bottom. It may be difficult right at the very bottom where all the yarn ends are, but crochet as far as you can. Cut, but leave the yarn end the same length as the others.
Want to turn these into a mobile? See below.
Baby Mobile
For this project, you will need a bamboo ring, which comes in two sizes at makeyourown.se: 15 cm or 20 cm. You can decide how many moons, rainbows, or stars you would like in your mobile. My recommendation is to have about 3-4 hanging around the ring, and you can also place one in the center.
Start with the thinner yarn (a great tip is to use a yarn with glitter to add some sparkle to your mobile). Cut a long piece of yarn, about 120 cm, and thread it through the moon/rainbow/star so that both ends are equal in length. Tie a knot at the bottom, and when you’re satisfied with the length it should hang from the bamboo ring (before tying it to the ring), tie another double knot. Let the yarn ends go on either side of the ring and tie a knot so the ring is secured between the knots. Repeat this process for each piece.
If you choose to have one piece in the center, do not attach it to the ring, but instead directly to the loop at the top.
Once you’ve attached all the pieces to the ring, including the optional center hanger, gather all the yarn ends, balance them so the ring is level, and tie a double knot with all the ends. Then, make a loop or bow with the yarn ends and trim them to your desired length.
A helpful tip is to glue the hanging pieces to the bamboo ring to prevent them from shifting. I apply a little glue to the ring to ensure that the pieces stay securely in place.
And that’s it – your baby mobile is ready! :)
Do you want to create a stroller chain?
Stroller Chain
If you'd like to create a stroller charm, you will need a stroller ring and a thinner yarn or thicker thread. There are many ways to do this, but here’s one method:
Cut 3 pieces of yarn, each 80 cm long. Thread them through the top of the moon/rainbow/star so that both ends are equal in length. Braid the yarn ends until you’re happy with the length. Once you're satisfied with the height, divide the 6 yarn ends into two groups, making two braids (3 strands each).
Take the stroller ring and tie a bow (it’s a good idea to make two double knots first).
And you're done! :)
The rights to this pattern belong to MYO Make Your Own. The pattern or its pictures may not be copied, shared or resold either in parts or in its entirety, but you may sell items you have crocheted from this pattern. If you have questions about the pattern, contact MYO at hello@makeyourown.se.
Before we start with the pattern; SAFETY! When making the stroller hangers and baby mobiles, safety is important! It is important that these products are for decoration only, they are not a toy and not for children to mouth/play with. It is you who crochet these products who are responsible for complying with the safety requirements and also passing on the information if they are given away as a gift.
MOON
Get started - the innermost ring
Hold the yarn in your left hand. Twist the yarn around your fingers (left hand) three times. Use your crochet hook to go under the first two loops and hook the third with your crochet hook. Pick up the yarn again and pull under the two finger loops, hook the yarn onto the hook and pull through. Now the loop on the crochet hook holds the double "inner ring" together and we can start on round 1.
First round
Now we will start crocheting the first row with stitches. Go down with the crochet in the ring and hook on the yarn and pull through, pick up the yarn again so you temporarily have two loops on the crochet hook, pick up the yarn and pull through both loops. Do this 7 more times so that you have a total of 8 stitches in the innermost ring. Now round 1 is done!
Second round
On this lap, we will make two stitches in each stitch from lap 1. Pass the crochet hook through the first stitch you made for the first lap and pull the yarn through. You now have two loops on the crochet hook. Grasp the yarn again and pull it through both loops. Now you have only one loop on the crochet and have crocheted the first stitch. On this lap we are going to make two stitches in each stitch so you go down in THE SAME stitch again and catches the yarn and pulls through so you temporarily get two loops on the crochet hook. Then pick up the yarn again and pull through.
You have now made two stitches in the same stitch. Continue in the same way round out, a total of 16 stitches on lap 2. Fasten the end of the yarn from the beginning. You fasten by threading the yarn under a stitch and tying a knot, then you hide the end of the yarn under neighboring stitches.
Third lap
Crochet two stitches in each stitch again, exactly the same as the previous round. You will have a total of 32 stitches on the round when you are finished.
Fourth round
This will be the last lap of the moon. Make two stitches in the same stitch in every other stitch, in between you make a stitch in each stitch. A total of 48 stitches on the round. If you want a small moon, skip this round.
Now you fold the moon with the yarn end at the top.
Now fold the moon with the end of the yarn at the top.
Fifth round
Now we will crochet through both layers and you will start at the top. We will crochet every second puff stitch and every other slip stitch, starting with a puff stitch. Crochet a puff stitch by taking the yarn over the crochet hook, go down the stitch and pick up yarn (you have three loops on the crochet hook). Take the yarn over the crochet hook and go down into the stitch and pick up yarn again. Do the same a third time, you now have 7 stitches on the crochet hook. Take the yarn over the crochet hook and pull through all the stitches.
In the stitch after, crochet a slip stitch. A slip stitch is crocheted by going down with the crochet needle in the stitch and picking up yarn and pulling through directly. Crochet every other puff and every other slip stitch until you are at the bottom. Attach the yarn. Note that you should not crochet the puff stitches too tightly but rather loosely, check the video if in doubt.
Attach the end of the yarn to the back.
STAR
Get started - the innermost ring
Hold the yarn in your left hand. Twist the yarn around your fingers (left hand) three times. Use your crochet hook to go under the first two loops and hook the third with your crochet hook. Pick up the yarn again and pull under the two finger loops, hook the yarn onto the hook and pull through. Now the loop on the crochet hook holds the double "inner ring" together and we can start on round 1.
Round 1
Now we will start crocheting the first round with single crochet. Go down into the ring and pick up the yarn (you have two loops on the hook), bring the yarn over the hook again, and pull through. Crochet a total of seven stitches.
Round 2
On this round we will make two regular double crochets in each stitch from round 1. Insert the crochet hook through the first stitch you made for the first round and pull the yarn through. You now have two loops on the hook. Grab the yarn again and pull it through both loops. Now you only have one loop on the hook and have crocheted the first stitch. On this round we will make two stitches in each stitch so you go down in the SAME stitch again and make another stitch. Continue in the same way round out but in the last stitch you make three stitches in the same stitch. A total of 15 stitches on round 2. It is important that there are 15 stitches here so that the star is even (total number of stitches must be divisible by five).
In round 3 we will crochet the five triangles on the star. Then follow below steps. Crochet a single crochet, and then three loops
b. Now we will crochet the chain with three loops that you just crocheted. Skip the nearest loop and start in loop two. Crochet a single crochet.
c. In the next loop of the chain, crochet a half double crochet. A half double crochet is crocheted by taking the yarn over the crochet hook, going down the stitch and picking up yarn (you have three loops on the crochet hook), picking up yarn and pulling through all the loops.
d. Skip a stitch on the roundabout and go down the third stitch and crochet a slip stitch (a slip stitch is crocheted by going down the stitch and picking up yarn and pulling through directly).
e. Repeat 4 more times, until you have a star. Cut the yarn and fasten.
f. Crochet the same one more time but do not cut the yarn at the end.
Now we will crochet the two parts together.
Lay them with the fine side out. Start crocheting together. Crochet a slip stitch into each stitch. In cases where there are two loop arches, select only the one closest to you, take a look in the video if in doubt. At the top of the corners of the tops, crochet a slip stitch, a loose loop and a slip stitch again, all in the same stitch. When you're done, attach the yarn.
RAINBOW
Use 1-5 colors.
Start with the first color.
Round 1: Start with a loop, one way you can start is to wrap the yarn around your index and middle finger and then pull the yarn up so that the loop locks when you tighten. The end of the yarn formed should preferably be about 20 cm, we will use it at the end. Crochet 7 loops.
Start in the second stitch, i.e. skip the first stitch. Crochet five single crochets. In the top stitch, you crochet four single stitches in the same stitch. Crochet four single crochets on the other side of the chain and in the last stitch you crochet three single crochets in the same stitch. In the last stitch, you make the last pass with your new color, see the video if you want guidance. The loose yarn end should preferably be about 20 cm, we will use it at the end. You have a total of 16 stitches on the round.
Round 2: In the first stitch, you crochet two single crochets in the same stitch, then you crochet four single crochets (one stitch in each stitch). After that, you crochet two double crochets in the same stitch in the next four stitches (the four stitches on top). Then crochet four single crochet, one in each. After that, you crochet two single crochets in the same stitch in the last three stitches. In the last stitch, you make the last pass with your new color, see the video if you want guidance. The loose yarn end should preferably be about 20 cm, we will use it at the end. In total you have 24 stitches on the row.
Round 3: In the first stitch, you crochet two single crochets in the same stitch, then you crochet six single crochets (one stitch in each stitch). After that, you crochet two single crochets in the same stitch in the next six stitches (the six stitches at the top). Crochet six single crochets, one in each. Then crochet two single crochets in the same stitch in the last five stitches. In the last stitch, you make the last pass with your new color, see the video if you want guidance. The loose yarn end should preferably be about 20 cm, we will use it at the end. A total of 36 stitches.
If you want a small rainbow, skip round 4 and go directly to the point after.
Round 4
Crochet 12 single stitches (one stitch in each stitch). After that, you crochet two single crochets in the same stitch in the next five single crochets (the five stitches at the top). Crochet 14 single crochets, one in each. Then crochet two single stitches and in the next five stitches. In the last stitch, you crochet a regular single crochet. Now crochet regular single crochets until you are in the middle of the long side (approx. 3-4 sts for a small and approx. 6-7 sts for a large one). In the last stitch, you make the last pass with your new color, see the video if you want guidance. The loose yarn end should preferably be about 20 cm, we will use it at the end.
Cut off all yarn ends and save approx. 20 cm of yarn end.
Fold the rainbow so that the yarn is where the arrow points in the picture below. Place all loose yarn ends on the left side (if you have more than 7, place the rest on the right side). They should not be hidden in the rainbow. Work a single crochet in each stitch around the entire hoop until you are at the bottom. Can be difficult at the very bottom where all the yarn ends are, but crochet as far as you can. Cut but keep the yarn end the same length as the other ends.
Now we will do the last step and create pendants on the rainbow. Count how many yarn ends there are on the sides where the yarn ends stick out. It is nice to have about 8 pcs. Then cut as many yarn ends as you need to fill in so you have equal numbers on both sides. Cut them about 30 cm long and thread them through the corner of the rainbow so that they hang equally on each side. Tie a knot with all yarn ends, pulling them tight so they are tight. Then cut them to the desired length.
Stroller hanger
If you want to make a stroller hanger, you need a stroller ring and a thinner yarn/thicker wire. There are many ways to do this, but below
comes one way:
Cut 3 pieces of yarn of 80 cm. Thread them through the top of the moon/rainbow/star so that there are equal long ends on both sides. Braid the yarn ends until you are happy with the height. When you are satisfied with the height, divide the 6 yarn ends and make two braids (three and three). Take the pram ring and tie a bow (preferably two double knots first).
Stroller mobile.
For this you need a bamboo ring, there are two different sizes at makeyourown.se, 15 cm or 20 cm. You can choose for yourself how many moons/rainbows/stars you want in your mobile. My tip is to have about 3-4pcs around the ring, you can also have one in the middle.
Start by taking the thinner yarn (a tip is to take a yarn with glitter to bring some life to the mobile), cut a longer piece of yarn about 120 cm and thread it through the moon/rainbow/star so it is the same length on both sides. Tie a knot at the bottom and when you are satisfied with the length it should hang from the bamboo ring (before you tie it in the ring) then tie a double knot again. Let the yarn ends go on each side of the ring and tie a knot (so that the ring is fixed between the knots). Do the same with all parts. If you choose to have one in the middle, it will not be attached to the ring, but directly to the loop at the top.
When you attach all the parts of the ring plus any pendant you have in the middle, you take all the ends of the yarn and balance so that the ring is straight and make a double knot with all the ends. Then make a loop/bow from all the ends of the yarn and cut off to the desired length.
A tip is to glue the parts that hang from the bamboo ring so that they do not move. I glue a little on the bamboo ring so that the parts stay firmly in place.
Abbreviations:
m = stitch
sc = single crochet
ch = chain
sl st = slip stitch
dc = double crochet
hdc = half double crochet
puff = puff stitch
inc = increase (2 stitches in the same stitch)
*...* = Repeat the instructions within ... as many times as indicated
Now let's crochet a moon, rainbow, and star. You can use these in a baby mobile or as decoration, bunting, etc. If you need help along the way, refer to our easy version of this pattern. There are no pictures in this version, so we refer to the full video tutorial.
Safety:
When making stroller hangers and baby mobiles, safety is important! These products are meant for decoration only, they are not toys and should not be put in a child's mouth or played with. You, as the crafter, are responsible for adhering to safety requirements and also passing on this information if the items are given as gifts.
Moon
Round 1: Crochet 8 sc in a MR (8)
Round 2: Inc x8 (16)
Round 3: Inc x16 (32)
If you want a smaller moon, skip round 4.
Round 4: *1 sc, inc* x16 (48)
Fold the moon in half and crochet through both layers, starting at the top. We will crochet alternating puff stitches and slip stitches, starting with a puff stitch.
Puff stitch (puff):
To make a puff stitch, yarn over, insert your hook into the stitch, and pull up a loop (you will have 3 loops on your hook). Yarn over again, insert your hook into the stitch, and pull up another loop (you will have 5 loops on your hook). Yarn over again, insert your hook into the stitch, and pull up another loop (you will have 7 loops on your hook). Yarn over again and pull through all 7 loops.
Round 5: *1 puff, 1 sl st* repeat until you reach the bottom of the moon and finish with a sl st.
Cut off the yarn and weave in the ends. Your moon is complete.
Star
Round 1: Crochet 7 sc in a MR (7)
Round 2: Inc x6, crochet 3 sc in the last stitch (15)
The total number of stitches must be divisible by five.
Round 3: 1 sc, 3 ch. Start in the 2nd chain from the hook and crochet 1 sc, 1 hdc. Skip 1 stitch on the ring and crochet 1 sl st. Repeat 4 more times so you have 5 points.
Cut and fasten off the yarn for the first piece.
Crochet a second piece.
When you have two pieces, join them together. Place them with the right side facing out (wrong sides together). Crochet a sl st into each stitch. In places where there are two loops, only work into the one closest to you. At the top of each point, crochet 1 sl st, 1 ch, and 1 sl st all into the same stitch.
When you're finished, fasten off the yarn.
Your star is complete.
Rainbow
Round 1: Crochet 7 ch (leave a 20 cm long yarn tail from the start) (7)
Crochet around the chain: Start in the 2nd ch from the hook and crochet 5 sc. In the top stitch, crochet 4 sc in the same stitch. Crochet on the other side of the chain: 4 sc, 3 sc in the last stitch (16)
Change color, leaving both yarn ends around 20 cm, we will use them at the end.
Round 2: 1 inc, 4 sc, inc x4, 4 sc, inc x3 (24)
Change color, leave both yarn ends around 20 cm, we will use them at the end.
Round 3: 1 inc, 6 sc, inc x6, 6 sc, inc x5 (36)
Change color, leave both yarn ends around 20 cm, we will use them at the end.
If you want a smaller rainbow, skip round 4 and proceed to the next step.
Round 4: 12 sc, inc x5, 14 sc, inc x5 (46)
Now crochet sc until you reach the middle of the long side (around 3-4 stitches for a small rainbow and 6-7 stitches for a large one). In the last stitch, make the final pull-through with your new color. The loose yarn end should be about 20 cm, we will use it at the end. Cut all yarn ends and save around 20 cm yarn tail.
Fold the rainbow. Place all the loose yarn ends on the left side (if you have more than 7, place the remaining ones on the right side). Do not hide them in the rainbow. Crochet 1 sc in each stitch around the entire rainbow until you reach the bottom. It may be difficult right at the very bottom where all the yarn ends are, but crochet as far as you can. Cut, but leave the yarn end the same length as the others.
Want to turn these into a mobile? See below.
Baby Mobile
For this project, you will need a bamboo ring, which comes in two sizes at makeyourown.se: 15 cm or 20 cm. You can decide how many moons, rainbows, or stars you would like in your mobile. My recommendation is to have about 3-4 hanging around the ring, and you can also place one in the center.
Start with the thinner yarn (a great tip is to use a yarn with glitter to add some sparkle to your mobile). Cut a long piece of yarn, about 120 cm, and thread it through the moon/rainbow/star so that both ends are equal in length. Tie a knot at the bottom, and when you’re satisfied with the length it should hang from the bamboo ring (before tying it to the ring), tie another double knot. Let the yarn ends go on either side of the ring and tie a knot so the ring is secured between the knots. Repeat this process for each piece.
If you choose to have one piece in the center, do not attach it to the ring, but instead directly to the loop at the top.
Once you’ve attached all the pieces to the ring, including the optional center hanger, gather all the yarn ends, balance them so the ring is level, and tie a double knot with all the ends. Then, make a loop or bow with the yarn ends and trim them to your desired length.
A helpful tip is to glue the hanging pieces to the bamboo ring to prevent them from shifting. I apply a little glue to the ring to ensure that the pieces stay securely in place.
And that’s it – your baby mobile is ready! :)
Do you want to create a stroller chain?
Stroller Chain
If you'd like to create a stroller charm, you will need a stroller ring and a thinner yarn or thicker thread. There are many ways to do this, but here’s one method:
Cut 3 pieces of yarn, each 80 cm long. Thread them through the top of the moon/rainbow/star so that both ends are equal in length. Braid the yarn ends until you’re happy with the length. Once you're satisfied with the height, divide the 6 yarn ends into two groups, making two braids (3 strands each).
Take the stroller ring and tie a bow (it’s a good idea to make two double knots first).
And you're done! :)
The rights to this pattern belong to MYO Make Your Own. The pattern or its pictures may not be copied, shared or resold either in parts or in its entirety, but you may sell items you have crocheted from this pattern. If you have questions about the pattern, contact MYO at hello@makeyourown.se.
%20(1).jpg)

Share your creations with us
Thank you!
Your comment was sent!