
Hood Scarf "Dahlia"
Crochet a Trendy Hood Scarf in Granny Squares.
This pattern is based on our popular balaclava pattern "Della." We guide you through the pattern with the help of tutorial videos. You will need our yarn Dreamy Blend and a 6 mm crochet hook. The colors used in this balaclava are Pink, Ocean Blue, and Green. You can choose any color combination you like.
Yarn Consumption: approx. 250-300 g, depending on how tightly you crochet. You will need 1-2 skeins per color if you don't choose to crochet the balaclava in just one color. For reference, we used 1.5 skeins of pink, 1.5 skeins of green, and 2.5 skeins of blue (main color).
Please note that in this tutorial, we use videos from our technique library along with explanatory images.


Here's how to do it
The balaclava is crocheted with 19 granny squares, which are then sewn together in the correct order. Please note, you can also skip a row on each square to make the balaclava smaller if you'd like!

This is what you need:
Here you can directly purchase the material for the product. Please note that the instruction is digital and appears here on the page (no written instruction).


MYO Dreamy blend | 50g
A soft blend yarn that consists of 40% cotton, 35% superfine alpaca, and 25% wool.
Buy product.jpg)
Unleash your creativity
For only 85kr per month you get access to all our 300+ beginner-friendly instructions for crochet, knitting and macrame.
A perfect way to get started with your new hobby!

Granny Squares
Crochet 19 granny squares.
We start by making the granny squares in different colors. Begin with the color you want in the center of each square. If you’re unsure how to crochet granny squares, watch the video below (Granny Square). The last round of each square will be worked in the same color on all squares (the main color).
Round 1: Make a magic ring. In the ring, chain 3 (this counts as the first double crochet). Crochet 2 more double crochets. Together with the chain 3, this forms your first dc group. Chain 2 between dc groups—this space forms the corner of the square. Repeat 3 dc, 2 ch three more times (so you have four dc groups in total with 2 chains between each). After completing all double crochets, pull the short tail to tighten the center of the ring. Join with a slip stitch in the 3rd chain from the beginning.
Round 2: Cut the old yarn and fasten off. Attach the new yarn in one corner (the corner is the space between two dc groups from the previous round). Start the round with 3 chains (counts as first dc), then in the same space: 2 dc, 2 ch, and 3 dc. Move to the next corner and crochet 3 dc, 2 ch, 3 dc. Repeat for the remaining corners (total of four corners). Join with a slip stitch in the 3rd chain of the beginning chain. Cut the yarn if you want to change color. If you continue with the same color, slip stitch in each stitch to the next corner (through the chain space from the previous round).
Round 3: Change color or keep the same. Begin in a space between two corners: 3 ch (counts as first dc), 2 dc. In the corners, work 3 dc, 2 ch, 3 dc. Continue around with the same pattern: 3 dc in the side spaces and 3 dc, 2 ch, 3 dc in the corners. Join with a slip stitch in the 3rd chain from the beginning.
Rounds 4–5: To make larger granny squares, continue as in Round 3. In each corner: 3 dc, 2 ch, 3 dc, and in each side space between corners: 3 dc. Begin and end the round as in Round 3. Fasten off all ends when finished.
After Round 5, the square measures approximately 15–16 × 15–16 cm. You may need to add 1–2 extra rounds to reach the desired size (depending on your tension). You can also add a round of single crochets if you want a neater edge.
Joining the Finished Squares
Start by joining 7 squares horizontally to form Rows 1 and 2. Place the squares wrong sides together (the “back” sides facing each other).
- Begin in a corner of the first two squares. Insert your hook through both loops of the corner stitches on both squares and work a single crochet (sc).
- Continue working sc through both loops of each corresponding stitch across the edge until you reach the opposite corner.
- Take 2 new squares, go into the corners of both squares, and continue joining them in the same way.
- When 6 squares are joined, take the 7th square and join it with Row 1 using the same method.
Cut the yarn and fasten off.
If you are unsure how to join squares, watch a video tutorial on “attaching granny squares”. This is just one technique; there are several ways to join squares depending on the look you prefer.
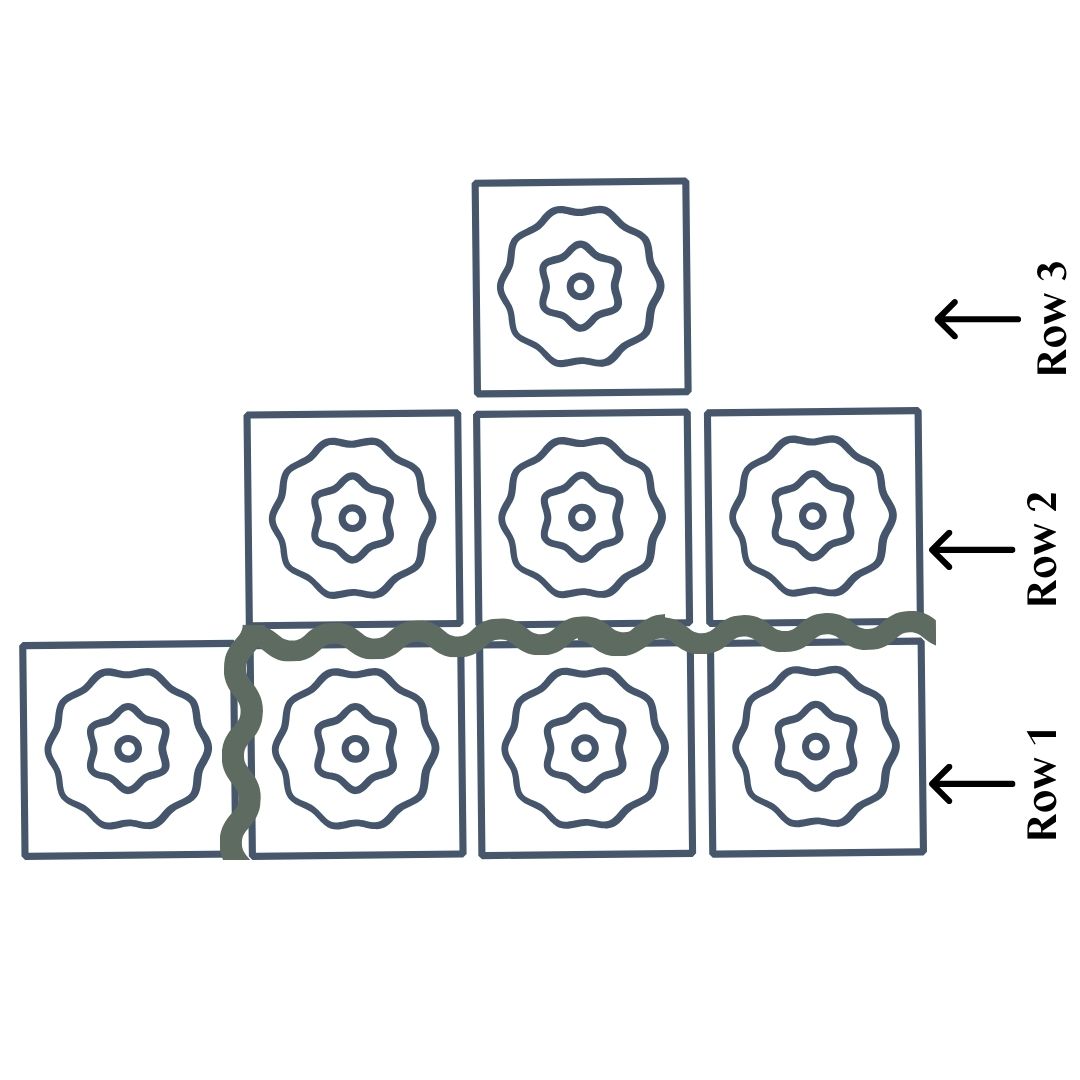
The next step is to join the squares vertically, using the same method as before. Crochet together from the bottom of row 1 up to row 3. Then join row 2 to row 3.
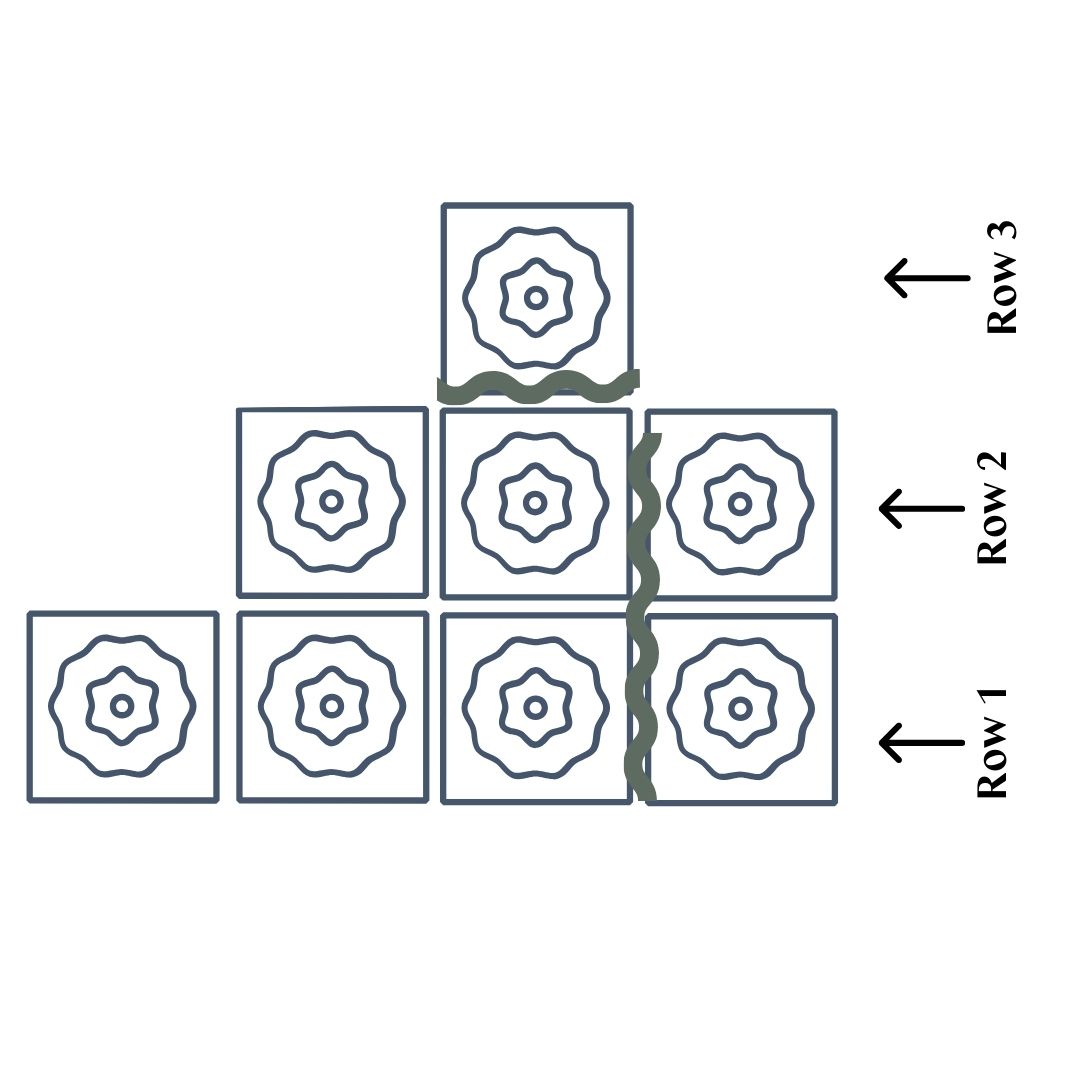
After this, crochet row 1 to row 2, and then crochet row 2 to row 3 again (see picture 3). Now all 8 squares are joined together.
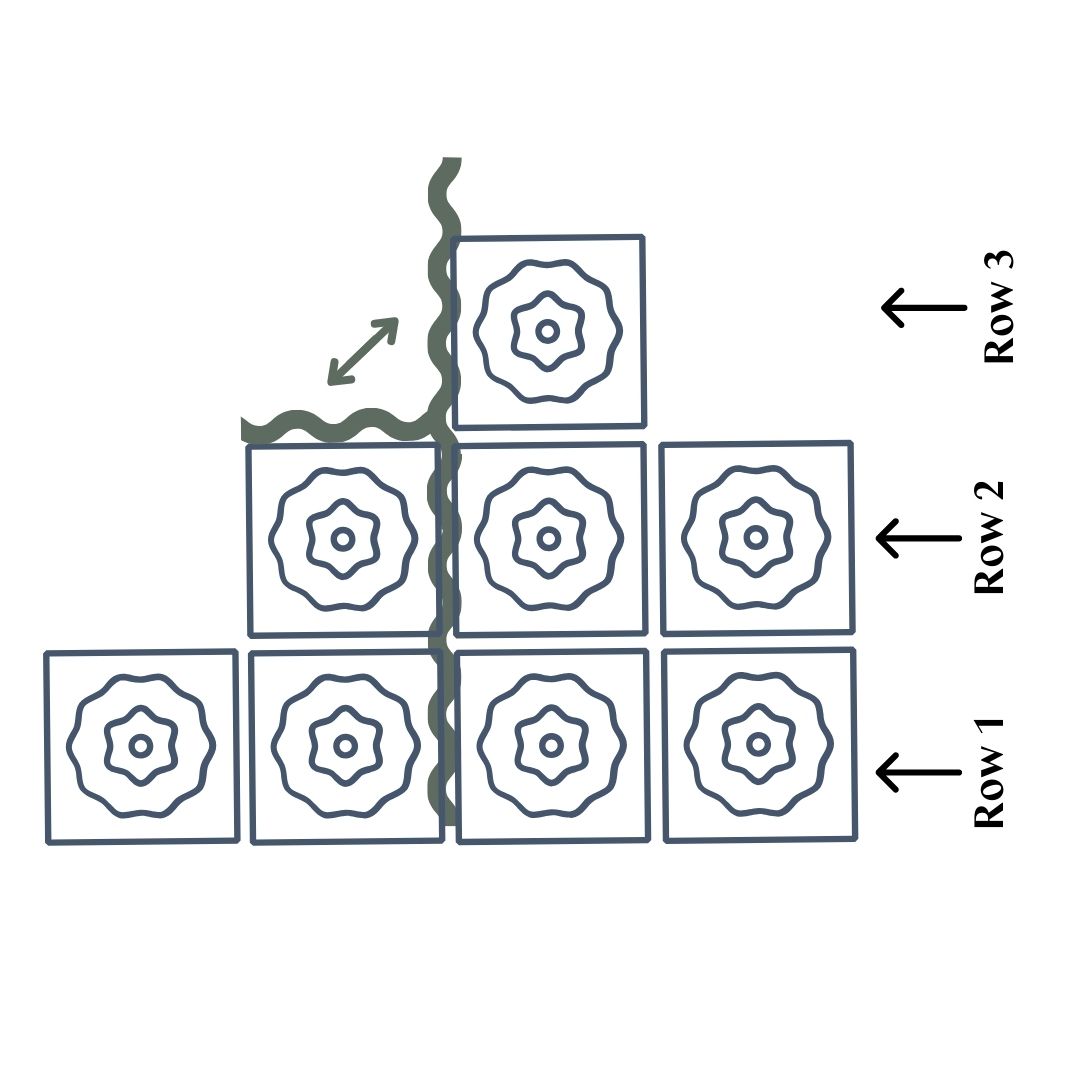
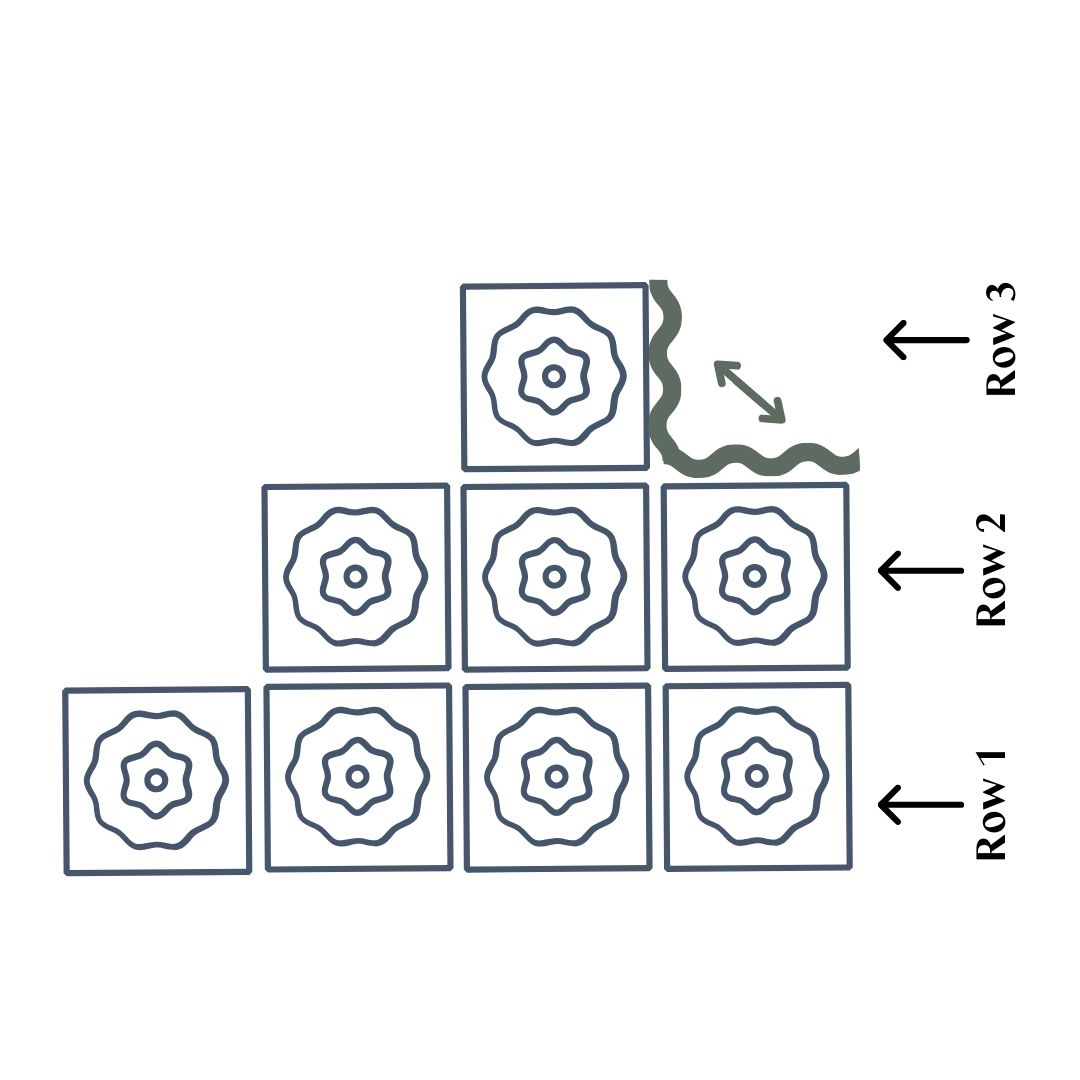
Attach the square in row 3 to row 2 (see picture 4).
Now the hood itself is complete. On row 1, you will now attach the last 11 squares that form the shawl. Crochet 6 squares on one side and 5 squares on the other side so that the shawl parts are equal in length. Join the squares in the same way as before.
The final step is to crochet a border around the entire piece. Start in a corner and work 1 stitch in each stitch. In the corners, crochet 3 single crochets in the same stitch (this gives a nice finish). If you want to work more rounds of single crochet, you can do so—just keep in mind that it will use more yarn. You can also finish with 1 round of slip stitches if you like.
Cut the yarn and weave in all ends.
Done!
Description with Crochet Terms
This part of the pattern uses standard crochet terms. If you need help along the way, we recommend checking the simpler version or the full-length video.
Abbreviations
- MR = magic ring
- st = stitch
- ch = chain
- sl st = slip stitch
- dc = double crochet
- (...) = indicates the number of stitches in the current round
- *...* = everything within *...* is repeated the specified number of times
Pattern
We start by making granny squares in different colors.
Granny Squares
Make 19 squares. Start with the color you want in the center of the square.
Round 1: Make 1 MR. Chain 3 (counts as first dc), work 2 dc, chain 2, *3 dc, ch 2* × 3. Join with a slip stitch to the 3rd chain at the beginning of the round. There should be 12 dc in this round. Change color or continue with the same color.
Round 2: Start in a chain space. Attach the yarn with a slip stitch in a corner and work 3 chains (counts as first dc), 2 dc, chain 2, 3 dc, *skip to next corner, 3 dc, chain 2, 3 dc *× 3. Join with a slip stitch to the 3rd chain at the beginning of the round. There should be 24 dc in this round. Change color or continue with the same color.
Round 3: Start in a space between corners. Attach yarn with a slip stitch, chain 3 (counts as first dc), 2 dc, *skip to next corner, 3 dc, chain 2, 3 dc, skip to next side space, 3 dc* × 3. Skip to next corner, 3 dc, chain 2, 3 dc. Join with a slip stitch to the 3rd chain at the beginning of the round. There should be 36 dc in this round. Change color or continue with the same color.
Round 4: Work as in round 3, i.e., 3 dc in each side space and in each corner work 3 dc, chain 2, 3 dc. Cut and fasten off. There should be 48 dc in this round. Change color or continue with the same color.
Round 5: Work as in round 4. There should be 60 dc in this round. Cut and fasten off.
After round 5, each square measures approx. 18 × 18 cm. You may need to add one or two more rounds to reach the same size (this depends on your tension).
Assembly
Now it’s time to join the squares together. Row 1 will have 4 squares and row 2 will have 3 squares.
Start by joining 7 squares horizontally to form rows 1 and 2. Place squares with the wrong sides together. Begin in a corner on both squares and join them with single crochet through both loops of both squares. Continue in each stitch until you reach the opposite corner.
Now take 2 new squares, go into the corners on both squares, and continue joining. Once you have joined 6 squares in this way, take the 7th square and join it to row 1. Cut and fasten off the yarn.
Next step: Join the squares vertically, in the same way as before. Crochet them together from the bottom of row 1 up to row 3. Then join row 2 and row 3 together as shown below.
After this, crochet row 1 to row 2, and then crochet row 2 to row 3 again (see image 3). Now all 8 squares are joined together.
Secure the square in row 3 to row 2.
Now the hood itself is finished. On row 1, the last 11 squares, which will form the shawl, should be attached. Join 6 squares on one side and 5 squares on the other side so that the shawl parts are of equal length. Join the squares the same way as before.
The final step is to crochet an edging around the entire piece. Start in a corner and crochet 1 sc in each stitch. In the corners, crochet 3 sc in the same stitch (this gives a neat finish). If you want, you can crochet additional rounds of single crochet, keeping in mind that this will increase yarn usage. You can also finish with 1 round of slip stitches if you like. Cut the yarn and secure all ends.
Your hooded shawl is now complete! Hope you love it :)
The rights to this pattern belong to MYO Make Your Own. The pattern or its pictures may not be copied, shared or resold either in parts or in its entirety, but you may sell items you have crocheted from this pattern. If you have questions about the pattern, contact MYO at hello@makeyourown.se.
Granny Squares
Crochet 19 granny squares.
We start by making the granny squares in different colors. Begin with the color you want in the center of each square. If you’re unsure how to crochet granny squares, watch the video below (Granny Square). The last round of each square will be worked in the same color on all squares (the main color).
Round 1: Make a magic ring. In the ring, chain 3 (this counts as the first double crochet). Crochet 2 more double crochets. Together with the chain 3, this forms your first dc group. Chain 2 between dc groups—this space forms the corner of the square. Repeat 3 dc, 2 ch three more times (so you have four dc groups in total with 2 chains between each). After completing all double crochets, pull the short tail to tighten the center of the ring. Join with a slip stitch in the 3rd chain from the beginning.
Round 2: Cut the old yarn and fasten off. Attach the new yarn in one corner (the corner is the space between two dc groups from the previous round). Start the round with 3 chains (counts as first dc), then in the same space: 2 dc, 2 ch, and 3 dc. Move to the next corner and crochet 3 dc, 2 ch, 3 dc. Repeat for the remaining corners (total of four corners). Join with a slip stitch in the 3rd chain of the beginning chain. Cut the yarn if you want to change color. If you continue with the same color, slip stitch in each stitch to the next corner (through the chain space from the previous round).
Round 3: Change color or keep the same. Begin in a space between two corners: 3 ch (counts as first dc), 2 dc. In the corners, work 3 dc, 2 ch, 3 dc. Continue around with the same pattern: 3 dc in the side spaces and 3 dc, 2 ch, 3 dc in the corners. Join with a slip stitch in the 3rd chain from the beginning.
Rounds 4–5: To make larger granny squares, continue as in Round 3. In each corner: 3 dc, 2 ch, 3 dc, and in each side space between corners: 3 dc. Begin and end the round as in Round 3. Fasten off all ends when finished.
After Round 5, the square measures approximately 15–16 × 15–16 cm. You may need to add 1–2 extra rounds to reach the desired size (depending on your tension). You can also add a round of single crochets if you want a neater edge.
Joining the Finished Squares
Start by joining 7 squares horizontally to form Rows 1 and 2. Place the squares wrong sides together (the “back” sides facing each other).
- Begin in a corner of the first two squares. Insert your hook through both loops of the corner stitches on both squares and work a single crochet (sc).
- Continue working sc through both loops of each corresponding stitch across the edge until you reach the opposite corner.
- Take 2 new squares, go into the corners of both squares, and continue joining them in the same way.
- When 6 squares are joined, take the 7th square and join it with Row 1 using the same method.
Cut the yarn and fasten off.
If you are unsure how to join squares, watch a video tutorial on “attaching granny squares”. This is just one technique; there are several ways to join squares depending on the look you prefer.
The next step is to join the squares vertically, using the same method as before. Crochet together from the bottom of row 1 up to row 3. Then join row 2 to row 3.
After this, crochet row 1 to row 2, and then crochet row 2 to row 3 again (see picture 3). Now all 8 squares are joined together.
Attach the square in row 3 to row 2 (see picture 4).
Now the hood itself is complete. On row 1, you will now attach the last 11 squares that form the shawl. Crochet 6 squares on one side and 5 squares on the other side so that the shawl parts are equal in length. Join the squares in the same way as before.
The final step is to crochet a border around the entire piece. Start in a corner and work 1 stitch in each stitch. In the corners, crochet 3 single crochets in the same stitch (this gives a nice finish). If you want to work more rounds of single crochet, you can do so—just keep in mind that it will use more yarn. You can also finish with 1 round of slip stitches if you like.
Cut the yarn and weave in all ends.
Done!
Description with Crochet Terms
This part of the pattern uses standard crochet terms. If you need help along the way, we recommend checking the simpler version or the full-length video.
Abbreviations
- MR = magic ring
- st = stitch
- ch = chain
- sl st = slip stitch
- dc = double crochet
- (...) = indicates the number of stitches in the current round
- *...* = everything within *...* is repeated the specified number of times
Pattern
We start by making granny squares in different colors.
Granny Squares
Make 19 squares. Start with the color you want in the center of the square.
Round 1: Make 1 MR. Chain 3 (counts as first dc), work 2 dc, chain 2, *3 dc, ch 2* × 3. Join with a slip stitch to the 3rd chain at the beginning of the round. There should be 12 dc in this round. Change color or continue with the same color.
Round 2: Start in a chain space. Attach the yarn with a slip stitch in a corner and work 3 chains (counts as first dc), 2 dc, chain 2, 3 dc, *skip to next corner, 3 dc, chain 2, 3 dc *× 3. Join with a slip stitch to the 3rd chain at the beginning of the round. There should be 24 dc in this round. Change color or continue with the same color.
Round 3: Start in a space between corners. Attach yarn with a slip stitch, chain 3 (counts as first dc), 2 dc, *skip to next corner, 3 dc, chain 2, 3 dc, skip to next side space, 3 dc* × 3. Skip to next corner, 3 dc, chain 2, 3 dc. Join with a slip stitch to the 3rd chain at the beginning of the round. There should be 36 dc in this round. Change color or continue with the same color.
Round 4: Work as in round 3, i.e., 3 dc in each side space and in each corner work 3 dc, chain 2, 3 dc. Cut and fasten off. There should be 48 dc in this round. Change color or continue with the same color.
Round 5: Work as in round 4. There should be 60 dc in this round. Cut and fasten off.
After round 5, each square measures approx. 18 × 18 cm. You may need to add one or two more rounds to reach the same size (this depends on your tension).
Assembly
Now it’s time to join the squares together. Row 1 will have 4 squares and row 2 will have 3 squares.
Start by joining 7 squares horizontally to form rows 1 and 2. Place squares with the wrong sides together. Begin in a corner on both squares and join them with single crochet through both loops of both squares. Continue in each stitch until you reach the opposite corner.
Now take 2 new squares, go into the corners on both squares, and continue joining. Once you have joined 6 squares in this way, take the 7th square and join it to row 1. Cut and fasten off the yarn.
Next step: Join the squares vertically, in the same way as before. Crochet them together from the bottom of row 1 up to row 3. Then join row 2 and row 3 together as shown below.
After this, crochet row 1 to row 2, and then crochet row 2 to row 3 again (see image 3). Now all 8 squares are joined together.
Secure the square in row 3 to row 2.
Now the hood itself is finished. On row 1, the last 11 squares, which will form the shawl, should be attached. Join 6 squares on one side and 5 squares on the other side so that the shawl parts are of equal length. Join the squares the same way as before.
The final step is to crochet an edging around the entire piece. Start in a corner and crochet 1 sc in each stitch. In the corners, crochet 3 sc in the same stitch (this gives a neat finish). If you want, you can crochet additional rounds of single crochet, keeping in mind that this will increase yarn usage. You can also finish with 1 round of slip stitches if you like. Cut the yarn and secure all ends.
Your hooded shawl is now complete! Hope you love it :)
The rights to this pattern belong to MYO Make Your Own. The pattern or its pictures may not be copied, shared or resold either in parts or in its entirety, but you may sell items you have crocheted from this pattern. If you have questions about the pattern, contact MYO at hello@makeyourown.se.


Share your creations with us
Thank you!
Your comment was sent!