Du kommer att förlora åtkomst till våra instruktioner och medlemsrabatter. Vi hoppas att du vill stanna kvar, men förstår om det inte känns rätt just nu - du är alltid välkommen tillbaka! :)

Buy your material here

You can buy the materials and needles we use at makeyourown.semakeyourown.se

Go to shop
Copyright © 2022 Make Your Own
Please verify your email address by clicking on the link sent to youremail@gmail.com or resubmit.
patterns

Crochet Scarf “Astrid”

Crochet a cozy scarf with leftover yarns in MYO Basic Wool

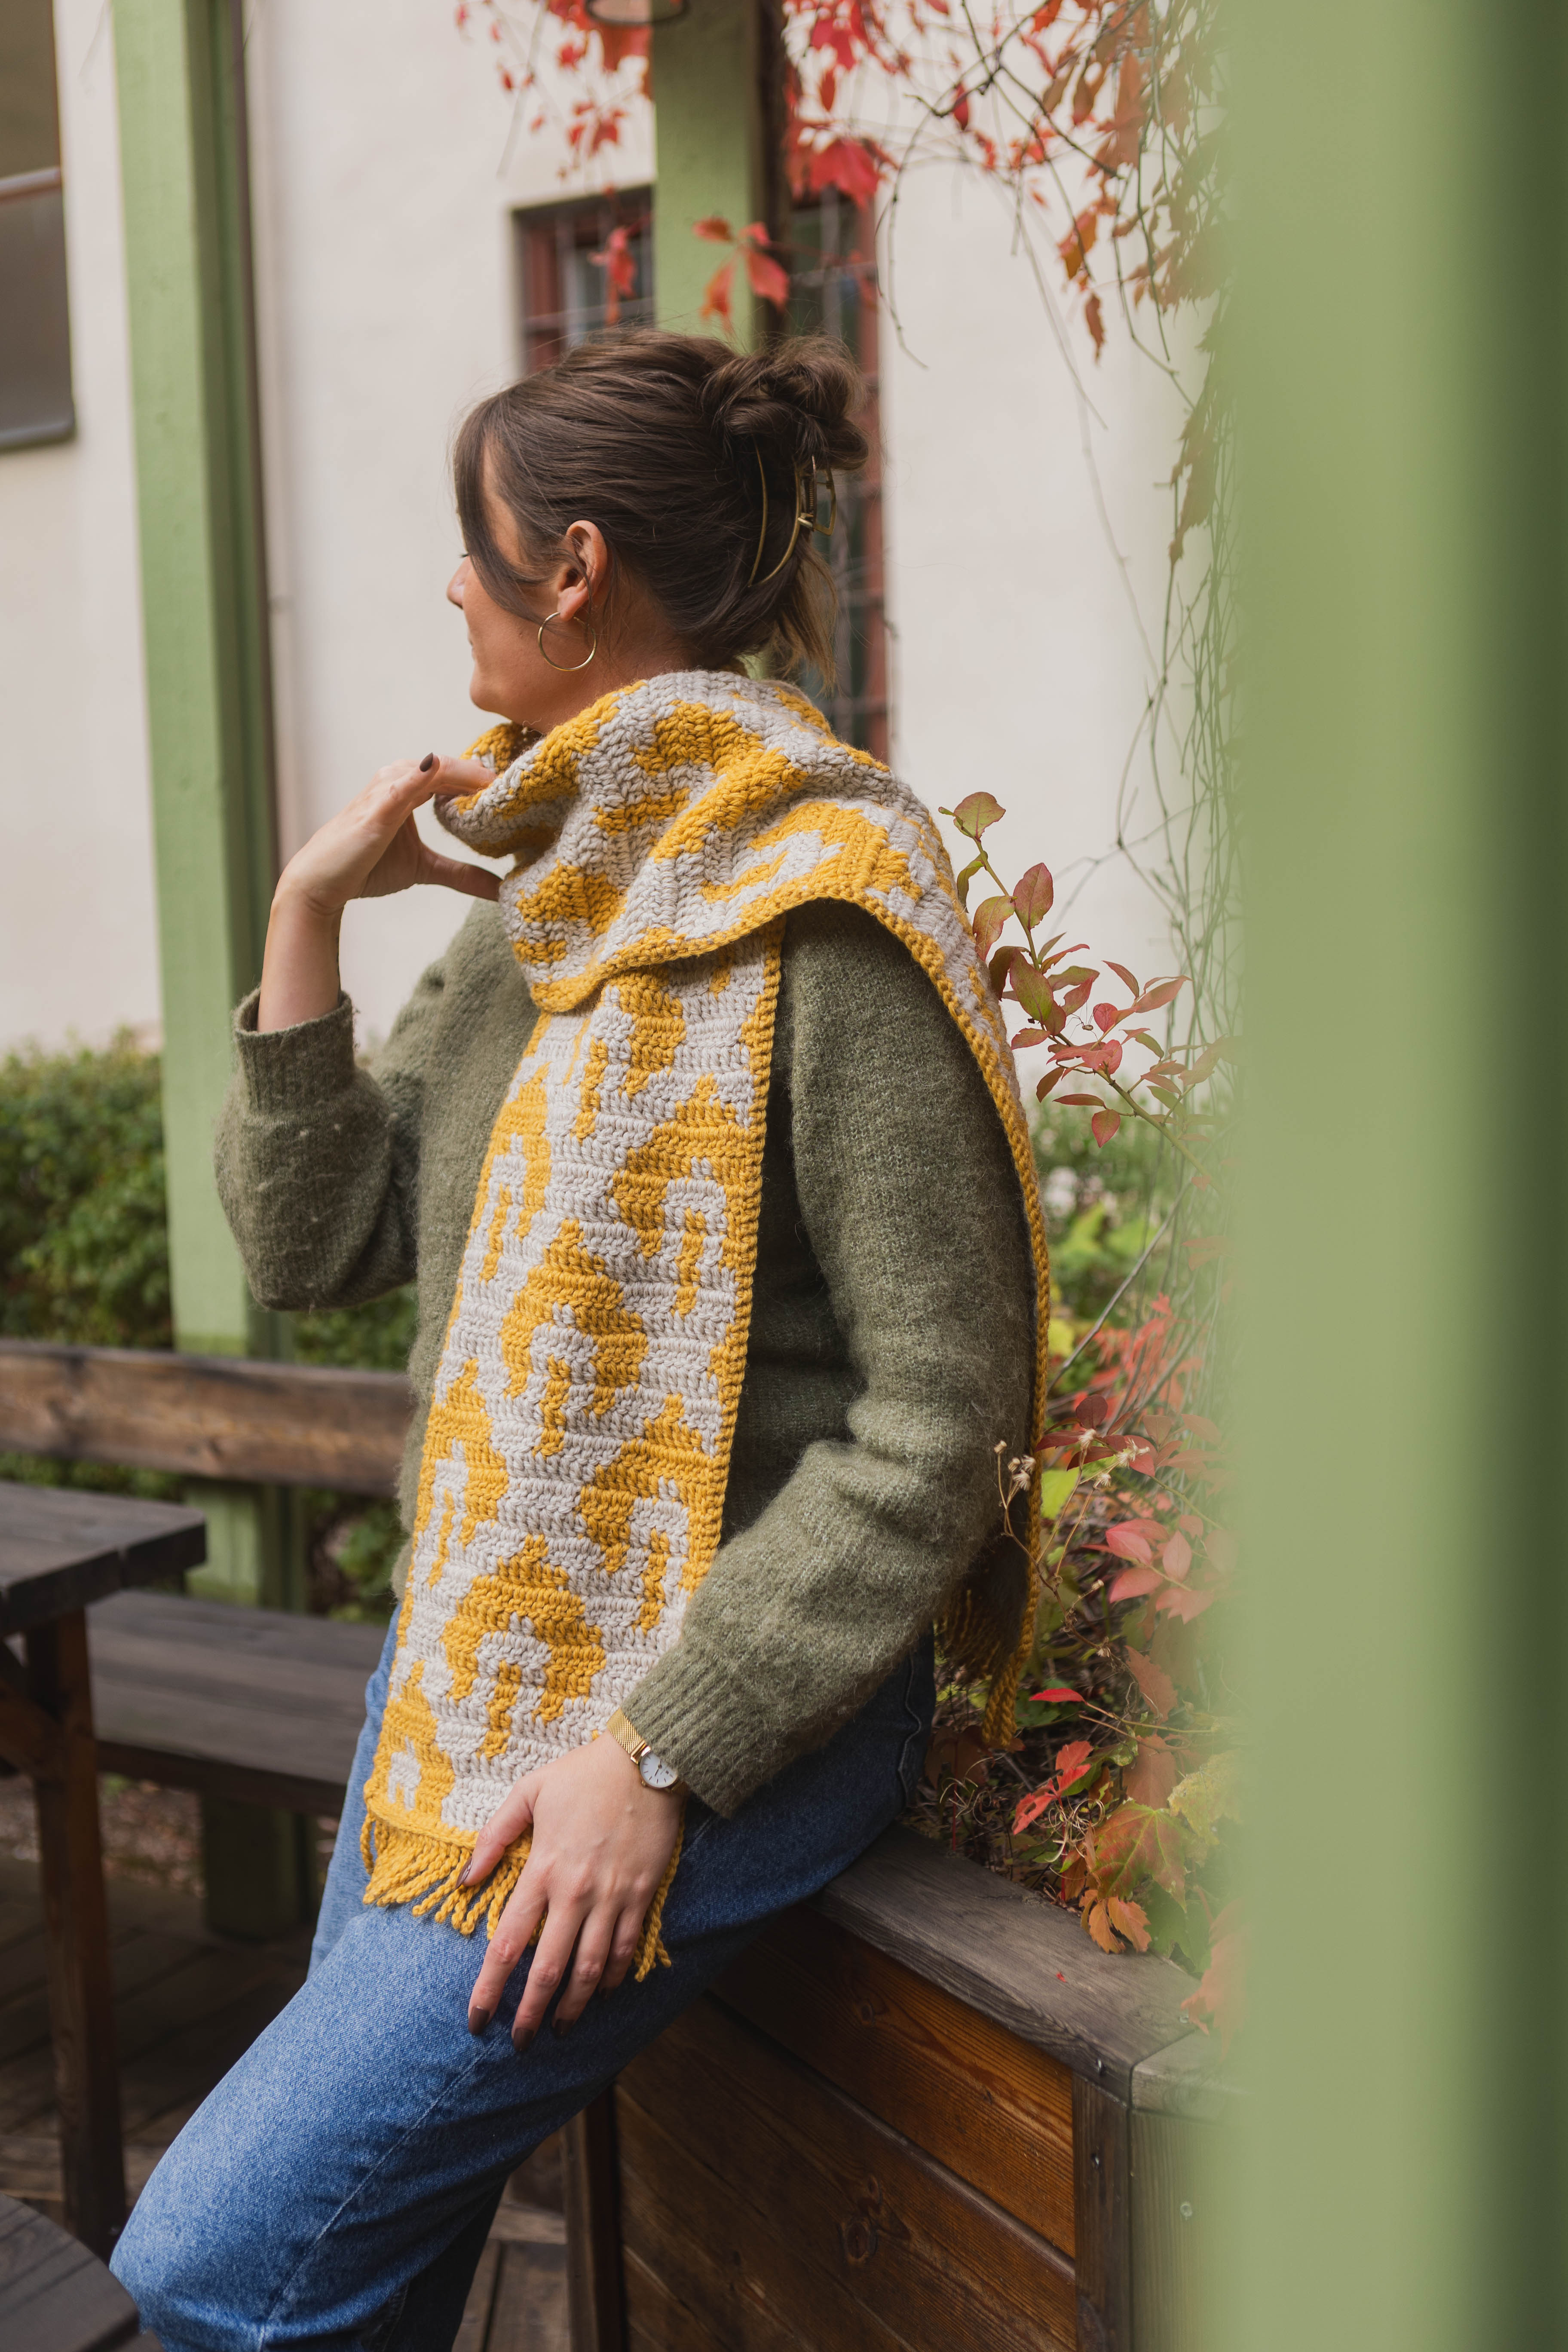
The scarf Astrid is easy to crochet and is great for beginners. Astrid is the ever-changing scarf, this tutorial shows you how to easily crochet 4 different techniques, all with a similar starting point. A pattern where you can play with colors, mix leftover yarn from previous projects, and create a character with different techniques. Let your creativity flow and create a scarf with your own style. For the scarf, you need MYO Basic Wool and a crochet hook 7 mm for the project

Yarn consumption : 220-250 g (depends on how big you want to crochet it, if you want to crochet a larger version than the one we show, you will need more).

Crochet Scarf “Astrid”

This is what you need:

MYO Basic wool | 100g

Basic wool - Wool yarn

Köp produkt

Crochet hook 7mm

100% Bamboo

Köp produkt

Here's how to do it

For the scarf, you can use basically any woolen yarn you like. We first crochet the chain and then proceed to make the different textures of the scarf. Good luck to you!

Rebecca Pedersen

Sign up to see the full instruction

This instruction is exclusive content for those who have an active membership with MYO. By being a member, you get access to all our 100+ instructions, technology tips, etc., but also membership offers and priority to new product launches. At the same time, you help us develop the instructions page further and release new instructions every week.

Becoming a member is easy and works like a subscription (price: 80 kr/mo), if you want to test our instructions first, we have a number of free instructions available for everyone.

Welcome to our wonderful team of creators! /The Girls from MYO

Steg 1

Step 1 : Chain

Start by making a slipknot. You do it like this: Wrap the yarn around two fingers so that the yarn crosses each other, then pull the yarn through the loop you just made and tighten it, you now have made a slipknot. Insert the crochet hook into the knot, this loop counts as the first loop on the chain. Continue crocheting loops by catching the yarn with the crochet hook and pulling through the loop, repeating until you reach the desired width of your scarf. Remember that a loop is lost when you start crocheting your first round, so always count an extra loop to get the correct number.

Tip : Crochet with an uneven number of loops. Why: Well, if you choose to crochet with puff stitch which is one of the options, I chose to crochet every other double crochet/every other puff to get a nice edge. Hence, an uneven number is required. This is of course a matter of taste and not a must.

Steg 2

Step 2 - the different techniques

‍ Now we go through the different techniques so that you can then freely crochet your own design! So you choose how many rows of each technique you want and thus create your completely unique design.

Technique 1: Single Crochet

We start with the starting point of single stitches, which is also the basis for 3 of the techniques in this pattern.

Do this: In the second loop of the chain from the hook, insert the hook, catch the yarn, and pull up so you have two loops around the hook. Catch the yarn again and pull through both loops, you have now made a single crochet stitch. Crochet a single crochet in each loop of your chain. Finish the round by crocheting a loop and turning your work.

Single crochet version: One way to create character with single crochet is to crochet in only the back loop, this creates a "stripe" and becomes a nice detail. Two styles with same stitch.

Steg 3

Technique 2: Waistcoat stitch

This technique is very similar to single stitches, the difference is that instead of crocheting in the upper loop you instead insert the crochet hook under/in the middle of what looks like a V (see video instructions for clarification).

Crochet in the same way as a single stitch, catch the yarn and pull through so you have 2 loops on your hook, catch the yarn again, and pull through both loops. Continue crocheting one in each stitch on your row. Since you crocheted between the stitches the row needs to be finished by crocheting a single stitch in the very outermost stitch on the edge. As usual, finish the row with a loop and turn your work.

Remember that you should always have the same number of stitches in each row.

Tip : Crochet loosely to make it easier. Another option is to use a larger crochet hook if you find it easier.

And, Waistcoat stitch always starts with a row of single stitches. Good to think about if you switch between different stitches.

Steg 4

Technique 3: Puff Stitch

Start by wrapping the yarn around your hook, insert the hook into the upper loop, catch the yarn and pull up. You should have 3 loops on the crochet hook. Repeat this process a total of 3 times in the same stitch so you have 7 loops on the hook. Finish by catching the yarn and pulling through all the loops at once.

Tip : To get even rows, I chose to crochet every second single stitch and every other puff stitch (begin and end the round with single stitches) This is a matter of taste and you decide how you want to crochet.

Steg 5

Now we have gone through the different techniques used in the 'Astrid' scarf video. You choose both width, length and which technique(s) you crochet with and how many rows of each. Let the imagination flow!

Example :

In the instructions, 25 loops are crocheted as the width of the chain.

We chose to crochet both wide and narrow sections with colors to create an expressive style, this was done by crocheting several rows of waistcoat stich or single crochet and adding details such as a row of single crochet in the back loop or a row of puff stitches here and there.

Good luck! Feel free to share your Astrid scarf on social media with @ makeyourown.se , we love to meet through the craft!

Steg 6
Steg 7
Steg 8
Steg 9
Steg 10

The rights to this pattern belong to MYO Make Your Own. The pattern or its pictures may not be copied, shared or resold either in parts or in its entirety, but you may sell items you have crocheted from this pattern. If you have questions about the pattern, contact MYO at hello@makeyourown.se.

Crochet Scarf “Astrid”

Crochet a cozy scarf with leftover yarns in MYO Basic Wool

The scarf Astrid is easy to crochet and is great for beginners. Astrid is the ever-changing scarf, this tutorial shows you how to easily crochet 4 different techniques, all with a similar starting point. A pattern where you can play with colors, mix leftover yarn from previous projects, and create a character with different techniques. Let your creativity flow and create a scarf with your own style. For the scarf, you need MYO Basic Wool and a crochet hook 7 mm for the project

Yarn consumption : 220-250 g (depends on how big you want to crochet it, if you want to crochet a larger version than the one we show, you will need more).

Crochet Scarf “Astrid”
Steg 1

Step 1 : Chain

Start by making a slipknot. You do it like this: Wrap the yarn around two fingers so that the yarn crosses each other, then pull the yarn through the loop you just made and tighten it, you now have made a slipknot. Insert the crochet hook into the knot, this loop counts as the first loop on the chain. Continue crocheting loops by catching the yarn with the crochet hook and pulling through the loop, repeating until you reach the desired width of your scarf. Remember that a loop is lost when you start crocheting your first round, so always count an extra loop to get the correct number.

Tip : Crochet with an uneven number of loops. Why: Well, if you choose to crochet with puff stitch which is one of the options, I chose to crochet every other double crochet/every other puff to get a nice edge. Hence, an uneven number is required. This is of course a matter of taste and not a must.

Steg 2

Step 2 - the different techniques

‍ Now we go through the different techniques so that you can then freely crochet your own design! So you choose how many rows of each technique you want and thus create your completely unique design.

Technique 1: Single Crochet

We start with the starting point of single stitches, which is also the basis for 3 of the techniques in this pattern.

Do this: In the second loop of the chain from the hook, insert the hook, catch the yarn, and pull up so you have two loops around the hook. Catch the yarn again and pull through both loops, you have now made a single crochet stitch. Crochet a single crochet in each loop of your chain. Finish the round by crocheting a loop and turning your work.

Single crochet version: One way to create character with single crochet is to crochet in only the back loop, this creates a "stripe" and becomes a nice detail. Two styles with same stitch.

Steg 3

Technique 2: Waistcoat stitch

This technique is very similar to single stitches, the difference is that instead of crocheting in the upper loop you instead insert the crochet hook under/in the middle of what looks like a V (see video instructions for clarification).

Crochet in the same way as a single stitch, catch the yarn and pull through so you have 2 loops on your hook, catch the yarn again, and pull through both loops. Continue crocheting one in each stitch on your row. Since you crocheted between the stitches the row needs to be finished by crocheting a single stitch in the very outermost stitch on the edge. As usual, finish the row with a loop and turn your work.

Remember that you should always have the same number of stitches in each row.

Tip : Crochet loosely to make it easier. Another option is to use a larger crochet hook if you find it easier.

And, Waistcoat stitch always starts with a row of single stitches. Good to think about if you switch between different stitches.

Steg 4

Technique 3: Puff Stitch

Start by wrapping the yarn around your hook, insert the hook into the upper loop, catch the yarn and pull up. You should have 3 loops on the crochet hook. Repeat this process a total of 3 times in the same stitch so you have 7 loops on the hook. Finish by catching the yarn and pulling through all the loops at once.

Tip : To get even rows, I chose to crochet every second single stitch and every other puff stitch (begin and end the round with single stitches) This is a matter of taste and you decide how you want to crochet.

Steg 5

Now we have gone through the different techniques used in the 'Astrid' scarf video. You choose both width, length and which technique(s) you crochet with and how many rows of each. Let the imagination flow!

Example :

In the instructions, 25 loops are crocheted as the width of the chain.

We chose to crochet both wide and narrow sections with colors to create an expressive style, this was done by crocheting several rows of waistcoat stich or single crochet and adding details such as a row of single crochet in the back loop or a row of puff stitches here and there.

Good luck! Feel free to share your Astrid scarf on social media with @ makeyourown.se , we love to meet through the craft!

Steg 6
Steg 7
Steg 8
Steg 9
Steg 10

The rights to this pattern belong to MYO Make Your Own. The pattern or its pictures may not be copied, shared or resold either in parts or in its entirety, but you may sell items you have crocheted from this pattern. If you have questions about the pattern, contact MYO at hello@makeyourown.se.
Crochet Scarf “Astrid”

Crochet a cozy scarf with leftover yarns in MYO Basic Wool

The scarf Astrid is easy to crochet and is great for beginners. Astrid is the ever-changing scarf, this tutorial shows you how to easily crochet 4 different techniques, all with a similar starting point. A pattern where you can play with colors, mix leftover yarn from previous projects, and create a character with different techniques. Let your creativity flow and create a scarf with your own style. For the scarf, you need MYO Basic Wool and a crochet hook 7 mm for the project

Yarn consumption : 220-250 g (depends on how big you want to crochet it, if you want to crochet a larger version than the one we show, you will need more).

Crochet Scarf “Astrid”
Steg 1

Step 1 : Chain

Start by making a slipknot. You do it like this: Wrap the yarn around two fingers so that the yarn crosses each other, then pull the yarn through the loop you just made and tighten it, you now have made a slipknot. Insert the crochet hook into the knot, this loop counts as the first loop on the chain. Continue crocheting loops by catching the yarn with the crochet hook and pulling through the loop, repeating until you reach the desired width of your scarf. Remember that a loop is lost when you start crocheting your first round, so always count an extra loop to get the correct number.

Tip : Crochet with an uneven number of loops. Why: Well, if you choose to crochet with puff stitch which is one of the options, I chose to crochet every other double crochet/every other puff to get a nice edge. Hence, an uneven number is required. This is of course a matter of taste and not a must.

Steg 2

Step 2 - the different techniques

‍ Now we go through the different techniques so that you can then freely crochet your own design! So you choose how many rows of each technique you want and thus create your completely unique design.

Technique 1: Single Crochet

We start with the starting point of single stitches, which is also the basis for 3 of the techniques in this pattern.

Do this: In the second loop of the chain from the hook, insert the hook, catch the yarn, and pull up so you have two loops around the hook. Catch the yarn again and pull through both loops, you have now made a single crochet stitch. Crochet a single crochet in each loop of your chain. Finish the round by crocheting a loop and turning your work.

Single crochet version: One way to create character with single crochet is to crochet in only the back loop, this creates a "stripe" and becomes a nice detail. Two styles with same stitch.

Steg 3

Technique 2: Waistcoat stitch

This technique is very similar to single stitches, the difference is that instead of crocheting in the upper loop you instead insert the crochet hook under/in the middle of what looks like a V (see video instructions for clarification).

Crochet in the same way as a single stitch, catch the yarn and pull through so you have 2 loops on your hook, catch the yarn again, and pull through both loops. Continue crocheting one in each stitch on your row. Since you crocheted between the stitches the row needs to be finished by crocheting a single stitch in the very outermost stitch on the edge. As usual, finish the row with a loop and turn your work.

Remember that you should always have the same number of stitches in each row.

Tip : Crochet loosely to make it easier. Another option is to use a larger crochet hook if you find it easier.

And, Waistcoat stitch always starts with a row of single stitches. Good to think about if you switch between different stitches.

Steg 4

Technique 3: Puff Stitch

Start by wrapping the yarn around your hook, insert the hook into the upper loop, catch the yarn and pull up. You should have 3 loops on the crochet hook. Repeat this process a total of 3 times in the same stitch so you have 7 loops on the hook. Finish by catching the yarn and pulling through all the loops at once.

Tip : To get even rows, I chose to crochet every second single stitch and every other puff stitch (begin and end the round with single stitches) This is a matter of taste and you decide how you want to crochet.

Steg 5

Now we have gone through the different techniques used in the 'Astrid' scarf video. You choose both width, length and which technique(s) you crochet with and how many rows of each. Let the imagination flow!

Example :

In the instructions, 25 loops are crocheted as the width of the chain.

We chose to crochet both wide and narrow sections with colors to create an expressive style, this was done by crocheting several rows of waistcoat stich or single crochet and adding details such as a row of single crochet in the back loop or a row of puff stitches here and there.

Good luck! Feel free to share your Astrid scarf on social media with @ makeyourown.se , we love to meet through the craft!

Steg 6
Steg 7
Steg 8
Steg 9
Steg 10

The rights to this pattern belong to MYO Make Your Own. The pattern or its pictures may not be copied, shared or resold either in parts or in its entirety, but you may sell items you have crocheted from this pattern. If you have questions about the pattern, contact MYO at hello@makeyourown.se.