
Christmas Stockning "Tindra"
Crochet Your Own Christmas Stocking!
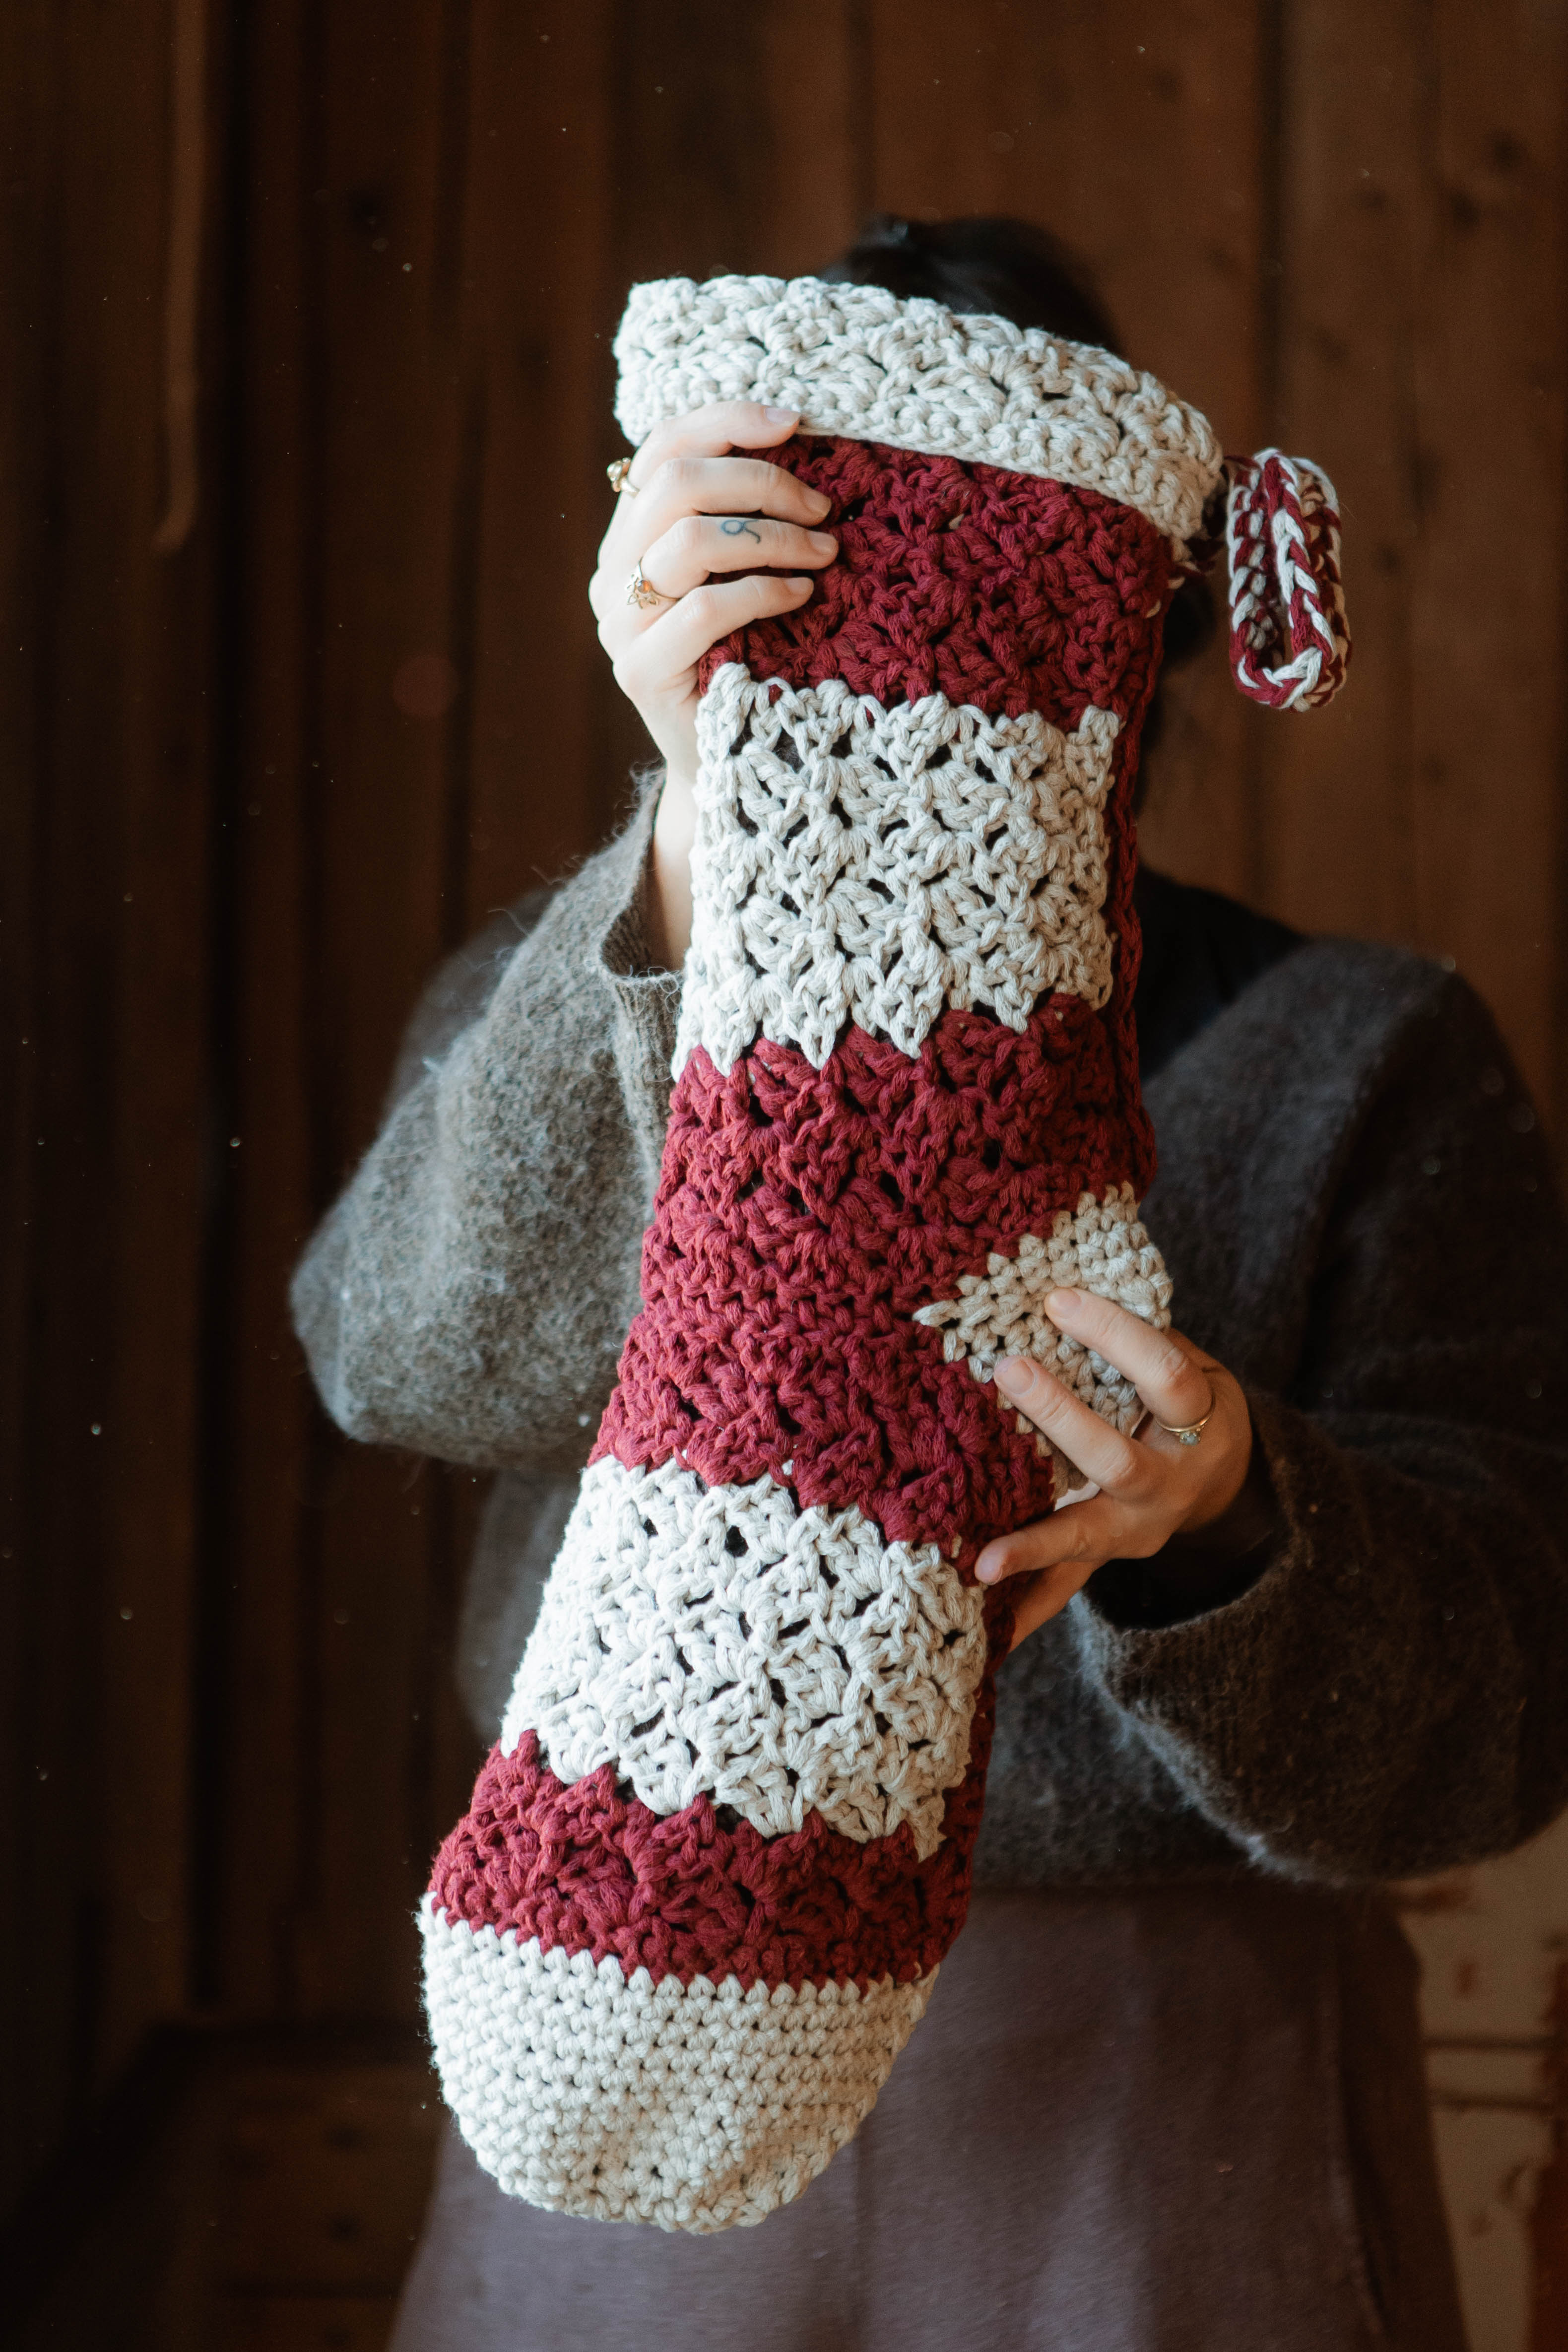
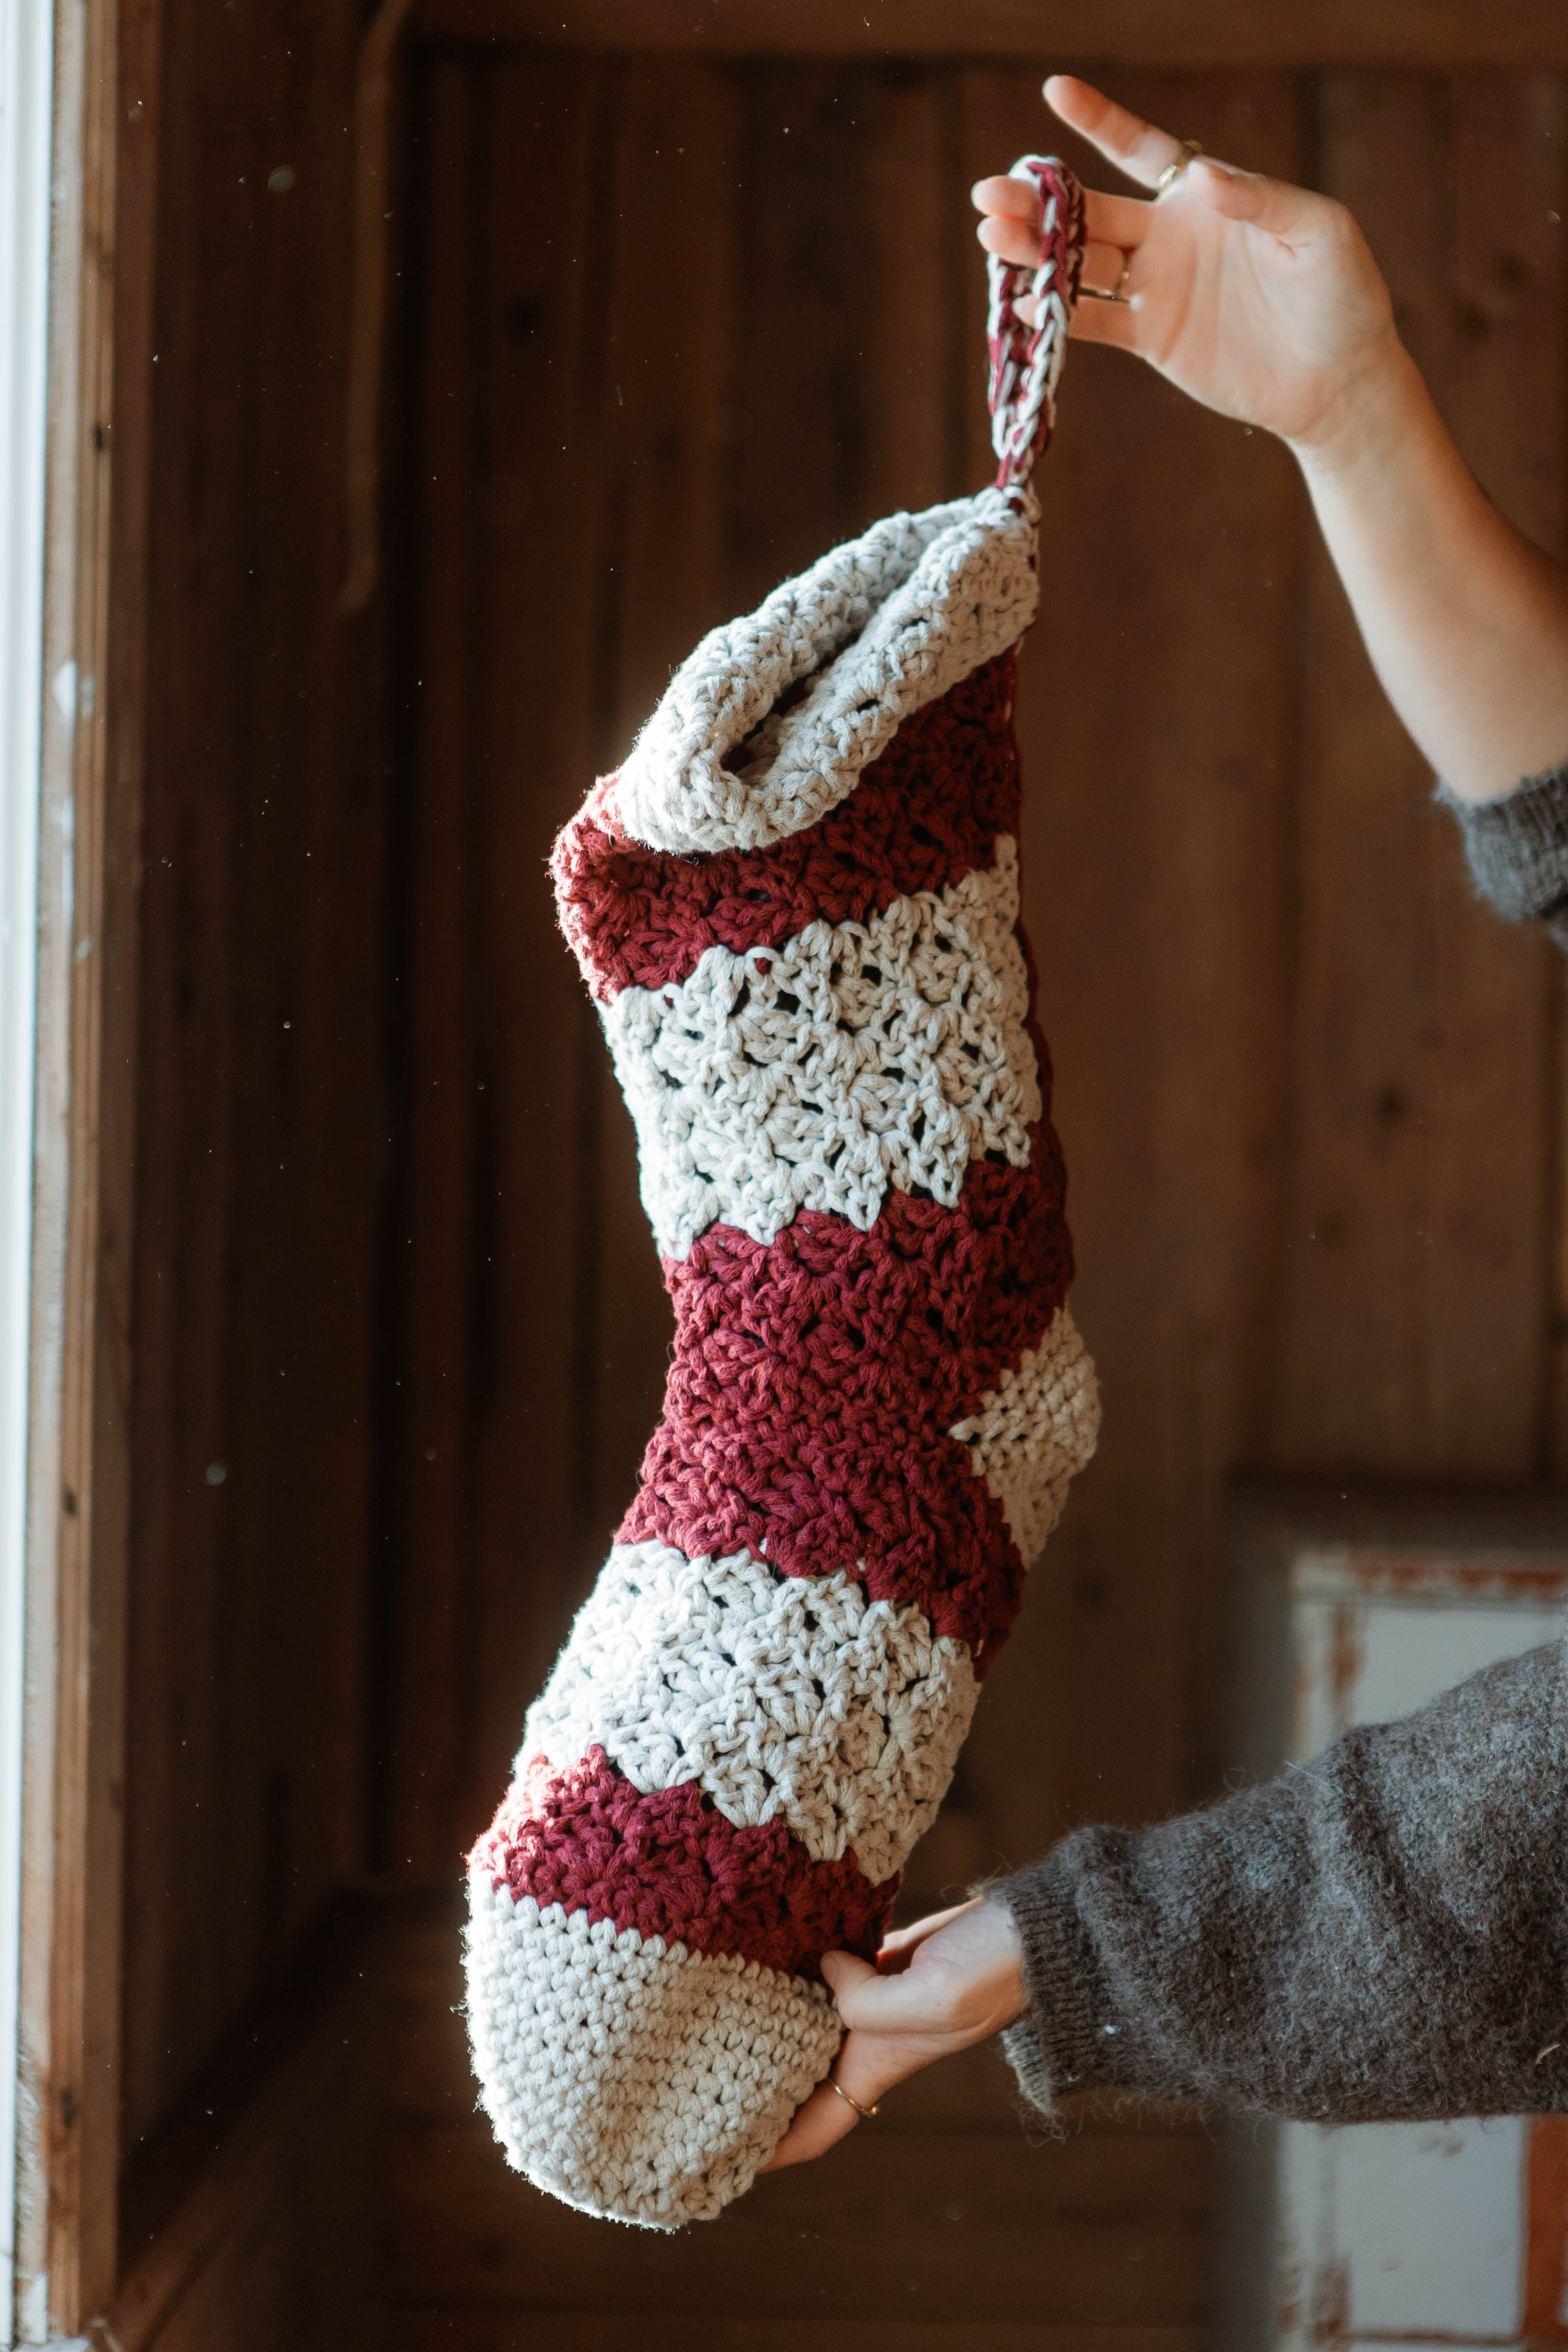
Finally, you can crochet your own Christmas stocking using a super fun and simple technique. It looks a bit like a candy cane and is truly unique! Perfect as a gift. This stocking can be used year after year and is a sustainable alternative to buying new, while giving you the joy of creating something with your own hands. It’s crocheted with EKO nano yarn and a 7 mm crochet hook.
Yarn Consumption: Approximately 385 g total (180 g burgundy & 220 g greige). The amount of yarn needed may vary depending on your crochet tension.
Note that we in this instruction uses videos from out technique library.


Here's how to do it
This pattern is crocheted in parts that are then joined together. The technique is called C2C (Corner to Corner) and is easy to learn, worked in rows to create a beautifully light and airy result. Finally, the heel and toe are crocheted with single crochet stitches./Emma
%20(1).jpg)
This is what you need:
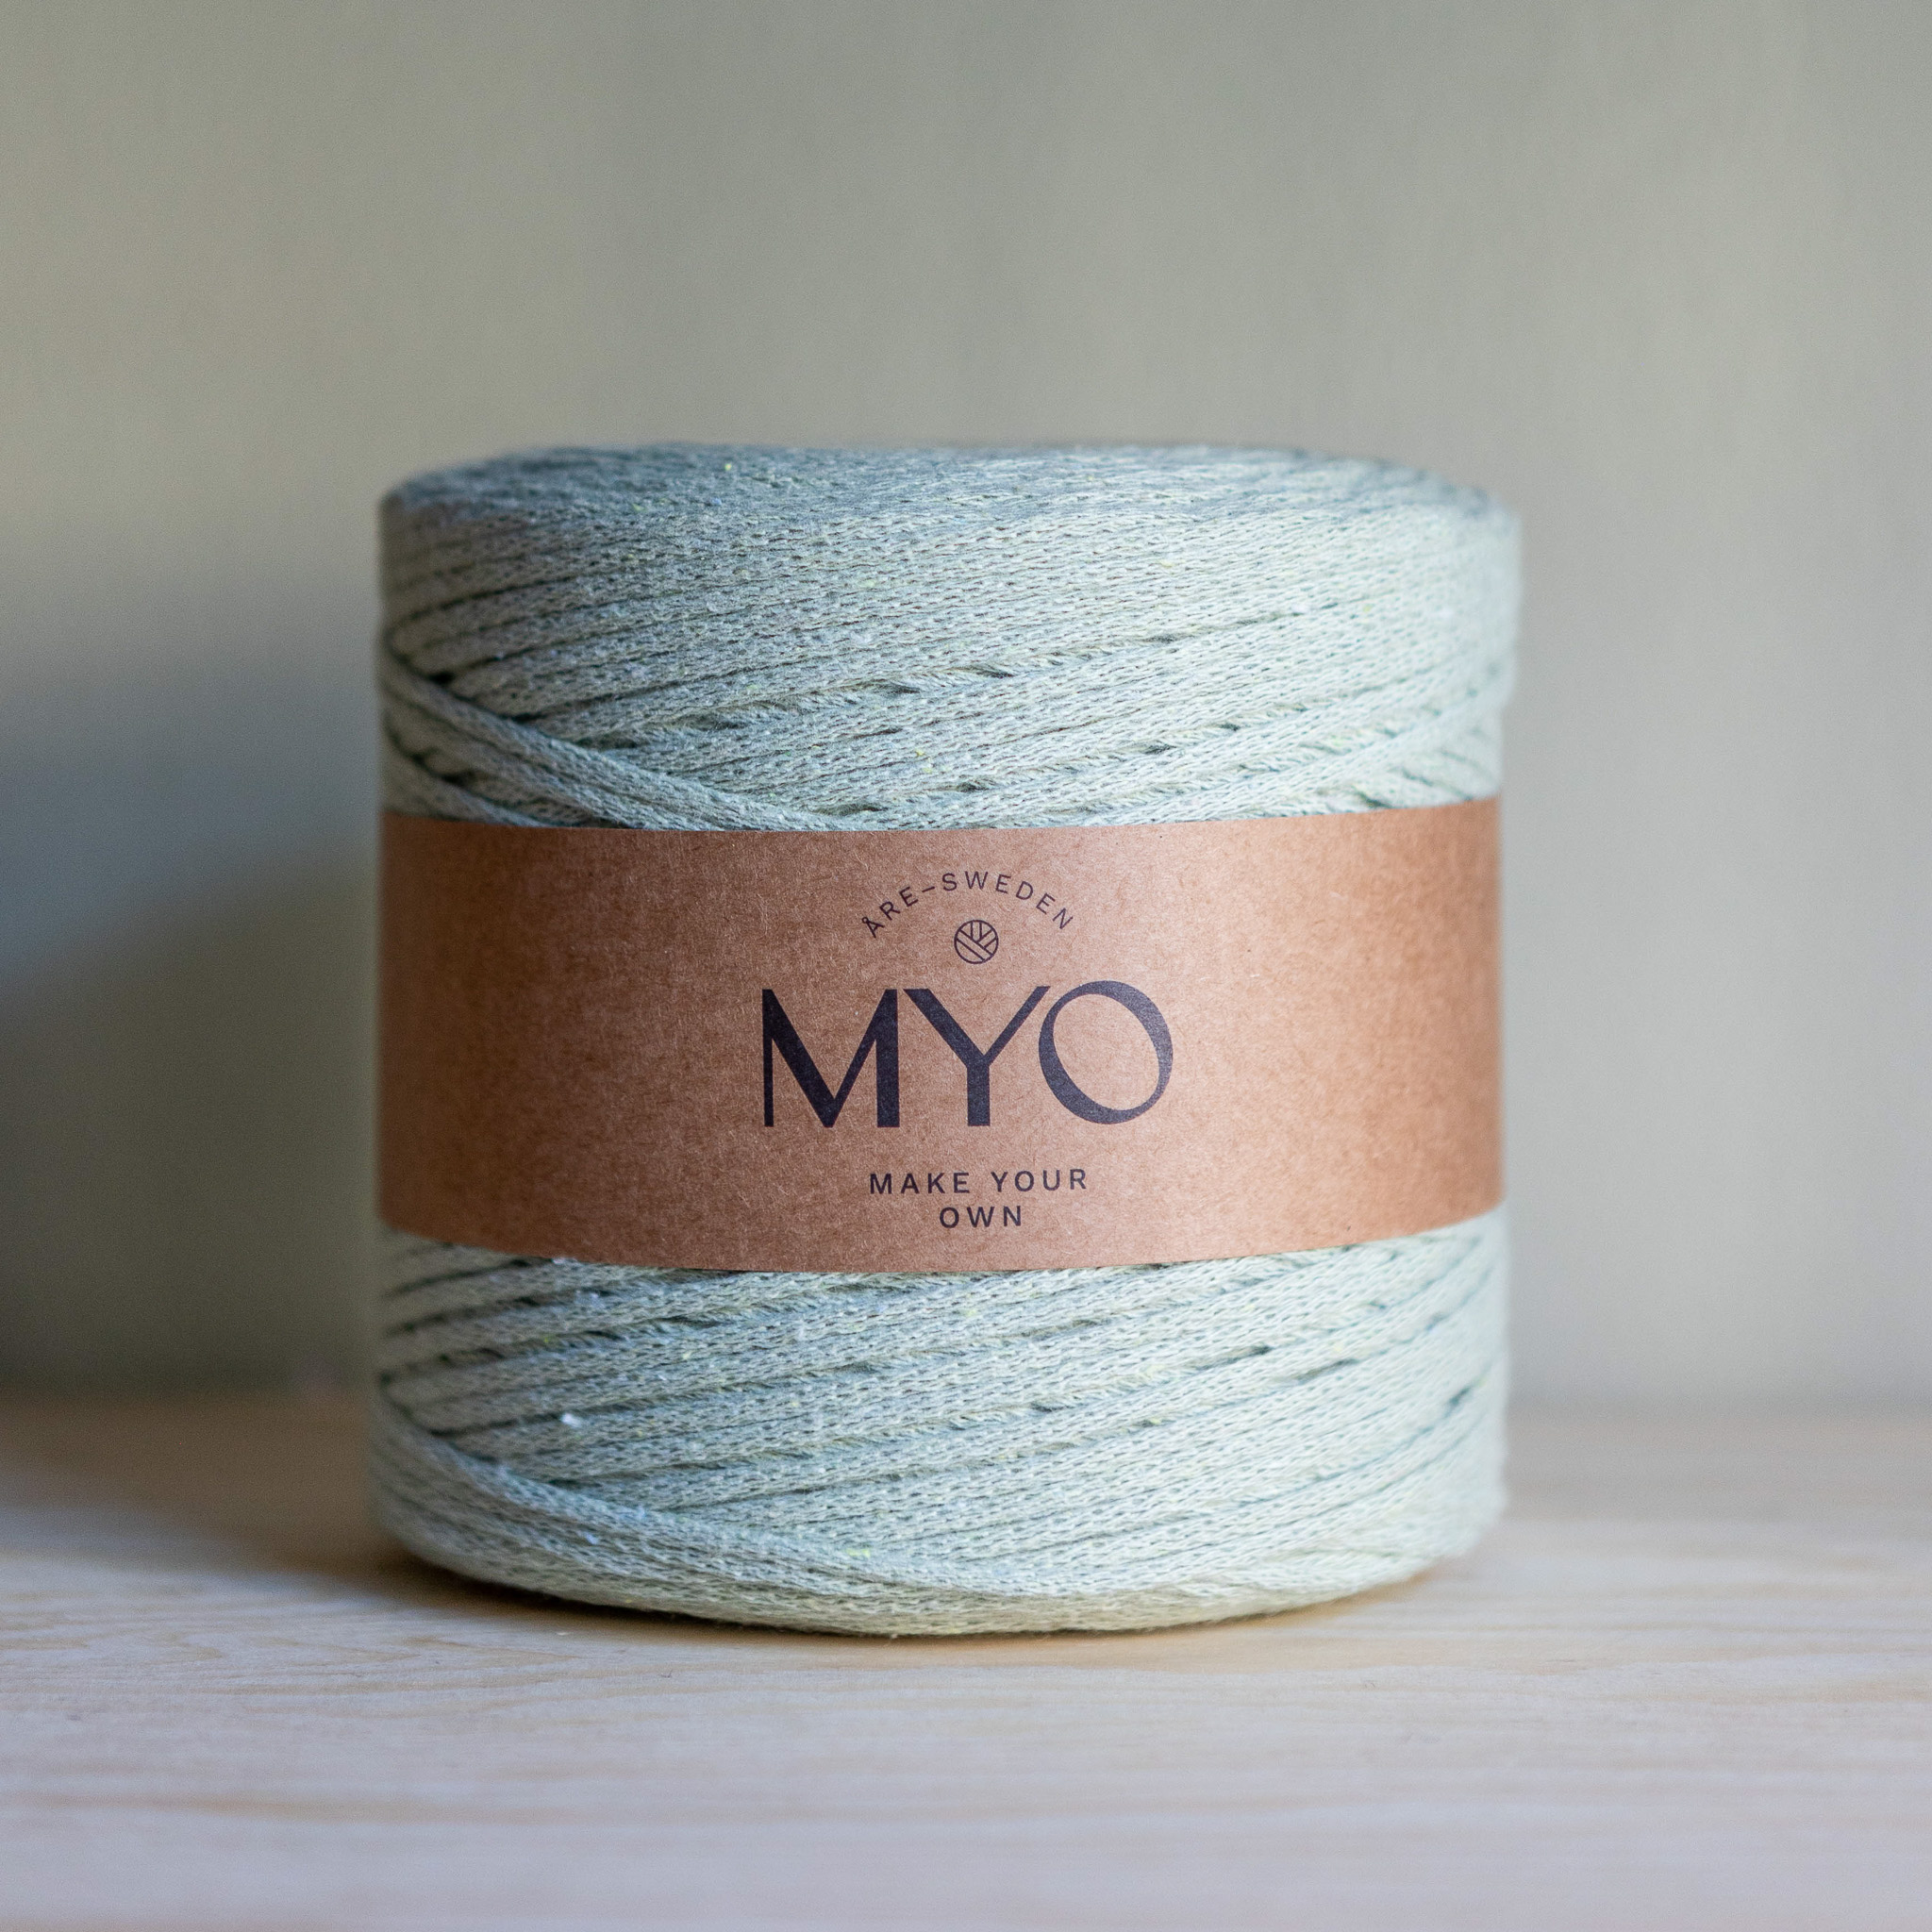
Here you can directly purchase the material for the product. Please note that the instruction is digital and appears here on the page (no written instruction).

.jpg)
Your next favorite project is waiting
Get access to this pattern and over 300 other beginner-friendly projects for crochet, knitting, and macramé.
Then 85 SEK/month. Cancel anytime.

Row 1: Start with the greige yarn. Begin by making a slip knot and then crochet a chain of 46 chain stitches. When working with the C2C technique, the chain needs to be a multiple of 4. Once you have crocheted a chain with a number of stitches divisible by 4, add two extra chain stitches. For reference, we used 46 stitches. If you're unsure how to make a slip knot or chain stitches, refer to the videos below.
Row 2: Skip the first chain stitch and then single crochet into each stitch across. You should end up with 45 single crochet stitches, which is one less than the chain stitches you made. Chain 4 and turn your work. If you're unsure how to make single crochets, refer to the video below.
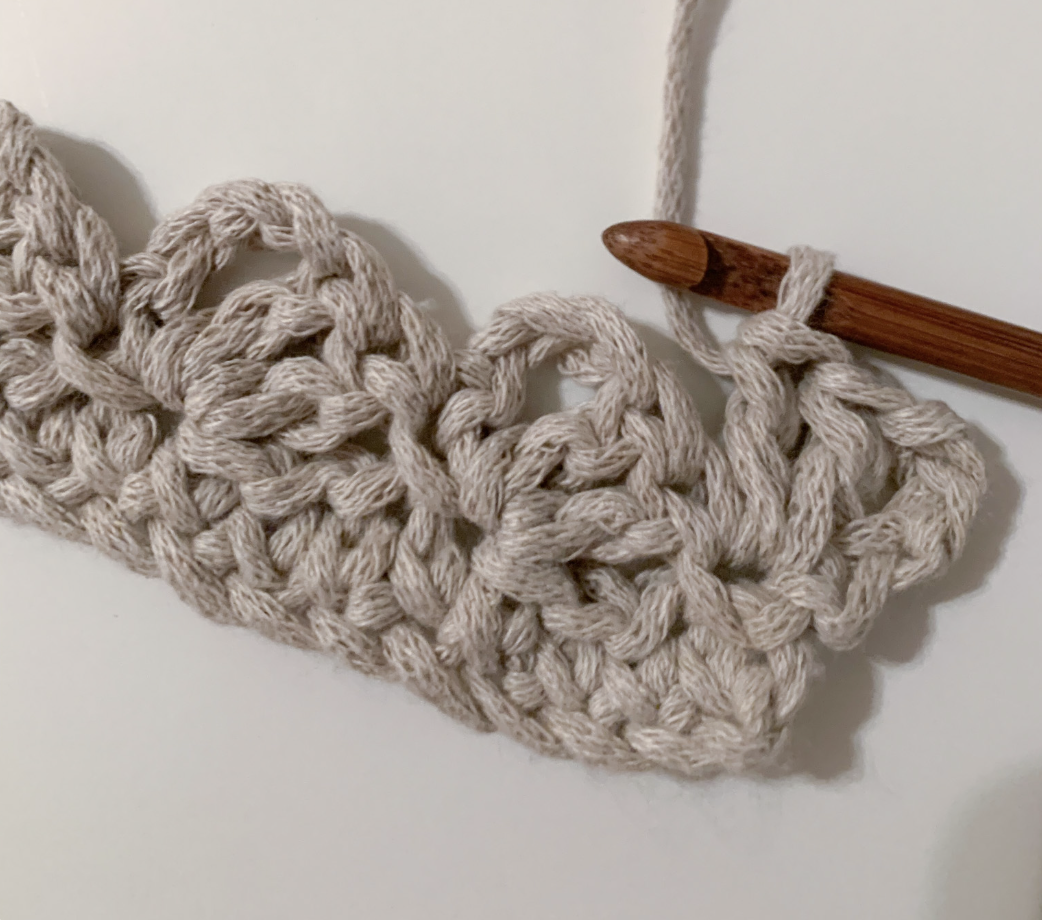
Row 3: Now it's time to start the c2c (corner-to-corner) technique. Skip the chain stitches we just made. Crochet 2 double crochets into the first stitch, which is closest to the chain. Skip 3 stitches, then make a single crochet in the fourth stitch. Next, crochet a chain of 3 chain stitches. Then crochet 2 double crochets in the same stitch as the chain. Skip 3 stitches and make a single crochet in the next stitch. Repeat this pattern across the row. In the last stitch, make a single crochet followed by a chain of four stitches, and turn your work. You should now have 11 c2c clusters. See the image below. If you're unsure about the c2c technique, refer to the video below.

Row 4: Start the same way you did in row 3: skip the chain stitches you previously made. Crochet two double crochets in the first stitch, which is the same as the chain. Continue crocheting using the same technique, but now you will crochet into the chain loops from the previous row.
In the first chain loop, crochet one single crochet, followed by a chain of three, then crochet two double crochets into the same loop. In the last loop, crochet one single crochet, then a chain of four and turn your work.

Rows 5-7: Repeat row 4 until you have 5 rows of C2C clusters.
It’s now time to change color. You will change color when you make the last single crochet of the row.
- When you have two loops left on your hook after starting with the last stitch, take the burgundy yarn and pull it through both loops on your hook.
- Crochet a chain of 4 chain stitches.
- Pull both yarn ends tight, cut off the greige yarn, and tie a knot to temporarily secure the yarns.
Now, turn your work to continue with the new color (red).
If you are unsure how to change color, please refer to the tutorial video below for further guidance.


Rows 8-12: Continue crocheting as in row 4 with the burgundy yarn, completing a total of 5 rows of C2C clusters.
Rows 13-17: Switch from the burgundy yarn to the greige yarn and continue as before, crocheting 5 rows of C2C arches in the greige color.
Remember to always change color at the end of the row, just like you did in row 5.


Rows 18-21: Switch to the burgundy yarn and crochet only 3 rows of C2C clusters.
Row 22: Start the same way as before with 4 chain stitches, turn, and crochet 2 double crochets in the first stitch. Then, crochet a single crochet in the chain space, but this time do not make a chain. Next, crochet 2 double crochets into the “valley” (the single crochet from the previous row). This last row is described in the video in Step 1, so you can refer to that if you need guidance.
This should create the final row for your piece!

Crochet a single crochet in the chain space. Crochet 2 double crochets into the "valley" (the single crochet from the previous row). Continue in the same way across the row and finish with a single crochet in the last chain space. Keep the yarn and crochet hook in place for the next step.

Fasten off all yarn ends, if you are unsure how to do this, see below video.
Crochet the long sides together.
Now you will crochet the long sides to form a cylinder, which will create the upper part of the stocking. Check which side looks the best to you, and fold the long sides together so that the best side is facing outwards. Start by crocheting 3 single crochets through both chain spaces on the outermost long sides.


Continue in the same way along the entire long side, crocheting 3 single crochets through both loops to form the cylinder. Also crochet in the yarn ends from where you changed colors, or alternatively, secure them when you're finished.
Keep in mind that the loops you’re joining may be different colors, as we've made uneven rows with 5 rows of each color. Make sure it’s even, but since the loops will be uneven, you will need to join the last loop with the first row of C2C you made. Crochet 2 single crochets and 1 single crochet in the corners.

Finish by making a slip stitch, cut the yarn, and pull it through to secure it so that it won’t unravel. Weave in any remaining yarn ends, and now you’re done with the top part of the stocking!
Step 2:
Now, you will crochet the lower part of the stocking in the same way as the top part, but with fewer rows.
Row 1: Start with a slip knot and crochet a chain of 46 chain stitches in Burgundy color.
Row 2: Skip the first chain stitch and crochet single crochets in each stitch. You will crochet 45 single crochets. Now, crochet a chain of 4 chain stitches and turn your work.
Row 3: Now you will begin the C2C technique. Crochet 2 double crochets into the first stitch (next to the chain). Skip 3 stitches, crochet a single crochet into the 4th stitch. Then crochet a chain of 3 chain stitches, followed by 2 double crochets into the same stitch as the chain. Skip 3 stitches and crochet a single crochet into the next stitch. Repeat the entire row. In the last stitch, crochet a single crochet and a chain of 4 chain stitches, and turn your work. You should have crocheted 11 C2C "bays."
Row 4: Start the same way as Row 3. Crochet two double crochets into the first stitch, the same as the chain. Now continue to crochet the same technique but crochet into the chain bays from the previous row. In the first chain bay, crochet a single crochet, a chain of 3 chain stitches, and 2 double crochets. In the last bay, crochet a single crochet, a chain of 4 chain stitches, and turn your work.
Rows 6-10: Continue as before with the C2C technique. Crochet 5 rows using the greige yarn. Change to Burgundy yarn in the last stitch of the 5th row.
Rows 11-12: Crochet 2 rows with the red yarn.
Row 13: Crochet a final row to create a straight edge. Start the same way as before: crochet 4 chain stitches, turn your work, and crochet two double crochets into the first stitch. Crochet a single crochet in the chain bay, but this time do not crochet a chain. Crochet 2 double crochets into the "valley" (the single crochet from the previous row). This row is also described in the video from Step 1 if you need guidance.
Crochet a single crochet in the chain bay. Crochet 2 double crochets into the "valley" (the single crochet from the previous row). Continue this pattern across the row and finish with a single crochet in the last chain bay. Keep the yarn and crochet hook there for the next step.


Sewing the Sides Together
Now, you will join the sides to form a cylinder, just like you did with the upper part of the sock. Check which side looks the best to you and fold the sides so that the best side is on the outside.
Start by crocheting 3 single crochets through both chain loops on the outer edges of the long sides. Continue in the same way along the entire long side, crocheting 3 single crochets through both loops, forming a cylinder.
Remember to crochet in any loose yarn ends from the color changes, or secure them after you are done.
Finish by crocheting 1 chain stitch, cut the yarn, and pull it through so it cannot be unraveled. Secure any remaining yarn ends, and you are finished with the lower part of the sock!


Step 3: Joining the Cylinders
Now it's time to crochet the two cylinders together. Start by turning them inside out. Place the sides with the finished parts together, ensuring that the seams are on the same side.
Mark the 7th stitch (excluding the chain, just counting the single crochet stitches) from the seam using stitch markers or safety pins. Secure both cylinders together at this point, marking the 7th stitch from the seam on both sides.
This will ensure that the two parts are joined evenly and aligned properly.


Crochet the cylinders together with single crochet stitches, from one marker to the other (on the side without seams). Start with a slip knot and attach it to the stitch after the marker, the 8th stitch, and then begin crocheting into the same stitch.

Continue crocheting with single crochet stitches all the way to the second marker. Finish with a chain stitch, cut the yarn, and pull it through. Secure the ends right away. Remove the stitch markers and turn the stocking back to the right side.
Step 4
Now it's time to crochet the heel into the hole left when you joined the two cylinders. Start with a slip knot using the grey yarn and fasten it in a single crochet stitch.

Crochet single crochets all the way around the heel, including one in each seam to minimize the difference in height.
When the first round joins, make a decrease—crochet two single crochets together in the same stitch. You may want to mark the first decrease with a stitch marker to help keep track of the rounds, and to ensure the decreases are evenly spaced in the upcoming rounds. Continue with single crochets until you reach the next fold, and make another decrease there. Make a decrease at each "fold" for the next two rounds as well. If you're unsure how to make a decrease, refer to the video below.

For the next three rounds, make a decrease in every other stitch, which will cause the hole to close up quite quickly. It might be a bit tight and tricky, but it is doable.
When there is only a small hole left, turn the sock inside out, fold the hole horizontally, and crochet it together with single crochets.


Finish by making a chain stitch, cutting the yarn, and pulling it through to secure it. Fasten the yarn end and turn the sock right side out again.
Step 5:
Now you will crochet the bottom of the sock together, similar to how you crocheted the heel. Start with a slip knot using the greige yarn and attach it to one of the edges. Crochet single crochets around the entire round, making a decrease where the round joins, just like in the heel. Mark the decrease with a stitch marker, and continue to the other edge, making a decrease there as well. Continue decreasing in both corners for a total of 7 rounds.

During the next two rounds, decrease in every other stitch. The hole will close up quickly, and you should then close it up just like you did with the heel. Cut the yarn, leaving enough to close the hole, and remove the stitch marker. Turn the sock inside out, fold the hole horizontally, and crochet it closed with single crochet stitches.


Finish by making a chain stitch, pulling the yarn through, and fastening off the yarn end. Turn the sock right side out again, and your crochet sock is complete!
Step 6:
The final step is to crochet a loop for the stocking. Use both colors, or two of the same if you prefer, but make sure to use doubled yarn so that it can hold christmas gifts. Start by making a slip knot and crochet 20 chain stitches. Then, make a slip stitch in the first chain you made to form a loop. Now crochet one round of single crochets around the entire loop, and finish with a slip stitch. Fold down the top of the stocking a bit and use the matching red yarn to attach the loop securely.

Secure the loop by crocheting a slip stitch into the red yarn. You can also secure it properly by continuing with single crochet along the folded edge. Finish with a chain stitch, cut the yarn, pull it through, and fasten any remaining yarn ends.

Good job! you are done :)

Description Using Crochet Terms
This section of the pattern uses crochet terminology. If you need a little extra help, we recommend checking out the easier section, which includes more detailed explanations.
Abbreviations
MR = Magic Ring
sc = single crochet
sl st = slip stitch
dc = double crochet
ch = chain
sk = skip
st = stitch
decrease = 2 single crochet stitches worked together as 1
... = repeat the instructions the specified number of times
(...) = number of stitches in the row
Row 1: Chain 46 (ch 46). When working C2C, you need a foundation chain with a number that can be divided by 4. Once you have chained a number that is divisible by 4, add 2 extra chains. For reference, we have used 46 chains.
Row 2: Sk the first ch. Sc in each stitch across. (45) Ch 4 and turn.
Row 3: Now you will begin the C2C technique.
Sk the ch-4. Work 2 dc in the first stitch, the stitch closest to the chain. Sk 3 sts, then work 1 sc in the 4th stitch. Ch 3, then work 2 dc in the same stitch where you made the sc. Sk 3 sts, then work 1 sc in the next stitch. Repeat this across the row. In the final stitch, work 1 sc. Ch 4 and turn.
You should now have 11 C2C arches. If you are unsure how to work the C2C technique, click here.
Row 4: Sk the ch-4. Work 2 dc in the first stitch where the chain begins. Continue using the same technique as above, but this time work into the ch-3 spaces from the previous row. In the first ch-3 space, work 1 sc, ch 3, and 2 dc. In the final ch-3 space, work 1 sc. Ch 4 and turn.
Rows 5–7: Repeat Row 4 until you have 5 rows of C2C arches.
It is now time to change yarn color. Change colors when working the last sc of the row. When you have 2 loops on your hook, take the red yarn and pull it through both loops to complete the sc.
Ch 4 and turn. Gently pull on both yarn ends to tighten, then cut the gray yarn and tie the two yarn ends together to temporarily secure them. Turn.
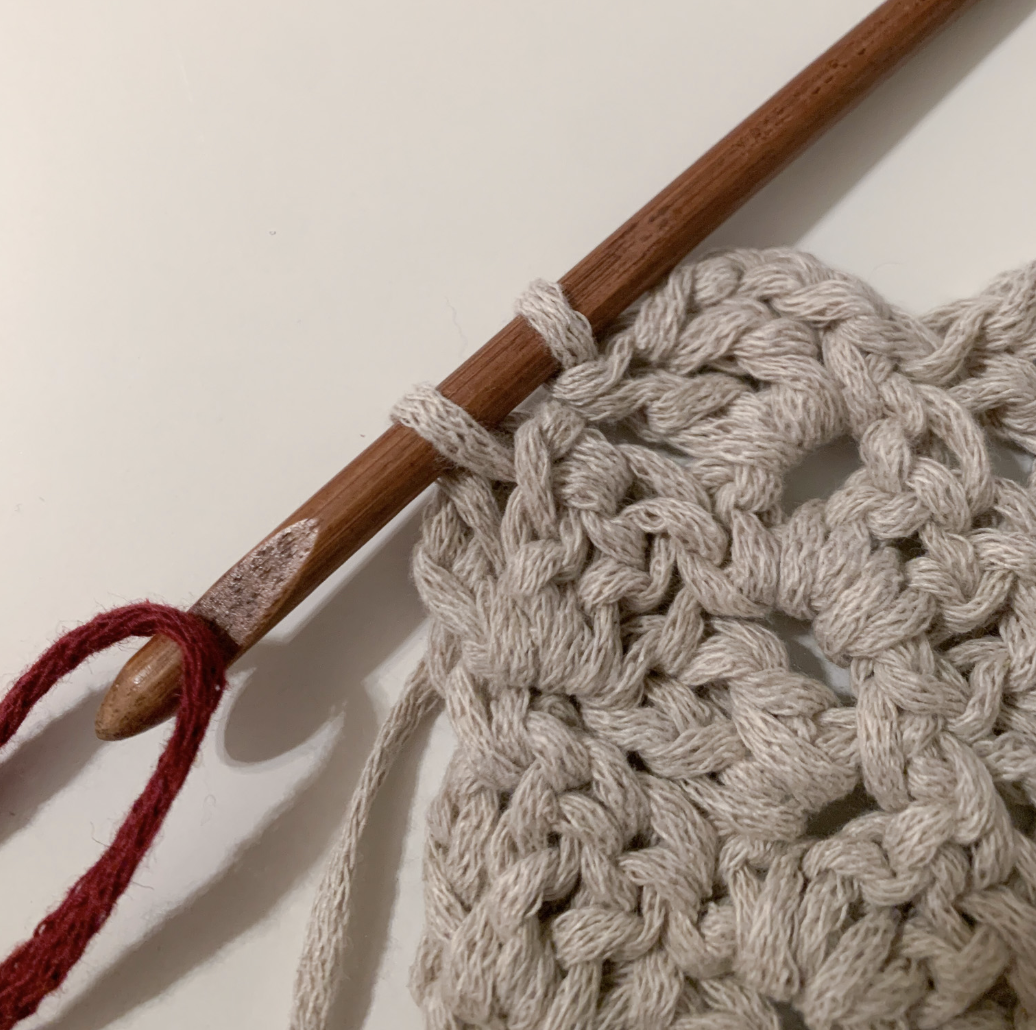
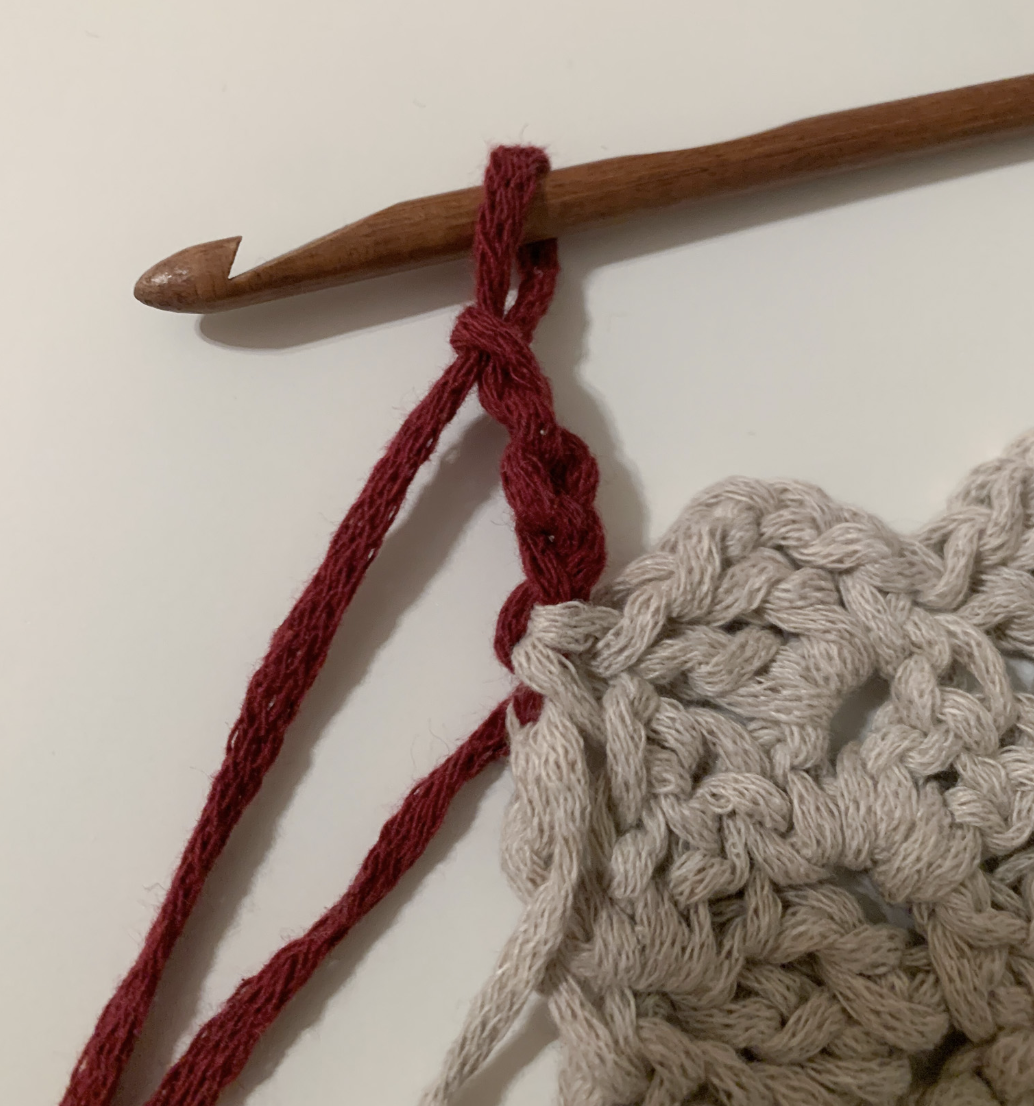
Rows 8–12: Continue crocheting as in Row 4 using the red yarn, for a total of 5 rows.
Rows 13–17: Change from the red yarn to the gray yarn and continue as before, working 5 rows of C2C arches.
Rows 18–21: Change back to the red yarn and work only 3 rows. Then work one final row to straighten the top edge of the piece (this will be Row 22).
Row 22: Ch 4 and turn. Work 2 dc in the first stitch. Work 1 sc in the ch-3 space, but do not make a chain this time. Work 2 dc in the “valley,” which is the sc from the previous row.
Work 1 sc in the next ch-3 space. Work 2 dc in the “valley” (the sc from the previous row). Continue in the same way across the row and finish with 1 sc in the final ch-3 space.
Leave the yarn attached with the hook in place for the next step.
Weave in all yarn ends.
Joining the Long Sides
You will now crochet the long sides together to form a cylinder. This will create the upper part of the stocking.
Choose which side of your work looks best and fold the piece in half with the best-looking side facing outward.
Start by working 3 sc through both ch-3 spaces at the outermost edge of the long sides.
Continue working in the same way along the entire long side, working 3 sc through both spaces to join the sides and form a cylinder. You can also crochet over the yarn ends from the color changes, or weave them in after you are finished.
Keep in mind that the arches you are joining may be different colors because we have worked an uneven number of rows—5 rows of each color. Make sure everything lines up as evenly as possible. The arches will not line up perfectly, so the final arch will need to be joined to the first row of C2C that you made.
Work 2 sc and 1 sc in the corners.
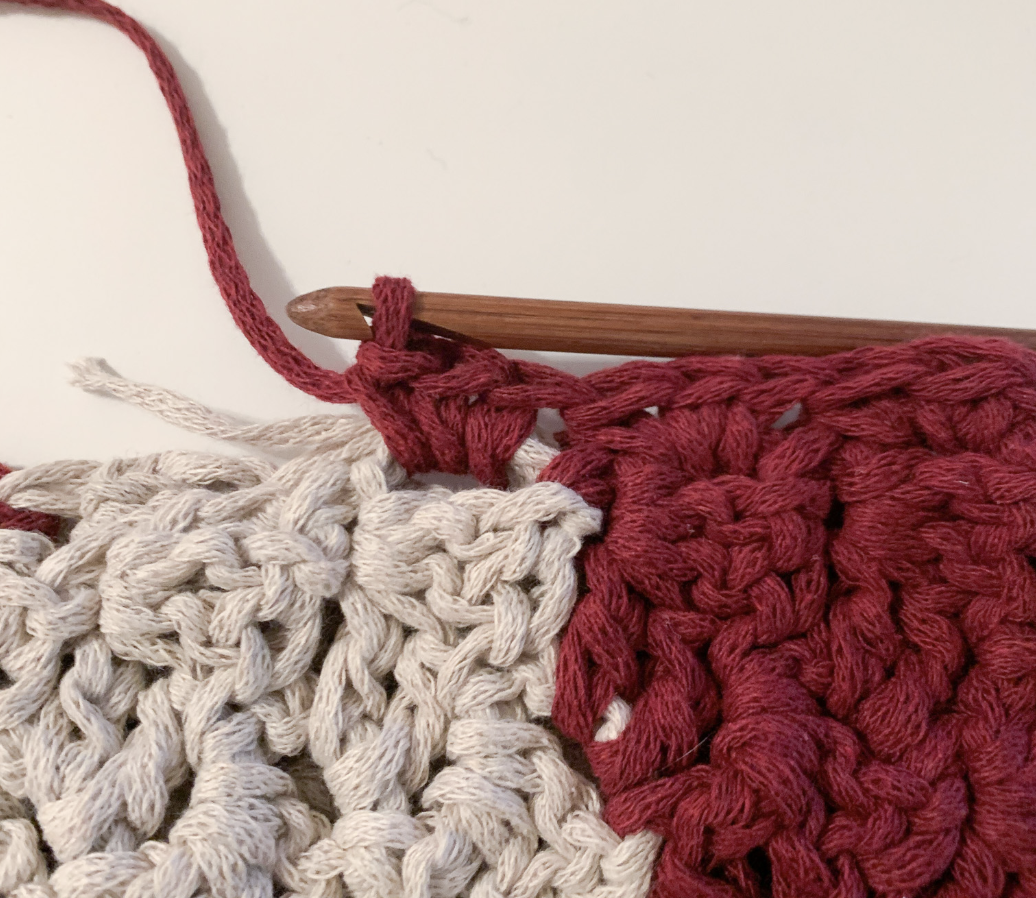
Finish with 1 ch, cut the yarn, and pull it through the loop to secure it so the work does not unravel. Weave in any remaining yarn ends, and you have now finished the upper part of the stocking!
You will now crochet the lower part of the stocking in the same way as the upper part, but with fewer rows.
Row 1: Ch 46 using Burgundy yarn.
Row 2: Sk the first ch. Sc in each stitch across. (45) Ch 4 and turn.
Row 3: Now you will begin the C2C technique.
Sk the ch-4. Work 2 dc in the first stitch, the stitch closest to the chain. Sk 3 sts, then work 1 sc in the 4th stitch. Ch 3, then work 2 dc in the same stitch where you made the sc. Sk 3 sts, then work 1 sc in the next stitch. Repeat this across the row. In the final stitch, work 1 sc. Ch 4 and turn.
You should now have 11 C2C arches. If you are unsure how to work the C2C technique, click here.
Row 4: Sk the ch-4. Work 2 dc in the first stitch where the chain begins. Continue using the same technique as above, but this time work into the ch-3 spaces from the previous row. In the first ch-3 space, work 1 sc, ch 3, and 2 dc. In the final ch-3 space, work 1 sc. Ch 4 and turn.
Row 5: Work one more row the same way as Row 4. Before working the final sc, have the gray yarn ready. Change colors while working the final sc. When you have 2 loops on your hook, take the gray yarn and pull it through both loops to complete the sc.
Ch 4 and turn. Gently pull on both yarn ends to tighten, then cut the red yarn and tie the two yarn ends together to temporarily secure them.
Rows 6–10: Continue as before using the C2C technique. Work 5 rows with the gray yarn. Change back to Burgundy in the final stitch of Row 10.
Rows 11–12: Work 2 rows using the red yarn.
Row 13: Work a final row to create a straight edge. Ch 4 and turn. Work 2 dc in the first stitch. Work 1 sc in the ch-3 space, but do not make a chain this time. Work 2 dc in the “valley,” which is the sc from the previous row.
Work 1 sc in the next ch-3 space. Work 2 dc in the “valley” (the sc from the previous row). Continue in the same way across the row and finish with 1 sc in the final ch-3 space.
Leave the yarn attached with the hook in place for the next step.
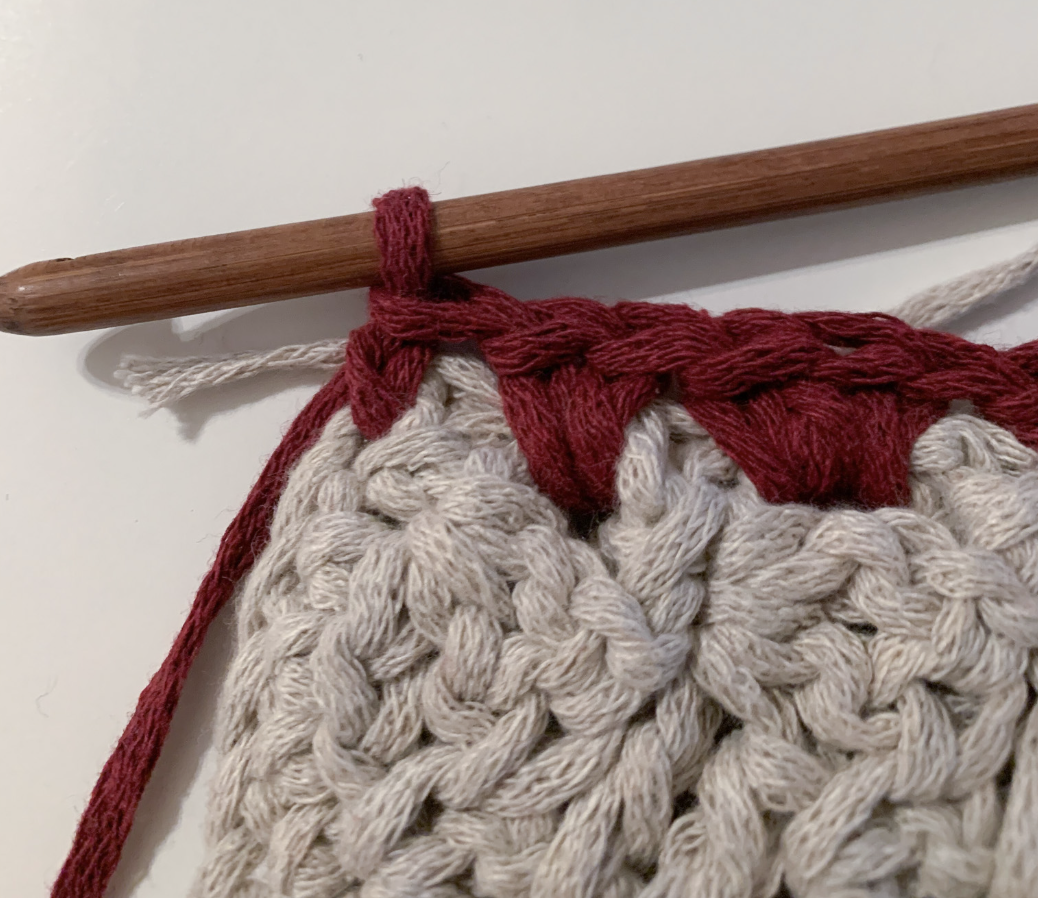
You will now join the sides to form a cylinder, in the same way as for the upper part of the stocking.
Choose which side of your work looks best and fold the piece in half with the best-looking side facing outward.
Start by working 3 sc through both ch-3 spaces at the outermost edge of the long sides.
Continue in the same way along the entire long side, working 3 sc through both spaces to join the sides and form a cylinder. You can also crochet over the yarn ends from the color changes, or weave them in after you are finished.
Finish with 1 ch, cut the yarn, and pull it through the loop to secure it so the work does not unravel. Weave in all remaining yarn ends.
Joining the Two Cylinders
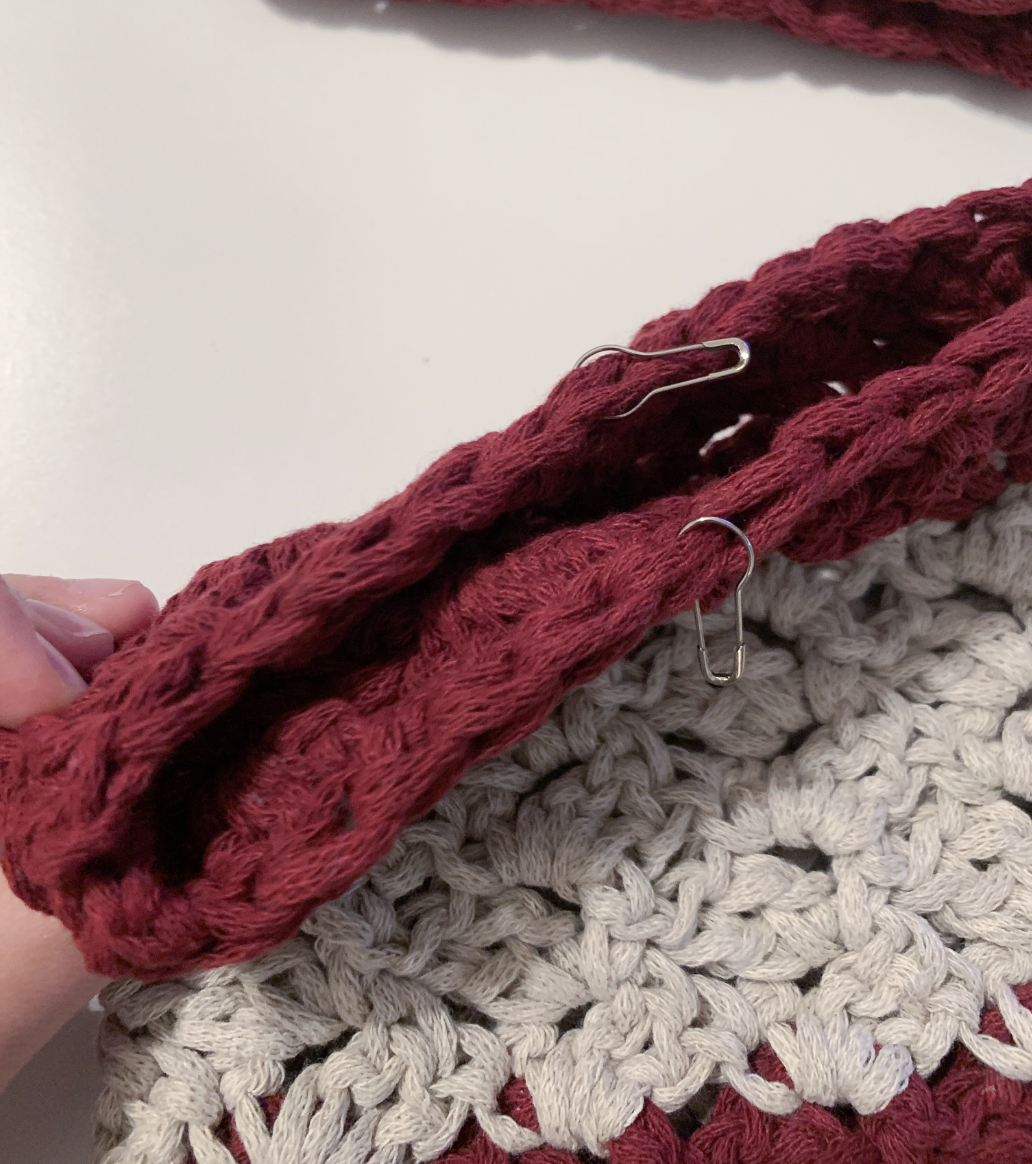
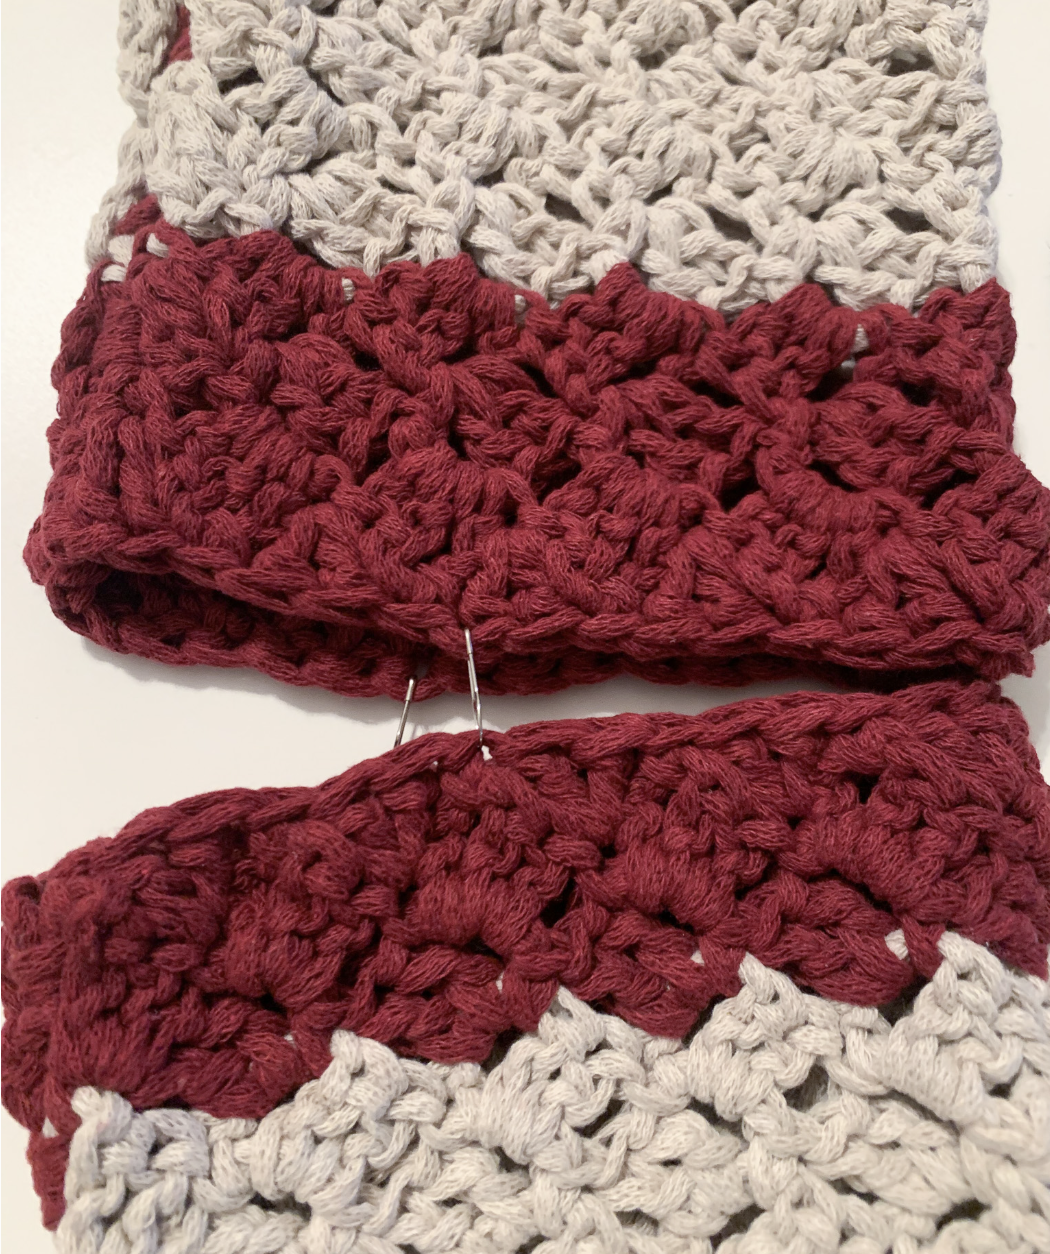
It is now time to join the two cylinders together. Start by turning both cylinders inside out. Place the edges with the finished ends together, making sure the seams are aligned on the same side.
Using stitch markers or safety pins, mark the 7th stitch from the seam on both sides. Do not count the chain stitches—only count the single crochet stitches.
Also, pin the two cylinders together to keep them aligned while joining them.
Joining the Cylinders
Join the two cylinders with sc, working from one marker to the other along the side without the seams.
Start with a slip knot and attach the yarn to the stitch immediately after the marker (the 8th stitch). Begin working your sc in that same stitch.
Continue working sc all the way to the other marker. Finish with 1 ch, cut the yarn, and pull it through the loop to secure it. Weave in the yarn ends right away.
Remove the stitch markers and turn the stocking right side out.
Crocheting the Heel
You will now crochet the heel in the opening left when you joined the two cylinders.
Start with a slip knot using the gray yarn and attach it to a single crochet stitch.
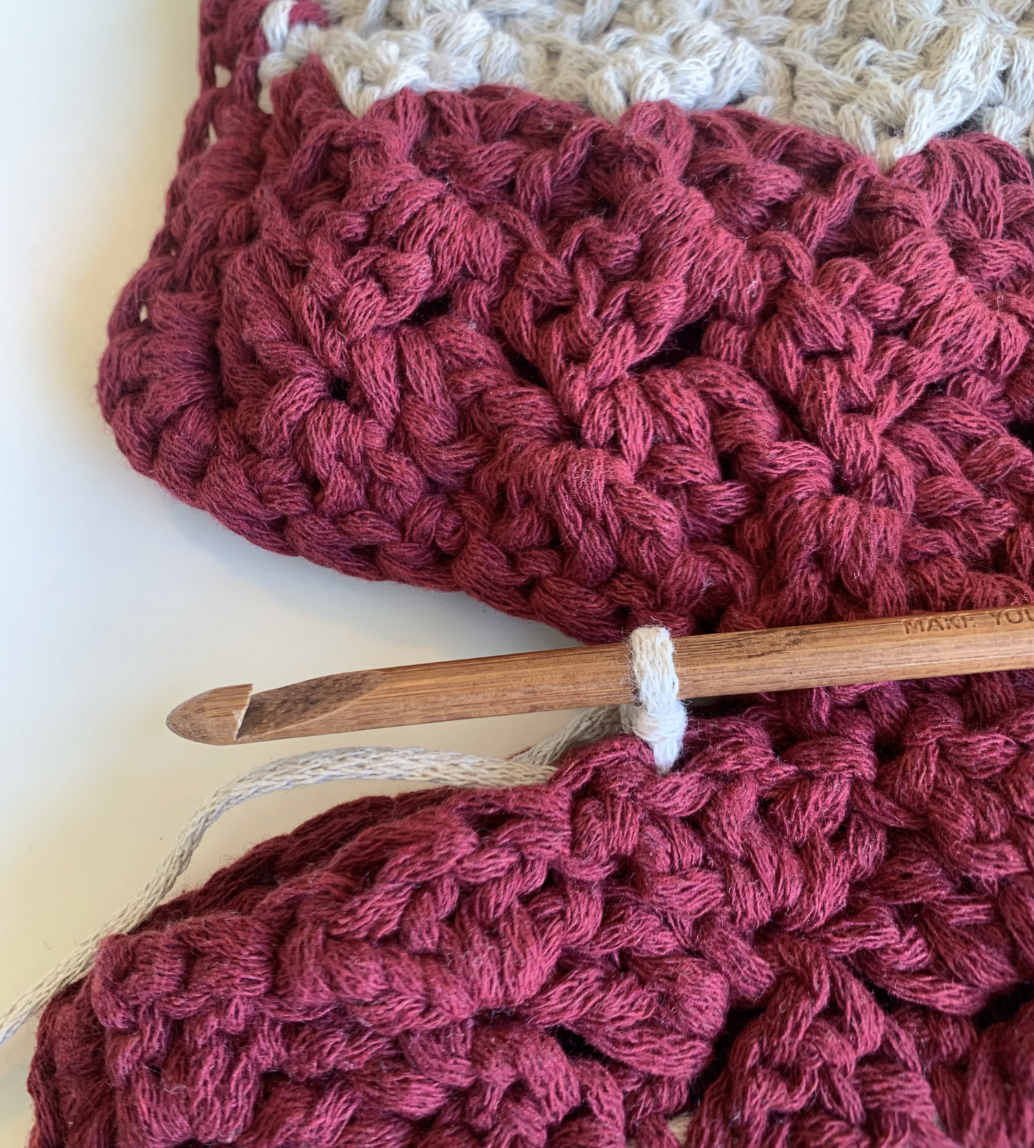
Work sc all the way around, including 1 sc in each seam, so there is not too much of a difference in height.
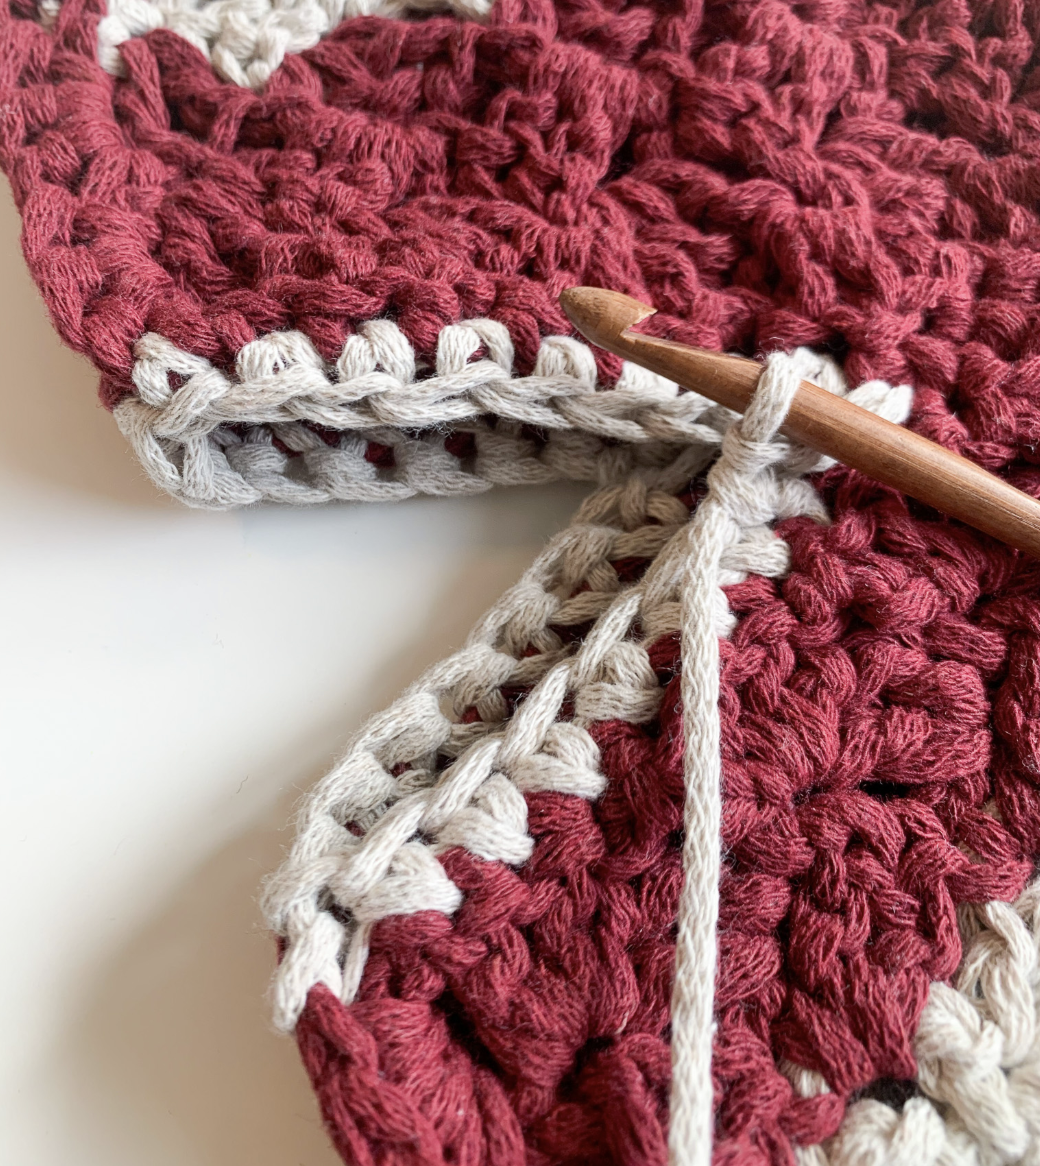
When you reach the beginning of the first round, work a decrease. You may want to place a stitch marker where you made the first decrease to help you keep track of the rounds. This will also help you keep the decreases in the same places throughout the following rounds.
Continue working sc until you reach the next fold, then work a decrease there as well.
Work 1 decrease at both “folds” for the next 2 rounds as well.
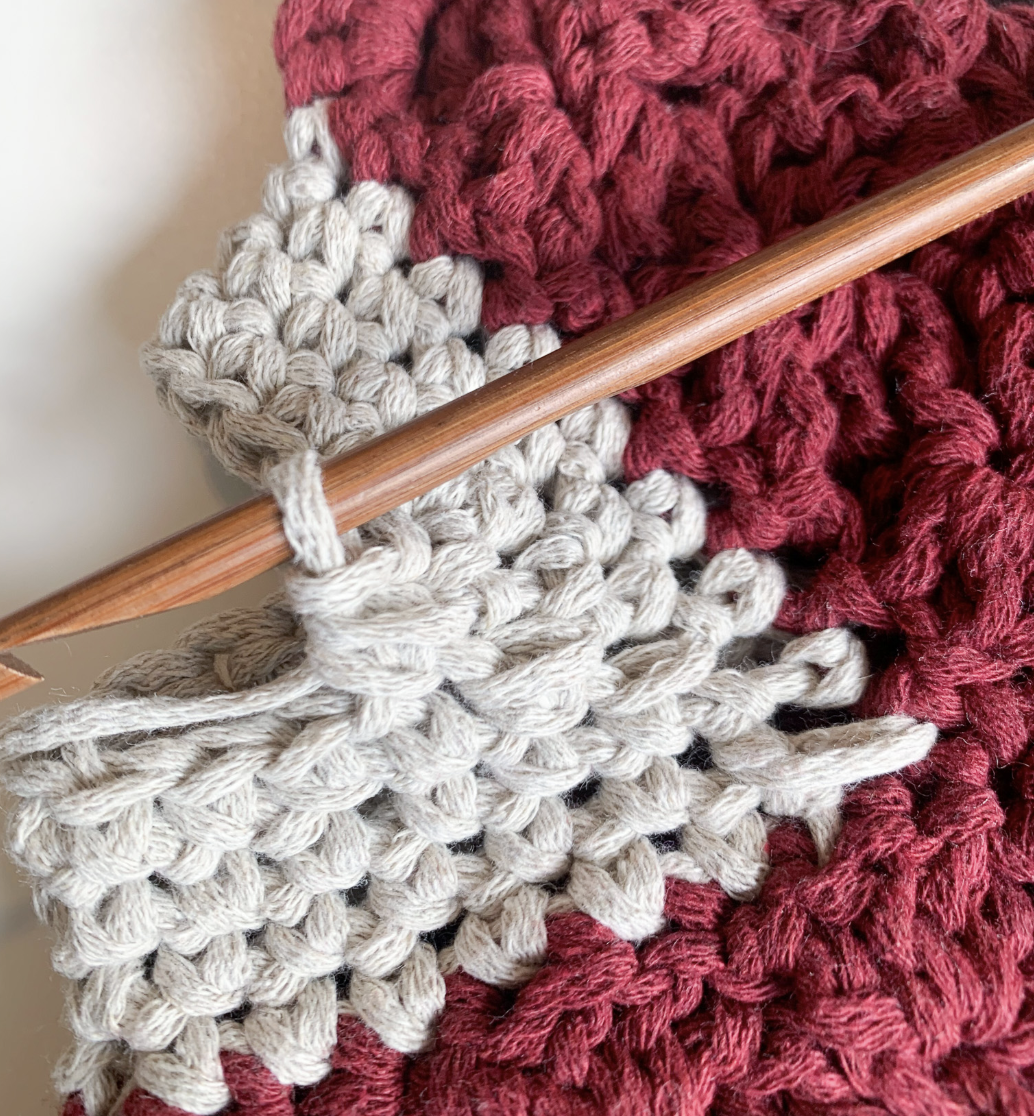
Finishing the Heel
For the next 3 rounds, work a decrease in every other stitch. The opening will close up fairly quickly. It may feel a little tight and tricky to work into, but it will come together.
When only a small opening remains, turn the stocking inside out. Fold the opening in half horizontally and join the two sides together using sc.
Finish with 1 ch, cut the yarn, and pull it through the loop to secure it. Weave in the yarn end, then turn the stocking right side out again.
Joining the Bottom of the Stocking
You will now join the bottom of the stocking in much the same way as you joined the heel.
Start with a slip knot using the gray yarn and attach it to one of the edges.
Work sc all the way around. At the point where the round joins, work a decrease, just as you did for the heel. Place a stitch marker at the decrease and continue to the opposite edge. Work 1 decrease there as well.
Continue working a decrease at both corners for a total of 7 rounds.
For the next 2 rounds, work a decrease in every other stitch. The opening will close up quickly. You will then join the opening in the same way as you did for the heel.
Cut the yarn, leaving a long enough tail to sew or crochet the opening closed, and remove the stitch marker. Turn the stocking inside out, fold the opening in half horizontally, and join the two sides together using sc.
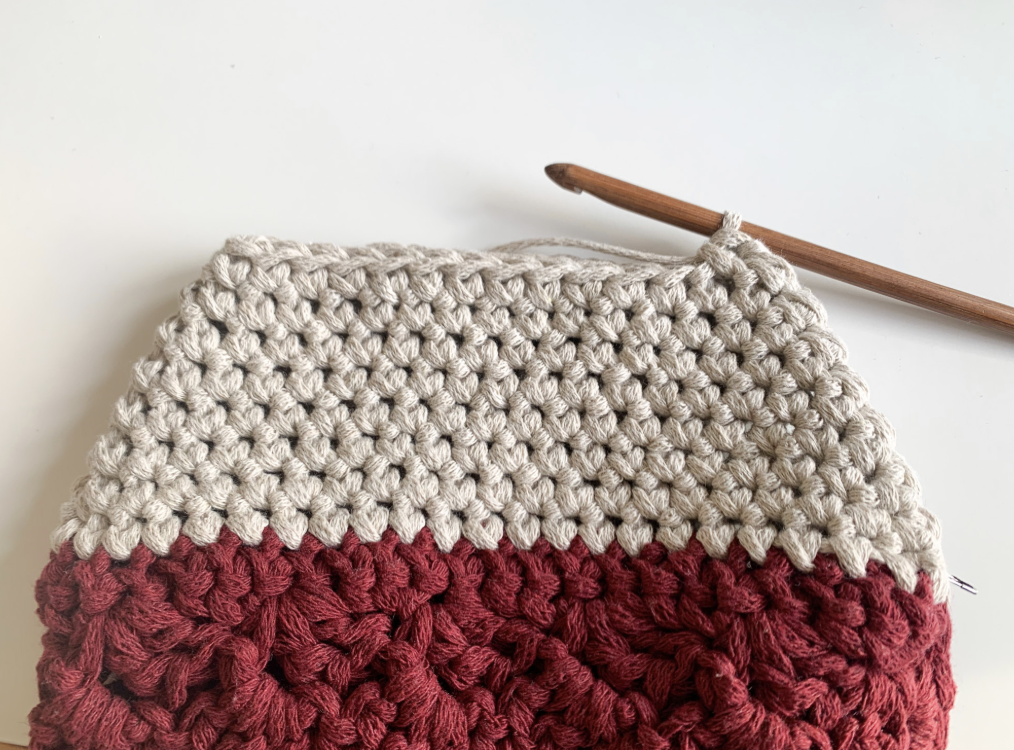
Finish with 1 ch, pull the yarn through the loop to secure it, and weave in the yarn end. Turn the stocking right side out again.
Adding the Hanging Loop
The final step is to crochet a hanging loop for the stocking. Use both colors of yarn, or two strands of the same color if you prefer. The loop needs to be made with double yarn so it will be strong enough to hold the stocking when it is filled with gifts.
Make a slip knot and ch 20. Join with a sl st to the first chain you made to form a loop.
Now work 1 round of sc around the entire loop, finishing with a sl st.
Fold down the top edge of the stocking slightly and use the matching red yarn to attach the loop.
Secure the loop by working a sc with the red yarn. You can also make it extra secure by continuing to work sc along the folded edge.
Finish with 1 ch, cut the yarn, and pull it through the loop to secure it. Weave in all remaining yarn ends.
Great job! Your Christmas stocking is now finished!
The rights to this pattern belong to MYO Make Your Own. The pattern or its pictures may not be copied, shared or resold either in parts or in its entirety, but you may sell items you have crocheted from this pattern. If you have questions about the pattern, contact MYO at hello@makeyourown.se.
Row 1: Start with the greige yarn. Begin by making a slip knot and then crochet a chain of 46 chain stitches. When working with the C2C technique, the chain needs to be a multiple of 4. Once you have crocheted a chain with a number of stitches divisible by 4, add two extra chain stitches. For reference, we used 46 stitches. If you're unsure how to make a slip knot or chain stitches, refer to the videos below.
Row 2: Skip the first chain stitch and then single crochet into each stitch across. You should end up with 45 single crochet stitches, which is one less than the chain stitches you made. Chain 4 and turn your work. If you're unsure how to make single crochets, refer to the video below.
Row 3: Now it's time to start the c2c (corner-to-corner) technique. Skip the chain stitches we just made. Crochet 2 double crochets into the first stitch, which is closest to the chain. Skip 3 stitches, then make a single crochet in the fourth stitch. Next, crochet a chain of 3 chain stitches. Then crochet 2 double crochets in the same stitch as the chain. Skip 3 stitches and make a single crochet in the next stitch. Repeat this pattern across the row. In the last stitch, make a single crochet followed by a chain of four stitches, and turn your work. You should now have 11 c2c clusters. See the image below. If you're unsure about the c2c technique, refer to the video below.
Row 4: Start the same way you did in row 3: skip the chain stitches you previously made. Crochet two double crochets in the first stitch, which is the same as the chain. Continue crocheting using the same technique, but now you will crochet into the chain loops from the previous row.
In the first chain loop, crochet one single crochet, followed by a chain of three, then crochet two double crochets into the same loop. In the last loop, crochet one single crochet, then a chain of four and turn your work.
Rows 5-7: Repeat row 4 until you have 5 rows of C2C clusters.
It’s now time to change color. You will change color when you make the last single crochet of the row.
- When you have two loops left on your hook after starting with the last stitch, take the burgundy yarn and pull it through both loops on your hook.
- Crochet a chain of 4 chain stitches.
- Pull both yarn ends tight, cut off the greige yarn, and tie a knot to temporarily secure the yarns.
Now, turn your work to continue with the new color (red).
If you are unsure how to change color, please refer to the tutorial video below for further guidance.
Rows 8-12: Continue crocheting as in row 4 with the burgundy yarn, completing a total of 5 rows of C2C clusters.
Rows 13-17: Switch from the burgundy yarn to the greige yarn and continue as before, crocheting 5 rows of C2C arches in the greige color.
Remember to always change color at the end of the row, just like you did in row 5.
Rows 18-21: Switch to the burgundy yarn and crochet only 3 rows of C2C clusters.
Row 22: Start the same way as before with 4 chain stitches, turn, and crochet 2 double crochets in the first stitch. Then, crochet a single crochet in the chain space, but this time do not make a chain. Next, crochet 2 double crochets into the “valley” (the single crochet from the previous row). This last row is described in the video in Step 1, so you can refer to that if you need guidance.
This should create the final row for your piece!
Crochet a single crochet in the chain space. Crochet 2 double crochets into the "valley" (the single crochet from the previous row). Continue in the same way across the row and finish with a single crochet in the last chain space. Keep the yarn and crochet hook in place for the next step.
Fasten off all yarn ends, if you are unsure how to do this, see below video.
Crochet the long sides together.
Now you will crochet the long sides to form a cylinder, which will create the upper part of the stocking. Check which side looks the best to you, and fold the long sides together so that the best side is facing outwards. Start by crocheting 3 single crochets through both chain spaces on the outermost long sides.
Continue in the same way along the entire long side, crocheting 3 single crochets through both loops to form the cylinder. Also crochet in the yarn ends from where you changed colors, or alternatively, secure them when you're finished.
Keep in mind that the loops you’re joining may be different colors, as we've made uneven rows with 5 rows of each color. Make sure it’s even, but since the loops will be uneven, you will need to join the last loop with the first row of C2C you made. Crochet 2 single crochets and 1 single crochet in the corners.
Finish by making a slip stitch, cut the yarn, and pull it through to secure it so that it won’t unravel. Weave in any remaining yarn ends, and now you’re done with the top part of the stocking!
Step 2:
Now, you will crochet the lower part of the stocking in the same way as the top part, but with fewer rows.
Row 1: Start with a slip knot and crochet a chain of 46 chain stitches in Burgundy color.
Row 2: Skip the first chain stitch and crochet single crochets in each stitch. You will crochet 45 single crochets. Now, crochet a chain of 4 chain stitches and turn your work.
Row 3: Now you will begin the C2C technique. Crochet 2 double crochets into the first stitch (next to the chain). Skip 3 stitches, crochet a single crochet into the 4th stitch. Then crochet a chain of 3 chain stitches, followed by 2 double crochets into the same stitch as the chain. Skip 3 stitches and crochet a single crochet into the next stitch. Repeat the entire row. In the last stitch, crochet a single crochet and a chain of 4 chain stitches, and turn your work. You should have crocheted 11 C2C "bays."
Row 4: Start the same way as Row 3. Crochet two double crochets into the first stitch, the same as the chain. Now continue to crochet the same technique but crochet into the chain bays from the previous row. In the first chain bay, crochet a single crochet, a chain of 3 chain stitches, and 2 double crochets. In the last bay, crochet a single crochet, a chain of 4 chain stitches, and turn your work.
Rows 6-10: Continue as before with the C2C technique. Crochet 5 rows using the greige yarn. Change to Burgundy yarn in the last stitch of the 5th row.
Rows 11-12: Crochet 2 rows with the red yarn.
Row 13: Crochet a final row to create a straight edge. Start the same way as before: crochet 4 chain stitches, turn your work, and crochet two double crochets into the first stitch. Crochet a single crochet in the chain bay, but this time do not crochet a chain. Crochet 2 double crochets into the "valley" (the single crochet from the previous row). This row is also described in the video from Step 1 if you need guidance.
Crochet a single crochet in the chain bay. Crochet 2 double crochets into the "valley" (the single crochet from the previous row). Continue this pattern across the row and finish with a single crochet in the last chain bay. Keep the yarn and crochet hook there for the next step.
Sewing the Sides Together
Now, you will join the sides to form a cylinder, just like you did with the upper part of the sock. Check which side looks the best to you and fold the sides so that the best side is on the outside.
Start by crocheting 3 single crochets through both chain loops on the outer edges of the long sides. Continue in the same way along the entire long side, crocheting 3 single crochets through both loops, forming a cylinder.
Remember to crochet in any loose yarn ends from the color changes, or secure them after you are done.
Finish by crocheting 1 chain stitch, cut the yarn, and pull it through so it cannot be unraveled. Secure any remaining yarn ends, and you are finished with the lower part of the sock!
Step 3: Joining the Cylinders
Now it's time to crochet the two cylinders together. Start by turning them inside out. Place the sides with the finished parts together, ensuring that the seams are on the same side.
Mark the 7th stitch (excluding the chain, just counting the single crochet stitches) from the seam using stitch markers or safety pins. Secure both cylinders together at this point, marking the 7th stitch from the seam on both sides.
This will ensure that the two parts are joined evenly and aligned properly.
Crochet the cylinders together with single crochet stitches, from one marker to the other (on the side without seams). Start with a slip knot and attach it to the stitch after the marker, the 8th stitch, and then begin crocheting into the same stitch.
Continue crocheting with single crochet stitches all the way to the second marker. Finish with a chain stitch, cut the yarn, and pull it through. Secure the ends right away. Remove the stitch markers and turn the stocking back to the right side.
Step 4
Now it's time to crochet the heel into the hole left when you joined the two cylinders. Start with a slip knot using the grey yarn and fasten it in a single crochet stitch.
Crochet single crochets all the way around the heel, including one in each seam to minimize the difference in height.
When the first round joins, make a decrease—crochet two single crochets together in the same stitch. You may want to mark the first decrease with a stitch marker to help keep track of the rounds, and to ensure the decreases are evenly spaced in the upcoming rounds. Continue with single crochets until you reach the next fold, and make another decrease there. Make a decrease at each "fold" for the next two rounds as well. If you're unsure how to make a decrease, refer to the video below.
For the next three rounds, make a decrease in every other stitch, which will cause the hole to close up quite quickly. It might be a bit tight and tricky, but it is doable.
When there is only a small hole left, turn the sock inside out, fold the hole horizontally, and crochet it together with single crochets.
Finish by making a chain stitch, cutting the yarn, and pulling it through to secure it. Fasten the yarn end and turn the sock right side out again.
Step 5:
Now you will crochet the bottom of the sock together, similar to how you crocheted the heel. Start with a slip knot using the greige yarn and attach it to one of the edges. Crochet single crochets around the entire round, making a decrease where the round joins, just like in the heel. Mark the decrease with a stitch marker, and continue to the other edge, making a decrease there as well. Continue decreasing in both corners for a total of 7 rounds.
During the next two rounds, decrease in every other stitch. The hole will close up quickly, and you should then close it up just like you did with the heel. Cut the yarn, leaving enough to close the hole, and remove the stitch marker. Turn the sock inside out, fold the hole horizontally, and crochet it closed with single crochet stitches.
Finish by making a chain stitch, pulling the yarn through, and fastening off the yarn end. Turn the sock right side out again, and your crochet sock is complete!
Step 6:
The final step is to crochet a loop for the stocking. Use both colors, or two of the same if you prefer, but make sure to use doubled yarn so that it can hold christmas gifts. Start by making a slip knot and crochet 20 chain stitches. Then, make a slip stitch in the first chain you made to form a loop. Now crochet one round of single crochets around the entire loop, and finish with a slip stitch. Fold down the top of the stocking a bit and use the matching red yarn to attach the loop securely.
Secure the loop by crocheting a slip stitch into the red yarn. You can also secure it properly by continuing with single crochet along the folded edge. Finish with a chain stitch, cut the yarn, pull it through, and fasten any remaining yarn ends.
Good job! you are done :)
Description Using Crochet Terms
This section of the pattern uses crochet terminology. If you need a little extra help, we recommend checking out the easier section, which includes more detailed explanations.
Abbreviations
MR = Magic Ring
sc = single crochet
sl st = slip stitch
dc = double crochet
ch = chain
sk = skip
st = stitch
decrease = 2 single crochet stitches worked together as 1
... = repeat the instructions the specified number of times
(...) = number of stitches in the row
Row 1: Chain 46 (ch 46). When working C2C, you need a foundation chain with a number that can be divided by 4. Once you have chained a number that is divisible by 4, add 2 extra chains. For reference, we have used 46 chains.
Row 2: Sk the first ch. Sc in each stitch across. (45) Ch 4 and turn.
Row 3: Now you will begin the C2C technique.
Sk the ch-4. Work 2 dc in the first stitch, the stitch closest to the chain. Sk 3 sts, then work 1 sc in the 4th stitch. Ch 3, then work 2 dc in the same stitch where you made the sc. Sk 3 sts, then work 1 sc in the next stitch. Repeat this across the row. In the final stitch, work 1 sc. Ch 4 and turn.
You should now have 11 C2C arches. If you are unsure how to work the C2C technique, click here.
Row 4: Sk the ch-4. Work 2 dc in the first stitch where the chain begins. Continue using the same technique as above, but this time work into the ch-3 spaces from the previous row. In the first ch-3 space, work 1 sc, ch 3, and 2 dc. In the final ch-3 space, work 1 sc. Ch 4 and turn.
Rows 5–7: Repeat Row 4 until you have 5 rows of C2C arches.
It is now time to change yarn color. Change colors when working the last sc of the row. When you have 2 loops on your hook, take the red yarn and pull it through both loops to complete the sc.
Ch 4 and turn. Gently pull on both yarn ends to tighten, then cut the gray yarn and tie the two yarn ends together to temporarily secure them. Turn.
Rows 8–12: Continue crocheting as in Row 4 using the red yarn, for a total of 5 rows.
Rows 13–17: Change from the red yarn to the gray yarn and continue as before, working 5 rows of C2C arches.
Rows 18–21: Change back to the red yarn and work only 3 rows. Then work one final row to straighten the top edge of the piece (this will be Row 22).
Row 22: Ch 4 and turn. Work 2 dc in the first stitch. Work 1 sc in the ch-3 space, but do not make a chain this time. Work 2 dc in the “valley,” which is the sc from the previous row.
Work 1 sc in the next ch-3 space. Work 2 dc in the “valley” (the sc from the previous row). Continue in the same way across the row and finish with 1 sc in the final ch-3 space.
Leave the yarn attached with the hook in place for the next step.
Weave in all yarn ends.
Joining the Long Sides
You will now crochet the long sides together to form a cylinder. This will create the upper part of the stocking.
Choose which side of your work looks best and fold the piece in half with the best-looking side facing outward.
Start by working 3 sc through both ch-3 spaces at the outermost edge of the long sides.
Continue working in the same way along the entire long side, working 3 sc through both spaces to join the sides and form a cylinder. You can also crochet over the yarn ends from the color changes, or weave them in after you are finished.
Keep in mind that the arches you are joining may be different colors because we have worked an uneven number of rows—5 rows of each color. Make sure everything lines up as evenly as possible. The arches will not line up perfectly, so the final arch will need to be joined to the first row of C2C that you made.
Work 2 sc and 1 sc in the corners.
Finish with 1 ch, cut the yarn, and pull it through the loop to secure it so the work does not unravel. Weave in any remaining yarn ends, and you have now finished the upper part of the stocking!
You will now crochet the lower part of the stocking in the same way as the upper part, but with fewer rows.
Row 1: Ch 46 using Burgundy yarn.
Row 2: Sk the first ch. Sc in each stitch across. (45) Ch 4 and turn.
Row 3: Now you will begin the C2C technique.
Sk the ch-4. Work 2 dc in the first stitch, the stitch closest to the chain. Sk 3 sts, then work 1 sc in the 4th stitch. Ch 3, then work 2 dc in the same stitch where you made the sc. Sk 3 sts, then work 1 sc in the next stitch. Repeat this across the row. In the final stitch, work 1 sc. Ch 4 and turn.
You should now have 11 C2C arches. If you are unsure how to work the C2C technique, click here.
Row 4: Sk the ch-4. Work 2 dc in the first stitch where the chain begins. Continue using the same technique as above, but this time work into the ch-3 spaces from the previous row. In the first ch-3 space, work 1 sc, ch 3, and 2 dc. In the final ch-3 space, work 1 sc. Ch 4 and turn.
Row 5: Work one more row the same way as Row 4. Before working the final sc, have the gray yarn ready. Change colors while working the final sc. When you have 2 loops on your hook, take the gray yarn and pull it through both loops to complete the sc.
Ch 4 and turn. Gently pull on both yarn ends to tighten, then cut the red yarn and tie the two yarn ends together to temporarily secure them.
Rows 6–10: Continue as before using the C2C technique. Work 5 rows with the gray yarn. Change back to Burgundy in the final stitch of Row 10.
Rows 11–12: Work 2 rows using the red yarn.
Row 13: Work a final row to create a straight edge. Ch 4 and turn. Work 2 dc in the first stitch. Work 1 sc in the ch-3 space, but do not make a chain this time. Work 2 dc in the “valley,” which is the sc from the previous row.
Work 1 sc in the next ch-3 space. Work 2 dc in the “valley” (the sc from the previous row). Continue in the same way across the row and finish with 1 sc in the final ch-3 space.
Leave the yarn attached with the hook in place for the next step.
You will now join the sides to form a cylinder, in the same way as for the upper part of the stocking.
Choose which side of your work looks best and fold the piece in half with the best-looking side facing outward.
Start by working 3 sc through both ch-3 spaces at the outermost edge of the long sides.
Continue in the same way along the entire long side, working 3 sc through both spaces to join the sides and form a cylinder. You can also crochet over the yarn ends from the color changes, or weave them in after you are finished.
Finish with 1 ch, cut the yarn, and pull it through the loop to secure it so the work does not unravel. Weave in all remaining yarn ends.
Joining the Two Cylinders
It is now time to join the two cylinders together. Start by turning both cylinders inside out. Place the edges with the finished ends together, making sure the seams are aligned on the same side.
Using stitch markers or safety pins, mark the 7th stitch from the seam on both sides. Do not count the chain stitches—only count the single crochet stitches.
Also, pin the two cylinders together to keep them aligned while joining them.
Joining the Cylinders
Join the two cylinders with sc, working from one marker to the other along the side without the seams.
Start with a slip knot and attach the yarn to the stitch immediately after the marker (the 8th stitch). Begin working your sc in that same stitch.
Continue working sc all the way to the other marker. Finish with 1 ch, cut the yarn, and pull it through the loop to secure it. Weave in the yarn ends right away.
Remove the stitch markers and turn the stocking right side out.
Crocheting the Heel
You will now crochet the heel in the opening left when you joined the two cylinders.
Start with a slip knot using the gray yarn and attach it to a single crochet stitch.
Work sc all the way around, including 1 sc in each seam, so there is not too much of a difference in height.
When you reach the beginning of the first round, work a decrease. You may want to place a stitch marker where you made the first decrease to help you keep track of the rounds. This will also help you keep the decreases in the same places throughout the following rounds.
Continue working sc until you reach the next fold, then work a decrease there as well.
Work 1 decrease at both “folds” for the next 2 rounds as well.
Finishing the Heel
For the next 3 rounds, work a decrease in every other stitch. The opening will close up fairly quickly. It may feel a little tight and tricky to work into, but it will come together.
When only a small opening remains, turn the stocking inside out. Fold the opening in half horizontally and join the two sides together using sc.
Finish with 1 ch, cut the yarn, and pull it through the loop to secure it. Weave in the yarn end, then turn the stocking right side out again.
Joining the Bottom of the Stocking
You will now join the bottom of the stocking in much the same way as you joined the heel.
Start with a slip knot using the gray yarn and attach it to one of the edges.
Work sc all the way around. At the point where the round joins, work a decrease, just as you did for the heel. Place a stitch marker at the decrease and continue to the opposite edge. Work 1 decrease there as well.
Continue working a decrease at both corners for a total of 7 rounds.
For the next 2 rounds, work a decrease in every other stitch. The opening will close up quickly. You will then join the opening in the same way as you did for the heel.
Cut the yarn, leaving a long enough tail to sew or crochet the opening closed, and remove the stitch marker. Turn the stocking inside out, fold the opening in half horizontally, and join the two sides together using sc.
Finish with 1 ch, pull the yarn through the loop to secure it, and weave in the yarn end. Turn the stocking right side out again.
Adding the Hanging Loop
The final step is to crochet a hanging loop for the stocking. Use both colors of yarn, or two strands of the same color if you prefer. The loop needs to be made with double yarn so it will be strong enough to hold the stocking when it is filled with gifts.
Make a slip knot and ch 20. Join with a sl st to the first chain you made to form a loop.
Now work 1 round of sc around the entire loop, finishing with a sl st.
Fold down the top edge of the stocking slightly and use the matching red yarn to attach the loop.
Secure the loop by working a sc with the red yarn. You can also make it extra secure by continuing to work sc along the folded edge.
Finish with 1 ch, cut the yarn, and pull it through the loop to secure it. Weave in all remaining yarn ends.
Great job! Your Christmas stocking is now finished!
The rights to this pattern belong to MYO Make Your Own. The pattern or its pictures may not be copied, shared or resold either in parts or in its entirety, but you may sell items you have crocheted from this pattern. If you have questions about the pattern, contact MYO at hello@makeyourown.se.
%20(1).jpg)




Share your creations with us
Thank you!
Your comment was sent!